
!["[New] Digital Dynamics Mastering YouTube Video Distribution on Facebook"](https://www.lifewire.com/thmb/mG1jEzWorlq7_ZhXbAoV8fWxZ_g=/400x300/filters:no_upscale():max_bytes(150000):strip_icc()/481205627-5804f62c3df78cbc289797fb.jpg)
"[New] Digital Dynamics Mastering YouTube Video Distribution on Facebook"
Digital Dynamics: Mastering YouTube Video Distribution on Facebook
Create High-Quality Video - Wondershare Filmora
An easy and powerful YouTube video editor
Numerous video and audio effects to choose from
Detailed tutorials provided by the official channel
YouTube reports that Facebook is the most utilized platform fans use to watch online content. More so, up to 40% of those who watch the content do share links with their friends online – this then makes it quick to promote YouTube content on Facebook. Simply by making your new YouTube content visible on your Facebook page, and you’ll be certain that thousands of viewers will have a glimpse of it. You must already be scratching your head for ways on how to post a YouTube video on a Facebook page. Well, we bring you several ways to go through that and make your YouTube content accessible on Facebook.
In this article
01 How to Post YouTube video on Facebook?
02 Extra Tip: Facebook Video Tips for more Views and Shares
03 Frequently Asked Question about Facebook video
How to Post YouTube video on Facebook?
Since Facebook is easily accessible, many users have more access to it than other social media platforms. More so, the page allows you to communicate with your audience via photos, videos, graphics, text, among many other multimedia contents. You don’t even need any programming skills to operate it. Here are ways to post YouTube content to Facebook.
How to share a YouTube video on Facebook using a computer
If you have a stationary point of work, i.e., a computer, it is possible to share your YouTube video through it.
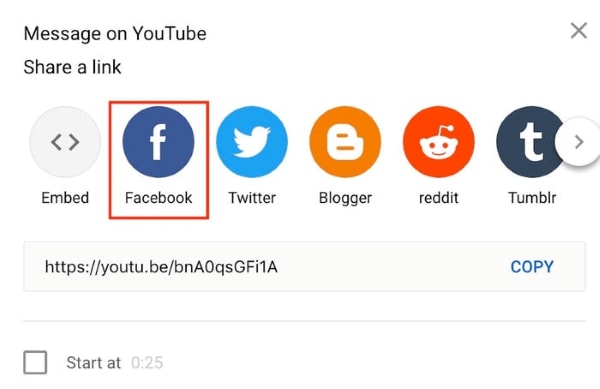
Step 1. First, visit the YouTube site at https://www.youtube.com . It can launch from any web browser.
Step 2. Choose from among your videos on YouTube the one you wish to share on Facebook.
Step 3. Then find the “Share” icon located directly under the video you want to share. Click on the video and hit the “Share” button below the video.
Step 4. Choose “Facebook” from the sharing options that pop up.
Step 5. Next, sign in to “Facebook” on your desktop. Then select the destination point you want your video to land in by using the drop-down menu at the top of your desktop screen. Select the “Share to News Feed” or perhaps the share to “Story.”
Step 6. Finally, click the “Post to Facebook” tab to share your YouTube content with Facebook.
How to share a YouTube video on Facebook using a mobile device
Are you on the go and want your Facebook fans to know what content you have on your YouTube channel? Here are the simple steps on how to post a YouTube video on Facebook right from the palm of your hands – a mobile device.
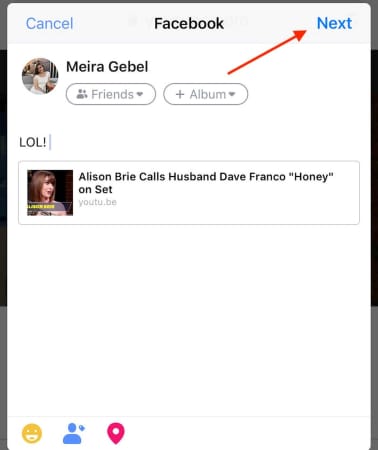
Step 1. Use any browser on your mobile device to launch the YouTube app from the official website.
Step 2. Peruse through your YouTube videos and choose the one you wish to share on Facebook.
Step 3. Check below the video and click on the “Share” icon.
Step 4. Search through the app’s options and choose Facebook. Also, ensure that the “Facebook” app is installed on your mobile device to make your videos sharable.
Step 5. Click on the “Next” option in the upper right-hand corner of your mobile screen. It will enable video sharing.
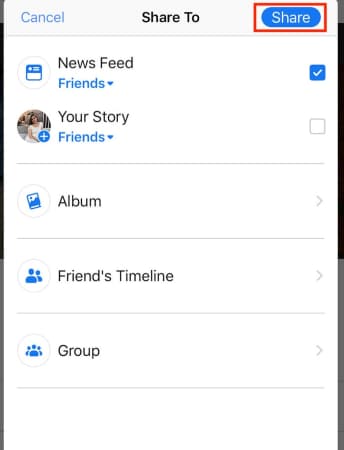
Step 6. Then choose the YouTube video’s post destination to your Facebook. It could be shared on your timeline, story, or a Facebook group’s page.
Step 7. Finally, click on the “Share” tab to make your video viewable on Facebook.
How to post a YouTube video on Facebook
Easily post your YouTube video on Facebook and let viewers access them directly from your Facebook feed. By this, your fans don’t have to click on other tabs but will access the videos directly.
Step 1. Copy the YouTube video’s link
First, go to your YouTube channel and copy the video link that you want to post to Facebook. You can as well copy the embed code.
Step 2. Embed the video link you copied
This link should be embedded into a Facebook post. Do this by first logging into your Facebook account. Then go to the top of your “Facebook News Feed” and click the “What’s on your mind” box.
Step 3. Paste your link
Right-click on the “What’s on your mind” box, then select the “Paste” option.
Step 4. Preview video
Facebook will let you preview the video you just posted. Check whether you have pasted the right video before you post it.
Step 5. Post your video
Now, scroll down and click on the “Post” tab. You can also add a message to your post. Just place a cursor after the video URL and hit the “Enter” key on your keyboard. Finally, scroll down and hit the “Post” tab to make your video public on Facebook.
Extra Tip: Facebook Video Tips for more Views and Shares
You have to play your cards well when it comes to posting and sharing your videos on Facebook. These tips are all you need.
- Catch viewer’s attention within the shortest time possible
Here, your main aim is to convince your viewers. So, don’t let them spend so much time before you catch their attention. You can bring up a point about some latest news or adventures that let your viewers connect immediately.
- Add captions to the video
It is not necessarily possible that viewers will watch your videos with the sound on. Some like it when it’s silent and might disable the sound auto-play. Add some captions so that viewers will understand your video, even on silent mode.
- Emphasize on one key-point
Focus on one key point so that your viewers are not swayed away. Your video is highly sharable if it is easy to understand.
- Add a Call To Action
Including a call-to-action will encourage your viewers to subscribe to your channel. Ensure you include it at the end of your video to tell viewers what to do next. You could also include a link to your blog post to let your viewers read and find more content from your other channels.
- Facebook ads can make a great difference
Facebook is a great place for running ads that reach a wider audience. Adverts are great ways to target a specific audience. They explain your products and services more straightforwardly.
- Embed your videos on blog posts
Numerous people get to access guest posts and blog posts. You can embed your Facebook videos on such posts to reach more people. Just get the embed code from your video, then copy and paste it to a guest or blog post.
Frequently Asked Question about Facebook video
Both viewers and content creators have a few concerns about YouTube and Facebook videos. Here are some frequently asked questions that will be of benefit to you.
1) Is it legal to share YouTube videos?
YouTube is just one platform where content creators showcase their productions. Yes, it is legal to share your content on other forums like Facebook, Twitter, Instagram, etc.
2) What is the best time to post to your Facebook page?
The best time to post on a Facebook page depends on your time zone. Generally, viewers access Facebook late in the evening and early in the night. Perhaps they are off work and now want to relax by checking the day’s updates.
3) What are Facebook business accounts and personal accounts?
Facebook business accounts are designed for users who want to use Facebook to administer their pages and advert campaigns. This account cannot be found in searching or receiving friend request apps. Nonetheless, personal accounts are used at basic and casual levels. You can search for friends and send requests. Personal accounts are also easy to manage.
4) Can I mobilize people to share my posted content on Facebook?
Yes, it is possible to let others share what you have posted. Just ensure they know your intention by constant reminders. Some popular ways that are proven to be effective include the use of “Call to Action,” using an image or video with your Facebook status update and offering some incentive to your fans for sharing.
5) Does the quality of my YouTube content drop when I share it with Facebook?
Of course not! What you pull from your YouTube channel is the kind of video that will be watched from Facebook. The quality cannot deteriorate. However, it is good to ensure you compose quality videos on YouTube before sharing them. Several video editing apps like Filmora can help you compose quality videos with high resolution.
Conclusion
● Facebook is a great platform that is accessed by a wide audience. More so, you can share your content from other platforms easily. The article has covered how to share YouTube videos on Facebook and hook your audience. You can use your computer or share directly from your mobile device in simple steps. It is also better to play some tricks on your effort to reach a wider audience. These include a CTA, embedding your Facebook videos to blogs posts, among other options.
YouTube reports that Facebook is the most utilized platform fans use to watch online content. More so, up to 40% of those who watch the content do share links with their friends online – this then makes it quick to promote YouTube content on Facebook. Simply by making your new YouTube content visible on your Facebook page, and you’ll be certain that thousands of viewers will have a glimpse of it. You must already be scratching your head for ways on how to post a YouTube video on a Facebook page. Well, we bring you several ways to go through that and make your YouTube content accessible on Facebook.
In this article
01 How to Post YouTube video on Facebook?
02 Extra Tip: Facebook Video Tips for more Views and Shares
03 Frequently Asked Question about Facebook video
How to Post YouTube video on Facebook?
Since Facebook is easily accessible, many users have more access to it than other social media platforms. More so, the page allows you to communicate with your audience via photos, videos, graphics, text, among many other multimedia contents. You don’t even need any programming skills to operate it. Here are ways to post YouTube content to Facebook.
How to share a YouTube video on Facebook using a computer
If you have a stationary point of work, i.e., a computer, it is possible to share your YouTube video through it.
Step 1. First, visit the YouTube site at https://www.youtube.com . It can launch from any web browser.
Step 2. Choose from among your videos on YouTube the one you wish to share on Facebook.
Step 3. Then find the “Share” icon located directly under the video you want to share. Click on the video and hit the “Share” button below the video.
Step 4. Choose “Facebook” from the sharing options that pop up.
Step 5. Next, sign in to “Facebook” on your desktop. Then select the destination point you want your video to land in by using the drop-down menu at the top of your desktop screen. Select the “Share to News Feed” or perhaps the share to “Story.”
Step 6. Finally, click the “Post to Facebook” tab to share your YouTube content with Facebook.
How to share a YouTube video on Facebook using a mobile device
Are you on the go and want your Facebook fans to know what content you have on your YouTube channel? Here are the simple steps on how to post a YouTube video on Facebook right from the palm of your hands – a mobile device.
Step 1. Use any browser on your mobile device to launch the YouTube app from the official website.
Step 2. Peruse through your YouTube videos and choose the one you wish to share on Facebook.
Step 3. Check below the video and click on the “Share” icon.
Step 4. Search through the app’s options and choose Facebook. Also, ensure that the “Facebook” app is installed on your mobile device to make your videos sharable.
Step 5. Click on the “Next” option in the upper right-hand corner of your mobile screen. It will enable video sharing.
Step 6. Then choose the YouTube video’s post destination to your Facebook. It could be shared on your timeline, story, or a Facebook group’s page.
Step 7. Finally, click on the “Share” tab to make your video viewable on Facebook.
How to post a YouTube video on Facebook
Easily post your YouTube video on Facebook and let viewers access them directly from your Facebook feed. By this, your fans don’t have to click on other tabs but will access the videos directly.
Step 1. Copy the YouTube video’s link
First, go to your YouTube channel and copy the video link that you want to post to Facebook. You can as well copy the embed code.
Step 2. Embed the video link you copied
This link should be embedded into a Facebook post. Do this by first logging into your Facebook account. Then go to the top of your “Facebook News Feed” and click the “What’s on your mind” box.
Step 3. Paste your link
Right-click on the “What’s on your mind” box, then select the “Paste” option.
Step 4. Preview video
Facebook will let you preview the video you just posted. Check whether you have pasted the right video before you post it.
Step 5. Post your video
Now, scroll down and click on the “Post” tab. You can also add a message to your post. Just place a cursor after the video URL and hit the “Enter” key on your keyboard. Finally, scroll down and hit the “Post” tab to make your video public on Facebook.
Extra Tip: Facebook Video Tips for more Views and Shares
You have to play your cards well when it comes to posting and sharing your videos on Facebook. These tips are all you need.
- Catch viewer’s attention within the shortest time possible
Here, your main aim is to convince your viewers. So, don’t let them spend so much time before you catch their attention. You can bring up a point about some latest news or adventures that let your viewers connect immediately.
- Add captions to the video
It is not necessarily possible that viewers will watch your videos with the sound on. Some like it when it’s silent and might disable the sound auto-play. Add some captions so that viewers will understand your video, even on silent mode.
- Emphasize on one key-point
Focus on one key point so that your viewers are not swayed away. Your video is highly sharable if it is easy to understand.
- Add a Call To Action
Including a call-to-action will encourage your viewers to subscribe to your channel. Ensure you include it at the end of your video to tell viewers what to do next. You could also include a link to your blog post to let your viewers read and find more content from your other channels.
- Facebook ads can make a great difference
Facebook is a great place for running ads that reach a wider audience. Adverts are great ways to target a specific audience. They explain your products and services more straightforwardly.
- Embed your videos on blog posts
Numerous people get to access guest posts and blog posts. You can embed your Facebook videos on such posts to reach more people. Just get the embed code from your video, then copy and paste it to a guest or blog post.
Frequently Asked Question about Facebook video
Both viewers and content creators have a few concerns about YouTube and Facebook videos. Here are some frequently asked questions that will be of benefit to you.
1) Is it legal to share YouTube videos?
YouTube is just one platform where content creators showcase their productions. Yes, it is legal to share your content on other forums like Facebook, Twitter, Instagram, etc.
2) What is the best time to post to your Facebook page?
The best time to post on a Facebook page depends on your time zone. Generally, viewers access Facebook late in the evening and early in the night. Perhaps they are off work and now want to relax by checking the day’s updates.
3) What are Facebook business accounts and personal accounts?
Facebook business accounts are designed for users who want to use Facebook to administer their pages and advert campaigns. This account cannot be found in searching or receiving friend request apps. Nonetheless, personal accounts are used at basic and casual levels. You can search for friends and send requests. Personal accounts are also easy to manage.
4) Can I mobilize people to share my posted content on Facebook?
Yes, it is possible to let others share what you have posted. Just ensure they know your intention by constant reminders. Some popular ways that are proven to be effective include the use of “Call to Action,” using an image or video with your Facebook status update and offering some incentive to your fans for sharing.
5) Does the quality of my YouTube content drop when I share it with Facebook?
Of course not! What you pull from your YouTube channel is the kind of video that will be watched from Facebook. The quality cannot deteriorate. However, it is good to ensure you compose quality videos on YouTube before sharing them. Several video editing apps like Filmora can help you compose quality videos with high resolution.
Conclusion
● Facebook is a great platform that is accessed by a wide audience. More so, you can share your content from other platforms easily. The article has covered how to share YouTube videos on Facebook and hook your audience. You can use your computer or share directly from your mobile device in simple steps. It is also better to play some tricks on your effort to reach a wider audience. These include a CTA, embedding your Facebook videos to blogs posts, among other options.
Enhancing YouTube Videos: Proper Lighting Methods
How To Light Your YouTube Video

Richard Bennett
Oct 26, 2023• Proven solutions
When it comes to sensitivity to light, no consumer-level camera sensor comes close in performance to the human eye. Many newbies to videography, though, don’t think about this when they use their camera indoors and discover that their recorded footage appears too dark.
If you want to use your camera indoors as many YouTubers do, you’ll need to have extra light. But the solution is not as simple as surrounding yourself with lamps that are all randomly placed.
Below, I’ll go into detail on how you can set up your lighting equipment to make your YouTube videos look good.
| Table of Contents Using Light You Already Have Window LightingHome Lighting Home Studio Lighting Light Control3-Point Lighting4-Point Lighting |
|---|
Part 1: Using Light You Already Have
Most beginner YouTubers light their videos with what they already have. That’s what I did to start as well. In the past, my video recording space consisted of natural sunlight coming from my window and ceiling light for times when the sunlight wasn’t strong enough.
1. Window Lighting
The best thing about window lighting is that it’s free. The worst thing about it is that it’s uncontrollable. The amount of light you get in your video can vary with all the changes in the weather.
Window lighting for me was especially difficult to work with because I live in a very rainy and cloudy city, Vancouver, Canada, where we pretty much just get three months of good sun.

Above are two freeze frames from one of Daniel’s past window-lit vlogs. Although these two frames are both from the same vlog, you can see that the image on the right looks brighter due to clearer skies at that moment. These varying amounts of light is what you will have to deal with if you choose to light your YouTube video with window lighting.
2. Home Lighting
Home lighting is another source of light that many new YouTubers use. In the past, when my window light wasn’t strong enough to light my video recording space, I would turn on the ceiling light.

Notice how the color of Daniel’s skin looks much more orange here (above) than the color of the skin in the two side-by-side window lighting examples? The side of the face also appears to look bluer. This all happened because he mixed up different color temperatures shining out of the two lights (cooler window light and warmer ceiling light).
Most home lighting is warmer in its color temperature. If you want to use your home lights without everything being orange-tinted, you’ll need to switch out your light bulbs for daytime LED light bulbs.
Ceiling lights are also typically situated in the center of a room in order to light an entire room evenly. This is not likely to be the best location for your filming video. Since the ceiling light was directly above the face in the above example, you can see harder shadows beneath his cheeks.
Part 2: Home Studio Lighting
If you rather not deal with all the window and home lighting challenges, you can set up studio lighting in your home.
1. Light Control
The first thing you’ll want to do to set up studio lighting in your home is to pick a room to film in and eliminate as much external lighting as you can. Use blinds, curtains, towels, or any thick fabric to block sunlight from shining into your room.
2. 3-Point Lighting
The most common setup for studio lighting is 3-point lighting. For this kind of lighting you’ll need three lights: a key light, a fill light, and a back light (also called a hair light).

Out of the three lights, the key light should be the brightest. When it is positioned to the left of you (as shown in the diagram above) your right side will have shadows.
To minimize the shadows on your right side, use a weaker light as a fill light. You don’t want your fill light to completely eliminate all your shadows or else your shot will look flat.
Lastly, a backlight positioned behind you can give an appealing highlight to the ends of your head and even help to separate your hair from blending into your background if both happen to be dark.
3. 4-Point Lighting
As a YouTuber, you may not only want yourself to be seen optimally with proper lighting, but you may also want your background to be seen optimally, especially if you’ve taken the time to decorate it for your audience.
What you’ll need to ensure that your background is sufficiently lit is 4-point lighting setup. The 4-point lighting setup is the same as a 3-point lighting setup, but with an additional light shining at your background.
For more information on lighting equipment, check out my Top 17 Video Lighting Equipment For YouTubers .
Touch Up YouTube Videos with Filmora
Filmora is one of the best video editing software for YouTube beginners to start the YouTube channel. So, if you find the lighting isn’t perfect after recording, you can use the Auto Color Enhancement feature in Filmora to adjust the color with one-click. Or, you can change the white balance, Light, color, and HSL manually. Filmora also features some presets and LUTs templates , which allows you to apply pre-programmed effects to video for color correction faster.


Richard Bennett
Richard Bennett is a writer and a lover of all things video.
Follow @Richard Bennett
Richard Bennett
Oct 26, 2023• Proven solutions
When it comes to sensitivity to light, no consumer-level camera sensor comes close in performance to the human eye. Many newbies to videography, though, don’t think about this when they use their camera indoors and discover that their recorded footage appears too dark.
If you want to use your camera indoors as many YouTubers do, you’ll need to have extra light. But the solution is not as simple as surrounding yourself with lamps that are all randomly placed.
Below, I’ll go into detail on how you can set up your lighting equipment to make your YouTube videos look good.
| Table of Contents Using Light You Already Have Window LightingHome Lighting Home Studio Lighting Light Control3-Point Lighting4-Point Lighting |
|---|
Part 1: Using Light You Already Have
Most beginner YouTubers light their videos with what they already have. That’s what I did to start as well. In the past, my video recording space consisted of natural sunlight coming from my window and ceiling light for times when the sunlight wasn’t strong enough.
1. Window Lighting
The best thing about window lighting is that it’s free. The worst thing about it is that it’s uncontrollable. The amount of light you get in your video can vary with all the changes in the weather.
Window lighting for me was especially difficult to work with because I live in a very rainy and cloudy city, Vancouver, Canada, where we pretty much just get three months of good sun.
Above are two freeze frames from one of Daniel’s past window-lit vlogs. Although these two frames are both from the same vlog, you can see that the image on the right looks brighter due to clearer skies at that moment. These varying amounts of light is what you will have to deal with if you choose to light your YouTube video with window lighting.
2. Home Lighting
Home lighting is another source of light that many new YouTubers use. In the past, when my window light wasn’t strong enough to light my video recording space, I would turn on the ceiling light.
Notice how the color of Daniel’s skin looks much more orange here (above) than the color of the skin in the two side-by-side window lighting examples? The side of the face also appears to look bluer. This all happened because he mixed up different color temperatures shining out of the two lights (cooler window light and warmer ceiling light).
Most home lighting is warmer in its color temperature. If you want to use your home lights without everything being orange-tinted, you’ll need to switch out your light bulbs for daytime LED light bulbs.
Ceiling lights are also typically situated in the center of a room in order to light an entire room evenly. This is not likely to be the best location for your filming video. Since the ceiling light was directly above the face in the above example, you can see harder shadows beneath his cheeks.
Part 2: Home Studio Lighting
If you rather not deal with all the window and home lighting challenges, you can set up studio lighting in your home.
1. Light Control
The first thing you’ll want to do to set up studio lighting in your home is to pick a room to film in and eliminate as much external lighting as you can. Use blinds, curtains, towels, or any thick fabric to block sunlight from shining into your room.
2. 3-Point Lighting
The most common setup for studio lighting is 3-point lighting. For this kind of lighting you’ll need three lights: a key light, a fill light, and a back light (also called a hair light).
Out of the three lights, the key light should be the brightest. When it is positioned to the left of you (as shown in the diagram above) your right side will have shadows.
To minimize the shadows on your right side, use a weaker light as a fill light. You don’t want your fill light to completely eliminate all your shadows or else your shot will look flat.
Lastly, a backlight positioned behind you can give an appealing highlight to the ends of your head and even help to separate your hair from blending into your background if both happen to be dark.
3. 4-Point Lighting
As a YouTuber, you may not only want yourself to be seen optimally with proper lighting, but you may also want your background to be seen optimally, especially if you’ve taken the time to decorate it for your audience.
What you’ll need to ensure that your background is sufficiently lit is 4-point lighting setup. The 4-point lighting setup is the same as a 3-point lighting setup, but with an additional light shining at your background.
For more information on lighting equipment, check out my Top 17 Video Lighting Equipment For YouTubers .
Touch Up YouTube Videos with Filmora
Filmora is one of the best video editing software for YouTube beginners to start the YouTube channel. So, if you find the lighting isn’t perfect after recording, you can use the Auto Color Enhancement feature in Filmora to adjust the color with one-click. Or, you can change the white balance, Light, color, and HSL manually. Filmora also features some presets and LUTs templates , which allows you to apply pre-programmed effects to video for color correction faster.
Richard Bennett
Richard Bennett is a writer and a lover of all things video.
Follow @Richard Bennett
Also read:
- Audio Ambition Selecting Top 6 Free Downloader Apps From YouTube Vaults for 2024
- From Frame-by-Frame Filmmaking to Financial Flourishing
- The Best 8 Free Editing Programs to Streamline Your YouTube Projects
- Journey Through Virtuality YouTube's Best 10
- Unlock Creative Potential with No-Cost Green Screen Knowledge From Top 4 Educational Channels
- Conquer Zero Viewers 10 Essential Tips for Video Popularity
- [New] Elevating Your Channels' Profits with Impactful and Effective Trailers
- [Updated] Capture Every Angle – How to Create Dynamic, Viewpoint-Driven Reaction Vids for YouTube Success
- 50 FREE YouTube Banners - Come See Them All!
- Unleash Potential Access Premium Sound Effects
- Pro-Level GIF Generation A Critical Review
- Leading Edge 16 YouTube Intros That Skyrocket Views
- Cultivate Creativity 10 Inspiration-Boosting Videos
- 2024 Approved Dissecting Video Ranking Algorithms on YouTube
- Essential Notebooks Excellent in Media Post-Production
- Securing Cash Through YouTube Content Sales
- 2024 Approved Coordinate Channel Coverage for Maximum Viewer Impact (YT+TW)
- Best 5 Camera Apps to Shoot and Record Videos on iPhone and Andriod
- [Updated] Comprehensive Tutorial on Youtube Annotation
- [Updated] Discovering How YouTube Runs Its Creator Workshop
- [New] Elevate Your YouTube Livestream Game Plan
- Navigating YouTube's Monetization Frequency
- Revel in the Power of Leading Video Rank Tracker Tools
- [Updated] In 2024, Compile the Best 6 Leading Apps for FB Lite Video Downloads
- In 2024, Best Video Chatting Tools for Remote Team Interactions
- [New] Your Guide to Affordable Android Recording with Top 8 Free Apps
- 2024 Approved Speed Up or Slow Down A Comprehensive Camtasia Video Guide
- New Most Acclaimed Digital Music Cutter Tools – Updated
- Best Methods for Vivo Y100i Power 5G Wont Turn On | Dr.fone
- What are Location Permissions Life360 On Vivo X Fold 2? | Dr.fone
- Quickly Remove Google FRP Lock on Blaze 2 Pro
- Trending Tweets Triumph Today's Top Viewed Videos
- [New] 2024 Approved Capture the Competition Essential Tools for Gamers on Pc/Mac
- Top 10 Password Cracking Tools For Vivo Y200
- How to Recover Deleted Data from iPhone 6 using Stellar Data Recovery for iPhone? | Stellar
- New What Is AI Generated Text for 2024
- Mastering Android Device Manager The Ultimate Guide to Unlocking Your Nubia Z50S Pro Device
- In 2024, Lights, Camera, Action! Easy Movie Making for All
- Here are Some of the Best Pokemon Discord Servers to Join On Infinix Smart 8 Pro | Dr.fone
- Mastering Silence in Audio A Step-by-Step Guide for Removing Voices From Videos
- [Updated] In 2024, Maximizing Your Video's Impact with Expertly Recorded Voices
- Hassle-Free Ways to Remove FRP Lock on Realme GT 5 Phones with/without a PC
- 3 Easy Solutions to Hard Reset Xiaomi 13 Ultra | Dr.fone
- [Updated] 2024 Approved FB Video Extraction for Desktops & Phones
- Title: "[New] Digital Dynamics Mastering YouTube Video Distribution on Facebook"
- Author: Brian
- Created at : 2024-05-25 12:36:20
- Updated at : 2024-05-26 12:36:20
- Link: https://youtube-video-recordings.techidaily.com/new-digital-dynamics-mastering-youtube-video-distribution-on-facebook/
- License: This work is licensed under CC BY-NC-SA 4.0.
