
![[New] Detailed Steps to Supercharge Your YouTube Audio Content](https://www.lifewire.com/thmb/xWg1yHDU11x4ZrjNTzzLWwJyEKI=/400x300/filters:no_upscale():max_bytes(150000):strip_icc()/GettyImages-1005528904-7d476f41edcd46bb809080651f746d68.jpg)
[New] Detailed Steps to Supercharge Your YouTube Audio Content
Detailed Steps to Supercharge Your YouTube Audio Content
How to Edit Audio on YouTube

Richard Bennett
Mar 27, 2024• Proven solutions
In this article, we are going to show you how to edit audio with YouTube Video Editor, and the tips on adding your own audio file to YouTube.
- Part 1: Add your Own Audio File to YouTube Video
- Part 2: How to Edit Audio with YouTube Video Editor
Part 1: Add your Own Audio File to YouTube Video
Tools You Are Going to Need
YouTube video editor is far from meeting the needs of people who want to have more control on their audio. On the bright side, if you are interested in learning how to edit audio on YouTube, there is a solution. There are many video editors in the market that allow you to add your own music or audio files to a video. Windows Movie Maker, iMovie, Adobe Premiere, and Magisto are some of the video editors available for you to choose from. In this guide, we recommend the Wondershare Filmora video editor. Below is a quick tutorial about how to edit audio in Filmora.
 Download Mac Version ](https://tools.techidaily.com/wondershare/filmora/download/ )
Why Should You Choose Wondershare Filmora?
There are many advantages associated with the use of Wondershare Filmora. You will see that it allows you to fully edit any audio file and gain 100% control over your files. It is an integrated solution that lacks nothing in terms of efficiency and quality standards. To be more specific, Filmora offers the following unique features:
- Built-in audio editing tools that allow you to gain full control of your audio in an easy way
- Exclusive audio track that enables you to mute, detach or even de-noise the audio from video
- All audio effects can easily be adjusted with one click only
- The built-in Equalizer is capable enough to create amazing audio effects
- Directly upload your video to YouTube, Facebook or Vimeo from Wondershare Filmora
How to add audio files to YouTube video with Wondershare Filmora
Do you want to know more about audio editing? Please read this article: How to add audio to video.
Step 1 Import Video Clips into Filmora
Filmora supports a wide range of video formats, such as MKV, MOV, AVI, WebM and MP4, you can import the video clip shot with Camera, smartphone or camcorder easily to it.
Step 2 Detach Audio
If you want to edit the original audio of the video, you can choose to split the audio file from the video by using the Audio Detach option on Wondershare Filmora. Then, the audio file will be shown in the audio track, and you can cut or trim it.

Note: If you do not want to keep the original audio file in the video, you can delete it from the audio track directly.
Step 3Add Audio Files
Wondershare Filmora offers you multiple royalty free audio effects and music in its rich audio library. What is more, you can also import your own music or audio file from your computer or iTunes. Of course, you should know that the audio should be royalty free for you to make use of. In a different situation, you cannot upload it and benefit from its quality and nature.
Step 4Edit Audio
In this step, you can adjust the audio volume and pitch, etc. There are multiple options for you to benefit from, including the Audio Equalizer, Music, Mix Audio. In this way, you can make sure that the audio is exactly like you have wanted it to be. For further information as to how you can improve the sound quality of your recorded videos, you can check out: How to improve sound quality of recorded videos.
Step 5Save Your Work and Upload on YouTube
If you are satisfied with your work on the audio file and you wish to publish it, the process is quite simple. You just hit Export and select to upload the video to YouTube. After signing in to your YouTube account, you will be ready to start uploading the audio file.

In case you wish to edit the audio from an already published video, you have to download the video first. Then, you can follow the steps above to edit the audio file in Filmora. As one of the widely used video editing software for YouTubers, Filmora is here to empower your imagination. Just download the free trial version and try it now.

Part 2: How to Edit Audio with YouTube Video Editor
Unfortunately, YouTube does not allow users to upload audio files such as MP3, WAV, etc. Instead, you can only upload audio files which are offered by YouTube in the first place. Since YouTube has got a plentiful audio library, you can find a lot of audio there. In this part, we will show you how to add and edit audio with YouTube Video Editor.
You may also like: How to Add Music to YouTube Videos >>
Note: From 20th September 2017 users will no longer be able to use the complimentary editing suite. Check the best YouTube video editor alternatives from this complete guide. In the following part, I will show you how to add audio track , replace the original audio and adjust the audio position and length as well.
- Step 1: Sign in to your YouTube account
- **Step 2:**Click your profile avatar and select Creator Studio option.
- Step 3: In the left pane, go to Video Manager and then click Videos. In the Videos list, choose the video that you want to add new audio track, and then select Audio from the Edit button.

- Step 4: Now you can add or replace the audio in your video. Here you will find that there are various songs and audio files you can choose from. Click ADD TO VIDEO and the audio track will be added to the video directly.

- Step 5: Now you will see the audio track appears at the bottom of the player. Here you can trim and drag the audio bar to adjust the audio positon and length. To Trim the audio, click the beginning or the end of the audio bar and then drag it to the left or right. After trimming, drag it to meet the target position.

Conclusion
Normally, it would be better to add and edit audio to video before updating to YouTube. In this case, Filmora is highly recommended as one of the best video editor for YouTubers , which provides some royalty free music sound in the Music Library to choose from and also the audio editing tools like remove background noise from the video, add fade in and fade out effects with ease or play the video backward or fast forward.
Richard Bennett
Richard Bennett is a writer and a lover of all things video.
Follow @Richard Bennett
Richard Bennett
Mar 27, 2024• Proven solutions
In this article, we are going to show you how to edit audio with YouTube Video Editor, and the tips on adding your own audio file to YouTube.
- Part 1: Add your Own Audio File to YouTube Video
- Part 2: How to Edit Audio with YouTube Video Editor
Part 1: Add your Own Audio File to YouTube Video
Tools You Are Going to Need
YouTube video editor is far from meeting the needs of people who want to have more control on their audio. On the bright side, if you are interested in learning how to edit audio on YouTube, there is a solution. There are many video editors in the market that allow you to add your own music or audio files to a video. Windows Movie Maker, iMovie, Adobe Premiere, and Magisto are some of the video editors available for you to choose from. In this guide, we recommend the Wondershare Filmora video editor. Below is a quick tutorial about how to edit audio in Filmora.
Download Mac Version ](https://tools.techidaily.com/wondershare/filmora/download/ )
Why Should You Choose Wondershare Filmora?
There are many advantages associated with the use of Wondershare Filmora. You will see that it allows you to fully edit any audio file and gain 100% control over your files. It is an integrated solution that lacks nothing in terms of efficiency and quality standards. To be more specific, Filmora offers the following unique features:
- Built-in audio editing tools that allow you to gain full control of your audio in an easy way
- Exclusive audio track that enables you to mute, detach or even de-noise the audio from video
- All audio effects can easily be adjusted with one click only
- The built-in Equalizer is capable enough to create amazing audio effects
- Directly upload your video to YouTube, Facebook or Vimeo from Wondershare Filmora
How to add audio files to YouTube video with Wondershare Filmora
Do you want to know more about audio editing? Please read this article: How to add audio to video.
Step 1 Import Video Clips into Filmora
Filmora supports a wide range of video formats, such as MKV, MOV, AVI, WebM and MP4, you can import the video clip shot with Camera, smartphone or camcorder easily to it.
Step 2 Detach Audio
If you want to edit the original audio of the video, you can choose to split the audio file from the video by using the Audio Detach option on Wondershare Filmora. Then, the audio file will be shown in the audio track, and you can cut or trim it.
Note: If you do not want to keep the original audio file in the video, you can delete it from the audio track directly.
Step 3Add Audio Files
Wondershare Filmora offers you multiple royalty free audio effects and music in its rich audio library. What is more, you can also import your own music or audio file from your computer or iTunes. Of course, you should know that the audio should be royalty free for you to make use of. In a different situation, you cannot upload it and benefit from its quality and nature.
Step 4Edit Audio
In this step, you can adjust the audio volume and pitch, etc. There are multiple options for you to benefit from, including the Audio Equalizer, Music, Mix Audio. In this way, you can make sure that the audio is exactly like you have wanted it to be. For further information as to how you can improve the sound quality of your recorded videos, you can check out: How to improve sound quality of recorded videos.
Step 5Save Your Work and Upload on YouTube
If you are satisfied with your work on the audio file and you wish to publish it, the process is quite simple. You just hit Export and select to upload the video to YouTube. After signing in to your YouTube account, you will be ready to start uploading the audio file.
In case you wish to edit the audio from an already published video, you have to download the video first. Then, you can follow the steps above to edit the audio file in Filmora. As one of the widely used video editing software for YouTubers, Filmora is here to empower your imagination. Just download the free trial version and try it now.
Part 2: How to Edit Audio with YouTube Video Editor
Unfortunately, YouTube does not allow users to upload audio files such as MP3, WAV, etc. Instead, you can only upload audio files which are offered by YouTube in the first place. Since YouTube has got a plentiful audio library, you can find a lot of audio there. In this part, we will show you how to add and edit audio with YouTube Video Editor.
You may also like: How to Add Music to YouTube Videos >>
Note: From 20th September 2017 users will no longer be able to use the complimentary editing suite. Check the best YouTube video editor alternatives from this complete guide. In the following part, I will show you how to add audio track , replace the original audio and adjust the audio position and length as well.
- Step 1: Sign in to your YouTube account
- **Step 2:**Click your profile avatar and select Creator Studio option.
- Step 3: In the left pane, go to Video Manager and then click Videos. In the Videos list, choose the video that you want to add new audio track, and then select Audio from the Edit button.
- Step 4: Now you can add or replace the audio in your video. Here you will find that there are various songs and audio files you can choose from. Click ADD TO VIDEO and the audio track will be added to the video directly.
- Step 5: Now you will see the audio track appears at the bottom of the player. Here you can trim and drag the audio bar to adjust the audio positon and length. To Trim the audio, click the beginning or the end of the audio bar and then drag it to the left or right. After trimming, drag it to meet the target position.
Conclusion
Normally, it would be better to add and edit audio to video before updating to YouTube. In this case, Filmora is highly recommended as one of the best video editor for YouTubers , which provides some royalty free music sound in the Music Library to choose from and also the audio editing tools like remove background noise from the video, add fade in and fade out effects with ease or play the video backward or fast forward.
Richard Bennett
Richard Bennett is a writer and a lover of all things video.
Follow @Richard Bennett
Navigating the Best Dates and Hours for YouTube Impact
Create High-Quality Video - Wondershare Filmora
An easy and powerful YouTube video editor
Numerous video and audio effects to choose from
Detailed tutorials provided by the official channel
Creators have one thing in mind when posting their content online. To be viewed by numerous followers and potential subscribers. For this, you need to run your channels tactfully. There are days when people throng the social media to watch upcoming content and videos. Perhaps you can make your best bets on such days. And is there any best day to post YouTube video?
Probably yes! People will settle on social media sites when they are more relaxed and off heavy duties on the weekdays. Let’s now dive into posting your videos and attaining some good leads.

In this article
01 Why is it important to post your YouTube video on the best days?
02 Best Days to Post on YouTube - General Practices
03 Best Days to Post on YouTube - Individual channel
Why is it important to post your YouTube video on the best days?
You are better off with best days to post on YouTube to increase the chances of getting more views. You want to make the biggest catch, and putting in a little effort will help you yield good results.
1) Your content never dies
The major advantage of posting on best days is that they hit the wall right from the onset of posting. You won’t need a lot of time to invest in expensive equipment. Remember, when viewers see your content immediately, they are posted, there are high chances of them sharing along with friends.
2) You’ll grow your audience worldwide
Growing a worldwide audience is every content creator’s dream. Posting your videos on the best days will open doors to new visitors who perhaps haven’t heard about you. It is even better to include captions so that people of all walks get your message deeply.
3) You’ll appear more on Google searches
Posting at the right time will help Google identify your content and make it appear on Google searches. Google uses an algorithm to check on many concepts of video posting. It means that posting your videos to YouTube on the best days will spike the graph and automatically get noticed by Google.
4) Your audience will promote you
Remember, when viewers go on searches, they look for something important to them. So, coming across your content at the right time will make an instant catch. They only want to fulfill their needs at that specific time. Hence will buy or promote you as long as what you sell is what they are looking for.
5) Increased subscribers
People want to associate themselves with new content. Anyone would be thrilled to hit the button on content that just popped up when they are online at their relaxed moments. You never know; you may just hit that 1,000 subscribers list by posting your videos on the best days.
Best Days to Post on YouTube - General Practices
How then do you know the best day to upload on YouTube? You can use general practices to pinpoint when your viewers are online or when your channel is at its peak.
- Weekday evenings
Weekdays are very busy days for everyone. People feel relaxed and ready to catch up on social media’s trending in the evening. So, posting in the evenings on weekdays may instantly help you get some increased views.
- Target Thursdays and Fridays
Depending on your YouTube content, you can target school-age children these days. If your content is about kid’s stuff and other online learning skills, then pushing it just before the weekend could give you some good visits. Kids tend to have various activities over the weekend and so, the best time for them to embark on online learning is just before the weekend kicks off.
- Weekends
Weekends will suit content that needs to sell products to the middle-class. Since they are busy the whole week with other duties, they probably find time over the weekend to chill and check out what’s happening around them and the world at large.
- End year
When it comes to the best months to post on YouTube, the end-year period tends to be the best. Usually, this is when companies and individuals are winding up on their busy schedules of the year. They want to get improvements and tips to start the next year. It is wise to spend more time online, giving the necessary tips and probably hooking up some potential customers.
Best Days to Post on YouTube - Individual channel
Stop guessing and find the facts right. Hitting on the road at the right time can get you as many viewers as possible. YouTube makes getting the facts right quite easy. Just use YouTube studio to know when your viewers are online.
First, go to YouTube Studio
Check in the “YouTube Studio” > “Analytics” > “Audience” option. Remember that your channel should have enough views for this option to give you relevant data.
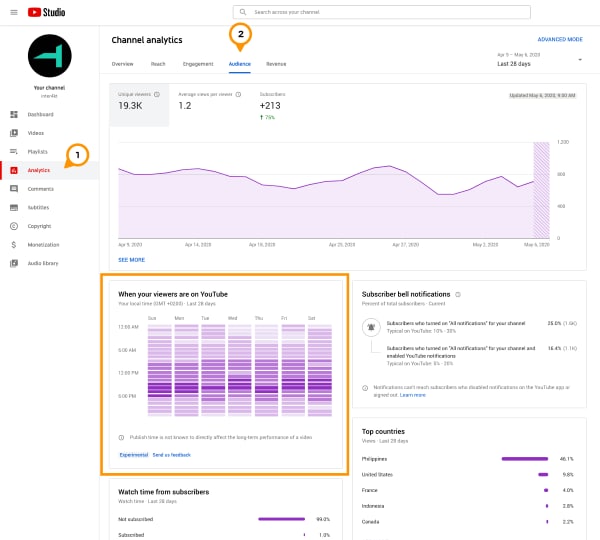
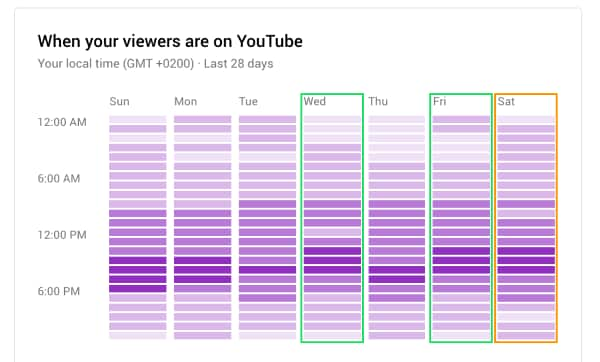
Find the hours with the darkest purple bars
You’ll realize that there are dark bars and light ones. The latter represent when few viewers are on your channel. Avoid posting during such times and focus when you have many viewers on site. Also, try to post a few hours before the peak time.

Focus on the days with the darkest bars
Apart from specific times of the day, you can focus on days of the week when your viewers are on your channel. You will mostly realize that the best days of the week to post to your channel are on weekends. It is quite typical as it’s the days when viewers are more relaxed and can find new things online. However, you can monitor your statistics and learn the number of days per week you need to emphasize more on posting your videos.
Post videos a day before the peak day
You can also dwell on the narrative; the early bird catches the worm. You can make an early catch since you know the day when your viewers will throng’ your channel, but you don’t know the time. Post videos a day before your channel goes busy. By this, you won’t leave any viewers outside your new postings.
A few hours before prime time
Another trick is to get your videos posted in good time. Once you have known the best hour of the day when viewers are likely to be active, make your video available a few hours before then. They’ll then get it rolling once they land into the channel for the newest updates. If not, you may miss out on views you would have gotten by making your video go public earlier.
Upload your videos in private a few hours before publishing
Yes, mistakes do happen, and you don’t want to be caught up in the mix of errors. You can increase perfection by uploading your videos for some hours before publishing them. It will give you a good time to check it out privately and iron out any concerns. You don’t want your video going viral with tons of mishaps.
Create High-Quality Video with Filmora to Ensure Video Engagement
Besides knowing the best days to post on YouTube, you have to give your audience quality for their time. Composing the best video is the killer for this course. Learn how to get high-quality videos with Filmora. It is a widely used video editing tool that comes in hand with lots of templates and effects. These features enable you to compose high-end videos in 4K and HD resolution. The effect of quality videos is that they’ll help you get many views because users will understand your video first. Filmora has an intuitive interface that will give you an easy time.
- Edit your videos with minimal effect. You can easily merge, crop, tilt, and perform more with Filmora.
- Easily do motion tracking from the main interface.
- It supports 4K and HD editing ability./li>
- Use the speed control feature to make your clips up to ten times faster or slower.
- Make magical moves with the Reverse feature. You can flip your videos and play them backward.
- Create stunning video colors in your video using the color tuning feature. You can adjust the white balance and the dynamic range of colors.
- Get quality sound with the noise removal feature.
For Win 7 or later (64-bit)
For macOS 10.12 or later
Conclusion
● You don’t have to guess the best days to upload to YouTube anymore. You can use YouTube algorithm Studio to calculate and give you the exact hours and days when your viewers are at bay. But again, this will only be effective if you have already gathered a substantial number of viewers. It will, therefore, not work for you if you are starting on YouTube. Usually, there isn’t enough data yet for the system to know the best time to publish, and neither know how your content performs in general.
● But all in all, you can use general practices to know when to post your content. Most likely, combine your efforts and don’t dwell on specific hours or days. Use both combined to reach as many audiences as possible.
Creators have one thing in mind when posting their content online. To be viewed by numerous followers and potential subscribers. For this, you need to run your channels tactfully. There are days when people throng the social media to watch upcoming content and videos. Perhaps you can make your best bets on such days. And is there any best day to post YouTube video?
Probably yes! People will settle on social media sites when they are more relaxed and off heavy duties on the weekdays. Let’s now dive into posting your videos and attaining some good leads.
In this article
01 Why is it important to post your YouTube video on the best days?
02 Best Days to Post on YouTube - General Practices
03 Best Days to Post on YouTube - Individual channel
Why is it important to post your YouTube video on the best days?
You are better off with best days to post on YouTube to increase the chances of getting more views. You want to make the biggest catch, and putting in a little effort will help you yield good results.
1) Your content never dies
The major advantage of posting on best days is that they hit the wall right from the onset of posting. You won’t need a lot of time to invest in expensive equipment. Remember, when viewers see your content immediately, they are posted, there are high chances of them sharing along with friends.
2) You’ll grow your audience worldwide
Growing a worldwide audience is every content creator’s dream. Posting your videos on the best days will open doors to new visitors who perhaps haven’t heard about you. It is even better to include captions so that people of all walks get your message deeply.
3) You’ll appear more on Google searches
Posting at the right time will help Google identify your content and make it appear on Google searches. Google uses an algorithm to check on many concepts of video posting. It means that posting your videos to YouTube on the best days will spike the graph and automatically get noticed by Google.
4) Your audience will promote you
Remember, when viewers go on searches, they look for something important to them. So, coming across your content at the right time will make an instant catch. They only want to fulfill their needs at that specific time. Hence will buy or promote you as long as what you sell is what they are looking for.
5) Increased subscribers
People want to associate themselves with new content. Anyone would be thrilled to hit the button on content that just popped up when they are online at their relaxed moments. You never know; you may just hit that 1,000 subscribers list by posting your videos on the best days.
Best Days to Post on YouTube - General Practices
How then do you know the best day to upload on YouTube? You can use general practices to pinpoint when your viewers are online or when your channel is at its peak.
- Weekday evenings
Weekdays are very busy days for everyone. People feel relaxed and ready to catch up on social media’s trending in the evening. So, posting in the evenings on weekdays may instantly help you get some increased views.
- Target Thursdays and Fridays
Depending on your YouTube content, you can target school-age children these days. If your content is about kid’s stuff and other online learning skills, then pushing it just before the weekend could give you some good visits. Kids tend to have various activities over the weekend and so, the best time for them to embark on online learning is just before the weekend kicks off.
- Weekends
Weekends will suit content that needs to sell products to the middle-class. Since they are busy the whole week with other duties, they probably find time over the weekend to chill and check out what’s happening around them and the world at large.
- End year
When it comes to the best months to post on YouTube, the end-year period tends to be the best. Usually, this is when companies and individuals are winding up on their busy schedules of the year. They want to get improvements and tips to start the next year. It is wise to spend more time online, giving the necessary tips and probably hooking up some potential customers.
Best Days to Post on YouTube - Individual channel
Stop guessing and find the facts right. Hitting on the road at the right time can get you as many viewers as possible. YouTube makes getting the facts right quite easy. Just use YouTube studio to know when your viewers are online.
First, go to YouTube Studio
Check in the “YouTube Studio” > “Analytics” > “Audience” option. Remember that your channel should have enough views for this option to give you relevant data.
Find the hours with the darkest purple bars
You’ll realize that there are dark bars and light ones. The latter represent when few viewers are on your channel. Avoid posting during such times and focus when you have many viewers on site. Also, try to post a few hours before the peak time.
Focus on the days with the darkest bars
Apart from specific times of the day, you can focus on days of the week when your viewers are on your channel. You will mostly realize that the best days of the week to post to your channel are on weekends. It is quite typical as it’s the days when viewers are more relaxed and can find new things online. However, you can monitor your statistics and learn the number of days per week you need to emphasize more on posting your videos.
Post videos a day before the peak day
You can also dwell on the narrative; the early bird catches the worm. You can make an early catch since you know the day when your viewers will throng’ your channel, but you don’t know the time. Post videos a day before your channel goes busy. By this, you won’t leave any viewers outside your new postings.
A few hours before prime time
Another trick is to get your videos posted in good time. Once you have known the best hour of the day when viewers are likely to be active, make your video available a few hours before then. They’ll then get it rolling once they land into the channel for the newest updates. If not, you may miss out on views you would have gotten by making your video go public earlier.
Upload your videos in private a few hours before publishing
Yes, mistakes do happen, and you don’t want to be caught up in the mix of errors. You can increase perfection by uploading your videos for some hours before publishing them. It will give you a good time to check it out privately and iron out any concerns. You don’t want your video going viral with tons of mishaps.
Create High-Quality Video with Filmora to Ensure Video Engagement
Besides knowing the best days to post on YouTube, you have to give your audience quality for their time. Composing the best video is the killer for this course. Learn how to get high-quality videos with Filmora. It is a widely used video editing tool that comes in hand with lots of templates and effects. These features enable you to compose high-end videos in 4K and HD resolution. The effect of quality videos is that they’ll help you get many views because users will understand your video first. Filmora has an intuitive interface that will give you an easy time.
- Edit your videos with minimal effect. You can easily merge, crop, tilt, and perform more with Filmora.
- Easily do motion tracking from the main interface.
- It supports 4K and HD editing ability./li>
- Use the speed control feature to make your clips up to ten times faster or slower.
- Make magical moves with the Reverse feature. You can flip your videos and play them backward.
- Create stunning video colors in your video using the color tuning feature. You can adjust the white balance and the dynamic range of colors.
- Get quality sound with the noise removal feature.
For Win 7 or later (64-bit)
For macOS 10.12 or later
Conclusion
● You don’t have to guess the best days to upload to YouTube anymore. You can use YouTube algorithm Studio to calculate and give you the exact hours and days when your viewers are at bay. But again, this will only be effective if you have already gathered a substantial number of viewers. It will, therefore, not work for you if you are starting on YouTube. Usually, there isn’t enough data yet for the system to know the best time to publish, and neither know how your content performs in general.
● But all in all, you can use general practices to know when to post your content. Most likely, combine your efforts and don’t dwell on specific hours or days. Use both combined to reach as many audiences as possible.
Also read:
- [Updated] Capturing Contentment A Practical Guide to Daily Vlogging
- Premium Cut Tools The Top 8 Linux Apps
- Step by Step Guide How To Convert YouTube Streaming Into a Free Screencast
- [Updated] A Creator’s Guide to Understanding YouTube Policies
- [Updated] Best YouTube Names Generators [+ How to Brainstorm]
- The Comprehensive Guide to YouTube Playlists Creation
- A Step-by-Step Tutorial to Monetize Product Videography for 2024
- 2024 Approved Anonymous Sharing Simplified Blurring Techniques for Videos
- [Updated] A Complete List of Creative and Catchy YouTube Channel Titles for Modern Blogging (Maximum Length 156 Characters)
- In 2024, 5-Second Stories Explained Well
- Premiere Masterclass Making Your Videos Shine on YouTube
- Android Freedom Selecting Prime Video Editing Tools
- [New] The 9 Best Smartphone Camera Accessories for Vloggers
- [New] Elevate Engagement Posting YouTube Video on FB
- [New] Escape the Top Chart Unexpected Flick Winners
- In 2024, Convert YouTube Videos Smoothly Into Professional WebM Files
- [Updated] End Credits Designed for You Free Top 6 Suggestions
- Instant Techniques to Shuffle YouTube Song Sequences
- Secrets Attracting YouTube Affiliates with Minimal Channel Size
- Cutting-Edge Gadgets for Elite Gamers for 2024
- In 2024, Enhancing Video Content Top Formats on YouTube
- Quick Resize YouTube Videos to Right Aspect Ratio on Mac
- 2024 Approved Addressing YouTube Shorts No Image Upload Issue?
- Effortlessly Stream MP3 to YouTube with 3 Key Steps
- Best Gamers' Streaming Tools
- [New] Essential Guide to Enhancing YouTube Content Post-Upload
- [New] Capturing Top-Notch Audio Without Microphone Dependency
- [Updated] Channel Trailers that Convert Viewers Into Customers
- The Composer's Guide to Creating YouTube Music Cohorts
- [New] Digital Dynamics Mastering YouTube Video Distribution on Facebook
- 2024 Approved Elevate Your Videos with Effective YouTube Thumbnails
- From Screens to Spreads The Do's and Don'ts of Live Blogging
- International Ranks YouTube Stars With the Most Loyal Viewers
- New In 2024, TikTok Visuals Unlocked A Complete Aspect Ratio Guide
- 2024 Approved Behind-the-Scenes Creating Magic with Magix
- How to Quickly Fix Bluetooth Not Working on Xiaomi Redmi A2+ | Dr.fone
- How to Access Your iPhone 12 Pro Max When You Forget the Passcode? | Dr.fone
- How to Reset a Lava Blaze 2 Phone That Is Locked | Dr.fone
- 4 Feasible Ways to Fake Location on Facebook For your Poco X5 Pro | Dr.fone
- Simple Voice Changer Features, Guidelines, and Alternatives
- [New] Seamless Desktop Capture High-Quality Free Windows/Mac Software
- Guide How To Unbrick a Bricked Realme 12 Pro 5G Phone | Dr.fone
- In 2024, 5 Ways to Transfer Music from Meizu 21 Pro to Other Android Devices Easily | Dr.fone
- [New] Adopting the Way of Google Meet Webinars for 2024
- In 2024, Perfect Pictures at Work Master Snap Camera Use
- How To Fix Part of the Touch Screen Not Working on Vivo Y100i | Dr.fone
- In 2024, Professional-Grade Video Editing Why Final Cut Pro Trumps Express
- AMR Audio Transformation A Step-by-Step Manual for Complete AMR Files Conversion
- Top Selection Scintillating Cardboard VR Gaming Experiences
- How To Bypass FRP on Motorola Moto G14
- [New] 2024 Approved Drive Engagement Tips for Going Viral on Instagram
- In 2024, Network Locked SIM Card Inserted On Your Sony Xperia 1 V Phone? Unlock It Now
- [Updated] Prime Selection of Invisible Android Recorders for 2024
- In 2024, How to Unlock a Network Locked Realme Narzo 60 Pro 5G Phone?
- Updated 2024 Approved Film Like a Pro A Beginners Guide to High-Quality Video Production
- How to Enhance Facebook Stream Volume Completely for 2024
- In 2024, Process of Screen Sharing Honor 100 Pro to PC- Detailed Steps | Dr.fone
- What is Geo-Blocking and How to Bypass it On Lava Blaze Pro 5G? | Dr.fone
- Title: [New] Detailed Steps to Supercharge Your YouTube Audio Content
- Author: Brian
- Created at : 2024-05-25 12:36:04
- Updated at : 2024-05-26 12:36:04
- Link: https://youtube-video-recordings.techidaily.com/new-detailed-steps-to-supercharge-your-youtube-audio-content/
- License: This work is licensed under CC BY-NC-SA 4.0.
