
![[New] Decoding YouTube's Thumbnail Impact on Traffic](https://www.lifewire.com/thmb/LKFN_Lro4pYMdm6FbsJMfVQlGnE=/400x300/filters:no_upscale():max_bytes(150000):strip_icc()/cigarettelightersocketdoesntworknocharge-5bb3c7fac9e77c0051fbd30d.jpg)
[New] Decoding YouTube's Thumbnail Impact on Traffic
Decoding YouTube’s Thumbnail Impact on Traffic
The Ultimate Guide to YouTube Thumbnails that Get Views

Richard Bennett
Oct 26, 2023• Proven solutions
Search for any topic on YouTube and you’ll find thousands of videos. How do you decide which of them to watch? Thumbnails play a major role in what viewers decide to click on. They’re often more important than video titles.
Viewers click on thumbnails that both standout and feel relevant to their search. Your task when it comes to creating YouTube thumbnails is to make something that does both of those things while also maintaining your personal style.
- How to Make a YouTube Thumbnail
- How to Upload a YouTube Thumbnail
- YouTube Thumbnail Makers
- How to Make Thumbnails that Get Clicks (Without Clickbait!)
- Animated YouTube Thumbnails
Part 1: How to Make a YouTube Thumbnail
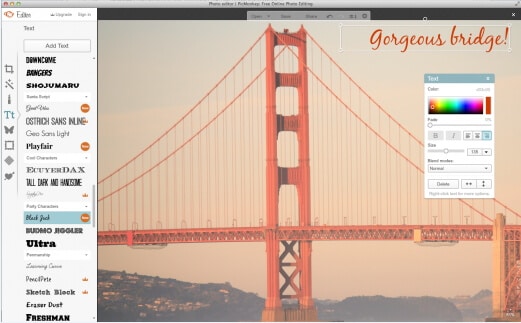
In order to create a custom video thumbnail, you’ll need a program to put it together in. You can use an image editing program like Photoshop if you have one, but if you don’t you can check out these free thumbnail makers.
Here are some examples of popular thumbnail styles.

1. The Classic Thumbnail (Photo or Screenshot)
A photo that shows what happens in your video – whether that means the finished ‘look’ from your makeup tutorial or you posing in front of the landmark you shot your travel vlog in front of – is a great way to let viewers know what to expect. While curiosity can be a big motive behind clicking on a video thumbnail (or anything online), when people have searched for a specific topic they want to be convinced that your video has what they’re looking for.
#1. Choose Your Photo
To start off, either choose a still frame from your video or take a photograph while you’re still set up from your video. A separate photograph is usually a better idea because your video editor might not be able to export a high-quality snapshot, and also because you’re able to choose your facial expression.
Aim to make this shot a close-up or medium close-up and make sure you’re either in the center of the screen or off to one side, as per the ‘rule of thirds’. Many cameras allow you to bring an optional grid up onto your viewfinder. This will divide your screen into three equal segments both vertically and horizontally. Try to make sure your eyes line up with the top line, and if you’re going to be off to one side then make sure you’re on one of the vertical lines. This will ensure your image is visually appealing.
If you want to add text later, it’s a good idea to be off to one side.
Including your face is important for most types of YouTube videos. People are attracted to eye contact and are more likely to click on thumbnails that feature a face. Gamers might choose to use a picture of a video game character instead and it will have the same effect.
Some situations where it isn’t essential to include your face include tech reviews, where viewers will be more interested in seeing the product, and cooking videos where people are looking to be tempted by a yummy food pic.
#2. Add Text and/or Images
This part isn’t essential – in some cases, a photo is enough – but a lot of the thumbnails for the videos ranked highest in YouTube’s search results include either a couple of words of text, a simple graphic (i.e. an emoji), or both.
In some cases you might use text to make it clear what type of video you’ve made, i.e. ‘review’ or ‘tutorial’. It’s best to keep any text you use brief, but you could get a bit more descriptive and write something like ‘fall makeup tutorial’. Three words is probably the most you can get away with. Remember that your text will be shrunk down with the rest of your image; you need to make it big enough to read easily once it’s shrunk, and that means you don’t have a ton of room for text.
You should also avoid fonts that are harder to read. Fonts with a lot of curves can be harder to read, and you want to make sure you choose a color that stands out from your background. Yellow might work against black, but it probably won’t work against the beige wall of your sunny bedroom. Sans serif fonts tend to be best.
Another tactic used in successful thumbnails is to add small graphics, like emojis or small images (i.e. pumpkins for a Halloween video), which are related to your video’s content. As with text, you don’t want to overload your thumbnail with images, but they’re a great way to add something eye-catching that’s a bit different from competing thumbnails.
2. The Emotional Laser (Background + Face Reacting)
One increasingly popular style of YouTube thumbnail is what we’re going to call the ‘Emotional Laser’. It’s bright (like, blindingly bright), it communicates a clear feeling, and it creates high expectations for how exciting the video’s content is going to be.
The three main elements of the Emotional Laser thumbnail are a background (usually bright), your face on the right wearing an over-pronounced expression, and either the thing your expression is in reaction to (i.e. food, a product, the topic of your video in text) or reinforcement of your emotion (i.e an emoji or question marks) on the left.


#1. Ham It Up (Take Your Reaction Photo)
Take a high-quality photograph of yourself conveying strong emotion. Generally, you want to look extremely excited, disgusted, angry, or shocked depending on the theme of the video.
If there’s an object you want to include in your thumbnail, like a product you’ll be talking about, then it’s a good idea to hold it for this photo. Hold it to one side of your head, turn towards it slightly (but not so much that the camera can only see the side of your face) and put on the expression that’s supposed to be a reaction to the object.
It can be a good idea to take this photo in front of a solid color so you can remove the background easily with chroma key.
#2. Choose Your Background
Your background might be scenery, a solid color, or even the room you filmed the video in. Light or bright colors are popular. Make sure there’s nothing that will distract from your expression. If your background is a room, or anything else where there could be things like pictures hanging, you may want to add a blur effect in the next step.
#3. Put It Together
In your thumbnail maker or a program like Photoshop, you’ll need to put your photo and your background together. This will work differently depending on what program you use. If your program has a chroma key tool and your reaction photo was taken against a solid color then you can make that solid color transparent.
What if I don’t have a separate background? If you don’t have a background you want to use, but you still want your reaction to stand out the same way it would if you did, then you can use your photo editor’s blur tool to turn the normal background of your photo into something you can pop-out from.
#4. Add Extras (Text, Emojis, etc.)
If instead of an object you plan to fill the other side of your thumbnail with text, question marks, emojis, or some other graphic element then now is the time to add it.
Part 2: How to Upload a YouTube Thumbnail
When you upload a new video to YouTube, you will see a Custom thumbnail option under Video thumbnails after your upload is complete.
If you want to add a custom thumbnail to a video that’s already up, that’s easy too.
- Go to your Video Manager in the Creator Studio.
- Find the video you want to change the thumbnail for and click Edit next to it.
- Click Custom thumbnail on the right of the preview screen.
- Upload your thumbnail and click Save changes.
Remember when you’re uploading custom thumbnails that you need to use a .JPG, .GIF, .BMP, or .PNG image with an aspect ratio of 16:9 and that your file size has to be under 2MB.
YouTube recommends that thumbnail images have a resolution of 1280x720px, and you cannot upload an image with a width of less than 640 pixels.
Make sure that all of your thumbnails adhere to YouTube’s Community guidelines. Anything sexually suggestive, violent, or otherwise graphic could result in your video being age-restricted.
Part 3: YouTube Thumbnail Makers
You don’t have to go out and buy a photo editor like Photoshop to make custom video thumbnails (although it’s a good thing to use if you already have it). Here are two free online programs you can use instead:
Canva is an intuitive option with templates for Thumbnails, Channel Art, and other social media graphics. There are stock photos and graphics provided, but not all of them are free (paid options cost $1 each). Canva’s templates do tend to include paid resources, so you may want to use them mostly for their layouts or as inspiration and replace everything they provide with your own images.
Generally, using Canva is as easy as dragging and dropping things where you want them. You’ll be able to set the dimensions for your project so the image you export is a perfect size. Adding text and changing the size, font, or color is easy too.
Adobe Spark also has templates for channel art, and it’s also very easy to use. The first time you use it helpful notes will pop up to guide you through the process. Using templates is especially simple because you just click on the elements in the pre-made thumbnail and replace them with your own photos/text.
You can make changes to the colors in your Spark thumbnail easily by selecting a new color scheme or filter. You can even toggle through layouts easily. When you choose a new layout, Spark will rearrange all the pieces of your current thumbnail to align with the new layout so you can quickly see what it looks like instead of having to rebuild.
Click to check more YouTube thumbnail makers
Part 4: How to Make Thumbnails That Get Clicks (Without Clickbait!)
Here are the top 10 best practices for creating effective YouTube thumbnails:
#1. Show What Your Video Is About
Being mysterious and clickbaity can get you views, if you’re already big. For small YouTubers, it pays off to be clear about your video’s topic. You want people to click who want to watch the actual content of your video. Even if you manage to get some clicks by being mysterious, you’ll probably end up with low viewer retention because people are clicking away when they realize your video isn’t what they were looking for. That will make YouTube’s algorithm rank your video lower, and then even fewer people will find it.
If your video is a product review, show the product in the thumbnail and maybe even write ‘review’ on it. If your video is a makeup tutorial, show your face with the finished makeup and maybe even include pictures of the products you used. People want to know what they’re clicking on before they click.
#2. Use a Consistent Layout
As you grow, you’ll want people to be able to see one of your thumbnails and instantly know it’s yours. Building a recognizable brand is about consistency. Try to stick with one basic layout for all of your videos. You can still customize every individual thumbnail by using different facial expressions and different graphics, but try to use similar backgrounds, fonts, and general layouts (i.e. you to the right of the thumbnails, text to the left) over and over.
#3. Use Your Face
Why should people want to watch your videos? If the answer is ‘because I can teach them to create delicious food’ or ‘because they want to learn about the latest iPhone’ then your thumbnail should include that food or that iPhone.
If part of the reason people want to watch your videos is you – your personality and your sense of humor – then you should be in your thumbnail.
Viewers who are on YouTube because they like seeing a creator’s personality like to feel the presence of that personality in the video thumbnail, and eye contact naturally draws attention and clicks.
#4. Add Small Graphics
Adding small graphics, like emojis or hearts, to your thumbnail can help you stand out in a couple different ways. First, if they’re being compared to thumbnails that are just screenshots from the video, your thumbnails will look a lot more polished. Second, they’ll add a splash of color which can draw eyes to your video in a search where other thumbnails are not using those same colors.
#5. Your Text Should Be Huge
Your thumbnail will end up being a fraction of the size it is while you’re creating it in your thumbnail maker, and that means that any text you use will end up being shrunk down. You could probably type a six-word sentence in a size 18 font and have it look fine while you’re making your thumbnail, but after you upload it there’s no way people will be able to read it at a glance.
Aim for a huge font size, and 3 words or less (so your thumbnail doesn’t end up looking crowded).
#6. Check Out The Competition
Type your video’s title or topic into the search engine on YouTube and look at the thumbnails for the videos that come up. These are your competition. You want to make a thumbnail that is similar enough to what comes up that viewers know it’s on the same topic, but different enough that it stands out.
Generally, if most of the thumbnails have the same layout, you’ll want to mimic that layout. Where you can break from the crowd is in the colors, fonts, and graphics you use.
Part 5: Animated YouTube Thumbnails
Whether or not you upload a custom thumbnail to YouTube, YouTube’s A.I will choose what it thinks are the 3 juiciest seconds of your video (you cannot choose for yourself) and play them as a GIF-like animation when people mouseover your video thumbnails.
As of now, this only works in the Google Chrome desktop browser. Videos have to be at least 30 seconds long to get moving thumbnails.
Alright, now that you know everything about YouTube thumbnails, go make one! Tell us in the comments what you’re going to do to make your video thumbnails stand out.
Touch Up YouTube Videos with Effects & Elements in Filmora
As one of the most widely used video editing software in YouTube video editing, Filmora provides lots of templates and effects with an intuitive interface. Download the free trial version and get started now.
Richard Bennett
Richard Bennett is a writer and a lover of all things video.
Follow @Richard Bennett
Richard Bennett
Oct 26, 2023• Proven solutions
Search for any topic on YouTube and you’ll find thousands of videos. How do you decide which of them to watch? Thumbnails play a major role in what viewers decide to click on. They’re often more important than video titles.
Viewers click on thumbnails that both standout and feel relevant to their search. Your task when it comes to creating YouTube thumbnails is to make something that does both of those things while also maintaining your personal style.
- How to Make a YouTube Thumbnail
- How to Upload a YouTube Thumbnail
- YouTube Thumbnail Makers
- How to Make Thumbnails that Get Clicks (Without Clickbait!)
- Animated YouTube Thumbnails
Part 1: How to Make a YouTube Thumbnail
In order to create a custom video thumbnail, you’ll need a program to put it together in. You can use an image editing program like Photoshop if you have one, but if you don’t you can check out these free thumbnail makers.
Here are some examples of popular thumbnail styles.
1. The Classic Thumbnail (Photo or Screenshot)
A photo that shows what happens in your video – whether that means the finished ‘look’ from your makeup tutorial or you posing in front of the landmark you shot your travel vlog in front of – is a great way to let viewers know what to expect. While curiosity can be a big motive behind clicking on a video thumbnail (or anything online), when people have searched for a specific topic they want to be convinced that your video has what they’re looking for.
#1. Choose Your Photo
To start off, either choose a still frame from your video or take a photograph while you’re still set up from your video. A separate photograph is usually a better idea because your video editor might not be able to export a high-quality snapshot, and also because you’re able to choose your facial expression.
Aim to make this shot a close-up or medium close-up and make sure you’re either in the center of the screen or off to one side, as per the ‘rule of thirds’. Many cameras allow you to bring an optional grid up onto your viewfinder. This will divide your screen into three equal segments both vertically and horizontally. Try to make sure your eyes line up with the top line, and if you’re going to be off to one side then make sure you’re on one of the vertical lines. This will ensure your image is visually appealing.
If you want to add text later, it’s a good idea to be off to one side.
Including your face is important for most types of YouTube videos. People are attracted to eye contact and are more likely to click on thumbnails that feature a face. Gamers might choose to use a picture of a video game character instead and it will have the same effect.
Some situations where it isn’t essential to include your face include tech reviews, where viewers will be more interested in seeing the product, and cooking videos where people are looking to be tempted by a yummy food pic.
#2. Add Text and/or Images
This part isn’t essential – in some cases, a photo is enough – but a lot of the thumbnails for the videos ranked highest in YouTube’s search results include either a couple of words of text, a simple graphic (i.e. an emoji), or both.
In some cases you might use text to make it clear what type of video you’ve made, i.e. ‘review’ or ‘tutorial’. It’s best to keep any text you use brief, but you could get a bit more descriptive and write something like ‘fall makeup tutorial’. Three words is probably the most you can get away with. Remember that your text will be shrunk down with the rest of your image; you need to make it big enough to read easily once it’s shrunk, and that means you don’t have a ton of room for text.
You should also avoid fonts that are harder to read. Fonts with a lot of curves can be harder to read, and you want to make sure you choose a color that stands out from your background. Yellow might work against black, but it probably won’t work against the beige wall of your sunny bedroom. Sans serif fonts tend to be best.
Another tactic used in successful thumbnails is to add small graphics, like emojis or small images (i.e. pumpkins for a Halloween video), which are related to your video’s content. As with text, you don’t want to overload your thumbnail with images, but they’re a great way to add something eye-catching that’s a bit different from competing thumbnails.
2. The Emotional Laser (Background + Face Reacting)
One increasingly popular style of YouTube thumbnail is what we’re going to call the ‘Emotional Laser’. It’s bright (like, blindingly bright), it communicates a clear feeling, and it creates high expectations for how exciting the video’s content is going to be.
The three main elements of the Emotional Laser thumbnail are a background (usually bright), your face on the right wearing an over-pronounced expression, and either the thing your expression is in reaction to (i.e. food, a product, the topic of your video in text) or reinforcement of your emotion (i.e an emoji or question marks) on the left.
#1. Ham It Up (Take Your Reaction Photo)
Take a high-quality photograph of yourself conveying strong emotion. Generally, you want to look extremely excited, disgusted, angry, or shocked depending on the theme of the video.
If there’s an object you want to include in your thumbnail, like a product you’ll be talking about, then it’s a good idea to hold it for this photo. Hold it to one side of your head, turn towards it slightly (but not so much that the camera can only see the side of your face) and put on the expression that’s supposed to be a reaction to the object.
It can be a good idea to take this photo in front of a solid color so you can remove the background easily with chroma key.
#2. Choose Your Background
Your background might be scenery, a solid color, or even the room you filmed the video in. Light or bright colors are popular. Make sure there’s nothing that will distract from your expression. If your background is a room, or anything else where there could be things like pictures hanging, you may want to add a blur effect in the next step.
#3. Put It Together
In your thumbnail maker or a program like Photoshop, you’ll need to put your photo and your background together. This will work differently depending on what program you use. If your program has a chroma key tool and your reaction photo was taken against a solid color then you can make that solid color transparent.
What if I don’t have a separate background? If you don’t have a background you want to use, but you still want your reaction to stand out the same way it would if you did, then you can use your photo editor’s blur tool to turn the normal background of your photo into something you can pop-out from.
#4. Add Extras (Text, Emojis, etc.)
If instead of an object you plan to fill the other side of your thumbnail with text, question marks, emojis, or some other graphic element then now is the time to add it.
Part 2: How to Upload a YouTube Thumbnail
When you upload a new video to YouTube, you will see a Custom thumbnail option under Video thumbnails after your upload is complete.
If you want to add a custom thumbnail to a video that’s already up, that’s easy too.
- Go to your Video Manager in the Creator Studio.
- Find the video you want to change the thumbnail for and click Edit next to it.
- Click Custom thumbnail on the right of the preview screen.
- Upload your thumbnail and click Save changes.
Remember when you’re uploading custom thumbnails that you need to use a .JPG, .GIF, .BMP, or .PNG image with an aspect ratio of 16:9 and that your file size has to be under 2MB.
YouTube recommends that thumbnail images have a resolution of 1280x720px, and you cannot upload an image with a width of less than 640 pixels.
Make sure that all of your thumbnails adhere to YouTube’s Community guidelines. Anything sexually suggestive, violent, or otherwise graphic could result in your video being age-restricted.
Part 3: YouTube Thumbnail Makers
You don’t have to go out and buy a photo editor like Photoshop to make custom video thumbnails (although it’s a good thing to use if you already have it). Here are two free online programs you can use instead:
Canva is an intuitive option with templates for Thumbnails, Channel Art, and other social media graphics. There are stock photos and graphics provided, but not all of them are free (paid options cost $1 each). Canva’s templates do tend to include paid resources, so you may want to use them mostly for their layouts or as inspiration and replace everything they provide with your own images.
Generally, using Canva is as easy as dragging and dropping things where you want them. You’ll be able to set the dimensions for your project so the image you export is a perfect size. Adding text and changing the size, font, or color is easy too.
Adobe Spark also has templates for channel art, and it’s also very easy to use. The first time you use it helpful notes will pop up to guide you through the process. Using templates is especially simple because you just click on the elements in the pre-made thumbnail and replace them with your own photos/text.
You can make changes to the colors in your Spark thumbnail easily by selecting a new color scheme or filter. You can even toggle through layouts easily. When you choose a new layout, Spark will rearrange all the pieces of your current thumbnail to align with the new layout so you can quickly see what it looks like instead of having to rebuild.
Click to check more YouTube thumbnail makers
Part 4: How to Make Thumbnails That Get Clicks (Without Clickbait!)
Here are the top 10 best practices for creating effective YouTube thumbnails:
#1. Show What Your Video Is About
Being mysterious and clickbaity can get you views, if you’re already big. For small YouTubers, it pays off to be clear about your video’s topic. You want people to click who want to watch the actual content of your video. Even if you manage to get some clicks by being mysterious, you’ll probably end up with low viewer retention because people are clicking away when they realize your video isn’t what they were looking for. That will make YouTube’s algorithm rank your video lower, and then even fewer people will find it.
If your video is a product review, show the product in the thumbnail and maybe even write ‘review’ on it. If your video is a makeup tutorial, show your face with the finished makeup and maybe even include pictures of the products you used. People want to know what they’re clicking on before they click.
#2. Use a Consistent Layout
As you grow, you’ll want people to be able to see one of your thumbnails and instantly know it’s yours. Building a recognizable brand is about consistency. Try to stick with one basic layout for all of your videos. You can still customize every individual thumbnail by using different facial expressions and different graphics, but try to use similar backgrounds, fonts, and general layouts (i.e. you to the right of the thumbnails, text to the left) over and over.
#3. Use Your Face
Why should people want to watch your videos? If the answer is ‘because I can teach them to create delicious food’ or ‘because they want to learn about the latest iPhone’ then your thumbnail should include that food or that iPhone.
If part of the reason people want to watch your videos is you – your personality and your sense of humor – then you should be in your thumbnail.
Viewers who are on YouTube because they like seeing a creator’s personality like to feel the presence of that personality in the video thumbnail, and eye contact naturally draws attention and clicks.
#4. Add Small Graphics
Adding small graphics, like emojis or hearts, to your thumbnail can help you stand out in a couple different ways. First, if they’re being compared to thumbnails that are just screenshots from the video, your thumbnails will look a lot more polished. Second, they’ll add a splash of color which can draw eyes to your video in a search where other thumbnails are not using those same colors.
#5. Your Text Should Be Huge
Your thumbnail will end up being a fraction of the size it is while you’re creating it in your thumbnail maker, and that means that any text you use will end up being shrunk down. You could probably type a six-word sentence in a size 18 font and have it look fine while you’re making your thumbnail, but after you upload it there’s no way people will be able to read it at a glance.
Aim for a huge font size, and 3 words or less (so your thumbnail doesn’t end up looking crowded).
#6. Check Out The Competition
Type your video’s title or topic into the search engine on YouTube and look at the thumbnails for the videos that come up. These are your competition. You want to make a thumbnail that is similar enough to what comes up that viewers know it’s on the same topic, but different enough that it stands out.
Generally, if most of the thumbnails have the same layout, you’ll want to mimic that layout. Where you can break from the crowd is in the colors, fonts, and graphics you use.
Part 5: Animated YouTube Thumbnails
Whether or not you upload a custom thumbnail to YouTube, YouTube’s A.I will choose what it thinks are the 3 juiciest seconds of your video (you cannot choose for yourself) and play them as a GIF-like animation when people mouseover your video thumbnails.
As of now, this only works in the Google Chrome desktop browser. Videos have to be at least 30 seconds long to get moving thumbnails.
Alright, now that you know everything about YouTube thumbnails, go make one! Tell us in the comments what you’re going to do to make your video thumbnails stand out.
Touch Up YouTube Videos with Effects & Elements in Filmora
As one of the most widely used video editing software in YouTube video editing, Filmora provides lots of templates and effects with an intuitive interface. Download the free trial version and get started now.
Richard Bennett
Richard Bennett is a writer and a lover of all things video.
Follow @Richard Bennett
Channel Identity Made Simple: Discover the 10 Best Banner Maker Apps
Youtube Banners Makers: 10+ Online Tools to Create Channel Art
Richard Bennett
Mar 27, 2024• Proven solutions
If you want to have more fans on your YouTube channel, it becomes really important to make your channel more attractive and fresh. YouTube banner is one of the important factors which represents the style, quality, and taste of your channel. Fortunately, there are many tools on the market that can help you make attractive banners. Therefore, we have brought you 10+ best-known YouTube banner makers that can enhance the beauty of your channel with their exceptionally amazing features. We will also let you know how to make a YouTube banner. Let’s explore.
You may also like: How to add custom thumbnails to YouTube videos >>
- Part 1: YouTube Banner Dimensions You Should Know
- Part 2: How to Make a YouTube Banner with Canva for Free
- Part 3: 10+ Best YouTube Banner Makers
Part 1: YouTube Banner Dimensions You Should Know
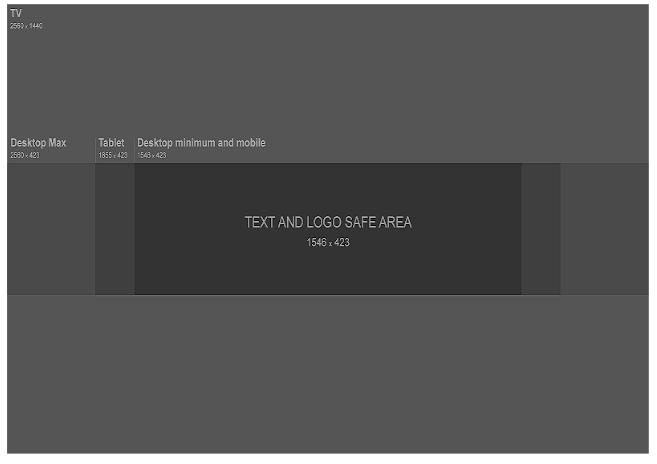
YouTube banner dimensions varied on different platforms, so you need to make the YouTube banner look great on desktop, tablet, and phone. According to Google , the recommended dimension is 2560 x 1440 px as the YouTube banner will be cropped if its size is too large. Minimum dimension is 2048 x 1152 px for uploading. The maximum width is 2560 x 423 px. The largest file size is 6MB. You can also add links to your own social media on YouTube banner, so it is a great place to recommend your other social media.
Part 2: How to Make a YouTube Banner with Canva for Free
There are so many tools that you can make a YouTube banner in the market, but it is not easy to find the right tool to make a banner if you can’t find the right tools. We have listed one way to make a YouTube banner below. You can use Wondershare Filmora to edit YouTube videos as it is designed to be a YouTube editor. Besides the basic editing including cropping/trimming and adding transitions, you can use it to add various text, more than 300 effects/filters, free audio, and more. It is also easy to make a YouTube intro. Download it to have a try!
Download Mac Version ](https://tools.techidaily.com/wondershare/filmora/download/ )
Step 1: Choose your template and layout
Canva is an online tool to make YouTube banner, so first you need to open it up . You are asked to log in.
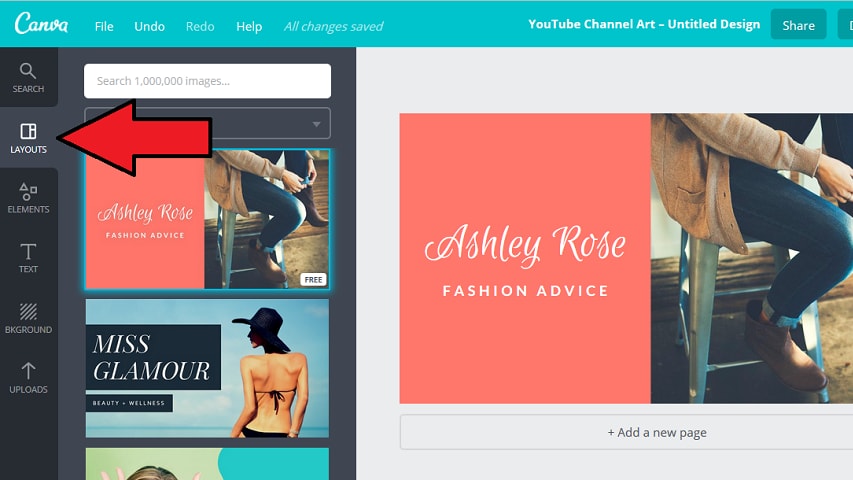
After you’ve signed up for Canva you will see a variety of different templates. Scroll through them until you find YouTube Channel Art under Social Media & Email Headers.
This template will be the right size for a YouTube banner, but it will not show you the ‘safe zones’. Your banner will show up differently depending on the screen a viewer is watching on. Click here to download YouTube’s official template, which displays safe zones. You will be able to use it as a reference.
And Canva also provides you with sample layouts that you can build off of. They will include stock photos and text. Most are free, but some might cost a dollar.
If the one you happen to like isn’t free, don’t worry. It’s actually just the specific stock images being used in the example that cost money, and you’re probably planning on replacing those anyways.
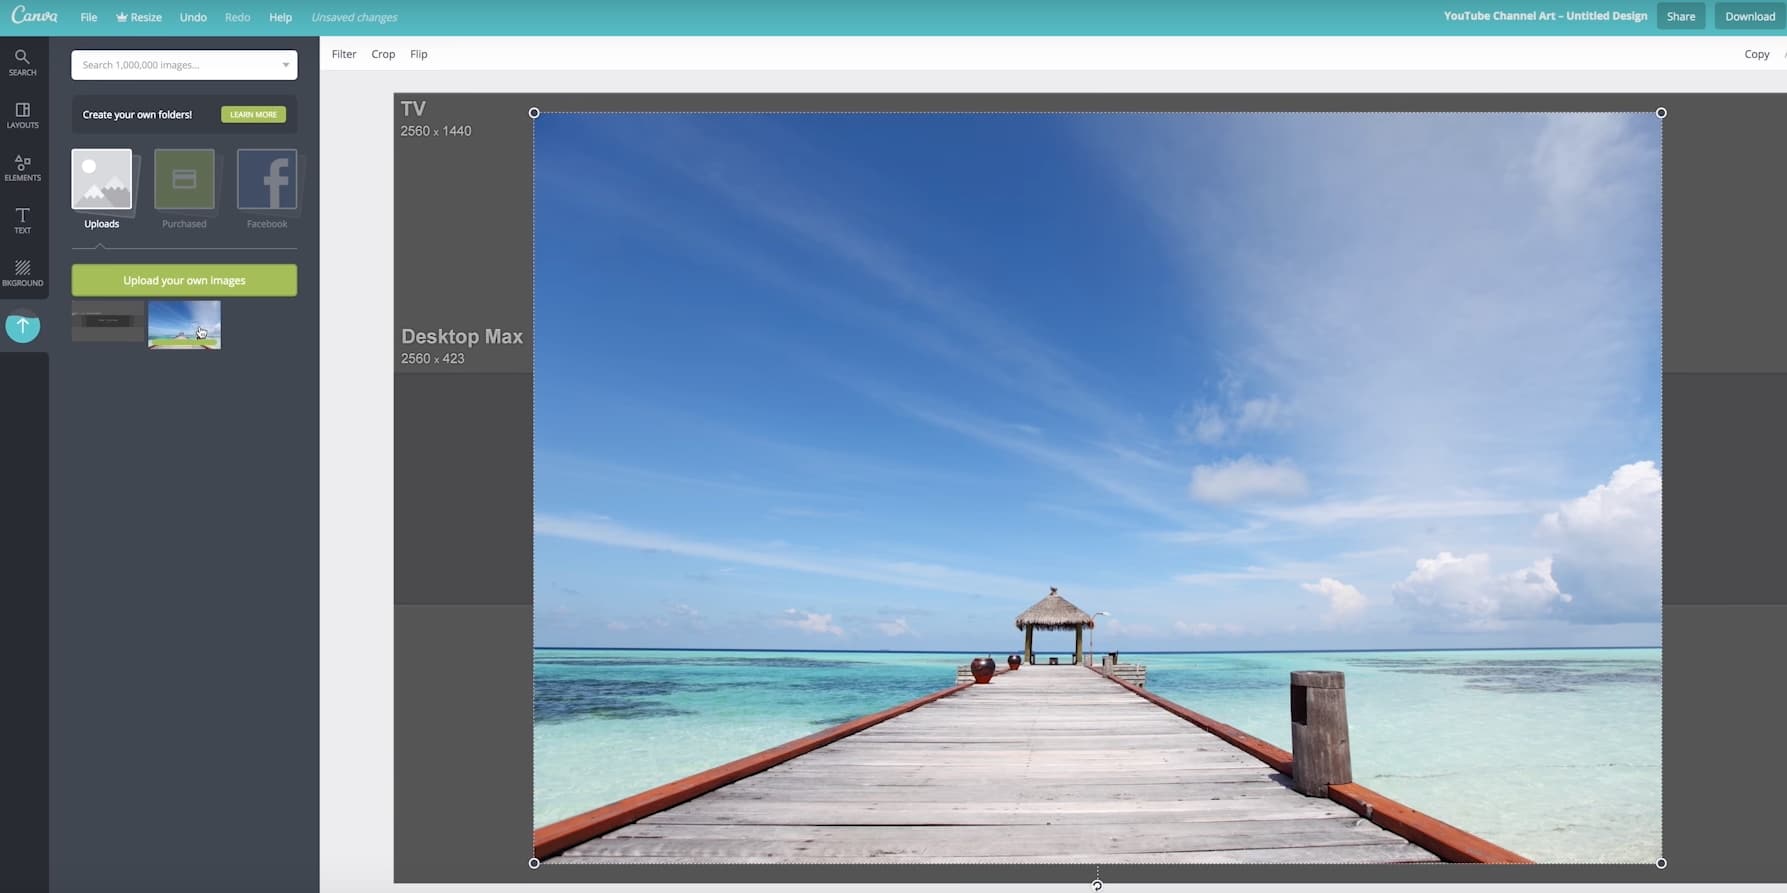
Step 2: Import your image
Canva provides a selection of stock images you can use for free. You can find them by clicking on Elements in the menu on the far left, and then clicking on Free Photos.
If you’d rather use your own images, click on Upload at the bottom of that same menu on the left. You’ll have the option of uploading images from your computer or importing them from Facebook.
After you have found the image you want to use or loaded it into Canva, click on it and it will appear in your layout.
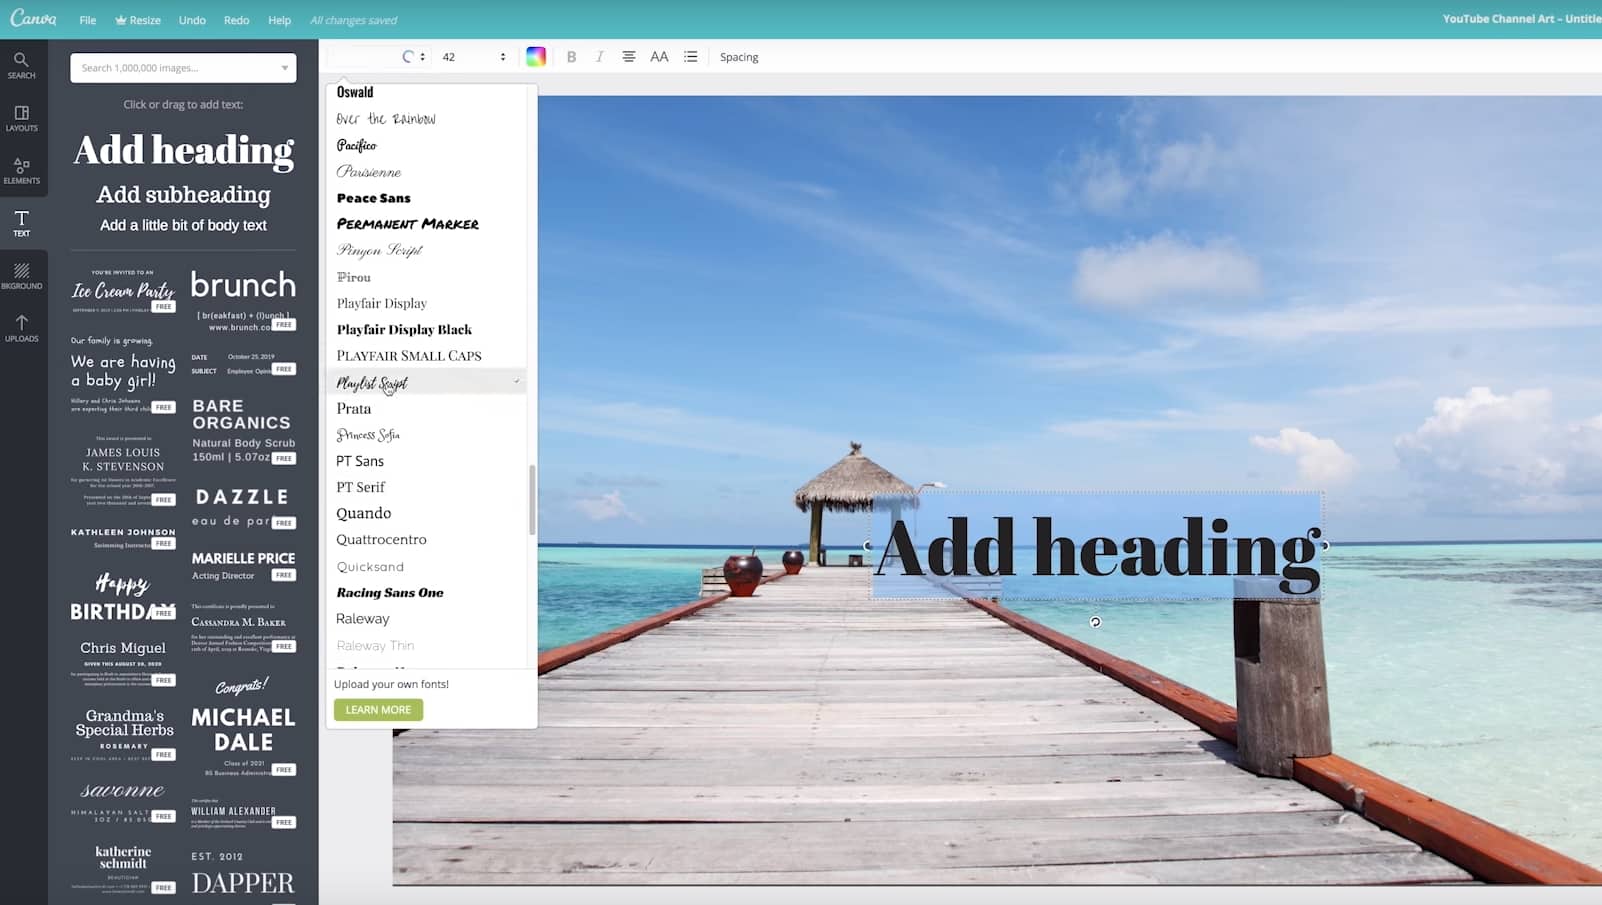
Step 3: Add text to YouTube banner
You can add various text after it is imported. There are lots of text templates in Canva, so just pick the one you like. You can also change text color and transparency to make it look great. Now to place it in the right position.
Step 4: Edit other elements
The layout you chose might include things like borders or backgrounds behind the text. You can change the colors of any of these just by clicking on them, then clicking on the color swatch in the top left corner of your design area.

Step 5: Download YouTube banner
Once you finish the editing, there is a download button in the top right corner of your screen. Click on it when you are finished to save your new channel art to your computer. It supports JPEG, PNG, and PDF. Now upload it to YouTube. So simple. Isn’t it?

Part 3: 10+ Best YouTube Banner Makers
1. Canva:
Canva is probably the most popular site for making channel art, for good reason. It has over 8000 templates for different kinds of graphics, including YouTube channel art, and there’s a huge variety of stock photos available either for free or $1. On Canva, creating your perfect banner is as easy as dragging and dropping images into a pre-built layout. Resizing is automatic, and you can flip/rotate or apply filters in just a few clicks
Pros: It contains millions of stock images, about 100 professional layouts, and lots of stunning filters.
Cons: Some high-quality images can be accessed only after payment of $1.
Price: The best thing to know is that this tool is available for free.
2. Wondershare PixStudio

Wondershare PixStudio is an all-in-one and powerful online graphic design maker for everyone. It has various types of templates for YouTube Thumbnails, Logos, Posters, etc. You can create a beautiful design by simply dragging and dropping the elements and photos. The online platform is free to use all templates, just One-Click to download your creations, and share to your Facebook, Instagram Story, and YouTube Thumbnails, etc. immediately.
Pros:
- Various types of templates
- Simple and Fast Design
- Background remover
Cons: The features of removing background be used after payment of $7.99 per month.
Price: The best thing to know is that this tool is available for free.
3. Fotor:
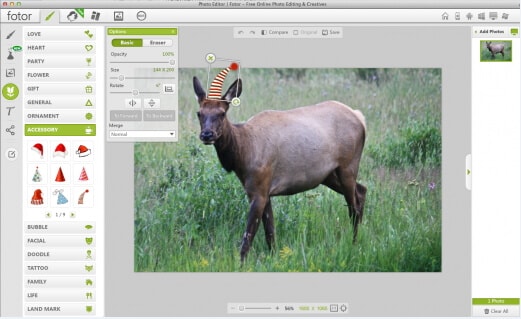
The makers of Fotor describe it as a ‘revolutionary photo editor and graphic designer’, and it is certainly a powerful tool. Fotor allows you to do a lot of fine editing on your photos – brightness, saturation, and color temperature are just a few of the things you can adjust – and its design feature is perfect for YouTube channel art.
Fotor has templates for YouTube channel art and a lot of fun sticker-like graphics. The Design interface is very similar to Canva, if slightly more complicated.
Pros: Complete art can be created within a few minutes and contains dozens of templates.
Cons: Little difficult to use for beginners.
Price: Free
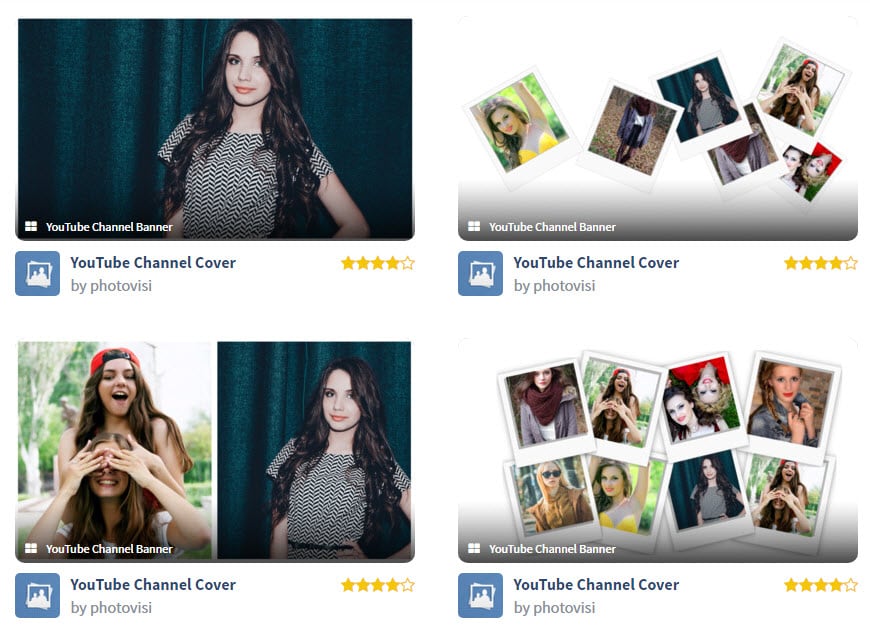
4. Photovisi:
It is a great source of inspiration for your YouTube channel where you can easily design, save and share your customized banner.
Pros: It automatically adjusts the size of the banner to the required format and is loaded with unlimited themes. Works on Android, Windows, Mac, and iOS.
Cons: Demand some special skills for usage.
Price: It is available for free at the official website
5. iKomee:
It is possible to have customized results for your YouTube banner designing using the iKomee platform where few minutes are enough to create wonders. It is one of the most loved tools of all professionals.
Pros: Contains lots of cool templates for channel art.
Cons: Limited themes and layouts.
Price: Available for free.

6. Banners Nack:
Here is one of the most wonderful YouTube banner maker for you that can be accessed online with easy to use interface where one can design animated, static HTML5 with interactive banner ads.
Pros: Professional, easy to use platform with rich quality fonts, stock images, and animated effects.
Cons: Little costly.
Price: Users can go ahead with premium plans where the basic plan is worth $12/month and a professional plan is $18/month with a business plan offer of $24 per month.
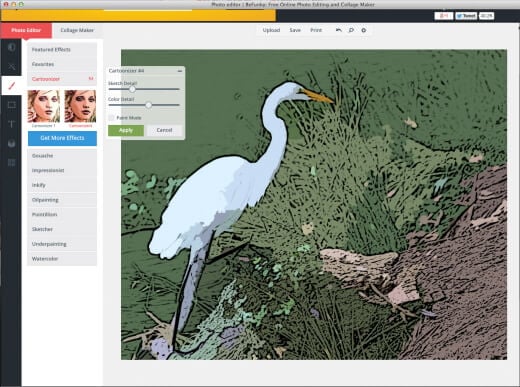
7. BeFunky:
BeFunky allows users to create meaningful banners for YouTube business building. The platform consists of numerous effortless options for banner designs and the drag and drops features make everything much easier. It is possible to boost traffic on your YouTube channel with this highly ranked banner maker.
Pros: Four-step banner-making process that can be followed by beginners too.
Cons: The uploading and downloading process takes more time due to heavy projects.
Price: Get started for free.
8. Picmonkey:
With PicMonkey.com you will be able to get customized, readymade banners with a perfect look. It is much easier to make selections for fonts, colors, and graphics with advanced templates here.
Pros: The best platform to enhance your creativity; users will be able to get perfect sharpness of quality.
Cons: File size is more for output banner and special features can be accessed only after payment.
Price: Free trial.
9. iPiccy:
The number of steps to be followed for designing a YouTube banner here completely depends upon your demand of end banner design type. Generally, four-step method is capable enough to provide you professional output with proper cropping dimensions and small file size for download
Pros: Various additional features are available like adding text etc so that highly customized designs can be created for YouTube Banners.
Cons: Demands more time of the user for making quality banner.
Price: Get started for free within a few seconds.
10. Adobe Spark:
Adobe Spark is one of the amazing online YouTube banner makers that helps you create the desired banner for your YouTube channel with ease. All that you need to do is browse to the site and pick the ‘YouTube channel art’ option to get the YouTube banner of the right size, though there are other options as well. Due to its easily customizable features, you can alter or change the background completely and try different color combinations to match your brand’s logo.
Pros:
- The drag-n-drop feature of Adobe Spark enables you to craft eye-catching and engaging banners effortlessly.
- Adobe Spark offers you the freedom to experiment with unlimited alterations in alignments, text, layouts, and themes like a trusted YouTube banner creator.
Cons: Though Adobe Spark is free, it annoys the users when it automatically adds Adobe Spark’s watermark logo to your creation. To get it removed, you must be an active subscriber of Adobe products.

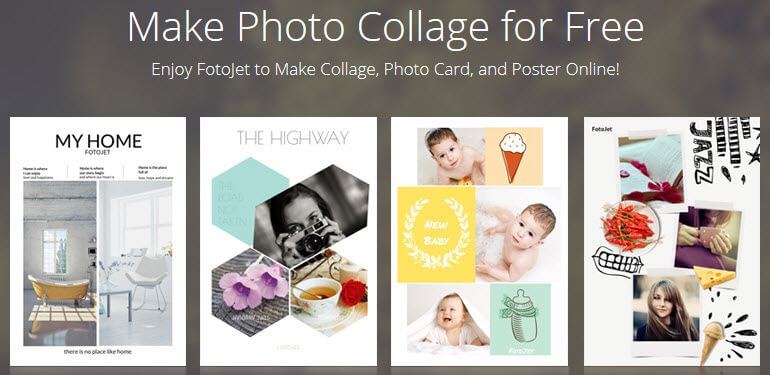
11. Fotojet:
FotoJet being a reliable YouTube banner maker assists you in creating personalized banners using numerous free templates. You get hold of interesting YouTube banner without toiling with the intricacies of graphic designing. Impressing your visitors with your unique and brand new banner from FotoJet YouTube banner creator is class apart.
Pros: It offers you the flexibility to add anything and everything on your channel art and upload it on YouTube right away.
Cons: Similar to Adobe Spark, FotoJet too adds a watermark logo of its name to your creation which is again a bit of nuisance.
Conclusion
Want to make your YouTube video more attractive and beautiful? Wondershare Filmora is such video editing software designed for YouTube creators. It not only allows you to cut, trim, crop, zoom, reverse, rotate the video clips, but also makes the advanced features like green screen, PIP, tilt-shift, and mosaic easy like a piece of cake. With Wondershare Filmora, you can ignite your YouTube videos with over 300 effects like Fashion, Beauty, BlockBuster, Travel, etc.
Richard Bennett
Richard Bennett is a writer and a lover of all things video.
Follow @Richard Bennett
Richard Bennett
Mar 27, 2024• Proven solutions
If you want to have more fans on your YouTube channel, it becomes really important to make your channel more attractive and fresh. YouTube banner is one of the important factors which represents the style, quality, and taste of your channel. Fortunately, there are many tools on the market that can help you make attractive banners. Therefore, we have brought you 10+ best-known YouTube banner makers that can enhance the beauty of your channel with their exceptionally amazing features. We will also let you know how to make a YouTube banner. Let’s explore.
You may also like: How to add custom thumbnails to YouTube videos >>
- Part 1: YouTube Banner Dimensions You Should Know
- Part 2: How to Make a YouTube Banner with Canva for Free
- Part 3: 10+ Best YouTube Banner Makers
Part 1: YouTube Banner Dimensions You Should Know
YouTube banner dimensions varied on different platforms, so you need to make the YouTube banner look great on desktop, tablet, and phone. According to Google , the recommended dimension is 2560 x 1440 px as the YouTube banner will be cropped if its size is too large. Minimum dimension is 2048 x 1152 px for uploading. The maximum width is 2560 x 423 px. The largest file size is 6MB. You can also add links to your own social media on YouTube banner, so it is a great place to recommend your other social media.
Part 2: How to Make a YouTube Banner with Canva for Free
There are so many tools that you can make a YouTube banner in the market, but it is not easy to find the right tool to make a banner if you can’t find the right tools. We have listed one way to make a YouTube banner below. You can use Wondershare Filmora to edit YouTube videos as it is designed to be a YouTube editor. Besides the basic editing including cropping/trimming and adding transitions, you can use it to add various text, more than 300 effects/filters, free audio, and more. It is also easy to make a YouTube intro. Download it to have a try!
Download Mac Version ](https://tools.techidaily.com/wondershare/filmora/download/ )
Step 1: Choose your template and layout
Canva is an online tool to make YouTube banner, so first you need to open it up . You are asked to log in.
After you’ve signed up for Canva you will see a variety of different templates. Scroll through them until you find YouTube Channel Art under Social Media & Email Headers.
This template will be the right size for a YouTube banner, but it will not show you the ‘safe zones’. Your banner will show up differently depending on the screen a viewer is watching on. Click here to download YouTube’s official template, which displays safe zones. You will be able to use it as a reference.
And Canva also provides you with sample layouts that you can build off of. They will include stock photos and text. Most are free, but some might cost a dollar.
If the one you happen to like isn’t free, don’t worry. It’s actually just the specific stock images being used in the example that cost money, and you’re probably planning on replacing those anyways.
Step 2: Import your image
Canva provides a selection of stock images you can use for free. You can find them by clicking on Elements in the menu on the far left, and then clicking on Free Photos.
If you’d rather use your own images, click on Upload at the bottom of that same menu on the left. You’ll have the option of uploading images from your computer or importing them from Facebook.
After you have found the image you want to use or loaded it into Canva, click on it and it will appear in your layout.
Step 3: Add text to YouTube banner
You can add various text after it is imported. There are lots of text templates in Canva, so just pick the one you like. You can also change text color and transparency to make it look great. Now to place it in the right position.
Step 4: Edit other elements
The layout you chose might include things like borders or backgrounds behind the text. You can change the colors of any of these just by clicking on them, then clicking on the color swatch in the top left corner of your design area.
Step 5: Download YouTube banner
Once you finish the editing, there is a download button in the top right corner of your screen. Click on it when you are finished to save your new channel art to your computer. It supports JPEG, PNG, and PDF. Now upload it to YouTube. So simple. Isn’t it?
Part 3: 10+ Best YouTube Banner Makers
1. Canva:
Canva is probably the most popular site for making channel art, for good reason. It has over 8000 templates for different kinds of graphics, including YouTube channel art, and there’s a huge variety of stock photos available either for free or $1. On Canva, creating your perfect banner is as easy as dragging and dropping images into a pre-built layout. Resizing is automatic, and you can flip/rotate or apply filters in just a few clicks
Pros: It contains millions of stock images, about 100 professional layouts, and lots of stunning filters.
Cons: Some high-quality images can be accessed only after payment of $1.
Price: The best thing to know is that this tool is available for free.
2. Wondershare PixStudio
Wondershare PixStudio is an all-in-one and powerful online graphic design maker for everyone. It has various types of templates for YouTube Thumbnails, Logos, Posters, etc. You can create a beautiful design by simply dragging and dropping the elements and photos. The online platform is free to use all templates, just One-Click to download your creations, and share to your Facebook, Instagram Story, and YouTube Thumbnails, etc. immediately.
Pros:
- Various types of templates
- Simple and Fast Design
- Background remover
Cons: The features of removing background be used after payment of $7.99 per month.
Price: The best thing to know is that this tool is available for free.
3. Fotor:
The makers of Fotor describe it as a ‘revolutionary photo editor and graphic designer’, and it is certainly a powerful tool. Fotor allows you to do a lot of fine editing on your photos – brightness, saturation, and color temperature are just a few of the things you can adjust – and its design feature is perfect for YouTube channel art.
Fotor has templates for YouTube channel art and a lot of fun sticker-like graphics. The Design interface is very similar to Canva, if slightly more complicated.
Pros: Complete art can be created within a few minutes and contains dozens of templates.
Cons: Little difficult to use for beginners.
Price: Free
4. Photovisi:
It is a great source of inspiration for your YouTube channel where you can easily design, save and share your customized banner.
Pros: It automatically adjusts the size of the banner to the required format and is loaded with unlimited themes. Works on Android, Windows, Mac, and iOS.
Cons: Demand some special skills for usage.
Price: It is available for free at the official website
5. iKomee:
It is possible to have customized results for your YouTube banner designing using the iKomee platform where few minutes are enough to create wonders. It is one of the most loved tools of all professionals.
Pros: Contains lots of cool templates for channel art.
Cons: Limited themes and layouts.
Price: Available for free.
6. Banners Nack:
Here is one of the most wonderful YouTube banner maker for you that can be accessed online with easy to use interface where one can design animated, static HTML5 with interactive banner ads.
Pros: Professional, easy to use platform with rich quality fonts, stock images, and animated effects.
Cons: Little costly.
Price: Users can go ahead with premium plans where the basic plan is worth $12/month and a professional plan is $18/month with a business plan offer of $24 per month.
7. BeFunky:
BeFunky allows users to create meaningful banners for YouTube business building. The platform consists of numerous effortless options for banner designs and the drag and drops features make everything much easier. It is possible to boost traffic on your YouTube channel with this highly ranked banner maker.
Pros: Four-step banner-making process that can be followed by beginners too.
Cons: The uploading and downloading process takes more time due to heavy projects.
Price: Get started for free.
8. Picmonkey:
With PicMonkey.com you will be able to get customized, readymade banners with a perfect look. It is much easier to make selections for fonts, colors, and graphics with advanced templates here.
Pros: The best platform to enhance your creativity; users will be able to get perfect sharpness of quality.
Cons: File size is more for output banner and special features can be accessed only after payment.
Price: Free trial.
9. iPiccy:
The number of steps to be followed for designing a YouTube banner here completely depends upon your demand of end banner design type. Generally, four-step method is capable enough to provide you professional output with proper cropping dimensions and small file size for download
Pros: Various additional features are available like adding text etc so that highly customized designs can be created for YouTube Banners.
Cons: Demands more time of the user for making quality banner.
Price: Get started for free within a few seconds.
10. Adobe Spark:
Adobe Spark is one of the amazing online YouTube banner makers that helps you create the desired banner for your YouTube channel with ease. All that you need to do is browse to the site and pick the ‘YouTube channel art’ option to get the YouTube banner of the right size, though there are other options as well. Due to its easily customizable features, you can alter or change the background completely and try different color combinations to match your brand’s logo.
Pros:
- The drag-n-drop feature of Adobe Spark enables you to craft eye-catching and engaging banners effortlessly.
- Adobe Spark offers you the freedom to experiment with unlimited alterations in alignments, text, layouts, and themes like a trusted YouTube banner creator.
Cons: Though Adobe Spark is free, it annoys the users when it automatically adds Adobe Spark’s watermark logo to your creation. To get it removed, you must be an active subscriber of Adobe products.
11. Fotojet:
FotoJet being a reliable YouTube banner maker assists you in creating personalized banners using numerous free templates. You get hold of interesting YouTube banner without toiling with the intricacies of graphic designing. Impressing your visitors with your unique and brand new banner from FotoJet YouTube banner creator is class apart.
Pros: It offers you the flexibility to add anything and everything on your channel art and upload it on YouTube right away.
Cons: Similar to Adobe Spark, FotoJet too adds a watermark logo of its name to your creation which is again a bit of nuisance.
Conclusion
Want to make your YouTube video more attractive and beautiful? Wondershare Filmora is such video editing software designed for YouTube creators. It not only allows you to cut, trim, crop, zoom, reverse, rotate the video clips, but also makes the advanced features like green screen, PIP, tilt-shift, and mosaic easy like a piece of cake. With Wondershare Filmora, you can ignite your YouTube videos with over 300 effects like Fashion, Beauty, BlockBuster, Travel, etc.
Richard Bennett
Richard Bennett is a writer and a lover of all things video.
Follow @Richard Bennett
Also read:
- In 2024, Constructive Communication Leads to More Subscribers
- [Updated] Audiophiles Recommend Top 5 Headset Choices
- Tips for Preventing Invisible Thumbnails on Shorts Videos
- 2024 Approved A Fresh Take on Frigidity Crafting Inviting Backdrops
- Essential Guide for Prime Webcams in YouTube Live Broadcasts
- 2024 Approved Elevate Your Channel's Aesthetics - Free Banners Available
- Rip & Save The Best YouTube Download Software
- [Updated] Essential List of Free Rippers For Video Conversion
- 2024 Approved Channel Branding Made Simple & Free
- Multimedia Caption Compiler
- Lead With Originality 10 Tips to Make Your YT Shorts Shine
- [New] Creating Captivating Visuals with DIY Filming Methods
- Effortless Online Audio Accessibility Ideal Tools for iPhone & YouTube
- 2024 Approved Dominate Search Results Essential Tips for Optimizing YouTube Videos
- 2024 Approved Content Distribution Showdown Vimeo vs YouTubes and DailyMotions
- Creative Vlog Ideas for Daily Use
- [New] Elevating Video View Count Top Hashtag Trends Guide
- Bridging Gaps Transforming Trend Data Into Video Concepts for 2024
- Channel-Building Through Characters and Plot Twists
- Enhancing Viewership with Informative YouTube Video Captions for 2024
- Incorporating YouTube's Video Content on Your Domain
- Charting Your Path to YouTube Affiliate Status with 10K Vistas Goal for 2024
- Tailored Video Dimensions Across Platforms
- Creating High-Impact YT Cover Images
- [New] Educational Gaming Content on YouTube
- Top 10 Tools for YouTube to WebM Conversion
- Chuckle Fest The Ultimate List of Hilarious YouTube Personalities
- 1-5 Best URL Trimmer Tools for YouTube Videos
- Leading 8 Channels Accelerating Video Views
- How to Avoid and Reverse Strikes on Your YouTube Channel
- Becoming a YouTube Guru Essential Production Know-How
- 2024 Approved Easy Extraction Top 10 YouTube Text Grabber Apps Reviewed
- The Ultimate Guide to Transforming Your Youtube Channel via WireCast
- In 2024, Cutting Through the Noise Optimal Thumbnail Sizes
- Boost Channels to Partner Status in Under 90 Days, Start Now
- [Updated] Boosting YouTube Income Using Studio Anywhere, Anyhow
- Turning Screen Time Into Cash The YouTube Way
- Discover the Best 12 Free and Paid Video Game Openings for YT
- Boosting Channels' Growth Strategies for Effective Trailers for 2024
- [Updated] Digital Cinematographer Hub
- Updated In 2024, How to Color Grading in Final Cut Pro
- Liberate Yourself with FREE MOVIE PLAYER Software
- How To Track IMEI Number Of Xiaomi 13 Ultra Through Google Earth?
- [New] Unlock Your FB Videos - Instant MP4 Download
- [Updated] Your Roadmap to Acquiring Facebook’s Esteemed Verification
- Updated How to Calculate Display Resolution Ratios with Ease for 2024
- In 2024, How to Unlock Vivo S17t Pattern Lock if Forgotten? 6 Ways
- 2024 Approved Breaking Barriers Twitter-to-Facebook Posting Process
- Ways To Find Unlocking Codes For Oppo Reno 10 5G Phones
- [New] 2024 Approved Instagram Edge Techniques for Effective Video Cropping and Exporting
- Updated 2024 Approved Put Music Over a Video
- 3 Facts You Need to Know about Screen Mirroring Xiaomi Redmi 12 5G | Dr.fone
- New In 2024, Free Online DAW Options Ranking the Most Convenient and Cost-Effective Tools
- Updated In 2024, Discovering the Top 5 Audio Mixers Perfect for Mac Users
- [New] Optimal Video Recorder TikTok Downloads as High-Quality MP4s
- Game Capture Made Easy with 5 Methods on Windows 11
- [New] In 2024, Godly Onslaught Ragnarok’s Day
- [New] Circle Construction in Minecraft The Ultimate Guide
- New Gaming Made Easy 3 Simple Video Game Recording Options for 2024
- [New] In 2024, Premium Mac Capture Software Substitutes for Bandicam
- New In 2024, Your Guide to Androids Favorite Voice Modification Applications
- [Updated] 2024 Approved Cutting Edge Strategies for Efficient Speech Translation with Google
- Ultimate Aiff Converter Selection Blueprint for 2024
- [New] Innovative VFX Equipment for Eco Warriors for 2024
- [New] Paving the Pathway to Popularity Thriving on Instagram
- [Updated] In 2024, Premium Editing Platform Tailored to Vimeo
- [New] 2024 Approved Twist Tactics Achieving Angles That Stand Out on Social Media
- [Updated] Amazon Prime Hits Twitter's Trendiest Watchers & Lovers
- [Updated] Unlock the Potential of Your Channels with Our Guide to Discord Broadcasting
- [New] In 2024, SocialSnatcher Grab and Save Twitter Vids in a Flash
- Useful Tips How Can You Use Voxal Voice Changer on Discord for 2024
- Capture the Essence Two Effective Ways to Create Time Lapse Videos That Impress for 2024
- [New] Ad Innovations What to Expect From Facebook for 2024
- [Updated] Crafting Captivating Chronicles The World's Best Schools (Top 8)
- The Essential Guide to Mastering YouTube Video Content Structure with Chapters
- How To Repair iOS System Issues of iPhone XR? | Dr.fone
- [Updated] 2024 Approved Speed in Seizing Picture + Pitch
- [New] The A-List Playbook Swiftly Climb the Social Ladder on Instagram with These Essentials
- [Updated] In 2024, Elevate Your Visual Communication Adding Instagram Video Descriptions
- How to identify some outdated your hardware drivers with Windows Device Manager in Windows 10
- Title: [New] Decoding YouTube's Thumbnail Impact on Traffic
- Author: Brian
- Created at : 2024-05-25 12:35:43
- Updated at : 2024-05-26 12:35:43
- Link: https://youtube-video-recordings.techidaily.com/new-decoding-youtubes-thumbnail-impact-on-traffic/
- License: This work is licensed under CC BY-NC-SA 4.0.
