
!["[New] Creative Components FREE YouTube Visual Resources"](https://www.lifewire.com/thmb/dUT4PgROTFbL62vW7fTE8PtcF7k=/400x300/filters:no_upscale():max_bytes(150000):strip_icc()/how-to-fix-it-when-theres-no-sound-on-fire-stick-f248a020eb424349acc82c507c4e958e.jpg)
"[New] Creative Components FREE YouTube Visual Resources"
Creative Components: FREE YouTube Visual Resources
Free YouTube Channel Art Templates - Find Them Here

Richard Bennett
Oct 26, 2023• Proven solutions
Looking for free YouTube channel art templates? Good channel art can be the difference between a visitor to your channel thinking of you as a YouTuber instead of just someone who posted a few videos. Branding your channel with a banner doesn’t only make your channel look nicer, it makes you look like you’re serious about YouTube.
Here are 7 places where you can find templates for YouTube channel art.
1. 50 Free Banner Art Templates from Filmora
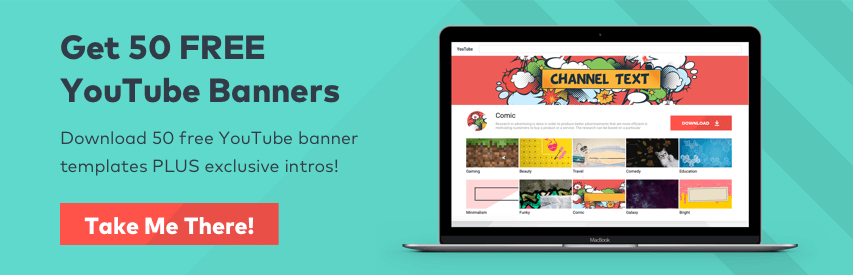
You can download 50 free YouTube channel art templates right here on filmora.io. We have 10 categories of banners: gaming, beauty, travel, comedy, education, minimalist, funky, comics, galaxy, and bright. There’s something for everyone.


You will have the option of downloading either PSD files you can edit in Photoshop, or PNG files you can customize in a free online program like Canva.com. Click here (link) to learn more and download your free channel art templates.
2. Canva
Phil from Video School Online’s Canva tutorial.
Canva is a free online program you can use to create all kinds of graphics easily (learn how to use Canva here ), and they even have templates you can use to make YouTube channel art. Using a template on Canva is as easy as clicking on the one you want and then dragging and dropping in your own images (if you don’t want to use theirs) and changing what the text says.
Although Canva is free to use, and includes many free options for graphics and stock photos, it does also have some premium images and clip art which cost $1 each to use. Making a free banner is as easy as making sure none of the paid elements are in your design (they’re watermarked, so you’ll know).
3. Wondershare PixStudio
Wondershare PixStudio is an all-in-one and powerful online graphic design maker for everyone. It has various types of templates for YouTube Thumbnails, Logos, Posters, etc. You can create a beautiful design by simply dragging and dropping the elements and photos. The online platform is free to use all templates, just One-Click to download your creations and share to your Facebook, Instagram Story, and YouTube Thumbnails, etc. immediately.
PixStudio has special features to remove the image background. With a single click, you can quickly remove the image background, and use your image with more flexibility. Just payment of $7.99 per month to use the features.
4. Fotor
In the above video, YouTuber BBelleGames walks you through all of the features you can use to build your channel art in Fotor.
Fotor is another free online drag-n-drop program with YouTube channel art templates. You can create your banner with Fotor in 4 steps. First open the Design feature and choose a template. Second, either choose a design or build one from scratch. Third, overlay images and any text you want over your background. Finally, save your banner and choose a format to export it in.
The free version of Fotor will work well enough for most YouTubers, but you can also upgrade to their paid Pro program to unlock more content and features.
5. Visme
Visme offers 50 YouTube channel art templates which you can customize the text of for free. You just create a free account, choose the template that best suits your channel, insert your own text and edit that text’s font and color.
6. YourTube
YourTube has a ton of really nice looking channel art templates you can download for free. The downloads include both PSD (Photoshop) files and the background images without text. This is great because you’ll have an editable file you can build on in Photoshop, if you have it, and an image file you can use in combination with a free service like Canva if you don’t.
7. Banner Snack
Banner Snack is for all kinds of social media graphics from YouTube channel art to Twitter headers. It’s a high quality service that’s been used by a lot of major brands, like Lego and Xerox. The only downside of Banner Snack is that their free service is limited and has a watermark. You need to be paying at least $7 per month in order to get rid of the watermark.
Let us know if you know anywhere else to get free YouTube channel art templates!
Richard Bennett
Richard Bennett is a writer and a lover of all things video.
Follow @Richard Bennett
Richard Bennett
Oct 26, 2023• Proven solutions
Looking for free YouTube channel art templates? Good channel art can be the difference between a visitor to your channel thinking of you as a YouTuber instead of just someone who posted a few videos. Branding your channel with a banner doesn’t only make your channel look nicer, it makes you look like you’re serious about YouTube.
Here are 7 places where you can find templates for YouTube channel art.
1. 50 Free Banner Art Templates from Filmora
You can download 50 free YouTube channel art templates right here on filmora.io. We have 10 categories of banners: gaming, beauty, travel, comedy, education, minimalist, funky, comics, galaxy, and bright. There’s something for everyone.
You will have the option of downloading either PSD files you can edit in Photoshop, or PNG files you can customize in a free online program like Canva.com. Click here (link) to learn more and download your free channel art templates.
2. Canva
Phil from Video School Online’s Canva tutorial.
Canva is a free online program you can use to create all kinds of graphics easily (learn how to use Canva here ), and they even have templates you can use to make YouTube channel art. Using a template on Canva is as easy as clicking on the one you want and then dragging and dropping in your own images (if you don’t want to use theirs) and changing what the text says.
Although Canva is free to use, and includes many free options for graphics and stock photos, it does also have some premium images and clip art which cost $1 each to use. Making a free banner is as easy as making sure none of the paid elements are in your design (they’re watermarked, so you’ll know).
3. Wondershare PixStudio
Wondershare PixStudio is an all-in-one and powerful online graphic design maker for everyone. It has various types of templates for YouTube Thumbnails, Logos, Posters, etc. You can create a beautiful design by simply dragging and dropping the elements and photos. The online platform is free to use all templates, just One-Click to download your creations and share to your Facebook, Instagram Story, and YouTube Thumbnails, etc. immediately.
PixStudio has special features to remove the image background. With a single click, you can quickly remove the image background, and use your image with more flexibility. Just payment of $7.99 per month to use the features.
4. Fotor
In the above video, YouTuber BBelleGames walks you through all of the features you can use to build your channel art in Fotor.
Fotor is another free online drag-n-drop program with YouTube channel art templates. You can create your banner with Fotor in 4 steps. First open the Design feature and choose a template. Second, either choose a design or build one from scratch. Third, overlay images and any text you want over your background. Finally, save your banner and choose a format to export it in.
The free version of Fotor will work well enough for most YouTubers, but you can also upgrade to their paid Pro program to unlock more content and features.
5. Visme
Visme offers 50 YouTube channel art templates which you can customize the text of for free. You just create a free account, choose the template that best suits your channel, insert your own text and edit that text’s font and color.
6. YourTube
YourTube has a ton of really nice looking channel art templates you can download for free. The downloads include both PSD (Photoshop) files and the background images without text. This is great because you’ll have an editable file you can build on in Photoshop, if you have it, and an image file you can use in combination with a free service like Canva if you don’t.
7. Banner Snack
Banner Snack is for all kinds of social media graphics from YouTube channel art to Twitter headers. It’s a high quality service that’s been used by a lot of major brands, like Lego and Xerox. The only downside of Banner Snack is that their free service is limited and has a watermark. You need to be paying at least $7 per month in order to get rid of the watermark.
Let us know if you know anywhere else to get free YouTube channel art templates!
Richard Bennett
Richard Bennett is a writer and a lover of all things video.
Follow @Richard Bennett
Learn to Convert YouTube Videos Into Text – No Cost
How to Transcribe a YouTube Video for FREE
Richard Bennett
Mar 27, 2024• Proven solutions
If you want to transcribe your videos to make the dialogs and speeches available in text format, you can use YouTube Transcribe feature that the streaming site offers for free. In this article, I’ll share with you a couple of methods to transcribe a YouTube video for free.
- Part 1: Transcribe YouTube Video Automatically for Free [2 Ways]
- Part 2: Transcribe YouTube Video to Text Online with Third-Party Service
- Part 3: Benefits of Transcribing YouTube Videos
- Part 4: YouTube Video Transcription FAQs
Part 1: How to Transcribe YouTube Video Automatically for Free [2 Ways]
Besides the basic video editing features on the YouTube platform, you can now quickly transcribe YouTube videos to the text as well. The good thing is, you can either use the automatic transcription feature that YouTube offers, or upload it manually while adjusting the timing as you go further.
Below are the two methods to transcribe your YouTube videos for free:
Method 1: Use the Automated Transcription Service on YouTube
As the name suggests, YouTube automatic transcription service works automatically. This means you don’t even have to click the ‘Transcribe’ button anymore to transcribe a YouTube video, and the website takes care of it on its own. All you need to do is, choose English as the language of the video when setting up subtitles. You can follow the instructions given below to do so:
Step 1 Upload a Video
Sign in to your YouTube account, click your profile picture from the top-right corner, and click YouTube Studio from the menu. Next, click CREATE from the upper-right corner, click Upload videos from the menu, and drag and drop a video from your computer to the Upload videos box that appears next.

Step 2 Select Transcription Language
On the Details page of the next box that appears, scroll down and click MORE OPTIONS, and select English in the Video language drop-down list under the Language, subtitles, and closed captions (CC) section.

Step 3 Publish the Video
Follow the on-screen instructions from this point to publish the video, and wait while YouTube automatically transcribes and adds the close captions to it.
Note: Depending on the duration of the clip, the time YouTube would take to transcribe may vary.
After YouTube has transcribed the video, you can download the transcription file in your preferred format. The instructions are given below explain how you can do so:
- Get to the Subtitles Window
While on the YouTube Studio page, click Subtitles from the left pane to go to the Channel subtitles page. And then click the video you want to modify.
- Get to Classic Studio
In the video subtitle page of the target video, hover mouse on the Published Automatic status under the Subtitles column, click the Options icon (with three vertical dots) that appears, and click Edit on Classic Studio.

- Download Transcription File
Click and open the Actions drop-down list from the top-left corner of the left pane, click your preferred transcription format including .vtt, .srt and .sbv from the list, and save the file on your local hard disk.

Method 2: Get YouTube Transcription when Watching
In addition, if you are watching any other video, you can make YouTube transcribe that for you as well. You can follow the instructions given below to get the YouTube video to text transcription:
Step 1: Play the Video
Go to the video on YouTube and start playing it. Make sure NOT to get to full-screen mode as doing so would hide the option to transcribe the clip.
Step 2: Enable Transcription
Click the More icon (with three horizontal dots) from under the bottom-right corner of the video player, and click Open transcript to see the video transcription in the Transcript pane that appears in the right.
Step 3: Manage Timestamps
Click the Options icon (with three vertical dots) from the top-right corner of the Transcript pane, and click Toggle timestamp to enable or disable the timestamps in the video transcription.
Limitations of Using YouTube Transcribe
Although YouTube’s automatic transcription is a decent feature that saves you a lot of time, since Google uses machine learning algorithms to convert the speech to text, the level of accuracy may vary depending on the accent of the speaker, and the clarity of the audio the video has. Also, even sometime you may not be satisfied with the end-results.
Alternatively, you can use Kapwing to transcribe a YouTube video and download the transcription file with the below step-by-step instructions:
Step 1: Add YouTube Video
Copy the URL of YouTube video you want to transcribe, go to https://www.kapwing.com/subtitles , paste the URL in the Paste a URL field, wait while Kapwing fetches the content of the video, and opens the Add subtitles to Video page.
Step 2: Transcribe the Video
Click Auto-generate from the right window, and follow the on-screen instructions to transcribe YouTube video to text.

Step 3: Download the Transcription File
Click Download SRT from the left pane, and follow the instructions from there to download the transcription file in *.srt format.

Pros
- Kapwing is free to use
- The auto-transcription process is quick and less tedious
- Kapwing also allows manual transcription and uploading of an existing *.srt file
Cons
- The auto-transcribed text might lack accuracy as the task is done by the speech-to-text tools that work in the background
You can follow the step-by-step instructions to transcribe a YouTube video and download the transcription file using Kapwing:
Step 1: Add YouTube Video
Copy the URL of YouTube video you want to transcribe, go to https://www.kapwing.com/subtitles , paste the URL in the Paste a URL field, wait while Kapwing fetches the content of the video, and opens the Add subtitles to Video page.
Step 2: Transcribe the Video
Click Auto-generate from the right window, and follow the on-screen instructions to transcribe YouTube video to text.
Step 3: Download the Transcription File
Click Download SRT from the left pane, and follow the instructions from there to download the transcription file in *.srt format.
Pros
- Kapwing is free to use
- The auto-transcription process is quick and less tedious
- Kapwing also allows manual transcription and uploading of an existing *.srt file
Cons
- The auto-transcribed text might lack accuracy as the task is done by the speech-to-text tools that work in the background
Part 3: Benefits of Transcribing YouTube Videos
You may need video transcriptions for several reasons, such as analyzing the summary of the entire speech in the video, extracting a single phrase or quote that was spoken in the clip, or making the video helpful even for those suffering from hearing impairment. When you transcribe a YouTube video, the transcript can be useful in many ways. Some of the most common benefits of transcribing a video include:
- Search Engine Optimization
When you add subtitles, the text can appear in Google search results when someone types a similar phrase in the search box. This helps get more views to your videos, thus giving your channel popularity, and you, monetary gains in the long run.
- Accent
If the speaker in the video is from a different region and is using an accent that you are not much comfortable with, you can turn on the subtitles and read the dialogs along with the video.
- Repurposing on Blogs
If you own a blog that you have embedded your video to, the transcription could be used to add text to it so the target audience can get a fair idea of what the video is all about. This is useful because many people prefer reading over watching.
YouTube Video Transcription FAQs
1. How to Transcribe YouTube Video to Text
Usually the transcription files have *.srt extension that are globally accepted and supported by almost all media players. However, there might be instances when you want to have the subtitles in plain text.
That said, to convert an SRT file to TXT, you can:
- Right-click the SRT file
- Go to Rename
- Replace srt with txt and press Enter
- Click OK on the confirmation box that appears next to convert SRT to TXT
After this, you can simply double-click the file, and read and modify the transcribed content as needed.
2. How to Edit and Upload Edited Transcript to YouTube
If you made any modifications to the transcript that was automatically generated by YouTube or any other third-party transcription tool, you can follow the steps given below to upload the new file to the YouTube video:
- Go to YouTube Studio and then to the Channel subtitles page as explained earlier
- Expand the Languages column of the target video
- Click the Options icon that appears under the Subtitles column when you hover mouse on to it
- Click Edit on Classic Studio
- On the next page, click Edit from the top-right corner

- Click to open the Actions drop-down list from the upper-left corner
- Click Upload a file
- Follow the on-screen instructions from there to upload the modified transcription file
- Click Save Changes from the top-right corner of the page when done
Conclusion
If you are looking for a quick and easy way of adding subtitles to your videos, letting YouTube transcribe for you could be a good approach. However, because these auto-generated transcriptions are created by machine learning algorithms, their accuracy cannot be counted on. Therefore, the best way to get the job done accurately is, let YouTube auto-transcribe your video, download the transcription file, make the necessary changes to it, and then upload the file back to the video.
Richard Bennett
Richard Bennett is a writer and a lover of all things video.
Follow @Richard Bennett
Richard Bennett
Mar 27, 2024• Proven solutions
If you want to transcribe your videos to make the dialogs and speeches available in text format, you can use YouTube Transcribe feature that the streaming site offers for free. In this article, I’ll share with you a couple of methods to transcribe a YouTube video for free.
- Part 1: Transcribe YouTube Video Automatically for Free [2 Ways]
- Part 2: Transcribe YouTube Video to Text Online with Third-Party Service
- Part 3: Benefits of Transcribing YouTube Videos
- Part 4: YouTube Video Transcription FAQs
Part 1: How to Transcribe YouTube Video Automatically for Free [2 Ways]
Besides the basic video editing features on the YouTube platform, you can now quickly transcribe YouTube videos to the text as well. The good thing is, you can either use the automatic transcription feature that YouTube offers, or upload it manually while adjusting the timing as you go further.
Below are the two methods to transcribe your YouTube videos for free:
Method 1: Use the Automated Transcription Service on YouTube
As the name suggests, YouTube automatic transcription service works automatically. This means you don’t even have to click the ‘Transcribe’ button anymore to transcribe a YouTube video, and the website takes care of it on its own. All you need to do is, choose English as the language of the video when setting up subtitles. You can follow the instructions given below to do so:
Step 1 Upload a Video
Sign in to your YouTube account, click your profile picture from the top-right corner, and click YouTube Studio from the menu. Next, click CREATE from the upper-right corner, click Upload videos from the menu, and drag and drop a video from your computer to the Upload videos box that appears next.
Step 2 Select Transcription Language
On the Details page of the next box that appears, scroll down and click MORE OPTIONS, and select English in the Video language drop-down list under the Language, subtitles, and closed captions (CC) section.
Step 3 Publish the Video
Follow the on-screen instructions from this point to publish the video, and wait while YouTube automatically transcribes and adds the close captions to it.
Note: Depending on the duration of the clip, the time YouTube would take to transcribe may vary.
After YouTube has transcribed the video, you can download the transcription file in your preferred format. The instructions are given below explain how you can do so:
- Get to the Subtitles Window
While on the YouTube Studio page, click Subtitles from the left pane to go to the Channel subtitles page. And then click the video you want to modify.
- Get to Classic Studio
In the video subtitle page of the target video, hover mouse on the Published Automatic status under the Subtitles column, click the Options icon (with three vertical dots) that appears, and click Edit on Classic Studio.
- Download Transcription File
Click and open the Actions drop-down list from the top-left corner of the left pane, click your preferred transcription format including .vtt, .srt and .sbv from the list, and save the file on your local hard disk.
Method 2: Get YouTube Transcription when Watching
In addition, if you are watching any other video, you can make YouTube transcribe that for you as well. You can follow the instructions given below to get the YouTube video to text transcription:
Step 1: Play the Video
Go to the video on YouTube and start playing it. Make sure NOT to get to full-screen mode as doing so would hide the option to transcribe the clip.
Step 2: Enable Transcription
Click the More icon (with three horizontal dots) from under the bottom-right corner of the video player, and click Open transcript to see the video transcription in the Transcript pane that appears in the right.
Step 3: Manage Timestamps
Click the Options icon (with three vertical dots) from the top-right corner of the Transcript pane, and click Toggle timestamp to enable or disable the timestamps in the video transcription.
Limitations of Using YouTube Transcribe
Although YouTube’s automatic transcription is a decent feature that saves you a lot of time, since Google uses machine learning algorithms to convert the speech to text, the level of accuracy may vary depending on the accent of the speaker, and the clarity of the audio the video has. Also, even sometime you may not be satisfied with the end-results.
Alternatively, you can use Kapwing to transcribe a YouTube video and download the transcription file with the below step-by-step instructions:
Step 1: Add YouTube Video
Copy the URL of YouTube video you want to transcribe, go to https://www.kapwing.com/subtitles , paste the URL in the Paste a URL field, wait while Kapwing fetches the content of the video, and opens the Add subtitles to Video page.
Step 2: Transcribe the Video
Click Auto-generate from the right window, and follow the on-screen instructions to transcribe YouTube video to text.
Step 3: Download the Transcription File
Click Download SRT from the left pane, and follow the instructions from there to download the transcription file in *.srt format.
Pros
- Kapwing is free to use
- The auto-transcription process is quick and less tedious
- Kapwing also allows manual transcription and uploading of an existing *.srt file
Cons
- The auto-transcribed text might lack accuracy as the task is done by the speech-to-text tools that work in the background
You can follow the step-by-step instructions to transcribe a YouTube video and download the transcription file using Kapwing:
Step 1: Add YouTube Video
Copy the URL of YouTube video you want to transcribe, go to https://www.kapwing.com/subtitles , paste the URL in the Paste a URL field, wait while Kapwing fetches the content of the video, and opens the Add subtitles to Video page.
Step 2: Transcribe the Video
Click Auto-generate from the right window, and follow the on-screen instructions to transcribe YouTube video to text.
Step 3: Download the Transcription File
Click Download SRT from the left pane, and follow the instructions from there to download the transcription file in *.srt format.
Pros
- Kapwing is free to use
- The auto-transcription process is quick and less tedious
- Kapwing also allows manual transcription and uploading of an existing *.srt file
Cons
- The auto-transcribed text might lack accuracy as the task is done by the speech-to-text tools that work in the background
Part 3: Benefits of Transcribing YouTube Videos
You may need video transcriptions for several reasons, such as analyzing the summary of the entire speech in the video, extracting a single phrase or quote that was spoken in the clip, or making the video helpful even for those suffering from hearing impairment. When you transcribe a YouTube video, the transcript can be useful in many ways. Some of the most common benefits of transcribing a video include:
- Search Engine Optimization
When you add subtitles, the text can appear in Google search results when someone types a similar phrase in the search box. This helps get more views to your videos, thus giving your channel popularity, and you, monetary gains in the long run.
- Accent
If the speaker in the video is from a different region and is using an accent that you are not much comfortable with, you can turn on the subtitles and read the dialogs along with the video.
- Repurposing on Blogs
If you own a blog that you have embedded your video to, the transcription could be used to add text to it so the target audience can get a fair idea of what the video is all about. This is useful because many people prefer reading over watching.
YouTube Video Transcription FAQs
1. How to Transcribe YouTube Video to Text
Usually the transcription files have *.srt extension that are globally accepted and supported by almost all media players. However, there might be instances when you want to have the subtitles in plain text.
That said, to convert an SRT file to TXT, you can:
- Right-click the SRT file
- Go to Rename
- Replace srt with txt and press Enter
- Click OK on the confirmation box that appears next to convert SRT to TXT
After this, you can simply double-click the file, and read and modify the transcribed content as needed.
2. How to Edit and Upload Edited Transcript to YouTube
If you made any modifications to the transcript that was automatically generated by YouTube or any other third-party transcription tool, you can follow the steps given below to upload the new file to the YouTube video:
- Go to YouTube Studio and then to the Channel subtitles page as explained earlier
- Expand the Languages column of the target video
- Click the Options icon that appears under the Subtitles column when you hover mouse on to it
- Click Edit on Classic Studio
- On the next page, click Edit from the top-right corner
- Click to open the Actions drop-down list from the upper-left corner
- Click Upload a file
- Follow the on-screen instructions from there to upload the modified transcription file
- Click Save Changes from the top-right corner of the page when done
Conclusion
If you are looking for a quick and easy way of adding subtitles to your videos, letting YouTube transcribe for you could be a good approach. However, because these auto-generated transcriptions are created by machine learning algorithms, their accuracy cannot be counted on. Therefore, the best way to get the job done accurately is, let YouTube auto-transcribe your video, download the transcription file, make the necessary changes to it, and then upload the file back to the video.
Richard Bennett
Richard Bennett is a writer and a lover of all things video.
Follow @Richard Bennett
Also read:
- In 2024, Crafting Channel Graphics Icons, Banners & Thumbnails
- Tailoring Content Advanced PC Video Editing Methods for YouTube
- [New] Enhance Discoverability with Effective Video Tags
- How to Extract YouTube Content Easily
- [New] Earning by Critiquing Goodies A YouTube Guide
- Unlock Online Visibility with Essential Vids' Tools
- [Updated] A Journey Through Time Best History YouTubes for Scholars & Enthusiasts
- In 2024, Boosting Engagement Perfect Time-Stamping Techniques for Videos
- 2024 Approved Channel Image Makeovers on the House
- [New] Analyzing Why YouTube Features Specific Comments
- The Key to Profit YouTube Shorts Insights
- 2024 Approved Conquering the Labyrinth of Lesser-Known YouTube Content
- Unlocking the Secrets of YouTube's Data Analysis and Cash Flows
- [Updated] Enhancing Creativity - Discover Top 10 Video Cutter Software
- Mastering Shots A Vlogger’s Lens Compendium
- The Strategic Use of Tags A Guide to YouTube Success
- 2024 Approved Digital Dollars Kings & Queens YouTube Edition
- Transformative Techniques to Mute Background Noise
- Seamlessly Incorporating YT Clips in Slideshows via PPT
- In 2024, Activating or Deactivating User Feedback on Videos
- The Hidden Costs and Benefits of Purchased Video Traction on Channels
- 2024 Approved Convert with Confidence Best Apps to Turn Spotify Into YouTube Channels
- Channel Naming Excellence Tips & Strategies for 2024
- Influencing Audiences with Short-Form Videos
- Unlinking From YouTube Shorts - Easy and Permanent
- How to Purge Personal YouTube History Records
- [Updated] Elevate Your Online Presence A Guide to Thriving YouTube Branding
- [New] Dissecting Video Platform Features YouTube Vs. DailyMention
- Superior Streaming Technologies for YouTube Starters
- 2024 Approved Creative Music Videos A List of 15 YouTube Projects
- Bypassing Blackouts with Video Tips for 2024
- [Updated] Elevate Your Content Strategies for YouTube Success
- [New] Elevate Your YouTube Shorts Top 10 Strategies for Uniqueness
- Engage Viewers with an Effortless YouTube Animated Subscribe Button Using Filmora for 2024
- Elevate Your Content With These 20 Pro Video Shortcuts for 2024
- Enlightening Your YouTube Footage with Proper Lighting
- Seize Endless Photographic Content From Elite 4 Video Clips
- MediaMeld EditSuite
- In 2024, Curating Your Music Collection The Easy Guide to YouTube Playlist Creation (Web/App)
- 2024 Approved 5 Tricks for Instantly Boosting YouTube Subscribers
- In 2024, Effective Streaming Across Platforms, Including Facebook and Twitch
- Boosting YouTube Traffic Perfecting Titles & Tags for Max Views for 2024
- [Updated] Elevate Well-Being The Leading Online Yoga Vids
- 2024 Approved Elevating Content Strategy Through YouTube Metrics
- [New] Content Spotlight Platform Perks Compared
- BeatsEdit Pro Master PC Editor with Musical Flair
- Customizable Social Icon Crafting a Caricature Online for 2024
- [New] Best of the Best 12 Personal Screen Recorders for 2024
- [Updated] 2024 Approved Understanding Instagram's Video Restriction
- How to Track Samsung Galaxy F04 Location by Number | Dr.fone
- ScreenFreedom Pro The Unpriced Gaming Recorder
- New In 2024, Make Time-Lapse Video on MacBook Complete Guide
- 5 Quick Methods to Bypass Samsung Galaxy A14 4G FRP
- Little Known Ways of Adding Emojis to Photos on iPhone & Android
- Sonic Ambiance for Catching Up on the Latest News for 2024
- In 2024, Guidelines for Responsible Content Disclosure in Online Spaces Like FB
- [New] In 2024, Expertly Enhance Videos with Top 10+ Mobile & Desktop Editors
- In 2024, Top 10 Telegram Spy Tools On Xiaomi 14 for Parents | Dr.fone
- 2024 Approved The Art of Publicizing Vimeo Videos
- [New] Innovate Your Images with Leading Snapchat Effects
- In 2024, How I Transferred Messages from Xiaomi Redmi Note 13 Pro 5G to iPhone 12/XS (Max) in Seconds | Dr.fone
- Updated Exploring Googles Audio Broadcasting Platform for Listeners for 2024
- Innovative 10 Ideas That'll Boost Your Brand on IGTV for 2024
- 5 Ways to Record VR Gameplay for 2024
- Infinix Hot 30i Music Recovery - Recover Deleted Music from Infinix Hot 30i
- App Wont Open on Your Nokia G310? Here Are All Fixes | Dr.fone
- The Essential Voicemod Playbook Transform Your Desktop & Mobile Discords for 2024
- [New] In 2024, Top Cycling Sims Worth Your Time!
- In 2024, 104 Chuckle-Inducing TikTok Skits for All Ages
- Premium Video Noise Extraction Tool for PCs and Macs (2024 Version)
- How to recover deleted pictures from Samsung Galaxy F14 5G.
- 2024 Approved Audio Alchemy Mixing Techniques for Sound Fusion with DaVinci Resolve
- Why Your WhatsApp Live Location is Not Updating and How to Fix on your Poco M6 5G | Dr.fone
- Title: "[New] Creative Components FREE YouTube Visual Resources"
- Author: Brian
- Created at : 2024-05-25 12:34:29
- Updated at : 2024-05-26 12:34:29
- Link: https://youtube-video-recordings.techidaily.com/new-creative-components-free-youtube-visual-resources/
- License: This work is licensed under CC BY-NC-SA 4.0.
