![[New] Conserve Space, Not Time YouTube Video Length Adjustment](https://thmb.techidaily.com/18a804e379d2e35c3dce7adfbd6c31163356bdf9fa867d443daa8eb75630573f.jpg)
"[New] Conserve Space, Not Time YouTube Video Length Adjustment"
Conserve Space, Not Time: YouTube Video Length Adjustment
How to Edit the Length of a Video on YouTube

Richard Bennett
Mar 27, 2024• Proven solutions
Apart from providing video hosting and sharing features, the YouTube platform also has an online editor which is going to provide you with the possibility to make changes and additions online without having to download any particular program. In this guide, we are going to show you how to make your video shorter or longer with YouTube online video editor.
A Better Alternative on How to Edit YouTube Video Length - Wondershare Filmora is a perfect alternative to edit every single clip frame by frame. Not just to shorten or lengthen the video. It offers quite a lot of opportunities. Watch the video below to know more:
 Download Mac Version ](https://tools.techidaily.com/wondershare/filmora/download/ )
For instance, the application is offering non-linear ripple video editing. This is going to allow you to combine multiple video clips and pin them together conveniently. What is more, you can also apply PIP and Green Screen professional effects with just a few clicks. Sure, the YouTube video editor is a perfect solution for those who don’t want to achieve professional quality, but if you do, Wondershare Filmora is without a doubt the far better alternative. This is something that’s going to enable you to edit and re-touch your videos as well as to size them appropriately. Instead of dragging two bars together, you will be able to touch every single frame and size it according to your own particular needs. This is going to result in flawless videos.
How to Edit YouTube Video Length Using the built-in Video Editor
The YouTube video editor is easy to use, and you can easily learn how to do all sorts of changes to your video. Let’s see the things that you need to go through in order to edit the length.
Note: From 20th September 2017 users will no longer be able to use the complimentary editing suite. Check the best YouTube video editor alternatives from this complete guide.
Step 1 Get to the video editor

In order to do so, you would have to go ahead and login into your account. Then, go to the “My Channel” panel and select the video that you want to cut. Once you’ve done this, click on the “Video manager” option and click on the “create” tab which should be located on the right side for the page. There, you will be able to find the “Video Editor”. Of course, you can also add “/editor” to YouTube’s URL, and you would be good to go.
Step 2 Import Your Video
Once you’ve done all of the above, you would have to drag your video in order to cut it’s time. Keep in mind that the videos are made out of a maximum of 50 clips. The site is going to save every single video that you upload as a particular clip which could be properly combined with the rest in order to make one larger video. This is important.
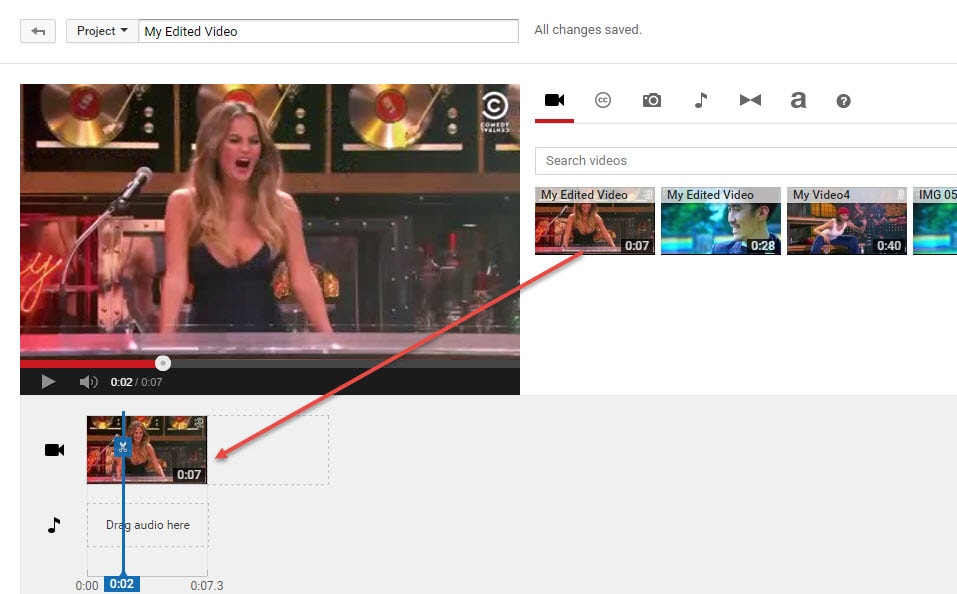
Step 3 Edit the Length
This is the part where you actually get to edit the length of your video. In order to do so effectively, you have to drag the bar at either end of your clip towards the other end in order to shorten the clip conveniently.
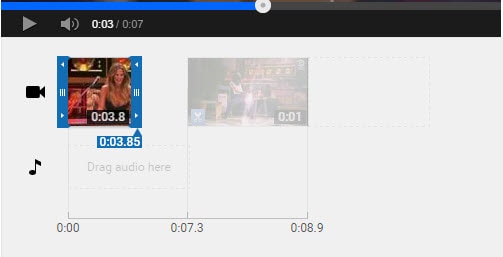
What is more, if you want to increase the length, you have to drag the bar to the opposite end – outwards. There is going to be an indicator which is going to appear at the bottom of the clip, and it’s going to show you the overall duration of the file, and it’s going to adjust itself as you slide the bars accordingly.
Step 4 Save the Clip
Of course, you would have to save the clip in order for the changes to reflect. Even though this might seem like a particularly obvious thing to do, you would be surprise to find out that a lot of people get everything done and then discard the changes by forgetting to save them and their effort goes to waste.
Richard Bennett
Richard Bennett is a writer and a lover of all things video.
Follow @Richard Bennett
Richard Bennett
Mar 27, 2024• Proven solutions
Apart from providing video hosting and sharing features, the YouTube platform also has an online editor which is going to provide you with the possibility to make changes and additions online without having to download any particular program. In this guide, we are going to show you how to make your video shorter or longer with YouTube online video editor.
A Better Alternative on How to Edit YouTube Video Length - Wondershare Filmora is a perfect alternative to edit every single clip frame by frame. Not just to shorten or lengthen the video. It offers quite a lot of opportunities. Watch the video below to know more:
Download Mac Version ](https://tools.techidaily.com/wondershare/filmora/download/ )
For instance, the application is offering non-linear ripple video editing. This is going to allow you to combine multiple video clips and pin them together conveniently. What is more, you can also apply PIP and Green Screen professional effects with just a few clicks. Sure, the YouTube video editor is a perfect solution for those who don’t want to achieve professional quality, but if you do, Wondershare Filmora is without a doubt the far better alternative. This is something that’s going to enable you to edit and re-touch your videos as well as to size them appropriately. Instead of dragging two bars together, you will be able to touch every single frame and size it according to your own particular needs. This is going to result in flawless videos.
How to Edit YouTube Video Length Using the built-in Video Editor
The YouTube video editor is easy to use, and you can easily learn how to do all sorts of changes to your video. Let’s see the things that you need to go through in order to edit the length.
Note: From 20th September 2017 users will no longer be able to use the complimentary editing suite. Check the best YouTube video editor alternatives from this complete guide.
Step 1 Get to the video editor

In order to do so, you would have to go ahead and login into your account. Then, go to the “My Channel” panel and select the video that you want to cut. Once you’ve done this, click on the “Video manager” option and click on the “create” tab which should be located on the right side for the page. There, you will be able to find the “Video Editor”. Of course, you can also add “/editor” to YouTube’s URL, and you would be good to go.
Step 2 Import Your Video
Once you’ve done all of the above, you would have to drag your video in order to cut it’s time. Keep in mind that the videos are made out of a maximum of 50 clips. The site is going to save every single video that you upload as a particular clip which could be properly combined with the rest in order to make one larger video. This is important.
Step 3 Edit the Length
This is the part where you actually get to edit the length of your video. In order to do so effectively, you have to drag the bar at either end of your clip towards the other end in order to shorten the clip conveniently.
What is more, if you want to increase the length, you have to drag the bar to the opposite end – outwards. There is going to be an indicator which is going to appear at the bottom of the clip, and it’s going to show you the overall duration of the file, and it’s going to adjust itself as you slide the bars accordingly.
Step 4 Save the Clip
Of course, you would have to save the clip in order for the changes to reflect. Even though this might seem like a particularly obvious thing to do, you would be surprise to find out that a lot of people get everything done and then discard the changes by forgetting to save them and their effort goes to waste.
Richard Bennett
Richard Bennett is a writer and a lover of all things video.
Follow @Richard Bennett
Richard Bennett
Mar 27, 2024• Proven solutions
Apart from providing video hosting and sharing features, the YouTube platform also has an online editor which is going to provide you with the possibility to make changes and additions online without having to download any particular program. In this guide, we are going to show you how to make your video shorter or longer with YouTube online video editor.
A Better Alternative on How to Edit YouTube Video Length - Wondershare Filmora is a perfect alternative to edit every single clip frame by frame. Not just to shorten or lengthen the video. It offers quite a lot of opportunities. Watch the video below to know more:
Download Mac Version ](https://tools.techidaily.com/wondershare/filmora/download/ )
For instance, the application is offering non-linear ripple video editing. This is going to allow you to combine multiple video clips and pin them together conveniently. What is more, you can also apply PIP and Green Screen professional effects with just a few clicks. Sure, the YouTube video editor is a perfect solution for those who don’t want to achieve professional quality, but if you do, Wondershare Filmora is without a doubt the far better alternative. This is something that’s going to enable you to edit and re-touch your videos as well as to size them appropriately. Instead of dragging two bars together, you will be able to touch every single frame and size it according to your own particular needs. This is going to result in flawless videos.
How to Edit YouTube Video Length Using the built-in Video Editor
The YouTube video editor is easy to use, and you can easily learn how to do all sorts of changes to your video. Let’s see the things that you need to go through in order to edit the length.
Note: From 20th September 2017 users will no longer be able to use the complimentary editing suite. Check the best YouTube video editor alternatives from this complete guide.
Step 1 Get to the video editor
In order to do so, you would have to go ahead and login into your account. Then, go to the “My Channel” panel and select the video that you want to cut. Once you’ve done this, click on the “Video manager” option and click on the “create” tab which should be located on the right side for the page. There, you will be able to find the “Video Editor”. Of course, you can also add “/editor” to YouTube’s URL, and you would be good to go.
Step 2 Import Your Video
Once you’ve done all of the above, you would have to drag your video in order to cut it’s time. Keep in mind that the videos are made out of a maximum of 50 clips. The site is going to save every single video that you upload as a particular clip which could be properly combined with the rest in order to make one larger video. This is important.
Step 3 Edit the Length
This is the part where you actually get to edit the length of your video. In order to do so effectively, you have to drag the bar at either end of your clip towards the other end in order to shorten the clip conveniently.
What is more, if you want to increase the length, you have to drag the bar to the opposite end – outwards. There is going to be an indicator which is going to appear at the bottom of the clip, and it’s going to show you the overall duration of the file, and it’s going to adjust itself as you slide the bars accordingly.
Step 4 Save the Clip
Of course, you would have to save the clip in order for the changes to reflect. Even though this might seem like a particularly obvious thing to do, you would be surprise to find out that a lot of people get everything done and then discard the changes by forgetting to save them and their effort goes to waste.
Richard Bennett
Richard Bennett is a writer and a lover of all things video.
Follow @Richard Bennett
Creating High-Impact YT Cover Images
What’s the Best YouTube Thumbnail Size?
Richard Bennett
Dec 30, 2022• Proven solutions
Making better YouTube thumbnails will help you get more views, and knowing the best YouTube thumbnail size is part of that. There are millions of videos on YouTube, so if you want the audience to click on yours, then you need to make a great first impression.
- What’s the ideal YouTube thumbnail Size and Dimension?
- Tips for Perfect Thumbnails
- Making Better Thumbnails for YouTube
1. What’s the ideal YouTube thumbnail Size and Dimension?
An essential thing that every YouTube video developer needs to know is about the selection of the right side of the thumbnail for any video. As per the guidelines circulated by Google itself, the most appropriate size for the thumbnail image is 1280x720 pixels, where the recommended minimal pixel width is 640 pixels. Generally, the 16:9 ratio is considered as an ideal choice for Most of YouTube previews and players.
Here is one interesting thing that you need to know; the thumbnail of videos appears smaller during searches, but it naturally grows to the full size of a video during suggestions. Now the fact is that upscaling of images often loses the quality of content, whereas it is much easier to downscale larger images into smaller ones. Hence, the best idea is to use large size images so that this search and suggestion based scaling needs can be well accomplished.
You May Also Like:
Top 12 Best Free YouTube Thumbnail Makers >>
How to Download YouTube Thumbnail in 3 Ways [Online/Win/Mac] >>
2. Tips for Perfect Thumbnails
So, if you are ready to add thumbnails to your videos, then it is time to learn a few essential tips to do this task with improved impact. You need to ignore the blurry details and boost the eye-catching ones. Here are a few essential tips for developing the best videos with an impressive selection of thumbnail images:
YouTube’s Default Thumbnails
When you upload your video on YouTube, the platform itself gives you suggestions about thumbnails, and they are directly picked up from your own video. Although the idea is good and original, these thumbnails use to be of low quality with blur details. Hope! You don’t want to lose your audience with this bad selection.
Custom Thumbnails
This is probably the best choice for your customized videos, and the interesting thing is that here you can control everything manually with lots of useful effects.
First of all, you need to open your video on YouTube and then scrub a useful still from your video that you wish to use as a thumbnail.
Now, you need to take a screenshot of this particular instance of your video file. The best part is that most of the operating systems allow users to enjoy several shortcuts to complete this task. For example:
Mac users need to press Command+Shift+4 and then simply highlight the area that you want to include in your screenshot with the help of a frame. The system will automatically save your selected area to your desktop in the form of an image.
Window users are advised to access Windows Key with Print Screen option to get their desired screenshot.
Once you are ready with your video specific still image, then simply get it uploaded on YouTube using the edit video page.
3. Making Better Thumbnails for YouTube
The best part is to access some photo editing software tool to edit your image the way you like. You can use an advanced tool like Photoshop or a free online tool like Canva.
- Focus on Size:
It is always advised to create thumbnail images with standard video file size; the most commonly used standard size range is 1980x1080 or 1280x720. Images having a size smaller than this range may often appear blurry.
- Add Text:
The best idea is to use text-based editing for your thumbnail images and preferably add the title of your video to this image. It will naturally attract more viewers.
- Borders matter:
Professionals recommend adding borders around thumbnail images but do not try to make it too thick rather, try to make it noticeable with fine details.
- Background editing:
Most of the expert video thumbnail developers prefer to change the impact of thumbnail background by simply replacing the background color with solid colors. It will definitely attract more viewers and will bring major attention to the major subject.
- Test it before uploading:
Before uploading your customized thumbnail to your YouTube channel, prefer to check its final view. Zoom in to check the appearance of the thumbnail image on the larger screen, and it should also look fine when sized down.
Now that you know the best YouTube thumbnail size and how to design better thumbnails, do you think you’ll revisit the thumbnails of your existing YouTube videos?
If you want to find a video editing solution that empowers your imagination and creativity yet takes less effort, please try this robust and user-friendly video editing software Wondershare Filmora. It provides special effects, stock photo & video, sound library, etc., which will definitely enhance your productivity and helps to make money by making videos much accessible.

Richard Bennett
Richard Bennett is a writer and a lover of all things video.
Follow @Richard Bennett
Richard Bennett
Dec 30, 2022• Proven solutions
Making better YouTube thumbnails will help you get more views, and knowing the best YouTube thumbnail size is part of that. There are millions of videos on YouTube, so if you want the audience to click on yours, then you need to make a great first impression.
- What’s the ideal YouTube thumbnail Size and Dimension?
- Tips for Perfect Thumbnails
- Making Better Thumbnails for YouTube
1. What’s the ideal YouTube thumbnail Size and Dimension?
An essential thing that every YouTube video developer needs to know is about the selection of the right side of the thumbnail for any video. As per the guidelines circulated by Google itself, the most appropriate size for the thumbnail image is 1280x720 pixels, where the recommended minimal pixel width is 640 pixels. Generally, the 16:9 ratio is considered as an ideal choice for Most of YouTube previews and players.
Here is one interesting thing that you need to know; the thumbnail of videos appears smaller during searches, but it naturally grows to the full size of a video during suggestions. Now the fact is that upscaling of images often loses the quality of content, whereas it is much easier to downscale larger images into smaller ones. Hence, the best idea is to use large size images so that this search and suggestion based scaling needs can be well accomplished.
You May Also Like:
Top 12 Best Free YouTube Thumbnail Makers >>
How to Download YouTube Thumbnail in 3 Ways [Online/Win/Mac] >>
2. Tips for Perfect Thumbnails
So, if you are ready to add thumbnails to your videos, then it is time to learn a few essential tips to do this task with improved impact. You need to ignore the blurry details and boost the eye-catching ones. Here are a few essential tips for developing the best videos with an impressive selection of thumbnail images:
YouTube’s Default Thumbnails
When you upload your video on YouTube, the platform itself gives you suggestions about thumbnails, and they are directly picked up from your own video. Although the idea is good and original, these thumbnails use to be of low quality with blur details. Hope! You don’t want to lose your audience with this bad selection.
Custom Thumbnails
This is probably the best choice for your customized videos, and the interesting thing is that here you can control everything manually with lots of useful effects.
First of all, you need to open your video on YouTube and then scrub a useful still from your video that you wish to use as a thumbnail.
Now, you need to take a screenshot of this particular instance of your video file. The best part is that most of the operating systems allow users to enjoy several shortcuts to complete this task. For example:
Mac users need to press Command+Shift+4 and then simply highlight the area that you want to include in your screenshot with the help of a frame. The system will automatically save your selected area to your desktop in the form of an image.
Window users are advised to access Windows Key with Print Screen option to get their desired screenshot.
Once you are ready with your video specific still image, then simply get it uploaded on YouTube using the edit video page.
3. Making Better Thumbnails for YouTube
The best part is to access some photo editing software tool to edit your image the way you like. You can use an advanced tool like Photoshop or a free online tool like Canva.
- Focus on Size:
It is always advised to create thumbnail images with standard video file size; the most commonly used standard size range is 1980x1080 or 1280x720. Images having a size smaller than this range may often appear blurry.
- Add Text:
The best idea is to use text-based editing for your thumbnail images and preferably add the title of your video to this image. It will naturally attract more viewers.
- Borders matter:
Professionals recommend adding borders around thumbnail images but do not try to make it too thick rather, try to make it noticeable with fine details.
- Background editing:
Most of the expert video thumbnail developers prefer to change the impact of thumbnail background by simply replacing the background color with solid colors. It will definitely attract more viewers and will bring major attention to the major subject.
- Test it before uploading:
Before uploading your customized thumbnail to your YouTube channel, prefer to check its final view. Zoom in to check the appearance of the thumbnail image on the larger screen, and it should also look fine when sized down.
Now that you know the best YouTube thumbnail size and how to design better thumbnails, do you think you’ll revisit the thumbnails of your existing YouTube videos?
If you want to find a video editing solution that empowers your imagination and creativity yet takes less effort, please try this robust and user-friendly video editing software Wondershare Filmora. It provides special effects, stock photo & video, sound library, etc., which will definitely enhance your productivity and helps to make money by making videos much accessible.
Richard Bennett
Richard Bennett is a writer and a lover of all things video.
Follow @Richard Bennett
Also read:
- [New] Artistry in Motion Compelling Selection of 3D Animation Software
- [New] In 2024, Simplifying Video Workflows with ShowMore's Top Recording Tool
- [Updated] Crafting Exceptional FreeFire Content on YouTube Platforms
- Bypassing Blockbusters 2023 Indie Favorites
- Complete Tutorial to Use GPS Joystick to Fake GPS Location On Nokia C12 Plus | Dr.fone
- Expert Comparison Review: Assessing the Power and Features of the Samsung Galaxy S21 Ultra vs Rivals
- In 2024, Crafting Compelling Combinations A Guide to Creating Your Own YouTube Playlists
- In 2024, Decode the Digital Dollar with YouTube An Effective Triple Step Method for Income Analysis
- In 2024, How Do You Unlock your Apple iPhone 14 Pro Max? Learn All 4 Methods
- Microsoft Flight Simulator 2020 - Fixes for Persistent Update Loading Problems
- New Cutting-Edge Siri Speech Replicator Cross-Platform Solution for 2024
- Partnered Filmmaking Expand Your Channel's Reach
- Step-by-Step Strategies to Recover Deleted Numbers From Your Android Phonebook
- Stepwise Strategy Creating Effective YouTube Subscriber Buttons
- Title: [New] Conserve Space, Not Time YouTube Video Length Adjustment
- Author: Brian
- Created at : 2024-10-18 16:03:35
- Updated at : 2024-10-23 19:52:10
- Link: https://youtube-video-recordings.techidaily.com/new-conserve-space-not-time-youtube-video-length-adjustment/
- License: This work is licensed under CC BY-NC-SA 4.0.