
!["[New] Capturing Top-Notch Audio Without Microphone Dependency"](https://www.lifewire.com/thmb/hofjzwWxFXQOP-TMMBgrBGFlUvQ=/400x300/filters:no_upscale():max_bytes(150000):strip_icc()/why-does-car-battery-die-4140227-ad907eef646446d6a1306940af16410a.jpg)
"[New] Capturing Top-Notch Audio Without Microphone Dependency"
Capturing Top-Notch Audio Without Microphone Dependency
How to Record Good Audio Without a Microphone?

Richard Bennett
Oct 26, 2023• Proven solutions
Audio quality is more important than video quality on YouTube. You’ve probably heard that before – viewers might forgive sub-par video quality if they’re interested in what you’re saying, but if it’s hard to understand what you’re saying they’ll click away.
Getting an external mic (even a $10 one-off Amazon ) is one of the best ways to improve your videos. That said, maybe your budget is $0. Or, maybe you just don’t happen to have a mic now and don’t want to wait to make videos. It could even be that you just don’t want to bother with an external mic.
Luckily, there are a lot of easy, free, things you can do to protect the quality of your audio recording even if you’re not using an external mic. Here are a few tips:
- 1. Keep Your Camera Close
- 2. Shoot Somewhere Quiet
- 3. Pick a Good Room
- 4. Protect your Built-In Mic from Wind
- 5. Use a Free Audio App
- 6. Do a Sound Check
1. Keep Your Camera Close (like, really close)
The biggest problem with the mic built into any camera or phone is just that, since it’s with the camera, it’s usually too far away from you. Built-in mics can record decent audio up close, but usually, your camera will be set up farther away from you than an external mic would be.
For example, your camera’s mic might be just as good as a clip-on LAV, but that LAV is right by your mouth and the camera is a couple of big steps away.
Moving your camera/smartphone physically closer to you will make it hard to include anything besides your head and shoulders in your shot, but it will get you significantly better audio.
2.Shoot Somewhere Quiet
The best way to limit the amount of background noise you pick up in your sound recording is to shoot somewhere where there’s no background noise. That probably seems really basic, but it’s something a lot of people just don’t do. It’s easy to default to recording in your home office, even though it’s right next to the kitchen where your family is bustling around, or in your bedroom even though there’s a busy street right outside your window.
Sometimes the best thing you can do for your audio is simply to scout out a quiet room in your house where the sound recording conditions are better. Speaking of recording conditions…
3. Pick a Good Room
There’s more that goes into picking a good room than how quiet it is. If you try to record in a room that’s too big your voice might sound to distant, and if you try to record in a room that’s too small your audio will be too echo-y. You need a room that’s just right.
You should also pay attention to what’s in the room you’re recording in. Avoid hard, reflective, surfaces like appliances and mirrors which your voice will bounce off of. The same conditions that make you sound great when you sing in the shower will – like recording in a small space -make your voiceover unpleasantly echo-y.
Look for a room that has a lot of soft things in it, like beds and sofas.
4. Protect your Built-In Mic from Wind
If you shoot outside, then the wind passing over your built-in mic will do terrible things to your audio. You can do a lot to counter-act this problem by physically blocking the wind.
There are a few ways to do this. If you’re doing hand-held shots you can partially cover your camera or phone’s mic with your finger. You don’t want to completely cover it/press down or your audio will be muffled. What you’re trying to do is create a barrier blocking out the wind.
On movie sets, they block out wind by covering the microphones with big fuzzy things called ‘dead cats’. You can also block out wind noise by attaching something fuzzy to your microphone. If your camera’s built-in mic is on front of it then you just need something big and fluffy you can loop around the lens. You can use a piece of a boa, a fuzzy novelty scrunchie – you can even murder a fuzzy stuffed animal! Do you have an old coat with a fuzz around the hood? That fuzz would do nicely.
The pompom used in this video cost $2, but you might already have something that would work!
If your built-in mic is on top of your camera you can get something called a ‘micromuff’. A micromuff is essentially a circular or rectangular piece of velcro with long strands of fluff on top. It’s open in the middle so it doesn’t actually cover your mic, but the surrounding fuzz blocks out the wind.

You use the adhesive backing to attach the base velcro to your camera. The other side of the velcro has your fluff attached to the back.
The only thing about a micromuff is that it costs about $30, and if you’re going to spend $30 on audio equipment then you could just buy yourself an inexpensive LAV mic. I only bring up the micromuff because it’s a very simple design you can probably DIY – you just need velcro with adhesive backing and any of the fluff-sources we just discussed.
5. Use a Free Audio App
If you’re recording on a smartphone, you can download a free app that will let you make adjustments to your audio as you record it. With the right app, you can adjust your gain (volume is how you control ‘output’ audio, and gain is for ‘input’ audio. By turning up your gain, you can make your mic more sensitive), tempo, and more. A lot of the time, your audio recording app will also let you edit your audio afterward.
Even if you’re not recording video from your smartphone, it might be a good idea to use your phone as your mic and record a separate audio file. You’ll be able to use an app to fine-tune your recording, and you can set your phone up closer to you the way you would an external mic while keeping your camera back a bit farther.
Free audio apps: Hi-Q MP3 Voice Recorder (Android), RecForge II (Android), Smart Voice Recorder (Android), Audio Memos (iOS), and Recorder Plus (iOS).
6. Do a Sound Check
Once you think you’ve got good audio set up – test it! You don’t want to do a whole video and find out when you play it back that your audio doesn’t sound good.
Do you have any of your own audio tips to pass on? Leave them in the comments!
This topic was suggested by RS Beauty over in the forums. Thanks for the idea!
Polish Your YouTube Videos with Filmora
As one of the most widely used video editing software in YouTube video editing, Filmora allows you to record voiceover and edit the recorded audio with mixer, equalizer and provides lots of templates and effects with an intuitive interface, which saves much time. Download the free trial version and get started now.


Richard Bennett
Richard Bennett is a writer and a lover of all things video.
Follow @Richard Bennett
Richard Bennett
Oct 26, 2023• Proven solutions
Audio quality is more important than video quality on YouTube. You’ve probably heard that before – viewers might forgive sub-par video quality if they’re interested in what you’re saying, but if it’s hard to understand what you’re saying they’ll click away.
Getting an external mic (even a $10 one-off Amazon ) is one of the best ways to improve your videos. That said, maybe your budget is $0. Or, maybe you just don’t happen to have a mic now and don’t want to wait to make videos. It could even be that you just don’t want to bother with an external mic.
Luckily, there are a lot of easy, free, things you can do to protect the quality of your audio recording even if you’re not using an external mic. Here are a few tips:
- 1. Keep Your Camera Close
- 2. Shoot Somewhere Quiet
- 3. Pick a Good Room
- 4. Protect your Built-In Mic from Wind
- 5. Use a Free Audio App
- 6. Do a Sound Check
1. Keep Your Camera Close (like, really close)
The biggest problem with the mic built into any camera or phone is just that, since it’s with the camera, it’s usually too far away from you. Built-in mics can record decent audio up close, but usually, your camera will be set up farther away from you than an external mic would be.
For example, your camera’s mic might be just as good as a clip-on LAV, but that LAV is right by your mouth and the camera is a couple of big steps away.
Moving your camera/smartphone physically closer to you will make it hard to include anything besides your head and shoulders in your shot, but it will get you significantly better audio.
2.Shoot Somewhere Quiet
The best way to limit the amount of background noise you pick up in your sound recording is to shoot somewhere where there’s no background noise. That probably seems really basic, but it’s something a lot of people just don’t do. It’s easy to default to recording in your home office, even though it’s right next to the kitchen where your family is bustling around, or in your bedroom even though there’s a busy street right outside your window.
Sometimes the best thing you can do for your audio is simply to scout out a quiet room in your house where the sound recording conditions are better. Speaking of recording conditions…
3. Pick a Good Room
There’s more that goes into picking a good room than how quiet it is. If you try to record in a room that’s too big your voice might sound to distant, and if you try to record in a room that’s too small your audio will be too echo-y. You need a room that’s just right.
You should also pay attention to what’s in the room you’re recording in. Avoid hard, reflective, surfaces like appliances and mirrors which your voice will bounce off of. The same conditions that make you sound great when you sing in the shower will – like recording in a small space -make your voiceover unpleasantly echo-y.
Look for a room that has a lot of soft things in it, like beds and sofas.
4. Protect your Built-In Mic from Wind
If you shoot outside, then the wind passing over your built-in mic will do terrible things to your audio. You can do a lot to counter-act this problem by physically blocking the wind.
There are a few ways to do this. If you’re doing hand-held shots you can partially cover your camera or phone’s mic with your finger. You don’t want to completely cover it/press down or your audio will be muffled. What you’re trying to do is create a barrier blocking out the wind.
On movie sets, they block out wind by covering the microphones with big fuzzy things called ‘dead cats’. You can also block out wind noise by attaching something fuzzy to your microphone. If your camera’s built-in mic is on front of it then you just need something big and fluffy you can loop around the lens. You can use a piece of a boa, a fuzzy novelty scrunchie – you can even murder a fuzzy stuffed animal! Do you have an old coat with a fuzz around the hood? That fuzz would do nicely.
The pompom used in this video cost $2, but you might already have something that would work!
If your built-in mic is on top of your camera you can get something called a ‘micromuff’. A micromuff is essentially a circular or rectangular piece of velcro with long strands of fluff on top. It’s open in the middle so it doesn’t actually cover your mic, but the surrounding fuzz blocks out the wind.
You use the adhesive backing to attach the base velcro to your camera. The other side of the velcro has your fluff attached to the back.
The only thing about a micromuff is that it costs about $30, and if you’re going to spend $30 on audio equipment then you could just buy yourself an inexpensive LAV mic. I only bring up the micromuff because it’s a very simple design you can probably DIY – you just need velcro with adhesive backing and any of the fluff-sources we just discussed.
5. Use a Free Audio App
If you’re recording on a smartphone, you can download a free app that will let you make adjustments to your audio as you record it. With the right app, you can adjust your gain (volume is how you control ‘output’ audio, and gain is for ‘input’ audio. By turning up your gain, you can make your mic more sensitive), tempo, and more. A lot of the time, your audio recording app will also let you edit your audio afterward.
Even if you’re not recording video from your smartphone, it might be a good idea to use your phone as your mic and record a separate audio file. You’ll be able to use an app to fine-tune your recording, and you can set your phone up closer to you the way you would an external mic while keeping your camera back a bit farther.
Free audio apps: Hi-Q MP3 Voice Recorder (Android), RecForge II (Android), Smart Voice Recorder (Android), Audio Memos (iOS), and Recorder Plus (iOS).
6. Do a Sound Check
Once you think you’ve got good audio set up – test it! You don’t want to do a whole video and find out when you play it back that your audio doesn’t sound good.
Do you have any of your own audio tips to pass on? Leave them in the comments!
This topic was suggested by RS Beauty over in the forums. Thanks for the idea!
Polish Your YouTube Videos with Filmora
As one of the most widely used video editing software in YouTube video editing, Filmora allows you to record voiceover and edit the recorded audio with mixer, equalizer and provides lots of templates and effects with an intuitive interface, which saves much time. Download the free trial version and get started now.
Richard Bennett
Richard Bennett is a writer and a lover of all things video.
Follow @Richard Bennett
Channel Catalysts: Affiliates Aiding Budgeted Buzzers
How to Get YouTube Sponsorship for Small Channels (Easy)
Richard Bennett
Mar 27, 2024• Proven solutions
Are you looking for YouTube sponsorship? Getting YouTube sponsorship for small channels might seem to be a very difficult goal. Whenever the word sponsors strikes your mind, you think of the big and expensive commercials.
However, if you lower your expectation from the big commercial companies, there are several other companies in the market that can help you with the YouTube sponsorship.
In this article, you will learn how to get YouTube sponsorship and make money out of it.
- Part1: Before You Start Applying For Sponsorship
- Part2: How To Get A Sponsor For Youtube Channel
- Part3: Types of Sponsorship
Part 1: Before You Start Applying For Sponsorship
1. Read YouTube Rules
As you are a small channel, you must be very cautious about the YouTube rules. Never put up any abusive content on your channel that degrades the value of YouTube. Ensure that your channel’s content fits the directions and guidelines of YouTube.
The supporters of YouTube sponsorship for small channels would never wish to get associated with channels that might be erased due to the strategy infringement of YouTube. So, be careful before uploading your content.

2. Quality Content Is Important
The content you offer through your channel must offer valuable content. Not just that, you must have a library of valuable content so that the potential sponsors can browse through several materials in your channel. Uploading once in a blue moon or just a few contents in the beginning and expecting YouTube sponsorships to pour in is not the way out to acquire supporters.

3. Leave Your Business Email
Always add a business email ID to your channel, which shows that you would love to receive business inquiries. This is the ID where you will receive notifications for friend requests, video comments, and even the battering messages once you have a large fan following.

4. Try to Make Your Video Eye-catching
A high-quality video will also attract sponsors. Don’t just put your footage together and upload it to YouTube, add some transitions, elements, and effects to make it more entertaining and attractive. Yet not everyone is able to edit videos perfectly, that’s why we would like to recommend Filmora for you.
Filmora is a video editing software for people of different levels. For beginners, the Instant Mode, Template Mode saves you from the trouble of finding the proper transitions or elements. For experienced, the Green Screen, Split Screen, Speed Ramping, and more allow you to add more effects to your video.
Check the below videos to find out the features of Filmora and download it to get started with video editing.
Part 2: How To Get A Sponsor For Youtube Channel
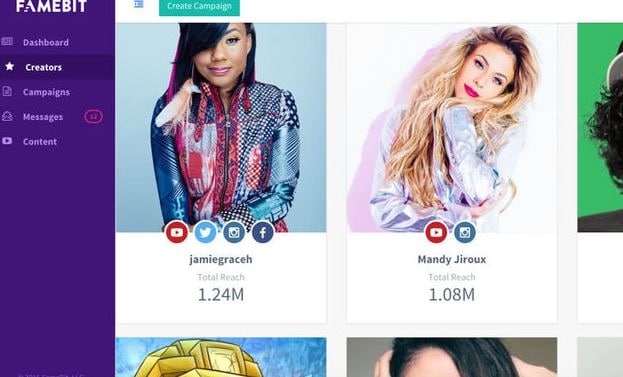
1. Use YouTube Sponsorship Platform – Famebit
If you are searching for YouTube sponsorship for small channels, Famebit is a trusted platform that can be considered. It is an interface for the advertisers and the video creators who require sponsorship for their content.
Utilizing Famebit can be beneficial in acquiring more than the average amount of cash as it is added by Google. If you have 5000 endorsers for your channel, you can very well utilize Famebit to obtain YouTube sponsorship for small channels.
You can explore various items like contraptions, innovations, designs, and more when you get to their commercial center by making a free record. Famebit charges 10% of the sponsored amount and the installment is made by check or PayPal.
2. Reach Out Directly
Reaching out to the people directly is one of the tried and tested ways to acquire YouTube sponsorship for small channels. Research and try to find 50 to 100 companies that would be interested in your channel.
It will not be much difficult to search for that one person within this list whom you can connect with directly. Once you have the company’s list and detailed contact information of those companies, send a mail inviting them to check your channel and show your interest to partner with them.
It is essential to make yourself stand out in the colossal crowd. Ensure your channel is unique and somewhat different from the rest because the contacted companies keep receiving partnering submissions from several other content creators too.
One important thing is not to send out the same old letter to all 50 companies and keep hoping to receive a positive response from at least one. Try to focus on your channel’s USP and highlight the same in your letter to the companies while trying to contact the companies for YouTube Sponsorship.

3. Remember To Attend Exhibition
The trade shows and exhibitions are a great way to search for YouTube sponsorship for small channels. The exhibitions that focus on new media give a huge platform for you to find a sponsor when you participate in it.
Such events offer tricks and tips, helps you to talk to other content creators, and also lets you connect with the brand managers who can offer your channel with YouTube sponsorship.

Part 3: Types of Sponsorship
1. Product Sponsorships
When you are searching for sponsorship for a particular product, ensure that it is relevant to your channel. Never approach the sponsors without ensuring the same as you might put off your viewers and your sponsors will not achieve their expected results. You might lose both your sponsors and audiences in such a case.
When you try to get YouTube sponsorship for small channels, it is quite difficult as the promotion of the product becomes limited to whatever small following they have. Product reviews and tutorials are the best ways to obtain product sponsorships.
2. Paid Sponsorship
Among all sponsorships, paid sponsorship is the most challenging one. Usually, when you review the products of the affiliate links in your videos, you earn revenues, but, in the paid sponsorship you earn by advertising product and company links on your channel.
When you add the company’s products to your videos, you earn money. It appears at the beginning and at the end of your videos after it is played on your YouTube channel.
3. Affiliate Sponsorship
It is the easiest of all sponsorships but also the least revenue-generating one too. Affiliate sponsorship works by sharing affiliate codes and links. It is used by your audiences to obtain discounts or offer you a reward.
There are two types in which affiliate sponsorship works. One is the discounting option where the code is shared and the viewers use these codes to get discounts anywhere between 5-15% in shopping products from that same site. Another option is to use the affiliate code to integrate it into an URL that offers profits to a content creator in form of traffic.
Conclusion
Not just the popular channels, the newbies can also earn YouTube sponsorship when they know the way outs. Follow the above tricks to get the youtube sponsorship for small channels without much effort. If your content is unique and your process to reach the sponsors is right, you can definitely make money through this medium. If you want to edit a YouTube video, Filmora can help you with its powerful features.
Richard Bennett
Richard Bennett is a writer and a lover of all things video.
Follow @Richard Bennett
Richard Bennett
Mar 27, 2024• Proven solutions
Are you looking for YouTube sponsorship? Getting YouTube sponsorship for small channels might seem to be a very difficult goal. Whenever the word sponsors strikes your mind, you think of the big and expensive commercials.
However, if you lower your expectation from the big commercial companies, there are several other companies in the market that can help you with the YouTube sponsorship.
In this article, you will learn how to get YouTube sponsorship and make money out of it.
- Part1: Before You Start Applying For Sponsorship
- Part2: How To Get A Sponsor For Youtube Channel
- Part3: Types of Sponsorship
Part 1: Before You Start Applying For Sponsorship
1. Read YouTube Rules
As you are a small channel, you must be very cautious about the YouTube rules. Never put up any abusive content on your channel that degrades the value of YouTube. Ensure that your channel’s content fits the directions and guidelines of YouTube.
The supporters of YouTube sponsorship for small channels would never wish to get associated with channels that might be erased due to the strategy infringement of YouTube. So, be careful before uploading your content.
2. Quality Content Is Important
The content you offer through your channel must offer valuable content. Not just that, you must have a library of valuable content so that the potential sponsors can browse through several materials in your channel. Uploading once in a blue moon or just a few contents in the beginning and expecting YouTube sponsorships to pour in is not the way out to acquire supporters.
3. Leave Your Business Email
Always add a business email ID to your channel, which shows that you would love to receive business inquiries. This is the ID where you will receive notifications for friend requests, video comments, and even the battering messages once you have a large fan following.
4. Try to Make Your Video Eye-catching
A high-quality video will also attract sponsors. Don’t just put your footage together and upload it to YouTube, add some transitions, elements, and effects to make it more entertaining and attractive. Yet not everyone is able to edit videos perfectly, that’s why we would like to recommend Filmora for you.
Filmora is a video editing software for people of different levels. For beginners, the Instant Mode, Template Mode saves you from the trouble of finding the proper transitions or elements. For experienced, the Green Screen, Split Screen, Speed Ramping, and more allow you to add more effects to your video.
Check the below videos to find out the features of Filmora and download it to get started with video editing.
Part 2: How To Get A Sponsor For Youtube Channel
1. Use YouTube Sponsorship Platform – Famebit
If you are searching for YouTube sponsorship for small channels, Famebit is a trusted platform that can be considered. It is an interface for the advertisers and the video creators who require sponsorship for their content.
Utilizing Famebit can be beneficial in acquiring more than the average amount of cash as it is added by Google. If you have 5000 endorsers for your channel, you can very well utilize Famebit to obtain YouTube sponsorship for small channels.
You can explore various items like contraptions, innovations, designs, and more when you get to their commercial center by making a free record. Famebit charges 10% of the sponsored amount and the installment is made by check or PayPal.
2. Reach Out Directly
Reaching out to the people directly is one of the tried and tested ways to acquire YouTube sponsorship for small channels. Research and try to find 50 to 100 companies that would be interested in your channel.
It will not be much difficult to search for that one person within this list whom you can connect with directly. Once you have the company’s list and detailed contact information of those companies, send a mail inviting them to check your channel and show your interest to partner with them.
It is essential to make yourself stand out in the colossal crowd. Ensure your channel is unique and somewhat different from the rest because the contacted companies keep receiving partnering submissions from several other content creators too.
One important thing is not to send out the same old letter to all 50 companies and keep hoping to receive a positive response from at least one. Try to focus on your channel’s USP and highlight the same in your letter to the companies while trying to contact the companies for YouTube Sponsorship.
3. Remember To Attend Exhibition
The trade shows and exhibitions are a great way to search for YouTube sponsorship for small channels. The exhibitions that focus on new media give a huge platform for you to find a sponsor when you participate in it.
Such events offer tricks and tips, helps you to talk to other content creators, and also lets you connect with the brand managers who can offer your channel with YouTube sponsorship.
Part 3: Types of Sponsorship
1. Product Sponsorships
When you are searching for sponsorship for a particular product, ensure that it is relevant to your channel. Never approach the sponsors without ensuring the same as you might put off your viewers and your sponsors will not achieve their expected results. You might lose both your sponsors and audiences in such a case.
When you try to get YouTube sponsorship for small channels, it is quite difficult as the promotion of the product becomes limited to whatever small following they have. Product reviews and tutorials are the best ways to obtain product sponsorships.
2. Paid Sponsorship
Among all sponsorships, paid sponsorship is the most challenging one. Usually, when you review the products of the affiliate links in your videos, you earn revenues, but, in the paid sponsorship you earn by advertising product and company links on your channel.
When you add the company’s products to your videos, you earn money. It appears at the beginning and at the end of your videos after it is played on your YouTube channel.
3. Affiliate Sponsorship
It is the easiest of all sponsorships but also the least revenue-generating one too. Affiliate sponsorship works by sharing affiliate codes and links. It is used by your audiences to obtain discounts or offer you a reward.
There are two types in which affiliate sponsorship works. One is the discounting option where the code is shared and the viewers use these codes to get discounts anywhere between 5-15% in shopping products from that same site. Another option is to use the affiliate code to integrate it into an URL that offers profits to a content creator in form of traffic.
Conclusion
Not just the popular channels, the newbies can also earn YouTube sponsorship when they know the way outs. Follow the above tricks to get the youtube sponsorship for small channels without much effort. If your content is unique and your process to reach the sponsors is right, you can definitely make money through this medium. If you want to edit a YouTube video, Filmora can help you with its powerful features.
Richard Bennett
Richard Bennett is a writer and a lover of all things video.
Follow @Richard Bennett
Also read:
- In 2024, Efficient Trimming Made Simple with Top 10 Software
- A Quick Guide to Chroma Key Background
- Incorporating Cards and Annotations in YouTube Content
- Legal Landscapes Understanding YouTube & CC Divergences
- Navigating YouTube Video Production Tools
- The Definitive Guide to Proportion Perfection in YouTube
- 2024 Approved Convert with Confidence Best Apps to Turn Spotify Into YouTube Channels
- 10+ Top Videos & Tutorials on Best iPhone/iPad Editing Tools
- In 2024, 10 FREE YouTube Playlist Downloaders [Online/PC/Android/iOS]2
- [Updated] Deciphering the Coded Language of Concealed YouTube Movies
- [New] Crafting Compelling YouTube Narratives with Chapters and Subsections
- The Power of Personal Storytelling in Video Content
- YouTube's Leading 20 Music Videographers
- The Ultimate List of 10 Highest Subscribed YouTube Stars
- [New] Breakout 8 Channel Visionaries Amplifying Impact
- In 2024, Balancing Act Tripod Use for Stable Vlogging
- Top 9 Free Video Channel Logomakers Showcase Reviewed
- Visionary Editor Pro Flawless PC Cinematic Creation
- In 2024, Assessing Your Video Streaming Needs To Subscribe or Not to Subscribe?
- ScholarStreams Essential Educational YouTube Sites
- How to Use Google Trends to Come up with Video Ideas [Easy Guide]
- Cutting the Excess A Guide to Shortening YouTube Videos
- Crafting Professionalism The Best Practices for Post-Upload Editing for 2024
- [New] Analyzing T-Series' Revenue Generation on Youtube Channels
- In 2024, Breaking the Norm Eye-Catching Talents Amongst Female YouTube Stars
- Perfect & Unique Youtube Channel Names for Professional Filmmakers & Vloggers (No More than 156 Characters)
- [Updated] Boosting Income Through Effective Video Marketing
- 2024 Approved Evaluating Mr. Beast's Monetary World
- Indulge in Infinite Cinema YouTube’s Top 10 for Peaceful Nights
- [Updated] Conquer Your Screen Top 10 Simple YouTube Projects for All Creators
- In 2024, Earning Power Through Engagement Ajay’s Success on YouTube Monetization
- Community Builders Gamer YouTubers
- Leading YouTube Creators Top 10 By Views
- [Updated] Blueprints to Masterful Valorant Thumbnail Designs on Social Platforms
- In 2024, Things You Must Know for Screen Mirroring Apple iPhone 14 Plus | Dr.fone
- How To Open Your iPhone 12 Pro Without a Home Button | Dr.fone
- 2024 Approved The Essential Guide to Affordable Video Conferencing Tools For Corporate/Educational Use
- Comprehensive Guide to Nero WaveAudio Editor
- Updated 2024 Approved Smooth Operator Best Free Video Stabilization Software
- New 2024 Approved Embark on a Journey with These Top 9 State-of-the-Art AI-Enabled Voice Assistants for a Better Day
- [Updated] In 2024, Step-by-Step FBX Capture For Gamers
- How to Repair Broken video files of Poco M6 5G on Mac?
- How to Reset a Locked Realme Note 50 Phone
- Useful ways that can help to effectively recover deleted files from Spark Go (2024)
- Undelete lost photos from Itel A60s.
- The Complete Guide to Tecno Phantom V Fold FRP Bypass Everything You Need to Know
- [New] Will Your TV Screen Showcase FB Feeds Soon?
- How to use Snapchat Location Spoofer to Protect Your Privacy On Motorola Defy 2? | Dr.fone
- The Clear Way to Capture Your Screen – Best Free Tools Explored
- 2024 Approved Adding Realism to Portraits Applying Motion Blur in Picsart
- Updated Best Practices to Minimize Resonance in Sound Captures for 2024
- In 2024, The Ultimate Guide How to Bypass Swipe Screen to Unlock on Vivo X90S Device
- 2024 Approved The Best Watermark-Free Video Joining Software for You
- [Updated] In 2024, Top 5 PS1 Emulation Software on Modern Computers
- [Updated] 2024 Approved Can You Project YouTube & FB Videos Onto Your HDTV?
- [New] In 2024, Discovering Top Foodie Influencers on TikTok
- [Updated] Add Personality to Your Device A Comprehensively Tailored Sound & Ringtone Guide for Android
- The Ultimate FCP Hack Flipping Clips in Just 4 Clicks for 2024
- [Updated] Gaining Heavy Followers & Verification Status A Quick Guide with Top 6 Insights
- 7 Solutions to Fix Error Code 963 on Google Play Of Realme 11X 5G | Dr.fone
- Updated 2024 Approved How to Do Perfect Match Paint 100 the Simple Way
- Configure Streamlabs on Your Mac Using OBS
- [Updated] In 2024, Exploring User Experiences Triller & TikTok Compared (Max 156 Chars)
- [Updated] In 2024, The Quick-Step to Cutting Edge GIF Creation From Vimeo
- In 2024, Ways To Find Unlocking Codes For Vivo V30 Lite 5G Phones
- Title: "[New] Capturing Top-Notch Audio Without Microphone Dependency"
- Author: Brian
- Created at : 2024-05-25 12:31:07
- Updated at : 2024-05-26 12:31:07
- Link: https://youtube-video-recordings.techidaily.com/new-capturing-top-notch-audio-without-microphone-dependency/
- License: This work is licensed under CC BY-NC-SA 4.0.
