
!["[New] Captivating Viewers YouTubers’ Guide to Dynamic Game Sessions"](https://www.lifewire.com/thmb/hGgaSloXZI-BPV8BPpLHy5urmOA=/400x300/filters:no_upscale():max_bytes(150000):strip_icc()/inside-impero-cinema--central-region--asmara--eritrea----1174900385-f49e10d112a6451c89a8310bdb0ecc4e.jpg)
"[New] Captivating Viewers YouTubers’ Guide to Dynamic Game Sessions"
Captivating Viewers: YouTubers’ Guide to Dynamic Game Sessions
How to Live Stream on YouTube Gaming?

Richard Bennett
Mar 27, 2024• Proven solutions
1. Live Stream on YouTube Gaming with OBS
You need to follow these simple Step s to use OBS for YouTube Live Streaming:
**Step 1:**First of all you need to login to your YouTube account. You might be aware of the fact that same YouTube account is used for YouTube gaming needs.
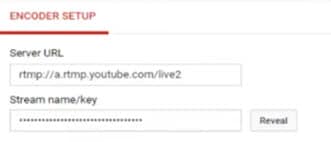
**Step 2:**Once entered inside your account then you need to visit the Go live streaming options and then from drop down menu simply choose Stream Now option.
**Step 3:**It is time to fill the details on screen; put impressive words for your live stream description so that it can grab attention of more viewers. Then select category as ‘Gaming’.

**Step 4:**Now you need to copy the stream key.
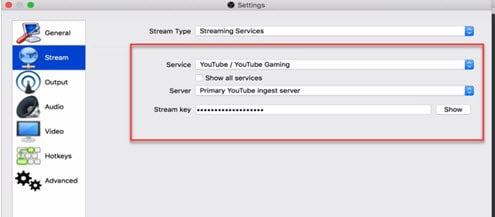
**Step 5:**Now open your OBS tool and then select YouTube as your active game streaming service. Users here need to paste that copied streaming key of Step 5 into the space provided on OBS settings page.
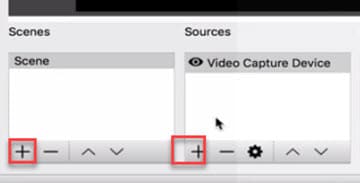
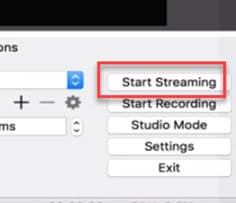
**Step 6:**It is time to make your desktop a video source.
**Step 7:**Once all these settings are completed then you need to hit the start streaming option.
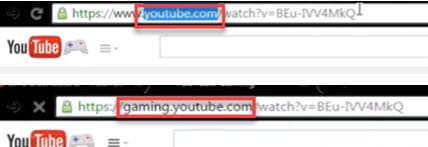
**Step 8:**The service may take few seconds to bring your live on YouTube and after this small duration you will be connected to your channel with your streamed content. Then change your url from youtube.com to gaming.youtube.com
**Step 9:**You are all set to be live on your YouTube gaming profile.
2. Live Stream on YouTube with Elgato Game Capture HD
A: Basic Settings for Elgato Game Capture HD
The Step s below will help you to get ready for streaming with all basic settings that are required by Elgato Game Capture HD tool.
**Step 1:**First of all, you need to open your browser, search for Elgato Game Capture HD software on its official website and then download it for your system. Get it installed.
**Step 2:**Once installation process is complete then launch your software.
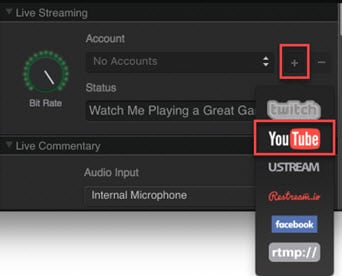
**Step 3:**Now you need to hit the add button on screen and select YouTube from drop down menu.
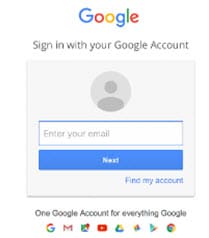
Step 4: It is time to sign in with your Google Account.
**Step 5:**After sign up process, allow the Elgato Game Capture tool to make connection with your YouTube account.

**Step 6:**Soon you will be able to access you account from Elgato platform.

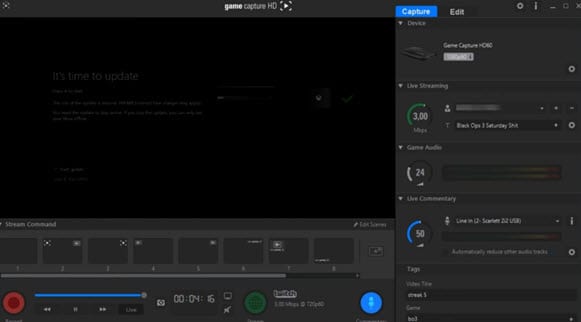
**Step 7:**It is time to make adjustments for streaming settings.
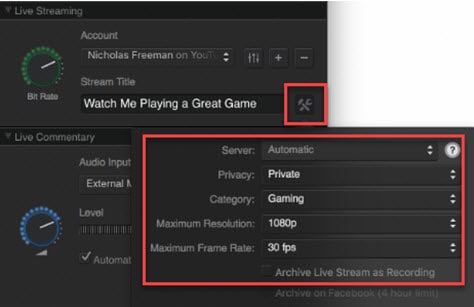
B: Test your Bandwidth and make adjustments for Stream settings
It is essential to check speed of your internet connection during live streaming because if it goes slow then your content will become annoying to viewers and it will decay the reputation of your channel. So prefer to use following Step s to complete the basic settings and to test your internet connection.
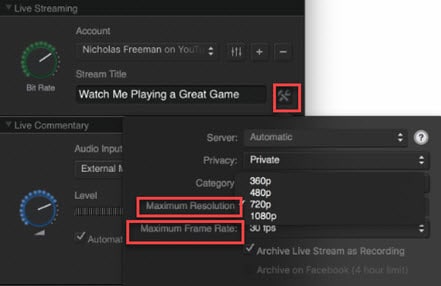
**Step 1:**Open your browser and then visit the speedtest.net platform. You can also use other similar kind of websites to ensure the speed of your internet. Note that you will find a Bit Rate dial in the live streaming section, here you can make adjustments for bit rates to bring it to desired level.
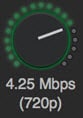
**Step 2:**It is also possible to make customized settings for frame rate and resolution as per need of your stream content.
**Step 3:**One can also prefer to archive his streaming.
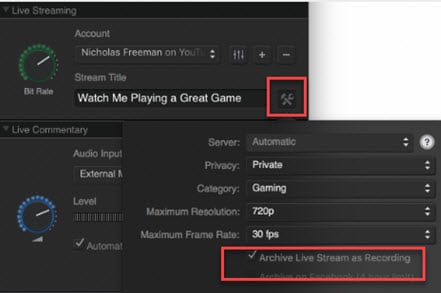
**Step 4:**As soon as you have completed all above settings then you need to hit the stream button on screen.

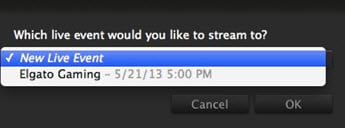
**Step 5:**Soon your software will ask you to select the event that you want to stream, choose your desired event and then press Ok. Soon you will be live on YouTube.
Richard Bennett
Richard Bennett is a writer and a lover of all things video.
Follow @Richard Bennett
Richard Bennett
Mar 27, 2024• Proven solutions
1. Live Stream on YouTube Gaming with OBS
You need to follow these simple Step s to use OBS for YouTube Live Streaming:
**Step 1:**First of all you need to login to your YouTube account. You might be aware of the fact that same YouTube account is used for YouTube gaming needs.
**Step 2:**Once entered inside your account then you need to visit the Go live streaming options and then from drop down menu simply choose Stream Now option.
**Step 3:**It is time to fill the details on screen; put impressive words for your live stream description so that it can grab attention of more viewers. Then select category as ‘Gaming’.
**Step 4:**Now you need to copy the stream key.
**Step 5:**Now open your OBS tool and then select YouTube as your active game streaming service. Users here need to paste that copied streaming key of Step 5 into the space provided on OBS settings page.
**Step 6:**It is time to make your desktop a video source.
**Step 7:**Once all these settings are completed then you need to hit the start streaming option.
**Step 8:**The service may take few seconds to bring your live on YouTube and after this small duration you will be connected to your channel with your streamed content. Then change your url from youtube.com to gaming.youtube.com
**Step 9:**You are all set to be live on your YouTube gaming profile.
2. Live Stream on YouTube with Elgato Game Capture HD
A: Basic Settings for Elgato Game Capture HD
The Step s below will help you to get ready for streaming with all basic settings that are required by Elgato Game Capture HD tool.
**Step 1:**First of all, you need to open your browser, search for Elgato Game Capture HD software on its official website and then download it for your system. Get it installed.
**Step 2:**Once installation process is complete then launch your software.
**Step 3:**Now you need to hit the add button on screen and select YouTube from drop down menu.
Step 4: It is time to sign in with your Google Account.
**Step 5:**After sign up process, allow the Elgato Game Capture tool to make connection with your YouTube account.
**Step 6:**Soon you will be able to access you account from Elgato platform.
**Step 7:**It is time to make adjustments for streaming settings.
B: Test your Bandwidth and make adjustments for Stream settings
It is essential to check speed of your internet connection during live streaming because if it goes slow then your content will become annoying to viewers and it will decay the reputation of your channel. So prefer to use following Step s to complete the basic settings and to test your internet connection.
**Step 1:**Open your browser and then visit the speedtest.net platform. You can also use other similar kind of websites to ensure the speed of your internet. Note that you will find a Bit Rate dial in the live streaming section, here you can make adjustments for bit rates to bring it to desired level.
**Step 2:**It is also possible to make customized settings for frame rate and resolution as per need of your stream content.
**Step 3:**One can also prefer to archive his streaming.
**Step 4:**As soon as you have completed all above settings then you need to hit the stream button on screen.
**Step 5:**Soon your software will ask you to select the event that you want to stream, choose your desired event and then press Ok. Soon you will be live on YouTube.
Richard Bennett
Richard Bennett is a writer and a lover of all things video.
Follow @Richard Bennett
Economical Audio Devices for Vloggers on a Budget
Cheap Microphones for Youtubers on a Budget
Richard Bennett
Dec 30, 2022• Proven solutions
An expensive microphone doesn’t mean it is the best option — at least, not for YouTubers. Without professional experience or additional equipment, having a $1000 studio microphone could be wasted money.
If you are on a budget or new to YouTube, and what you want is to improve the audio quality of your video gradually, you should look into the cheaper options first.
In this article, I will highlight microphones in 3 price ranges.
We will have a look at each of these microphones, their pros, and cons, and then you can decide which one will be best for your channel and your budget.
As for keeping with your financial needs, we aren’t going to be looking at any XLR microphones, as they will require an audio interface, thus increasing your price range. The microphones in this list will be plug-and-plays, and you will only need the basic audio recording skills to get started.
Disclaimer: Prices are subjected to change.
YouTube Microphones for Under $20
BOYA BY-M1 - $16.99
TheBOYA BY-M1 is a lavalier microphone (a hand-free mic that clips onto your clothing) that connects to smartphones, DSLR, computers, and other audio recorders.

Pro: As an omnidirectional condenser microphone, it will be able to pick up audio from 360 degrees, and with 20 feet (6 meters) of cable, you can have a significant range movement even if you are connected to the camera.
The BOYA BY-M1 is a terrific choice for YouTubers on a budget that is frequently making videos on the go. It’s easy to carry around, and the ability to simply connect to a smartphone means you can set up and shoot your video on the fly.
Con: This mic, although it has a great range, can also pick up subtle movements you make as it is clipped onto you. Not great if there is a lot of action in your videos.
TONOR PC Microphone Computer Condenser - $15.99
The TONOR is an easy-to-setup condenser microphone that you can connect to your computer via USB and start recording in seconds.

Pro: The value of this microphone is in its ease of use. With a flexible, foldable stand, you can adjust the TONOR PC microphone the way it suits your setup. The legs of the stand are retractable, which makes it easy for you to store. If you are a gamer or creating videos primarily from your desk, this is a perfectly suitable microphone for you to start your YouTube journey with.
Con: The audio quality of this mic can help you get the job done, but it won’t blow you away. The cable is attached to the microphone and is 6.5 feet (2 meters) long, which isn’t a wide range. It’s pretty much restricted to the desk with your computer. This microphone has limitations, and high-achieving YouTubers will certainly grow out of it.
YouTube Microphones for Under $50
Purple Panda Lavalier Microphone - $23.99
The Purple Panda lavalier microphone comes with multiple adapters and is compatible with nearly all devices, including smartphone, DSLR, computers, and even GoPro cameras. The only device where you will need anadditional adapter is if you have an iPhone 7.

Pro: This microphone is a versatile option for YouTubers who create a variety of content. It doesn’t require any battery and is powered by whatever device it is plugged into, which is great for YouTubers with already so many devices to keep charged.
Con: Much like the BOYA BY-M1, the Purple Panda, as it is clipped onto your lapel or shirt collar, will capture the sound of your clothes brushing against it if too much movement occurs.
Samson Go Mic Portable USB Condenser Microphone - $37.73
The Samson Go microphone is the kind of mic that can fit in your pocket and be taken with you anywhere.

Pro: This microphone has both a cardioid and an omnidirectional mode. This means that you can choose to have your microphone focused more on the subject speaking by switching to cardio or switch to Omni-directional to capture audio from the entire surrounding.
It is designed to be able to clip onto a flat surface such as your computer screen. This allows you to place the microphone on different levels to record.
Con: Because of its unique design and the portability of the device, it will suffer wear-and-tear faster. Attention to storage is necessary to increase the lifespan of the device.
XIAOKOA Mini Condenser Microphone with Stand - $24.99
TheXIAOKOA portable mini condenser microphone is compatible with smartphones, computers, and any devices using 3.5mm recording jacks.

Pro: With a cardioid pickup, this condenser microphone will do a fine job picking up vocals. If you are a YouTuber who does a lot of singing videos, this is definitely an affordable microphone to check out.
Con: This microphone, perhaps primarily designed for karaoke, has an echo feature that, although might create new dimensions to your vocals, may not be desired for your YouTube video. This feature can be problematic, as it could spoil your recording.
TAKSTAR SGC-598 - $26.93
The TAKSTAR SGC is a condenser microphone, and it can be fixed onto your camera, which simplifies your YouTube setup. This camera can plug directly into your camera, reducing the audio tracks you need to manage when editing.

Pro: The camera-mounted microphone has a shock-resistant design that reduces noise when the camera is moved. The cardioid microphone will be able to pick up audio in the direction it is pointed in, reducing noise capturing from behind the camera. This is a good microphone for vlogging or interviews.
Con: The TAKSTAR SGC requires one AA battery, so you’ll have to remember to carry a backup every time you film.
Limited to a vocal subject standing 4-5 feet away, any more and the microphone will be hard-pressed to pick up the audio without capturing a lot of surround audio.
The design requires it to be mounted to the camera. If you want to separate it from the camera and still have it recorded, a bit of creativity is required to keep it standing.
YouTube Microphones for Under $100
Behringer C-1U - $59.99
The Behringer C-1U is a condenser microphone with a cardioid pickup pattern that connects to your computer via USB.

Pro: This microphone has a solid metal build and has a good weight. It is quick and easy to set up and is a good microphone for anyone wanting a simple solution for better audio on YouTube.
Con: A pop filter is recommended for this microphone as it picks up a lot of popping sounds when the subject speaks.
Blue Microphones Snowball iCE - $64.94
The Blue Microphones Snowball iCE is a cardioid condenser microphone that connects to your computer via USB.

Pro: The Snowball iCE is a plug-and-play microphone that is super easy to use and doesn’t require any additional battery. Simply connect it to the computer, and you are ready to record your voice. It captures clear and crisp audio for a single voice or single-person recording.
Con: The range of this microphone is not that great; you’ll have to be close and be speaking directly into the microphone to get the best audio. It is not ideal for recording moving subjects or those who are further than 2-3 feet away.
Marantz Professional MPM-1000U - $57.06
The Marantz Professional MPM-1000U is a condenser microphone that records in a cardioid polar pattern that connects to your computer via USB.

Pro: This budget microphone has excellent all-metal construction. It has a plug-and-play setup and doesn’t require any drivers or installations. It records great instrumentals and would recommend it to those who are recording music for YouTube.
Con: May pick up extraneous noises if you are recording vocals while there are movements in your surrounding, but otherwise, this is an excellent microphone in its price range.
Final Thoughts
When looking for microphones under $100, the difference in audio quality is not going to be drastic. What you need to consider is how you are going to be using this piece of equipment.
If your YouTube videos consist of you in a quiet studio environment, I would recommend the Marantz Professional MPM-1000U .
However, if you will be recording on the go and require your hands to be free in the scene, I recommend getting a lavalier microphone such as the Purple Panda .
But, if you are going to be recording other people, in addition to yourself, I’d say go with the TAKSTAR SGC as it will give you more audio control in busy environments.
What are you looking for in a budget microphone? Let us know in the comments below.
If you want to find a video editing solution that empowers your imagination and creativity yet takes less effort, please try this robust and user-friendly video editing software Wondershare Filmora. It provides special effects, stock photo & video, sound library, etc., which will definitely enhance your productivity and helps to make money by making videos much accessible.


Richard Bennett
Richard Bennett is a writer and a lover of all things video.
Follow @Richard Bennett
Richard Bennett
Dec 30, 2022• Proven solutions
An expensive microphone doesn’t mean it is the best option — at least, not for YouTubers. Without professional experience or additional equipment, having a $1000 studio microphone could be wasted money.
If you are on a budget or new to YouTube, and what you want is to improve the audio quality of your video gradually, you should look into the cheaper options first.
In this article, I will highlight microphones in 3 price ranges.
We will have a look at each of these microphones, their pros, and cons, and then you can decide which one will be best for your channel and your budget.
As for keeping with your financial needs, we aren’t going to be looking at any XLR microphones, as they will require an audio interface, thus increasing your price range. The microphones in this list will be plug-and-plays, and you will only need the basic audio recording skills to get started.
Disclaimer: Prices are subjected to change.
YouTube Microphones for Under $20
BOYA BY-M1 - $16.99
TheBOYA BY-M1 is a lavalier microphone (a hand-free mic that clips onto your clothing) that connects to smartphones, DSLR, computers, and other audio recorders.
Pro: As an omnidirectional condenser microphone, it will be able to pick up audio from 360 degrees, and with 20 feet (6 meters) of cable, you can have a significant range movement even if you are connected to the camera.
The BOYA BY-M1 is a terrific choice for YouTubers on a budget that is frequently making videos on the go. It’s easy to carry around, and the ability to simply connect to a smartphone means you can set up and shoot your video on the fly.
Con: This mic, although it has a great range, can also pick up subtle movements you make as it is clipped onto you. Not great if there is a lot of action in your videos.
TONOR PC Microphone Computer Condenser - $15.99
The TONOR is an easy-to-setup condenser microphone that you can connect to your computer via USB and start recording in seconds.
Pro: The value of this microphone is in its ease of use. With a flexible, foldable stand, you can adjust the TONOR PC microphone the way it suits your setup. The legs of the stand are retractable, which makes it easy for you to store. If you are a gamer or creating videos primarily from your desk, this is a perfectly suitable microphone for you to start your YouTube journey with.
Con: The audio quality of this mic can help you get the job done, but it won’t blow you away. The cable is attached to the microphone and is 6.5 feet (2 meters) long, which isn’t a wide range. It’s pretty much restricted to the desk with your computer. This microphone has limitations, and high-achieving YouTubers will certainly grow out of it.
YouTube Microphones for Under $50
Purple Panda Lavalier Microphone - $23.99
The Purple Panda lavalier microphone comes with multiple adapters and is compatible with nearly all devices, including smartphone, DSLR, computers, and even GoPro cameras. The only device where you will need anadditional adapter is if you have an iPhone 7.
Pro: This microphone is a versatile option for YouTubers who create a variety of content. It doesn’t require any battery and is powered by whatever device it is plugged into, which is great for YouTubers with already so many devices to keep charged.
Con: Much like the BOYA BY-M1, the Purple Panda, as it is clipped onto your lapel or shirt collar, will capture the sound of your clothes brushing against it if too much movement occurs.
Samson Go Mic Portable USB Condenser Microphone - $37.73
The Samson Go microphone is the kind of mic that can fit in your pocket and be taken with you anywhere.
Pro: This microphone has both a cardioid and an omnidirectional mode. This means that you can choose to have your microphone focused more on the subject speaking by switching to cardio or switch to Omni-directional to capture audio from the entire surrounding.
It is designed to be able to clip onto a flat surface such as your computer screen. This allows you to place the microphone on different levels to record.
Con: Because of its unique design and the portability of the device, it will suffer wear-and-tear faster. Attention to storage is necessary to increase the lifespan of the device.
XIAOKOA Mini Condenser Microphone with Stand - $24.99
TheXIAOKOA portable mini condenser microphone is compatible with smartphones, computers, and any devices using 3.5mm recording jacks.
Pro: With a cardioid pickup, this condenser microphone will do a fine job picking up vocals. If you are a YouTuber who does a lot of singing videos, this is definitely an affordable microphone to check out.
Con: This microphone, perhaps primarily designed for karaoke, has an echo feature that, although might create new dimensions to your vocals, may not be desired for your YouTube video. This feature can be problematic, as it could spoil your recording.
TAKSTAR SGC-598 - $26.93
The TAKSTAR SGC is a condenser microphone, and it can be fixed onto your camera, which simplifies your YouTube setup. This camera can plug directly into your camera, reducing the audio tracks you need to manage when editing.
Pro: The camera-mounted microphone has a shock-resistant design that reduces noise when the camera is moved. The cardioid microphone will be able to pick up audio in the direction it is pointed in, reducing noise capturing from behind the camera. This is a good microphone for vlogging or interviews.
Con: The TAKSTAR SGC requires one AA battery, so you’ll have to remember to carry a backup every time you film.
Limited to a vocal subject standing 4-5 feet away, any more and the microphone will be hard-pressed to pick up the audio without capturing a lot of surround audio.
The design requires it to be mounted to the camera. If you want to separate it from the camera and still have it recorded, a bit of creativity is required to keep it standing.
YouTube Microphones for Under $100
Behringer C-1U - $59.99
The Behringer C-1U is a condenser microphone with a cardioid pickup pattern that connects to your computer via USB.
Pro: This microphone has a solid metal build and has a good weight. It is quick and easy to set up and is a good microphone for anyone wanting a simple solution for better audio on YouTube.
Con: A pop filter is recommended for this microphone as it picks up a lot of popping sounds when the subject speaks.
Blue Microphones Snowball iCE - $64.94
The Blue Microphones Snowball iCE is a cardioid condenser microphone that connects to your computer via USB.
Pro: The Snowball iCE is a plug-and-play microphone that is super easy to use and doesn’t require any additional battery. Simply connect it to the computer, and you are ready to record your voice. It captures clear and crisp audio for a single voice or single-person recording.
Con: The range of this microphone is not that great; you’ll have to be close and be speaking directly into the microphone to get the best audio. It is not ideal for recording moving subjects or those who are further than 2-3 feet away.
Marantz Professional MPM-1000U - $57.06
The Marantz Professional MPM-1000U is a condenser microphone that records in a cardioid polar pattern that connects to your computer via USB.
Pro: This budget microphone has excellent all-metal construction. It has a plug-and-play setup and doesn’t require any drivers or installations. It records great instrumentals and would recommend it to those who are recording music for YouTube.
Con: May pick up extraneous noises if you are recording vocals while there are movements in your surrounding, but otherwise, this is an excellent microphone in its price range.
Final Thoughts
When looking for microphones under $100, the difference in audio quality is not going to be drastic. What you need to consider is how you are going to be using this piece of equipment.
If your YouTube videos consist of you in a quiet studio environment, I would recommend the Marantz Professional MPM-1000U .
However, if you will be recording on the go and require your hands to be free in the scene, I recommend getting a lavalier microphone such as the Purple Panda .
But, if you are going to be recording other people, in addition to yourself, I’d say go with the TAKSTAR SGC as it will give you more audio control in busy environments.
What are you looking for in a budget microphone? Let us know in the comments below.
If you want to find a video editing solution that empowers your imagination and creativity yet takes less effort, please try this robust and user-friendly video editing software Wondershare Filmora. It provides special effects, stock photo & video, sound library, etc., which will definitely enhance your productivity and helps to make money by making videos much accessible.
Richard Bennett
Richard Bennett is a writer and a lover of all things video.
Follow @Richard Bennett
Also read:
- Surviving YouTube's Copyright Enforcement Hurdles
- Track Your Traffic The Straightforward Strategy for Scrutinizing YouTube Earnings
- Transform Into a YouTuber Best Tutorials for Novices
- Unifying Your Musical Journey Converting Spotify Plays Into YouTube Music Lists
- 2024 Approved Engaging Vlogger Subjects Each Day
- [New] Developing a Streamlined Subscription Web Address
- 2024 Approved Eternal Banishment of YouTube's Quick Clips
- Vocal Visions Instructions for Posting Songs on YouTube
- 2024 Approved Ace Your Youtube Livestreams Mastering Broadcast Techniques Using WireCast
- Channel Progression Reach and Maintain 10K Viewer Threshold
- 2024 Approved Defeating Darkness in Youtube Videos
- Breaking the Cycle of Zero Video Views on YouTube
- Enhance Visibility YouTube Thumbnails Made Simple for 2024
- Instagram Integration with YouTube Video Sharing
- Maximize Impact Sharing YouTube Videos on Social Media (FB)
- [Updated] Boost Views via Strategic Tagging Tactics
- Earn on YouTube Decoding Recent Policy Changes
- [New] Drive Engagement, Not Farewells Top Strategies to Keep Your Audience Hooked on YouTube
- Swift Transformation Video Aspects to Mac Standard
- [New] 15 Must-Watch Anime Web Channels for Uplifting Days
- In 2024, Cutting-Edge Techniques for Excellent Sound, No Mic Included
- [New] Crafting a YouTube Future Scaling Up or Staying Independent?
- Mastering Free Melodies A Guide for YouTube Producers
- Gain Currency with 500 YouTube Followers
- Navigating the World of YouTube Shorts A Filmmaker's Handbook
- In 2024, Code Commanders Elite Females on YT
- In 2024, Brand Yourself Differently Strategies for Finding Uncommon Names
- 10 Best VR Videos on YouTube to Have Immersive Experience for 2024
- [Updated] Elevating Your Vlogs A List of the Top 12 Professional Cameras
- In 2024, Aesthetic Enigma The Ultimate Backdrop Collection for Video Thumbnails
- Blending Harmonies in a Social Media Slot
- [New] In 2024, The Secrets to Hassle-Free Background Hocus Pocus on Zoom
- [Updated] In 2024, Top 10 Unique Gaming Screen Capture Applications
- New 2024 Approved Where to Download High-Quality MP3s of Purring Animals
- [New] In 2024, Quick Guide Automating Mac Screenshot via Shortcuts
- How to Recover Deleted iPhone 7 Plus Camera Roll Photos and Photo Stream Pictures? | Stellar
- In 2024, How to Watch Hulu Outside US On Apple iPhone 15 Pro Max | Dr.fone
- Infinix Zero 5G 2023 Turbo Not Receiving Texts? 10 Hassle-Free Solutions Here | Dr.fone
- [Updated] Mastering the Art of Online Meeting Recordings with Google for 2024
- New In 2024, Insights From the Best OGG Conversion Tools
- In 2024, The Complete Guide to Video Editors Best Options for Windows, Mac, iOS, Android, and Linux
- In 2024, How to Migrate Android Data From Motorola Edge 2023 to New Android Phone? | Dr.fone
- Updated In 2024, Looking for a Free Video Editor without a Watermark on an Android Device? In This Article, I Will Introduce some of the Best Free Video Editing Apps for Android without Watermark, Keep Reading
- In 2024, Hacks to do pokemon go trainer battles For OnePlus Nord CE 3 5G | Dr.fone
- In 2024, Top 4 SIM Location Trackers To Easily Find Your Lost Samsung Galaxy A24 Device
- Uncomplicated Video Logging Tool W10 for 2024
- Explore Pathways to Amusement Sounds
- Award Winners in Writing for Different Movie Types for 2024
- New Best 8 Cloud-Based Speech Capture Tools for 2024
- In 2024, How to Transfer Data from OnePlus Ace 2V to BlackBerry | Dr.fone
- How to Track WhatsApp Messages on Oppo Reno 11F 5G Without Them Knowing? | Dr.fone
- Title: "[New] Captivating Viewers YouTubers’ Guide to Dynamic Game Sessions"
- Author: Brian
- Created at : 2024-05-25 12:30:57
- Updated at : 2024-05-26 12:30:57
- Link: https://youtube-video-recordings.techidaily.com/new-captivating-viewers-youtubers-guide-to-dynamic-game-sessions/
- License: This work is licensed under CC BY-NC-SA 4.0.
