
![[New] Building Inspiring Lifestyle Content for Viewers](https://www.lifewire.com/thmb/4GZTLPOe6q523tAZNmvcN9uct_c=/400x300/filters:no_upscale():max_bytes(150000):strip_icc()/GettyImages-753288297-5b1837e631283400368d60e0.jpg)
[New] Building Inspiring Lifestyle Content for Viewers
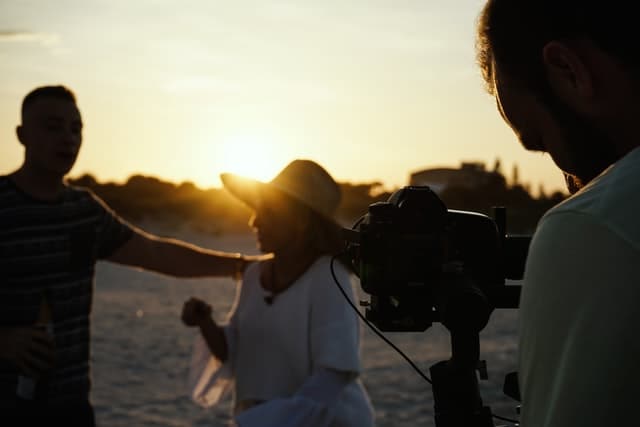
Building Inspiring Lifestyle Content for Viewers
How to Create a Lifestyle Video to Inspire Your Audience

Richard Bennett
Mar 27, 2024• Proven solutions
Do you wish to show your brand or product to inspire your audience with the lifestyle that they aspire to have? Are you on the lookout for innovative ways to earn intensely loyal and interactive followers for your business? Creating a lifestyle video that appeals to a niche demographic and helps your audience visualize how your products fit into their way of life is the ideal way to motivate them to take action and become your customer.

Whether you are a lifestyle brand or not, you need to offer content that educates and informs your audience and stands out amongst the best in the industry. Videos are an excellent way to connect with the audience, especially for brands that wish to engage their customers with meaningful content.
Today, businesses of every size tend to favor lifestyle videos that better appeal to the audience and communicate the brand’s values. Creating an attractive lifestyle video can thus be the ticket to reach a wider audience and upgrade the digital presence of every business.
- Part 1: What is Lifestyle Video?
- Part 2: 6 Key Benefits of Creating a Lifestyle Video
- Part 3: How to Create a Lifestyle Video?
- Part 4: How to Promote Your Lifestyle Video?
What is Lifestyle Video?
Lifestyle content exemplifies the ‘lifestyle’ behind a product or service and appeals to the demographic that you are trying to reach. It is a form of video marketing that pushes products and services to customers by showing the quality of life associated with a particular brand.
The principal objective of lifestyle content is appealing to a specific demographic, culture, or subculture. With these videos, you can focus on your products and services, using stunning visuals and action shots to portray a beautiful picture of what your brand’s potential customers’ lives will be like if they become the consumer of your product and services.
6 Key Benefits of Creating a Lifestyle Video
1. Informing & Educating
One of the most significant benefits of lifestyle content is that it helps customers understand products. With a plethora of choices out there, marketers today are no longer taking the pitching kind of approach. They want to approach their audience with a value-based offer instead of sales. And with lifestyle videos, you can excel at giving customers a close-up look at your products and services.
2. Caters to Your Audience’s Interests
Lifestyle content caters to the target audience. Since these videos define your market and your brand, it carries a specific style that’s based on your aesthetics or looks. What makes video marketing so effective is that they can introduce your story and brand in an interesting way to potential customers.
3. Search Engine Optimization
Search engines love high-quality content like videos. Using lifestyle videos in your web pages and other types of content can thus work wonders for search engine optimization. As long as your lifestyle video is well-optimized with the right keywords, a solid title, and a good meta description, your video content can increase your web traffic.
4. Great Promotional Tool
Brands can distribute lifestyle content on different channels for reaching your target audience right away. Once you post the video on your website, you can share it on your social networking platforms or promote it with paid ads. This way, you can get customers excited about what you are offering them.
5. Taps into Emotions
Emotions are a significant component of the purchasing decision of consumers. Studies have found that ad campaigns with only emotional content perform about twice as well compared to those with only rational content. So, creating lifestyle video content that makes your audience feel good can put your business in a positive light.
6. Boosts Conversions
Lifestyle videos are excellent for conversions on websites as they influence visitors by promoting the lifestyle a customer can achieve if they patronize the product or service. What makes such content more compelling is that they excite customers about what you offer them.
How to Create a Lifestyle Video?
The most stunning lifestyle videos are polished, sleek, and visually appealing. Developing a lifestyle video content that exceeds your target audience’s expectations is vital to appeal to your customer’s perfect lifestyle. Creating these videos is easy if you follow the step-by-step guide.
Step 1: Pre-Production
The pre-production stage is when the planning happens for a video. From creative brainstorming to innovative storyboarding, everything happens here. Pre-production begins with experts getting a feel of your product, who it appeals to, and how it works. Next, is the stage of scripting out your video, writing down the visual ideas, and the product features and dialogue that go alongside it. Finally, you need to round up talents like actors, voice-actors, locations, and extras needed to film.
Step 2: Production
Once your lifestyle video is meticulously planned out, your next step is to film it. While shooting an average video takes eight hours, some videos with several locations can require two full shooting days or more. The exact shooting schedule depends on what the script demands.
Since these videos are meant to capture a particular way of life for appealing to a specific kind of person, you should not cut corners in terms of quality. Remember, the better the quality of the footage, the more appealing the end product will be.
Step 3: Post-Production
It is the stage where you need to gather the footage you have shot so far and put them along with voice-over or music depending on your script demands. The main goal in this stage is to put the visuals together in a captivating way to promote your service and product. Here, using a powerful video editing tool seems necessary because you need to make your lifestyle video stand out from the crowd.


How to Promote Your Lifestyle Video?
A lifestyle video is one of the popular marketing tools for businesses of every size today. These videos are more memorable, more engaging, and much more popular than any other kinds of content among consumers. But, are you curious as to how to promote your lifestyle content to gain maximum exposure? All you need to do is distribute your lifestyle content on the proper channels to grab your audience’s attention and engage with new consumers.

Social Media
Lifestyle videos are aspirational, enlightening in nature, and made to appeal to specific demographics. It makes them great content for sharing on social networking platforms – an active digital marketing channel. Share your lifestyle content across various social media accounts. Ensure you attach a call-to-action for your friends and followers to share.
Your Company’s Website
Hosting your promotional videos on your website, particularly your homepage is an excellent way to immediately introduce incoming web traffic to your products and services, thus increasing your site’s SEO ranking. Besides the homepage, sharing the video content on your blogs is another unique way of re-purposing your content.
Media Outlets
Find out related media outlets that your potential customers read and follow daily. It would help if you also pitched journalists who take an interest in your brand or consider purchasing advertising space on their website. Since there are both correct and incorrect ways to do so, ensure you conduct thorough research on how to pitch media outlets beforehand.
Paid Advertising
You can also pay for featuring your lifestyle video on popular blogs and social networking sites. This way, you can take advantage of hyper-specific tools for reaching your target audience. Advertising on social media platforms like YouTube, Twitter, Facebook, and LinkedIn is an excellent way to reach the right demographic.
Niche Groups & Forums
When targeting a particular demographic, you will want to reach out to where your audience hangs out online. Do research on the industry chat rooms your target demographic frequently uses. While sharing your video content on these channels, just ensure that they are relevant to your potential customer-base, regularly updated, and also includes active users.
Conclusion
Lifestyle videos allow brands to connect with their consumers better. Whether you are a start-up, an SME, or an established company, lifestyle videos may be just what you need to create a unique brand statement or get people excited about your product or service. So what are you still waiting for? It’s time to create content that resonates with your target market and establish your business as a top choice!
Richard Bennett
Richard Bennett is a writer and a lover of all things video.
Follow @Richard Bennett
Richard Bennett
Mar 27, 2024• Proven solutions
Do you wish to show your brand or product to inspire your audience with the lifestyle that they aspire to have? Are you on the lookout for innovative ways to earn intensely loyal and interactive followers for your business? Creating a lifestyle video that appeals to a niche demographic and helps your audience visualize how your products fit into their way of life is the ideal way to motivate them to take action and become your customer.
Whether you are a lifestyle brand or not, you need to offer content that educates and informs your audience and stands out amongst the best in the industry. Videos are an excellent way to connect with the audience, especially for brands that wish to engage their customers with meaningful content.
Today, businesses of every size tend to favor lifestyle videos that better appeal to the audience and communicate the brand’s values. Creating an attractive lifestyle video can thus be the ticket to reach a wider audience and upgrade the digital presence of every business.
- Part 1: What is Lifestyle Video?
- Part 2: 6 Key Benefits of Creating a Lifestyle Video
- Part 3: How to Create a Lifestyle Video?
- Part 4: How to Promote Your Lifestyle Video?
What is Lifestyle Video?
Lifestyle content exemplifies the ‘lifestyle’ behind a product or service and appeals to the demographic that you are trying to reach. It is a form of video marketing that pushes products and services to customers by showing the quality of life associated with a particular brand.
The principal objective of lifestyle content is appealing to a specific demographic, culture, or subculture. With these videos, you can focus on your products and services, using stunning visuals and action shots to portray a beautiful picture of what your brand’s potential customers’ lives will be like if they become the consumer of your product and services.
6 Key Benefits of Creating a Lifestyle Video
1. Informing & Educating
One of the most significant benefits of lifestyle content is that it helps customers understand products. With a plethora of choices out there, marketers today are no longer taking the pitching kind of approach. They want to approach their audience with a value-based offer instead of sales. And with lifestyle videos, you can excel at giving customers a close-up look at your products and services.
2. Caters to Your Audience’s Interests
Lifestyle content caters to the target audience. Since these videos define your market and your brand, it carries a specific style that’s based on your aesthetics or looks. What makes video marketing so effective is that they can introduce your story and brand in an interesting way to potential customers.
3. Search Engine Optimization
Search engines love high-quality content like videos. Using lifestyle videos in your web pages and other types of content can thus work wonders for search engine optimization. As long as your lifestyle video is well-optimized with the right keywords, a solid title, and a good meta description, your video content can increase your web traffic.
4. Great Promotional Tool
Brands can distribute lifestyle content on different channels for reaching your target audience right away. Once you post the video on your website, you can share it on your social networking platforms or promote it with paid ads. This way, you can get customers excited about what you are offering them.
5. Taps into Emotions
Emotions are a significant component of the purchasing decision of consumers. Studies have found that ad campaigns with only emotional content perform about twice as well compared to those with only rational content. So, creating lifestyle video content that makes your audience feel good can put your business in a positive light.
6. Boosts Conversions
Lifestyle videos are excellent for conversions on websites as they influence visitors by promoting the lifestyle a customer can achieve if they patronize the product or service. What makes such content more compelling is that they excite customers about what you offer them.
How to Create a Lifestyle Video?
The most stunning lifestyle videos are polished, sleek, and visually appealing. Developing a lifestyle video content that exceeds your target audience’s expectations is vital to appeal to your customer’s perfect lifestyle. Creating these videos is easy if you follow the step-by-step guide.
Step 1: Pre-Production
The pre-production stage is when the planning happens for a video. From creative brainstorming to innovative storyboarding, everything happens here. Pre-production begins with experts getting a feel of your product, who it appeals to, and how it works. Next, is the stage of scripting out your video, writing down the visual ideas, and the product features and dialogue that go alongside it. Finally, you need to round up talents like actors, voice-actors, locations, and extras needed to film.
Step 2: Production
Once your lifestyle video is meticulously planned out, your next step is to film it. While shooting an average video takes eight hours, some videos with several locations can require two full shooting days or more. The exact shooting schedule depends on what the script demands.
Since these videos are meant to capture a particular way of life for appealing to a specific kind of person, you should not cut corners in terms of quality. Remember, the better the quality of the footage, the more appealing the end product will be.
Step 3: Post-Production
It is the stage where you need to gather the footage you have shot so far and put them along with voice-over or music depending on your script demands. The main goal in this stage is to put the visuals together in a captivating way to promote your service and product. Here, using a powerful video editing tool seems necessary because you need to make your lifestyle video stand out from the crowd.
How to Promote Your Lifestyle Video?
A lifestyle video is one of the popular marketing tools for businesses of every size today. These videos are more memorable, more engaging, and much more popular than any other kinds of content among consumers. But, are you curious as to how to promote your lifestyle content to gain maximum exposure? All you need to do is distribute your lifestyle content on the proper channels to grab your audience’s attention and engage with new consumers.
Social Media
Lifestyle videos are aspirational, enlightening in nature, and made to appeal to specific demographics. It makes them great content for sharing on social networking platforms – an active digital marketing channel. Share your lifestyle content across various social media accounts. Ensure you attach a call-to-action for your friends and followers to share.
Your Company’s Website
Hosting your promotional videos on your website, particularly your homepage is an excellent way to immediately introduce incoming web traffic to your products and services, thus increasing your site’s SEO ranking. Besides the homepage, sharing the video content on your blogs is another unique way of re-purposing your content.
Media Outlets
Find out related media outlets that your potential customers read and follow daily. It would help if you also pitched journalists who take an interest in your brand or consider purchasing advertising space on their website. Since there are both correct and incorrect ways to do so, ensure you conduct thorough research on how to pitch media outlets beforehand.
Paid Advertising
You can also pay for featuring your lifestyle video on popular blogs and social networking sites. This way, you can take advantage of hyper-specific tools for reaching your target audience. Advertising on social media platforms like YouTube, Twitter, Facebook, and LinkedIn is an excellent way to reach the right demographic.
Niche Groups & Forums
When targeting a particular demographic, you will want to reach out to where your audience hangs out online. Do research on the industry chat rooms your target demographic frequently uses. While sharing your video content on these channels, just ensure that they are relevant to your potential customer-base, regularly updated, and also includes active users.
Conclusion
Lifestyle videos allow brands to connect with their consumers better. Whether you are a start-up, an SME, or an established company, lifestyle videos may be just what you need to create a unique brand statement or get people excited about your product or service. So what are you still waiting for? It’s time to create content that resonates with your target market and establish your business as a top choice!
Richard Bennett
Richard Bennett is a writer and a lover of all things video.
Follow @Richard Bennett
Elevate Your Online Presence with This All-Inclusive YouTube Upload Manual
How To Upload Videos to YouTube [a Step-by-Step Guide]
Richard Bennett
Mar 27, 2024• Proven solutions
Want to learn how to upload videos to YouTube? Millions of people watch YouTube every day. Creating and posting YouTube videos can be a lot of fun, and if you get a lot of views and become popular you can also make money. YouTube videos are a creative way to connect with people all around the world.
These simple steps can assist you in learning how to upload YouTube videos from a desktop computer. You are going to Learn:
Edit YouTube with Powerful Video Editor
As a YouTuber, it is necessary to have an easy-to-use video editor, especially for beginners. Download Filmora for free and start your editing journey happily.
Part 1: Basic Rules You Need to Know Before Uploading
Clicking the ‘upload’ button is easy, but during the upload process, there are things you can do to help your video get views and maintain its quality. You should also keep an eye on the length and file size limits. The more basic things you need to consider carefully when you upload are the title, description, and tags of your video. These are part of what determines if and where your video comes up in people’s search results. There are also slightly more advanced video specs, like your video’s resolution, which will be helpful for you to understand as somebody who will be producing video content frequently. These sorts of specs will affect how long it takes your videos to upload and how much of the quality they maintain.
1. How Long Can my Video Be?
By default, your YouTube videos can only be 15 minutes long. You can post longer videos by going to the upload page and clicking on ‘Increase your Limit’ at the bottom. After you have followed the steps to verify your account you will be able to post videos that are a maximum of 11 hours long.
2. How Big a File Can I Upload?
Your file size was capped at 20GB, initially. If you follow the same steps for posting videos longer than 15 minutes then you can also increase your maximum file size to 128GB.
3. Other Basics
After you click the ‘upload’ button on YouTube you are taken to a page where you choose a category for your video and add a title, description, and tags. These are all important for getting hits so you should put some thought into them.
Title: Keep your title under 70 characters so none of it disappears into a ‘…’. The best titles make people curious or elicit an emotional response. Terms like ‘video’, ‘how-to’, and ‘tutorial’ are often typed into people’s searches so if they apply to your video it can help to put them in the title.
Description: A short synopsis of your video which includes your most important keyword. You have about three lines before your text is hidden by a ‘show more’ tab. If you are including the URL of your channel or other videos then you should make sure they are above the ‘show more’.
Tags: Use a lot of them. These are the keywords and terms people will be searching for when they find your video. YouTube will suggest some after you start adding. A quick way to find good keywords to use is to search for videos similar to yours and check out their tags. A while ago YouTube started hiding video tags by default but you can download a free, YouTube-certified, extension for Google Chrome which will allow you to see them from vidIQ.com.
4. Digging Deeper
To get your viewers to subscribe to your channel you will need to make sure your videos are not losing quality when you upload them. Here are some things to be aware of if you want your videos to look great on YouTube.
Resolution: the number of pixels in your image. For example when a video has a resolution of 1080p that means it has a grid of pixels that is 1920 x 1080. The more pixels you have the sharper your image.
Bitrate: Bitrate is a measurement of how compressed your file is, and the less compressed it is the more information there is per frame. Higher bitrates mean larger file sizes.
Your resolution and bitrate should complement each other. If you have a higher bitrate than is needed for your video’s resolution your file will be unnecessarily large. If your bitrate is too low for your resolution then you will not see the quality you expect.
YouTube has a list of recommended resolutions and bitrates at support.google.com/youtube/answer/1722171.
Aspect Ratio: the dimensions of your video, in terms of width and height. YouTube’s aspect ratio is 16:9, so your videos should also be 16:9. If they are not then you will get black bars on either side of your video after you upload it. The most common way that people end up with the wrong aspect ratio is by creating videos on their smartphones and holding them up and down instead of sideways.
Part 2: Steps to Upload Videos to YouTube
Uploading YouTube Video on Desktop:
1. Sign in to your YouTube account
2. Hit the upload button
3. Select your video type (Public, Private, Unlisted)
4. Manage the upload
5. Choose your thumbnail
Step 1: Sign in to your YouTube account
In order to upload videos to YouTube, the very first thing you need to do is sign in. The sign-in button is located at the top right corner of the YouTube homepage. If you have multiple accounts registered to one device, you will be asked to choose one to log in to.

Step 2: Hit the upload button
It is a simple step that you will have to follow right after you log in to YouTube. As soon as you enter YouTube, after using your Google account and password for login, you will find the upload button in the top right corner of the screen. Click on this button and it will take you to the dedicated upload page.
Step 3: Select your video type (Public, Private, Unlisted)
Choose your audience. If you wish to make your video available to everyone on YouTube, simply go to the privacy settings and choose the “Public” option from the drop-down menu.
If you do not want your video to be searchable, but still want to be able to easily share a link to it with your friends and family, choose the “Unlisted” option.
Those who wish to keep their video personal can choose the “Private” option from the drop-down menu. You can still share a private video with a limited number of people (as long as they have Google accounts).
The “Scheduled” option is available for choosing a future date and time to make the video available to viewers. Once you have selected your privacy level, simply upload your video from your device storage.

Step 4: Manage the upload
As soon as you have confirmed your video upload, you will find a progress bar on the screen. It will take some time depending on factors such as the resolution of the video and how long it is. In the meanwhile, you can write a title, description and add relevant tags for your video so that YouTube knows what search results to include it in and viewers can find it. Remember that YouTube is the second biggest search engine on the Internet, so take some time to optimize your keywords .
Step 5: Choose your thumbnail
Once your video uploading is complete, it is time to choose a creative thumbnail for your video. The system provides you with three options to choose from automatically, all of which will be screenshots from your video. It is usually better toupload your own custom thumbnail , as thumbnails are a very important factor in attracting viewers. Hit the “Done” button or use the “Publish” button to finalize your upload.
That’s how to upload a video on YouTube! Any questions?
Richard Bennett
Richard Bennett is a writer and a lover of all things video.
Follow @Richard Bennett
Richard Bennett
Mar 27, 2024• Proven solutions
Want to learn how to upload videos to YouTube? Millions of people watch YouTube every day. Creating and posting YouTube videos can be a lot of fun, and if you get a lot of views and become popular you can also make money. YouTube videos are a creative way to connect with people all around the world.
These simple steps can assist you in learning how to upload YouTube videos from a desktop computer. You are going to Learn:
Edit YouTube with Powerful Video Editor
As a YouTuber, it is necessary to have an easy-to-use video editor, especially for beginners. Download Filmora for free and start your editing journey happily.
Part 1: Basic Rules You Need to Know Before Uploading
Clicking the ‘upload’ button is easy, but during the upload process, there are things you can do to help your video get views and maintain its quality. You should also keep an eye on the length and file size limits. The more basic things you need to consider carefully when you upload are the title, description, and tags of your video. These are part of what determines if and where your video comes up in people’s search results. There are also slightly more advanced video specs, like your video’s resolution, which will be helpful for you to understand as somebody who will be producing video content frequently. These sorts of specs will affect how long it takes your videos to upload and how much of the quality they maintain.
1. How Long Can my Video Be?
By default, your YouTube videos can only be 15 minutes long. You can post longer videos by going to the upload page and clicking on ‘Increase your Limit’ at the bottom. After you have followed the steps to verify your account you will be able to post videos that are a maximum of 11 hours long.
2. How Big a File Can I Upload?
Your file size was capped at 20GB, initially. If you follow the same steps for posting videos longer than 15 minutes then you can also increase your maximum file size to 128GB.
3. Other Basics
After you click the ‘upload’ button on YouTube you are taken to a page where you choose a category for your video and add a title, description, and tags. These are all important for getting hits so you should put some thought into them.
Title: Keep your title under 70 characters so none of it disappears into a ‘…’. The best titles make people curious or elicit an emotional response. Terms like ‘video’, ‘how-to’, and ‘tutorial’ are often typed into people’s searches so if they apply to your video it can help to put them in the title.
Description: A short synopsis of your video which includes your most important keyword. You have about three lines before your text is hidden by a ‘show more’ tab. If you are including the URL of your channel or other videos then you should make sure they are above the ‘show more’.
Tags: Use a lot of them. These are the keywords and terms people will be searching for when they find your video. YouTube will suggest some after you start adding. A quick way to find good keywords to use is to search for videos similar to yours and check out their tags. A while ago YouTube started hiding video tags by default but you can download a free, YouTube-certified, extension for Google Chrome which will allow you to see them from vidIQ.com.
4. Digging Deeper
To get your viewers to subscribe to your channel you will need to make sure your videos are not losing quality when you upload them. Here are some things to be aware of if you want your videos to look great on YouTube.
Resolution: the number of pixels in your image. For example when a video has a resolution of 1080p that means it has a grid of pixels that is 1920 x 1080. The more pixels you have the sharper your image.
Bitrate: Bitrate is a measurement of how compressed your file is, and the less compressed it is the more information there is per frame. Higher bitrates mean larger file sizes.
Your resolution and bitrate should complement each other. If you have a higher bitrate than is needed for your video’s resolution your file will be unnecessarily large. If your bitrate is too low for your resolution then you will not see the quality you expect.
YouTube has a list of recommended resolutions and bitrates at support.google.com/youtube/answer/1722171.
Aspect Ratio: the dimensions of your video, in terms of width and height. YouTube’s aspect ratio is 16:9, so your videos should also be 16:9. If they are not then you will get black bars on either side of your video after you upload it. The most common way that people end up with the wrong aspect ratio is by creating videos on their smartphones and holding them up and down instead of sideways.
Part 2: Steps to Upload Videos to YouTube
Uploading YouTube Video on Desktop:
1. Sign in to your YouTube account
2. Hit the upload button
3. Select your video type (Public, Private, Unlisted)
4. Manage the upload
5. Choose your thumbnail
Step 1: Sign in to your YouTube account
In order to upload videos to YouTube, the very first thing you need to do is sign in. The sign-in button is located at the top right corner of the YouTube homepage. If you have multiple accounts registered to one device, you will be asked to choose one to log in to.
Step 2: Hit the upload button
It is a simple step that you will have to follow right after you log in to YouTube. As soon as you enter YouTube, after using your Google account and password for login, you will find the upload button in the top right corner of the screen. Click on this button and it will take you to the dedicated upload page.
Step 3: Select your video type (Public, Private, Unlisted)
Choose your audience. If you wish to make your video available to everyone on YouTube, simply go to the privacy settings and choose the “Public” option from the drop-down menu.
If you do not want your video to be searchable, but still want to be able to easily share a link to it with your friends and family, choose the “Unlisted” option.
Those who wish to keep their video personal can choose the “Private” option from the drop-down menu. You can still share a private video with a limited number of people (as long as they have Google accounts).
The “Scheduled” option is available for choosing a future date and time to make the video available to viewers. Once you have selected your privacy level, simply upload your video from your device storage.
Step 4: Manage the upload
As soon as you have confirmed your video upload, you will find a progress bar on the screen. It will take some time depending on factors such as the resolution of the video and how long it is. In the meanwhile, you can write a title, description and add relevant tags for your video so that YouTube knows what search results to include it in and viewers can find it. Remember that YouTube is the second biggest search engine on the Internet, so take some time to optimize your keywords .
Step 5: Choose your thumbnail
Once your video uploading is complete, it is time to choose a creative thumbnail for your video. The system provides you with three options to choose from automatically, all of which will be screenshots from your video. It is usually better toupload your own custom thumbnail , as thumbnails are a very important factor in attracting viewers. Hit the “Done” button or use the “Publish” button to finalize your upload.
That’s how to upload a video on YouTube! Any questions?
Richard Bennett
Richard Bennett is a writer and a lover of all things video.
Follow @Richard Bennett
Also read:
- In 2024, Effortless Offline Viewing How to Save YouTube Videos for iPhone/iPad
- Elevate Engagement Cutting-Edge Hashtags for Hit-Making Videos for 2024
- Stellar Showmanship YouTube’s Best Magic Tricks Edited!
- In 2024, Economic Expressiveness in Video Theming Tools
- 2024 Approved 8 Best Free Video Editing Software for YouTube
- Best Movie Swaps Top 7 Alternate Films for 2024
- Watch Without Paying? Here Are the Top 10 Free Films Online
- [New] Discovering 10 Superior History Educational Videos
- Top 15 YouTube Recording Software for Gamers
- Enhancing Video Impact Interpreting YouTube Metrics Wisely for 2024
- The Command Center Where You Create on YouTube
- Permanently Quit YouTube Shorts Now
- Assessing Subforsup's Reliability in Safely Amplifying YouTube Viewers for 2024
- The Game Changer Implementing Custom Gaming Banners
- 2024 Approved Essential Techniques in Creating YouTube Thumbnails That Stand Out
- [Updated] Check Your YouTube Channels for Accurate Monetization Practices
- 2024 Approved Essential Tips Sharing Your Apple Devices Screen with YouTube
- 2024 Approved Convert with Confidence Best Apps to Turn Spotify Into YouTube Channels
- [New] Discover the Best Anime Vids on YouTube (List)
- [Updated] Digital Delights The Finest 15 Comedic Channels on YouTube
- [New] Essential Free Video Editing Apps for iPhones/iPads
- Essential Picks Discover the Top 12 Easy-to-Use Flipscreen Cams for 2024
- Unraveling the Process of Uploading 360° Footage to YouTube
- Acquire Unlimited Stock Images via Top 4 YouTube Sources
- In 2024, Conquering the Digital Landscape Leveraging Multi-Platform Streaming
- In 2024, A Taste of Film Home Cook's Visual Journey
- [Updated] Captivating Startups Discovering the Best 15 Video Intros
- In 2024, Dive Into the World of Interactive Video Features on YouTube
- [New] Boost Traffic Critical YouTube SEO Instruments for Video Success
- In 2024, Decoding the Functionality of YouTube's Media Hub
- [New] Elevate Your Channel Identity Essential YouTube Naming Strategies
- [New] Elevate Engagement Natural Ways to Popularize Your Videos
- 2024 Approved Boost Popularity Quickly Top 30 Hashtags Every Gamer Needs
- Improve Engagement with Skillful Use of Jump Cuts
- Easy Access Best Free YouTube Subtitle Extractors for 2024
- Mirrorless Vs. DSLR Cameras Which Is Better for Videos?
- [Updated] Creating Unique YouTube Music Mixtapes
- 2024 Approved Echoes of Chuckles Parody Playlists
- From Sunrise to Starry Nights - Top Animated YouTubers for Daily Joy
- Engineering Captivating Video Teasers for Online Presence for 2024
- [New] Crafting a Simplified YouTube Auto-Subscribe URL
- [New] Boost Engagement Discover the Top 5 YouTube Promotion Tactics
- In 2024, 5 Effective Tricks for YouTube Subscriber Surges
- New 2024 Approved How to Create a YouTube Intro Animation Like a Pro
- New 6 Top-Notch Audio Converters for Seamless File Conversion
- Thinking About Changing Your Netflix Region Without a VPN On Apple iPhone 12? | Dr.fone
- Windows 11 Customization A Visual Journey
- [Updated] Step-by-Step Guide Live Broadcast of Recorded Videos on FB for 2024
- [Updated] In 2024, Top-Rated 5 Web Videography Editing Suites
- [New] 2024 Approved Top 12 Tycoons A Gamer's Dream, Achieving Business Brilliance on Screen
- MP4 Video Repair Tool - Repair corrupt, damaged, unplayable video files of Xiaomi Redmi A2
- The Ultimate Guide to Nokia C12 Pattern Lock Screen Everything You Need to Know
- [Updated] Exclusive Insta Network Upgrades The Safest Free Follower Aids for 2024
- [New] AZ Capture Extraordinaire Thorough App Reviews
- Updated Where Can I Find Clapping Sound Effect, In 2024
- Perfecting Zoom's Visual Impact Smart Filters Use for 2024
- All Must-Knows to Use Fake GPS GO Location Spoofer On Vivo Y77t | Dr.fone
- [New] Mastering Movies The Best of Viral TikTok Creations (Top 10)
- Premium Mobile and Desktop AVC Viewer with Ease
- Top 6 Apps/Services to Trace Any Realme GT 3 Location By Mobile Number | Dr.fone
- 2024 Approved Smart Techniques Save Your Insta Story Videos
- In 2024, How to Unlock Samsung Galaxy A24 Pattern Lock if Forgotten? 6 Ways
- In 2024, Mastering MacOS Producing High-Quality OOTD TikToks
- Maximize Your Snapchat Impact with Mac Footage for 2024
- [Updated] In 2024, Top 10 Mobile MOBAs for Android Gamers
- Updated A Complete Guide to the Best Brand Story Videos
- Is your Itel S23+ working too slow? Heres how you can hard reset it | Dr.fone
- Updated 2024 Approved Beginners Guideline for Stop Motion Studio and Its Alternatives
- In 2024, How to Change Lock Screen Wallpaper on Infinix Note 30 Pro
- New What Is Talking Avatar?
- Title: [New] Building Inspiring Lifestyle Content for Viewers
- Author: Brian
- Created at : 2024-05-25 12:30:40
- Updated at : 2024-05-26 12:30:40
- Link: https://youtube-video-recordings.techidaily.com/new-building-inspiring-lifestyle-content-for-viewers/
- License: This work is licensed under CC BY-NC-SA 4.0.
