
![[New] Brand Differentiation with Powerful YouTube Names](https://www.lifewire.com/thmb/NmUr_CUQe4MhD1o3QpyXYVxA7CE=/300x200/filters:no_upscale():max_bytes(150000):strip_icc()/LIFEWIRE-9-best-uninterrupted-power-supplies-4142625-dbe357e3a4f3419d89c9b0513dd466d1.jpg)
[New] Brand Differentiation with Powerful YouTube Names
Brand Differentiation with Powerful YouTube Names
Best YouTube Names Generators [+ How to Brainstorm]

Liza Brown
Oct 26, 2023• Proven solutions
It’s important to have a good name for your YouTube channel – something that people will remember. The following is a list of the 3 best YouTube name generators, an easy step-by-step for brainstorming, and instructions for updating your YouTube name.
Whether you’re a YouTuber beginner or want to improve your YouTube videos to the next level, a good YouTube video editing software will be a good helper. Wondershare Filmora is a video editor for all YouTube creators with plentiful effects and templates, and you can download it directly and have a try before purchasing.


- YouTube Name Generators
- How to Come Up With a Good YouTube Name
- How to Change Your YouTube Name
- Requesting a Custom URL for YouTube
Part 1: 3 Awesome YouTube Name Generators
Need some help brainstorming your channel name? Here are 3 tools for getting started. Even if you don’t use one of the names you generate you’ll get some great inspiration.
1. SpinXO
Key points:
- Lots of options
- Checks availability
This is a great generator. If you were brainstorming yourself, you’d probably write out a bunch of words related to yourself and the kinds of videos you want to make and see what goes together. SpinXO does that for you, and mixes in other words that sound good in usernames.
Here’s what happened when I tried to name a hypothetical baking channel:
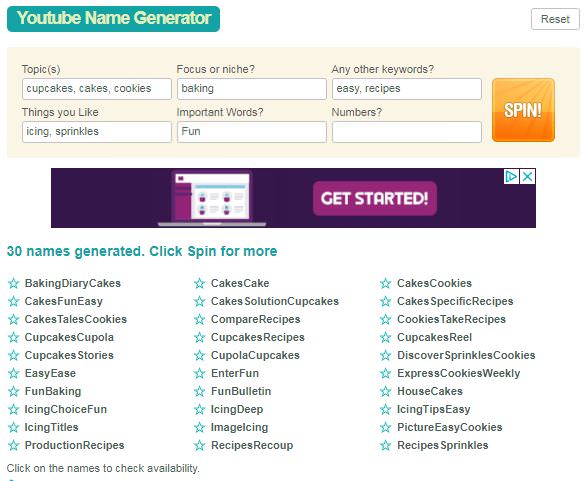
Not all of the results are great, but there are some cool sounding options in there.
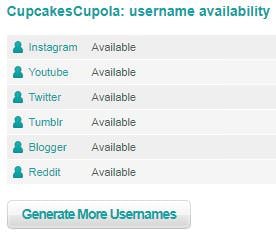
One of the most useful features of SpinXO is that you can check the availability of the usernames. I liked the sound of CupcakesCupola, and when I clicked on it I was able to see that nobody else was using it on other sites.
2. Name Generator
Key points:
- Can be hilarious
- Names tend to be a bit long
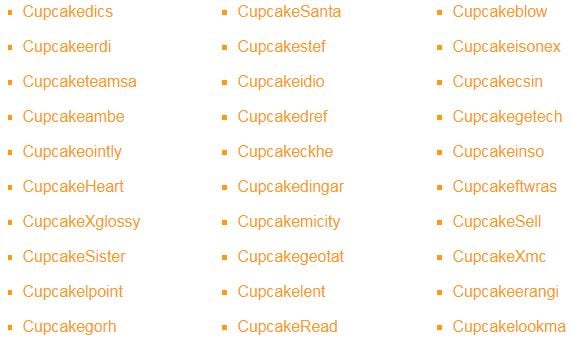
This is a fairly limited generator. You plunk in a prefix and a suffix, and it generates a random word or term to stuff between them. Here’s what I got for my fictional cupcake channel:
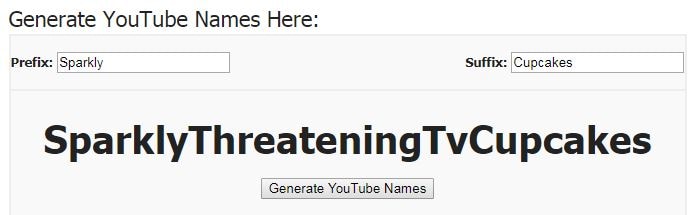
So, on one hand - that’s hilarious and I’m considering legally changing my name. On the other hand, all of the results look exactly like this (which means they’re all a bit too long). It shows you a longer list if you scroll down:
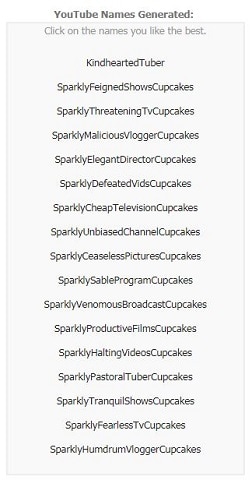
You can pick your favorite names and it’ll list them out so you can easily copy them into a word document. That’ll be useful if you’re collecting options from several sites.
3. Username Generator
Key points:
- Can generate a huge number of names at once
- You only input one word
For this name generator, you type in one important word and choose how many results you want to see. You can see up to 300 at once.

The generator will take your keyword and add endings (and occasional beginnings) to it. Some endings are words, and some are just suffixes. Here’s what I got:
Part 2: How to Come Up With a Good YouTube Name – 3 Easy Steps
The name of your YouTube channel needs to accomplish two things:
- Tell viewers what your channel is about
- Stick in viewer’s heads by being catchy and unique
Here’s how you can brainstorm the perfect name for your channel!
Step 1: Gather up relevant words
Open up a journal (or a word document) and start writing down words that relate to you and your channel.
You may want to make one list of ‘you’ words (personality traits, nicknames, titles, etc.) and another of words related to your channel’s category (i.e. gaming, makeup, or baking).
Step 2: Combinations
Start combining your ‘you’ words with your category words to see what sounds good. You may want to use one of the name generators above (anchor) for this part.
Try to keep your name fairly short (3 words or less) so it’s easier for people to remember. Don’t include numbers if you can avoid it.
Step 3: Say it out loud
Once you have a shortlist of potential names, read them aloud to yourself to make sure they sound good. Ideally, you want to get that ‘oh, that has a nice ring to it!’ feeling.
Part 3: How to Change Your YouTube Name
In the early days of YouTube, you couldn’t change your name, but now you can!
- Click on your account icon in the top right corner of YouTube and choose settings.
- Click Edit on Google.
- Update your name and click OK.
Part 4: Requesting a Custom URL for YouTube
Here are several types of YouTube channel URL , wouldn’t it be nice if, instead of a string of numbers and letters, your channel URL included your name? YouTube can do that for you!
You need…
- 100 Subscribers
- to have been on YouTube for 30 days
- use a photo as your channel icon/profile picture
- have uploaded channel art
Here’s how to get your custom URL:
- Click on your icon in the top right corner of YouTube and choose Advanced under Settings / the gear icon.
- If you meet the qualifications above, you’ll see ‘You’re eligible for a custom URL’ under Channel Settings.
- YouTube will show you the custom URL you’re approved for in the Get a custom URL box. You can’t change what’s there, but you can add to the end of it.
- Click Change URL after reading the terms of use.
You can delete your custom URL and claim a new one, but doing this might be confusing for your followers.
If you already have a YouTube channel name – are you happy with it? How did you choose it?
Liza Brown
Liza Brown is a writer and a lover of all things video.
Follow @Liza Brown
Liza Brown
Oct 26, 2023• Proven solutions
It’s important to have a good name for your YouTube channel – something that people will remember. The following is a list of the 3 best YouTube name generators, an easy step-by-step for brainstorming, and instructions for updating your YouTube name.
Whether you’re a YouTuber beginner or want to improve your YouTube videos to the next level, a good YouTube video editing software will be a good helper. Wondershare Filmora is a video editor for all YouTube creators with plentiful effects and templates, and you can download it directly and have a try before purchasing.
- YouTube Name Generators
- How to Come Up With a Good YouTube Name
- How to Change Your YouTube Name
- Requesting a Custom URL for YouTube
Part 1: 3 Awesome YouTube Name Generators
Need some help brainstorming your channel name? Here are 3 tools for getting started. Even if you don’t use one of the names you generate you’ll get some great inspiration.
1. SpinXO
Key points:
- Lots of options
- Checks availability
This is a great generator. If you were brainstorming yourself, you’d probably write out a bunch of words related to yourself and the kinds of videos you want to make and see what goes together. SpinXO does that for you, and mixes in other words that sound good in usernames.
Here’s what happened when I tried to name a hypothetical baking channel:
Not all of the results are great, but there are some cool sounding options in there.
One of the most useful features of SpinXO is that you can check the availability of the usernames. I liked the sound of CupcakesCupola, and when I clicked on it I was able to see that nobody else was using it on other sites.
2. Name Generator
Key points:
- Can be hilarious
- Names tend to be a bit long
This is a fairly limited generator. You plunk in a prefix and a suffix, and it generates a random word or term to stuff between them. Here’s what I got for my fictional cupcake channel:
So, on one hand - that’s hilarious and I’m considering legally changing my name. On the other hand, all of the results look exactly like this (which means they’re all a bit too long). It shows you a longer list if you scroll down:
You can pick your favorite names and it’ll list them out so you can easily copy them into a word document. That’ll be useful if you’re collecting options from several sites.
3. Username Generator
Key points:
- Can generate a huge number of names at once
- You only input one word
For this name generator, you type in one important word and choose how many results you want to see. You can see up to 300 at once.
The generator will take your keyword and add endings (and occasional beginnings) to it. Some endings are words, and some are just suffixes. Here’s what I got:
Part 2: How to Come Up With a Good YouTube Name – 3 Easy Steps
The name of your YouTube channel needs to accomplish two things:
- Tell viewers what your channel is about
- Stick in viewer’s heads by being catchy and unique
Here’s how you can brainstorm the perfect name for your channel!
Step 1: Gather up relevant words
Open up a journal (or a word document) and start writing down words that relate to you and your channel.
You may want to make one list of ‘you’ words (personality traits, nicknames, titles, etc.) and another of words related to your channel’s category (i.e. gaming, makeup, or baking).
Step 2: Combinations
Start combining your ‘you’ words with your category words to see what sounds good. You may want to use one of the name generators above (anchor) for this part.
Try to keep your name fairly short (3 words or less) so it’s easier for people to remember. Don’t include numbers if you can avoid it.
Step 3: Say it out loud
Once you have a shortlist of potential names, read them aloud to yourself to make sure they sound good. Ideally, you want to get that ‘oh, that has a nice ring to it!’ feeling.
Part 3: How to Change Your YouTube Name
In the early days of YouTube, you couldn’t change your name, but now you can!
- Click on your account icon in the top right corner of YouTube and choose settings.
- Click Edit on Google.
- Update your name and click OK.
Part 4: Requesting a Custom URL for YouTube
Here are several types of YouTube channel URL , wouldn’t it be nice if, instead of a string of numbers and letters, your channel URL included your name? YouTube can do that for you!
You need…
- 100 Subscribers
- to have been on YouTube for 30 days
- use a photo as your channel icon/profile picture
- have uploaded channel art
Here’s how to get your custom URL:
- Click on your icon in the top right corner of YouTube and choose Advanced under Settings / the gear icon.
- If you meet the qualifications above, you’ll see ‘You’re eligible for a custom URL’ under Channel Settings.
- YouTube will show you the custom URL you’re approved for in the Get a custom URL box. You can’t change what’s there, but you can add to the end of it.
- Click Change URL after reading the terms of use.
You can delete your custom URL and claim a new one, but doing this might be confusing for your followers.
If you already have a YouTube channel name – are you happy with it? How did you choose it?
Liza Brown
Liza Brown is a writer and a lover of all things video.
Follow @Liza Brown
Making a Visual Impact: Neon-Borded YouTube Thumbnails Guide
Your YouTube video, or any other clip published on any forum, gets a larger number of hits if it has an attractive thumbnail. And, the fact is, a thumbnail becomes 10x more attractive when the main character that the image has have a neon border around it.
With that said, in the following sections, you will learn a couple of methods on how to add a YouTube thumbnail border around the main characters and/or objects that are significant to the clip.
In this article
01 Add Glowing Neon Border to YouTube Thumbnail with Filmora
02 Add a Glowing Neon Border in YouTube Thumbnail with Canva
03 Outline a Person in a YouTube Thumbnail with Photoshop
Part 1: How to Add Neon Border to YouTube Thumbnail for Free with Filmora
Being one of the most versatile and intuitive post-production tools available in the market today, Wondershare Filmora X allows you to add a neon border to a YouTube thumbnail quite conveniently. You can learn how to get this done on Windows or Mac by following the steps given below.
For Win 7 or later (64-bit)
For macOS 10.12 or later
Step 1: Define Project Settings and Add Image to the Timeline
Launch Wondershare Filmora X on your PC (a MacBook Pro M1 is used here), ensure that the project aspect ratio is set to 16:9 (Widescreen) on the splash screen, and click New Project. On the main interface, click the Preview quality and display settings icon from the upper-right area of the Timeline, click Change Project Aspect Ratio, click to select 1280 x 720 (HD) from the Resolution menu of the Project Settings box, and click OK to save the custom project settings.

Then select My Media from the menu bar if not already selected, click Project Media from the navigation pane, and click Import from the Media box to select and import the image of the main character or object that you want to use in the thumbnail.

Now, drag the image from the Media box to the Timeline at the bottom.

Step 2: Clear Image Background, Add Border, and Add Custom Background
Go to Effects from the menu bar, click to select the Default tab and then AI Portrait from the navigation pane, and click and drag the Human Segmentation preset from the right box, and place it over the image track in the Timeline.

Double-click the image layer, scroll down the upper-left box to the Video Effects section, and use the Edge Thickness and Edge Feather sliders to adjust the character’s edges to make them as realistic as possible. Click OK when done.

Next, click and drag the Human Border preset over the image track in the Timeline, and follow the same procedure to customize the border. This will give the character a neon border effect.

Now, use the method explained earlier to import a custom image for the background, and drag and place it under the previous track in the Timeline.

If you are running the latest version of Filmora, you will find there are some neon light effects available under AI Portrait as well.

Step 3: Add Titles to Thumbnail
Go to Titles from the menu bar, click to select the Default tab and then Lower 3rds from the navigation pane, and click and drag your preferred lower-third preset from the right window to a separate layer in the Timeline. Double-click the lower-third layer, and use the available options in the upper-left window to change the text, its color, etc., and drag the textbox to place it to your preferred position on the image as well. Click OK to save the changes.
Next, click to select Titles from the navigation pane, and drag your preferred title from the right window to the upper-most track in the Timeline. Now use the method explained earlier to edit the text, its color, position, etc. to make it look professional.

For more tips and tricks for creating YouTube thumbnail, you can check this You Tube thumbnail creating guide.
Step 4: Get the Neon Border Thumbnail
Click the Snapshot (Camera) icon from the upper-right area of the Timeline, go to My Media from the menu bar, right-click the thumbnail of the screenshot you captured, and click Reveal in Finder (on Mac) or Reveal in Explorer (on Windows) to get to the folder the YouTube thumbnail border is saved in.

Part 2: How to Add a Glowing Neon Border in Your YouTube Thumbnail with Canva
Canva is another intuitive editing program that works on the web interface rather than having you download and install an app on your PC. You can add a neon border for YouTube thumbnails using Canva by following the instructions given below:
Step 1: Define Project Settings and Add a Background
After signing in to your Canva account, click Create a design from the top-right corner of the page, click Custom size from the bottom, define 1280 and 720 in the Width and Height fields on the box that appears respectively, and click Create new design.

Now, click to select Background from the navigation bar on the left (if the Background tool is not visible, click More and then choose Background from the expanded list), and click to select a background from the images available in the center pane.

Step 2: Upload an Image and Add Effects
Click Uploads from the navigation bar, click the More icon from the right of the Upload media button present at the top of the center pane, choose your preferred method to upload the image (with the transparent background) that you want to use, upload the image, and drag it from the center pane to the Canvas.
Note: You can use any of the tools available online to remove the background from your image for free.

To add a YouTube thumbnail border, make sure that the image that you added to the Canvas is selected, click the Duplicate icon from the upper-right area, and use the scaling handles of the copy of the image to increase its size a bit. Reposition the image back to its original location as well.
Then, click Edit image from the upper-left corner of the Canvas, click Duotone from the Edit image pane at the center, if need be, click See all, choose your preferred duotone effect to apply on the image, choose your preferred highlight and shadow colors from the box that appears next, and click Back from the top of the pane.

Next, click See all next to the Adjust section from the center pane, and drag the Blur slider to the right to increase the blur effect on the image.

Step 3: Position the Layers
While keeping the duplicate image selected, click the Position button from the upper-right area of the Canvas, and click Background to send the second image behind the first one to get the neon border effect for the photo.

Part 3: How to Outline a Person in a YouTube Thumbnail with Photoshop
Because YouTube thumbnails are nothing but static images, creating YouTube thumbnail border with Adobe Photoshop is comparatively easier. The process of doing this is given below:
Step 1: Define Document Preferences and Import an Image
Launch Adobe Photoshop on your PC, click Create new, and on the New Document customization box, define the width and height values to 1280 and 720 pixels respectively. Select Transparent from the Background Contents menu as well if not already selected. Click Create from the bottom to create a new Photoshop document with the specified document settings. Next, open the folder that contains the source image, drag the photo to Photoshop, and press Enter to place the photo.

Step 2: Remove Background from the Image
Make sure that the image layer is selected in the Layers panel on the right, go to Select from the menu bar at the top, and click Subject. From the bottom of the Layers panel, click the Add a mask icon to get rid of the background, leaving only the human on the Canvas.

Step 3: Add a Custom Background and an Outline Around the Subject
Use the method explained earlier to import a background image of your choice to Photoshop. Drag the background image layer to the bottom in the Layers panel. Double-click the masked layer, click to select Stroke from the left pane of the Layer Style box, and use the options available on the right to manage the size, color, position, etc. of the stroke that has been added around the human subject. Click OK when done, and then export the image normally to use it as a YouTube thumbnail border.

Summary
It is important to know that the default resolution of a YouTube thumbnail is 1280 x 720 pixels that is usually written and referred to as 720p. While adding a YouTube thumbnail border, it is also imperative to have a good sense of color combination and fonts. Furthermore, a decent tool like Wondershare Filmora X must be used to add an appealing neon border around the main subject in the thumbnail image easily and quickly.
02 Add a Glowing Neon Border in YouTube Thumbnail with Canva
03 Outline a Person in a YouTube Thumbnail with Photoshop
Part 1: How to Add Neon Border to YouTube Thumbnail for Free with Filmora
Being one of the most versatile and intuitive post-production tools available in the market today, Wondershare Filmora X allows you to add a neon border to a YouTube thumbnail quite conveniently. You can learn how to get this done on Windows or Mac by following the steps given below.
For Win 7 or later (64-bit)
For macOS 10.12 or later
Step 1: Define Project Settings and Add Image to the Timeline
Launch Wondershare Filmora X on your PC (a MacBook Pro M1 is used here), ensure that the project aspect ratio is set to 16:9 (Widescreen) on the splash screen, and click New Project. On the main interface, click the Preview quality and display settings icon from the upper-right area of the Timeline, click Change Project Aspect Ratio, click to select 1280 x 720 (HD) from the Resolution menu of the Project Settings box, and click OK to save the custom project settings.
Then select My Media from the menu bar if not already selected, click Project Media from the navigation pane, and click Import from the Media box to select and import the image of the main character or object that you want to use in the thumbnail.
Now, drag the image from the Media box to the Timeline at the bottom.
Step 2: Clear Image Background, Add Border, and Add Custom Background
Go to Effects from the menu bar, click to select the Default tab and then AI Portrait from the navigation pane, and click and drag the Human Segmentation preset from the right box, and place it over the image track in the Timeline.
Double-click the image layer, scroll down the upper-left box to the Video Effects section, and use the Edge Thickness and Edge Feather sliders to adjust the character’s edges to make them as realistic as possible. Click OK when done.
Next, click and drag the Human Border preset over the image track in the Timeline, and follow the same procedure to customize the border. This will give the character a neon border effect.
Now, use the method explained earlier to import a custom image for the background, and drag and place it under the previous track in the Timeline.
If you are running the latest version of Filmora, you will find there are some neon light effects available under AI Portrait as well.
Step 3: Add Titles to Thumbnail
Go to Titles from the menu bar, click to select the Default tab and then Lower 3rds from the navigation pane, and click and drag your preferred lower-third preset from the right window to a separate layer in the Timeline. Double-click the lower-third layer, and use the available options in the upper-left window to change the text, its color, etc., and drag the textbox to place it to your preferred position on the image as well. Click OK to save the changes.
Next, click to select Titles from the navigation pane, and drag your preferred title from the right window to the upper-most track in the Timeline. Now use the method explained earlier to edit the text, its color, position, etc. to make it look professional.
For more tips and tricks for creating YouTube thumbnail, you can check this You Tube thumbnail creating guide.
Step 4: Get the Neon Border Thumbnail
Click the Snapshot (Camera) icon from the upper-right area of the Timeline, go to My Media from the menu bar, right-click the thumbnail of the screenshot you captured, and click Reveal in Finder (on Mac) or Reveal in Explorer (on Windows) to get to the folder the YouTube thumbnail border is saved in.
Part 2: How to Add a Glowing Neon Border in Your YouTube Thumbnail with Canva
Canva is another intuitive editing program that works on the web interface rather than having you download and install an app on your PC. You can add a neon border for YouTube thumbnails using Canva by following the instructions given below:
Step 1: Define Project Settings and Add a Background
After signing in to your Canva account, click Create a design from the top-right corner of the page, click Custom size from the bottom, define 1280 and 720 in the Width and Height fields on the box that appears respectively, and click Create new design.
Now, click to select Background from the navigation bar on the left (if the Background tool is not visible, click More and then choose Background from the expanded list), and click to select a background from the images available in the center pane.
Step 2: Upload an Image and Add Effects
Click Uploads from the navigation bar, click the More icon from the right of the Upload media button present at the top of the center pane, choose your preferred method to upload the image (with the transparent background) that you want to use, upload the image, and drag it from the center pane to the Canvas.
Note: You can use any of the tools available online to remove the background from your image for free.
To add a YouTube thumbnail border, make sure that the image that you added to the Canvas is selected, click the Duplicate icon from the upper-right area, and use the scaling handles of the copy of the image to increase its size a bit. Reposition the image back to its original location as well.
Then, click Edit image from the upper-left corner of the Canvas, click Duotone from the Edit image pane at the center, if need be, click See all, choose your preferred duotone effect to apply on the image, choose your preferred highlight and shadow colors from the box that appears next, and click Back from the top of the pane.
Next, click See all next to the Adjust section from the center pane, and drag the Blur slider to the right to increase the blur effect on the image.
Step 3: Position the Layers
While keeping the duplicate image selected, click the Position button from the upper-right area of the Canvas, and click Background to send the second image behind the first one to get the neon border effect for the photo.
Part 3: How to Outline a Person in a YouTube Thumbnail with Photoshop
Because YouTube thumbnails are nothing but static images, creating YouTube thumbnail border with Adobe Photoshop is comparatively easier. The process of doing this is given below:
Step 1: Define Document Preferences and Import an Image
Launch Adobe Photoshop on your PC, click Create new, and on the New Document customization box, define the width and height values to 1280 and 720 pixels respectively. Select Transparent from the Background Contents menu as well if not already selected. Click Create from the bottom to create a new Photoshop document with the specified document settings. Next, open the folder that contains the source image, drag the photo to Photoshop, and press Enter to place the photo.
Step 2: Remove Background from the Image
Make sure that the image layer is selected in the Layers panel on the right, go to Select from the menu bar at the top, and click Subject. From the bottom of the Layers panel, click the Add a mask icon to get rid of the background, leaving only the human on the Canvas.
Step 3: Add a Custom Background and an Outline Around the Subject
Use the method explained earlier to import a background image of your choice to Photoshop. Drag the background image layer to the bottom in the Layers panel. Double-click the masked layer, click to select Stroke from the left pane of the Layer Style box, and use the options available on the right to manage the size, color, position, etc. of the stroke that has been added around the human subject. Click OK when done, and then export the image normally to use it as a YouTube thumbnail border.
Summary
It is important to know that the default resolution of a YouTube thumbnail is 1280 x 720 pixels that is usually written and referred to as 720p. While adding a YouTube thumbnail border, it is also imperative to have a good sense of color combination and fonts. Furthermore, a decent tool like Wondershare Filmora X must be used to add an appealing neon border around the main subject in the thumbnail image easily and quickly.
Also read:
- Launch Your Athletic Channel Step by Step Guide on Mac OS
- 2024 Approved Chart-Toppers Unveiled Top YouTube Stars and Their Subs
- Understanding YouTube's Content Crafting Environment
- [Updated] A Comprehensible Breakdown for YouTube Annotation and Card Implementation
- 2024 Approved 8 Best Free Video Editing Software for YouTube
- A Step-by-Step Approach for Adding Soundtracks to YouTube Clips
- Eliminate YouTube Short Headaches with These Tips for 2024
- [New] How to Edit the Length of a Video on YouTube
- [Updated] Elevate Your Channel's Aesthetics - Free Banners Available
- Easy Steps for Exporting Videos From YouTube to Dailymotion for 2024
- 2024 Approved Becoming a Video Virtuoso Essential Tips for Upside-Down Youtube Livestreams
- Essential Tips for Successful YouTube Broadcasts for 2024
- Unlocking YouTube Studio's Power for Professional Edits
- Micro Movie Moments Actors in Audio Arts
- Elevate Your YT Presence and Skyrocket To 1000+ Fans for 2024
- Permanent Silence of the Quick Content Platform
- [New] Effective Approach to Swiftly Eliminate Video Comments
- In 2024, 5 Simple Yet Powerful Strategies to Skyrocket Your YouTube Views
- Becoming a YouTube Guru Essential Production Know-How
- 2024 Approved Earning Mastery Youtube Short Video Tips
- Attract More Viewers Crafting Impressive Youtube Description with Custom Templates
- [Updated] Eclipsing Fears in Your First 10 Videos
- 2024 Approved A Simple Path to Enhanced YouTube Sign-Ups - Create Animated Subscription Bar Using Filmora
- In 2024, Beginner's Blueprint for Online Content Simple, Straightforward Video Projects
- What Is Haul Video and How to Make a Catchy Try on Haul Video
- [Updated] Beginning a Blogging Journey Profit From Your Passion
- Infographic Inquiry! Unraveling the Stats of YT (2017)
- 2024 Approved Channel Upgrade Smartphone Techniques for Professional Videos
- Diversifying Audience Across 30+ Online Venues
- [Updated] Decoding TSeries’ Monetary Strategies on YouTube Video Platforms
- 2024 Approved Bridging the Audience Gap Successful Multi-Streaming Approaches on Youtube & Twitch
- Partnered Filmmaking Expand Your Channel's Reach
- [Updated] Enhance Visibility 11 Must-Know YouTube Video SEO Tactics
- In 2024, Channel Titles That Shine How to Innovate
- Step-by-Step iDevice Guide for YouTube Video Upload
- [Updated] Crafting a Music Career 15 Essential Video Tutorials for Artists
- 2024 Approved Crafting an Apple-Powered Athletic Broadcast Platform
- Elevate Your Content Game Tactics for Optimal YouTube Featured Channels for 2024
- [Updated] Cinematic Dialogue Assembler
- Ensuring Profitability in YouTube with Correct Monetization
- Transform Your Unboxing Videos with These Tips
- [Updated] Dive Into Digital Green Magic Top 4 YouTube Sources for No-Cost Background Workshops
- [New] Diving Deep Into the Income of Ajey (CarryMinati)
- Streamlined Processes for Swift Comment Removal on YouTube
- Eco Ad Boosting Subscription & Green Screen Combo
- [New] In 2024, Reel Your Audience in with Top Mobile Video Editors for Snaps
- [New] In 2024, Perfecting Slow Motion Cinematography for Social Media Engagement on Instagram
- Top 8 Best Video Grabbers for Windows 10 for 2024
- In 2024, How to Remove Activation Lock On the iPhone 11 Pro Without Previous Owner?
- [Updated] From Memories to Reels Building Stellar SlideShows for Facebook for 2024
- [Updated] A Step-by-Step Recorder for Discord Enthusiasts for 2024
- New In 2024, VLC Trimmer Mac Best Way to Trim VLC Without Losing Quality
- How do I reset my HTC U23 Pro Phone without technical knowledge? | Dr.fone
- In 2024, Why Your WhatsApp Live Location is Not Updating and How to Fix on your Huawei P60 | Dr.fone
- Easy steps to recover deleted call history from Infinix Hot 30 5G
- Top 5 Vivo Y77t Bypass FRP Tools for PC That Actually Work
- Avoid Breaches The Pre-Upload Guide to Copyright on TikTok
- New In 2024, The Ultimate Manual for Sonic Enhancement Using Sony Vegas Pro 2023
- [Updated] 2024 Approved 15 Favorites That Echoed Across TikTok’s Bookish Community
- Updated Top 10 Open-Source Video Editing Software for Linux Users
- Updated Free WMV Video Cutting Tools Top Picks for 2024
- In 2024, iSpoofer is not working On Motorola Moto E13? Fixed | Dr.fone
- Title: [New] Brand Differentiation with Powerful YouTube Names
- Author: Brian
- Created at : 2024-05-25 12:29:51
- Updated at : 2024-05-26 12:29:51
- Link: https://youtube-video-recordings.techidaily.com/new-brand-differentiation-with-powerful-youtube-names/
- License: This work is licensed under CC BY-NC-SA 4.0.
