
![[New] Boost Your Buzz Factor with These 3 Dynamic Approaches to YouTube Video Reactions](https://www.lifewire.com/thmb/OuVef_5haGHVKpJil20272Du6cI=/400x300/filters:no_upscale():max_bytes(150000):strip_icc()/computer-internals-with-red-LED-and-RGB-GettyImages-ebb5630f80ee4f8e874dd787739ad3cb.jpg)
[New] Boost Your Buzz Factor with These 3 Dynamic Approaches to YouTube Video Reactions
Boost Your Buzz Factor with These 3 Dynamic Approaches to YouTube Video Reactions
How to Make a YouTube Reaction Video?

Richard Bennett
Mar 27, 2024• Proven solutions
Sharing ideas and opinions on virtually any topic you can think of with millions of people around the world is arguably one of the greatest benefits YouTube gives to content creators. Even so, building your channel exclusively around reaction videos may prove to be difficult, but this doesn’t mean that you can’t use this type of video to comment on what other YouTubers are saying.
The process of making a YouTube reaction video is not overly technical, although you will have to decide which video editing technique you are going to use to make a reaction video. That is why in this article we are going to take a look at different ways to make a YouTube reaction video.
- Method 1: Making Reaction Videos with PIP feature in Filmora
- Method 2: Create YouTube Reaction Video with Split Screen Templates
- Method 3: Make A Reaction Video for YouTube with AI Portrait
How to Make a Reaction Video for Your YouTube Channel? [3 Ways]
Using the footage without the consent of the copyright owner is punishable by the law, which means that you can only include the footage in a reaction video if you have the owner’s consent. Consequently, the selection of videos you can comment on is going to be limited, since it is entirely up to the creator of the video if they are going to give you permission to use their footage in your reaction video.
You can use the following video editing techniques, once you have access to the video you would like to comment on.
Method 1: Making a reaction video with the Picture-in-Picture feature in Filmora
Video editing software, like Filmora , can also be used to create YouTube reaction videos, but you must have all the footage you would like to include in that video before you can start putting it together.
The first step is to create a new project in Filmora and then import the media assets into the editor. Besides video clips, you can also add music, pictures, or create opening titles and end credits for your reaction video.


Place the video you’re reacting to on a video track on the timeline and then add the video of your reaction to the timeline that is directly above the one to which you added the first video clip. Click on the top video in the preview window and use the handles that are positioned around the edges of the video to adjust its size.
If you would like to change the on-screen position of the overlay clip, you should simply click on it and drag it to the new location within the preview window.

Filmora offers more than sixty motion effects, hundreds of transitions, and visual effects that can make your reaction video more visually appealing to the audience.

Moreover, Filmora video editing software offers a variety of blending modes, and it lets you control the opacity of the overlay video so that you can make it more transparent. Whether or not you are going to use these options depends on the footage you’re working with and the demands of a particular project.
Pros of using the Picture in Picture feature to make reaction videos in Filmora: You can place and adjust the videos with more customizable options. Get more tips about Making a PIP video in Filmora .
Method 2: Create several reaction windows with the Split Screen feature
Besides the Picture-in-Picture option, Filmora also enables you to play two or more videos simultaneously with Split Screen templates. Drag and drop the template you want to use in your reaction video to the timeline and click on the Enable Split Screen Animation tick box if you want to use the template without animations.

Afterward, you should drag the video clips from the Media tab and drop them onto the section of the preview window where you want them to be located. Keep in mind that you cannot add more than six videos to a split-screen template.

All videos you add to a split-screen template can be edited, and you just have to click on them if you want to adjust their sizes, enhance colors, mute their audio tracks or add a new audio file to the template.
Check the details about How to make a split-screen video step by step.
Pros of using Split-screen template to make reaction video in Filmora: various templates for creating stylish video side by side easily.
Method 3: Create A YouTube Reaction Video with AI Portrait
With the human segmentation effect in AI Portrait, you can now blend the reaction video in a more natural way. The human segmentation effect will isolate people from the background, you can use any background in the video.
Note: You can use this feature after version after V 10.5 for Windows, and V 10.4 for Mac. Click the button below to get the latest version of Filmora on your desktop.
Step 1: Import the videos to the media library, and then drag the background video to the first video track, and the reaction video to the track above.

Step 2: Go to the Effects tab at the top, and click the AI Portrait category, and then you will see many effects such as Human Segmentation, Human Pixelate, Human Noise, and lighting flash. Here, drag and drop the Human segmentation effect to the reaction video.

Step 3: Select the reaction video in the timeline, and then adjust its size and position by dragging it on the preview window. See, the reaction video is fine blended with the background video.

Step 4: That’s the basic editing of making a reaction video. You can also add the neon or flashing effect to the video. If everything goes well, click Export and save the video.

You can find out more details about using the AI Portrait effect to make a reaction video .
How to Avoid Copyright Infringements While Making a YouTube Reaction Video
All videos you can find on YouTube are protected by intellectual property regulations, and you can’t use them without the copyright owner’s permission. The only way to avoid being absolutely sure that your reaction video isn’t violating the law is to contact the video creator and ask for permission to use their intellectual property. However, most YouTubers are reluctant to let others download and edit their videos unless they already have a large fan base.
In case you’re granted permission to comment on a video, you have nothing to worry about. However, if you don’t get the permission you’re all the money the reaction video generates will go to the copyright owner or you will be forced to delete the video from your channel. There are still a few things you can do, even if you don’t get permission to use the video you would like to comment on.
Muting the video’s audio or altering its pitch will make it more difficult for YouTube’s bots to detect copyright infringement, although this method may not always work. In addition, you can play a video for up to thirty seconds, then comment on that segment, and then play another segment of that video.
There is no way of saying whether any of these editing tricks are going to help you avoid a copyright claim, and you should only use them if you have no other option.
Conclusion
Anyone can master the technical aspects of making a reaction video, but the topics you react to need to be related to the general topic your channel covers. What’s more, the idea of your reaction video has to be relevant for your audience if you want to attract their attention. Which video editing techniques are you using to make a YouTube reaction video?
Download Mac Version ](https://tools.techidaily.com/wondershare/filmora/download/ )
Richard Bennett
Richard Bennett is a writer and a lover of all things video.
Follow @Richard Bennett
Richard Bennett
Mar 27, 2024• Proven solutions
Sharing ideas and opinions on virtually any topic you can think of with millions of people around the world is arguably one of the greatest benefits YouTube gives to content creators. Even so, building your channel exclusively around reaction videos may prove to be difficult, but this doesn’t mean that you can’t use this type of video to comment on what other YouTubers are saying.
The process of making a YouTube reaction video is not overly technical, although you will have to decide which video editing technique you are going to use to make a reaction video. That is why in this article we are going to take a look at different ways to make a YouTube reaction video.
- Method 1: Making Reaction Videos with PIP feature in Filmora
- Method 2: Create YouTube Reaction Video with Split Screen Templates
- Method 3: Make A Reaction Video for YouTube with AI Portrait
How to Make a Reaction Video for Your YouTube Channel? [3 Ways]
Using the footage without the consent of the copyright owner is punishable by the law, which means that you can only include the footage in a reaction video if you have the owner’s consent. Consequently, the selection of videos you can comment on is going to be limited, since it is entirely up to the creator of the video if they are going to give you permission to use their footage in your reaction video.
You can use the following video editing techniques, once you have access to the video you would like to comment on.
Method 1: Making a reaction video with the Picture-in-Picture feature in Filmora
Video editing software, like Filmora , can also be used to create YouTube reaction videos, but you must have all the footage you would like to include in that video before you can start putting it together.
The first step is to create a new project in Filmora and then import the media assets into the editor. Besides video clips, you can also add music, pictures, or create opening titles and end credits for your reaction video.
Place the video you’re reacting to on a video track on the timeline and then add the video of your reaction to the timeline that is directly above the one to which you added the first video clip. Click on the top video in the preview window and use the handles that are positioned around the edges of the video to adjust its size.
If you would like to change the on-screen position of the overlay clip, you should simply click on it and drag it to the new location within the preview window.
Filmora offers more than sixty motion effects, hundreds of transitions, and visual effects that can make your reaction video more visually appealing to the audience.
Moreover, Filmora video editing software offers a variety of blending modes, and it lets you control the opacity of the overlay video so that you can make it more transparent. Whether or not you are going to use these options depends on the footage you’re working with and the demands of a particular project.
Pros of using the Picture in Picture feature to make reaction videos in Filmora: You can place and adjust the videos with more customizable options. Get more tips about Making a PIP video in Filmora .
Method 2: Create several reaction windows with the Split Screen feature
Besides the Picture-in-Picture option, Filmora also enables you to play two or more videos simultaneously with Split Screen templates. Drag and drop the template you want to use in your reaction video to the timeline and click on the Enable Split Screen Animation tick box if you want to use the template without animations.
Afterward, you should drag the video clips from the Media tab and drop them onto the section of the preview window where you want them to be located. Keep in mind that you cannot add more than six videos to a split-screen template.
All videos you add to a split-screen template can be edited, and you just have to click on them if you want to adjust their sizes, enhance colors, mute their audio tracks or add a new audio file to the template.
Check the details about How to make a split-screen video step by step.
Pros of using Split-screen template to make reaction video in Filmora: various templates for creating stylish video side by side easily.
Method 3: Create A YouTube Reaction Video with AI Portrait
With the human segmentation effect in AI Portrait, you can now blend the reaction video in a more natural way. The human segmentation effect will isolate people from the background, you can use any background in the video.
Note: You can use this feature after version after V 10.5 for Windows, and V 10.4 for Mac. Click the button below to get the latest version of Filmora on your desktop.
Step 1: Import the videos to the media library, and then drag the background video to the first video track, and the reaction video to the track above.
Step 2: Go to the Effects tab at the top, and click the AI Portrait category, and then you will see many effects such as Human Segmentation, Human Pixelate, Human Noise, and lighting flash. Here, drag and drop the Human segmentation effect to the reaction video.
Step 3: Select the reaction video in the timeline, and then adjust its size and position by dragging it on the preview window. See, the reaction video is fine blended with the background video.
Step 4: That’s the basic editing of making a reaction video. You can also add the neon or flashing effect to the video. If everything goes well, click Export and save the video.
You can find out more details about using the AI Portrait effect to make a reaction video .
How to Avoid Copyright Infringements While Making a YouTube Reaction Video
All videos you can find on YouTube are protected by intellectual property regulations, and you can’t use them without the copyright owner’s permission. The only way to avoid being absolutely sure that your reaction video isn’t violating the law is to contact the video creator and ask for permission to use their intellectual property. However, most YouTubers are reluctant to let others download and edit their videos unless they already have a large fan base.
In case you’re granted permission to comment on a video, you have nothing to worry about. However, if you don’t get the permission you’re all the money the reaction video generates will go to the copyright owner or you will be forced to delete the video from your channel. There are still a few things you can do, even if you don’t get permission to use the video you would like to comment on.
Muting the video’s audio or altering its pitch will make it more difficult for YouTube’s bots to detect copyright infringement, although this method may not always work. In addition, you can play a video for up to thirty seconds, then comment on that segment, and then play another segment of that video.
There is no way of saying whether any of these editing tricks are going to help you avoid a copyright claim, and you should only use them if you have no other option.
Conclusion
Anyone can master the technical aspects of making a reaction video, but the topics you react to need to be related to the general topic your channel covers. What’s more, the idea of your reaction video has to be relevant for your audience if you want to attract their attention. Which video editing techniques are you using to make a YouTube reaction video?
Download Mac Version ](https://tools.techidaily.com/wondershare/filmora/download/ )
Richard Bennett
Richard Bennett is a writer and a lover of all things video.
Follow @Richard Bennett
Guaranteed Safe Approaches for Turning YouTube Songs Into MP3 Files
How to Convert YouTube to MP3 in 3 Ways [Safe]

Benjamin Arango
Mar 27, 2024• Proven solutions
There is a wide range of prominent tools available in the digital market to convert YouTube to MP3 files. The basic idea behind these tools is that you can extract the audio content from your favorite youtube video and save it to an mp3 file. The RIP of the audio process differs from the program built-in within the application. Many sound professionals opt for an mp3 file format because of its smaller file size, high-frequency audio quality, etc.
After you convert youtube to mp3, you will be able to listen to the background music or audio offline and the MP3 file format guarantees flawless audio quality for you.
You may also like: Best Free Youtube to MP3 Converters You Should Know
Three Ways to Convert YouTube Videos to MP3
Now it is a perfect time to explore unique ways to convert youtube to mp3 files. I will share three different ways in this article. Let’s take a quick look at it below:
- **1. How to Convert YouTube to MP3 by an Online YouTube to MP3 Tool
- **2. How to Convert YouTube to MP3 by q Video Converter
- **3. How to Convert YouTube to MP3 by a Video Editing Software
1. How to Convert YouTube to MP3 by an Online YouTube to MP3 Tool
It is a free service and allows you to convert any videos within the one-hour time limit. The whole conversion process completes within a few minutes effectively. There is no need to register to avail of this online service. You can save the converted files at your desired location and play it during your comfort zone. This online application is compatible with PC, gadgets, tablets, etc.
- Get YtMp3 tool: Click Hereon your browser and step into the online YouTube converter platform
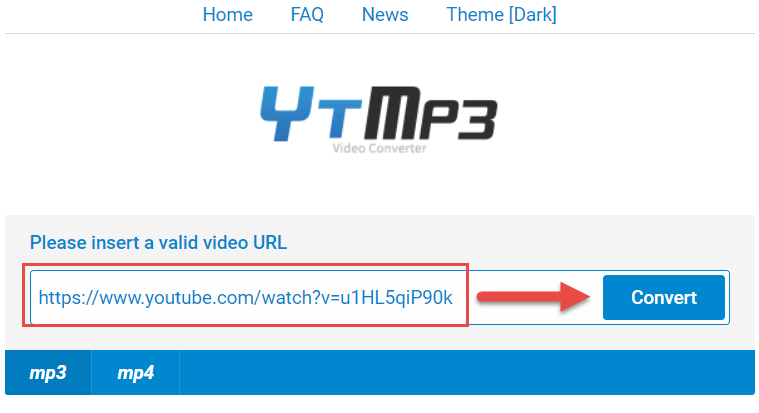
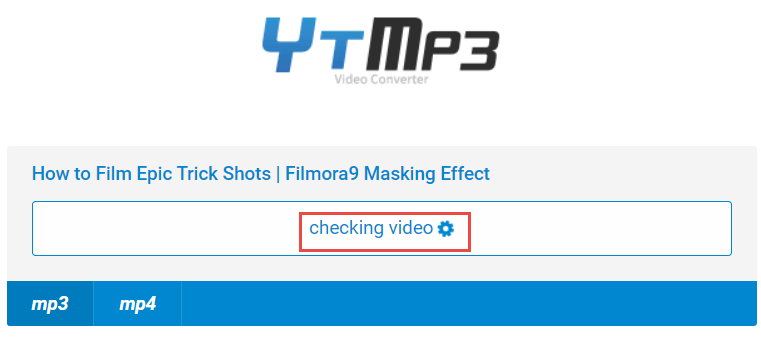
- **Paste the URL: Now copy your favorite track URL from YouTube and paste it on the box. Then hit the ‘Convert’ button beside the pasted URL. You have to wait for a few minutes until the conversion process completes.
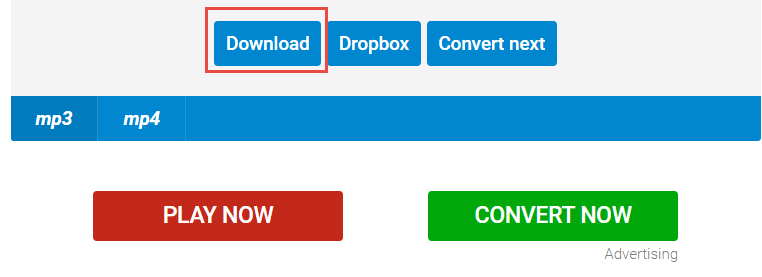
- **Download mp3: Immediately you must tap the ‘Download‘ button and choose the desired location by navigating between drives and folders to save the converted MP3 files. You can also choose the ‘Dropbox’ option to store it on the virtual location for easy retrieval.
Tips:
The converted YouTube video in the MP3 file format is available for further transfer to other external gadgets. Make use of the MP3 files according to your convenience without any limitations.
2. How to Convert YouTube to MP3 by a Video Converter
If you take a deeper look at the converter tools at the online platform you will end with piles of collection of software. The key factor which you must bear in your mind is the reliability of the conversion program. Wondershare Uniconverter is an ultimate tool and it meets the expectations of the users without any compromises. Let’s see how to convert youtube to mp3 with this video converter:
- Click Here to download and install Wondershare Uniconverter on your computer
- Visit your favorite YouTube channel and copy the link of your favorite tract at its address bar.
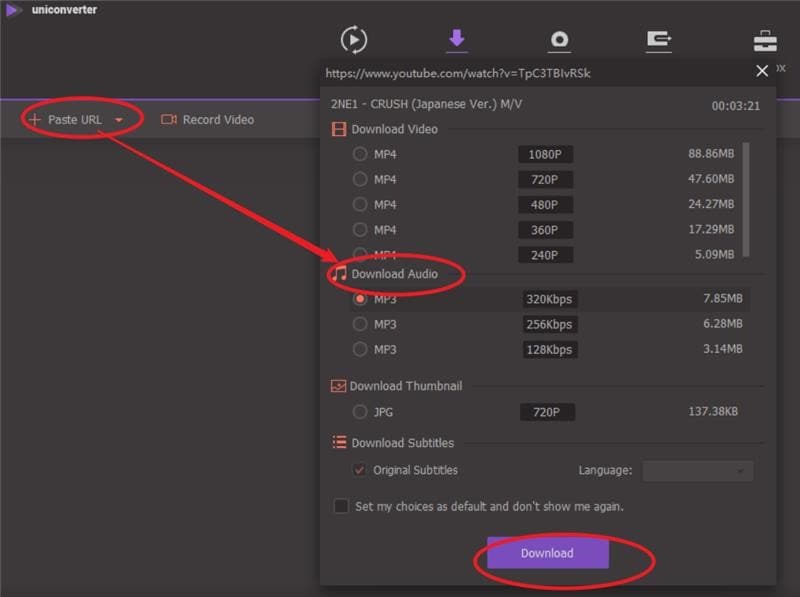
- Launch Wondershare Uniconverter, then click the ‘Paste UR L‘ option at the top left side of the screen and select ‘Download MP3‘ from the drop-down icon. The audio extraction process commences immediately.
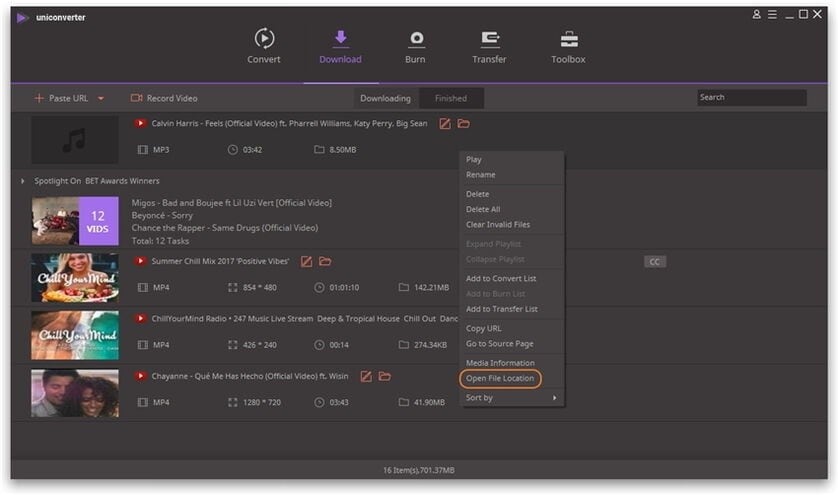
- After the download completes, you must hit the ‘Finished’ tab at the top of the screen to obtain the audio view. If you want to find out the folder details then you have to right-click and choose ‘Open File Location‘. This action takes you to the folder where the MP3 is available to carry out further tasks on it.
3. How to Convert YouTube to MP3 by a Video Editing Software
This method gives you access to convert Youtube to mp3 using a Video Editor. Wondershare Filmora not only offers many basic and professional editing tools and video effects but also can convert youtube to mp3. If you need further editing for mp3 after converting, Filmora will be the right one for you.
Here are the guidelines to convert YouTube to MP3 using Filmora:
Note:
This is a video editing software, and cannot convert a Youtube URL to an mp3 directly. You should convert the youtube URL to a local video in mp4 or other supported video formats first. You can read Convert Youtube to MP4 Guide and try some Youtube video downloaders to convert Youtube to mp4.
- Once you convert Youtube to mp4, please download Filmora below and install it on your computer
Download Mac Version ](https://tools.techidaily.com/wondershare/filmora/download/ )
- Open Filmora, then go to File-Import-Media to load the converted mp4 video to the Media Library

- Add or drag the video to the timeline(If you need to further edit or cut your video, you can double click the video on the track, and get more video and audio editing tools as you like, such as audio fade in/out and volume adjustment).
- Then hit the ‘Export‘ button and select ‘MP3’ format from the expanded list. You can click Settings in the export panel to customize the output audio settings, such as the audio bitrate for higher audio quality.

Warnings
Authorized Download—YouTube allows only legal download and conversion of videos on its platform. You can work on your videos on YouTube without any issues. You must own the copyrights if you want to download third person videos. As per the legal policy of YouTube, unauthorized download is strictly prohibited.
To sum up
There are multiple methods to convert youtube to mp3 effectively. The great challenge you may face while choosing the perfect app which fits your needs optimally. It is highly recommended to follow the YouTube copyrights guides and carryout legal downloads without any issues.
Stay tuned for more exciting facts on video converters. Leave your valuable comments and suggestions on this article.
Benjamin Arango
Benjamin Arango is a writer and a lover of all things video.
Follow @Benjamin Arango
Benjamin Arango
Mar 27, 2024• Proven solutions
There is a wide range of prominent tools available in the digital market to convert YouTube to MP3 files. The basic idea behind these tools is that you can extract the audio content from your favorite youtube video and save it to an mp3 file. The RIP of the audio process differs from the program built-in within the application. Many sound professionals opt for an mp3 file format because of its smaller file size, high-frequency audio quality, etc.
After you convert youtube to mp3, you will be able to listen to the background music or audio offline and the MP3 file format guarantees flawless audio quality for you.
You may also like: Best Free Youtube to MP3 Converters You Should Know
Three Ways to Convert YouTube Videos to MP3
Now it is a perfect time to explore unique ways to convert youtube to mp3 files. I will share three different ways in this article. Let’s take a quick look at it below:
- **1. How to Convert YouTube to MP3 by an Online YouTube to MP3 Tool
- **2. How to Convert YouTube to MP3 by q Video Converter
- **3. How to Convert YouTube to MP3 by a Video Editing Software
1. How to Convert YouTube to MP3 by an Online YouTube to MP3 Tool
It is a free service and allows you to convert any videos within the one-hour time limit. The whole conversion process completes within a few minutes effectively. There is no need to register to avail of this online service. You can save the converted files at your desired location and play it during your comfort zone. This online application is compatible with PC, gadgets, tablets, etc.
- Get YtMp3 tool: Click Hereon your browser and step into the online YouTube converter platform
- **Paste the URL: Now copy your favorite track URL from YouTube and paste it on the box. Then hit the ‘Convert’ button beside the pasted URL. You have to wait for a few minutes until the conversion process completes.
- **Download mp3: Immediately you must tap the ‘Download‘ button and choose the desired location by navigating between drives and folders to save the converted MP3 files. You can also choose the ‘Dropbox’ option to store it on the virtual location for easy retrieval.
Tips:
The converted YouTube video in the MP3 file format is available for further transfer to other external gadgets. Make use of the MP3 files according to your convenience without any limitations.
2. How to Convert YouTube to MP3 by a Video Converter
If you take a deeper look at the converter tools at the online platform you will end with piles of collection of software. The key factor which you must bear in your mind is the reliability of the conversion program. Wondershare Uniconverter is an ultimate tool and it meets the expectations of the users without any compromises. Let’s see how to convert youtube to mp3 with this video converter:
- Click Here to download and install Wondershare Uniconverter on your computer
- Visit your favorite YouTube channel and copy the link of your favorite tract at its address bar.
- Launch Wondershare Uniconverter, then click the ‘Paste UR L‘ option at the top left side of the screen and select ‘Download MP3‘ from the drop-down icon. The audio extraction process commences immediately.
- After the download completes, you must hit the ‘Finished’ tab at the top of the screen to obtain the audio view. If you want to find out the folder details then you have to right-click and choose ‘Open File Location‘. This action takes you to the folder where the MP3 is available to carry out further tasks on it.
3. How to Convert YouTube to MP3 by a Video Editing Software
This method gives you access to convert Youtube to mp3 using a Video Editor. Wondershare Filmora not only offers many basic and professional editing tools and video effects but also can convert youtube to mp3. If you need further editing for mp3 after converting, Filmora will be the right one for you.
Here are the guidelines to convert YouTube to MP3 using Filmora:
Note:
This is a video editing software, and cannot convert a Youtube URL to an mp3 directly. You should convert the youtube URL to a local video in mp4 or other supported video formats first. You can read Convert Youtube to MP4 Guide and try some Youtube video downloaders to convert Youtube to mp4.
- Once you convert Youtube to mp4, please download Filmora below and install it on your computer
Download Mac Version ](https://tools.techidaily.com/wondershare/filmora/download/ )
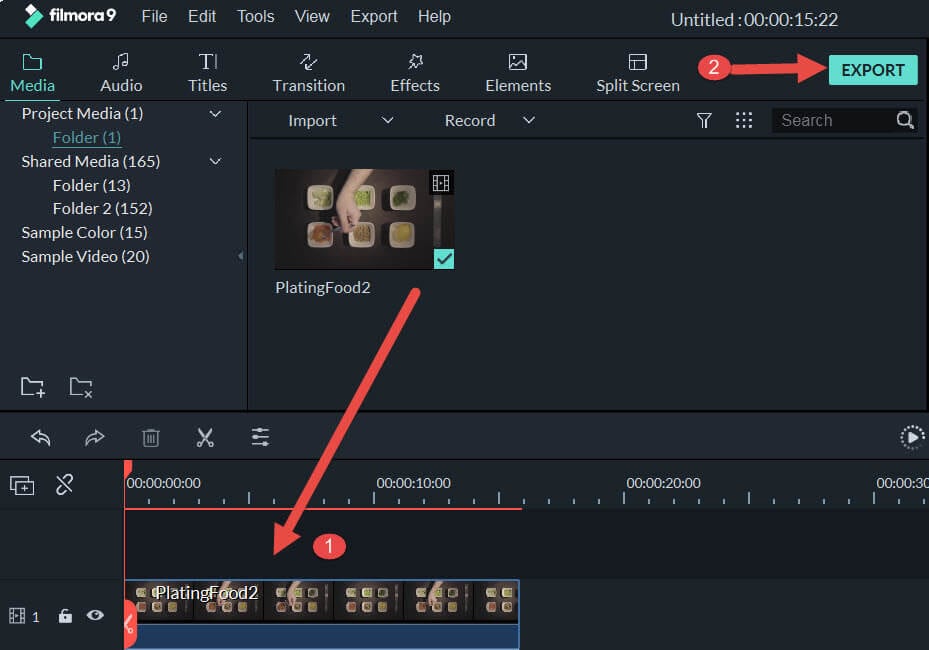
- Open Filmora, then go to File-Import-Media to load the converted mp4 video to the Media Library
- Add or drag the video to the timeline(If you need to further edit or cut your video, you can double click the video on the track, and get more video and audio editing tools as you like, such as audio fade in/out and volume adjustment).
- Then hit the ‘Export‘ button and select ‘MP3’ format from the expanded list. You can click Settings in the export panel to customize the output audio settings, such as the audio bitrate for higher audio quality.
Warnings
Authorized Download—YouTube allows only legal download and conversion of videos on its platform. You can work on your videos on YouTube without any issues. You must own the copyrights if you want to download third person videos. As per the legal policy of YouTube, unauthorized download is strictly prohibited.
To sum up
There are multiple methods to convert youtube to mp3 effectively. The great challenge you may face while choosing the perfect app which fits your needs optimally. It is highly recommended to follow the YouTube copyrights guides and carryout legal downloads without any issues.
Stay tuned for more exciting facts on video converters. Leave your valuable comments and suggestions on this article.
Benjamin Arango
Benjamin Arango is a writer and a lover of all things video.
Follow @Benjamin Arango
Benjamin Arango
Mar 27, 2024• Proven solutions
There is a wide range of prominent tools available in the digital market to convert YouTube to MP3 files. The basic idea behind these tools is that you can extract the audio content from your favorite youtube video and save it to an mp3 file. The RIP of the audio process differs from the program built-in within the application. Many sound professionals opt for an mp3 file format because of its smaller file size, high-frequency audio quality, etc.
After you convert youtube to mp3, you will be able to listen to the background music or audio offline and the MP3 file format guarantees flawless audio quality for you.
You may also like: Best Free Youtube to MP3 Converters You Should Know
Three Ways to Convert YouTube Videos to MP3
Now it is a perfect time to explore unique ways to convert youtube to mp3 files. I will share three different ways in this article. Let’s take a quick look at it below:
- **1. How to Convert YouTube to MP3 by an Online YouTube to MP3 Tool
- **2. How to Convert YouTube to MP3 by q Video Converter
- **3. How to Convert YouTube to MP3 by a Video Editing Software
1. How to Convert YouTube to MP3 by an Online YouTube to MP3 Tool
It is a free service and allows you to convert any videos within the one-hour time limit. The whole conversion process completes within a few minutes effectively. There is no need to register to avail of this online service. You can save the converted files at your desired location and play it during your comfort zone. This online application is compatible with PC, gadgets, tablets, etc.
- Get YtMp3 tool: Click Hereon your browser and step into the online YouTube converter platform
- **Paste the URL: Now copy your favorite track URL from YouTube and paste it on the box. Then hit the ‘Convert’ button beside the pasted URL. You have to wait for a few minutes until the conversion process completes.
- **Download mp3: Immediately you must tap the ‘Download‘ button and choose the desired location by navigating between drives and folders to save the converted MP3 files. You can also choose the ‘Dropbox’ option to store it on the virtual location for easy retrieval.
Tips:
The converted YouTube video in the MP3 file format is available for further transfer to other external gadgets. Make use of the MP3 files according to your convenience without any limitations.
2. How to Convert YouTube to MP3 by a Video Converter
If you take a deeper look at the converter tools at the online platform you will end with piles of collection of software. The key factor which you must bear in your mind is the reliability of the conversion program. Wondershare Uniconverter is an ultimate tool and it meets the expectations of the users without any compromises. Let’s see how to convert youtube to mp3 with this video converter:
- Click Here to download and install Wondershare Uniconverter on your computer
- Visit your favorite YouTube channel and copy the link of your favorite tract at its address bar.
- Launch Wondershare Uniconverter, then click the ‘Paste UR L‘ option at the top left side of the screen and select ‘Download MP3‘ from the drop-down icon. The audio extraction process commences immediately.
- After the download completes, you must hit the ‘Finished’ tab at the top of the screen to obtain the audio view. If you want to find out the folder details then you have to right-click and choose ‘Open File Location‘. This action takes you to the folder where the MP3 is available to carry out further tasks on it.
3. How to Convert YouTube to MP3 by a Video Editing Software
This method gives you access to convert Youtube to mp3 using a Video Editor. Wondershare Filmora not only offers many basic and professional editing tools and video effects but also can convert youtube to mp3. If you need further editing for mp3 after converting, Filmora will be the right one for you.
Here are the guidelines to convert YouTube to MP3 using Filmora:
Note:
This is a video editing software, and cannot convert a Youtube URL to an mp3 directly. You should convert the youtube URL to a local video in mp4 or other supported video formats first. You can read Convert Youtube to MP4 Guide and try some Youtube video downloaders to convert Youtube to mp4.
- Once you convert Youtube to mp4, please download Filmora below and install it on your computer
Download Mac Version ](https://tools.techidaily.com/wondershare/filmora/download/ )
- Open Filmora, then go to File-Import-Media to load the converted mp4 video to the Media Library
- Add or drag the video to the timeline(If you need to further edit or cut your video, you can double click the video on the track, and get more video and audio editing tools as you like, such as audio fade in/out and volume adjustment).
- Then hit the ‘Export‘ button and select ‘MP3’ format from the expanded list. You can click Settings in the export panel to customize the output audio settings, such as the audio bitrate for higher audio quality.
Warnings
Authorized Download—YouTube allows only legal download and conversion of videos on its platform. You can work on your videos on YouTube without any issues. You must own the copyrights if you want to download third person videos. As per the legal policy of YouTube, unauthorized download is strictly prohibited.
To sum up
There are multiple methods to convert youtube to mp3 effectively. The great challenge you may face while choosing the perfect app which fits your needs optimally. It is highly recommended to follow the YouTube copyrights guides and carryout legal downloads without any issues.
Stay tuned for more exciting facts on video converters. Leave your valuable comments and suggestions on this article.
Benjamin Arango
Benjamin Arango is a writer and a lover of all things video.
Follow @Benjamin Arango
Also read:
- Event Harmony Sourcing Perfect DJ Video Templates
- In 2024, Elevate Your Stream A Comprehensive Ad Revenue Guide on YouTube
- [Updated] Calculating Earnings Ad Revenues in the World of YouTube?
- Generating an Auto-Subscribe URL Template
- Content Creation Battleground Choosing Between Vimeo, YouTube, DailyMotion
- Increase Length of YouTube Creative Work
- Top 15 YouTube Channels for Stock Market to Follow
- [Updated] Enhancing Video Appeal 20 Premium Thumbnail Fonts
- Profiting From Gaming Channels
- Streamline Visual Marking in Youtube Posts with Watermarks & Logos
- Cut-to-the-Chase 8 Simple YouTube Thumbnail Builders for 2024
- 2024 Approved Charting a Course to Your Signature Sphere
- Embrace 9 Festive Feasts Watch Holiday Epics at Zero Cost Online
- 2024 Approved Boost Your Channels' Traffic & Value with Innovative Hashtags
- The Power of Personalization Upgrade Your YouTube URL
- Eliminate YouTube Short Headaches with These Tips for 2024
- What Is Haul Video and How to Make a Catchy Try on Haul Video
- Essential Techniques for Enhanced YouTube Long-Form Videos
- Audiovisual Innovators Best Portable Devices for Editors for 2024
- Dissecting Digital Dynamics Comparative Channel Analysis for 2024
- 2024 Approved Crafting Shorts for a Seamless User Experience
- Optimize Your Channels An Introduction to YouTube Statistics
- Navigating Through the Top 10 Making Magic on YouTube
- Tailor the Rhythm of YouTube Videos - Desktop/Mobile Way
- In 2024, Deciphering the Language of YouTube Live Images
- Leverage Creative Studio for Maximum YouTube Reach and Engagement
- [New] Elevate Video Consumption Constructing an Ideal 'Watch Later' List on YouTube
- [New] Amplifying Your YouTube Presence Through Consistent Content Release
- Understanding and Mastering YouTube Live Visuals for Engagement
- Clear YouTube Watch Later Playlist - [Step-by-Step] for 2024
- Beyond the Screen Metaverse Vs. Omniverse Dissected
- [Updated] 2024 Approved Secrets to Successful Twitpicing—Video Edition
- In 2024, Survival in Shambles Selecting the Top 8 Zombie Classics
- How to recover deleted photos from Android Gallery after format on Samsung Galaxy A15 5G
- [Updated] 2024 Approved Audience's Choice? Bandicam or Camtasia for Screen Capture
- In 2024, 5 Ways to Move Contacts From Honor X50i to iPhone (13/14/15) | Dr.fone
- In 2024, Why Your WhatsApp Location is Not Updating and How to Fix On Samsung Galaxy A15 5G | Dr.fone
- 2024 Approved Seamless Development Selecting 15 Preferred Android Emulators
- Effective Procedures for Screen Capturing Live Telecasts
- Conquering Export Errors for SRT in Premiere Pro for 2024
- [New] Building a Cohesive TikTok Ending Spectacle for 2024
- In 2024, Remove the Lock Screen Fingerprint Of Your Xiaomi
- In 2024, How to Unlock Xiaomi Redmi 12 5G Phone Pattern Lock without Factory Reset
- 2024 Approved Boosting Creativity Top Tips & Tricks for LunaPic Editors
- 2024 Approved Best 10 Online Waveform Generators You Should Try
- Updated 2024 Approved Simple Voice Changer Features, Guidelines, and Alternatives
- In 2024, AddROM Bypass An Android Tool to Unlock FRP Lock Screen For your Vivo Y100t
- Digital Zooming Essentials for Precision Screens
- Updated Reaction Video Makers Top Picks for iPhone and Android
- [Updated] Master Your Media Adhering to Twitter's Video Requirements for 2024
- 2024 Approved Step-by-Step Excellence Optimal Software Use & No-Software Strategies for Vimeo
- Updated Soundscape Quest Discovering Buttons Auditory Palette
- TitleGenius Revolutionizing Video Title Generation
- Quick Tips Eradicate Online Ads From Your Feed
- Top 5 Tools to Help You Know More Freeze-Frame Video Editing Skills
- Title: [New] Boost Your Buzz Factor with These 3 Dynamic Approaches to YouTube Video Reactions
- Author: Brian
- Created at : 2024-05-25 12:29:29
- Updated at : 2024-05-26 12:29:29
- Link: https://youtube-video-recordings.techidaily.com/new-boost-your-buzz-factor-with-these-3-dynamic-approaches-to-youtube-video-reactions/
- License: This work is licensed under CC BY-NC-SA 4.0.
