
!["[New] Best-in-Class Streaming Capture Software For YouTubers"](https://www.lifewire.com/thmb/zBEl_bEu07nfTMzj3iet9cEOY3E=/400x300/filters:no_upscale():max_bytes(150000):strip_icc()/Kruzadar2-997fddec8bfa45e5895b020f282d02aa.jpg)
"[New] Best-in-Class Streaming Capture Software For YouTubers"
Best-in-Class Streaming Capture Software For YouTubers
Best YouTube Livestreaming Screen Recorders

Richard Bennett
Oct 26, 2023• Proven solutions
The global pandemic has changed the way we live for the time being, and right now, we cannot attend events in the same way we did at the beginning of the year.
A growing number of cultural organizations, businesses, and influential YouTubers are turning towards YouTube’s Live feature because it provides a simple way of broadcasting different types of content in real-time. YouTube Live is by no means a new option, since the platform first introduced live streaming features in 2008, and some twelve years later, the feature has never been more popular.
However, the live streams you broadcast on YouTube are stored for just a brief period of time, which means you have to search for alternative methods of saving them. That’s why in this article we are going to take you through the best YouTube Live screen recorders you can use to capture the video content you are sharing with your followers.
Note: We resolutely oppose all forms of copyright-infringing downloads. This tutorial is only for downloading YouTube videos/audio materials from your own channel.
Top 10+ YouTube Live Screen Recorders
The maximum resolution in which you can record computer screen , audio recording options, or customization of the recording area are some of the most important features you need to consider while choosing a YouTube Live screen recorder.
We have selected some of the best YouTube Live screen recorders that enable you to do much more than just record live streams. So, let’s take a look at what they have to offer.
1. OBS Studio
Price: Free
Compatibility: Windows, Linux, macOS
The vast majority of live streams you can find on Twitch and YouTube are made with OBS Studio, but besides broadcasting videos, the software also gives you access to screencasting tools. This means that you can specify the area of the screen you want to record, choose the recording’s resolution and frame rate, or adjust the audio recording options.
OBS Studio is the best free, open-source screen recording program you can download. You shouldn’t use a software just because it’s free, but OBS Studio is also an extremely versatile tool. You can both record and stream in high definition and it comes with the ability to record either through your webcam or through your screen. It records directly through the graphics card , which means it can capture games even when in full-screen mode whereas a lot of other screen-recording software forces you to play games in windowed mode. The high quality can be seen easily in whatever you choose to broadcast.
OBS Studio allows you to record videos from a variety of sources, which makes it a perfect option for capturing the content you share through YouTube Live since you can select a browser window you want to capture in just a few clicks. What’s more, this open-source software is equipped with basic video editing tools, which enables you to preview the video you recorded before publishing it, apply transitions between cuts, or perform basic color correction.
Check the detailed guide to How to Record with OBS .
2. XSplit
Price: $24.95 for a three-month license
Compatibility: Windows
This is yet another broadcasting software that is equipped with powerful screen recording tools. Setting up a new screencasting session with XSplit is a simple and intuitive process that is not going to take much more than a few moments of your time.
All you need to do is define a workspace, then pick the preferred resolution and frame rate. The software allows you to capture screens in 4K resolution and at 60 fps, but it also offers a variety of resolution and frame rate options so that you can choose the one that best fits your needs. Furthermore, you can record the computer audio, which enables you to capture the live stream’s audio in excellent quality. Besides YouTube Live, XSplit can be used with Zoom , Skype, Google Hangouts, and numerous other live streaming and video calling apps.
3. Filmora
Price: Free, pricing plans start at $49.99/year
Compatibility: macOS, Windows


If you are looking for a screen recorder that is stacked with powerful video editing features, then Filmora is a great option for you. Customizing a YouTube Live or any other screencasting session with this video editing software is easy, and you can choose the resolution, frame rate, or even if you want to show mouse clicks in the recording.
Capturing the webcam feed and the computer’s screen simultaneously is also an option, while you can also decide whether or not you want to record audio from a microphone, computer audio, or both at the same time.
What’s more Filmora lets you set up the maximum duration of a screen recording and you start, pause, resume or stop a screen recording session by using hotkeys. Once you are done recording the live stream you shared on YouTube, you can edit the footage you created before uploading it to your YouTube channel.
4. Wondershare DemoCreator
Compatibility: Windows
Price: Start from $9.99
DemoCreator is a recorder that focuses its overall user experience. It is able to easily record high-quality videos at up to 120 FPS (60 FPS for Mac) and allows you to simultaneously record both your screen and webcam. This software is incredibly user friendly and makes for an easy experience for new streamers. The dual recording makes it great for gamers who are also looking to film their reactions.
5. CloudApp
Price: Free, $10 per month for an individual user
Compatibility: Windows, macOS, Linux, Chrome
Starting a new screen capturing session with the CloudApp requires you to just specify the portion of the screen you want to capture and hit the record button. Moreover, you can choose if you want to record with or without a webcam and you have the option to enable or disable the audio recording option.
However, you can only create 90-second screen recordings with the free version of the CloudApp and you cannot set resolution or frame rate of the recording. That’s why you need to upgrade to the Pro version if you want to use it to record live streams on YouTube. The Pro subscription model also grants you access to basic video editing tools and a variety of file sharing options. In addition, CloudApp lets you create and annotate still images and GIFs, which makes it a great option for digital marketers.
6. Techsmith Camtasia
Price: Free trial, $269.05 one-time fee
Compatibility: Windows, macOS
You don’t need years of video editing experience to start a new screen recording session in Camtasia. In fact, you just have to click on the Record button that is located in the software’s tool panel and then customize the settings.
Camtasia lets you choose if you want to record the full screen or just a selected portion of the screen or decide if you want to switch the webcam or the microphone off. You should make sure that the System Audio feature is enabled in order to record the sound of the live stream you’re sharing on YouTube. Pausing or stopping a screencasting session requires you to either click on the appropriate buttons or use the keyboard-based hotkeys. After you are done recording a live stream you can edit the footage using Camtasia’s video editing tools.
7. ScreenRec
Price: Free
Compatibility: Windows, macOS, Linux
Recording any live stream or TV show you play on your computer with ScreenRec is a straightforward process that can be completed in just a few clicks. Simply drag the mouse cursor over the area you want to record, then hit the Record button when you are ready and ScreenRec will start capturing the computer screen.
Once the screencasting session is completed you will get a sharable link that can be embedded to a website or used to save an MP4 file on your hard drive. Furthermore, ScreenRec is equipped with analytics tools that show you how many views your videos attracted or for how long each visitor watched them. All of these features make ScreenRec an excellent option for anyone who wants to record a live stream on YouTube or any other on-screen activity.
8. Flashback Express
Price: Free
Compatibility: Windows
Flashback Express is a simple screen recorder that lets you create high-res videos effortlessly. Setting up a new screencasting session requires you to just specify the area of the screen you want to record, choose whether or not you want to record the webcam feed and hit the Record button.
There are no restrictions in terms of the duration of screen recordings you can make with Flashback Express and the software doesn’t watermark the video you create.
However, you can only save the files in MP4, AVI, or WMW formats and you cannot adjust the video’s frame rate or resolution. What’s more, editing videos or applying effects with Flashback Express isn’t possible and you must upgrade to FlashBack Pro if you want to edit the live streams you broadcast on YouTube.
This piece of software is user friendly, but it doesn’t have as many features as other products on the market. Having said that, it is still an excellent tool that will help you live stream gameplay easily. Although it doesn’t come with built-in video editing software, it is possible to download another program to do this for you (i.e. Filmora). Flashback Express has the ability to record through your headset or microphone as well.
9. VLC
Price: Free
Compatibility: macOS, Linux, Windows
This is an iconic media player that became famous for its versatility and support for nearly all video file formats. Besides being one of the best media players ever created, VLC is also equipped with screen recording and video editing tools.
In order to start a new screencasting session, you will have to go to the Media menu and then select the Open Capture Device option. Once the new window pops up on the screen you should change the Capture Mode to Desktop and then adjust the frame rate in accordance with your needs.
Click on the Play button, and then hit the Record button after the screen recording window appears on the screen. You can only record the entire screen with VLC, since customizing the recording area isn’t an option, and all your files will be captured in the RAW format which means that you may have to resize them before you upload them to YouTube.
10. Screencast-o-matic
Price: Free, pricing options start at $1.65 per month
Compatibility: macOS, Windows
As its name suggests, this software product makes the screen recording process almost automatic. You can choose if you want to record an entire screen or just a window you selected. In addition, Screencast-o-matic lets you record the desktop and webcam footage at the same time, and you can even zoom in while the screencasting session is still in progress.
The free version of the software offers only a basic set of features that doesn’t include the option to record system audio. This means that you have to opt for one of the available subscription models if you want to record your live streams on YouTube with Screencast-o-matic. What’s more, you will be to create videos that are longer than 15 minutes, create recordings without watermarks or add music to your recordings if you opt for Deluxe or Premiere pricing options.
11. QuickTime Player
Price: Free
Compatibility: macOS, Windows
Mac users who want to record content that is broadcasted via YouTube Live can do so without having to install a third-party app. Apple ceased the support for the Windows-based version of QuickTime Player in 2016 and PC users can only capture their screens with this software if they have some of its earlier versions.
In order to start a new screen recording session in QuickTime Player, you just have to go to the File menu and select the New Screen Recording option. The Screen Recording window where you can choose if you want to record audio or show mouse click in the recording will pop up on the screen. QuickTime Player lets you choose if you want to capture the entire screen or just a portion of it, and you can click on the Record button to start a new screencasting session. In order to save a video file you created, you just have to go to the File menu and pick the Save option.
How to Record a YouTube Live Stream with Filmora
Recording a YouTube Live stream with Filmora is easy even if you never went through this process before. You can set up a new screencasting session in just a few easy steps that won’t take more than a few moments to complete. Here’s what you need to do:
Step 1: Launch Filmora and create a new project. Go to the Media tab once the video editor’s main window loads and click on the Record drop-down menu that is located next to the Import drop-down menu.
Choose the Record PC Screen option and then proceed to customize the settings for your screencasting session.

Step 2: Click on the Rectangular icon in the upper left corner of the Wondershare Filmora Scrn window and choose either Full Screen, Custom, or Target Window option, depending on how you want to record a YouTube Live stream to define the area of the screen that is going to be recorded.
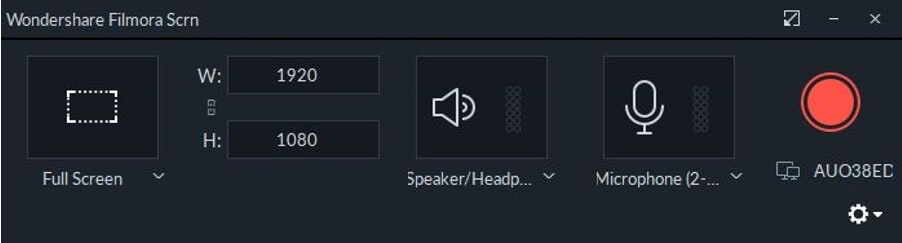
You can then proceed to insert the resolution your screen recording is going to have, and choose if you want to record system audio and sound from an external microphone.
Step 3: Click on the Gear icon below the Record button to gain access to additional settings, and then proceed to set the frame rate, adjust the video’s quality or activate the Show Mouse Clicks in Recording option.
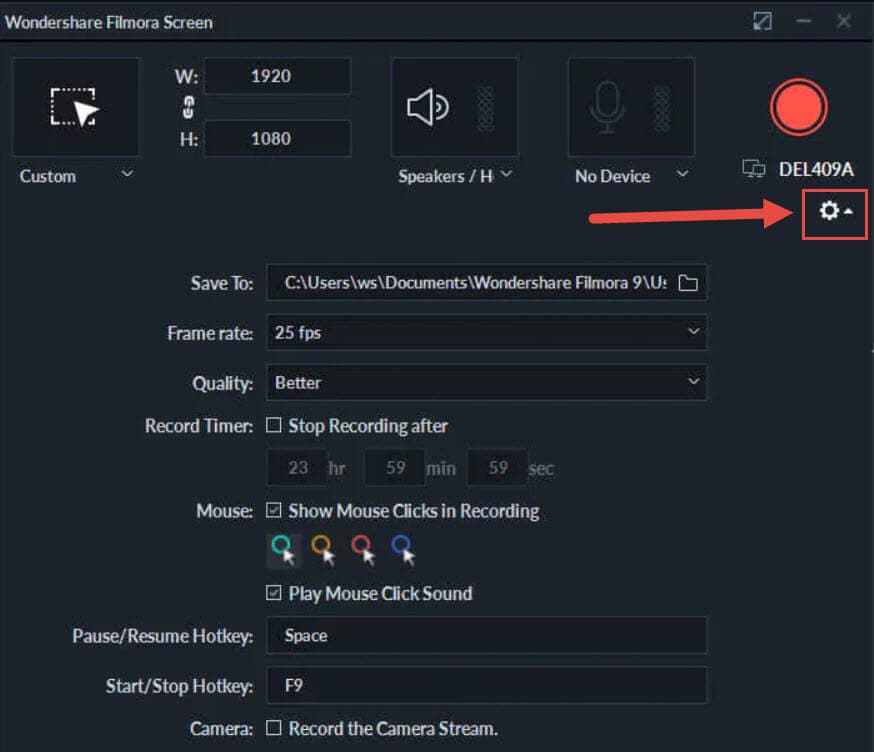
Make sure that the checkbox next to the Record the Camera Stream is marked if you want to record webcam feed and computer desktop at the same time.
Step 4: Press the red Record button in the upper right corner of the window and jump to the live stream. Once the broadcast is completed, you should click on the Stop button and use Filmora’s editing tools to remove all imperfections from the recording.
Filmora allows you to export all of your projects directly to your YouTube channel immediately after the rendering process is completed.
Frequently Asked Questions about YouTube Live Screen Recorders
1. Does YouTube Save Live Videos?
Stream Now, Mobile, Webcam, and Events streams can be stored automatically for 12 hours after they end. You can access all of your live streams by clicking on the Videos menu in the YouTube Studio and selecting the Live option and then change the Privacy setting in the Visibility menu.
2. How to use YouTube to Archive a Live Stream?
Once the live stream ends, you should go to the Dashboard and click on the Live feature, and then choose the Stream option. Check the Make Archive Unlisted When Complete checkbox and the live stream video will be saved accordingly.
Richard Bennett
Richard Bennett is a writer and a lover of all things video.
Follow @Richard Bennett
Richard Bennett
Oct 26, 2023• Proven solutions
The global pandemic has changed the way we live for the time being, and right now, we cannot attend events in the same way we did at the beginning of the year.
A growing number of cultural organizations, businesses, and influential YouTubers are turning towards YouTube’s Live feature because it provides a simple way of broadcasting different types of content in real-time. YouTube Live is by no means a new option, since the platform first introduced live streaming features in 2008, and some twelve years later, the feature has never been more popular.
However, the live streams you broadcast on YouTube are stored for just a brief period of time, which means you have to search for alternative methods of saving them. That’s why in this article we are going to take you through the best YouTube Live screen recorders you can use to capture the video content you are sharing with your followers.
Note: We resolutely oppose all forms of copyright-infringing downloads. This tutorial is only for downloading YouTube videos/audio materials from your own channel.
Top 10+ YouTube Live Screen Recorders
The maximum resolution in which you can record computer screen , audio recording options, or customization of the recording area are some of the most important features you need to consider while choosing a YouTube Live screen recorder.
We have selected some of the best YouTube Live screen recorders that enable you to do much more than just record live streams. So, let’s take a look at what they have to offer.
1. OBS Studio
Price: Free
Compatibility: Windows, Linux, macOS
The vast majority of live streams you can find on Twitch and YouTube are made with OBS Studio, but besides broadcasting videos, the software also gives you access to screencasting tools. This means that you can specify the area of the screen you want to record, choose the recording’s resolution and frame rate, or adjust the audio recording options.
OBS Studio is the best free, open-source screen recording program you can download. You shouldn’t use a software just because it’s free, but OBS Studio is also an extremely versatile tool. You can both record and stream in high definition and it comes with the ability to record either through your webcam or through your screen. It records directly through the graphics card , which means it can capture games even when in full-screen mode whereas a lot of other screen-recording software forces you to play games in windowed mode. The high quality can be seen easily in whatever you choose to broadcast.
OBS Studio allows you to record videos from a variety of sources, which makes it a perfect option for capturing the content you share through YouTube Live since you can select a browser window you want to capture in just a few clicks. What’s more, this open-source software is equipped with basic video editing tools, which enables you to preview the video you recorded before publishing it, apply transitions between cuts, or perform basic color correction.
Check the detailed guide to How to Record with OBS .
2. XSplit
Price: $24.95 for a three-month license
Compatibility: Windows
This is yet another broadcasting software that is equipped with powerful screen recording tools. Setting up a new screencasting session with XSplit is a simple and intuitive process that is not going to take much more than a few moments of your time.
All you need to do is define a workspace, then pick the preferred resolution and frame rate. The software allows you to capture screens in 4K resolution and at 60 fps, but it also offers a variety of resolution and frame rate options so that you can choose the one that best fits your needs. Furthermore, you can record the computer audio, which enables you to capture the live stream’s audio in excellent quality. Besides YouTube Live, XSplit can be used with Zoom , Skype, Google Hangouts, and numerous other live streaming and video calling apps.
3. Filmora
Price: Free, pricing plans start at $49.99/year
Compatibility: macOS, Windows
If you are looking for a screen recorder that is stacked with powerful video editing features, then Filmora is a great option for you. Customizing a YouTube Live or any other screencasting session with this video editing software is easy, and you can choose the resolution, frame rate, or even if you want to show mouse clicks in the recording.
Capturing the webcam feed and the computer’s screen simultaneously is also an option, while you can also decide whether or not you want to record audio from a microphone, computer audio, or both at the same time.
What’s more Filmora lets you set up the maximum duration of a screen recording and you start, pause, resume or stop a screen recording session by using hotkeys. Once you are done recording the live stream you shared on YouTube, you can edit the footage you created before uploading it to your YouTube channel.
4. Wondershare DemoCreator
Compatibility: Windows
Price: Start from $9.99
DemoCreator is a recorder that focuses its overall user experience. It is able to easily record high-quality videos at up to 120 FPS (60 FPS for Mac) and allows you to simultaneously record both your screen and webcam. This software is incredibly user friendly and makes for an easy experience for new streamers. The dual recording makes it great for gamers who are also looking to film their reactions.
5. CloudApp
Price: Free, $10 per month for an individual user
Compatibility: Windows, macOS, Linux, Chrome
Starting a new screen capturing session with the CloudApp requires you to just specify the portion of the screen you want to capture and hit the record button. Moreover, you can choose if you want to record with or without a webcam and you have the option to enable or disable the audio recording option.
However, you can only create 90-second screen recordings with the free version of the CloudApp and you cannot set resolution or frame rate of the recording. That’s why you need to upgrade to the Pro version if you want to use it to record live streams on YouTube. The Pro subscription model also grants you access to basic video editing tools and a variety of file sharing options. In addition, CloudApp lets you create and annotate still images and GIFs, which makes it a great option for digital marketers.
6. Techsmith Camtasia
Price: Free trial, $269.05 one-time fee
Compatibility: Windows, macOS
You don’t need years of video editing experience to start a new screen recording session in Camtasia. In fact, you just have to click on the Record button that is located in the software’s tool panel and then customize the settings.
Camtasia lets you choose if you want to record the full screen or just a selected portion of the screen or decide if you want to switch the webcam or the microphone off. You should make sure that the System Audio feature is enabled in order to record the sound of the live stream you’re sharing on YouTube. Pausing or stopping a screencasting session requires you to either click on the appropriate buttons or use the keyboard-based hotkeys. After you are done recording a live stream you can edit the footage using Camtasia’s video editing tools.
7. ScreenRec
Price: Free
Compatibility: Windows, macOS, Linux
Recording any live stream or TV show you play on your computer with ScreenRec is a straightforward process that can be completed in just a few clicks. Simply drag the mouse cursor over the area you want to record, then hit the Record button when you are ready and ScreenRec will start capturing the computer screen.
Once the screencasting session is completed you will get a sharable link that can be embedded to a website or used to save an MP4 file on your hard drive. Furthermore, ScreenRec is equipped with analytics tools that show you how many views your videos attracted or for how long each visitor watched them. All of these features make ScreenRec an excellent option for anyone who wants to record a live stream on YouTube or any other on-screen activity.
8. Flashback Express
Price: Free
Compatibility: Windows
Flashback Express is a simple screen recorder that lets you create high-res videos effortlessly. Setting up a new screencasting session requires you to just specify the area of the screen you want to record, choose whether or not you want to record the webcam feed and hit the Record button.
There are no restrictions in terms of the duration of screen recordings you can make with Flashback Express and the software doesn’t watermark the video you create.
However, you can only save the files in MP4, AVI, or WMW formats and you cannot adjust the video’s frame rate or resolution. What’s more, editing videos or applying effects with Flashback Express isn’t possible and you must upgrade to FlashBack Pro if you want to edit the live streams you broadcast on YouTube.
This piece of software is user friendly, but it doesn’t have as many features as other products on the market. Having said that, it is still an excellent tool that will help you live stream gameplay easily. Although it doesn’t come with built-in video editing software, it is possible to download another program to do this for you (i.e. Filmora). Flashback Express has the ability to record through your headset or microphone as well.
9. VLC
Price: Free
Compatibility: macOS, Linux, Windows
This is an iconic media player that became famous for its versatility and support for nearly all video file formats. Besides being one of the best media players ever created, VLC is also equipped with screen recording and video editing tools.
In order to start a new screencasting session, you will have to go to the Media menu and then select the Open Capture Device option. Once the new window pops up on the screen you should change the Capture Mode to Desktop and then adjust the frame rate in accordance with your needs.
Click on the Play button, and then hit the Record button after the screen recording window appears on the screen. You can only record the entire screen with VLC, since customizing the recording area isn’t an option, and all your files will be captured in the RAW format which means that you may have to resize them before you upload them to YouTube.
10. Screencast-o-matic
Price: Free, pricing options start at $1.65 per month
Compatibility: macOS, Windows
As its name suggests, this software product makes the screen recording process almost automatic. You can choose if you want to record an entire screen or just a window you selected. In addition, Screencast-o-matic lets you record the desktop and webcam footage at the same time, and you can even zoom in while the screencasting session is still in progress.
The free version of the software offers only a basic set of features that doesn’t include the option to record system audio. This means that you have to opt for one of the available subscription models if you want to record your live streams on YouTube with Screencast-o-matic. What’s more, you will be to create videos that are longer than 15 minutes, create recordings without watermarks or add music to your recordings if you opt for Deluxe or Premiere pricing options.
11. QuickTime Player
Price: Free
Compatibility: macOS, Windows
Mac users who want to record content that is broadcasted via YouTube Live can do so without having to install a third-party app. Apple ceased the support for the Windows-based version of QuickTime Player in 2016 and PC users can only capture their screens with this software if they have some of its earlier versions.
In order to start a new screen recording session in QuickTime Player, you just have to go to the File menu and select the New Screen Recording option. The Screen Recording window where you can choose if you want to record audio or show mouse click in the recording will pop up on the screen. QuickTime Player lets you choose if you want to capture the entire screen or just a portion of it, and you can click on the Record button to start a new screencasting session. In order to save a video file you created, you just have to go to the File menu and pick the Save option.
How to Record a YouTube Live Stream with Filmora
Recording a YouTube Live stream with Filmora is easy even if you never went through this process before. You can set up a new screencasting session in just a few easy steps that won’t take more than a few moments to complete. Here’s what you need to do:
Step 1: Launch Filmora and create a new project. Go to the Media tab once the video editor’s main window loads and click on the Record drop-down menu that is located next to the Import drop-down menu.
Choose the Record PC Screen option and then proceed to customize the settings for your screencasting session.
Step 2: Click on the Rectangular icon in the upper left corner of the Wondershare Filmora Scrn window and choose either Full Screen, Custom, or Target Window option, depending on how you want to record a YouTube Live stream to define the area of the screen that is going to be recorded.
You can then proceed to insert the resolution your screen recording is going to have, and choose if you want to record system audio and sound from an external microphone.
Step 3: Click on the Gear icon below the Record button to gain access to additional settings, and then proceed to set the frame rate, adjust the video’s quality or activate the Show Mouse Clicks in Recording option.
Make sure that the checkbox next to the Record the Camera Stream is marked if you want to record webcam feed and computer desktop at the same time.
Step 4: Press the red Record button in the upper right corner of the window and jump to the live stream. Once the broadcast is completed, you should click on the Stop button and use Filmora’s editing tools to remove all imperfections from the recording.
Filmora allows you to export all of your projects directly to your YouTube channel immediately after the rendering process is completed.
Frequently Asked Questions about YouTube Live Screen Recorders
1. Does YouTube Save Live Videos?
Stream Now, Mobile, Webcam, and Events streams can be stored automatically for 12 hours after they end. You can access all of your live streams by clicking on the Videos menu in the YouTube Studio and selecting the Live option and then change the Privacy setting in the Visibility menu.
2. How to use YouTube to Archive a Live Stream?
Once the live stream ends, you should go to the Dashboard and click on the Live feature, and then choose the Stream option. Check the Make Archive Unlisted When Complete checkbox and the live stream video will be saved accordingly.
Richard Bennett
Richard Bennett is a writer and a lover of all things video.
Follow @Richard Bennett
Noble Mic Necessities for YouTube Newbies on the Cheap
Cheap Microphones for Youtubers on a Budget
Richard Bennett
Dec 30, 2022• Proven solutions
An expensive microphone doesn’t mean it is the best option — at least, not for YouTubers. Without professional experience or additional equipment, having a $1000 studio microphone could be wasted money.
If you are on a budget or new to YouTube, and what you want is to improve the audio quality of your video gradually, you should look into the cheaper options first.
In this article, I will highlight microphones in 3 price ranges.
We will have a look at each of these microphones, their pros, and cons, and then you can decide which one will be best for your channel and your budget.
As for keeping with your financial needs, we aren’t going to be looking at any XLR microphones, as they will require an audio interface, thus increasing your price range. The microphones in this list will be plug-and-plays, and you will only need the basic audio recording skills to get started.
Disclaimer: Prices are subjected to change.
YouTube Microphones for Under $20
BOYA BY-M1 - $16.99
TheBOYA BY-M1 is a lavalier microphone (a hand-free mic that clips onto your clothing) that connects to smartphones, DSLR, computers, and other audio recorders.

Pro: As an omnidirectional condenser microphone, it will be able to pick up audio from 360 degrees, and with 20 feet (6 meters) of cable, you can have a significant range movement even if you are connected to the camera.
The BOYA BY-M1 is a terrific choice for YouTubers on a budget that is frequently making videos on the go. It’s easy to carry around, and the ability to simply connect to a smartphone means you can set up and shoot your video on the fly.
Con: This mic, although it has a great range, can also pick up subtle movements you make as it is clipped onto you. Not great if there is a lot of action in your videos.
TONOR PC Microphone Computer Condenser - $15.99
The TONOR is an easy-to-setup condenser microphone that you can connect to your computer via USB and start recording in seconds.

Pro: The value of this microphone is in its ease of use. With a flexible, foldable stand, you can adjust the TONOR PC microphone the way it suits your setup. The legs of the stand are retractable, which makes it easy for you to store. If you are a gamer or creating videos primarily from your desk, this is a perfectly suitable microphone for you to start your YouTube journey with.
Con: The audio quality of this mic can help you get the job done, but it won’t blow you away. The cable is attached to the microphone and is 6.5 feet (2 meters) long, which isn’t a wide range. It’s pretty much restricted to the desk with your computer. This microphone has limitations, and high-achieving YouTubers will certainly grow out of it.
YouTube Microphones for Under $50
Purple Panda Lavalier Microphone - $23.99
The Purple Panda lavalier microphone comes with multiple adapters and is compatible with nearly all devices, including smartphone, DSLR, computers, and even GoPro cameras. The only device where you will need anadditional adapter is if you have an iPhone 7.

Pro: This microphone is a versatile option for YouTubers who create a variety of content. It doesn’t require any battery and is powered by whatever device it is plugged into, which is great for YouTubers with already so many devices to keep charged.
Con: Much like the BOYA BY-M1, the Purple Panda, as it is clipped onto your lapel or shirt collar, will capture the sound of your clothes brushing against it if too much movement occurs.
Samson Go Mic Portable USB Condenser Microphone - $37.73
The Samson Go microphone is the kind of mic that can fit in your pocket and be taken with you anywhere.

Pro: This microphone has both a cardioid and an omnidirectional mode. This means that you can choose to have your microphone focused more on the subject speaking by switching to cardio or switch to Omni-directional to capture audio from the entire surrounding.
It is designed to be able to clip onto a flat surface such as your computer screen. This allows you to place the microphone on different levels to record.
Con: Because of its unique design and the portability of the device, it will suffer wear-and-tear faster. Attention to storage is necessary to increase the lifespan of the device.
XIAOKOA Mini Condenser Microphone with Stand - $24.99
TheXIAOKOA portable mini condenser microphone is compatible with smartphones, computers, and any devices using 3.5mm recording jacks.

Pro: With a cardioid pickup, this condenser microphone will do a fine job picking up vocals. If you are a YouTuber who does a lot of singing videos, this is definitely an affordable microphone to check out.
Con: This microphone, perhaps primarily designed for karaoke, has an echo feature that, although might create new dimensions to your vocals, may not be desired for your YouTube video. This feature can be problematic, as it could spoil your recording.
TAKSTAR SGC-598 - $26.93
The TAKSTAR SGC is a condenser microphone, and it can be fixed onto your camera, which simplifies your YouTube setup. This camera can plug directly into your camera, reducing the audio tracks you need to manage when editing.

Pro: The camera-mounted microphone has a shock-resistant design that reduces noise when the camera is moved. The cardioid microphone will be able to pick up audio in the direction it is pointed in, reducing noise capturing from behind the camera. This is a good microphone for vlogging or interviews.
Con: The TAKSTAR SGC requires one AA battery, so you’ll have to remember to carry a backup every time you film.
Limited to a vocal subject standing 4-5 feet away, any more and the microphone will be hard-pressed to pick up the audio without capturing a lot of surround audio.
The design requires it to be mounted to the camera. If you want to separate it from the camera and still have it recorded, a bit of creativity is required to keep it standing.
YouTube Microphones for Under $100
Behringer C-1U - $59.99
The Behringer C-1U is a condenser microphone with a cardioid pickup pattern that connects to your computer via USB.

Pro: This microphone has a solid metal build and has a good weight. It is quick and easy to set up and is a good microphone for anyone wanting a simple solution for better audio on YouTube.
Con: A pop filter is recommended for this microphone as it picks up a lot of popping sounds when the subject speaks.
Blue Microphones Snowball iCE - $64.94
The Blue Microphones Snowball iCE is a cardioid condenser microphone that connects to your computer via USB.

Pro: The Snowball iCE is a plug-and-play microphone that is super easy to use and doesn’t require any additional battery. Simply connect it to the computer, and you are ready to record your voice. It captures clear and crisp audio for a single voice or single-person recording.
Con: The range of this microphone is not that great; you’ll have to be close and be speaking directly into the microphone to get the best audio. It is not ideal for recording moving subjects or those who are further than 2-3 feet away.
Marantz Professional MPM-1000U - $57.06
The Marantz Professional MPM-1000U is a condenser microphone that records in a cardioid polar pattern that connects to your computer via USB.

Pro: This budget microphone has excellent all-metal construction. It has a plug-and-play setup and doesn’t require any drivers or installations. It records great instrumentals and would recommend it to those who are recording music for YouTube.
Con: May pick up extraneous noises if you are recording vocals while there are movements in your surrounding, but otherwise, this is an excellent microphone in its price range.
Final Thoughts
When looking for microphones under $100, the difference in audio quality is not going to be drastic. What you need to consider is how you are going to be using this piece of equipment.
If your YouTube videos consist of you in a quiet studio environment, I would recommend the Marantz Professional MPM-1000U .
However, if you will be recording on the go and require your hands to be free in the scene, I recommend getting a lavalier microphone such as the Purple Panda .
But, if you are going to be recording other people, in addition to yourself, I’d say go with the TAKSTAR SGC as it will give you more audio control in busy environments.
What are you looking for in a budget microphone? Let us know in the comments below.
If you want to find a video editing solution that empowers your imagination and creativity yet takes less effort, please try this robust and user-friendly video editing software Wondershare Filmora. It provides special effects, stock photo & video, sound library, etc., which will definitely enhance your productivity and helps to make money by making videos much accessible.
Richard Bennett
Richard Bennett is a writer and a lover of all things video.
Follow @Richard Bennett
Richard Bennett
Dec 30, 2022• Proven solutions
An expensive microphone doesn’t mean it is the best option — at least, not for YouTubers. Without professional experience or additional equipment, having a $1000 studio microphone could be wasted money.
If you are on a budget or new to YouTube, and what you want is to improve the audio quality of your video gradually, you should look into the cheaper options first.
In this article, I will highlight microphones in 3 price ranges.
We will have a look at each of these microphones, their pros, and cons, and then you can decide which one will be best for your channel and your budget.
As for keeping with your financial needs, we aren’t going to be looking at any XLR microphones, as they will require an audio interface, thus increasing your price range. The microphones in this list will be plug-and-plays, and you will only need the basic audio recording skills to get started.
Disclaimer: Prices are subjected to change.
YouTube Microphones for Under $20
BOYA BY-M1 - $16.99
TheBOYA BY-M1 is a lavalier microphone (a hand-free mic that clips onto your clothing) that connects to smartphones, DSLR, computers, and other audio recorders.
Pro: As an omnidirectional condenser microphone, it will be able to pick up audio from 360 degrees, and with 20 feet (6 meters) of cable, you can have a significant range movement even if you are connected to the camera.
The BOYA BY-M1 is a terrific choice for YouTubers on a budget that is frequently making videos on the go. It’s easy to carry around, and the ability to simply connect to a smartphone means you can set up and shoot your video on the fly.
Con: This mic, although it has a great range, can also pick up subtle movements you make as it is clipped onto you. Not great if there is a lot of action in your videos.
TONOR PC Microphone Computer Condenser - $15.99
The TONOR is an easy-to-setup condenser microphone that you can connect to your computer via USB and start recording in seconds.
Pro: The value of this microphone is in its ease of use. With a flexible, foldable stand, you can adjust the TONOR PC microphone the way it suits your setup. The legs of the stand are retractable, which makes it easy for you to store. If you are a gamer or creating videos primarily from your desk, this is a perfectly suitable microphone for you to start your YouTube journey with.
Con: The audio quality of this mic can help you get the job done, but it won’t blow you away. The cable is attached to the microphone and is 6.5 feet (2 meters) long, which isn’t a wide range. It’s pretty much restricted to the desk with your computer. This microphone has limitations, and high-achieving YouTubers will certainly grow out of it.
YouTube Microphones for Under $50
Purple Panda Lavalier Microphone - $23.99
The Purple Panda lavalier microphone comes with multiple adapters and is compatible with nearly all devices, including smartphone, DSLR, computers, and even GoPro cameras. The only device where you will need anadditional adapter is if you have an iPhone 7.
Pro: This microphone is a versatile option for YouTubers who create a variety of content. It doesn’t require any battery and is powered by whatever device it is plugged into, which is great for YouTubers with already so many devices to keep charged.
Con: Much like the BOYA BY-M1, the Purple Panda, as it is clipped onto your lapel or shirt collar, will capture the sound of your clothes brushing against it if too much movement occurs.
Samson Go Mic Portable USB Condenser Microphone - $37.73
The Samson Go microphone is the kind of mic that can fit in your pocket and be taken with you anywhere.
Pro: This microphone has both a cardioid and an omnidirectional mode. This means that you can choose to have your microphone focused more on the subject speaking by switching to cardio or switch to Omni-directional to capture audio from the entire surrounding.
It is designed to be able to clip onto a flat surface such as your computer screen. This allows you to place the microphone on different levels to record.
Con: Because of its unique design and the portability of the device, it will suffer wear-and-tear faster. Attention to storage is necessary to increase the lifespan of the device.
XIAOKOA Mini Condenser Microphone with Stand - $24.99
TheXIAOKOA portable mini condenser microphone is compatible with smartphones, computers, and any devices using 3.5mm recording jacks.
Pro: With a cardioid pickup, this condenser microphone will do a fine job picking up vocals. If you are a YouTuber who does a lot of singing videos, this is definitely an affordable microphone to check out.
Con: This microphone, perhaps primarily designed for karaoke, has an echo feature that, although might create new dimensions to your vocals, may not be desired for your YouTube video. This feature can be problematic, as it could spoil your recording.
TAKSTAR SGC-598 - $26.93
The TAKSTAR SGC is a condenser microphone, and it can be fixed onto your camera, which simplifies your YouTube setup. This camera can plug directly into your camera, reducing the audio tracks you need to manage when editing.
Pro: The camera-mounted microphone has a shock-resistant design that reduces noise when the camera is moved. The cardioid microphone will be able to pick up audio in the direction it is pointed in, reducing noise capturing from behind the camera. This is a good microphone for vlogging or interviews.
Con: The TAKSTAR SGC requires one AA battery, so you’ll have to remember to carry a backup every time you film.
Limited to a vocal subject standing 4-5 feet away, any more and the microphone will be hard-pressed to pick up the audio without capturing a lot of surround audio.
The design requires it to be mounted to the camera. If you want to separate it from the camera and still have it recorded, a bit of creativity is required to keep it standing.
YouTube Microphones for Under $100
Behringer C-1U - $59.99
The Behringer C-1U is a condenser microphone with a cardioid pickup pattern that connects to your computer via USB.
Pro: This microphone has a solid metal build and has a good weight. It is quick and easy to set up and is a good microphone for anyone wanting a simple solution for better audio on YouTube.
Con: A pop filter is recommended for this microphone as it picks up a lot of popping sounds when the subject speaks.
Blue Microphones Snowball iCE - $64.94
The Blue Microphones Snowball iCE is a cardioid condenser microphone that connects to your computer via USB.
Pro: The Snowball iCE is a plug-and-play microphone that is super easy to use and doesn’t require any additional battery. Simply connect it to the computer, and you are ready to record your voice. It captures clear and crisp audio for a single voice or single-person recording.
Con: The range of this microphone is not that great; you’ll have to be close and be speaking directly into the microphone to get the best audio. It is not ideal for recording moving subjects or those who are further than 2-3 feet away.
Marantz Professional MPM-1000U - $57.06
The Marantz Professional MPM-1000U is a condenser microphone that records in a cardioid polar pattern that connects to your computer via USB.
Pro: This budget microphone has excellent all-metal construction. It has a plug-and-play setup and doesn’t require any drivers or installations. It records great instrumentals and would recommend it to those who are recording music for YouTube.
Con: May pick up extraneous noises if you are recording vocals while there are movements in your surrounding, but otherwise, this is an excellent microphone in its price range.
Final Thoughts
When looking for microphones under $100, the difference in audio quality is not going to be drastic. What you need to consider is how you are going to be using this piece of equipment.
If your YouTube videos consist of you in a quiet studio environment, I would recommend the Marantz Professional MPM-1000U .
However, if you will be recording on the go and require your hands to be free in the scene, I recommend getting a lavalier microphone such as the Purple Panda .
But, if you are going to be recording other people, in addition to yourself, I’d say go with the TAKSTAR SGC as it will give you more audio control in busy environments.
What are you looking for in a budget microphone? Let us know in the comments below.
If you want to find a video editing solution that empowers your imagination and creativity yet takes less effort, please try this robust and user-friendly video editing software Wondershare Filmora. It provides special effects, stock photo & video, sound library, etc., which will definitely enhance your productivity and helps to make money by making videos much accessible.
Richard Bennett
Richard Bennett is a writer and a lover of all things video.
Follow @Richard Bennett
Also read:
- Cinema Comes at a Cost-Free Price Your Ultimate YouTube Movie List for 2024
- Top Earners on YouTube
- 10 Leading FLV to YouTube Video Converters
- A Guide to Essential ASMR Video Facts
- [Updated] Demystifying Mukbang A Comprehensive Production Guide
- YouTube's Commercial Free Chrome, Firefox, Android & iPhone Tips
- Starting a YouTube Channel The Ultimate Blueprint
- [New] Enhancing On-Screen Appeal Essential Tips for Talking-Head Shots
- In 2024, Charting Social Media Trends with Data Graphics
- Does the Sub4Sub Strategy Improve Content Consumption, In 2024
- [Updated] Elite Video Influencers
- 2024 Approved Brighten Up Your Videos Implementing Neons on Thumbnails
- Size Matters Crafting Engaging Video Titles
- What Is Virtual YouTuber and Can You Become One?
- [Updated] Dimensions for YTB Shorts, Ins, Fb and Other Apps
- Chasing Profit on Platforms YouTube Partner Application Steps for 2024
- Streamline Your Soundtrack Selection for YouTube
- 2024 Approved Crafting an Efficient YouTube Subscription Path
- Strategies for Amplifying Your YT Viewership Quickly
- Professionals' Choice Premium YouTube Cameras
- [New] Deciphering YouTube's Processing After Uploading
- Masterclass in Time The Top 10 YouTube Channels For History Students
- Digital Cash Kings Leading YouTube Creators
- 2024 Approved Elevating Your Content's Exposure with Ongoing Creative Commons Usage
- [New] Channel-Size-Independent Strategies for Securing Sponsors
- Updated 2024 Approved How to Make a Meme (Step by Step)
- How to Bypass Google FRP Lock from Vivo X Fold 2 Devices
- In 2024, 11 Best Location Changers for Xiaomi Redmi Note 12T Pro | Dr.fone
- Updated 2024 Approved Unleash Your Creativity Download Videoleap for MacBook
- 2024 Approved Launching Your Live Room | Virbo AI Live Stream
- How to Factory Reset Xiaomi Redmi 12 5G without Losing Data | Dr.fone
- [Updated] Crafting the Perfect Chat Sound Downloading & Customizing WhatsApp Ringtones
- [Updated] 2024 Approved QuickShot Recorder Evaluation Summary
- Updated In 2024, Classical Background Music Options for Wedding Videos
- New Choosing From a Wide Array of Movie Maker Android Applications Can Be a Challenge for New Video Content Creators. Here Is a List of Best Movie Maker Android Apps to Create High-Quality Videos for 2024
- Crafting Connection Tips and Tricks for Sharing Content via Facebook
- Play MKV movies on Huawei Nova Y91, is it possible?
- [Updated] Record Everything, Pay Nothing - Screen Tools for All Users for 2024
- Comparing Huawei P10 with Industry Standards of Smartphones
- Updated Crafting Original Soundscapes A Guide to Producing Music Video Tracks
- Title: "[New] Best-in-Class Streaming Capture Software For YouTubers"
- Author: Brian
- Created at : 2024-05-25 12:28:46
- Updated at : 2024-05-26 12:28:46
- Link: https://youtube-video-recordings.techidaily.com/new-best-in-class-streaming-capture-software-for-youtubers/
- License: This work is licensed under CC BY-NC-SA 4.0.
