
![[New] Advanced Strategies for YouTube Audio Editing Mastery](https://www.lifewire.com/thmb/VhWXwk4rULRvURLd-ts4rpfPSxw=/400x300/filters:no_upscale():max_bytes(150000):strip_icc():format(webp)/GettyImages-1250476440-2ff779100e984029aa752236f9791b11.jpg)
[New] Advanced Strategies for YouTube Audio Editing Mastery
Advanced Strategies for YouTube Audio Editing Mastery
How to Edit Audio on YouTube

Richard Bennett
Mar 27, 2024• Proven solutions
In this article, we are going to show you how to edit audio with YouTube Video Editor, and the tips on adding your own audio file to YouTube.
- Part 1: Add your Own Audio File to YouTube Video
- Part 2: How to Edit Audio with YouTube Video Editor
Part 1: Add your Own Audio File to YouTube Video
Tools You Are Going to Need
YouTube video editor is far from meeting the needs of people who want to have more control on their audio. On the bright side, if you are interested in learning how to edit audio on YouTube, there is a solution. There are many video editors in the market that allow you to add your own music or audio files to a video. Windows Movie Maker, iMovie, Adobe Premiere, and Magisto are some of the video editors available for you to choose from. In this guide, we recommend the Wondershare Filmora video editor. Below is a quick tutorial about how to edit audio in Filmora.
 Download Mac Version ](https://tools.techidaily.com/wondershare/filmora/download/ )
Why Should You Choose Wondershare Filmora?
There are many advantages associated with the use of Wondershare Filmora. You will see that it allows you to fully edit any audio file and gain 100% control over your files. It is an integrated solution that lacks nothing in terms of efficiency and quality standards. To be more specific, Filmora offers the following unique features:
- Built-in audio editing tools that allow you to gain full control of your audio in an easy way
- Exclusive audio track that enables you to mute, detach or even de-noise the audio from video
- All audio effects can easily be adjusted with one click only
- The built-in Equalizer is capable enough to create amazing audio effects
- Directly upload your video to YouTube, Facebook or Vimeo from Wondershare Filmora
How to add audio files to YouTube video with Wondershare Filmora
Do you want to know more about audio editing? Please read this article: How to add audio to video.
Step 1 Import Video Clips into Filmora
Filmora supports a wide range of video formats, such as MKV, MOV, AVI, WebM and MP4, you can import the video clip shot with Camera, smartphone or camcorder easily to it.
Step 2 Detach Audio
If you want to edit the original audio of the video, you can choose to split the audio file from the video by using the Audio Detach option on Wondershare Filmora. Then, the audio file will be shown in the audio track, and you can cut or trim it.

Note: If you do not want to keep the original audio file in the video, you can delete it from the audio track directly.
Step 3Add Audio Files
Wondershare Filmora offers you multiple royalty free audio effects and music in its rich audio library. What is more, you can also import your own music or audio file from your computer or iTunes. Of course, you should know that the audio should be royalty free for you to make use of. In a different situation, you cannot upload it and benefit from its quality and nature.
Step 4Edit Audio
In this step, you can adjust the audio volume and pitch, etc. There are multiple options for you to benefit from, including the Audio Equalizer, Music, Mix Audio. In this way, you can make sure that the audio is exactly like you have wanted it to be. For further information as to how you can improve the sound quality of your recorded videos, you can check out: How to improve sound quality of recorded videos.
Step 5Save Your Work and Upload on YouTube
If you are satisfied with your work on the audio file and you wish to publish it, the process is quite simple. You just hit Export and select to upload the video to YouTube. After signing in to your YouTube account, you will be ready to start uploading the audio file.

In case you wish to edit the audio from an already published video, you have to download the video first. Then, you can follow the steps above to edit the audio file in Filmora. As one of the widely used video editing software for YouTubers, Filmora is here to empower your imagination. Just download the free trial version and try it now.

Part 2: How to Edit Audio with YouTube Video Editor
Unfortunately, YouTube does not allow users to upload audio files such as MP3, WAV, etc. Instead, you can only upload audio files which are offered by YouTube in the first place. Since YouTube has got a plentiful audio library, you can find a lot of audio there. In this part, we will show you how to add and edit audio with YouTube Video Editor.
You may also like: How to Add Music to YouTube Videos >>
Note: From 20th September 2017 users will no longer be able to use the complimentary editing suite. Check the best YouTube video editor alternatives from this complete guide. In the following part, I will show you how to add audio track , replace the original audio and adjust the audio position and length as well.
- Step 1: Sign in to your YouTube account
- **Step 2:**Click your profile avatar and select Creator Studio option.
- Step 3: In the left pane, go to Video Manager and then click Videos. In the Videos list, choose the video that you want to add new audio track, and then select Audio from the Edit button.

- Step 4: Now you can add or replace the audio in your video. Here you will find that there are various songs and audio files you can choose from. Click ADD TO VIDEO and the audio track will be added to the video directly.

- Step 5: Now you will see the audio track appears at the bottom of the player. Here you can trim and drag the audio bar to adjust the audio positon and length. To Trim the audio, click the beginning or the end of the audio bar and then drag it to the left or right. After trimming, drag it to meet the target position.

Conclusion
Normally, it would be better to add and edit audio to video before updating to YouTube. In this case, Filmora is highly recommended as one of the best video editor for YouTubers , which provides some royalty free music sound in the Music Library to choose from and also the audio editing tools like remove background noise from the video, add fade in and fade out effects with ease or play the video backward or fast forward.
Richard Bennett
Richard Bennett is a writer and a lover of all things video.
Follow @Richard Bennett
Richard Bennett
Mar 27, 2024• Proven solutions
In this article, we are going to show you how to edit audio with YouTube Video Editor, and the tips on adding your own audio file to YouTube.
- Part 1: Add your Own Audio File to YouTube Video
- Part 2: How to Edit Audio with YouTube Video Editor
Part 1: Add your Own Audio File to YouTube Video
Tools You Are Going to Need
YouTube video editor is far from meeting the needs of people who want to have more control on their audio. On the bright side, if you are interested in learning how to edit audio on YouTube, there is a solution. There are many video editors in the market that allow you to add your own music or audio files to a video. Windows Movie Maker, iMovie, Adobe Premiere, and Magisto are some of the video editors available for you to choose from. In this guide, we recommend the Wondershare Filmora video editor. Below is a quick tutorial about how to edit audio in Filmora.
Download Mac Version ](https://tools.techidaily.com/wondershare/filmora/download/ )
Why Should You Choose Wondershare Filmora?
There are many advantages associated with the use of Wondershare Filmora. You will see that it allows you to fully edit any audio file and gain 100% control over your files. It is an integrated solution that lacks nothing in terms of efficiency and quality standards. To be more specific, Filmora offers the following unique features:
- Built-in audio editing tools that allow you to gain full control of your audio in an easy way
- Exclusive audio track that enables you to mute, detach or even de-noise the audio from video
- All audio effects can easily be adjusted with one click only
- The built-in Equalizer is capable enough to create amazing audio effects
- Directly upload your video to YouTube, Facebook or Vimeo from Wondershare Filmora
How to add audio files to YouTube video with Wondershare Filmora
Do you want to know more about audio editing? Please read this article: How to add audio to video.
Step 1 Import Video Clips into Filmora
Filmora supports a wide range of video formats, such as MKV, MOV, AVI, WebM and MP4, you can import the video clip shot with Camera, smartphone or camcorder easily to it.
Step 2 Detach Audio
If you want to edit the original audio of the video, you can choose to split the audio file from the video by using the Audio Detach option on Wondershare Filmora. Then, the audio file will be shown in the audio track, and you can cut or trim it.
Note: If you do not want to keep the original audio file in the video, you can delete it from the audio track directly.
Step 3Add Audio Files
Wondershare Filmora offers you multiple royalty free audio effects and music in its rich audio library. What is more, you can also import your own music or audio file from your computer or iTunes. Of course, you should know that the audio should be royalty free for you to make use of. In a different situation, you cannot upload it and benefit from its quality and nature.
Step 4Edit Audio
In this step, you can adjust the audio volume and pitch, etc. There are multiple options for you to benefit from, including the Audio Equalizer, Music, Mix Audio. In this way, you can make sure that the audio is exactly like you have wanted it to be. For further information as to how you can improve the sound quality of your recorded videos, you can check out: How to improve sound quality of recorded videos.
Step 5Save Your Work and Upload on YouTube
If you are satisfied with your work on the audio file and you wish to publish it, the process is quite simple. You just hit Export and select to upload the video to YouTube. After signing in to your YouTube account, you will be ready to start uploading the audio file.
In case you wish to edit the audio from an already published video, you have to download the video first. Then, you can follow the steps above to edit the audio file in Filmora. As one of the widely used video editing software for YouTubers, Filmora is here to empower your imagination. Just download the free trial version and try it now.
Part 2: How to Edit Audio with YouTube Video Editor
Unfortunately, YouTube does not allow users to upload audio files such as MP3, WAV, etc. Instead, you can only upload audio files which are offered by YouTube in the first place. Since YouTube has got a plentiful audio library, you can find a lot of audio there. In this part, we will show you how to add and edit audio with YouTube Video Editor.
You may also like: How to Add Music to YouTube Videos >>
Note: From 20th September 2017 users will no longer be able to use the complimentary editing suite. Check the best YouTube video editor alternatives from this complete guide. In the following part, I will show you how to add audio track , replace the original audio and adjust the audio position and length as well.
- Step 1: Sign in to your YouTube account
- **Step 2:**Click your profile avatar and select Creator Studio option.
- Step 3: In the left pane, go to Video Manager and then click Videos. In the Videos list, choose the video that you want to add new audio track, and then select Audio from the Edit button.
- Step 4: Now you can add or replace the audio in your video. Here you will find that there are various songs and audio files you can choose from. Click ADD TO VIDEO and the audio track will be added to the video directly.
- Step 5: Now you will see the audio track appears at the bottom of the player. Here you can trim and drag the audio bar to adjust the audio positon and length. To Trim the audio, click the beginning or the end of the audio bar and then drag it to the left or right. After trimming, drag it to meet the target position.
Conclusion
Normally, it would be better to add and edit audio to video before updating to YouTube. In this case, Filmora is highly recommended as one of the best video editor for YouTubers , which provides some royalty free music sound in the Music Library to choose from and also the audio editing tools like remove background noise from the video, add fade in and fade out effects with ease or play the video backward or fast forward.
Richard Bennett
Richard Bennett is a writer and a lover of all things video.
Follow @Richard Bennett
Inviolate Disengagement Protocol for Compact YouTube Clips
How to Disable/Remove YouTube Shorts Permanently?

Shanoon Cox
Nov 07, 2023• Proven solutions
YouTube Shorts is undoubtedly one of the most trending features, just like TikTok, which has also followed it for many years and created a vast user base. Creating such a short duration video is quick, grabs attention, and gets spread like a fire.
But, do you know that inclusion of YouTube shorts replaces the explore option to make proper adjustments for YouTube Shorts under the application. Not only this, many users dislike getting disturbed by such a short duration video while searching for some beneficial, informative, or detailed information.
If any of such cases, attune with you, and you want to know how to disable YouTube Shorts or remove Shorts from the YouTube platform. Then, this is the right place.
In this article, you will learn the process of disabling YouTube Shorts or removing YouTube shorts permanently. Just remain stick with the guidelines, and soon you will become able to do the same with easy steps.
- Method 1: Three dots option
- Method 2: Settings menu of YouTube
- Method 3: Can go with YouTube browser
- Method 4: Factory reset
- Method 5: Link to downgrade the YouTube
- Method 6: Removing all update
- Method 7: Try YouTube Vanced
Easy Ways to Disable/Remove YouTube Shorts
Now, as you have reached this section, you should be curious, what are the steps or methods with the help of which you would be able to disable YouTube Shorts. Don’t worry. Here, we shall cover all the methods of removing shorts from YouTube in detail.
You can choose either of them as per your suitability or the one which best suits you. Some of these methods are pretty easy to follow, or you might need to follow some steps for some. But the main essence is, following any method will show how to remove shorts from YouTube. So, now go with the methods one by one and follow the guidelines to remove shorts from YouTube.
Method 1: Three dots option
One of the primary things you can do with any short videos is to click on the three dots next to each of such videos if you are not particularly willing to see something. Doing so will open the pop-up window, which will give you the option of “Not interested”. Click on this option. That’s it. Next time, such a video will not appear to you while surfing videos on YouTube.
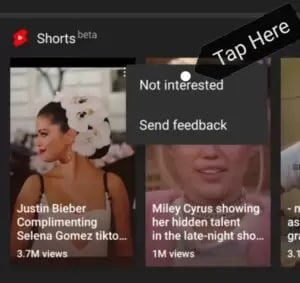
Here, no doubt the method is simple, but this method needs repetitiveness. As, whenever you see Shorts videos, you need to click on three dots to remove that.
Method 2: Settings menu of YouTube
At your YouTube homepage at the top end, you will see the profile icon. If you click on it, that will lead you towards the Settings menu of YouTube.
From there, you need to select “General”, which will show up some options. Here, click on the Shorts option to turn it off.
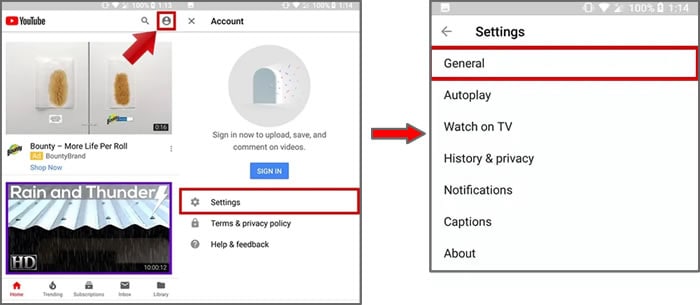
This way, by simply following and managing settings, you can easily disable YouTube shorts from the platform.
Now, restart your device to apply the removal process of YouTube shorts from there entirely. Thus, the next time you open the application, you will find that there exists no such YouTube shorts video as this option will disable YouTube Shorts.
Try Filmora to Create Funny yet Trendy YouTube Shorts!
As a YouTube fan, you can also create interesting video by yourself with Filmora YouTube Video Editor. You can add cool visual effects and popular emojis to decorate your video. Plus, there is a vast media library to add audio and filter! You are free to create popular YouTube Shorts and post it on YouTube or other social media directly.
Create YouTube Shorts Free Create YouTube Shorts Free Learn More >


Method 3: Can go with YouTube browser
Hey guys, there is one more trick. Whenever you want to access YouTube, instead of going through the application, try to open YouTube website either from your mobile or PC browser window. You would wonder why so and what difference it will make. The fact is that the Shorts tab has not yet been incorporated under the browser version of YouTube.
So friends, try this to avoid seeing YouTube Shorts videos either from phone or desktop. This is not only simple but also device-free. And even if you do not have a YouTube application, you can use this trick to solve your concern.
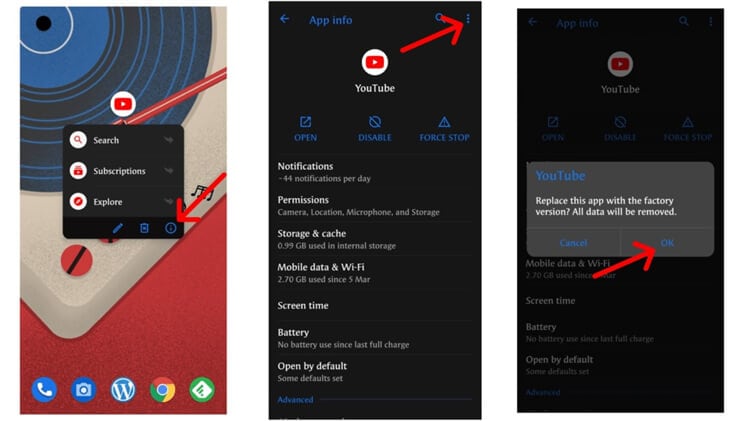
Method 4: Factory reset
If you disagree with the shorts video and want to get off of it entirely. This trick might help you. For this, visit the YouTube app on your mobile and press on it for some time. Doing so will lead you to the info section under the settings.
When you click on the Uninstall option, the YouTube version will get downgraded to the factory version. This is the version that is a pre-installed version of YouTube that comes with the device.
Also, if you have not updated your YouTube app, then don’t go with that. However, you will receive notifications many times that you should update your application. Just ignore it, especially if you are not willing to add the Shorts video option on your YouTube application.
Method 5: Link to downgrade the YouTube
Friends, for every problem, there exists some solution. And, if you are finding it difficult to factory reset the YouTube, you can download the downgraded version of YouTube. This is the version that does not contain the YouTube Shorts feature. Do like this:
- Visit the Link and download the downgraded version.
- Install by allowing unknown resources also.
- Then, disable the auto-update of the YouTube option also.
Note: While downloading and installing this version, you need to allow installation from unknown sources.
Filmora YouTube Video Editor
Get started easily with Filmora’s powerful performance, intuitive interface, and countless effects! Create YouTube Shorts with ease!
Make YouTube Shorts Make YouTube Shorts Make YouTube Shorts

Method 6: Removing all update
There exists one more simple trick to understand how to turn off YouTube Shorts. That is to remove all update options. How to do that, follow the below-mentioned steps you can do so.
On your smartphone, open the Settings > Apps or Manage Apps option > choose YouTube app> at the top right end, click on three dots there > click on Uninstall Updates. That will replace your YouTube app with that of the older version of YouTube.
Using this method, you can remove shorts easily from YouTube. And, it is not going to take much amount of time. So, go and follow the steps.
Method 7: Try YouTube Vanced
Wait, the list is not over yet. If none of the previous methods work, try YouTube Vanced, the advanced and premium version of YouTube to get rid of YouTube Shorts. Well, not only that, but YouTube Vanced also comes up with multiple services that you can enjoy along with it, such as disabling YouTube Shorts, blocking ads, stories, or any of the sponsored features.
If not sure how to go about it, then let’s have a look over the following steps that will guide you to get YouTube Vanced.
Step 1: Download YouTube Vanced
First, download the YouTube Vanced application from its website.
Step 2: Install and complete the setup process
After that, complete the installation process and follow the on-screen direction rightly to make it work effectively for you.
Note: If you are downloading from the website, not from the app store, then there might appear the warning. So ignore that and go with the downloading and installation process.
Step 3: Open application and visit settings
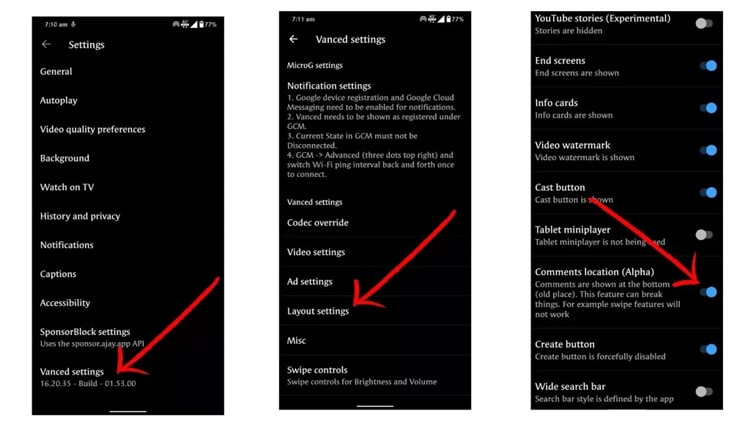
Once you have launched the application, under the settings, you need to go for the Vanced settings option> there opt for “Ad settings” > at the end of the page, switch on the Shorts shelf.
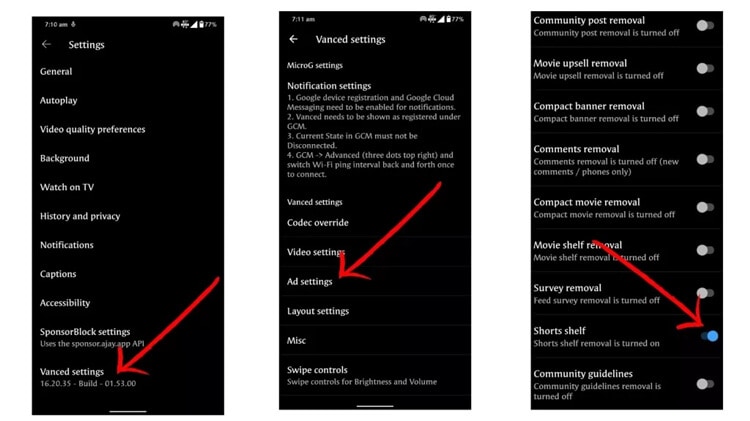
Doing so will disable the YouTube Shorts option from the Home screen.
Alternatively, remove the YouTube Shorts button also from the screen. Under the “Vanced settings” > Visit Layout settings > Switch on the Comments location option. That will further remove the Shorts button from the bottom end of the Home screen of the YouTube page.
Voila, now you can say that you get rid of those shorts videos by removing shorts from YouTube using YouTube Vanced option.
Thus, following the methods mentioned above gives you multiple ways to turn off shorts on YouTube. I hope that now you will be able to use YouTube without any concern or interference of YouTube Shorts videos.
![]()
A cross-platform for making videos anywhere for all creators

Why your video editing isn’t good enough? How about some creative inspo?
- 100 Million+ Users
- 150+ Countries and Regions
- 4 Million+ Social Media Followers
- 5 Million+ Stock Media for Use
* Secure Download

Conclusion
YouTube has always been the favorite choice for many users to explain videos under the same platform just a few steps away. Somehow, the YouTube Shorts will not be a good choice for those dedicated users who always explore YouTube for detailed videos or information.
Thus, keeping that issue in mind, this article assisted with both the ways to turn off YouTube shorts or remove YouTube shorts with simple steps.
So, friends, let’s not wait for anymore. Scroll up the article and get a detailed steps-wise guide and get a good grab of the process. So that your concern will get resolved, and soon you will be able to access the platform with the last look.
Shanoon Cox
Shanoon Cox is a writer and a lover of all things video.
Follow @Shanoon Cox
Shanoon Cox
Nov 07, 2023• Proven solutions
YouTube Shorts is undoubtedly one of the most trending features, just like TikTok, which has also followed it for many years and created a vast user base. Creating such a short duration video is quick, grabs attention, and gets spread like a fire.
But, do you know that inclusion of YouTube shorts replaces the explore option to make proper adjustments for YouTube Shorts under the application. Not only this, many users dislike getting disturbed by such a short duration video while searching for some beneficial, informative, or detailed information.
If any of such cases, attune with you, and you want to know how to disable YouTube Shorts or remove Shorts from the YouTube platform. Then, this is the right place.
In this article, you will learn the process of disabling YouTube Shorts or removing YouTube shorts permanently. Just remain stick with the guidelines, and soon you will become able to do the same with easy steps.
- Method 1: Three dots option
- Method 2: Settings menu of YouTube
- Method 3: Can go with YouTube browser
- Method 4: Factory reset
- Method 5: Link to downgrade the YouTube
- Method 6: Removing all update
- Method 7: Try YouTube Vanced
Easy Ways to Disable/Remove YouTube Shorts
Now, as you have reached this section, you should be curious, what are the steps or methods with the help of which you would be able to disable YouTube Shorts. Don’t worry. Here, we shall cover all the methods of removing shorts from YouTube in detail.
You can choose either of them as per your suitability or the one which best suits you. Some of these methods are pretty easy to follow, or you might need to follow some steps for some. But the main essence is, following any method will show how to remove shorts from YouTube. So, now go with the methods one by one and follow the guidelines to remove shorts from YouTube.
Method 1: Three dots option
One of the primary things you can do with any short videos is to click on the three dots next to each of such videos if you are not particularly willing to see something. Doing so will open the pop-up window, which will give you the option of “Not interested”. Click on this option. That’s it. Next time, such a video will not appear to you while surfing videos on YouTube.
Here, no doubt the method is simple, but this method needs repetitiveness. As, whenever you see Shorts videos, you need to click on three dots to remove that.
Method 2: Settings menu of YouTube
At your YouTube homepage at the top end, you will see the profile icon. If you click on it, that will lead you towards the Settings menu of YouTube.
From there, you need to select “General”, which will show up some options. Here, click on the Shorts option to turn it off.
This way, by simply following and managing settings, you can easily disable YouTube shorts from the platform.
Now, restart your device to apply the removal process of YouTube shorts from there entirely. Thus, the next time you open the application, you will find that there exists no such YouTube shorts video as this option will disable YouTube Shorts.
Try Filmora to Create Funny yet Trendy YouTube Shorts!
As a YouTube fan, you can also create interesting video by yourself with Filmora YouTube Video Editor. You can add cool visual effects and popular emojis to decorate your video. Plus, there is a vast media library to add audio and filter! You are free to create popular YouTube Shorts and post it on YouTube or other social media directly.
Create YouTube Shorts Free Create YouTube Shorts Free Learn More >
Method 3: Can go with YouTube browser
Hey guys, there is one more trick. Whenever you want to access YouTube, instead of going through the application, try to open YouTube website either from your mobile or PC browser window. You would wonder why so and what difference it will make. The fact is that the Shorts tab has not yet been incorporated under the browser version of YouTube.
So friends, try this to avoid seeing YouTube Shorts videos either from phone or desktop. This is not only simple but also device-free. And even if you do not have a YouTube application, you can use this trick to solve your concern.
Method 4: Factory reset
If you disagree with the shorts video and want to get off of it entirely. This trick might help you. For this, visit the YouTube app on your mobile and press on it for some time. Doing so will lead you to the info section under the settings.
When you click on the Uninstall option, the YouTube version will get downgraded to the factory version. This is the version that is a pre-installed version of YouTube that comes with the device.
Also, if you have not updated your YouTube app, then don’t go with that. However, you will receive notifications many times that you should update your application. Just ignore it, especially if you are not willing to add the Shorts video option on your YouTube application.
Method 5: Link to downgrade the YouTube
Friends, for every problem, there exists some solution. And, if you are finding it difficult to factory reset the YouTube, you can download the downgraded version of YouTube. This is the version that does not contain the YouTube Shorts feature. Do like this:
- Visit the Link and download the downgraded version.
- Install by allowing unknown resources also.
- Then, disable the auto-update of the YouTube option also.
Note: While downloading and installing this version, you need to allow installation from unknown sources.
Filmora YouTube Video Editor
Get started easily with Filmora’s powerful performance, intuitive interface, and countless effects! Create YouTube Shorts with ease!
Make YouTube Shorts Make YouTube Shorts Make YouTube Shorts
Method 6: Removing all update
There exists one more simple trick to understand how to turn off YouTube Shorts. That is to remove all update options. How to do that, follow the below-mentioned steps you can do so.
On your smartphone, open the Settings > Apps or Manage Apps option > choose YouTube app> at the top right end, click on three dots there > click on Uninstall Updates. That will replace your YouTube app with that of the older version of YouTube.
Using this method, you can remove shorts easily from YouTube. And, it is not going to take much amount of time. So, go and follow the steps.
Method 7: Try YouTube Vanced
Wait, the list is not over yet. If none of the previous methods work, try YouTube Vanced, the advanced and premium version of YouTube to get rid of YouTube Shorts. Well, not only that, but YouTube Vanced also comes up with multiple services that you can enjoy along with it, such as disabling YouTube Shorts, blocking ads, stories, or any of the sponsored features.
If not sure how to go about it, then let’s have a look over the following steps that will guide you to get YouTube Vanced.
Step 1: Download YouTube Vanced
First, download the YouTube Vanced application from its website.
Step 2: Install and complete the setup process
After that, complete the installation process and follow the on-screen direction rightly to make it work effectively for you.
Note: If you are downloading from the website, not from the app store, then there might appear the warning. So ignore that and go with the downloading and installation process.
Step 3: Open application and visit settings
Once you have launched the application, under the settings, you need to go for the Vanced settings option> there opt for “Ad settings” > at the end of the page, switch on the Shorts shelf.
Doing so will disable the YouTube Shorts option from the Home screen.
Alternatively, remove the YouTube Shorts button also from the screen. Under the “Vanced settings” > Visit Layout settings > Switch on the Comments location option. That will further remove the Shorts button from the bottom end of the Home screen of the YouTube page.
Voila, now you can say that you get rid of those shorts videos by removing shorts from YouTube using YouTube Vanced option.
Thus, following the methods mentioned above gives you multiple ways to turn off shorts on YouTube. I hope that now you will be able to use YouTube without any concern or interference of YouTube Shorts videos.
![]()
A cross-platform for making videos anywhere for all creators
Why your video editing isn’t good enough? How about some creative inspo?
- 100 Million+ Users
- 150+ Countries and Regions
- 4 Million+ Social Media Followers
- 5 Million+ Stock Media for Use
* Secure Download
Conclusion
YouTube has always been the favorite choice for many users to explain videos under the same platform just a few steps away. Somehow, the YouTube Shorts will not be a good choice for those dedicated users who always explore YouTube for detailed videos or information.
Thus, keeping that issue in mind, this article assisted with both the ways to turn off YouTube shorts or remove YouTube shorts with simple steps.
So, friends, let’s not wait for anymore. Scroll up the article and get a detailed steps-wise guide and get a good grab of the process. So that your concern will get resolved, and soon you will be able to access the platform with the last look.
Shanoon Cox
Shanoon Cox is a writer and a lover of all things video.
Follow @Shanoon Cox
Also read:
- [Updated] Altering Who Can Access Your YouTube Videos
- 2024 Approved Elevate Video Performance Top-Notch YouTube SEO Strategies
- A Quick Guide to Purging Watched YouTube Videos
- Inviolable Tactic to Eliminate YouTube Shorts
- [New] A Beginner's Guide to Personal Brand Craftsmanship
- [Updated] 100+ Cool Gaming Channel Names for Every Gamer
- Guide to Equipment Selection for YouTube Creators
- 2024 Approved Dive Into the World of Dynamic and Entertaining Video Shopping Content
- Balancing Acts in YouTube Music Mixes for 2024
- Tackling the Mystery of Missing Shorts Video Images
- Perfect Pair Merging Your YouTube Video Library
- Immutable Disabling Routine for YouTube’s Quick Content
- Unbox the Joy of 9 Premium, Complete Christmas Movies for Free
- [Updated] A Viewer-Friendly Approach Implementing Commentary and Alerts on YouTube
- In 2024, Audio Recording 101 From YouTube Playback To Files
- [New] Bring Your GSlides to Life with YouTube Media
- [New] Best 5 YouTube Video Editor Alternatives
- Accelerated Learning for Chromakey Artistry
- HarmonyCuts Editor The Best Video-Music Blend on PC
- 2024 Approved Crafting Collabs that Attract and Retain Viewers
- In 2024, Comprehensive iTunes Update Upload YouTube Videos Guide
- [New] City Planning for Climate Action A Comprehensive Guide
- Broadcast Easily 3 Steps to Post MP3 on YouTube
- 2024 Approved Crafting a Winning Edge Mastering Keywords in Digital Marketing
- Extract Subtitles for Free Top 10 Tools Reviewed
- 2024 Approved Dispelling Darkness, Enhancing Youtube Views
- Identifying the World's Top 8 YouTube Surges
- 2024 Approved Discover the Top 10 Historically Rich YouTube Tutorials
- [Updated] Amplify Audience Connection Best Creative Reacting Techniques
- 2024 Approved A Journey Through the Digital Landscape Six Engaging Quizzes for Every Vlogger Admirer
- [Updated] 15 Online Audio Haven Sites for Video Content Makers
- From Zero to Hero YouTube Tech Required
- How to Edit Uploaded/ Published YouTube Videos for 2024
- New Real-Time AI Voice Changer Revolutionizing Communication for 2024
- Fix the Error of Unfortunately the Process.com.android.phone Has Stopped on Realme Note 50 | Dr.fone
- [Updated] In 2024, Expert Tips for Mac Users Audacity's Audio Recording Features
- [Updated] Enhance Post Strategy with These Top 8 iOS & Android Planners for 2024
- 2024 Approved Proven Recorders IOS's Leading Screenshot Tools
- [Updated] In 2024, Uncomplicated Gameplay Saving in Warframe
- [Updated] Navigating TikTok Your Essential Toolbox
- Unleash Full Potential in YI 4K Recording
- How to Unlock Infinix Smart 8 Phone without Google Account?
- [Updated] Tailored Approach Software-Free Vs. Softwares For Vimeo Download
- [New] Top Picks Non-Intrusive Android Recorders
- In 2024, How to Share/Fake Location on WhatsApp for Oppo Reno 10 Pro+ 5G | Dr.fone
- In 2024, How To Bypass Infinix Note 30 5G FRP In 3 Different Ways
- How to Upgrade iPhone 11 without Losing Data? | Dr.fone
- 2024 Approved Decoding Social Media's New Wave 10 Realities About Reels
- [New] In 2024, The Definitive List of Win10's Top Video Capture Software
- In 2024, Download Filmora at No Cost Safe, Legal, and Virus-Free
- 2024 Approved How to Download Instagram MP3?
- List of Pokémon Go Joysticks On Tecno Spark 20C | Dr.fone
- Updated PolyTuneHub Syncing Audio Across Scenes in Adobe Premiere Pro with Precision New 2023 Features for 2024
- New In 2024, Unleash Your Creativity with These 20 Free Adobe Premiere Title Templates (2023 Edition)
- In 2024, How to Unlock Apple iPhone 14 Online? Here are 6 Easy Ways
- [Updated] In 2024, Easy Guide to Streaming TV Shows on Laptops
- [Updated] A Step-by-Step Approach to Snapchat Commerce
- Updated Edit FLV Videos on Windows 8 with Ease A Beginner-Friendly Editor
- [Updated] In 2024, FastTrack RetroSnap Replay
- In 2024, How to Track Samsung Galaxy M34 Location without Installing Software? | Dr.fone
- The 6 Best SIM Unlock Services That Actually Work On Your Vivo V29e Device
- Title: [New] Advanced Strategies for YouTube Audio Editing Mastery
- Author: Brian
- Created at : 2024-05-25 12:26:43
- Updated at : 2024-05-26 12:26:43
- Link: https://youtube-video-recordings.techidaily.com/new-advanced-strategies-for-youtube-audio-editing-mastery/
- License: This work is licensed under CC BY-NC-SA 4.0.
