
!["[New] Action-Packed Shoots Creating Dynamic Video Stories on YouTube"](https://www.lifewire.com/thmb/6oxt2IlY9yBUXLGddLOwwfnJT50=/400x300/filters:no_upscale():max_bytes(150000):strip_icc()/01LW4149830-HeroSquare-674cca11c4af4155bb41e14f1244a8e7.jpg)
"[New] Action-Packed Shoots Creating Dynamic Video Stories on YouTube"
Action-Packed Shoots: Creating Dynamic Video Stories on YouTube
10 Tips For Shooting Profesional YouTube Videos

Richard Bennett
Mar 27, 2024• Proven solutions
We have mentioned before about the equipment you should have to start your YouTube video shooting , however, being methodical in your approach to the video making process and knowing exactly what and where you are going to stage and record will increase the quality of the content. Focus on the technical aspects of your YouTube video before you actually start shooting and strive to be well prepared for all the challenges a day on the set may bring.
These and other useful tips may help you make better videos for your YouTube channel, so let’s explore different ways of improving your video making skills.
10 Tips for Shooting Better YouTube Videos
All videographers agree that you shouldn’t come to the set unprepared. Everything has to be in its place, no matter how insignificant it may seem, because a tiny detail can completely ruin the shot or even an entire day of work. These tips are going to help you avoid common mistakes, inexperienced video producers often make.
1. Write the Script
Everything starts with a script, at least in the cinematography world. You don’t have to write long, detailed descriptions of all scenes, just make a short note of every scene, what is being said in the shot, on-screen actions, camera positions, and so on. By doing this, you’ll save yourself a lot of valuable time, you can then dedicate to other burning issues on the set. Besides, knowing what you are going to say throughout the video so you don’t have to improvise all the time is going to help you feel more relaxed in front of a camera.
2. Build the Set (Lighting included)
Don’t leave anything to chance. You should control everything that is going to be in the shot, so avoid working at locations you can’t at least partially control. Shooting in studio-like conditions will enable you to carefully select the scenography and to design light so it matches the scene perfectly. The actors must always be clearly visible to the audience, which is why you need to pay attention to where they are located in the shot and how much light you have in that part of the shot.
3. Keep Your Batteries Charged
There is nothing more frustrating than arriving at the set anxious to start shooting just to find out that the batteries are empty. Charge the batteries at the end of each day on the set, because the chances are that you are going to need them early in the morning. Always have several spare batteries with you, so even if one battery is empty you have the replacement ready. You can also prolong the battery life by switching the camera off when you are not recording.
4. Do a Microphone Check
Capturing audio with an external microphone drastically increases the quality of the sound in your videos. That’s why making absolutely sure that all cables are connected and that the microphone is perfectly placed is paramount if you want to get the sound right. The host or the hosts of the video must be at the right distance from the microphone, usually, the length of their fist with the thumb and pinky finger extended, but this can vary a few inches to either side.
Check out the best microphone for YouTuber in 2018
5. Pay Attention to The Shot Composition
The rule of thirds is a common composition principle used by videographers to create balanced and unified images. The rule suggests that the subjects in a shot should be placed at the intersections of the lines that divide the screen. Most digital cameras have a grid that makes using the rule of thirds quite simple because you can easily see when the subjects in the shot are not positioned correctly.
This is just one of many shot composition techniques you have at your disposal, and as you gain more experience you’ll learn how to combine them and get aesthetically pleasing results.
6. Always Record Videos in Landscape Mode


Posting vertically oriented videos to your YouTube channel will make you look unprofessional because portrait mode is never used for capturing videos. YouTubers who record their videos with Smartphones are more likely to fall into this trap, but all you need to do to avoid this is remember to hold the device horizontally.
By switching to portrait mode, you’ll be cropping the frame in a way, so you might unknowingly end up removing parts of the shot you wanted to record.
In case that you want to convert your portrait video to landscape, do not miss this article about How to Convert A Portrait Video to Landscape.
7. Eliminate The Background Noises
Professional microphones can pick up even the softest sounds, that might prove difficult to remove in the post-production. You can reduce the noise levels in your videos by using shotgun microphones that only capture sounds that come directly into the microphone, or by using the omnidirectional mic to eliminate the wind if you’re shooting on an outdoor location.
Background noises can be particularly unpleasant when recording narration, because the viewers of the video may not want to watch it until the end if they can’t hear what the person in the video is saying.
If it is hard for you to record your YouTube video in quite environment, you can remove the background noise by using some video editing software. For YouTubers, we recommend you to try Wondershare Filmora to de-noise. Check the video below about how to remove background noise with one click.
8. Keep The Shot in Focus
You can always keep the shot in focus by simply enabling the autofocus feature, but if you do so you won’t be able to control where the focus is going to be. Pulling focus manually is an art that takes years to master, and you have to keep practicing it as much as you can in order to become good at it.
The best way to deal with out of focus shots is to avoid shooting scenes that include a lot of action because you won’t have to pull focus that often.
9. Put The Camera on a Tripod

The footage you produce should be smooth and free of camera shakes. All video cameras pick up vibrations easily, so even the slightest movement or impact can ruin a shot. Putting the camera on a tripod is one of the best ways to stabilize the shot and avoid camera shaking.
In addition, a tripod enables you to maintain image stability even when shooting form lower or upper angles, something that cannot be achieved by simply holding the camera.
We have chosen some of the best tripods that you can use for starting a YouTube vlogging Video shooting . If you are using a 4K camera, here are some tripods that you can use for your 4K Cameras .
10. Find The Best Angle
Every scene has its perfect angle, you just have to find it. This job is much easier if you have already built the set and adjusted the lighting before approaching the shot selection process because it will allow you to know exactly where the camera should be.
The camera position depends on a number of factors, including the video’s aesthetics or the action that takes place in the shot, and you have to go through this process for each shot in your video.
Read More to Get : How to Download YouTube Videos without Any Software Easily >>
Conclusion
Hopefully, the tips we provided in this article are going to help you create better YouTube videos. There are hundreds of tricks you’ll have to learn as your skills become more polished, but sometimes just paying attention to the basic rules of videography is more than enough to create a stunning video.
Leave a comment and let us know which tips helped you the most or tell us which useful tips we failed to mention in this article.
Richard Bennett
Richard Bennett is a writer and a lover of all things video.
Follow @Richard Bennett
Richard Bennett
Mar 27, 2024• Proven solutions
We have mentioned before about the equipment you should have to start your YouTube video shooting , however, being methodical in your approach to the video making process and knowing exactly what and where you are going to stage and record will increase the quality of the content. Focus on the technical aspects of your YouTube video before you actually start shooting and strive to be well prepared for all the challenges a day on the set may bring.
These and other useful tips may help you make better videos for your YouTube channel, so let’s explore different ways of improving your video making skills.
10 Tips for Shooting Better YouTube Videos
All videographers agree that you shouldn’t come to the set unprepared. Everything has to be in its place, no matter how insignificant it may seem, because a tiny detail can completely ruin the shot or even an entire day of work. These tips are going to help you avoid common mistakes, inexperienced video producers often make.
1. Write the Script
Everything starts with a script, at least in the cinematography world. You don’t have to write long, detailed descriptions of all scenes, just make a short note of every scene, what is being said in the shot, on-screen actions, camera positions, and so on. By doing this, you’ll save yourself a lot of valuable time, you can then dedicate to other burning issues on the set. Besides, knowing what you are going to say throughout the video so you don’t have to improvise all the time is going to help you feel more relaxed in front of a camera.
2. Build the Set (Lighting included)
Don’t leave anything to chance. You should control everything that is going to be in the shot, so avoid working at locations you can’t at least partially control. Shooting in studio-like conditions will enable you to carefully select the scenography and to design light so it matches the scene perfectly. The actors must always be clearly visible to the audience, which is why you need to pay attention to where they are located in the shot and how much light you have in that part of the shot.
3. Keep Your Batteries Charged
There is nothing more frustrating than arriving at the set anxious to start shooting just to find out that the batteries are empty. Charge the batteries at the end of each day on the set, because the chances are that you are going to need them early in the morning. Always have several spare batteries with you, so even if one battery is empty you have the replacement ready. You can also prolong the battery life by switching the camera off when you are not recording.
4. Do a Microphone Check
Capturing audio with an external microphone drastically increases the quality of the sound in your videos. That’s why making absolutely sure that all cables are connected and that the microphone is perfectly placed is paramount if you want to get the sound right. The host or the hosts of the video must be at the right distance from the microphone, usually, the length of their fist with the thumb and pinky finger extended, but this can vary a few inches to either side.
Check out the best microphone for YouTuber in 2018
5. Pay Attention to The Shot Composition
The rule of thirds is a common composition principle used by videographers to create balanced and unified images. The rule suggests that the subjects in a shot should be placed at the intersections of the lines that divide the screen. Most digital cameras have a grid that makes using the rule of thirds quite simple because you can easily see when the subjects in the shot are not positioned correctly.
This is just one of many shot composition techniques you have at your disposal, and as you gain more experience you’ll learn how to combine them and get aesthetically pleasing results.
6. Always Record Videos in Landscape Mode
Posting vertically oriented videos to your YouTube channel will make you look unprofessional because portrait mode is never used for capturing videos. YouTubers who record their videos with Smartphones are more likely to fall into this trap, but all you need to do to avoid this is remember to hold the device horizontally.
By switching to portrait mode, you’ll be cropping the frame in a way, so you might unknowingly end up removing parts of the shot you wanted to record.
In case that you want to convert your portrait video to landscape, do not miss this article about How to Convert A Portrait Video to Landscape.
7. Eliminate The Background Noises
Professional microphones can pick up even the softest sounds, that might prove difficult to remove in the post-production. You can reduce the noise levels in your videos by using shotgun microphones that only capture sounds that come directly into the microphone, or by using the omnidirectional mic to eliminate the wind if you’re shooting on an outdoor location.
Background noises can be particularly unpleasant when recording narration, because the viewers of the video may not want to watch it until the end if they can’t hear what the person in the video is saying.
If it is hard for you to record your YouTube video in quite environment, you can remove the background noise by using some video editing software. For YouTubers, we recommend you to try Wondershare Filmora to de-noise. Check the video below about how to remove background noise with one click.
8. Keep The Shot in Focus
You can always keep the shot in focus by simply enabling the autofocus feature, but if you do so you won’t be able to control where the focus is going to be. Pulling focus manually is an art that takes years to master, and you have to keep practicing it as much as you can in order to become good at it.
The best way to deal with out of focus shots is to avoid shooting scenes that include a lot of action because you won’t have to pull focus that often.
9. Put The Camera on a Tripod
The footage you produce should be smooth and free of camera shakes. All video cameras pick up vibrations easily, so even the slightest movement or impact can ruin a shot. Putting the camera on a tripod is one of the best ways to stabilize the shot and avoid camera shaking.
In addition, a tripod enables you to maintain image stability even when shooting form lower or upper angles, something that cannot be achieved by simply holding the camera.
We have chosen some of the best tripods that you can use for starting a YouTube vlogging Video shooting . If you are using a 4K camera, here are some tripods that you can use for your 4K Cameras .
10. Find The Best Angle
Every scene has its perfect angle, you just have to find it. This job is much easier if you have already built the set and adjusted the lighting before approaching the shot selection process because it will allow you to know exactly where the camera should be.
The camera position depends on a number of factors, including the video’s aesthetics or the action that takes place in the shot, and you have to go through this process for each shot in your video.
Read More to Get : How to Download YouTube Videos without Any Software Easily >>
Conclusion
Hopefully, the tips we provided in this article are going to help you create better YouTube videos. There are hundreds of tricks you’ll have to learn as your skills become more polished, but sometimes just paying attention to the basic rules of videography is more than enough to create a stunning video.
Leave a comment and let us know which tips helped you the most or tell us which useful tips we failed to mention in this article.
Richard Bennett
Richard Bennett is a writer and a lover of all things video.
Follow @Richard Bennett
Expert Reviews: Best Game Capture Apps
15 Best Game Recording Software for YouTuber in 2024
Richard Bennett
Mar 27, 2024• Proven solutions
There is no doubt that gaming is one of the largest entertainment sources for most of people. The advanced technology has led to the development of game recorders by which you can record the video of your favorite game and share it with your friends and viewers on YouTube.
Wondershare Filmstock Gaming Video Editing Skils ](https://filmstock.wondershare.com/creative-theme-game?source%5Fchannel=seo%5Farticle&spm=rs.filmora%5Fweb )
You might be interested in:
If you are looking for a screen recorder that allows you to capture your gameplay, add markers to the important point during playing, and edit the recorded gameplay video easily, then we recommend you to try Wondershare DemoCreator.
With DemoCreator, you can:
- Add Markers to important points during recording
- Record high paced games at up to 120 fps
- Capture video, system audio, webcam, and mic at the same time
- Record the entire screen or just a part of your screen
- Change video speed and add fade in and fade out with a simple drag
- Detach audio and record voice narration during editing and reduce the noise
- Use the Blur effect to blur the private info or remove the watermark
- Share videos to Vimeo, YouTube, Facebook, and Twitch directly
However, if you are looking for a video editing software that provides various gameplay elements, I want to recommend - Wondershare Filmora , an easy to use while powerful video editor that allows you not only cut, split, crop, resize, reverse your videos, but also offers you multiple video effects specially designed for Fashion, Beauty, Gaming, Travel, Education, etc. Check the video to know more fantastic features, and keep reading the article to know why Filmora is still one of the best options when it comes to gameplay recording.
Download Mac Version ](https://tools.techidaily.com/wondershare/filmora/download/ )
15 Best Game Screen Recorders for Recording Game Videos
1. ShadowPlay
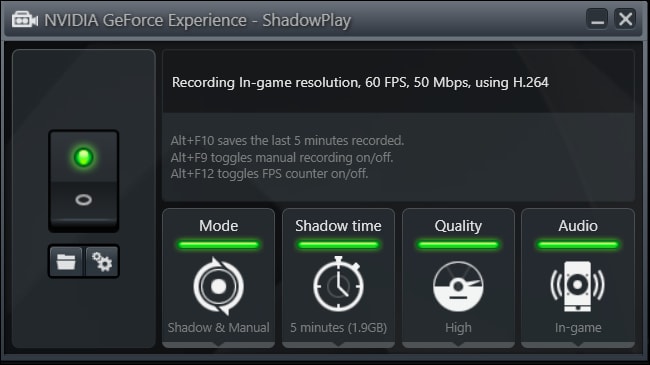
It is free game video capture software created by Nvidia GeForce for streaming game videos. There are two modes of this video recording tool i.e. Manual mode and Shadow mode.
Features:
- Instant replay and record
- Excellent hardware i.e. a GPU-accelerated video encoder
- It has a minimal performance impact
- Records up to 4K resolution at the speed of 130 Mbps
Compatibility: Windows XP, 7, 8, 8.1 and 10
Pros:
- Unlimited recording time in manual mode
- Allow it users to capture full desktop screen
Cons:
- Geforce GTX 600 and above is required to operate this software.
Price: It is available free of cost.
We have researched about how to record gameplay with Nvidia ShadowPlay, check this article How to Use Nvidia Share or ShadowPlay to Record Gameplay for the detailed information.
2. Camtasia

It is one of the best game recorders for recording professional videos on your PC. You can also import HD videos from an external source. The interactive videos can also be created by using this software.
Features:
- Stunning graphics
- Direct link to social media
- Effective recording option
- Drag and drop editing
- Google Drive integration
Compatibility: Windows 10, 8 and 7 SP1
Pros:
- You can easily include animated items
- Video, audio and cursor tracks can be edited individually
- Provides panning and zooming options
- Incorporates webcam
- You can also use the green screen effect
Cons:
- Free trial for only 30 days.
- The users cannot record videos for commercial use in the free version
- Very expensive
- Works slowly on large projects
Price: $299.00 USD but it can be reduced if you buy 5-9 licenses
3. Open Broadcast Software
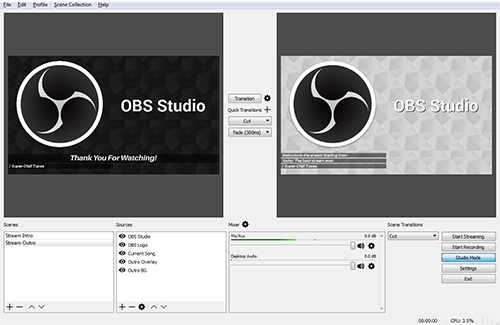
It is an open-source game recording tool having unlimited customization options. You can get idea about this software by its name i.e. the game streams can be broadcasted on various websites such as Twitch, YouTube, Hitbox etc.
Features:
- Simple interface
- Limitless scenes and sources
- It has file output to FLV or MP4
- GPU-based video game capture
Compatibility: Windows 10, 8, 8.1, Vista and 7, Version for Linux and Mac OS X is also in the pipeline
Pros:
- Easy to use
- High-speed performance
- Keyboard shortcuts
Cons:
- A sharp learning curve
- Difficult to construct scenes
Price: Free
4.Bandicam
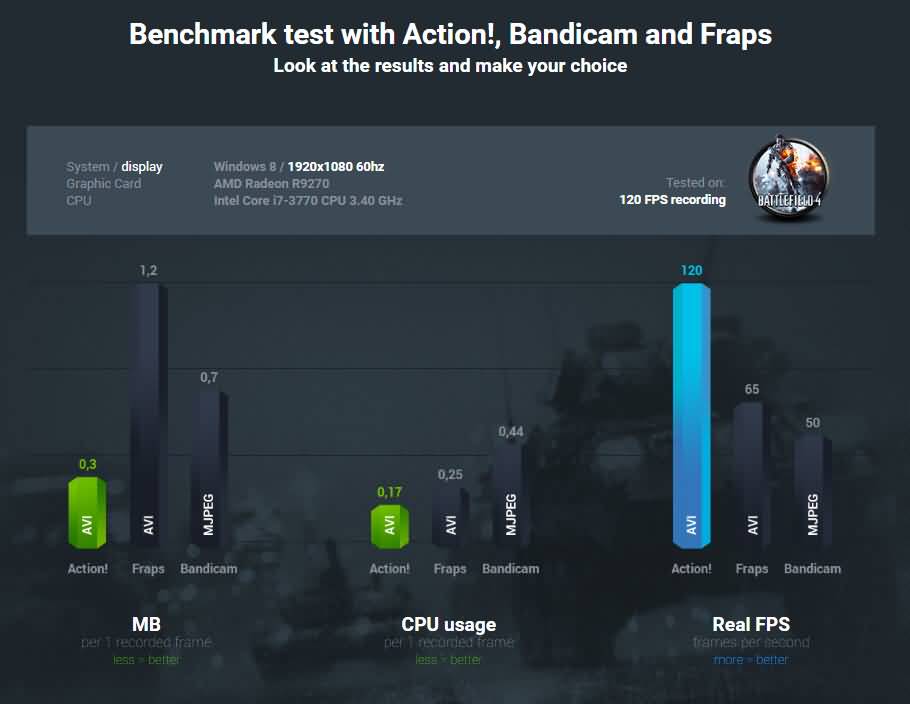
It is a perfect choice for beginners as it is easy to understand. You can also record a video game that utilizes the Direct X or OpenGL technology and share on YouTube with a single click. The size of the window can also be adjusted according to your need.
Features:
- Built-in compression feature ensuring high-quality videos
- Recording can be done for more than 24 hours
- You can record videos at 4k Ultra HD resolution
Compatibility: Windows XP, 10, 8.1, 8, and 7
Pros:
- Maximum frame rate i.e. 120 fps
- Two different audio inputs can be recorded at the same time
Cons:
- It does not proffer live streaming
Price: Free trial, $59 for two licenses, $39 for one license
5. EpicRewind

This software is developed recently introducing a unique feature i.e. RAM Rolling Buffer mode. It enables the user to replay the recording instantly. The buffer contents can also be saved by pressing a hotkey.
Features:
- You can conveniently capture screenshot and video from browser games or flash games.
- Direct-To-Disk capture mode
- Video Output Format and Codec can be configured with great ease.
Compatibility: It does not support windows
Pros:
- Videos are not encoded all the time.
Cons:
- It cannot be run on the Windows operating system.
Price: Free trial of the base version
6.D3DGear
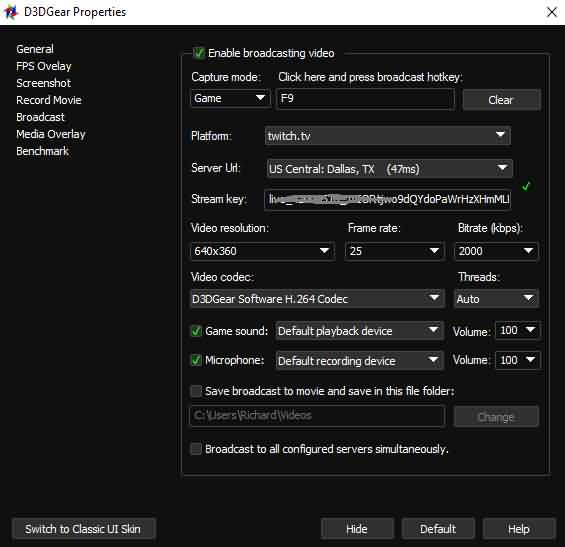
It is a very simple and light recorder. This software compresses the recorded files in real-time mode i.e. you are able to record screen activity even if there is less space in your storage drive. The videos can be shared over any social networking website.
Features:
- User-friendly interface
- Built-in compression system
Compatibility: Windows XP, 7, 10, 8, 8.1 and Vista
Pros:
- You can do live video streaming
- The audio files can be saved separately.
Cons:
- Pro version is very costly
Price: 15-day free trial otherwise it costs $34.95.
7.Fraps
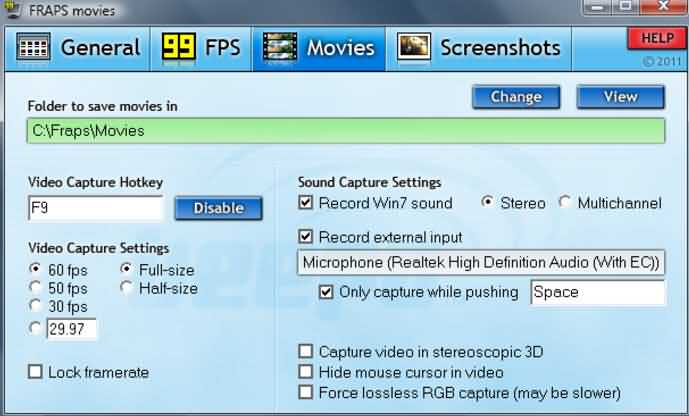
It is one of the most famous game screen recorders having superb features. The average performance rate can also be measured by using this recorder. You can also save these statistics in a different file. It is also very light software similar to D3DGear.
Features:
- It can be used as a benchmark tool.
- Capture high-quality footage
Compatibility: Windows Vista, XP, 7, 10, 8.1 and 8
Pros:
- You can record videos at 7680×4800 resolution
- Frames can be adjusted up to 120fps
Cons:
- It does not have streaming options
Price: Free version with few features, full version at $37
8.Microsoft Screen Encoder 4
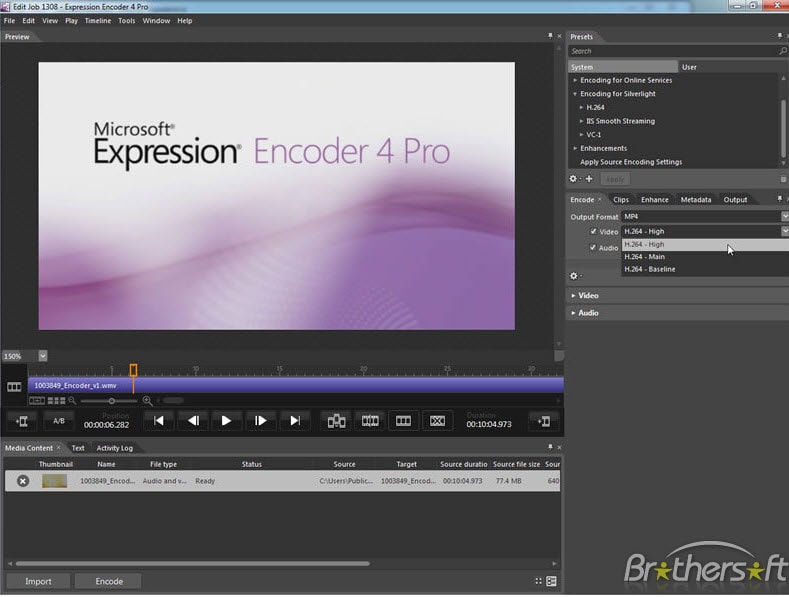
It is an advanced version of Microsoft screen encoder 3. It has wonderful graphics and live IIS (Internet Information Services) smooth streaming options. The Windows Media video, as well as audio files, can be produced with the help of this software.
Features:
- Screen capture
- GUI interface
- Live template support
Compatibility: Windows 7, Vista, Windows XP service pack2
Pros:
- High-quality playback
- Enables encoding using H.261Intuitive interface
Cons:
- Less editing tools in comparison to other software
- You cannot export your recordings to Sony Vegas11
Price: Pro version costs $199.95 while the standard version is free having limited features
9.Tinytake
This game recorder is an ideal choice for making commercial presentations. This software allows its users to capture video from the selected region and upload it directly on YouTube or any other social media.
Features:
- Drag and drop option
- You can conveniently annotate the videos
- Inbuilt online file viewer
Compatibility: It can work with Windows as well as Mac operating system
Pros:
- You can develop custom shortcut keys
- Bulk files sharing
- You can run this software on mobile devices
Cons:
- Files are saved only in MP4 format
- Video recording can be done up to 2 hours
- No free version is available for business purposes
Price: It ranges between $29.95 and $199.95 for a yearly plan. You will also get storage memory space up to 2TB with a business plan.
10.Ezvid
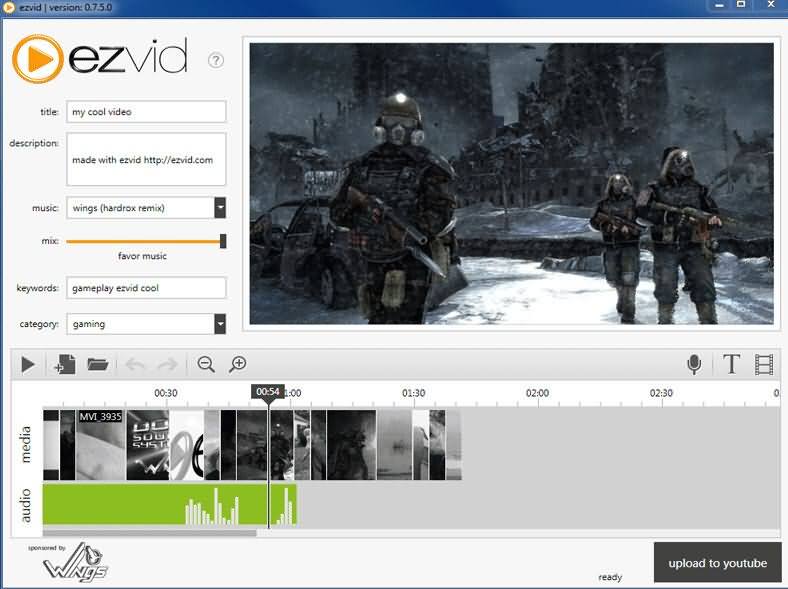
This screen software is specially designed for saving the time of the users. It also increases the recording speed and video editing capabilities. You can also add text and watermark to the videos.
Features:-
- Videos are uploaded on YouTube in a fast manner.
- It provides computer speech for narrative purposes.
- Modern and sleek interface
Compatibility: Windows XP SP3, 7 and Vista
Pros:
- High-quality video resolution
- You can also select the most popular music tracks
- It also has a facecam and a video editor
- You can also drag and drop videos
- Professional videos can be created in a few minutes
Cons:
- It is glitch and leggy.
- It requires 10GB free space
- Fewer features as compared to Camtasia software
Price: Free
11. Gecata
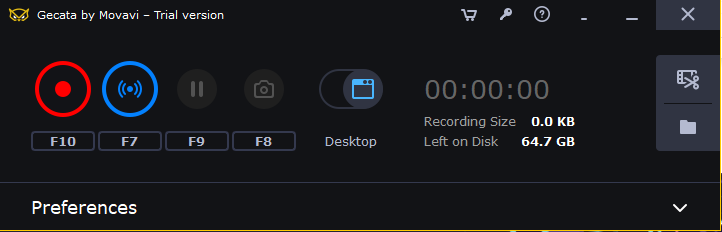
Gecata by Movavi is a lightweight video recording tool designed to capture gameplays. Screen recording with this program is easy without needing external hardware. You can capture all screen activities and save recordings in major video formats, including .MOV, .MP4, .AVI, and GIF.
Features:
- One-click screenshots
- Game mode for automatic recording
- Screen and audio recording simultaneously and separately
- Graphics hardware integration option (NVIDIA or Intel) for 400% faster encoding
Compatibility: Windows 7/8/10
Pros:
- Simple interface
- Speedy capturing
- Tested on dozens of games
- Game recording up to 120fps
Cons:
- The free version pastes a watermark on the recording
- Lagging
Price: $30.95 for a lifetime
12. EaseUS RecExperts

RecExperts by EaseUS is a premium screen recorder with many exciting features. For instance, you can record a particular part of the screen by making a selection through your mouse. Likewise, you can also record multiple screens side by side.
While RecExperts is made for gamers and YouTubers, you can use this tool for a wide range of purposes. Such as recording an online meeting, video tutorial, and more.
Features:
- Sound recording and extracting
- Web camera capturing
- Saving captured video into GIF
- Screenshots
- Schedule recording with automatic stop and split options
Compatibility: Windows 7/8.1/10/11 and macOS 10.13 or later
Pros:
- Simple software design
- Allows editing on the captured screen
- Supports different video and formats, including MP4, MKV, MOV, AVI
Cons:
- Limited editing, such as trimming and cutting
Price: $19.95 per month, $39.95 per year, and $79.95 for a lifetime
13. Flashback Express (Free Version)
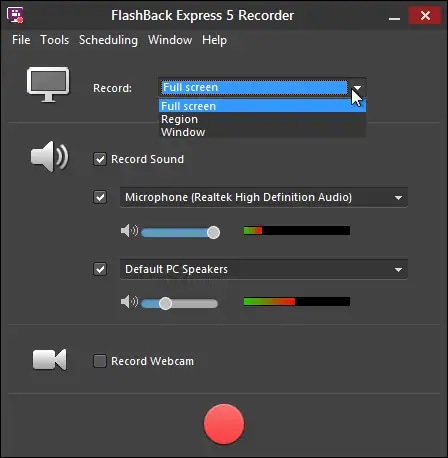
Flashback Express is a screen recording and editing software. It is a powerful tool for recording desktop screens simultaneously with mic sounds. You can also add webcam recordings to recorded gameplays as most YouTubers do.
Besides, there’s no time limit on the recording. So whether you want to capture a small portion of your video or screen record several hours of gameplay, feel free to do it.
Features:
- Video trimming
- Multi-screen recording
- Webcam overlay
- Direct YouTube uploading option
Compatibility: Windows 7/8.1/10/11
Pros:
- Easy interface
- No watermark
- Voice over during screen capturing
- Selected and full-screen recording
- You can save the recordings in MP4
Cons:
- Difficult export settings
- Unable to export audio in the free version
- You need to convert the video using other programs if you want your recording in different video formats
Price: Free
14. Snagit
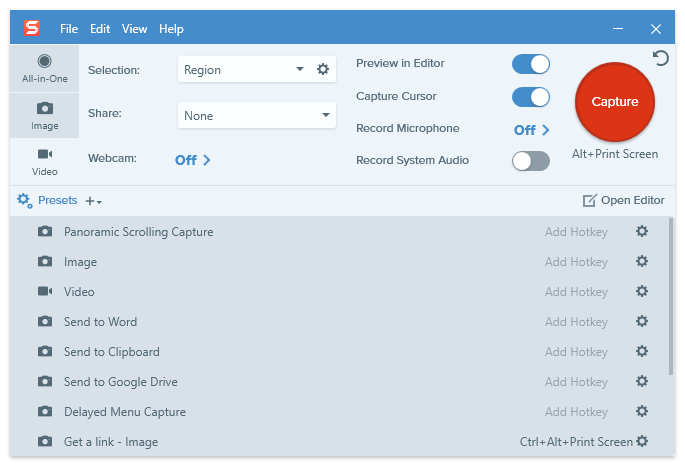
Snagit is another product by TechSmith (the developers of Camtasia). It’s a super easy tool to take screenshots and record screens.
You can save the captured video in MP4 and directly send the file through email. You can also upload files on different platforms and applications, including YouTube, Twitter, Slack, Google Drive, and more.
Features:
- Screen and audio recording
- Annotations
- Video trimming
- Webcam recording
- Cloud library
- Video conversion to GIFs
- Panoramic screen capturing
Compatibility: Windows 10/11 and Mac 11 or later
Pros:
- Simple user interface
- Fast video uploading to various platforms
Cons:
- Saved videos are only available in MP4 format
Price:$62.99 for a lifetime, including first-year maintenance (regular maintenance charges are $12.6 per year applicable after completing the first year)
15. Filmora
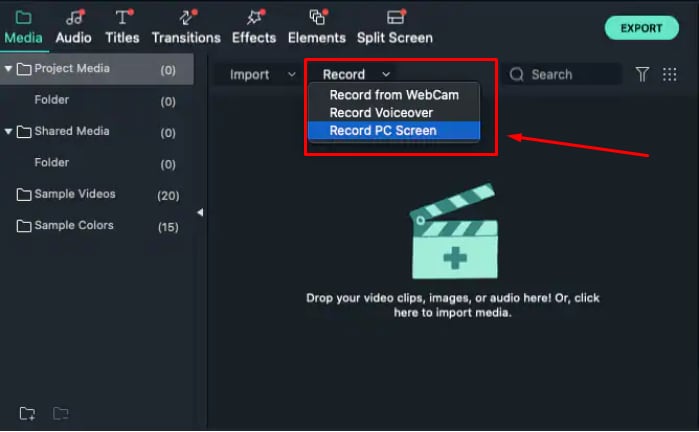
Filmora is an all-in-one program and is one of the top video editing tools cherished by all types of users – beginners and professionals. But what makes this software super cool for gamers and YouTubers is its screen recording option. With comprehensive features, you can record your gameplay and edit your screen recordings by using a wide range of features.
Features:
- Support 4K editing
- Noise removal
- Advanced text editor
- Color tuning
- Audio mixing
Compatibility: Windows 7/8/10/11 (64-bit) and macOS V10.1/V10.13/V10.14/V10.15/V11/V12
Pros:
- User-friendly interface
- Huge effects library
- Affordable perpetual licensing
- Wide range of features
- Support various video formats
- High-quality results
Cons:
- The free version includes a watermark
- You need to purchase the product to use some important features, such as keyframing
Price: $29.99 per month, $69.99 per year, and $79.99 for a perpetual
What to look for game screen recorder
There are many people who do not have any knowledge regarding game capture software. You must look for the following things before choosing a game screen recorder.
- The option of personalizing the hotkeys
- Number of built-in tools
- How to begin and pause recording
- Number of codes offered by it
- Recording time
- Editing features like cut and paste
- Custom-made Recording Resolution
- Adjustable video frames
In addition to this, some game recorders also affect your in-game fps (Frame per second). You should also check whether it is compatible with large-sized files or not. The quality of the video also depends upon the file size. The larger is file size, the higher is video quality. However, you can face problems while uploading huge-sized videos as online content distributors hardly support such files. So you must compress your video before sharing anywhere. There are also some recorders that provide a direct link to social networking sites. Thus you should consider these factors also before purchasing the game recording software.
You can easily run this recorder on your computer if it is updated and has 8GB of RAM. PC should also have two storage drives so as to install gaming software on one drive and record videos on another drive. It is also advisable to use computers than laptops for recording screen activities because laptops rarely have two storage drives.
You can easily run this recorder on your computer if it is updated and has 8GB of RAM. PC should also have two storage drives so as to install gaming software on one drive and record videos on another drive. It is also advisable to use computers than laptops for recording screen activities because laptops rarely have two storage drives.
FAQs
Q1. What software do YouTubers use to record gameplay?
Most gamers on YouTube use Open Broadcast System (OBS) and Bandicam to record their gameplays. However, there are a few more authentic screen recording tools for high-quality video recording, such as Filmora.
Using Filmora to record your gameplay will help you save the video in all major video formats. Moreover, the tool is also compatible with Mac and Windows operating systems.
Q2. How do I record my screen smoothly?
You should do a couple of things to avoid lagging while screen recording your gameplay. For example, do not use your built-in microphone to record your voice during screen recording. Instead, use an external microphone.
Only record what is important. Use high RAM and have a good graphics card. And most importantly, get screen recorders with at least 60fps.
Q3. Does screen recording decrease FPS?
Yes, it does affect your overall gaming performance. However, it depends on several factors. For instance, the fps won’t be affected much if you’re playing a less CPU-intensive game. The only way to sustain FPS is to have a high-quality screen recorder, such as OBS, Filmora, Bandicam, and Fraps.
Richard Bennett
Richard Bennett is a writer and a lover of all things video.
Follow @Richard Bennett
Richard Bennett
Mar 27, 2024• Proven solutions
There is no doubt that gaming is one of the largest entertainment sources for most of people. The advanced technology has led to the development of game recorders by which you can record the video of your favorite game and share it with your friends and viewers on YouTube.
Wondershare Filmstock Gaming Video Editing Skils ](https://filmstock.wondershare.com/creative-theme-game?source%5Fchannel=seo%5Farticle&spm=rs.filmora%5Fweb )
You might be interested in:
If you are looking for a screen recorder that allows you to capture your gameplay, add markers to the important point during playing, and edit the recorded gameplay video easily, then we recommend you to try Wondershare DemoCreator.
With DemoCreator, you can:
- Add Markers to important points during recording
- Record high paced games at up to 120 fps
- Capture video, system audio, webcam, and mic at the same time
- Record the entire screen or just a part of your screen
- Change video speed and add fade in and fade out with a simple drag
- Detach audio and record voice narration during editing and reduce the noise
- Use the Blur effect to blur the private info or remove the watermark
- Share videos to Vimeo, YouTube, Facebook, and Twitch directly
However, if you are looking for a video editing software that provides various gameplay elements, I want to recommend - Wondershare Filmora , an easy to use while powerful video editor that allows you not only cut, split, crop, resize, reverse your videos, but also offers you multiple video effects specially designed for Fashion, Beauty, Gaming, Travel, Education, etc. Check the video to know more fantastic features, and keep reading the article to know why Filmora is still one of the best options when it comes to gameplay recording.
Download Mac Version ](https://tools.techidaily.com/wondershare/filmora/download/ )
15 Best Game Screen Recorders for Recording Game Videos
1. ShadowPlay
It is free game video capture software created by Nvidia GeForce for streaming game videos. There are two modes of this video recording tool i.e. Manual mode and Shadow mode.
Features:
- Instant replay and record
- Excellent hardware i.e. a GPU-accelerated video encoder
- It has a minimal performance impact
- Records up to 4K resolution at the speed of 130 Mbps
Compatibility: Windows XP, 7, 8, 8.1 and 10
Pros:
- Unlimited recording time in manual mode
- Allow it users to capture full desktop screen
Cons:
- Geforce GTX 600 and above is required to operate this software.
Price: It is available free of cost.
We have researched about how to record gameplay with Nvidia ShadowPlay, check this article How to Use Nvidia Share or ShadowPlay to Record Gameplay for the detailed information.
2. Camtasia
It is one of the best game recorders for recording professional videos on your PC. You can also import HD videos from an external source. The interactive videos can also be created by using this software.
Features:
- Stunning graphics
- Direct link to social media
- Effective recording option
- Drag and drop editing
- Google Drive integration
Compatibility: Windows 10, 8 and 7 SP1
Pros:
- You can easily include animated items
- Video, audio and cursor tracks can be edited individually
- Provides panning and zooming options
- Incorporates webcam
- You can also use the green screen effect
Cons:
- Free trial for only 30 days.
- The users cannot record videos for commercial use in the free version
- Very expensive
- Works slowly on large projects
Price: $299.00 USD but it can be reduced if you buy 5-9 licenses
3. Open Broadcast Software
It is an open-source game recording tool having unlimited customization options. You can get idea about this software by its name i.e. the game streams can be broadcasted on various websites such as Twitch, YouTube, Hitbox etc.
Features:
- Simple interface
- Limitless scenes and sources
- It has file output to FLV or MP4
- GPU-based video game capture
Compatibility: Windows 10, 8, 8.1, Vista and 7, Version for Linux and Mac OS X is also in the pipeline
Pros:
- Easy to use
- High-speed performance
- Keyboard shortcuts
Cons:
- A sharp learning curve
- Difficult to construct scenes
Price: Free
4.Bandicam
It is a perfect choice for beginners as it is easy to understand. You can also record a video game that utilizes the Direct X or OpenGL technology and share on YouTube with a single click. The size of the window can also be adjusted according to your need.
Features:
- Built-in compression feature ensuring high-quality videos
- Recording can be done for more than 24 hours
- You can record videos at 4k Ultra HD resolution
Compatibility: Windows XP, 10, 8.1, 8, and 7
Pros:
- Maximum frame rate i.e. 120 fps
- Two different audio inputs can be recorded at the same time
Cons:
- It does not proffer live streaming
Price: Free trial, $59 for two licenses, $39 for one license
5. EpicRewind
This software is developed recently introducing a unique feature i.e. RAM Rolling Buffer mode. It enables the user to replay the recording instantly. The buffer contents can also be saved by pressing a hotkey.
Features:
- You can conveniently capture screenshot and video from browser games or flash games.
- Direct-To-Disk capture mode
- Video Output Format and Codec can be configured with great ease.
Compatibility: It does not support windows
Pros:
- Videos are not encoded all the time.
Cons:
- It cannot be run on the Windows operating system.
Price: Free trial of the base version
6.D3DGear
It is a very simple and light recorder. This software compresses the recorded files in real-time mode i.e. you are able to record screen activity even if there is less space in your storage drive. The videos can be shared over any social networking website.
Features:
- User-friendly interface
- Built-in compression system
Compatibility: Windows XP, 7, 10, 8, 8.1 and Vista
Pros:
- You can do live video streaming
- The audio files can be saved separately.
Cons:
- Pro version is very costly
Price: 15-day free trial otherwise it costs $34.95.
7.Fraps
It is one of the most famous game screen recorders having superb features. The average performance rate can also be measured by using this recorder. You can also save these statistics in a different file. It is also very light software similar to D3DGear.
Features:
- It can be used as a benchmark tool.
- Capture high-quality footage
Compatibility: Windows Vista, XP, 7, 10, 8.1 and 8
Pros:
- You can record videos at 7680×4800 resolution
- Frames can be adjusted up to 120fps
Cons:
- It does not have streaming options
Price: Free version with few features, full version at $37
8.Microsoft Screen Encoder 4
It is an advanced version of Microsoft screen encoder 3. It has wonderful graphics and live IIS (Internet Information Services) smooth streaming options. The Windows Media video, as well as audio files, can be produced with the help of this software.
Features:
- Screen capture
- GUI interface
- Live template support
Compatibility: Windows 7, Vista, Windows XP service pack2
Pros:
- High-quality playback
- Enables encoding using H.261Intuitive interface
Cons:
- Less editing tools in comparison to other software
- You cannot export your recordings to Sony Vegas11
Price: Pro version costs $199.95 while the standard version is free having limited features
9.Tinytake
This game recorder is an ideal choice for making commercial presentations. This software allows its users to capture video from the selected region and upload it directly on YouTube or any other social media.
Features:
- Drag and drop option
- You can conveniently annotate the videos
- Inbuilt online file viewer
Compatibility: It can work with Windows as well as Mac operating system
Pros:
- You can develop custom shortcut keys
- Bulk files sharing
- You can run this software on mobile devices
Cons:
- Files are saved only in MP4 format
- Video recording can be done up to 2 hours
- No free version is available for business purposes
Price: It ranges between $29.95 and $199.95 for a yearly plan. You will also get storage memory space up to 2TB with a business plan.
10.Ezvid
This screen software is specially designed for saving the time of the users. It also increases the recording speed and video editing capabilities. You can also add text and watermark to the videos.
Features:-
- Videos are uploaded on YouTube in a fast manner.
- It provides computer speech for narrative purposes.
- Modern and sleek interface
Compatibility: Windows XP SP3, 7 and Vista
Pros:
- High-quality video resolution
- You can also select the most popular music tracks
- It also has a facecam and a video editor
- You can also drag and drop videos
- Professional videos can be created in a few minutes
Cons:
- It is glitch and leggy.
- It requires 10GB free space
- Fewer features as compared to Camtasia software
Price: Free
11. Gecata
Gecata by Movavi is a lightweight video recording tool designed to capture gameplays. Screen recording with this program is easy without needing external hardware. You can capture all screen activities and save recordings in major video formats, including .MOV, .MP4, .AVI, and GIF.
Features:
- One-click screenshots
- Game mode for automatic recording
- Screen and audio recording simultaneously and separately
- Graphics hardware integration option (NVIDIA or Intel) for 400% faster encoding
Compatibility: Windows 7/8/10
Pros:
- Simple interface
- Speedy capturing
- Tested on dozens of games
- Game recording up to 120fps
Cons:
- The free version pastes a watermark on the recording
- Lagging
Price: $30.95 for a lifetime
12. EaseUS RecExperts
RecExperts by EaseUS is a premium screen recorder with many exciting features. For instance, you can record a particular part of the screen by making a selection through your mouse. Likewise, you can also record multiple screens side by side.
While RecExperts is made for gamers and YouTubers, you can use this tool for a wide range of purposes. Such as recording an online meeting, video tutorial, and more.
Features:
- Sound recording and extracting
- Web camera capturing
- Saving captured video into GIF
- Screenshots
- Schedule recording with automatic stop and split options
Compatibility: Windows 7/8.1/10/11 and macOS 10.13 or later
Pros:
- Simple software design
- Allows editing on the captured screen
- Supports different video and formats, including MP4, MKV, MOV, AVI
Cons:
- Limited editing, such as trimming and cutting
Price: $19.95 per month, $39.95 per year, and $79.95 for a lifetime
13. Flashback Express (Free Version)
Flashback Express is a screen recording and editing software. It is a powerful tool for recording desktop screens simultaneously with mic sounds. You can also add webcam recordings to recorded gameplays as most YouTubers do.
Besides, there’s no time limit on the recording. So whether you want to capture a small portion of your video or screen record several hours of gameplay, feel free to do it.
Features:
- Video trimming
- Multi-screen recording
- Webcam overlay
- Direct YouTube uploading option
Compatibility: Windows 7/8.1/10/11
Pros:
- Easy interface
- No watermark
- Voice over during screen capturing
- Selected and full-screen recording
- You can save the recordings in MP4
Cons:
- Difficult export settings
- Unable to export audio in the free version
- You need to convert the video using other programs if you want your recording in different video formats
Price: Free
14. Snagit
Snagit is another product by TechSmith (the developers of Camtasia). It’s a super easy tool to take screenshots and record screens.
You can save the captured video in MP4 and directly send the file through email. You can also upload files on different platforms and applications, including YouTube, Twitter, Slack, Google Drive, and more.
Features:
- Screen and audio recording
- Annotations
- Video trimming
- Webcam recording
- Cloud library
- Video conversion to GIFs
- Panoramic screen capturing
Compatibility: Windows 10/11 and Mac 11 or later
Pros:
- Simple user interface
- Fast video uploading to various platforms
Cons:
- Saved videos are only available in MP4 format
Price:$62.99 for a lifetime, including first-year maintenance (regular maintenance charges are $12.6 per year applicable after completing the first year)
15. Filmora
Filmora is an all-in-one program and is one of the top video editing tools cherished by all types of users – beginners and professionals. But what makes this software super cool for gamers and YouTubers is its screen recording option. With comprehensive features, you can record your gameplay and edit your screen recordings by using a wide range of features.
Features:
- Support 4K editing
- Noise removal
- Advanced text editor
- Color tuning
- Audio mixing
Compatibility: Windows 7/8/10/11 (64-bit) and macOS V10.1/V10.13/V10.14/V10.15/V11/V12
Pros:
- User-friendly interface
- Huge effects library
- Affordable perpetual licensing
- Wide range of features
- Support various video formats
- High-quality results
Cons:
- The free version includes a watermark
- You need to purchase the product to use some important features, such as keyframing
Price: $29.99 per month, $69.99 per year, and $79.99 for a perpetual
What to look for game screen recorder
There are many people who do not have any knowledge regarding game capture software. You must look for the following things before choosing a game screen recorder.
- The option of personalizing the hotkeys
- Number of built-in tools
- How to begin and pause recording
- Number of codes offered by it
- Recording time
- Editing features like cut and paste
- Custom-made Recording Resolution
- Adjustable video frames
In addition to this, some game recorders also affect your in-game fps (Frame per second). You should also check whether it is compatible with large-sized files or not. The quality of the video also depends upon the file size. The larger is file size, the higher is video quality. However, you can face problems while uploading huge-sized videos as online content distributors hardly support such files. So you must compress your video before sharing anywhere. There are also some recorders that provide a direct link to social networking sites. Thus you should consider these factors also before purchasing the game recording software.
You can easily run this recorder on your computer if it is updated and has 8GB of RAM. PC should also have two storage drives so as to install gaming software on one drive and record videos on another drive. It is also advisable to use computers than laptops for recording screen activities because laptops rarely have two storage drives.
You can easily run this recorder on your computer if it is updated and has 8GB of RAM. PC should also have two storage drives so as to install gaming software on one drive and record videos on another drive. It is also advisable to use computers than laptops for recording screen activities because laptops rarely have two storage drives.
FAQs
Q1. What software do YouTubers use to record gameplay?
Most gamers on YouTube use Open Broadcast System (OBS) and Bandicam to record their gameplays. However, there are a few more authentic screen recording tools for high-quality video recording, such as Filmora.
Using Filmora to record your gameplay will help you save the video in all major video formats. Moreover, the tool is also compatible with Mac and Windows operating systems.
Q2. How do I record my screen smoothly?
You should do a couple of things to avoid lagging while screen recording your gameplay. For example, do not use your built-in microphone to record your voice during screen recording. Instead, use an external microphone.
Only record what is important. Use high RAM and have a good graphics card. And most importantly, get screen recorders with at least 60fps.
Q3. Does screen recording decrease FPS?
Yes, it does affect your overall gaming performance. However, it depends on several factors. For instance, the fps won’t be affected much if you’re playing a less CPU-intensive game. The only way to sustain FPS is to have a high-quality screen recorder, such as OBS, Filmora, Bandicam, and Fraps.
Richard Bennett
Richard Bennett is a writer and a lover of all things video.
Follow @Richard Bennett
Also read:
- A Complete Guide to Registering with YouTube for 2024
- Crafting Content for Success How to Start Your Own YouTube Chanel
- Improve Engagement with Skillful Use of Jump Cuts
- Making Your Mark with YouTube’s Creative Commons Tools
- Boosting YouTube Rankings with Top SEO Practices (1-11) for 2024
- Explore the Leading YouTube-to-WebM Video Conversion Tools
- 2024 Approved Automatic Cycling of Videos on iPhone Ease
- Amplify Your Online Influence with These Best 5 YouTube Marketing Techniques for 2024
- Delightful Yuletide Cinema on YouTube Savor Nine Whole-Film Gems
- How to Stand Out YT Thumbnail Size and Engagement Strategies
- 2024 Approved Discovering & Perfecting Your Individual Style
- [Updated] A Compre Written by Daniel Kelley
- Exploring Differences in Vimeo & YouTube Services
- In 2024, Comprehensive List of 8 Prime YouTube-to-AVI Tools
- In 2024, Beating the Blues of Overly Green A Mac Video Editor's Handbook
- Maximize Views with These Top-Rated Keyword Analysis Tools
- Unveiling the 15 Most Enthralling Online Anime Spots
- Budding Buyers Guide Monetization Platforms for Novice Channels for 2024
- Nostalgia in Streaming Restoring YT Videos Removed
- Maximizing Your Channel's Earnings A Guide to Creating Impactful Trailers
- Pros' Insight Top 8 Online Repositories for Free Green Screen Scenery
- The Ultimate Audio Companion Top 5 Gaming Devices
- In 2024, Digital Content Arena Competing Titans - Vimeo, YouTube, DailyMotion
- Converting iMovie Edits for Online Exhibition - YouTube Edition for 2024
- [New] Driving Income Through YouTube Shorts Crucial Elements and Earnings Potential
- [Updated] 10 FREE YouTube Playlist Downloaders [Online/PC/Android/iOS]2
- [Updated] Everything You Need to Know About YouTube Shorts
- Cultivating Cash by Critiquing Consumer Commodities Online
- 2024 Approved Convert with Confidence Best Apps to Turn Spotify Into YouTube Channels
- In 2024, Essential 5 Gaming Earbuds for Video Creators
- [Updated] Easy Steps How to Master the Best of 9 Free YouTube Logomakers
- The Essential Guide to Professional Thumbnail Dimensions for YouTube
- Boost Engagement with Quick, Unique Coverage Options on Shorts
- In 2024, Beat Bazaar Curation of Superior DJ Video Samples for Download
- 2024 Approved Comparing the Costs and Advantages of Various YouTube Plans
- Becoming a Wise Trader Top Video Tutorials
- 2024 Approved Craft Your Story with Immersive YouTube Video Editing Tips
- [Updated] A Closer Look at YouTube's Payment System and Its Potential
- 2024 Approved Discover the Top 10 Historically Rich YouTube Tutorials
- In 2024, Discovering the Top 10 Most Watched YouTubers
- [New] Entryway Investments Cost-Effective Channels for Newbies
- 2024 Approved Co-Production Strategies for Online Content Proliferation
- Screenplay Grooves Best Background Tunes For YT Shorts
- How to Choose Best-Free YouTube Video Editor Apps on iOS
- How to Delete iCloud Account with or without Password from your iPhone 15 Plus/Windows/Mac
- Android Unlock Code Sim Unlock Your Nokia C12 Phone and Remove Locked Screen
- [New] In 2024, Ensuring Smooth Streaming How to Avoid Fb Live Glitches
- Top 4 Android System Repair Software for Samsung Galaxy F04 Bricked Devices | Dr.fone
- 2024 Approved Apex List of 10 Unmatched Recorders for Spotify Playbacks
- In 2024, Why Your WhatsApp Live Location is Not Updating and How to Fix on your Huawei Nova Y91 | Dr.fone
- 2024 Approved Easy Tutorial How to Record and Send Talking Emoji for iPhone
- [New] 2024 Approved Innovative Frameworks for Efficient IPTV Recording
- In 2024, 10 Free Location Spoofers to Fake GPS Location on your Poco X6 | Dr.fone
- Updated 2024 Approved Liven Up Your IGTV Playlist With Music Integration
- 2024 Approved Unlock 4K The Ultimate List of Free Video Converters
- Guide to Mirror Your Motorola Moto G24 to Other Android devices | Dr.fone
- In 2024, How to Unlock AT&T Apple iPhone 14 Pro Max with 3 Methods
- [Updated] Comprehensive iDevice Screenplay Techniques
- New Create a Face From Scratch Best Free Online Generators for 2024
- Title: "[New] Action-Packed Shoots Creating Dynamic Video Stories on YouTube"
- Author: Brian
- Created at : 2024-05-25 12:26:35
- Updated at : 2024-05-26 12:26:35
- Link: https://youtube-video-recordings.techidaily.com/new-action-packed-shoots-creating-dynamic-video-stories-on-youtube/
- License: This work is licensed under CC BY-NC-SA 4.0.
