
![[New] Achieve Perfect YouTube Broadcasts with Superior Webcams](https://www.lifewire.com/thmb/Cf134RZWfKPf0IK4nvJEe0UWK6M=/540x405/filters:no_upscale():max_bytes(150000):strip_icc()/buy-used-iphone-5717c2523df78c3fa23ddc70.jpg)
[New] Achieve Perfect YouTube Broadcasts with Superior Webcams
Achieve Perfect YouTube Broadcasts with Superior Webcams
Best Webcams for YouTube Livestreaming

Max Wales
Mar 27, 2024• Proven solutions
Broadcasting videos in real time on social media can be a great way to share some of the best moments of your life with your friends or to reach new customers for the products your company offers. YouTube is the world’s biggest video sharing platform that already allows its users to stream live videos through third-party applications such as Wirecast Play or OBS. Less than a month ago, YouTube has finally made possible live streaming directly from a computer’s webcam. The option is currently only available on Chrome browsers, but the company claims that more browsers will start offering this feature soon.
In this article, we are going to provide you with all the information you’ll need to create seamless live streams using a webcam and introduce you to some of the best webcam models in 2021.
Best webcams for YouTube Livestreaming in 2021
The quality of the video recording you intend to broadcast live is essential for the success of your live streams. Most built-in laptop webcams produce low-quality videos, and for that reason using an external webcam that captures high-resolution videos can help you create live streams that attract a lot of attention from YouTube’s community.
How to choose the right webcam for live streaming on YouTube?
Compatability: Even the best webcams on the market are completely useless if they are not compatible with your computer. Finding a webcam that works with a PC or a Mac shouldn’t be too difficult because both Windows and iOS platforms offer support for a wide range of models.
Video Resolution: YouTubers that just want to produce simple live streams don’t have to pay a lot of attention to the video resolution, because their videos don’t show too many details. Vloggers and gamers, on the other hand, should consider using webcams that produce 4K or HD footage since lower-priced options have a hard time realistically depicting colors. The quality of the video output a webcam produces can increase its price significantly, so there’s no reason investing in it if you don’t have the intention of utilizing its features to the fullest.
Sound Quality: Besides the video features, you should also look into the webcam’s audio options, because no one wants to watch a video with a terrible sound. Buying an external microphone is probably the best solution to this issue, but if you can’t afford one, then purchasing a webcam with decent audio recording features is the second best option.
Adjustable Location: Although the angle from which you are recording a stream may not seem important, poorly framed live streams are more likely to go unnoticed. A webcam that is easily adjustable can grant you the freedom of choosing your shots on every live stream you share online and it will enable you to control each and every detail in the video.
![]()

The All-in-One Screen Recorder & Video Editor
- Record desktop screen, voiceover, and webcam simultaneously
- Edit recorded clips quickly with a wide range of professional tools
- Built-in plentiful templates and effects
- Export to MP4, MOV, MKV, GIF and multiple formats
For Win 7 or later (64-bit)
For macOS 10.12 or later
 Secure Download
4 Best Webcams for YouTube Live streaming in 2021
There are thousands of different webcams you can use to record a live stream, but the models featured below are some of the very best currently available on the market.
1. Logitech 4K Pro webcam
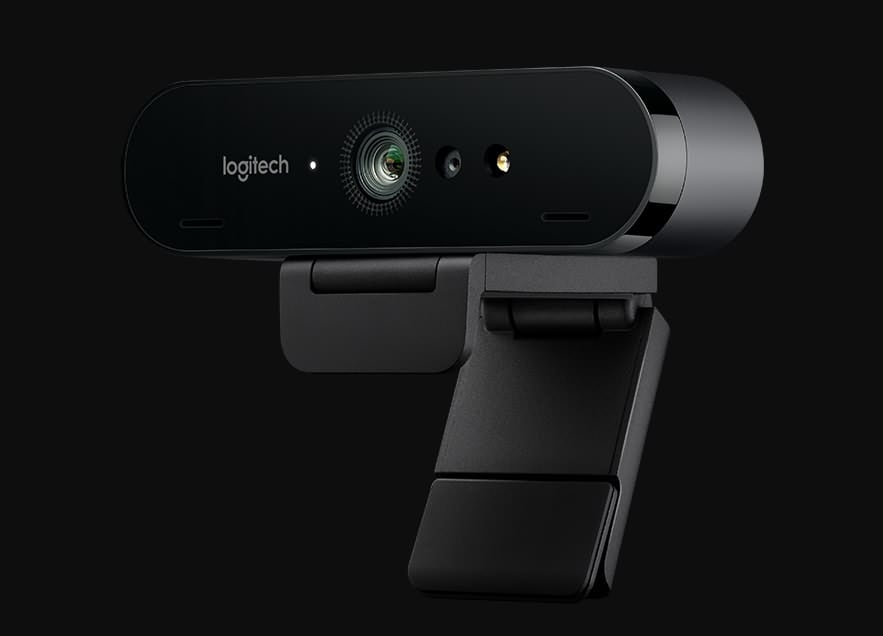
OS: Windows, macOS, Chrome OS
Price: $199
This is currently the only webcam on the market that supports 4K video recording, which makes it a forerunner of innovation and change. Besides the 4K option, the webcam’s features include a 5X digital zoom, infrared facial recognition and the amazing Right Light with HDR option that helps users record videos even under difficult light conditions.
The webcam can perform basic functions, like Skype calls, without the aid of third-party apps, which means that you can use it to create live streams on YouTube even if you don’t have a broadcasting software. The webcam’s stand is designed to fit almost any surface, so mounting the Logitech 4K Pro webcam to a laptop or monitor is quick and simple. The background replacement feature this Logitech’s webcam model offers can be quite useful if you want to use a different background in your YouTube live stream.
Pros:
- Produces incredibly clear and sharp images
- Superb background replacement options
- Expansive field of view
Cons:
- Poor audio recording options
- Internal software is basic
- A limited number of programs can capture 4K footage
2. Logitech HD Pro C920
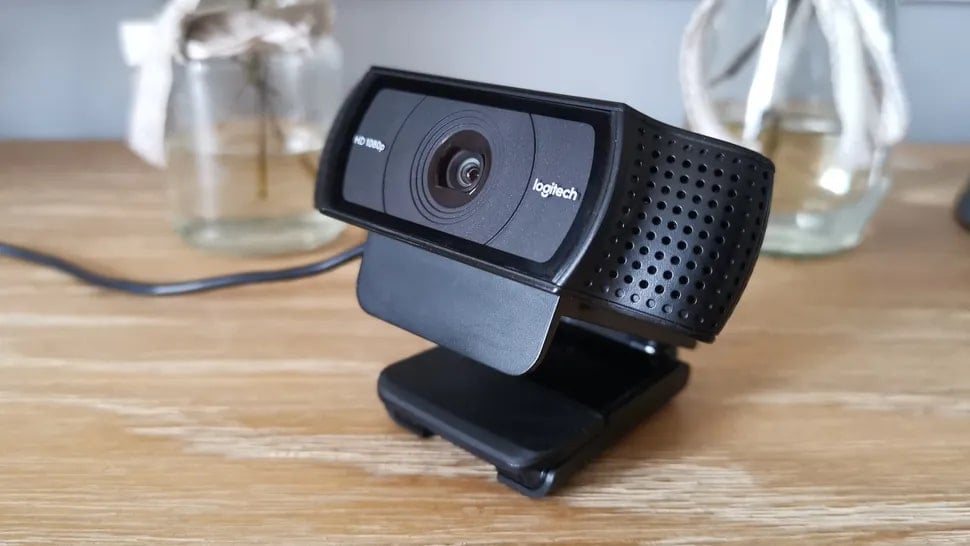
OS: macOS, Windows
Price: $99,99
Vloggers and all other YouTubers who care about video resolution will love using this webcam. Besides being capable of producing crystal clear videos in 1080p or HD 720 resolution at 30 or 60 fps, Logitech HD Pro C922 is also optimized for live streaming, which makes it a perfect webcam for live streaming on YouTube and all other video sharing platforms.
The webcam is equipped with two omnidirectional microphones that can record clear audio, but they pick up background noises easily, so using an external microphone for your live stream is still a much better option. The automatic low-light correction feature is designed to detect flickering lights in a video or increase visibility when streaming from a dimmed location. A foldable stand makes mounting the webcam easy, and you can also use a tripod if you want to record a live stream from an unusual perspective.
Pros:
- Produces 1080p and 720p resolution videos at 30 and 60 fps
- Allows users to integrate live images into their live streams
- Very easy to use
Cons
- Below average audio recording features
- Pricey
- Works only with OBS and XSplit broadcasting software
3. Logitech C922 Pro Stream webcam
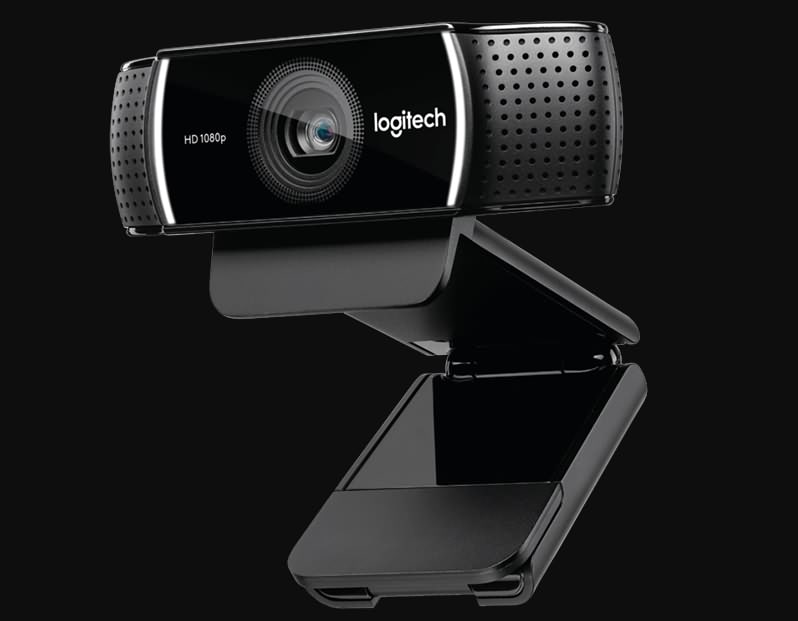
OS: Windows, macOS, Xbox, Chrome OS, Android 5.0 or above
Price: $99,99
Professional streamers, who want to capture impeccable live streams, should look no further. Logitech C922 Pro Stream webcam is the premier option for anyone who wants to be regarded as a professional streamer. This Logitech’s webcam lets you capture live streams in 1080p at 30 fps or 720p at 60 fps, while also providing the background removal feature for live streams on Twitch and YouTube. The video compression ensures that your live streams don’t take up too much of your network’s resources.
The webcam’s microphones enable users to record clear audio and reduce the need to use an external mic on every live stream you make. The Logitech C922 Pro Stream webcam delivers stunning performances in low light conditions, and it also has a 78-degree field of view lens. The webcam’s mounting options are somewhat limited, which can have a negative effect on the visual appeal of your YouTube live streams.
Pros:
- Offers a solid support for audio recording
- Delivers stunning picture quality
- Compatible with a wide range of operating systems
Cons:
- Limited mounting options
- Not plug-and-play friendly on Mac devices
- More expensive than webcams with similar capabilities
4. Microsoft LifeCam Studio
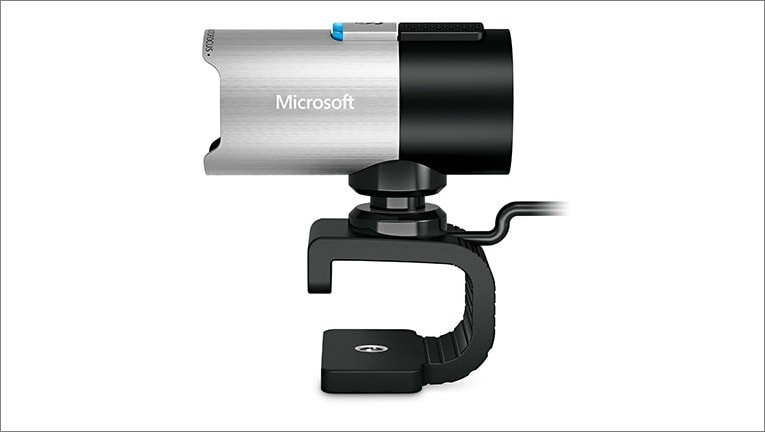
OS: Windows
Price: $99,95
The high-precision glass element lens this webcam features produces clear and sharp images. The Microsoft LifeCam Studio webcam has a 1080p HD sensor and it offers 720p HD video chat option. In addition to these remarkable features, the webcam is also equipped with TrueColor technology with face tracking that automatically adjusts the camera’s exposure to the environment and ensures that your live streams are always bright and colorful.
The Microsoft LifeCam Studio has a wide angle lens and an autofocus feature that guarantees that all live streams are always in focus. The webcam is Skype certified which means that it performs best when used with this software. Audio recording features exceed all expectations since the webcam can record natural audio recordings with no background noises. However, the limited compatibility narrows down the spectrum of its potential users.
Pros:
- Excellent video recording features.
- Crystal clear audio
- Great mounting options
Cons:
- Available only on Windows OS
- Demanding system requirements
- Not optimized for live streaming.
How to live stream from a webcam on YouTube in 2020
Although producing your own live stream on YouTube is easy, there are still a few steps you will have to take before you can start streaming from the webcam on your computer. If you don’t have a YouTube channel, you must make one, in order to be able to create your first live steam.
Step 1
Go to youtube.com/webcam , then complete the channel verification process and make sure that your channel doesn’t have any live streaming restrictions in the last 90 days. Head over to your channel, click on the Create a Video or Post icon in the upper right corner of the web page and select the GoLive option.
Afterward, you should give Chrome permission to access your webcam and the microphone you intend on using to record audio.
Step 2
Immediately after, the platform will ask you to give a title to your stream and it will let you choose whether or not you want the stream to be public or unlisted. It may be a good idea to create a few unlisted streams before you go public if you are still trying to figure out how this feature works.
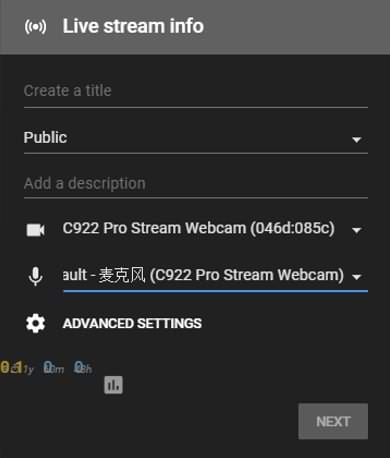
Proceed to select the camera and the microphone you intend to use to record the live stream, and you can also click on the Advanced Settings icon if you want to disable chat during the session or to specify that the live stream includes paid promotions.
Step 3
Once you’ve finished fine-tuning the advanced settings, you should click on the Next button. The platform will offer you to take or upload a thumbnail for your live stream.
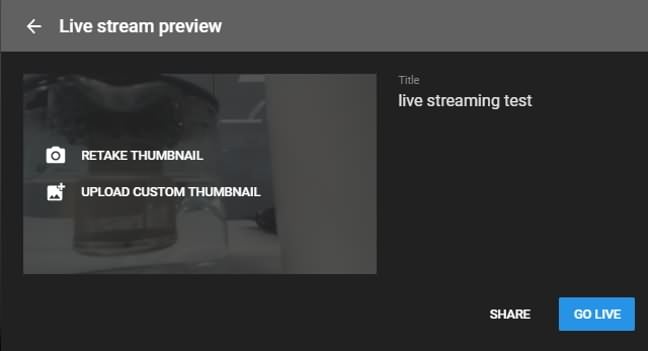
Clicking on the Share icon will enable you to share a live stream on social media, copy the link or access the embed code. Using the Share option is a great way to check if your live stream is functioning properly and to make sure that you are all set to begin the streaming session.
Step 4
Start your live stream by hitting the Go Live button. During the stream, you’ll be able to see and reply to comments people posted, the duration of the stream as well as the number of people following your live stream. If you haven’t shared your live stream before you started a new session you can do so while you are live. Click on the End Stream button to finish your webcam live stream on YouTube.
Step 5
After each live streaming session, YouTube will display some important statistics like the total and average watch time for the particular stream, the number of new subscribers or the number of playbacks of your live stream. The stream will be available for review in YouTube’s Creator Studio in the Events menu.
Max Wales
Max Wales is a writer and a lover of all things video.
Follow @Max Wales
Max Wales
Mar 27, 2024• Proven solutions
Broadcasting videos in real time on social media can be a great way to share some of the best moments of your life with your friends or to reach new customers for the products your company offers. YouTube is the world’s biggest video sharing platform that already allows its users to stream live videos through third-party applications such as Wirecast Play or OBS. Less than a month ago, YouTube has finally made possible live streaming directly from a computer’s webcam. The option is currently only available on Chrome browsers, but the company claims that more browsers will start offering this feature soon.
In this article, we are going to provide you with all the information you’ll need to create seamless live streams using a webcam and introduce you to some of the best webcam models in 2021.
Best webcams for YouTube Livestreaming in 2021
The quality of the video recording you intend to broadcast live is essential for the success of your live streams. Most built-in laptop webcams produce low-quality videos, and for that reason using an external webcam that captures high-resolution videos can help you create live streams that attract a lot of attention from YouTube’s community.
How to choose the right webcam for live streaming on YouTube?
Compatability: Even the best webcams on the market are completely useless if they are not compatible with your computer. Finding a webcam that works with a PC or a Mac shouldn’t be too difficult because both Windows and iOS platforms offer support for a wide range of models.
Video Resolution: YouTubers that just want to produce simple live streams don’t have to pay a lot of attention to the video resolution, because their videos don’t show too many details. Vloggers and gamers, on the other hand, should consider using webcams that produce 4K or HD footage since lower-priced options have a hard time realistically depicting colors. The quality of the video output a webcam produces can increase its price significantly, so there’s no reason investing in it if you don’t have the intention of utilizing its features to the fullest.
Sound Quality: Besides the video features, you should also look into the webcam’s audio options, because no one wants to watch a video with a terrible sound. Buying an external microphone is probably the best solution to this issue, but if you can’t afford one, then purchasing a webcam with decent audio recording features is the second best option.
Adjustable Location: Although the angle from which you are recording a stream may not seem important, poorly framed live streams are more likely to go unnoticed. A webcam that is easily adjustable can grant you the freedom of choosing your shots on every live stream you share online and it will enable you to control each and every detail in the video.
![]()
The All-in-One Screen Recorder & Video Editor
- Record desktop screen, voiceover, and webcam simultaneously
- Edit recorded clips quickly with a wide range of professional tools
- Built-in plentiful templates and effects
- Export to MP4, MOV, MKV, GIF and multiple formats
For Win 7 or later (64-bit)
For macOS 10.12 or later
Secure Download
4 Best Webcams for YouTube Live streaming in 2021
There are thousands of different webcams you can use to record a live stream, but the models featured below are some of the very best currently available on the market.
1. Logitech 4K Pro webcam
OS: Windows, macOS, Chrome OS
Price: $199
This is currently the only webcam on the market that supports 4K video recording, which makes it a forerunner of innovation and change. Besides the 4K option, the webcam’s features include a 5X digital zoom, infrared facial recognition and the amazing Right Light with HDR option that helps users record videos even under difficult light conditions.
The webcam can perform basic functions, like Skype calls, without the aid of third-party apps, which means that you can use it to create live streams on YouTube even if you don’t have a broadcasting software. The webcam’s stand is designed to fit almost any surface, so mounting the Logitech 4K Pro webcam to a laptop or monitor is quick and simple. The background replacement feature this Logitech’s webcam model offers can be quite useful if you want to use a different background in your YouTube live stream.
Pros:
- Produces incredibly clear and sharp images
- Superb background replacement options
- Expansive field of view
Cons:
- Poor audio recording options
- Internal software is basic
- A limited number of programs can capture 4K footage
2. Logitech HD Pro C920
OS: macOS, Windows
Price: $99,99
Vloggers and all other YouTubers who care about video resolution will love using this webcam. Besides being capable of producing crystal clear videos in 1080p or HD 720 resolution at 30 or 60 fps, Logitech HD Pro C922 is also optimized for live streaming, which makes it a perfect webcam for live streaming on YouTube and all other video sharing platforms.
The webcam is equipped with two omnidirectional microphones that can record clear audio, but they pick up background noises easily, so using an external microphone for your live stream is still a much better option. The automatic low-light correction feature is designed to detect flickering lights in a video or increase visibility when streaming from a dimmed location. A foldable stand makes mounting the webcam easy, and you can also use a tripod if you want to record a live stream from an unusual perspective.
Pros:
- Produces 1080p and 720p resolution videos at 30 and 60 fps
- Allows users to integrate live images into their live streams
- Very easy to use
Cons
- Below average audio recording features
- Pricey
- Works only with OBS and XSplit broadcasting software
3. Logitech C922 Pro Stream webcam
OS: Windows, macOS, Xbox, Chrome OS, Android 5.0 or above
Price: $99,99
Professional streamers, who want to capture impeccable live streams, should look no further. Logitech C922 Pro Stream webcam is the premier option for anyone who wants to be regarded as a professional streamer. This Logitech’s webcam lets you capture live streams in 1080p at 30 fps or 720p at 60 fps, while also providing the background removal feature for live streams on Twitch and YouTube. The video compression ensures that your live streams don’t take up too much of your network’s resources.
The webcam’s microphones enable users to record clear audio and reduce the need to use an external mic on every live stream you make. The Logitech C922 Pro Stream webcam delivers stunning performances in low light conditions, and it also has a 78-degree field of view lens. The webcam’s mounting options are somewhat limited, which can have a negative effect on the visual appeal of your YouTube live streams.
Pros:
- Offers a solid support for audio recording
- Delivers stunning picture quality
- Compatible with a wide range of operating systems
Cons:
- Limited mounting options
- Not plug-and-play friendly on Mac devices
- More expensive than webcams with similar capabilities
4. Microsoft LifeCam Studio
OS: Windows
Price: $99,95
The high-precision glass element lens this webcam features produces clear and sharp images. The Microsoft LifeCam Studio webcam has a 1080p HD sensor and it offers 720p HD video chat option. In addition to these remarkable features, the webcam is also equipped with TrueColor technology with face tracking that automatically adjusts the camera’s exposure to the environment and ensures that your live streams are always bright and colorful.
The Microsoft LifeCam Studio has a wide angle lens and an autofocus feature that guarantees that all live streams are always in focus. The webcam is Skype certified which means that it performs best when used with this software. Audio recording features exceed all expectations since the webcam can record natural audio recordings with no background noises. However, the limited compatibility narrows down the spectrum of its potential users.
Pros:
- Excellent video recording features.
- Crystal clear audio
- Great mounting options
Cons:
- Available only on Windows OS
- Demanding system requirements
- Not optimized for live streaming.
How to live stream from a webcam on YouTube in 2020
Although producing your own live stream on YouTube is easy, there are still a few steps you will have to take before you can start streaming from the webcam on your computer. If you don’t have a YouTube channel, you must make one, in order to be able to create your first live steam.
Step 1
Go to youtube.com/webcam , then complete the channel verification process and make sure that your channel doesn’t have any live streaming restrictions in the last 90 days. Head over to your channel, click on the Create a Video or Post icon in the upper right corner of the web page and select the GoLive option.
Afterward, you should give Chrome permission to access your webcam and the microphone you intend on using to record audio.
Step 2
Immediately after, the platform will ask you to give a title to your stream and it will let you choose whether or not you want the stream to be public or unlisted. It may be a good idea to create a few unlisted streams before you go public if you are still trying to figure out how this feature works.
Proceed to select the camera and the microphone you intend to use to record the live stream, and you can also click on the Advanced Settings icon if you want to disable chat during the session or to specify that the live stream includes paid promotions.
Step 3
Once you’ve finished fine-tuning the advanced settings, you should click on the Next button. The platform will offer you to take or upload a thumbnail for your live stream.
Clicking on the Share icon will enable you to share a live stream on social media, copy the link or access the embed code. Using the Share option is a great way to check if your live stream is functioning properly and to make sure that you are all set to begin the streaming session.
Step 4
Start your live stream by hitting the Go Live button. During the stream, you’ll be able to see and reply to comments people posted, the duration of the stream as well as the number of people following your live stream. If you haven’t shared your live stream before you started a new session you can do so while you are live. Click on the End Stream button to finish your webcam live stream on YouTube.
Step 5
After each live streaming session, YouTube will display some important statistics like the total and average watch time for the particular stream, the number of new subscribers or the number of playbacks of your live stream. The stream will be available for review in YouTube’s Creator Studio in the Events menu.
Max Wales
Max Wales is a writer and a lover of all things video.
Follow @Max Wales
Swaying Symbols: Dynamic Animation for Text Effects
How to Create Animated Bouncing Text

Liza Brown
Mar 27, 2024• Proven solutions
Earlier, you learned how to have a bounce text effect in Adobe After Effects . However, because AE is a complex application and has a steep learning curve, this section explains the two alternative ways to get the same effect on your existing video footage.
Method 1: How to Create Bouncing Text in Filmora Video Editor?
When talking about Wondershare Filmora , the application is populated with several presets for texts and titles, animations, effects, filters, and much more.
These pre-built templates not only make your task easier, they also save your decent amount of time that you would spend while working with After Effects or any other similar app that requires you to build things from scratch.
You can follow the instructions given below to add animated bounce text to any of your video footages with Filmora:
Step 1: Add a Footage to Timeline
Launch Wondershare Filmora on your Windows or Mac PC. By default, the aspect ratio of the project is set to 16:9. Click anywhere inside the Media window at the upper-left section, and select and import footage you want to add bounce text to.
Step 2: Insert Text and Add Bounce Effect
Click Titles from the standard toolbar at the top, and click and drag your preferred title template from the Library to the timeline. In case you don’t want any specific animation or style on the title, you can use the default title.
In the timeline, double-click the title you just added, use the upper-left section to edit the text, go to the Animation tab from the left pane, scroll down the list, and double-click the Up Down 1 or Up Down 2 preset to apply the bounce effect to the credits. Click OK to save the changes and to get back to the main window.

Step 3: Add Shake Filters
Go to Effects from the standard toolbar, expand the Filters category from the left pane, and click Shake. From the Library window, click and drag your preferred shake filter to the timeline. Here, I will choose Mild.

You can customize the default effect by double-clicking the shake filter in the timeline, using the sliders in the upper-left area of the interface to make necessary adjustments, and then clicking OK to save the changes and to get back to the previous interface.

Step 4: Export the Final Output
Click EXPORT from the top of the interface, go to the Local tab in the Export box, choose your preferred output format from the list in the left, make required customizations from the right pane, and click EXPORT from the bottom-right corner to export the video.

Now, you can add the bouncing text video and the background video to the timeline, and then place the bouncing text video above the background video track.
Double click the text track, go to the Chroma Key effect, select the Color Picker tool, and click anywhere in the Preview window to get things right. Finally, export the entire project to your preferred output format as explained in Step 4.
As explained before, Wondeshare Filmora makes the entire process of creating and adding bounce text effect pretty simple. With all the pre-build templates, and the versatility of the options that can be used to customize those presets, you can come up with the effects that are usually obtained when you start generating them from the scratch.


Method 2: Generate Animated Bouncing Texts Online
If you don’t want any heavy and resource-intensive app on your PC merely for some special text effects, you can try any of the online solutions instead. The benefit of using any such web app is that all the processing is done on site’s server, and it is only a web browser and an Internet connection that you need to have at your side.
Some most trusted websites to generate bounce text are listed below:
1. ENGFTO
Website: https://engfto.com/index/create%5Fanimated%5Fbouncing%5Ftext/0-26

You can follow the instructions given below to use Engfto to generate bouncing text for your footages:
Step 1: Get to the Animated Bouncing Text Page
Launch your favorite web browser, and go to the link given above to get to the Engfto’s animated bouncing text page.
Step 2: Customize Text and Preferences
Modify the values in the fields under the SIZE AREA and TEXT sections to customize the text area, the text itself, its size, and font. Next, adjust the values in the fields under the EFFECT PARAMETERS section to get the required bounce effect. Also, use the fields under the BACKGROUND section to either change the background color, or pick a background image from your PC.
Step 3: Obtain the Animated Text
Click the SAVE GIF ANIMATION button from the lower section of the page to download the animated text to your PC.
2. Loading.io
The instructions given below explain how to use Loading.io to get animated bounce text effect for your footages:
Step 1: Get to the Loading.io Webpage
Launch your favorite web browser and go to https://loading.io/animation/text/ .
Step 2: Customize the Text and Choose Animation Effect

Use the options available on the webpage to type your text, and change its font, color, background, transparency level etc. Select Bounce (or any of its variants) from the Animation drop-down list, and adjust the speed using the Speed slider.
Step 3: Obtain the Text
Click your preferred option from next to the Download As section to download the animated text to your PC.
Note: Regardless of the web solution you choose to generate and obtain animated bounce text, you will still need a post-production tool to add the downloaded text to your footage.
Conclusion
Generating bounce text effect is much simpler when you use Wondershare Filmora or any of the online solutions as explained in Method 2. While the former gives you more flexibility when it comes to customizations, the latter doesn’t require any app to be installed on your PC. In addition, many times the web apps offer their services for free, and therefore they are preferred by the novice users who are not much into post-production processes.
Liza Brown
Liza Brown is a writer and a lover of all things video.
Follow @Liza Brown
Liza Brown
Mar 27, 2024• Proven solutions
Earlier, you learned how to have a bounce text effect in Adobe After Effects . However, because AE is a complex application and has a steep learning curve, this section explains the two alternative ways to get the same effect on your existing video footage.
Method 1: How to Create Bouncing Text in Filmora Video Editor?
When talking about Wondershare Filmora , the application is populated with several presets for texts and titles, animations, effects, filters, and much more.
These pre-built templates not only make your task easier, they also save your decent amount of time that you would spend while working with After Effects or any other similar app that requires you to build things from scratch.
You can follow the instructions given below to add animated bounce text to any of your video footages with Filmora:
Step 1: Add a Footage to Timeline
Launch Wondershare Filmora on your Windows or Mac PC. By default, the aspect ratio of the project is set to 16:9. Click anywhere inside the Media window at the upper-left section, and select and import footage you want to add bounce text to.
Step 2: Insert Text and Add Bounce Effect
Click Titles from the standard toolbar at the top, and click and drag your preferred title template from the Library to the timeline. In case you don’t want any specific animation or style on the title, you can use the default title.
In the timeline, double-click the title you just added, use the upper-left section to edit the text, go to the Animation tab from the left pane, scroll down the list, and double-click the Up Down 1 or Up Down 2 preset to apply the bounce effect to the credits. Click OK to save the changes and to get back to the main window.
Step 3: Add Shake Filters
Go to Effects from the standard toolbar, expand the Filters category from the left pane, and click Shake. From the Library window, click and drag your preferred shake filter to the timeline. Here, I will choose Mild.
You can customize the default effect by double-clicking the shake filter in the timeline, using the sliders in the upper-left area of the interface to make necessary adjustments, and then clicking OK to save the changes and to get back to the previous interface.
Step 4: Export the Final Output
Click EXPORT from the top of the interface, go to the Local tab in the Export box, choose your preferred output format from the list in the left, make required customizations from the right pane, and click EXPORT from the bottom-right corner to export the video.
Now, you can add the bouncing text video and the background video to the timeline, and then place the bouncing text video above the background video track.
Double click the text track, go to the Chroma Key effect, select the Color Picker tool, and click anywhere in the Preview window to get things right. Finally, export the entire project to your preferred output format as explained in Step 4.
As explained before, Wondeshare Filmora makes the entire process of creating and adding bounce text effect pretty simple. With all the pre-build templates, and the versatility of the options that can be used to customize those presets, you can come up with the effects that are usually obtained when you start generating them from the scratch.
Method 2: Generate Animated Bouncing Texts Online
If you don’t want any heavy and resource-intensive app on your PC merely for some special text effects, you can try any of the online solutions instead. The benefit of using any such web app is that all the processing is done on site’s server, and it is only a web browser and an Internet connection that you need to have at your side.
Some most trusted websites to generate bounce text are listed below:
1. ENGFTO
Website: https://engfto.com/index/create%5Fanimated%5Fbouncing%5Ftext/0-26
You can follow the instructions given below to use Engfto to generate bouncing text for your footages:
Step 1: Get to the Animated Bouncing Text Page
Launch your favorite web browser, and go to the link given above to get to the Engfto’s animated bouncing text page.
Step 2: Customize Text and Preferences
Modify the values in the fields under the SIZE AREA and TEXT sections to customize the text area, the text itself, its size, and font. Next, adjust the values in the fields under the EFFECT PARAMETERS section to get the required bounce effect. Also, use the fields under the BACKGROUND section to either change the background color, or pick a background image from your PC.
Step 3: Obtain the Animated Text
Click the SAVE GIF ANIMATION button from the lower section of the page to download the animated text to your PC.
2. Loading.io
The instructions given below explain how to use Loading.io to get animated bounce text effect for your footages:
Step 1: Get to the Loading.io Webpage
Launch your favorite web browser and go to https://loading.io/animation/text/ .
Step 2: Customize the Text and Choose Animation Effect
Use the options available on the webpage to type your text, and change its font, color, background, transparency level etc. Select Bounce (or any of its variants) from the Animation drop-down list, and adjust the speed using the Speed slider.
Step 3: Obtain the Text
Click your preferred option from next to the Download As section to download the animated text to your PC.
Note: Regardless of the web solution you choose to generate and obtain animated bounce text, you will still need a post-production tool to add the downloaded text to your footage.
Conclusion
Generating bounce text effect is much simpler when you use Wondershare Filmora or any of the online solutions as explained in Method 2. While the former gives you more flexibility when it comes to customizations, the latter doesn’t require any app to be installed on your PC. In addition, many times the web apps offer their services for free, and therefore they are preferred by the novice users who are not much into post-production processes.
Liza Brown
Liza Brown is a writer and a lover of all things video.
Follow @Liza Brown
Also read:
- 2024 Approved Crafting Winning Collaboration Plans on YouTube
- Discover 8 Trustworthy Online Content Promoters for 2024
- FIFA Footage Analysis Trendy Video Patterns
- [New] Efficacy of Monetized YouTube Engagement for Content Creators?
- Frequent Monetization Is It Real on YouTube?
- [Updated] Dance Dictates Selecting Perfect Audio-Visuals
- Top 8 Validated Youtube Growth Solutions
- The Art of Captivating Viewers An Expert's Guide to YouTube Banners
- The Future of Content Creation Profitability on YouTube
- In 2024, Elevate Your Online Presence with Captivating Haul Videos
- In 2024, Discovering Your Dream Makeup Routine with YouTube's Leaders
- Thumbnail & Banner Strategies for Online Success
- Elevating Gameplay Streaming Mastery for YouTubers for 2024
- In 2024, Eco-Friendly Ad Strategy with Screen Tools
- Beam Your Content Upward Perfecting YouTube SEO Techniques for 2024
- Achieve the Perfect Look YouTube's Guide to Video Aspect Ratios
- 2024 Approved Building Your First Channel Essential Video Gear List
- Eco-Friendly Tactics for YouTube Call Conversions
- [New] 2024'S Blueprint for Effortless YouTube Video Posting on FB
- Is Investing in a Monthly YouTube Premium Worthwhile?
- Ignite Your Creativity Making Dynamic Splitscreen Videos
- Channel Expansion Sharing Your Show Across 30 Platforms for 2024
- [Updated] 50+ Youtube Channel Names for Vloggers [100%% New]
- Automate Playlist Retrieval From YouTube Directly
- 2024 Approved 3 Unconventional Tactics for Subscriber Growth
- 2024 Approved Charting the Course to YouTube Success – Top 5 Strategies Inside
- [New] 5 Leading Tools for Crafting Superior Video Titles and Tags
- In 2024, 10 Top YouTube Music Collectives Unveiled
- [New] Downloading the Latest Hits Top YouTube Playlist Savers for PC
- [Updated] Arena of Achievements A Million Gaming Milestones
- 2024 Approved Essential Microphones Tailored to Channel Genres
- [New] Best Binge-Watch Top 10 Free Films Online
- [Updated] Enhance Your Online Presence with These 50 Complimentary Banners
- [New] Academic Allies Premier Educators on YouTube
- Efficient Tricks to Scramble YouTube Playlists (PC/Phone/TV) for 2024
- Crafting Content Step by Step Guide to YouTube Video Editing
- 2024 Approved How to Embed A YouTube Playlist On a Website
- In 2024, Decoding YouTube's Clandestine Content with Orderliness
- How to Change/Add Location Filters on Snapchat For your Tecno Pova 5 Pro | Dr.fone
- [New] Night of the Living Dead Games An Epic Selection
- Updated 2024 Approved Top 10 Video Editing Apps for Android Devices
- How to Detect and Remove Spyware on OnePlus 12R? | Dr.fone
- [New] Boost TikTok Bio Presence Perfectly Pairing It with Linktree
- In 2024, Navigating Video Editing The Essentials of Cropping and Exporting to Instagram
- In 2024, Top 5 Car Locator Apps for Poco X6 Pro | Dr.fone
- [Updated] In 2024, Unveiling the Secrets to Flawless Lenovo Screen Recordings
- [Updated] 2024 Approved Beyond Likes & Shares The Concealed Factors of Viewers
- [New] Discovering The Quintessential 25 Influence Kings and Queens for 2024
- In 2024, The Most Reliable Sites to Stream Legal Background Music Collections
- How To Fix OEM Unlock Missing on Honor 90?
- In 2024, How to Cast Oppo A79 5G Screen to PC Using WiFi | Dr.fone
- [Updated] In 2024, The Heart of TikTok Animation, Dance, and Viral Humor
- IPhone's Finest Photo Tools for Objection Erasure
- How to Unlock Infinix Smart 8 HD Phone Password Without Factory Reset?
- In 2024, How to Delete iCloud Account From iPhone 11 without Password?
- Synchronized Screen Size Alteration Online
- New In 2024, The Ultimate Guide to Video Brightening Top Apps for Android and iOS
- How to Find iSpoofer Pro Activation Key On Tecno Phantom V Flip? | Dr.fone
- In 2024, Does find my friends work on Apple iPhone SE (2022) | Dr.fone
- [Updated] Top Picks Secure & Legal TikTok Follower Sources (Safe)
- Getting the Pokemon Go GPS Signal Not Found 11 Error in Lava Yuva 2 Pro | Dr.fone
- In 2024, Will Pokémon Go Ban the Account if You Use PGSharp On Vivo V29e | Dr.fone
- Fixing Foneazy MockGo Not Working On Honor Magic Vs 2 | Dr.fone
- 10 Top Free Voice Recorder for PC
- In 2024, 4 Ways to Transfer Music from Oppo A1 5G to iPhone | Dr.fone
- Title: [New] Achieve Perfect YouTube Broadcasts with Superior Webcams
- Author: Brian
- Created at : 2024-05-25 12:26:24
- Updated at : 2024-05-26 12:26:24
- Link: https://youtube-video-recordings.techidaily.com/new-achieve-perfect-youtube-broadcasts-with-superior-webcams/
- License: This work is licensed under CC BY-NC-SA 4.0.
