![[New] A Beginner's Guide to Making Attractive Video Thumbnails for Social Media Platforms](https://thmb.techidaily.com/ed24203618acc19422dc1e656e53cdd94b542178679b34754816329310d98db4.jpg)
[New] A Beginner's Guide to Making Attractive Video Thumbnails for Social Media Platforms
A Beginner’s Guide to Making Attractive Video Thumbnails for Social Media Platforms
How to Make Video Thumbnails for YouTube

Richard Bennett
Oct 26, 2023• Proven solutions
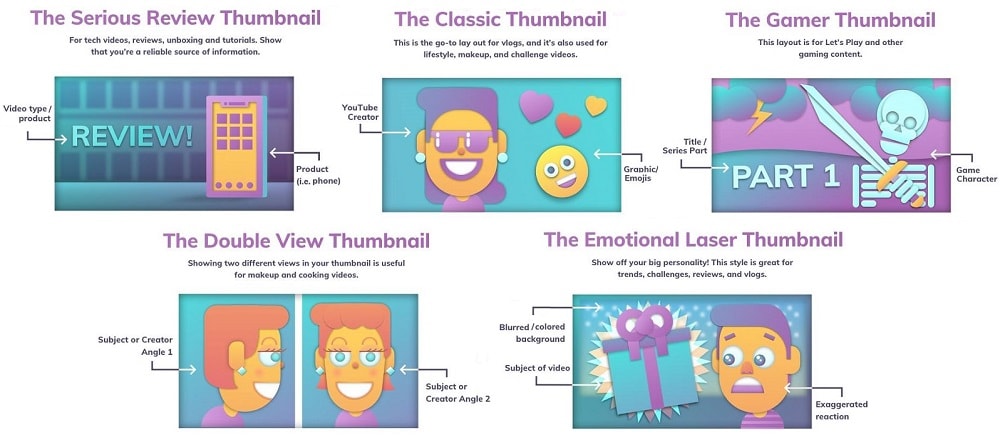
The video thumbnails you use for YouTube are vital to getting views and subscribers. There are a lot of things that go into making people watch your videos, but your video thumbnail might be the most important factor.
Here are 5 easy tips for creating thumbnails that get views.
- Have a Consistent Layout
- Use Your Face
- Use Graphics/Emojis That is On Topic
- Make Your Text Huge
- Keep It Clutter-Free!
Contest now closed.
Edit Your Videos Before Creating Video Thumbnails


1. Have a Consistent Layout
Your thumbnails all must look like part of the same set. You want viewers to recognize your videos like yours, and they are more likely to do that if you build up a standard layout that they can start associating with you.
An example of a standard layout could be you in the middle of the screen wearing an expression that matches the theme of your video, with your title written underneath your face. Every individual thumbnail would still be different, but you and the text would always be in the same spot.
2. Use Your Face
People feel automatically connected and drawn into images that make eye contact. This makes thumbnails which feature faces more click-able than thumbnails which don’t, in most genres (i.e. if you make food videos then this may not apply – featuring the food might be more important than featuring your face). Check out more tips like this here .
Also, if somebody recognizes you in your thumbnail from a previous video of yours, that will go a long way towards making them click.
3. Use Graphics/Emojis that are On Topic
Anybody can take a screenshot of themselves in their video and use it as a thumbnail. To make your thumbnails look polished, consider using small images (like emojis or hearts) to stand out. This will add color and personality to your thumbnail.
Make sure the images you choose are relevant to the topic of your video.
4. Make Your Text Huge
If you use text in your thumbnail (you don’t have to) then it should be to add context. For example, if the main image is just you smiling then you might need some text to let viewers know the video is a makeup tutorial.
Thumbnails might look large while you’re putting them together in your image editor, but when they’re displayed on YouTube they’re a lot smaller. That goes double if a viewer is watching on their phone. So, make sure that any text you use is large enough that it can be read easily on small screens.
5. Keep it Clutter-Free
It’s great to add text and emojis to your thumbnails, but you do need to be careful not to add too much. You never want your thumbnails to look cluttered. Viewers should be able to glance at your thumbnails and know exactly what kind of video to expect – that’s difficult to do if there’s too much to process.
A good rule for text is to use only 1-3 words. That way they won’t clutter your screen, and you can make them large enough to read on small-screened devices.
For even more tips on making great YouTube thumbnails, click here .
Use these tips to make video thumbnails for YouTube, and tell us what kind of results you get!
Richard Bennett
Richard Bennett is a writer and a lover of all things video.
Follow @Richard Bennett
Richard Bennett
Oct 26, 2023• Proven solutions
The video thumbnails you use for YouTube are vital to getting views and subscribers. There are a lot of things that go into making people watch your videos, but your video thumbnail might be the most important factor.
Here are 5 easy tips for creating thumbnails that get views.
- Have a Consistent Layout
- Use Your Face
- Use Graphics/Emojis That is On Topic
- Make Your Text Huge
- Keep It Clutter-Free!
Contest now closed.
Edit Your Videos Before Creating Video Thumbnails
1. Have a Consistent Layout
Your thumbnails all must look like part of the same set. You want viewers to recognize your videos like yours, and they are more likely to do that if you build up a standard layout that they can start associating with you.
An example of a standard layout could be you in the middle of the screen wearing an expression that matches the theme of your video, with your title written underneath your face. Every individual thumbnail would still be different, but you and the text would always be in the same spot.
2. Use Your Face
People feel automatically connected and drawn into images that make eye contact. This makes thumbnails which feature faces more click-able than thumbnails which don’t, in most genres (i.e. if you make food videos then this may not apply – featuring the food might be more important than featuring your face). Check out more tips like this here .
Also, if somebody recognizes you in your thumbnail from a previous video of yours, that will go a long way towards making them click.
3. Use Graphics/Emojis that are On Topic
Anybody can take a screenshot of themselves in their video and use it as a thumbnail. To make your thumbnails look polished, consider using small images (like emojis or hearts) to stand out. This will add color and personality to your thumbnail.
Make sure the images you choose are relevant to the topic of your video.
4. Make Your Text Huge
If you use text in your thumbnail (you don’t have to) then it should be to add context. For example, if the main image is just you smiling then you might need some text to let viewers know the video is a makeup tutorial.
Thumbnails might look large while you’re putting them together in your image editor, but when they’re displayed on YouTube they’re a lot smaller. That goes double if a viewer is watching on their phone. So, make sure that any text you use is large enough that it can be read easily on small screens.
5. Keep it Clutter-Free
It’s great to add text and emojis to your thumbnails, but you do need to be careful not to add too much. You never want your thumbnails to look cluttered. Viewers should be able to glance at your thumbnails and know exactly what kind of video to expect – that’s difficult to do if there’s too much to process.
A good rule for text is to use only 1-3 words. That way they won’t clutter your screen, and you can make them large enough to read on small-screened devices.
For even more tips on making great YouTube thumbnails, click here .
Use these tips to make video thumbnails for YouTube, and tell us what kind of results you get!

Richard Bennett
Richard Bennett is a writer and a lover of all things video.
Follow @Richard Bennett
Richard Bennett
Oct 26, 2023• Proven solutions
The video thumbnails you use for YouTube are vital to getting views and subscribers. There are a lot of things that go into making people watch your videos, but your video thumbnail might be the most important factor.
Here are 5 easy tips for creating thumbnails that get views.
- Have a Consistent Layout
- Use Your Face
- Use Graphics/Emojis That is On Topic
- Make Your Text Huge
- Keep It Clutter-Free!
Contest now closed.
Edit Your Videos Before Creating Video Thumbnails
1. Have a Consistent Layout
Your thumbnails all must look like part of the same set. You want viewers to recognize your videos like yours, and they are more likely to do that if you build up a standard layout that they can start associating with you.
An example of a standard layout could be you in the middle of the screen wearing an expression that matches the theme of your video, with your title written underneath your face. Every individual thumbnail would still be different, but you and the text would always be in the same spot.
2. Use Your Face
People feel automatically connected and drawn into images that make eye contact. This makes thumbnails which feature faces more click-able than thumbnails which don’t, in most genres (i.e. if you make food videos then this may not apply – featuring the food might be more important than featuring your face). Check out more tips like this here .
Also, if somebody recognizes you in your thumbnail from a previous video of yours, that will go a long way towards making them click.
3. Use Graphics/Emojis that are On Topic
Anybody can take a screenshot of themselves in their video and use it as a thumbnail. To make your thumbnails look polished, consider using small images (like emojis or hearts) to stand out. This will add color and personality to your thumbnail.
Make sure the images you choose are relevant to the topic of your video.
4. Make Your Text Huge
If you use text in your thumbnail (you don’t have to) then it should be to add context. For example, if the main image is just you smiling then you might need some text to let viewers know the video is a makeup tutorial.
Thumbnails might look large while you’re putting them together in your image editor, but when they’re displayed on YouTube they’re a lot smaller. That goes double if a viewer is watching on their phone. So, make sure that any text you use is large enough that it can be read easily on small screens.
5. Keep it Clutter-Free
It’s great to add text and emojis to your thumbnails, but you do need to be careful not to add too much. You never want your thumbnails to look cluttered. Viewers should be able to glance at your thumbnails and know exactly what kind of video to expect – that’s difficult to do if there’s too much to process.
A good rule for text is to use only 1-3 words. That way they won’t clutter your screen, and you can make them large enough to read on small-screened devices.
For even more tips on making great YouTube thumbnails, click here .
Use these tips to make video thumbnails for YouTube, and tell us what kind of results you get!
Richard Bennett
Richard Bennett is a writer and a lover of all things video.
Follow @Richard Bennett
Angular Adjustments on YouTube Videos - The Ultimate 2023 Guide
How to Rotate YouTube Videos by Any Angle
Richard Bennett
Mar 27, 2024• Proven solutions
YouTube is compatible to all devices such as smartphones, tablets and computers. However, when the screen is too small, so does the video, which makes the watching experience full of inconvenience.
Sometimes, you may need to rotate the video left/right 90 degrees or 180 degrees. To rotate the YouTube video when you watching it, you can move your devices in order for you to get the perfect angle and make your watching fun and smooth.
Yet, did you know that you could possibly rotate YouTube videos either downloaded or before uploading, to the angle you are comfortable watching? Here is how.
- Method 1: Using YouTube Video Editor to Rotate Videos After Uploading
- Method 2: Rotate YouTube Videos by Advanced YouTube Video Editor Alternatives
Method 1: Using YouTube Video Editor to Rotate Videos [Not available after 2017]
Note: After updating in 2017 September, you cannot rotate a video on YouTube Enhancement. If you need to rotate a video, you should rotate the video before uploading it to YouTube.
YouTube has a built-in video editor where you can rotate YouTube video. Here are the ways on how you can successfully rotate a YouTube video online.
- Log in to your YouTube account.
- Click the dropdown located beside your profile’s thumbnail that can be found in your dashboard.
- Once you have successfully clicked the dropdown menu, you can now search for the video that you want to rotate.
- When you have already found the video, you can now click the Edit button that can easily be found under the thumbnail of the video.
- In the Edit section, choose the Enhancements tab.
- You can find in the lower right part of the video preview the arrows for rotate right and rotate left.

- [Not Recommended] There is a hacky way to show Rotate button on 2021. Right click on the Trim button and click inspect in the pop-up menu. A DevTools window will open with HTML codes of the Trim button highlighted as you can see it in the below image. Find enhance-rotate-buttons on the html codes, and delete the hiddden=”true”, then press the Enter button.


- Then, after choosing, you have successfully rotated the video.
Check this video tutorial to know how to rotate/flip YouTube video with YouTube Video Editor
Cons of YouTube Video Editor
However, using YouTube Video Editor is not the best way to rotate or flip a YouTube video.
- Obviously, one of its disadvantages is that the features are very basic. You can’t use more advanced functions for better edition.
- In addition, since you are doing it online, you need to keep on refreshing the page whenever you are making some changes in your video, which eats a lot of time.
- Another disadvantage of YouTube Video Editor is that you have to get access to internet, or you can’t edit the videos. But it’s headache when you forget to save your work or the internet crashes.
Method 2: Easier Ways to Rotate YouTube Videos by Any Angle
It is recommended to rotate the video before uploading to YouTube. But when you have downloaded a YouTube video, you can also change the rotation by making use of software made for video editing.
Som of the most popular video editors include Wondershare Filmora , Windows Movie Maker, Sony Vegas Movie Studio and Adobe Premiere. These softwares are perfect for editing your videos either you want to enhance it or change the rotation.
1. Wondershare Filmora: Best Video Editor for Beginners and Semi-Pros
Wondershare Filmora video editor is one of the best video editor for PC and perfect for YouTube beginners and semi-pros. You can use on both Windows and Mac you would want to rotate or edit videos to make it look interesting.
It not only allows you to cut, crop, rotate, reverse videos, but also offers your advanced features like PIP, Green Screen, or audio mixing. What’s more, you can find lots of effects for Fashion, gaming, education, tutorial, sports, etc.
How to Rotate YouTube Videos with Filmora Video Editor?
- Import the video.

- To rotate the video, double click it on the timeline.

- The editing panel will appear and you will be able to see the rotation options.
- There are four buttons. You can rotate the videos in 90 degrees, 180 degrees and 270 degrees.

- Export the video that you have rotated.
2. Windows Movie Maker
For windows users who have Windows Movie Maker already installed on the computer, you can rotate the YouTube video with it with ease for Free. Besides rotating, you can edit the YouTube video with more features in Windows Movie Maker, such as combine several clips into one video, mirror and flip video, and reverse videos. For the detailed information, check our guide of How to Edit YouTube videos in Windows Movie Maker.
The steps of rotating a video in Windows Movie Maker is easy:
- Import the video.
- Click the video then select the rotate button that is found at the toolbar.

- Save the video after rotating on the right angle.
3. Sony Vegas Movie Studio
Sony Vegas Movie Studio is video editing software made for PC. Before it is knows as Sonic Foundry VideoFactory and Sony Screenblast Movie Studio.
- Click the square box that can be found on the video, which is situated at its end.
- The pan pop up will appear and you will be able to see the slider bar.
- At the slider bar, you can see the options rotation, position and key frame inter.
- Under the rotation section, you can enter the angle that you want to rotate the video then hit enter once you have entered the word angle.
4. Adobe Premiere: Best video editing software for professionals to rotate YouTube videos
Adobe Premier is video editing software that is time-line based and is included in the Adobe Creative Cloud.
- Launch Adobe Premiere.
- Start or open a project.
- Import the video.
- Drag the video to the timeline.
- Then, access Effects Control Lab.
- Find the option for rotation, which is located under the Motion option.
- Rotate the video to your desired angle.
For the detailed information, check How to Rotate videos in Premiere?
Have You Known How to Rotate a YouTube Video?
Whether you are watching YouTube videos online or you have downloaded it, you can feasibly rotate the videos on the angle that you want and it will be successful if you know how to do it. If you feel it helpful, share with your friends.
Richard Bennett
Richard Bennett is a writer and a lover of all things video.
Follow @Richard Bennett
Richard Bennett
Mar 27, 2024• Proven solutions
YouTube is compatible to all devices such as smartphones, tablets and computers. However, when the screen is too small, so does the video, which makes the watching experience full of inconvenience.
Sometimes, you may need to rotate the video left/right 90 degrees or 180 degrees. To rotate the YouTube video when you watching it, you can move your devices in order for you to get the perfect angle and make your watching fun and smooth.
Yet, did you know that you could possibly rotate YouTube videos either downloaded or before uploading, to the angle you are comfortable watching? Here is how.
- Method 1: Using YouTube Video Editor to Rotate Videos After Uploading
- Method 2: Rotate YouTube Videos by Advanced YouTube Video Editor Alternatives
Method 1: Using YouTube Video Editor to Rotate Videos [Not available after 2017]
Note: After updating in 2017 September, you cannot rotate a video on YouTube Enhancement. If you need to rotate a video, you should rotate the video before uploading it to YouTube.
YouTube has a built-in video editor where you can rotate YouTube video. Here are the ways on how you can successfully rotate a YouTube video online.
- Log in to your YouTube account.
- Click the dropdown located beside your profile’s thumbnail that can be found in your dashboard.
- Once you have successfully clicked the dropdown menu, you can now search for the video that you want to rotate.
- When you have already found the video, you can now click the Edit button that can easily be found under the thumbnail of the video.
- In the Edit section, choose the Enhancements tab.
- You can find in the lower right part of the video preview the arrows for rotate right and rotate left.
- [Not Recommended] There is a hacky way to show Rotate button on 2021. Right click on the Trim button and click inspect in the pop-up menu. A DevTools window will open with HTML codes of the Trim button highlighted as you can see it in the below image. Find enhance-rotate-buttons on the html codes, and delete the hiddden=”true”, then press the Enter button.
- Then, after choosing, you have successfully rotated the video.
Check this video tutorial to know how to rotate/flip YouTube video with YouTube Video Editor
Cons of YouTube Video Editor
However, using YouTube Video Editor is not the best way to rotate or flip a YouTube video.
- Obviously, one of its disadvantages is that the features are very basic. You can’t use more advanced functions for better edition.
- In addition, since you are doing it online, you need to keep on refreshing the page whenever you are making some changes in your video, which eats a lot of time.
- Another disadvantage of YouTube Video Editor is that you have to get access to internet, or you can’t edit the videos. But it’s headache when you forget to save your work or the internet crashes.
Method 2: Easier Ways to Rotate YouTube Videos by Any Angle
It is recommended to rotate the video before uploading to YouTube. But when you have downloaded a YouTube video, you can also change the rotation by making use of software made for video editing.
Som of the most popular video editors include Wondershare Filmora , Windows Movie Maker, Sony Vegas Movie Studio and Adobe Premiere. These softwares are perfect for editing your videos either you want to enhance it or change the rotation.
1. Wondershare Filmora: Best Video Editor for Beginners and Semi-Pros
Wondershare Filmora video editor is one of the best video editor for PC and perfect for YouTube beginners and semi-pros. You can use on both Windows and Mac you would want to rotate or edit videos to make it look interesting.
It not only allows you to cut, crop, rotate, reverse videos, but also offers your advanced features like PIP, Green Screen, or audio mixing. What’s more, you can find lots of effects for Fashion, gaming, education, tutorial, sports, etc.
How to Rotate YouTube Videos with Filmora Video Editor?
- Import the video.
- To rotate the video, double click it on the timeline.
- The editing panel will appear and you will be able to see the rotation options.
- There are four buttons. You can rotate the videos in 90 degrees, 180 degrees and 270 degrees.
- Export the video that you have rotated.
2. Windows Movie Maker
For windows users who have Windows Movie Maker already installed on the computer, you can rotate the YouTube video with it with ease for Free. Besides rotating, you can edit the YouTube video with more features in Windows Movie Maker, such as combine several clips into one video, mirror and flip video, and reverse videos. For the detailed information, check our guide of How to Edit YouTube videos in Windows Movie Maker.
The steps of rotating a video in Windows Movie Maker is easy:
- Import the video.
- Click the video then select the rotate button that is found at the toolbar.
- Save the video after rotating on the right angle.
3. Sony Vegas Movie Studio
Sony Vegas Movie Studio is video editing software made for PC. Before it is knows as Sonic Foundry VideoFactory and Sony Screenblast Movie Studio.
- Click the square box that can be found on the video, which is situated at its end.
- The pan pop up will appear and you will be able to see the slider bar.
- At the slider bar, you can see the options rotation, position and key frame inter.
- Under the rotation section, you can enter the angle that you want to rotate the video then hit enter once you have entered the word angle.
4. Adobe Premiere: Best video editing software for professionals to rotate YouTube videos
Adobe Premier is video editing software that is time-line based and is included in the Adobe Creative Cloud.
- Launch Adobe Premiere.
- Start or open a project.
- Import the video.
- Drag the video to the timeline.
- Then, access Effects Control Lab.
- Find the option for rotation, which is located under the Motion option.
- Rotate the video to your desired angle.
For the detailed information, check How to Rotate videos in Premiere?
Have You Known How to Rotate a YouTube Video?
Whether you are watching YouTube videos online or you have downloaded it, you can feasibly rotate the videos on the angle that you want and it will be successful if you know how to do it. If you feel it helpful, share with your friends.
Richard Bennett
Richard Bennett is a writer and a lover of all things video.
Follow @Richard Bennett
Also read:
- [New] Designing Striking Valorant Thumbnails for Online Platforms
- [New] Sharpen Zoom Conversations Eliminate Distortion
- [Updated] Digital Deception Steering Clear From Buying Non-Existent Followers
- 2024 Approved From Static to Swirling Implementing Motion Blur in AI Designs
- Achieving Seamless Ages Shifting Scenes
- Dive Deep Into Dynamic Dialogue Dives
- Enhancing Interior Luminosity Naturally for 2024
- Fortnite: A Mac Gamers' Delight with a Hidden Catch
- Hasty Thumbnail Crafting for Fortnite Gameplay
- How To Transfer WhatsApp From Apple iPhone 13 mini to other iPhone 13 Pro Max devices? | Dr.fone
- How To Troubleshoot and Correct Core.dll Not Found Problems in Windows
- In 2024, Beginner's Blueprint for Online Content Simple, Straightforward Video Projects
- Title: [New] A Beginner's Guide to Making Attractive Video Thumbnails for Social Media Platforms
- Author: Brian
- Created at : 2024-10-24 01:35:51
- Updated at : 2024-10-30 08:14:28
- Link: https://youtube-video-recordings.techidaily.com/new-a-beginners-guide-to-making-attractive-video-thumbnails-for-social-media-platforms/
- License: This work is licensed under CC BY-NC-SA 4.0.