
![[New] 10 Premium Yoga Channels for Ultimate Fitness Journey](https://www.lifewire.com/thmb/zq7Ptz05T3_xqwHwvLIjO0zEc0g=/400x300/filters:no_upscale():max_bytes(150000):strip_icc()/Bananaplug2-58dadbd83df78c5162067ddf.jpg)
[New] 10 Premium Yoga Channels for Ultimate Fitness Journey
10 Premium Yoga Channels for Ultimate Fitness Journey
Versatile YouTube Video Editor - Filmora
An easy yet powerful editor
Numerous effects to choose from
Detailed tutorials provided by official channel
10 Best Yoga YouTube Channels to Follow in 2024- Keep Fit
YouTube channels have now become a great medium to help people in their real-life activities. That includes Yoga, too. In this article, we will share some of the best Yoga YouTube channels that you can follow in 2024 and keep yourself fit.
In this article
01 10 Best Yoga YouTube Channels to Follow
02 How to Choose the Right Yoga Channel for Yourself?
03 How to Start Your Own Yoga Channel on YouTube?
Part 1: 10 Best Yoga YouTube Channels to Follow
Here are the 10 top yoga YouTube channels that you can follow in 2024 to keep yourself fit.
1. Yoga With Adriene
Adriene is one of the best Yoga YouTubers you will find, and our list tops with Yoga with Adriene YouTube channel. If you are a beginner, Yoga With Adriene might be the best choice for you. The series on ‘Foundation of Yoga’ in this channel is something you must view. The update frequency of the channel is 2-3 videos per month. Here is a video link from the channel:
2. Faith Hunter
As a Yoga mind, you must know how important meditation is. And Faith Hunter can help you with that with her guided tutorial videos on meditation. She is one of the best yoga teachers on YouTube. You can easily follow her yoga classes, especially if you are a beginner. The author and yoga teacher updates her YouTube channel with 3-4 videos quarterly. Here is a video link from the channel:
3. Candace Cabrera
Candace Cabrera, also known as Yoga by Candace, is another of the best yoga YouTube channels that you can follow in 2024. The videos on this channel helps more with the technical instructions than just regular yoga exercising. This channel can help you perfect your physical alignment when doing a pose. The channel updates with 3-4 videos per month. Here is a video link from the channel:
4. Koya Webb
It is one of the best yoga channels on YouTube for beginners. If you are looking for someone who is a personal trainer herself, you have come to the right place. Koya Webb is a personal trainer, an author. Besides, she is a motivational speaker that influences her videos on the channel. She updates her channel with 2 videos per week. Here is a video link from the channel:
5. The Yoga Room
The name itself sounds like a dedicated space for yoga. It is one of the best yoga YouTube channels 2021. The channel is totally based on the studio of Zelinda Yanez, a yoga teacher. In this channel, Zelinda teaches how you can practice safe, comfortable yoga, no matter what shape you are in. The channel comes with 4-5 videos quarterly. Here is a video link from the channel:
6. Pregnancy and Postpartum TV
As the name suggests, the channel is for pregnant mothers or who have just entered their postpartum life. The channel is run by Jessica Pumple, a yoga instructor and a registered dietitian. The videos base on yoga exercises during pregnancy, like the floor exercises. The channel comes with 4-5 videos every week. Here is a video link from the channel:
7. Yoga With Bird
If you are looking for a certified yoga online YouTube teacher, this is the perfect channel for you. The channel is basically for beginners and focuses on morning yoga, restorative yoga, etc. Bird comes with fresh content every day, sometimes two times a day. Here is a video link from Yoga With Bird:
8. Spirit Voyage
If you are past the beginning level of yoga and are looking for something advanced, Spirit Voyage is the right place for you. Especially if you are interested in the more spiritual spectrums of yoga, like chanting, hand gestures, breathing, and so on, this channel is the right spot for you. With an aesthetic look, the channel becomes much more attractive to the audience. The channel releases 2-3 videos a week. The channel offers soothing, inspirational music as well, helping yoga advance even more. Here is a video link from Spirit Voyage:
9. Yoga With Tim
Finally comes one of the best yoga YouTube channels, run by a male yoga teacher. If you are looking for the top yoga YouTube channels that topped in 2021 and you can follow in 2024, then Yoga With Time is the right spot for you. The channel focuses on advanced aspects of yoga, especially the more physical parts of it. Hopefully, it will help you develop a healthy self-image like it has Tim. The channel updates with 1-2 videos per week. Here is a video link from the channel:
10. YogaX Team
YogaX Team is basically a yoga school, which you will find at Stanford University. The yoga YouTube channel releases videos of classes that evolves around yoga philosophy as well as its practice. The team comprises of researchers and psychologists, who are trying to bring the yoga psychology in practice. The instructors here offer different types of pose variations. Hence, you can choose from a wide range of options that work for you. YogaX Team releases 3-4 videos per month. Here is a video link from the channel:
Part 2: How to Choose the Right Yoga Channel for Yourself?
Based on your level of yoga practice and needs, the channel will vary. But it is better to divide yoga practitioners in two basic ways. One is the beginner-level practitioners, and the other is the advanced-level practitioners.
If you are a beginner-level yoga practitioner, you can try to pick one pose at a time and explore it as deep as possible with time. In this article, you will find the first six best yoga YouTube channels suitable for beginner-level yoga practitioners.
If you are already past the beginner level and want to take yourself to the next stage, you can go for the advanced styles. Some of the common yoga styles are Bikram, Ashtanga, etc. You should follow one style after discussing with your instructor. In our list, you will find the last four YouTube channels a perfect place for advanced-level yoga practitioners.
Part 3: How to Start Your Own Yoga Channel on YouTube?
Just a few years back, yoga was practiced and instructed only in studios. Yoga instructors would visit studios after studios to instruct the practitioners. But the time has changed now. Most practitioners now practice yoga from home and so do the instructors. Here are a few tips on how to start your own yoga channel on YouTube.
Tip 1. Set your target audience
There are different levels of yoga practitioners as well as their lifestyle. A working mom may give you 10 minutes from her morning routine while a college-going student can give you 10 minutes in the afternoon. Hence, first you need to set your target audience and create your content based on that.
Tip 2. Upload videos as scheduled
As you are instructing yoga through your YouTube channel, you need to keep your audience updated. A good way to keep them updated is creating a schedule to upload videos on a regular basis. You can also post the schedule on the description of your channel so that your audience waits for the next.
Tip 3. Brand the practice
Creating a brand out of yoga practicing is the next thing you can do. When people hear the name of your YouTube channel, they value it for its brand. Make it just like this. It can be under your name or your studio’s name. Nevertheless, it should propose a brand value.
Tip 4. Rank on SEO
The present era is full of competition. If you cannot rank among the top ones, you cannot actually get to the audience and make a business out of it. Hence, you should learn to rank on search engine optimization so that people interested in yoga get to your first.
Tip 5. Proper video editing
Promoting your content through videos on YouTube channel is not like doing it in person. So you need to make sure that your videos exert a similar experience as that of reality. A good initiative towards that is expert video editing. Being one of the best video editors available, Filmora can help you in this case. Also, it allows you to edit videos with minimal effort. Therefore, you can concentrate enough on your actual content- yoga.
Wondershare Filmora
Get started easily with Filmora’s powerful performance, intuitive interface, and countless effects!
Try It Free Try It Free Try It Free Learn More >

Tip 6. Collaboration with other channels
Time to time, you can collaborate with other channels to have a ‘shared audience’ who can later turn into your dedicated audience. Nevertheless, it is a no-harm method that you can try to increase traffic to your best yoga YouTube channel.
Conclusion
The best yoga YouTube channels are not only about the yoga material. It also involves how you draw traffic to your channel, the level of your video editing, and so many more. Hopefully, you will find the tips helpful while creating your own yoga YouTube channel.
10 Best Yoga YouTube Channels to Follow in 2024- Keep Fit
YouTube channels have now become a great medium to help people in their real-life activities. That includes Yoga, too. In this article, we will share some of the best Yoga YouTube channels that you can follow in 2024 and keep yourself fit.
In this article
01 10 Best Yoga YouTube Channels to Follow
02 How to Choose the Right Yoga Channel for Yourself?
03 How to Start Your Own Yoga Channel on YouTube?
Part 1: 10 Best Yoga YouTube Channels to Follow
Here are the 10 top yoga YouTube channels that you can follow in 2024 to keep yourself fit.
1. Yoga With Adriene
Adriene is one of the best Yoga YouTubers you will find, and our list tops with Yoga with Adriene YouTube channel. If you are a beginner, Yoga With Adriene might be the best choice for you. The series on ‘Foundation of Yoga’ in this channel is something you must view. The update frequency of the channel is 2-3 videos per month. Here is a video link from the channel:
2. Faith Hunter
As a Yoga mind, you must know how important meditation is. And Faith Hunter can help you with that with her guided tutorial videos on meditation. She is one of the best yoga teachers on YouTube. You can easily follow her yoga classes, especially if you are a beginner. The author and yoga teacher updates her YouTube channel with 3-4 videos quarterly. Here is a video link from the channel:
3. Candace Cabrera
Candace Cabrera, also known as Yoga by Candace, is another of the best yoga YouTube channels that you can follow in 2024. The videos on this channel helps more with the technical instructions than just regular yoga exercising. This channel can help you perfect your physical alignment when doing a pose. The channel updates with 3-4 videos per month. Here is a video link from the channel:
4. Koya Webb
It is one of the best yoga channels on YouTube for beginners. If you are looking for someone who is a personal trainer herself, you have come to the right place. Koya Webb is a personal trainer, an author. Besides, she is a motivational speaker that influences her videos on the channel. She updates her channel with 2 videos per week. Here is a video link from the channel:
5. The Yoga Room
The name itself sounds like a dedicated space for yoga. It is one of the best yoga YouTube channels 2021. The channel is totally based on the studio of Zelinda Yanez, a yoga teacher. In this channel, Zelinda teaches how you can practice safe, comfortable yoga, no matter what shape you are in. The channel comes with 4-5 videos quarterly. Here is a video link from the channel:
6. Pregnancy and Postpartum TV
As the name suggests, the channel is for pregnant mothers or who have just entered their postpartum life. The channel is run by Jessica Pumple, a yoga instructor and a registered dietitian. The videos base on yoga exercises during pregnancy, like the floor exercises. The channel comes with 4-5 videos every week. Here is a video link from the channel:
7. Yoga With Bird
If you are looking for a certified yoga online YouTube teacher, this is the perfect channel for you. The channel is basically for beginners and focuses on morning yoga, restorative yoga, etc. Bird comes with fresh content every day, sometimes two times a day. Here is a video link from Yoga With Bird:
8. Spirit Voyage
If you are past the beginning level of yoga and are looking for something advanced, Spirit Voyage is the right place for you. Especially if you are interested in the more spiritual spectrums of yoga, like chanting, hand gestures, breathing, and so on, this channel is the right spot for you. With an aesthetic look, the channel becomes much more attractive to the audience. The channel releases 2-3 videos a week. The channel offers soothing, inspirational music as well, helping yoga advance even more. Here is a video link from Spirit Voyage:
9. Yoga With Tim
Finally comes one of the best yoga YouTube channels, run by a male yoga teacher. If you are looking for the top yoga YouTube channels that topped in 2021 and you can follow in 2024, then Yoga With Time is the right spot for you. The channel focuses on advanced aspects of yoga, especially the more physical parts of it. Hopefully, it will help you develop a healthy self-image like it has Tim. The channel updates with 1-2 videos per week. Here is a video link from the channel:
10. YogaX Team
YogaX Team is basically a yoga school, which you will find at Stanford University. The yoga YouTube channel releases videos of classes that evolves around yoga philosophy as well as its practice. The team comprises of researchers and psychologists, who are trying to bring the yoga psychology in practice. The instructors here offer different types of pose variations. Hence, you can choose from a wide range of options that work for you. YogaX Team releases 3-4 videos per month. Here is a video link from the channel:
Part 2: How to Choose the Right Yoga Channel for Yourself?
Based on your level of yoga practice and needs, the channel will vary. But it is better to divide yoga practitioners in two basic ways. One is the beginner-level practitioners, and the other is the advanced-level practitioners.
If you are a beginner-level yoga practitioner, you can try to pick one pose at a time and explore it as deep as possible with time. In this article, you will find the first six best yoga YouTube channels suitable for beginner-level yoga practitioners.
If you are already past the beginner level and want to take yourself to the next stage, you can go for the advanced styles. Some of the common yoga styles are Bikram, Ashtanga, etc. You should follow one style after discussing with your instructor. In our list, you will find the last four YouTube channels a perfect place for advanced-level yoga practitioners.
Part 3: How to Start Your Own Yoga Channel on YouTube?
Just a few years back, yoga was practiced and instructed only in studios. Yoga instructors would visit studios after studios to instruct the practitioners. But the time has changed now. Most practitioners now practice yoga from home and so do the instructors. Here are a few tips on how to start your own yoga channel on YouTube.
Tip 1. Set your target audience
There are different levels of yoga practitioners as well as their lifestyle. A working mom may give you 10 minutes from her morning routine while a college-going student can give you 10 minutes in the afternoon. Hence, first you need to set your target audience and create your content based on that.
Tip 2. Upload videos as scheduled
As you are instructing yoga through your YouTube channel, you need to keep your audience updated. A good way to keep them updated is creating a schedule to upload videos on a regular basis. You can also post the schedule on the description of your channel so that your audience waits for the next.
Tip 3. Brand the practice
Creating a brand out of yoga practicing is the next thing you can do. When people hear the name of your YouTube channel, they value it for its brand. Make it just like this. It can be under your name or your studio’s name. Nevertheless, it should propose a brand value.
Tip 4. Rank on SEO
The present era is full of competition. If you cannot rank among the top ones, you cannot actually get to the audience and make a business out of it. Hence, you should learn to rank on search engine optimization so that people interested in yoga get to your first.
Tip 5. Proper video editing
Promoting your content through videos on YouTube channel is not like doing it in person. So you need to make sure that your videos exert a similar experience as that of reality. A good initiative towards that is expert video editing. Being one of the best video editors available, Filmora can help you in this case. Also, it allows you to edit videos with minimal effort. Therefore, you can concentrate enough on your actual content- yoga.
Wondershare Filmora
Get started easily with Filmora’s powerful performance, intuitive interface, and countless effects!
Try It Free Try It Free Try It Free Learn More >
Tip 6. Collaboration with other channels
Time to time, you can collaborate with other channels to have a ‘shared audience’ who can later turn into your dedicated audience. Nevertheless, it is a no-harm method that you can try to increase traffic to your best yoga YouTube channel.
Conclusion
The best yoga YouTube channels are not only about the yoga material. It also involves how you draw traffic to your channel, the level of your video editing, and so many more. Hopefully, you will find the tips helpful while creating your own yoga YouTube channel.
Best Livestream Capturing Gear for Online Content Makers
Best YouTube Livestreaming Screen Recorders

Richard Bennett
Oct 26, 2023• Proven solutions
The global pandemic has changed the way we live for the time being, and right now, we cannot attend events in the same way we did at the beginning of the year.
A growing number of cultural organizations, businesses, and influential YouTubers are turning towards YouTube’s Live feature because it provides a simple way of broadcasting different types of content in real-time. YouTube Live is by no means a new option, since the platform first introduced live streaming features in 2008, and some twelve years later, the feature has never been more popular.
However, the live streams you broadcast on YouTube are stored for just a brief period of time, which means you have to search for alternative methods of saving them. That’s why in this article we are going to take you through the best YouTube Live screen recorders you can use to capture the video content you are sharing with your followers.
Note: We resolutely oppose all forms of copyright-infringing downloads. This tutorial is only for downloading YouTube videos/audio materials from your own channel.
Top 10+ YouTube Live Screen Recorders
The maximum resolution in which you can record computer screen , audio recording options, or customization of the recording area are some of the most important features you need to consider while choosing a YouTube Live screen recorder.
We have selected some of the best YouTube Live screen recorders that enable you to do much more than just record live streams. So, let’s take a look at what they have to offer.
1. OBS Studio
Price: Free
Compatibility: Windows, Linux, macOS
The vast majority of live streams you can find on Twitch and YouTube are made with OBS Studio, but besides broadcasting videos, the software also gives you access to screencasting tools. This means that you can specify the area of the screen you want to record, choose the recording’s resolution and frame rate, or adjust the audio recording options.
OBS Studio is the best free, open-source screen recording program you can download. You shouldn’t use a software just because it’s free, but OBS Studio is also an extremely versatile tool. You can both record and stream in high definition and it comes with the ability to record either through your webcam or through your screen. It records directly through the graphics card , which means it can capture games even when in full-screen mode whereas a lot of other screen-recording software forces you to play games in windowed mode. The high quality can be seen easily in whatever you choose to broadcast.
OBS Studio allows you to record videos from a variety of sources, which makes it a perfect option for capturing the content you share through YouTube Live since you can select a browser window you want to capture in just a few clicks. What’s more, this open-source software is equipped with basic video editing tools, which enables you to preview the video you recorded before publishing it, apply transitions between cuts, or perform basic color correction.
Check the detailed guide to How to Record with OBS .
2. XSplit
Price: $24.95 for a three-month license
Compatibility: Windows
This is yet another broadcasting software that is equipped with powerful screen recording tools. Setting up a new screencasting session with XSplit is a simple and intuitive process that is not going to take much more than a few moments of your time.
All you need to do is define a workspace, then pick the preferred resolution and frame rate. The software allows you to capture screens in 4K resolution and at 60 fps, but it also offers a variety of resolution and frame rate options so that you can choose the one that best fits your needs. Furthermore, you can record the computer audio, which enables you to capture the live stream’s audio in excellent quality. Besides YouTube Live, XSplit can be used with Zoom , Skype, Google Hangouts, and numerous other live streaming and video calling apps.
3. Filmora
Price: Free, pricing plans start at $49.99/year
Compatibility: macOS, Windows


If you are looking for a screen recorder that is stacked with powerful video editing features, then Filmora is a great option for you. Customizing a YouTube Live or any other screencasting session with this video editing software is easy, and you can choose the resolution, frame rate, or even if you want to show mouse clicks in the recording.
Capturing the webcam feed and the computer’s screen simultaneously is also an option, while you can also decide whether or not you want to record audio from a microphone, computer audio, or both at the same time.
What’s more Filmora lets you set up the maximum duration of a screen recording and you start, pause, resume or stop a screen recording session by using hotkeys. Once you are done recording the live stream you shared on YouTube, you can edit the footage you created before uploading it to your YouTube channel.
4. Wondershare DemoCreator
Compatibility: Windows
Price: Start from $9.99
DemoCreator is a recorder that focuses its overall user experience. It is able to easily record high-quality videos at up to 120 FPS (60 FPS for Mac) and allows you to simultaneously record both your screen and webcam. This software is incredibly user friendly and makes for an easy experience for new streamers. The dual recording makes it great for gamers who are also looking to film their reactions.
5. CloudApp
Price: Free, $10 per month for an individual user
Compatibility: Windows, macOS, Linux, Chrome
Starting a new screen capturing session with the CloudApp requires you to just specify the portion of the screen you want to capture and hit the record button. Moreover, you can choose if you want to record with or without a webcam and you have the option to enable or disable the audio recording option.
However, you can only create 90-second screen recordings with the free version of the CloudApp and you cannot set resolution or frame rate of the recording. That’s why you need to upgrade to the Pro version if you want to use it to record live streams on YouTube. The Pro subscription model also grants you access to basic video editing tools and a variety of file sharing options. In addition, CloudApp lets you create and annotate still images and GIFs, which makes it a great option for digital marketers.
6. Techsmith Camtasia
Price: Free trial, $269.05 one-time fee
Compatibility: Windows, macOS
You don’t need years of video editing experience to start a new screen recording session in Camtasia. In fact, you just have to click on the Record button that is located in the software’s tool panel and then customize the settings.
Camtasia lets you choose if you want to record the full screen or just a selected portion of the screen or decide if you want to switch the webcam or the microphone off. You should make sure that the System Audio feature is enabled in order to record the sound of the live stream you’re sharing on YouTube. Pausing or stopping a screencasting session requires you to either click on the appropriate buttons or use the keyboard-based hotkeys. After you are done recording a live stream you can edit the footage using Camtasia’s video editing tools.
7. ScreenRec
Price: Free
Compatibility: Windows, macOS, Linux
Recording any live stream or TV show you play on your computer with ScreenRec is a straightforward process that can be completed in just a few clicks. Simply drag the mouse cursor over the area you want to record, then hit the Record button when you are ready and ScreenRec will start capturing the computer screen.
Once the screencasting session is completed you will get a sharable link that can be embedded to a website or used to save an MP4 file on your hard drive. Furthermore, ScreenRec is equipped with analytics tools that show you how many views your videos attracted or for how long each visitor watched them. All of these features make ScreenRec an excellent option for anyone who wants to record a live stream on YouTube or any other on-screen activity.
8. Flashback Express
Price: Free
Compatibility: Windows
Flashback Express is a simple screen recorder that lets you create high-res videos effortlessly. Setting up a new screencasting session requires you to just specify the area of the screen you want to record, choose whether or not you want to record the webcam feed and hit the Record button.
There are no restrictions in terms of the duration of screen recordings you can make with Flashback Express and the software doesn’t watermark the video you create.
However, you can only save the files in MP4, AVI, or WMW formats and you cannot adjust the video’s frame rate or resolution. What’s more, editing videos or applying effects with Flashback Express isn’t possible and you must upgrade to FlashBack Pro if you want to edit the live streams you broadcast on YouTube.
This piece of software is user friendly, but it doesn’t have as many features as other products on the market. Having said that, it is still an excellent tool that will help you live stream gameplay easily. Although it doesn’t come with built-in video editing software, it is possible to download another program to do this for you (i.e. Filmora). Flashback Express has the ability to record through your headset or microphone as well.
9. VLC
Price: Free
Compatibility: macOS, Linux, Windows
This is an iconic media player that became famous for its versatility and support for nearly all video file formats. Besides being one of the best media players ever created, VLC is also equipped with screen recording and video editing tools.
In order to start a new screencasting session, you will have to go to the Media menu and then select the Open Capture Device option. Once the new window pops up on the screen you should change the Capture Mode to Desktop and then adjust the frame rate in accordance with your needs.
Click on the Play button, and then hit the Record button after the screen recording window appears on the screen. You can only record the entire screen with VLC, since customizing the recording area isn’t an option, and all your files will be captured in the RAW format which means that you may have to resize them before you upload them to YouTube.
10. Screencast-o-matic
Price: Free, pricing options start at $1.65 per month
Compatibility: macOS, Windows
As its name suggests, this software product makes the screen recording process almost automatic. You can choose if you want to record an entire screen or just a window you selected. In addition, Screencast-o-matic lets you record the desktop and webcam footage at the same time, and you can even zoom in while the screencasting session is still in progress.
The free version of the software offers only a basic set of features that doesn’t include the option to record system audio. This means that you have to opt for one of the available subscription models if you want to record your live streams on YouTube with Screencast-o-matic. What’s more, you will be to create videos that are longer than 15 minutes, create recordings without watermarks or add music to your recordings if you opt for Deluxe or Premiere pricing options.
11. QuickTime Player
Price: Free
Compatibility: macOS, Windows
Mac users who want to record content that is broadcasted via YouTube Live can do so without having to install a third-party app. Apple ceased the support for the Windows-based version of QuickTime Player in 2016 and PC users can only capture their screens with this software if they have some of its earlier versions.
In order to start a new screen recording session in QuickTime Player, you just have to go to the File menu and select the New Screen Recording option. The Screen Recording window where you can choose if you want to record audio or show mouse click in the recording will pop up on the screen. QuickTime Player lets you choose if you want to capture the entire screen or just a portion of it, and you can click on the Record button to start a new screencasting session. In order to save a video file you created, you just have to go to the File menu and pick the Save option.
How to Record a YouTube Live Stream with Filmora
Recording a YouTube Live stream with Filmora is easy even if you never went through this process before. You can set up a new screencasting session in just a few easy steps that won’t take more than a few moments to complete. Here’s what you need to do:
Step 1: Launch Filmora and create a new project. Go to the Media tab once the video editor’s main window loads and click on the Record drop-down menu that is located next to the Import drop-down menu.
Choose the Record PC Screen option and then proceed to customize the settings for your screencasting session.

Step 2: Click on the Rectangular icon in the upper left corner of the Wondershare Filmora Scrn window and choose either Full Screen, Custom, or Target Window option, depending on how you want to record a YouTube Live stream to define the area of the screen that is going to be recorded.
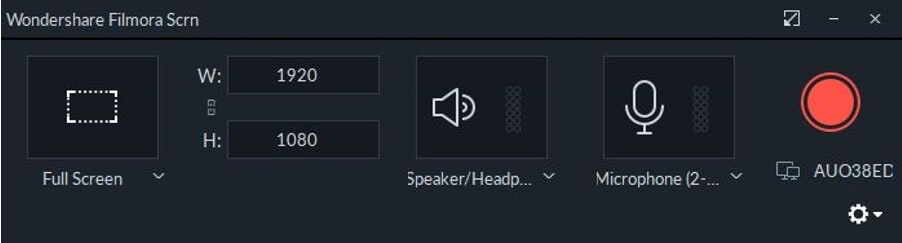
You can then proceed to insert the resolution your screen recording is going to have, and choose if you want to record system audio and sound from an external microphone.
Step 3: Click on the Gear icon below the Record button to gain access to additional settings, and then proceed to set the frame rate, adjust the video’s quality or activate the Show Mouse Clicks in Recording option.
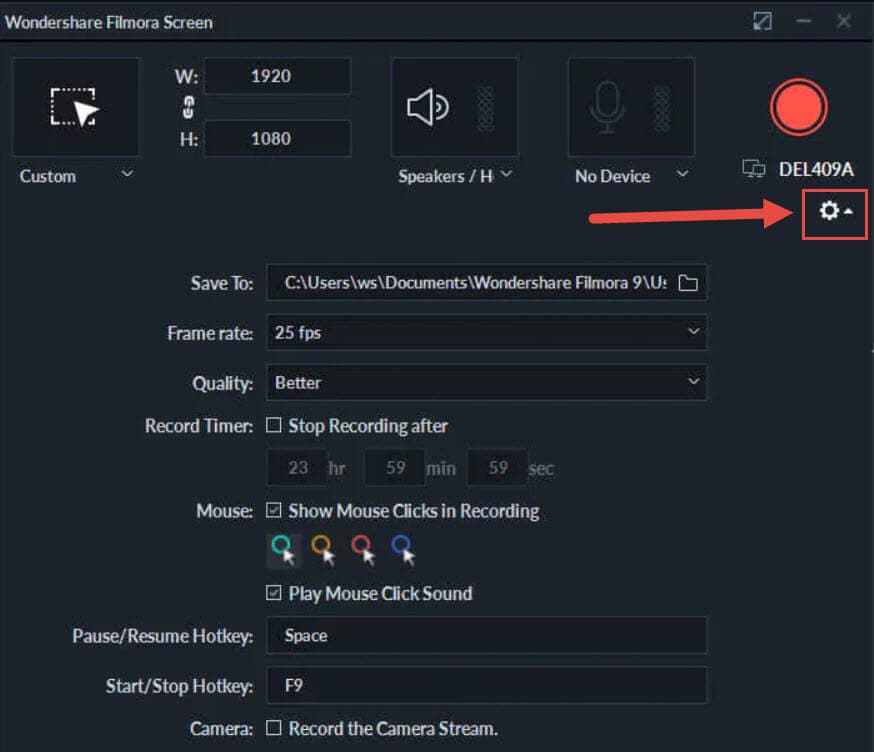
Make sure that the checkbox next to the Record the Camera Stream is marked if you want to record webcam feed and computer desktop at the same time.
Step 4: Press the red Record button in the upper right corner of the window and jump to the live stream. Once the broadcast is completed, you should click on the Stop button and use Filmora’s editing tools to remove all imperfections from the recording.
Filmora allows you to export all of your projects directly to your YouTube channel immediately after the rendering process is completed.
Frequently Asked Questions about YouTube Live Screen Recorders
1. Does YouTube Save Live Videos?
Stream Now, Mobile, Webcam, and Events streams can be stored automatically for 12 hours after they end. You can access all of your live streams by clicking on the Videos menu in the YouTube Studio and selecting the Live option and then change the Privacy setting in the Visibility menu.
2. How to use YouTube to Archive a Live Stream?
Once the live stream ends, you should go to the Dashboard and click on the Live feature, and then choose the Stream option. Check the Make Archive Unlisted When Complete checkbox and the live stream video will be saved accordingly.
Richard Bennett
Richard Bennett is a writer and a lover of all things video.
Follow @Richard Bennett
Richard Bennett
Oct 26, 2023• Proven solutions
The global pandemic has changed the way we live for the time being, and right now, we cannot attend events in the same way we did at the beginning of the year.
A growing number of cultural organizations, businesses, and influential YouTubers are turning towards YouTube’s Live feature because it provides a simple way of broadcasting different types of content in real-time. YouTube Live is by no means a new option, since the platform first introduced live streaming features in 2008, and some twelve years later, the feature has never been more popular.
However, the live streams you broadcast on YouTube are stored for just a brief period of time, which means you have to search for alternative methods of saving them. That’s why in this article we are going to take you through the best YouTube Live screen recorders you can use to capture the video content you are sharing with your followers.
Note: We resolutely oppose all forms of copyright-infringing downloads. This tutorial is only for downloading YouTube videos/audio materials from your own channel.
Top 10+ YouTube Live Screen Recorders
The maximum resolution in which you can record computer screen , audio recording options, or customization of the recording area are some of the most important features you need to consider while choosing a YouTube Live screen recorder.
We have selected some of the best YouTube Live screen recorders that enable you to do much more than just record live streams. So, let’s take a look at what they have to offer.
1. OBS Studio
Price: Free
Compatibility: Windows, Linux, macOS
The vast majority of live streams you can find on Twitch and YouTube are made with OBS Studio, but besides broadcasting videos, the software also gives you access to screencasting tools. This means that you can specify the area of the screen you want to record, choose the recording’s resolution and frame rate, or adjust the audio recording options.
OBS Studio is the best free, open-source screen recording program you can download. You shouldn’t use a software just because it’s free, but OBS Studio is also an extremely versatile tool. You can both record and stream in high definition and it comes with the ability to record either through your webcam or through your screen. It records directly through the graphics card , which means it can capture games even when in full-screen mode whereas a lot of other screen-recording software forces you to play games in windowed mode. The high quality can be seen easily in whatever you choose to broadcast.
OBS Studio allows you to record videos from a variety of sources, which makes it a perfect option for capturing the content you share through YouTube Live since you can select a browser window you want to capture in just a few clicks. What’s more, this open-source software is equipped with basic video editing tools, which enables you to preview the video you recorded before publishing it, apply transitions between cuts, or perform basic color correction.
Check the detailed guide to How to Record with OBS .
2. XSplit
Price: $24.95 for a three-month license
Compatibility: Windows
This is yet another broadcasting software that is equipped with powerful screen recording tools. Setting up a new screencasting session with XSplit is a simple and intuitive process that is not going to take much more than a few moments of your time.
All you need to do is define a workspace, then pick the preferred resolution and frame rate. The software allows you to capture screens in 4K resolution and at 60 fps, but it also offers a variety of resolution and frame rate options so that you can choose the one that best fits your needs. Furthermore, you can record the computer audio, which enables you to capture the live stream’s audio in excellent quality. Besides YouTube Live, XSplit can be used with Zoom , Skype, Google Hangouts, and numerous other live streaming and video calling apps.
3. Filmora
Price: Free, pricing plans start at $49.99/year
Compatibility: macOS, Windows
If you are looking for a screen recorder that is stacked with powerful video editing features, then Filmora is a great option for you. Customizing a YouTube Live or any other screencasting session with this video editing software is easy, and you can choose the resolution, frame rate, or even if you want to show mouse clicks in the recording.
Capturing the webcam feed and the computer’s screen simultaneously is also an option, while you can also decide whether or not you want to record audio from a microphone, computer audio, or both at the same time.
What’s more Filmora lets you set up the maximum duration of a screen recording and you start, pause, resume or stop a screen recording session by using hotkeys. Once you are done recording the live stream you shared on YouTube, you can edit the footage you created before uploading it to your YouTube channel.
4. Wondershare DemoCreator
Compatibility: Windows
Price: Start from $9.99
DemoCreator is a recorder that focuses its overall user experience. It is able to easily record high-quality videos at up to 120 FPS (60 FPS for Mac) and allows you to simultaneously record both your screen and webcam. This software is incredibly user friendly and makes for an easy experience for new streamers. The dual recording makes it great for gamers who are also looking to film their reactions.
5. CloudApp
Price: Free, $10 per month for an individual user
Compatibility: Windows, macOS, Linux, Chrome
Starting a new screen capturing session with the CloudApp requires you to just specify the portion of the screen you want to capture and hit the record button. Moreover, you can choose if you want to record with or without a webcam and you have the option to enable or disable the audio recording option.
However, you can only create 90-second screen recordings with the free version of the CloudApp and you cannot set resolution or frame rate of the recording. That’s why you need to upgrade to the Pro version if you want to use it to record live streams on YouTube. The Pro subscription model also grants you access to basic video editing tools and a variety of file sharing options. In addition, CloudApp lets you create and annotate still images and GIFs, which makes it a great option for digital marketers.
6. Techsmith Camtasia
Price: Free trial, $269.05 one-time fee
Compatibility: Windows, macOS
You don’t need years of video editing experience to start a new screen recording session in Camtasia. In fact, you just have to click on the Record button that is located in the software’s tool panel and then customize the settings.
Camtasia lets you choose if you want to record the full screen or just a selected portion of the screen or decide if you want to switch the webcam or the microphone off. You should make sure that the System Audio feature is enabled in order to record the sound of the live stream you’re sharing on YouTube. Pausing or stopping a screencasting session requires you to either click on the appropriate buttons or use the keyboard-based hotkeys. After you are done recording a live stream you can edit the footage using Camtasia’s video editing tools.
7. ScreenRec
Price: Free
Compatibility: Windows, macOS, Linux
Recording any live stream or TV show you play on your computer with ScreenRec is a straightforward process that can be completed in just a few clicks. Simply drag the mouse cursor over the area you want to record, then hit the Record button when you are ready and ScreenRec will start capturing the computer screen.
Once the screencasting session is completed you will get a sharable link that can be embedded to a website or used to save an MP4 file on your hard drive. Furthermore, ScreenRec is equipped with analytics tools that show you how many views your videos attracted or for how long each visitor watched them. All of these features make ScreenRec an excellent option for anyone who wants to record a live stream on YouTube or any other on-screen activity.
8. Flashback Express
Price: Free
Compatibility: Windows
Flashback Express is a simple screen recorder that lets you create high-res videos effortlessly. Setting up a new screencasting session requires you to just specify the area of the screen you want to record, choose whether or not you want to record the webcam feed and hit the Record button.
There are no restrictions in terms of the duration of screen recordings you can make with Flashback Express and the software doesn’t watermark the video you create.
However, you can only save the files in MP4, AVI, or WMW formats and you cannot adjust the video’s frame rate or resolution. What’s more, editing videos or applying effects with Flashback Express isn’t possible and you must upgrade to FlashBack Pro if you want to edit the live streams you broadcast on YouTube.
This piece of software is user friendly, but it doesn’t have as many features as other products on the market. Having said that, it is still an excellent tool that will help you live stream gameplay easily. Although it doesn’t come with built-in video editing software, it is possible to download another program to do this for you (i.e. Filmora). Flashback Express has the ability to record through your headset or microphone as well.
9. VLC
Price: Free
Compatibility: macOS, Linux, Windows
This is an iconic media player that became famous for its versatility and support for nearly all video file formats. Besides being one of the best media players ever created, VLC is also equipped with screen recording and video editing tools.
In order to start a new screencasting session, you will have to go to the Media menu and then select the Open Capture Device option. Once the new window pops up on the screen you should change the Capture Mode to Desktop and then adjust the frame rate in accordance with your needs.
Click on the Play button, and then hit the Record button after the screen recording window appears on the screen. You can only record the entire screen with VLC, since customizing the recording area isn’t an option, and all your files will be captured in the RAW format which means that you may have to resize them before you upload them to YouTube.
10. Screencast-o-matic
Price: Free, pricing options start at $1.65 per month
Compatibility: macOS, Windows
As its name suggests, this software product makes the screen recording process almost automatic. You can choose if you want to record an entire screen or just a window you selected. In addition, Screencast-o-matic lets you record the desktop and webcam footage at the same time, and you can even zoom in while the screencasting session is still in progress.
The free version of the software offers only a basic set of features that doesn’t include the option to record system audio. This means that you have to opt for one of the available subscription models if you want to record your live streams on YouTube with Screencast-o-matic. What’s more, you will be to create videos that are longer than 15 minutes, create recordings without watermarks or add music to your recordings if you opt for Deluxe or Premiere pricing options.
11. QuickTime Player
Price: Free
Compatibility: macOS, Windows
Mac users who want to record content that is broadcasted via YouTube Live can do so without having to install a third-party app. Apple ceased the support for the Windows-based version of QuickTime Player in 2016 and PC users can only capture their screens with this software if they have some of its earlier versions.
In order to start a new screen recording session in QuickTime Player, you just have to go to the File menu and select the New Screen Recording option. The Screen Recording window where you can choose if you want to record audio or show mouse click in the recording will pop up on the screen. QuickTime Player lets you choose if you want to capture the entire screen or just a portion of it, and you can click on the Record button to start a new screencasting session. In order to save a video file you created, you just have to go to the File menu and pick the Save option.
How to Record a YouTube Live Stream with Filmora
Recording a YouTube Live stream with Filmora is easy even if you never went through this process before. You can set up a new screencasting session in just a few easy steps that won’t take more than a few moments to complete. Here’s what you need to do:
Step 1: Launch Filmora and create a new project. Go to the Media tab once the video editor’s main window loads and click on the Record drop-down menu that is located next to the Import drop-down menu.
Choose the Record PC Screen option and then proceed to customize the settings for your screencasting session.
Step 2: Click on the Rectangular icon in the upper left corner of the Wondershare Filmora Scrn window and choose either Full Screen, Custom, or Target Window option, depending on how you want to record a YouTube Live stream to define the area of the screen that is going to be recorded.
You can then proceed to insert the resolution your screen recording is going to have, and choose if you want to record system audio and sound from an external microphone.
Step 3: Click on the Gear icon below the Record button to gain access to additional settings, and then proceed to set the frame rate, adjust the video’s quality or activate the Show Mouse Clicks in Recording option.
Make sure that the checkbox next to the Record the Camera Stream is marked if you want to record webcam feed and computer desktop at the same time.
Step 4: Press the red Record button in the upper right corner of the window and jump to the live stream. Once the broadcast is completed, you should click on the Stop button and use Filmora’s editing tools to remove all imperfections from the recording.
Filmora allows you to export all of your projects directly to your YouTube channel immediately after the rendering process is completed.
Frequently Asked Questions about YouTube Live Screen Recorders
1. Does YouTube Save Live Videos?
Stream Now, Mobile, Webcam, and Events streams can be stored automatically for 12 hours after they end. You can access all of your live streams by clicking on the Videos menu in the YouTube Studio and selecting the Live option and then change the Privacy setting in the Visibility menu.
2. How to use YouTube to Archive a Live Stream?
Once the live stream ends, you should go to the Dashboard and click on the Live feature, and then choose the Stream option. Check the Make Archive Unlisted When Complete checkbox and the live stream video will be saved accordingly.
Richard Bennett
Richard Bennett is a writer and a lover of all things video.
Follow @Richard Bennett
Also read:
- Tips for Quickly Locating the Epicenter of YouTube's Video Creation
- [Updated] Boost Your TV Experience Automatic Loops of YouTube Videos
- Boosting Engagement Joint Video Strategies for Growth
- 2024 Approved 20 Essential YouTube Groups Navigating Stocks
- Editing Savvy Streamlining Your YouTube Video Lengths
- Top 10 Online Yogis for Peak Physique and Harmony
- In 2024, Balancing Viral Potential with Long-Term Traction in Videos
- Mastering YouTube Videos Integrating Into PPT (4 Techniques)
- Elevate Your YouTube Creation by Merging Media and Music
- Elevate Video Reach Optimize Tags for $6,00Es+ Growth for 2024
- In 2024, Download Custom MCB Banner Packs
- [Updated] Comprehensive List of Top 9 Free Video Channel Branding Aids
- Mastering the Art of YT Prompts, GS-Style
- In 2024, 20 Offbeat Video Apps to Watch on Your Smartphone, Sans YouTube
- Navigating to Your Own Custom-Arranged Music Library on Youtube
- Charting the Course for Profitable Youtube Videos for 2024
- [New] Elevating Your Footage IMovie Videos for YouTube Enthusiasts
- [New] 2023'S Must-Watch Alternatives to Top Films
- [New] Beat Makers' Paradise Downloading Premium DJ Visuals
- From Vision to Visual Impact YouTube Trailers via Filmora
- 2024 Approved Elite 10 Volume Augmenters for All OS
- Top Best Video Editor with Music For PC Users
- [Updated] A Comprehensible Breakdown for YouTube Annotation and Card Implementation
- [New] Calculating Earnings Ad Revenues in the World of YouTube?
- Does Artific Written by Charles Kingsley Include Any of These Themes From 'The Nurse's Diary'?
- Effortlessly Replay Videos on iPhone for 2024
- In 2024, Discover the Top 8 Services to Amplify Video Content
- In 2024, Critical Components Affecting YouTube Video Scores
- 2024 Approved Elevating Your Video Content for a Fanbase Boom
- Culinary Callings 30 Unique Show Title Suggestions
- Unlock Online Visibility with Essential Vids' Tools
- [Updated] Behind the Scenes Expert Video Editing Techniques for YouTubers
- DSLR or Mirrorless for High-Quality Video Recording for 2024
- 2024 Approved Becoming a Leader in Video Marketing on YouTube
- [New] Broaden Your Reach with Concurrent Streams on YT+Twitch
- Strategies for Safe and Significant View Increase
- [New] Easy Guide to YouTube Livestreaming From Google Meet
- Start Your Affordable Webinar Journey with YouTube
- Audio Perfection Achieved Expert Tips Without a Microphone
- [Updated] Android & iOS The Best Sound Distortion Tools
- Elite Collection of Online Video Grabbers & Savers for 2024
- Boosting Audio Quality in Social Media Recordings for 2024
- Rank Higher on YouTube Essential SEO Tips Unveiled
- Efficiently Removing Youtube Channels A Device-Centric Approach
- Navigating Through Best YouTube Extractors
- [Updated] Creating an Athletic Channel on Apple Hardware
- 2024 Approved Choosing Channels TikTok vs YouTube Shorts Insights
- Bridging Creativity & Engagement - Anime Subscribe Buttons with Filmora for 2024
- Avoid Common Pitfalls with Proper Use of YouTube Tags for 2024
- Create Effective YouTube Advertisements on a Budget
- [Updated] 2024 Approved Trimming Footage for Insta on macOS
- Cellular Network Not Available for Voice Calls On Xiaomi Redmi A2 | Dr.fone
- Premium Webcam Options Tailored for Efficient Zoom Meetings
- The Easy Path to Engaging Animation in Your Videos
- Updated In 2024, Behind the Screens The Leading BGM Audio Selections
- Audio Liberation at Its Finest In-Depth Pazera Tool Examination
- Pokémon Go Cooldown Chart On Vivo Y200e 5G | Dr.fone
- In 2024, Apple ID Unlock On Apple iPhone 6s? How to Fix it?
- [Updated] Expert Strategies for Effective Zoom Sharing for 2024
- [New] In 2024, Why Fake Likes Will Ruin Your Instagram Account
- New 2024 Approved Best Apple Video Editing Software
- Infinity in Motion Aerospace's Longest-Flying Wonders
- [Updated] 2024 Approved Navigating Video Editing The Essentials of Cropping and Exporting to Instagram
- What is Geo-Blocking and How to Bypass it On Honor X50i+? | Dr.fone
- Guide on How To Free Up iPhone SE (2022) Space | Dr.fone
- Top 10 AirPlay Apps in Honor Magic 6 Lite for Streaming | Dr.fone
- [Updated] In 2024, The Quintessential Guide to Music & Voiceovers in Reels
- [New] In 2024, The Ultimate Guide to Windows 11 Gaming Recordings
- [New] Premier 6 Modern Architecture in MC World for 2024
- In 2024, Full Guide to Bypass Infinix Smart 8 Plus FRP
- Life360 Learn How Everything Works On Oppo A78 5G | Dr.fone
- Ultimate Guide, How to Transfer Music From Apple iPhone 12 to iPhone | Dr.fone
- New The Ultimate M4R Converter Primer Tips and Tricks to Keep in Mind
- [New] Top 10 PC Tools for Authentic 3Ds Experience
- New In 2024, Harmonizing Hues The 10 Best Free Mobile Apps That Transform Songs Into Vibrant Graphics for iPhone/Android
- [New] 2024 Approved Facebook Media Extractor – Quick MP3 Downloads
- 2024 Approved From Play to Replay Capturing Switch Games
- In 2024, About Lava Yuva 3 Pro FRP Bypass
- In 2024, Remove Watermarks 7 Free Video Trimmers to Try
- The Expert's List of Tools for Accelerating Your Facebook Vids
- Possible ways to recover deleted files from Oppo K11 5G
- Title: [New] 10 Premium Yoga Channels for Ultimate Fitness Journey
- Author: Brian
- Created at : 2024-05-25 12:24:37
- Updated at : 2024-05-26 12:24:37
- Link: https://youtube-video-recordings.techidaily.com/new-10-premium-yoga-channels-for-ultimate-fitness-journey/
- License: This work is licensed under CC BY-NC-SA 4.0.
