
"Monetizing Videos on YouTube Strategies Success"
Monetizing Videos on YouTube: Strategies Success
YouTube is a widely beloved platform that appeals to individuals of all age groups. If you understand how to harness its potential, YouTube can become a source of income. Generating income from YouTube videos becomes simple through YouTube video monetization. If you’re keen on monetizing your YouTube account, this article is your guide. You can turn it into a part-time gig or a full-time profession, potentially earning a solid income.
To earn well, your content must align with what viewers truly desire. Read this article to learn about how you can monetize YouTube videos, its rules, and requirements.
YouTube Monetization Helper Create the conditions for effective YouTube monetization with Wondershare Filmora!
Free Download Free Download Learn More

Part 1. How to Get Monetized on YouTube: Rules and Requirements
How to Monetize YouTube Channel
Begin making money from your YouTube videos through the YouTube Partner Program. You can create earnings from your YouTube channel by connecting it to your Google account. Monetize your website using Google AdSense.
Google AdSense generates substantial website revenue. If viewers interact with the ads in your videos, you earn money. Adding AdSense to your YouTube channel makes your videos monetizable.
Some videos cannot be monetized, however. Content must meet specific requirements to qualify for YouTube’s program. Criteria include content quality, community guidelines, and copyright compliance. Your YouTube channel can generate income once your videos meet these standards.
Monetizing YouTube Videos: What Are The Requirements?
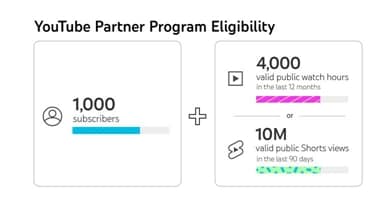
You can monetize your YouTube videos by joining the YouTube Partner Program. Everyone can create a YouTube account, but YPP requires certain requirements. Every time you create content, you must consider these requirements.
Prior to applying for the program, your channel must first accomplish the following:
- One thousand subscribers
- A total of 4,000 watch hours in the past year
Building your audience and creating great content will help you meet these requirements. Joining the YPP, and making sure your YouTube channel complies with YouTube’s rules and policies, is the more complicated aspect.
Those advertising on YouTube want to avoid being linked to low-quality content. Therefore, YouTube Partner Program members are encouraged to create unique, valuable videos.
When you upload content to YouTube, you’ll need to keep these things in mind. Those who plan on monetizing their videos should thoroughly read these documents. You also need to set up a Google AdSense account, which tracks and pays for your YouTube ads.

Part 2. 10 Proven Ways to Monetize Your YouTube Channel
10 Methods to Monetize YouTube Videos
You can monetize your YouTube videos in 10 different ways, including:
- Google Adsense
- Paid Sponsorship
- YouTube Premium
- Memberships
- Merchandise
- Invest in crowd-funding
- Stickers, chats, and thanks
- YouTube Shorts
- YouTube Brandconnect
- YouTube Shopping
1. Google AdSense
YouTube channel monetization is the most popular method. By adding AdSense to your videos, you can generate revenue from the ads displayed. You must adhere to our advertiser-friendly guidelines when creating your videos. The monetization of all videos may not be possible, therefore. YouTube and AdSense work seamlessly together. With no technical knowledge required, your monetization strategy can be set up and managed easily.

2. Paid Sponsorships
Sponsorship involves paying a content creator to use, demonstrate, or test a brand’s product in a video. Both the creator and the brand benefit from sponsorships provided by brands.
The rewards of sponsorship can be immense, but sponsorships are hard to come by. You can pitch relevant brands to partner with your influential channel if your channel has a large following.

3. YouTube Premium
Joining the YouTube Partner Program qualifies you for YouTube Premium. In addition, it can increase your earnings. YouTube Premium members get paid when they watch your content as a creator. The number of Premium members has now surpassed 20 million. It is possible that this may occur quite frequently. YouTube Premium will automatically pay you if someone watches your content.

4. Memberships
Creating membership tiers on your channel allows you to offer different perks to different levels of subscription. Using memberships has the main benefit of providing a more steady income stream. Ad revenue is a more traditional method of monetization. This feature is enabled by channels with at least 1,000 subscribers, and the creator sets fees.

5. Merchandise
You can sell merchandise on YouTube videos with over 10,000 subscribers using a merch shelf. By selling branded merchandise to your YouTube fans, you can generate additional revenue.
It’s especially useful for YouTube creators without their own website who want to sell merchandise. Currently, there are over 45 platforms or retailers worldwide that support merch, so growing your brand is easy.
6. Invest in crowd-funding
It’s not just for startups anymore; you can use crowdfunding to fund content creation on YouTube as well. You can find people to support your work through third-party applications like Patreon in exchange for perks. You can now place sponsor buttons on your YouTube videos, which allows you to crowdfund. With this, you can offer rewards in exchange for monthly funding like with Patreon.
7. Stickers, chats, and thanks
During live streams and premieres, creators can engage their fans with Super Chat and Super Stickers. In the live chat, fans can purchase Super Chats to display their message prominently. A Super Sticker is an animated image displayed during a live chat session. The Super Thanks feature enables creators to earn income from their videos. Additional appreciation may be expressed by those who wish to do so

8. YouTube Shorts
Using the YouTube app, short, vertical videos can be uploaded straight to YouTube using a smartphone. In the same way as Instagram Stories are uploaded to the social media site. The length of YouTube shorts is limited to 60 seconds. In 2021 and 2022, a $100 million fund will be distributed for YouTube Shorts. With this initial stage, YouTube Shorts began to monetize in May 2021. A YouTube Short will only be compensated if it meets the fund’s criteria.

9. YouTube BrandConnect
Brands and YouTube creators can work together on content campaigns through YouTube BrandConnect. In terms of product recommendations, audiences trust creators. It is also possible to partner with YouTube channels through BrandConnect
10. YouTube Shopping
YouTube shopping gives you the chance to promote your own products or those of other brands. It is possible to connect your store (such as Shopify) to YouTube. Add your products to videos, shorts, live streams, etc., as well as tag other brands’ products.
Part 3. Wondershare Filmora: A Video Editing Software to Help Edit YouTube Videos
Wondershare Filmora is your creative ally when it comes to enhancing and editing YouTube videos. Video editing software like Filmora allows you to produce visually engaging and captivating content. Creating the conditions for effective YouTube monetization.
Filmora is cross-platform compatible. Making it accessible for all creators, so you can work on your videos wherever you are. With Filmora, you can enhance your video content no matter what platform you’re using.
Edit YouTube videos with Filmora’s features
Using Filmora’s features, you can give your videos a professional edge.
Free Download For Win 7 or later(64-bit)
Free Download For macOS 10.14 or later
Adjustment Layer
Take the Adjustment Layer feature, for instance, which allows you to add general effects to multiple video clips simultaneously, saving you time and effort. This feature can make your video content more engaging, ultimately attracting a larger audience.
Split Screen
You can create eye-catching split-screen videos with Filmora’s Split Screen Video Editor. Simply click a button to create split-screen videos using premade templates. Enhancing the visual appeal and dynamic of your videos for easy monetization on YouTube.
Motion Tracking
Motion Tracking is another exciting feature that Filmora brings to the table. It enables you to track the movement of objects within your videos and pin graphics and media files to follow the motion magically. This not only adds a touch of professionalism to your videos but also keeps your audience engaged.
Video Effects
Filmora offers a treasure trove of creative possibilities with its Video Effects, including transitions, filters, titles, and motion elements that you won’t find elsewhere. These exclusive features will help you infuse your videos with creativity and style.
Mask and Blend
And let’s not forget the Mask and Blend feature, which allows you to create unique video effects by masking and blending video clips. With only a few clicks, you can create distinct video effects that will set your content apart.
Wondershare Filmora empowers you to take your YouTube videos to the next level. making them more visually appealing, engaging, and ultimately better suited for monetization.
Try Filmora out Free! Click here!
Free Download For Win 7 or later(64-bit)
Free Download For macOS 10.14 or later
Conclusion
For those aspiring to turn their passion into a source of income, YouTube is a treasure trove of opportunities. This comprehensive 2024 guide has shed light on the path to monetizing your YouTube channel. With Google AdSense, paid sponsorships, and YouTube Premium, you’ve learned the ropes of the YouTube Partner Program.
With Wondershare Filmora‘s user-friendly tools, your videos will stand out on a professional level. As a result, your YouTube dreams will become a reality in 2024 with dedication and these insights.
Free Download Free Download Learn More
Part 1. How to Get Monetized on YouTube: Rules and Requirements
How to Monetize YouTube Channel
Begin making money from your YouTube videos through the YouTube Partner Program. You can create earnings from your YouTube channel by connecting it to your Google account. Monetize your website using Google AdSense.
Google AdSense generates substantial website revenue. If viewers interact with the ads in your videos, you earn money. Adding AdSense to your YouTube channel makes your videos monetizable.
Some videos cannot be monetized, however. Content must meet specific requirements to qualify for YouTube’s program. Criteria include content quality, community guidelines, and copyright compliance. Your YouTube channel can generate income once your videos meet these standards.
Monetizing YouTube Videos: What Are The Requirements?
You can monetize your YouTube videos by joining the YouTube Partner Program. Everyone can create a YouTube account, but YPP requires certain requirements. Every time you create content, you must consider these requirements.
Prior to applying for the program, your channel must first accomplish the following:
- One thousand subscribers
- A total of 4,000 watch hours in the past year
Building your audience and creating great content will help you meet these requirements. Joining the YPP, and making sure your YouTube channel complies with YouTube’s rules and policies, is the more complicated aspect.
Those advertising on YouTube want to avoid being linked to low-quality content. Therefore, YouTube Partner Program members are encouraged to create unique, valuable videos.
When you upload content to YouTube, you’ll need to keep these things in mind. Those who plan on monetizing their videos should thoroughly read these documents. You also need to set up a Google AdSense account, which tracks and pays for your YouTube ads.
Part 2. 10 Proven Ways to Monetize Your YouTube Channel
10 Methods to Monetize YouTube Videos
You can monetize your YouTube videos in 10 different ways, including:
- Google Adsense
- Paid Sponsorship
- YouTube Premium
- Memberships
- Merchandise
- Invest in crowd-funding
- Stickers, chats, and thanks
- YouTube Shorts
- YouTube Brandconnect
- YouTube Shopping
1. Google AdSense
YouTube channel monetization is the most popular method. By adding AdSense to your videos, you can generate revenue from the ads displayed. You must adhere to our advertiser-friendly guidelines when creating your videos. The monetization of all videos may not be possible, therefore. YouTube and AdSense work seamlessly together. With no technical knowledge required, your monetization strategy can be set up and managed easily.
2. Paid Sponsorships
Sponsorship involves paying a content creator to use, demonstrate, or test a brand’s product in a video. Both the creator and the brand benefit from sponsorships provided by brands.
The rewards of sponsorship can be immense, but sponsorships are hard to come by. You can pitch relevant brands to partner with your influential channel if your channel has a large following.
3. YouTube Premium
Joining the YouTube Partner Program qualifies you for YouTube Premium. In addition, it can increase your earnings. YouTube Premium members get paid when they watch your content as a creator. The number of Premium members has now surpassed 20 million. It is possible that this may occur quite frequently. YouTube Premium will automatically pay you if someone watches your content.
4. Memberships
Creating membership tiers on your channel allows you to offer different perks to different levels of subscription. Using memberships has the main benefit of providing a more steady income stream. Ad revenue is a more traditional method of monetization. This feature is enabled by channels with at least 1,000 subscribers, and the creator sets fees.
5. Merchandise
You can sell merchandise on YouTube videos with over 10,000 subscribers using a merch shelf. By selling branded merchandise to your YouTube fans, you can generate additional revenue.
It’s especially useful for YouTube creators without their own website who want to sell merchandise. Currently, there are over 45 platforms or retailers worldwide that support merch, so growing your brand is easy.
6. Invest in crowd-funding
It’s not just for startups anymore; you can use crowdfunding to fund content creation on YouTube as well. You can find people to support your work through third-party applications like Patreon in exchange for perks. You can now place sponsor buttons on your YouTube videos, which allows you to crowdfund. With this, you can offer rewards in exchange for monthly funding like with Patreon.
7. Stickers, chats, and thanks
During live streams and premieres, creators can engage their fans with Super Chat and Super Stickers. In the live chat, fans can purchase Super Chats to display their message prominently. A Super Sticker is an animated image displayed during a live chat session. The Super Thanks feature enables creators to earn income from their videos. Additional appreciation may be expressed by those who wish to do so
8. YouTube Shorts
Using the YouTube app, short, vertical videos can be uploaded straight to YouTube using a smartphone. In the same way as Instagram Stories are uploaded to the social media site. The length of YouTube shorts is limited to 60 seconds. In 2021 and 2022, a $100 million fund will be distributed for YouTube Shorts. With this initial stage, YouTube Shorts began to monetize in May 2021. A YouTube Short will only be compensated if it meets the fund’s criteria.
9. YouTube BrandConnect
Brands and YouTube creators can work together on content campaigns through YouTube BrandConnect. In terms of product recommendations, audiences trust creators. It is also possible to partner with YouTube channels through BrandConnect
10. YouTube Shopping
YouTube shopping gives you the chance to promote your own products or those of other brands. It is possible to connect your store (such as Shopify) to YouTube. Add your products to videos, shorts, live streams, etc., as well as tag other brands’ products.
Part 3. Wondershare Filmora: A Video Editing Software to Help Edit YouTube Videos
Wondershare Filmora is your creative ally when it comes to enhancing and editing YouTube videos. Video editing software like Filmora allows you to produce visually engaging and captivating content. Creating the conditions for effective YouTube monetization.
Filmora is cross-platform compatible. Making it accessible for all creators, so you can work on your videos wherever you are. With Filmora, you can enhance your video content no matter what platform you’re using.
Edit YouTube videos with Filmora’s features
Using Filmora’s features, you can give your videos a professional edge.
Free Download For Win 7 or later(64-bit)
Free Download For macOS 10.14 or later
Adjustment Layer
Take the Adjustment Layer feature, for instance, which allows you to add general effects to multiple video clips simultaneously, saving you time and effort. This feature can make your video content more engaging, ultimately attracting a larger audience.
Split Screen
You can create eye-catching split-screen videos with Filmora’s Split Screen Video Editor. Simply click a button to create split-screen videos using premade templates. Enhancing the visual appeal and dynamic of your videos for easy monetization on YouTube.
Motion Tracking
Motion Tracking is another exciting feature that Filmora brings to the table. It enables you to track the movement of objects within your videos and pin graphics and media files to follow the motion magically. This not only adds a touch of professionalism to your videos but also keeps your audience engaged.
Video Effects
Filmora offers a treasure trove of creative possibilities with its Video Effects, including transitions, filters, titles, and motion elements that you won’t find elsewhere. These exclusive features will help you infuse your videos with creativity and style.
Mask and Blend
And let’s not forget the Mask and Blend feature, which allows you to create unique video effects by masking and blending video clips. With only a few clicks, you can create distinct video effects that will set your content apart.
Wondershare Filmora empowers you to take your YouTube videos to the next level. making them more visually appealing, engaging, and ultimately better suited for monetization.
Try Filmora out Free! Click here!
Free Download For Win 7 or later(64-bit)
Free Download For macOS 10.14 or later
Conclusion
For those aspiring to turn their passion into a source of income, YouTube is a treasure trove of opportunities. This comprehensive 2024 guide has shed light on the path to monetizing your YouTube channel. With Google AdSense, paid sponsorships, and YouTube Premium, you’ve learned the ropes of the YouTube Partner Program.
With Wondershare Filmora‘s user-friendly tools, your videos will stand out on a professional level. As a result, your YouTube dreams will become a reality in 2024 with dedication and these insights.
Elevate Your YouTube Presence with Custom Animated Subscription Buttons in Filmora
How to Make Your YouTube Animated Subscribe Button Easily With Filmora

Richard Bennett
Mar 27, 2024• Proven solutions
The main goal of every content creator is to increase its audience to expand its reach and views. To do so, it’s essential to provide something unique and different to the viewer. Without providing them the content they are looking for, it is impossible to grow your channel and reach. Once your content is ready and you are getting many views, it is essential to make these potential viewers your permanent viewers. The animated subscribe button will help you achieve this goal. While your viewers are watching your videos, you must remind them about subscribing to your channel for receiving such incredible content in the future. Subscribe animation plays a vital role in converting your viewers into subscribers.
There are so many platforms on the internet from where you can get Youtube subscribe button animation free, and you can also purchase these subscribe png gifs. But creating your own animated subscribe button can make you stand out from the crowd and make your videos unique and exclusive. Because it enables you to design it the way you want according to your brand, so, let’s create your own subscribe animation using Wondershare Filmora .
Step-By-Step guide
Step 1: To get started,open Filmora X. On your upper left corner, click on the “Sample Colors,” select the Green color and drag it to Video Track into the timeline. We are using a Green background to easily remove it using the green screen feature in Filmora to use it in our future projects after exporting it, without creating it again. Adjust the duration of this track according to your requirement. In my case, I am trying to make an animated subscribe button of 5 seconds.
Step 2: Lock this track by clicking on the lock icon to work on subscribe animation without disturbing the background easily.
Step 3: Now it’s time to design the subscribe png gif. Go to the Sample colors again and drag the red color into the time above the green background.
Step 4: Double click on the red color in the timeline and adjust its size. Make it look like a subscribe button that is a rectangle and place it at the bottom center of the background. You can put it anywhere you want it to appear in your future videos.
Step 5: Now, let’s add Subscribe text into the button. Go to the Title and select any style that you like. “Basic 6” will work perfectly fine for this purpose. Drag and drop it into the timeline above all tracks.
Step 6: Double click on the Title on the timeline and edit it with “Subscribe” and place it under the red rectangle and click OK.
Step 7: We have put a cursor that can click on the animated subscribe button. You can use Google Search to find a transparent cursor. Make sure to save it in png format. Download it and import it into Filmora.
Step 8: Drag and drop the cursor into the timeline and place it above all the other three tracks to make it prominent. Adjust the size of the cursor place it on the Subscribe button where you want it to appear.
Step 9: Now, it’s time to animate the design using keyframes. First of all, let’s animate the red rectangle. Double click on the red color on the timeline. Go to the ‘Animation’ tab and then click ‘Customize.’ Move to the 1 second in the timeline and click ‘Add.’
Step 10: Now go back to the beginning in the timeline and adjust the scale to 0%. It will make the rectangle pop up when you play the clip.
Step 11: Text needs to be animated as well to match it with the rectangle. Double click on the text in the timeline and click ‘ADVANCED.’
Step 12: In this Advance text editor, go to the ‘Animation’ tab and select any animation that you like. On the timeline under the preview screen, adjusts the dark areas according to the time you set on the rectangle, which was 1 second. We want the text to appear on the screen in 1 second, like the rectangle. Also, adjust the ending time when you want the text to disappear again. We have set it on 4 seconds. Which means it will start to fade after 4 seconds.
Step 13: Now, to animate the mouse cursor, we will use the same process we used for a rectangle that is key framing. Double click on the cursor track on the timeline and move the time on your timeline to a point when you want the cursor to appear. Now add a key frame by clicking ‘Add’.
Step 14: Now jump back to a point in your timeline, when the cursor will start appearing from outside the screen. Move the cursor outside the screen from where you want it to start moving toward the subscribe animation.
Step 15: To animate the click of the cursor, move ahead a little bit into your timeline and scale down the cursor to around 70%. Move it a little further and scale it up to 100%.
Step 16: You can add the sound of mouse click to make it more realistic. You can find this sound anywhere on the internet. Download it and import it into Filmora. Now place it into the timeline where it can match the movement of the cursor.
Step 17: Now it’s time to make this subscribe animation button disappear. Move forward into the time to the end, at around 4 seconds. Double click on the red button in the timeline and add a key frame at its actual scale.
Step 18: After that, move further in the timeline to the end and make its scale 0. It will make it disappear.
Step 19: Do the same with the cursor. Double click on the cursor in the time and add a key frame at its actual position.
Step 20: Move ahead when you want it to disappear. Move the cursor out of the screen and click ‘OK’.
Step 21: Your Subscribe png gif is ready to be exported and used in your videos. Click on export and choose from various formats and options to choose from while exporting it.
You may also like: How to Get People to Subscribe Channel
Conclusion:Your own Animated Subscribe Button is ready to be used in your future videos and projects. This is a ready-to-use subscribe button that can be easily used using the green screen effect in Filmora. Just import the clip, remove the green screen, and you are good to go. You can also customize this Subscribe Animation using your channel and more. Keep experimenting with new things using Filmora.


Richard Bennett
Richard Bennett is a writer and a lover of all things video.
Follow @Richard Bennett
Richard Bennett
Mar 27, 2024• Proven solutions
The main goal of every content creator is to increase its audience to expand its reach and views. To do so, it’s essential to provide something unique and different to the viewer. Without providing them the content they are looking for, it is impossible to grow your channel and reach. Once your content is ready and you are getting many views, it is essential to make these potential viewers your permanent viewers. The animated subscribe button will help you achieve this goal. While your viewers are watching your videos, you must remind them about subscribing to your channel for receiving such incredible content in the future. Subscribe animation plays a vital role in converting your viewers into subscribers.
There are so many platforms on the internet from where you can get Youtube subscribe button animation free, and you can also purchase these subscribe png gifs. But creating your own animated subscribe button can make you stand out from the crowd and make your videos unique and exclusive. Because it enables you to design it the way you want according to your brand, so, let’s create your own subscribe animation using Wondershare Filmora .
Step-By-Step guide
Step 1: To get started,open Filmora X. On your upper left corner, click on the “Sample Colors,” select the Green color and drag it to Video Track into the timeline. We are using a Green background to easily remove it using the green screen feature in Filmora to use it in our future projects after exporting it, without creating it again. Adjust the duration of this track according to your requirement. In my case, I am trying to make an animated subscribe button of 5 seconds.
Step 2: Lock this track by clicking on the lock icon to work on subscribe animation without disturbing the background easily.
Step 3: Now it’s time to design the subscribe png gif. Go to the Sample colors again and drag the red color into the time above the green background.
Step 4: Double click on the red color in the timeline and adjust its size. Make it look like a subscribe button that is a rectangle and place it at the bottom center of the background. You can put it anywhere you want it to appear in your future videos.
Step 5: Now, let’s add Subscribe text into the button. Go to the Title and select any style that you like. “Basic 6” will work perfectly fine for this purpose. Drag and drop it into the timeline above all tracks.
Step 6: Double click on the Title on the timeline and edit it with “Subscribe” and place it under the red rectangle and click OK.
Step 7: We have put a cursor that can click on the animated subscribe button. You can use Google Search to find a transparent cursor. Make sure to save it in png format. Download it and import it into Filmora.
Step 8: Drag and drop the cursor into the timeline and place it above all the other three tracks to make it prominent. Adjust the size of the cursor place it on the Subscribe button where you want it to appear.
Step 9: Now, it’s time to animate the design using keyframes. First of all, let’s animate the red rectangle. Double click on the red color on the timeline. Go to the ‘Animation’ tab and then click ‘Customize.’ Move to the 1 second in the timeline and click ‘Add.’
Step 10: Now go back to the beginning in the timeline and adjust the scale to 0%. It will make the rectangle pop up when you play the clip.
Step 11: Text needs to be animated as well to match it with the rectangle. Double click on the text in the timeline and click ‘ADVANCED.’
Step 12: In this Advance text editor, go to the ‘Animation’ tab and select any animation that you like. On the timeline under the preview screen, adjusts the dark areas according to the time you set on the rectangle, which was 1 second. We want the text to appear on the screen in 1 second, like the rectangle. Also, adjust the ending time when you want the text to disappear again. We have set it on 4 seconds. Which means it will start to fade after 4 seconds.
Step 13: Now, to animate the mouse cursor, we will use the same process we used for a rectangle that is key framing. Double click on the cursor track on the timeline and move the time on your timeline to a point when you want the cursor to appear. Now add a key frame by clicking ‘Add’.
Step 14: Now jump back to a point in your timeline, when the cursor will start appearing from outside the screen. Move the cursor outside the screen from where you want it to start moving toward the subscribe animation.
Step 15: To animate the click of the cursor, move ahead a little bit into your timeline and scale down the cursor to around 70%. Move it a little further and scale it up to 100%.
Step 16: You can add the sound of mouse click to make it more realistic. You can find this sound anywhere on the internet. Download it and import it into Filmora. Now place it into the timeline where it can match the movement of the cursor.
Step 17: Now it’s time to make this subscribe animation button disappear. Move forward into the time to the end, at around 4 seconds. Double click on the red button in the timeline and add a key frame at its actual scale.
Step 18: After that, move further in the timeline to the end and make its scale 0. It will make it disappear.
Step 19: Do the same with the cursor. Double click on the cursor in the time and add a key frame at its actual position.
Step 20: Move ahead when you want it to disappear. Move the cursor out of the screen and click ‘OK’.
Step 21: Your Subscribe png gif is ready to be exported and used in your videos. Click on export and choose from various formats and options to choose from while exporting it.
You may also like: How to Get People to Subscribe Channel
Conclusion:Your own Animated Subscribe Button is ready to be used in your future videos and projects. This is a ready-to-use subscribe button that can be easily used using the green screen effect in Filmora. Just import the clip, remove the green screen, and you are good to go. You can also customize this Subscribe Animation using your channel and more. Keep experimenting with new things using Filmora.
Richard Bennett
Richard Bennett is a writer and a lover of all things video.
Follow @Richard Bennett
Also read:
- [New] Building Brands on Video A Guide to Partnering with Popular YouTubers
- [New] Detailed Process of Integrating Subtitles Into MP4 Videos for 2024
- Bypass iCloud Activation Lock with IMEI Code On your Apple iPhone 11
- Capturing the World in HD with YI's 4K Camera
- Defeating Latency in Apex Legends: Connection Fixes That Worked for Me
- Efficiently Managing YouTube Videos with the Watch Later Feature
- Elevating Your Vlogs with High-Quality Editing - Premiere Pro Style for 2024
- Leading Video Cameras of 2024 Reviewed & Rated
- Making Every Minute Count YouTube Length Reduction Techniques
- Superlative Dramatic Dialogue Collection
- The Cutting-Edge Gaming Earpieces for YouTubers
- Title: Monetizing Videos on YouTube Strategies Success
- Author: Brian
- Created at : 2024-10-22 19:13:29
- Updated at : 2024-10-29 18:23:16
- Link: https://youtube-video-recordings.techidaily.com/monetizing-videos-on-youtube-strategies-success/
- License: This work is licensed under CC BY-NC-SA 4.0.