
:max_bytes(150000):strip_icc()/5440183030_e6c3c5f4b8_b-jason-young-5804eb213df78cbc288062ac.jpg)
"Maximize Views with These Top-Rated Keyword Analysis Tools"
Maximize Views with These Top-Rated Keyword Analysis Tools
10 Best YouTube Keyword Tools to Get More Views

Richard Bennett
Mar 27, 2024• Proven solutions
If we asked you to name the world’s biggest search engines, undoubtedly you’d come up with Google, but what would be number two? Bing? Yahoo? The truth might surprise you.
According to figures, the world’s second biggest search engine is actually YouTube. Millions of people are using it everyday to search for videos about fitness, hair, marketing and more. With such a large audience already searching directly on the platform, doesn’t it make sense that when we use YouTube keyword research and SEO should be as important as it is on our website?
Luckily, we can use YouTube keyword tools to analyze YouTube keywords. Here we’re going to take a look at 10 best YouTube keyword tools out there, which can help you identify and optimize for the highest traffic keywords for your videos. By optimizing your videos, you can rank higher, get more views and enjoy a larger audience on YouTube.
- Part 1: 10 Best YouTube Keyword Tools Recommendation
- Part 2: Bonues Tips - Google video result keywords
You May Also Like:
YouTube SEO Complete Guide >>
How to Edit and Optimize YouTube Title, Description, and Tags >>
Do you want to edit YouTube video easily? Filmora is a YouTube editor that you should have a try. As a YouTube video editing tool, it is simple to use with dragging and dropping. You can add various video effects, filters and transition to make your video better. Besides, titles and texts are also available to use. After editing, you can directly upload video to YouTube plactform. Now, download it to have a try!
 Download Mac Version ](https://tools.techidaily.com/wondershare/filmora/download/ )
Part 1: 10 Best YouTube Keyword Tools Recommendation
Before you can get into using any YouTube SEO tool, you’ll need to identify what the best keywords for your videos are. Let’s start by taking a look at the best YouTube keyword tools available.
1. YouTube autocomplete
When you start to search for something on YouTube, you’ll probably notice that YouTube suggests some keywords to finish your search. This is called autocomplete, and it works by suggesting the most popular keywords that start with the letters you’ve typed so far. What it is essentially saying is that those are the most frequently searched for terms that use the words you’ve already typed.
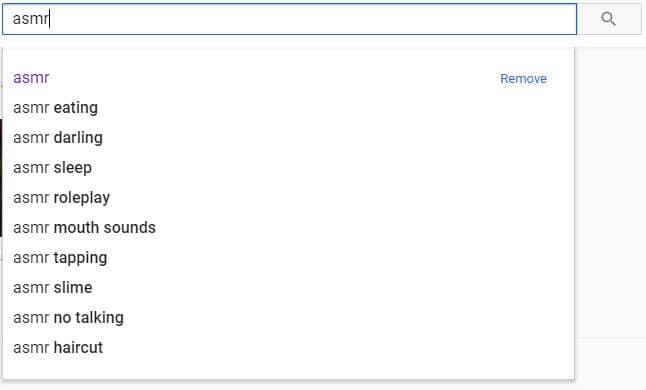
This means it’s a great place to start building your keywords, and a fantastic YouTube keyword tool for your videos. Just start your search for your video (e.g. shoes for…) and see what comes up. In this case, we can see that the most popular keywords are ‘girls’, ‘men’, ‘kids’, ‘summer’ and ‘boys’.
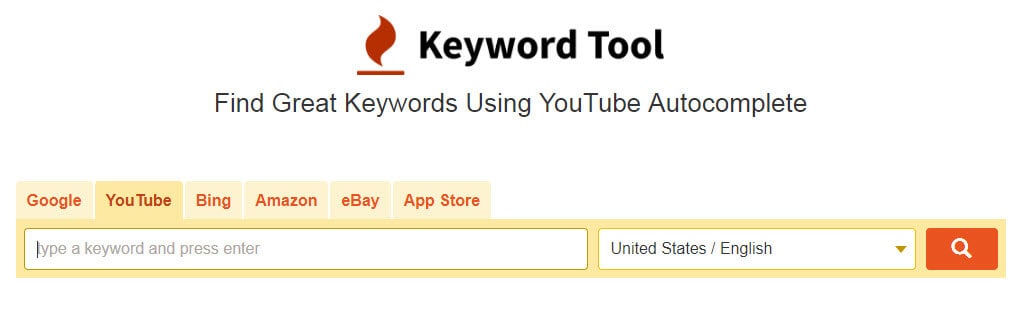
2. Keywordtool.io
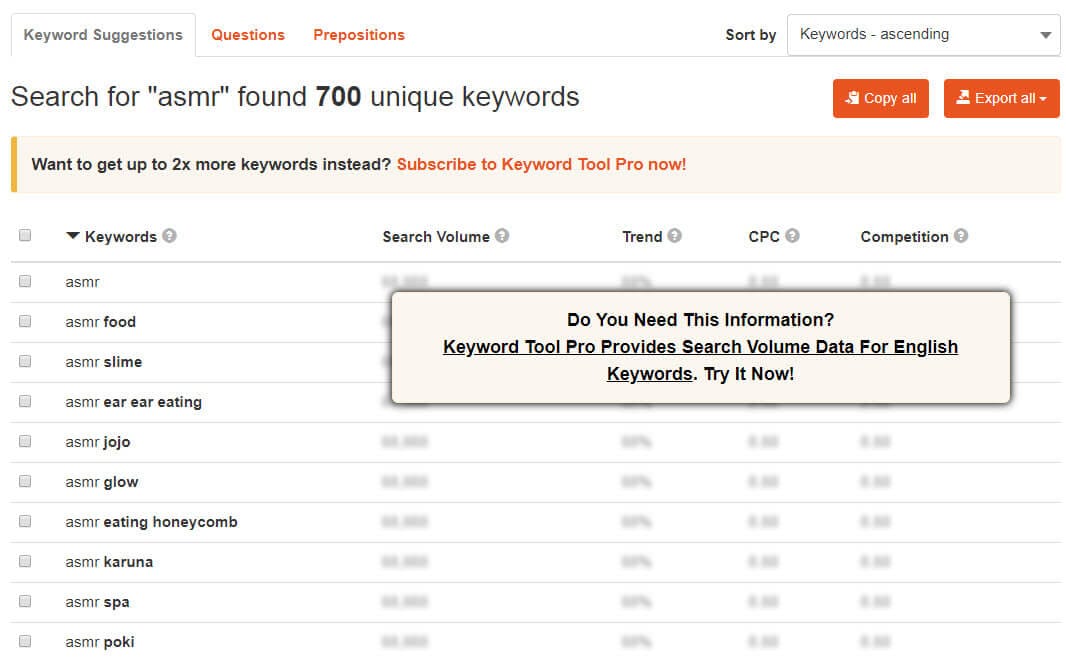
Without doubt, this is one of the most powerful YouTube keyword tools out there, ranking hundreds of keywords by popularity. It captures data from YouTube autocomplete and allows you to create lists of keywords from that data. As well as autocompete data, you can also search for questions people are asking, which makes it highly beneficial as a YouTube SEO tool.
The downside to this particular tool is that it’s fairly limited on the free version. Upgrading to Pro Basic will give you almost double the keyword results and will let you compare the volume of searches made for those terms too. However, this will set you back around $68 a year, so it’s going to be something of an investment if you go for it.
3. SEOChat
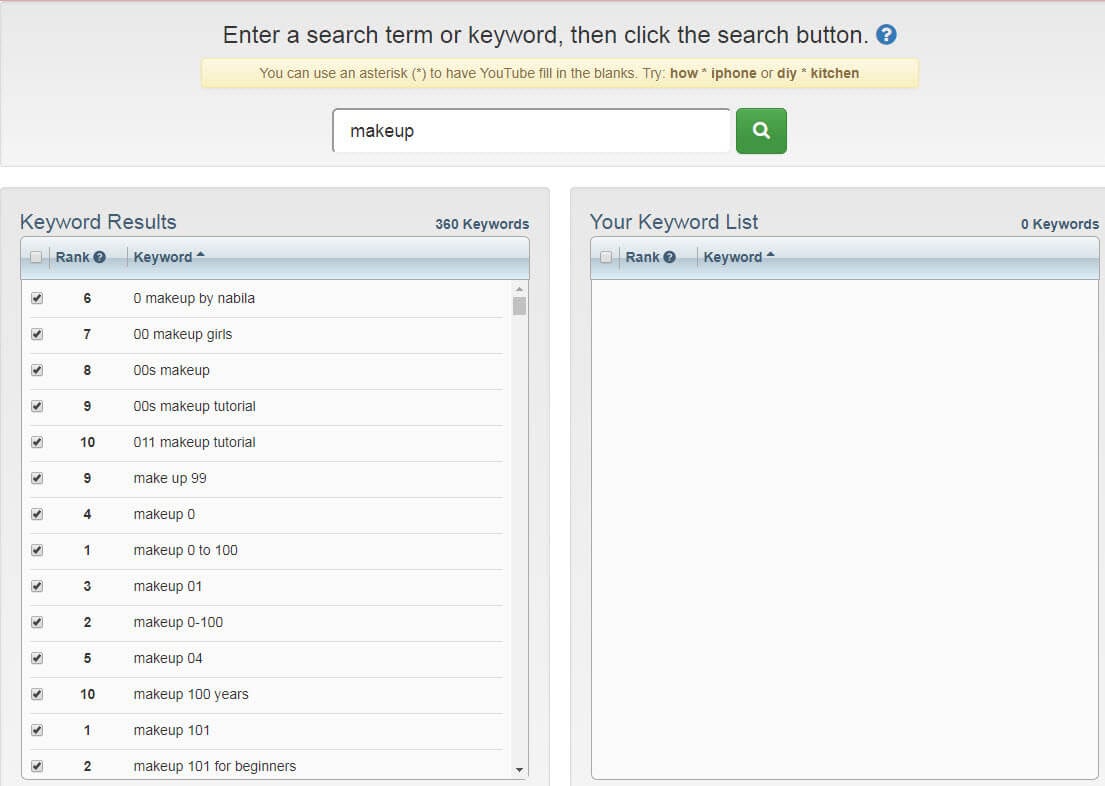
SEO Chat is an amazing free tool that can generate keyword ideas from Google, Amazon, Bing and YouTube. You can search for keywords from all of those sources or can just search YouTube alone to find your keyword lists. You’ll need a ‘seed’ keyword, such as ‘shoes’, ‘make up’ or ‘marketing’, and then organizes results alphabetically with other letters following your seed keyword.

Simply scrolling through the results is going to give you loads of ideas for keywords and possibly content too. The tool also allows you to further expand your results by selecting a keyword and running ‘part two’ of the process, which expands those phrases even further. Your chosen keywords can be exported from the software, ready for use in your YouTube SEO tool.
4. Gather keywords from your competitor
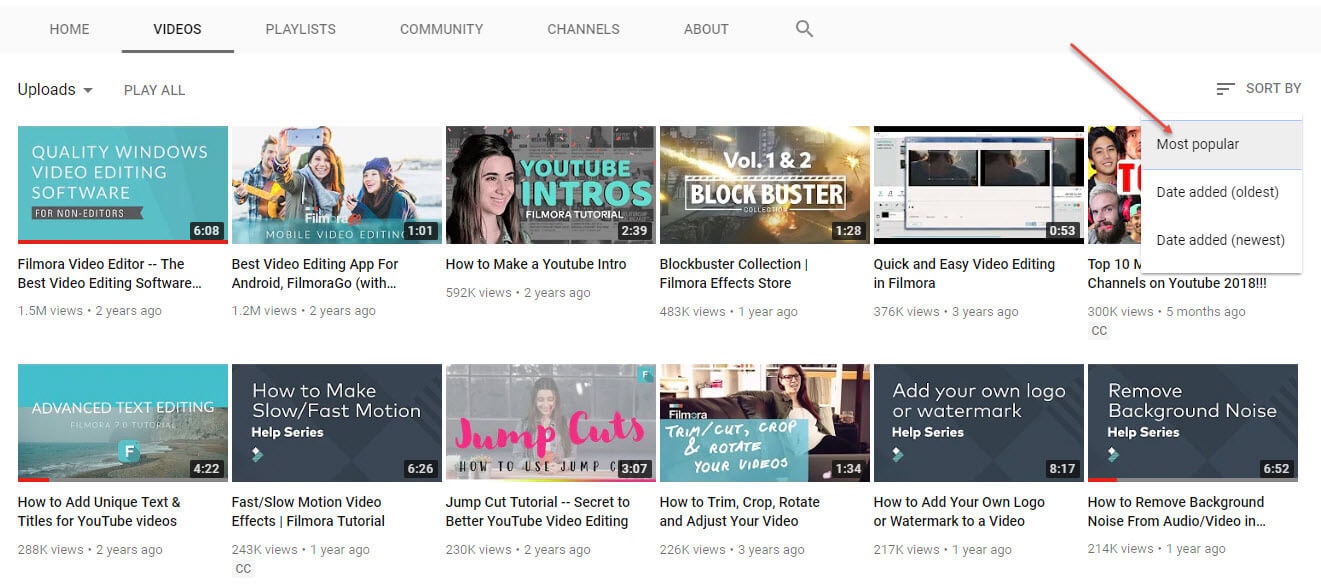
Why not learn from the best and see what’s already working for your competitors? Finding their high traffic keywords is easy and can save a lot of time and energy. To do this, pick a channel that is around your size, as they’re your nearest competitors. Steer clear of the huge channels, as you’ll find it hard to rank next to them.
Click the videos tab to see their content, and sort them by ‘most popular’ to see the ones which got the most views. Take a look at the title and the description of those videos, and you’ll find a good fistful of proven keywords that you can start using yourself.
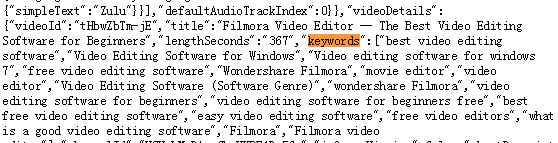
That’s not all though. To maximize your competitor research, let’s dig a little deeper into the tags they have used for their videos too. Unfortunately, these are hidden on YouTube, but are easily seen using the page’s HTML. Simply right click on the page and select ‘view source’. Don’t be alarmed at the great stream of HTML that pops up, it’s easy to search using your search function (press ctrl + f on Windows or ⌘ + f on iOS) by typing in ‘keywords’ to the search box. The following terms are the tags used in the video.
If ploughing through HTML sounds somewhat taxing, there is a handy YouTube SEO tool you can use to display the tags on page. It’s called TubeBuddy and is a Chrome extension which you’ll find in the Chrome store for free.
5. Keyword Tool Dominator
It’s got a grand name, but it’s actually really easy to use and a great place to start if you’re new to YouTube keyword research. Pop in your seed keywords and the Dominator will produce a list of relevant keywords related to those terms. You can then select the most useful and download them to your device.
The drawback with this is that you can only perform three searches a day on the free version. Perhaps that’s enough for you to begin with, but if you want to upgrade to the unlimited version, which will also give you search volumes, it’s a one-off fee of $39.99.
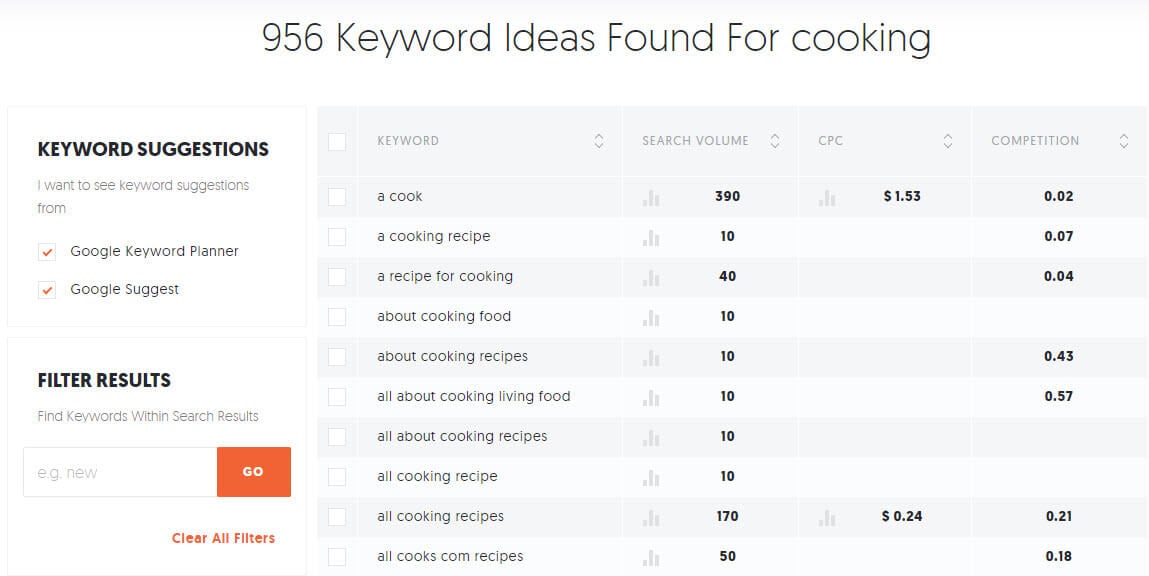
6. Ubersuggest
For getting more data on specific keywords, Ubersuggest from the SEO guru that is Neil Patel is one of the best tools out there. As well as showing search volume and competition, you can see other information such as cost per click and the seasonality of the keyword. It’s free to use with no limitations at all, so is well worth checking out.
7. Google trends
We would highly recommend investigating Google Trends as part of your YouTube keyword research, as it is powerful, accurate and, best of all, free! The options let you narrow down the trend results to just YouTube searches, which is great for gaining insights to your search terms. You can narrow down the results to a specific country too, helping you to gain insight into what your target demographic is currently interested in.
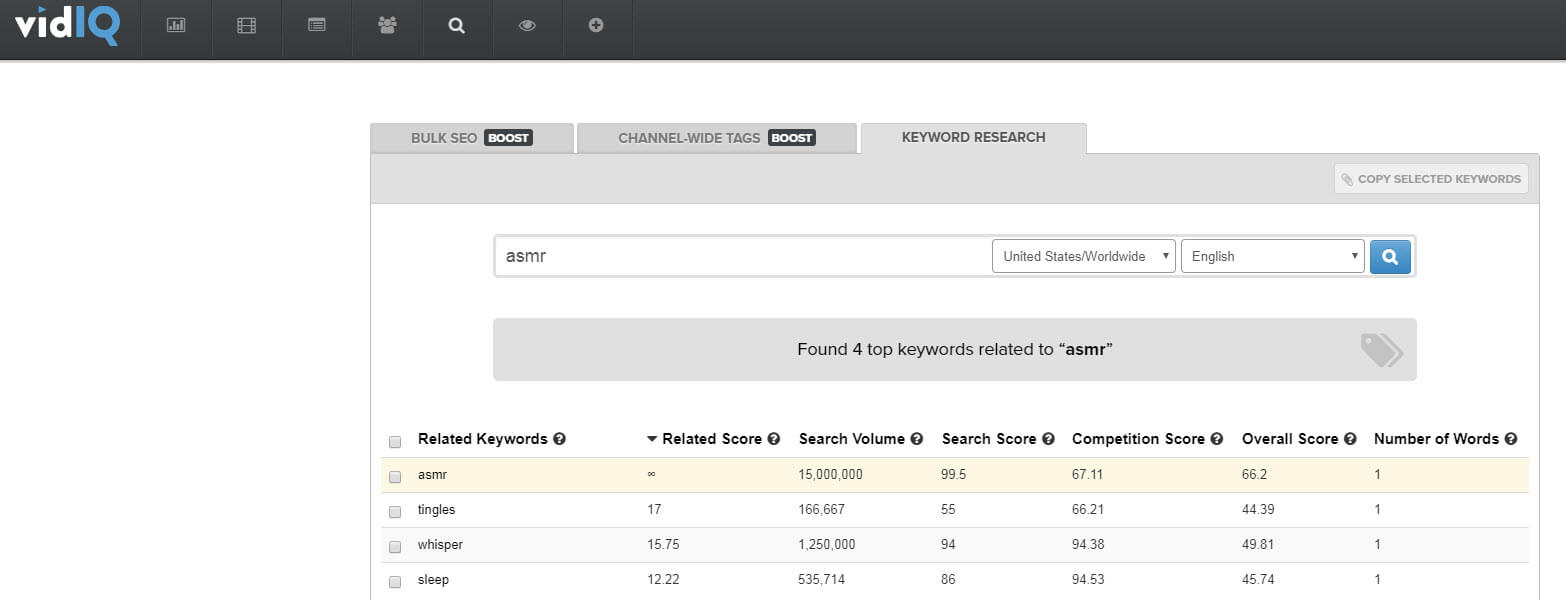
8. VidIQ
The keyword tool in VidIQ is one of very few research tools that has a function for just YouTube built in. You can paste in the keywords you want to research, choose the country you wish to target, and it will return all the search volumes and amount of competition, and will score your keywords based on these figures.
On the downside, there is a fairly complicated subscription process to go through if you want to upgrade from the free version. To be honest, the free version is OK for new users, but for in depth analytics you’re going to want to upgrade eventually.
9. Keyword Keg
Keyword Keg is definitely one of the most powerful YouTube keyword research tools out there. It offers lots of data, drawn from a variety of data sources including Wikipedia, Alibaba, Playstore and more. There are filters for country and language and you can drill down into issues like buyer intent and product info. However, as with most free YouTube keyword tools, there is a strict limit on what you can do before you pay. In this case, you only get to see the first five results unless you want to upgrade.

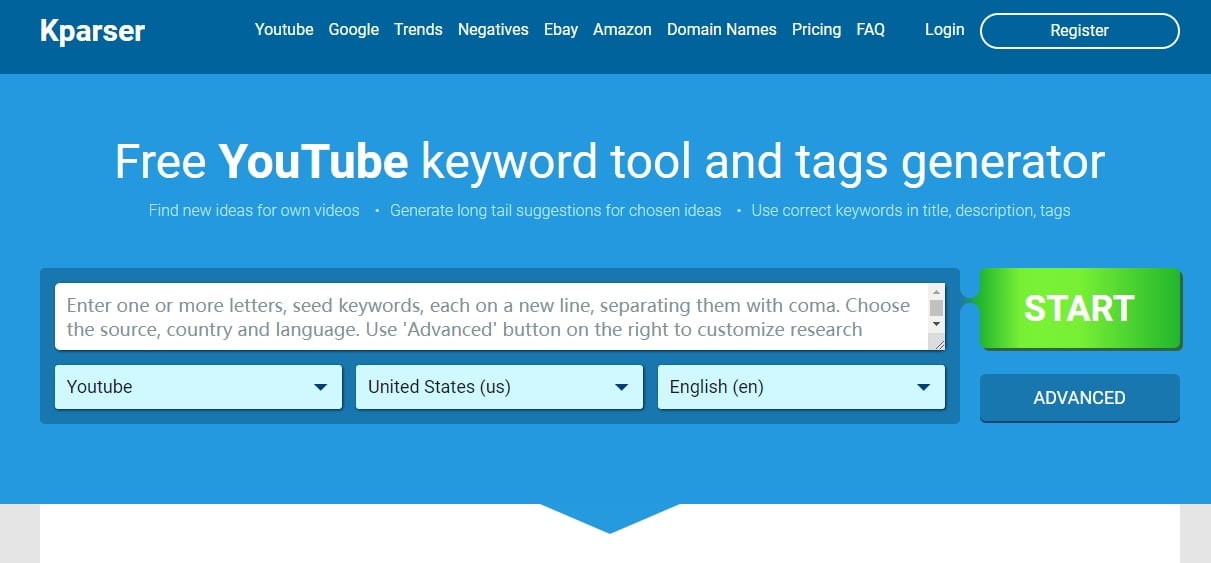
10. Kparser
Kparser is a YouTube keyword tool that you should notice. You can use it to find YouTube keywords free to use. More than finding the best core keywords, this tool can also give you suggestions on long tail keywords in every field. By use this, you don’t need to worry that you can’t the right keywords to use in title, description and tags. You also can selcet country and language when searching a YouTube keyword. For searching more than one keyword, remember to seperate them with coma.
Part 2: Bonus Tips - Google Video Result Keywords
Getting your video ranking highly on YouTube is excellent and will certainly bring you more traffic. But, do you know what would be even better than that? Getting your video ranking on Google as well.
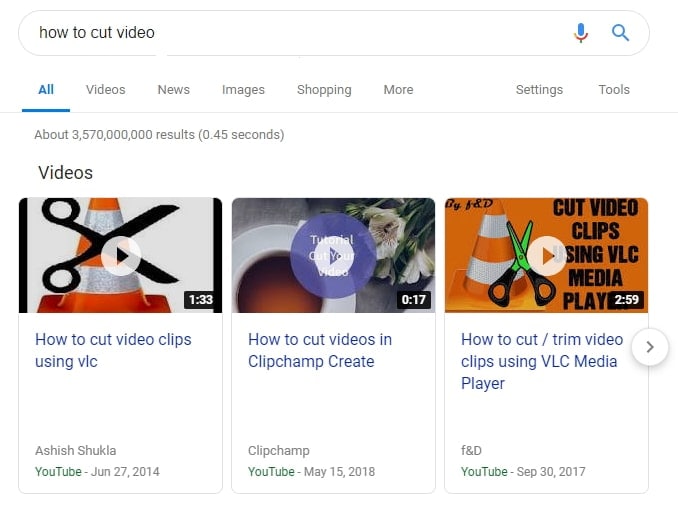
To do this you’ll need to find ‘video result keywords’ in Google, so that yours can be one of the selected videos that sometimes show up in search. Google decides what should and shouldn’t trigger a video result, and usually shows them when a video would make sense, for example when someone asks ‘how to’ or searches for ‘cute’ or ‘funny’ things.
There’s a bit of trial and error involved as there is no YouTube keyword tool to find video result keywords… yet. But you can use Google to search your keywords and see if they are video result keywords. Just type them in, and if a video appears in the listings below, you’ve discovered a video result keyword that is well worth optimizing for.
Richard Bennett
Richard Bennett is a writer and a lover of all things video.
Follow @Richard Bennett
Richard Bennett
Mar 27, 2024• Proven solutions
If we asked you to name the world’s biggest search engines, undoubtedly you’d come up with Google, but what would be number two? Bing? Yahoo? The truth might surprise you.
According to figures, the world’s second biggest search engine is actually YouTube. Millions of people are using it everyday to search for videos about fitness, hair, marketing and more. With such a large audience already searching directly on the platform, doesn’t it make sense that when we use YouTube keyword research and SEO should be as important as it is on our website?
Luckily, we can use YouTube keyword tools to analyze YouTube keywords. Here we’re going to take a look at 10 best YouTube keyword tools out there, which can help you identify and optimize for the highest traffic keywords for your videos. By optimizing your videos, you can rank higher, get more views and enjoy a larger audience on YouTube.
- Part 1: 10 Best YouTube Keyword Tools Recommendation
- Part 2: Bonues Tips - Google video result keywords
You May Also Like:
YouTube SEO Complete Guide >>
How to Edit and Optimize YouTube Title, Description, and Tags >>
Do you want to edit YouTube video easily? Filmora is a YouTube editor that you should have a try. As a YouTube video editing tool, it is simple to use with dragging and dropping. You can add various video effects, filters and transition to make your video better. Besides, titles and texts are also available to use. After editing, you can directly upload video to YouTube plactform. Now, download it to have a try!
Download Mac Version ](https://tools.techidaily.com/wondershare/filmora/download/ )
Part 1: 10 Best YouTube Keyword Tools Recommendation
Before you can get into using any YouTube SEO tool, you’ll need to identify what the best keywords for your videos are. Let’s start by taking a look at the best YouTube keyword tools available.
1. YouTube autocomplete
When you start to search for something on YouTube, you’ll probably notice that YouTube suggests some keywords to finish your search. This is called autocomplete, and it works by suggesting the most popular keywords that start with the letters you’ve typed so far. What it is essentially saying is that those are the most frequently searched for terms that use the words you’ve already typed.
This means it’s a great place to start building your keywords, and a fantastic YouTube keyword tool for your videos. Just start your search for your video (e.g. shoes for…) and see what comes up. In this case, we can see that the most popular keywords are ‘girls’, ‘men’, ‘kids’, ‘summer’ and ‘boys’.
2. Keywordtool.io
Without doubt, this is one of the most powerful YouTube keyword tools out there, ranking hundreds of keywords by popularity. It captures data from YouTube autocomplete and allows you to create lists of keywords from that data. As well as autocompete data, you can also search for questions people are asking, which makes it highly beneficial as a YouTube SEO tool.
The downside to this particular tool is that it’s fairly limited on the free version. Upgrading to Pro Basic will give you almost double the keyword results and will let you compare the volume of searches made for those terms too. However, this will set you back around $68 a year, so it’s going to be something of an investment if you go for it.
3. SEOChat
SEO Chat is an amazing free tool that can generate keyword ideas from Google, Amazon, Bing and YouTube. You can search for keywords from all of those sources or can just search YouTube alone to find your keyword lists. You’ll need a ‘seed’ keyword, such as ‘shoes’, ‘make up’ or ‘marketing’, and then organizes results alphabetically with other letters following your seed keyword.
Simply scrolling through the results is going to give you loads of ideas for keywords and possibly content too. The tool also allows you to further expand your results by selecting a keyword and running ‘part two’ of the process, which expands those phrases even further. Your chosen keywords can be exported from the software, ready for use in your YouTube SEO tool.
4. Gather keywords from your competitor
Why not learn from the best and see what’s already working for your competitors? Finding their high traffic keywords is easy and can save a lot of time and energy. To do this, pick a channel that is around your size, as they’re your nearest competitors. Steer clear of the huge channels, as you’ll find it hard to rank next to them.
Click the videos tab to see their content, and sort them by ‘most popular’ to see the ones which got the most views. Take a look at the title and the description of those videos, and you’ll find a good fistful of proven keywords that you can start using yourself.
That’s not all though. To maximize your competitor research, let’s dig a little deeper into the tags they have used for their videos too. Unfortunately, these are hidden on YouTube, but are easily seen using the page’s HTML. Simply right click on the page and select ‘view source’. Don’t be alarmed at the great stream of HTML that pops up, it’s easy to search using your search function (press ctrl + f on Windows or ⌘ + f on iOS) by typing in ‘keywords’ to the search box. The following terms are the tags used in the video.
If ploughing through HTML sounds somewhat taxing, there is a handy YouTube SEO tool you can use to display the tags on page. It’s called TubeBuddy and is a Chrome extension which you’ll find in the Chrome store for free.
5. Keyword Tool Dominator
It’s got a grand name, but it’s actually really easy to use and a great place to start if you’re new to YouTube keyword research. Pop in your seed keywords and the Dominator will produce a list of relevant keywords related to those terms. You can then select the most useful and download them to your device.
The drawback with this is that you can only perform three searches a day on the free version. Perhaps that’s enough for you to begin with, but if you want to upgrade to the unlimited version, which will also give you search volumes, it’s a one-off fee of $39.99.
6. Ubersuggest
For getting more data on specific keywords, Ubersuggest from the SEO guru that is Neil Patel is one of the best tools out there. As well as showing search volume and competition, you can see other information such as cost per click and the seasonality of the keyword. It’s free to use with no limitations at all, so is well worth checking out.
7. Google trends
We would highly recommend investigating Google Trends as part of your YouTube keyword research, as it is powerful, accurate and, best of all, free! The options let you narrow down the trend results to just YouTube searches, which is great for gaining insights to your search terms. You can narrow down the results to a specific country too, helping you to gain insight into what your target demographic is currently interested in.
8. VidIQ
The keyword tool in VidIQ is one of very few research tools that has a function for just YouTube built in. You can paste in the keywords you want to research, choose the country you wish to target, and it will return all the search volumes and amount of competition, and will score your keywords based on these figures.
On the downside, there is a fairly complicated subscription process to go through if you want to upgrade from the free version. To be honest, the free version is OK for new users, but for in depth analytics you’re going to want to upgrade eventually.
9. Keyword Keg
Keyword Keg is definitely one of the most powerful YouTube keyword research tools out there. It offers lots of data, drawn from a variety of data sources including Wikipedia, Alibaba, Playstore and more. There are filters for country and language and you can drill down into issues like buyer intent and product info. However, as with most free YouTube keyword tools, there is a strict limit on what you can do before you pay. In this case, you only get to see the first five results unless you want to upgrade.
10. Kparser
Kparser is a YouTube keyword tool that you should notice. You can use it to find YouTube keywords free to use. More than finding the best core keywords, this tool can also give you suggestions on long tail keywords in every field. By use this, you don’t need to worry that you can’t the right keywords to use in title, description and tags. You also can selcet country and language when searching a YouTube keyword. For searching more than one keyword, remember to seperate them with coma.
Part 2: Bonus Tips - Google Video Result Keywords
Getting your video ranking highly on YouTube is excellent and will certainly bring you more traffic. But, do you know what would be even better than that? Getting your video ranking on Google as well.
To do this you’ll need to find ‘video result keywords’ in Google, so that yours can be one of the selected videos that sometimes show up in search. Google decides what should and shouldn’t trigger a video result, and usually shows them when a video would make sense, for example when someone asks ‘how to’ or searches for ‘cute’ or ‘funny’ things.
There’s a bit of trial and error involved as there is no YouTube keyword tool to find video result keywords… yet. But you can use Google to search your keywords and see if they are video result keywords. Just type them in, and if a video appears in the listings below, you’ve discovered a video result keyword that is well worth optimizing for.
Richard Bennett
Richard Bennett is a writer and a lover of all things video.
Follow @Richard Bennett
Elevate Play Button Visuals: Vivid Neon Lines Added
Your YouTube video, or any other clip published on any forum, gets a larger number of hits if it has an attractive thumbnail. And, the fact is, a thumbnail becomes 10x more attractive when the main character that the image has have a neon border around it.
With that said, in the following sections, you will learn a couple of methods on how to add a YouTube thumbnail border around the main characters and/or objects that are significant to the clip.
In this article
01 Add Glowing Neon Border to YouTube Thumbnail with Filmora
02 Add a Glowing Neon Border in YouTube Thumbnail with Canva
03 Outline a Person in a YouTube Thumbnail with Photoshop
Part 1: How to Add Neon Border to YouTube Thumbnail for Free with Filmora
Being one of the most versatile and intuitive post-production tools available in the market today, Wondershare Filmora X allows you to add a neon border to a YouTube thumbnail quite conveniently. You can learn how to get this done on Windows or Mac by following the steps given below.
For Win 7 or later (64-bit)
For macOS 10.12 or later
Step 1: Define Project Settings and Add Image to the Timeline
Launch Wondershare Filmora X on your PC (a MacBook Pro M1 is used here), ensure that the project aspect ratio is set to 16:9 (Widescreen) on the splash screen, and click New Project. On the main interface, click the Preview quality and display settings icon from the upper-right area of the Timeline, click Change Project Aspect Ratio, click to select 1280 x 720 (HD) from the Resolution menu of the Project Settings box, and click OK to save the custom project settings.

Then select My Media from the menu bar if not already selected, click Project Media from the navigation pane, and click Import from the Media box to select and import the image of the main character or object that you want to use in the thumbnail.

Now, drag the image from the Media box to the Timeline at the bottom.

Step 2: Clear Image Background, Add Border, and Add Custom Background
Go to Effects from the menu bar, click to select the Default tab and then AI Portrait from the navigation pane, and click and drag the Human Segmentation preset from the right box, and place it over the image track in the Timeline.

Double-click the image layer, scroll down the upper-left box to the Video Effects section, and use the Edge Thickness and Edge Feather sliders to adjust the character’s edges to make them as realistic as possible. Click OK when done.

Next, click and drag the Human Border preset over the image track in the Timeline, and follow the same procedure to customize the border. This will give the character a neon border effect.

Now, use the method explained earlier to import a custom image for the background, and drag and place it under the previous track in the Timeline.

If you are running the latest version of Filmora, you will find there are some neon light effects available under AI Portrait as well.

Step 3: Add Titles to Thumbnail
Go to Titles from the menu bar, click to select the Default tab and then Lower 3rds from the navigation pane, and click and drag your preferred lower-third preset from the right window to a separate layer in the Timeline. Double-click the lower-third layer, and use the available options in the upper-left window to change the text, its color, etc., and drag the textbox to place it to your preferred position on the image as well. Click OK to save the changes.
Next, click to select Titles from the navigation pane, and drag your preferred title from the right window to the upper-most track in the Timeline. Now use the method explained earlier to edit the text, its color, position, etc. to make it look professional.

For more tips and tricks for creating YouTube thumbnail, you can check this You Tube thumbnail creating guide.
Step 4: Get the Neon Border Thumbnail
Click the Snapshot (Camera) icon from the upper-right area of the Timeline, go to My Media from the menu bar, right-click the thumbnail of the screenshot you captured, and click Reveal in Finder (on Mac) or Reveal in Explorer (on Windows) to get to the folder the YouTube thumbnail border is saved in.

Part 2: How to Add a Glowing Neon Border in Your YouTube Thumbnail with Canva
Canva is another intuitive editing program that works on the web interface rather than having you download and install an app on your PC. You can add a neon border for YouTube thumbnails using Canva by following the instructions given below:
Step 1: Define Project Settings and Add a Background
After signing in to your Canva account, click Create a design from the top-right corner of the page, click Custom size from the bottom, define 1280 and 720 in the Width and Height fields on the box that appears respectively, and click Create new design.

Now, click to select Background from the navigation bar on the left (if the Background tool is not visible, click More and then choose Background from the expanded list), and click to select a background from the images available in the center pane.

Step 2: Upload an Image and Add Effects
Click Uploads from the navigation bar, click the More icon from the right of the Upload media button present at the top of the center pane, choose your preferred method to upload the image (with the transparent background) that you want to use, upload the image, and drag it from the center pane to the Canvas.
Note: You can use any of the tools available online to remove the background from your image for free.

To add a YouTube thumbnail border, make sure that the image that you added to the Canvas is selected, click the Duplicate icon from the upper-right area, and use the scaling handles of the copy of the image to increase its size a bit. Reposition the image back to its original location as well.
Then, click Edit image from the upper-left corner of the Canvas, click Duotone from the Edit image pane at the center, if need be, click See all, choose your preferred duotone effect to apply on the image, choose your preferred highlight and shadow colors from the box that appears next, and click Back from the top of the pane.

Next, click See all next to the Adjust section from the center pane, and drag the Blur slider to the right to increase the blur effect on the image.

Step 3: Position the Layers
While keeping the duplicate image selected, click the Position button from the upper-right area of the Canvas, and click Background to send the second image behind the first one to get the neon border effect for the photo.

Part 3: How to Outline a Person in a YouTube Thumbnail with Photoshop
Because YouTube thumbnails are nothing but static images, creating YouTube thumbnail border with Adobe Photoshop is comparatively easier. The process of doing this is given below:
Step 1: Define Document Preferences and Import an Image
Launch Adobe Photoshop on your PC, click Create new, and on the New Document customization box, define the width and height values to 1280 and 720 pixels respectively. Select Transparent from the Background Contents menu as well if not already selected. Click Create from the bottom to create a new Photoshop document with the specified document settings. Next, open the folder that contains the source image, drag the photo to Photoshop, and press Enter to place the photo.

Step 2: Remove Background from the Image
Make sure that the image layer is selected in the Layers panel on the right, go to Select from the menu bar at the top, and click Subject. From the bottom of the Layers panel, click the Add a mask icon to get rid of the background, leaving only the human on the Canvas.

Step 3: Add a Custom Background and an Outline Around the Subject
Use the method explained earlier to import a background image of your choice to Photoshop. Drag the background image layer to the bottom in the Layers panel. Double-click the masked layer, click to select Stroke from the left pane of the Layer Style box, and use the options available on the right to manage the size, color, position, etc. of the stroke that has been added around the human subject. Click OK when done, and then export the image normally to use it as a YouTube thumbnail border.

Summary
It is important to know that the default resolution of a YouTube thumbnail is 1280 x 720 pixels that is usually written and referred to as 720p. While adding a YouTube thumbnail border, it is also imperative to have a good sense of color combination and fonts. Furthermore, a decent tool like Wondershare Filmora X must be used to add an appealing neon border around the main subject in the thumbnail image easily and quickly.
02 Add a Glowing Neon Border in YouTube Thumbnail with Canva
03 Outline a Person in a YouTube Thumbnail with Photoshop
Part 1: How to Add Neon Border to YouTube Thumbnail for Free with Filmora
Being one of the most versatile and intuitive post-production tools available in the market today, Wondershare Filmora X allows you to add a neon border to a YouTube thumbnail quite conveniently. You can learn how to get this done on Windows or Mac by following the steps given below.
For Win 7 or later (64-bit)
For macOS 10.12 or later
Step 1: Define Project Settings and Add Image to the Timeline
Launch Wondershare Filmora X on your PC (a MacBook Pro M1 is used here), ensure that the project aspect ratio is set to 16:9 (Widescreen) on the splash screen, and click New Project. On the main interface, click the Preview quality and display settings icon from the upper-right area of the Timeline, click Change Project Aspect Ratio, click to select 1280 x 720 (HD) from the Resolution menu of the Project Settings box, and click OK to save the custom project settings.
Then select My Media from the menu bar if not already selected, click Project Media from the navigation pane, and click Import from the Media box to select and import the image of the main character or object that you want to use in the thumbnail.
Now, drag the image from the Media box to the Timeline at the bottom.
Step 2: Clear Image Background, Add Border, and Add Custom Background
Go to Effects from the menu bar, click to select the Default tab and then AI Portrait from the navigation pane, and click and drag the Human Segmentation preset from the right box, and place it over the image track in the Timeline.
Double-click the image layer, scroll down the upper-left box to the Video Effects section, and use the Edge Thickness and Edge Feather sliders to adjust the character’s edges to make them as realistic as possible. Click OK when done.
Next, click and drag the Human Border preset over the image track in the Timeline, and follow the same procedure to customize the border. This will give the character a neon border effect.
Now, use the method explained earlier to import a custom image for the background, and drag and place it under the previous track in the Timeline.
If you are running the latest version of Filmora, you will find there are some neon light effects available under AI Portrait as well.
Step 3: Add Titles to Thumbnail
Go to Titles from the menu bar, click to select the Default tab and then Lower 3rds from the navigation pane, and click and drag your preferred lower-third preset from the right window to a separate layer in the Timeline. Double-click the lower-third layer, and use the available options in the upper-left window to change the text, its color, etc., and drag the textbox to place it to your preferred position on the image as well. Click OK to save the changes.
Next, click to select Titles from the navigation pane, and drag your preferred title from the right window to the upper-most track in the Timeline. Now use the method explained earlier to edit the text, its color, position, etc. to make it look professional.
For more tips and tricks for creating YouTube thumbnail, you can check this You Tube thumbnail creating guide.
Step 4: Get the Neon Border Thumbnail
Click the Snapshot (Camera) icon from the upper-right area of the Timeline, go to My Media from the menu bar, right-click the thumbnail of the screenshot you captured, and click Reveal in Finder (on Mac) or Reveal in Explorer (on Windows) to get to the folder the YouTube thumbnail border is saved in.
Part 2: How to Add a Glowing Neon Border in Your YouTube Thumbnail with Canva
Canva is another intuitive editing program that works on the web interface rather than having you download and install an app on your PC. You can add a neon border for YouTube thumbnails using Canva by following the instructions given below:
Step 1: Define Project Settings and Add a Background
After signing in to your Canva account, click Create a design from the top-right corner of the page, click Custom size from the bottom, define 1280 and 720 in the Width and Height fields on the box that appears respectively, and click Create new design.
Now, click to select Background from the navigation bar on the left (if the Background tool is not visible, click More and then choose Background from the expanded list), and click to select a background from the images available in the center pane.
Step 2: Upload an Image and Add Effects
Click Uploads from the navigation bar, click the More icon from the right of the Upload media button present at the top of the center pane, choose your preferred method to upload the image (with the transparent background) that you want to use, upload the image, and drag it from the center pane to the Canvas.
Note: You can use any of the tools available online to remove the background from your image for free.
To add a YouTube thumbnail border, make sure that the image that you added to the Canvas is selected, click the Duplicate icon from the upper-right area, and use the scaling handles of the copy of the image to increase its size a bit. Reposition the image back to its original location as well.
Then, click Edit image from the upper-left corner of the Canvas, click Duotone from the Edit image pane at the center, if need be, click See all, choose your preferred duotone effect to apply on the image, choose your preferred highlight and shadow colors from the box that appears next, and click Back from the top of the pane.
Next, click See all next to the Adjust section from the center pane, and drag the Blur slider to the right to increase the blur effect on the image.
Step 3: Position the Layers
While keeping the duplicate image selected, click the Position button from the upper-right area of the Canvas, and click Background to send the second image behind the first one to get the neon border effect for the photo.
Part 3: How to Outline a Person in a YouTube Thumbnail with Photoshop
Because YouTube thumbnails are nothing but static images, creating YouTube thumbnail border with Adobe Photoshop is comparatively easier. The process of doing this is given below:
Step 1: Define Document Preferences and Import an Image
Launch Adobe Photoshop on your PC, click Create new, and on the New Document customization box, define the width and height values to 1280 and 720 pixels respectively. Select Transparent from the Background Contents menu as well if not already selected. Click Create from the bottom to create a new Photoshop document with the specified document settings. Next, open the folder that contains the source image, drag the photo to Photoshop, and press Enter to place the photo.
Step 2: Remove Background from the Image
Make sure that the image layer is selected in the Layers panel on the right, go to Select from the menu bar at the top, and click Subject. From the bottom of the Layers panel, click the Add a mask icon to get rid of the background, leaving only the human on the Canvas.
Step 3: Add a Custom Background and an Outline Around the Subject
Use the method explained earlier to import a background image of your choice to Photoshop. Drag the background image layer to the bottom in the Layers panel. Double-click the masked layer, click to select Stroke from the left pane of the Layer Style box, and use the options available on the right to manage the size, color, position, etc. of the stroke that has been added around the human subject. Click OK when done, and then export the image normally to use it as a YouTube thumbnail border.
Summary
It is important to know that the default resolution of a YouTube thumbnail is 1280 x 720 pixels that is usually written and referred to as 720p. While adding a YouTube thumbnail border, it is also imperative to have a good sense of color combination and fonts. Furthermore, a decent tool like Wondershare Filmora X must be used to add an appealing neon border around the main subject in the thumbnail image easily and quickly.
Also read:
- Digital Audience Accolades for Content Makers
- Dive Into Maker's Earnings Exploring YouTube Shorts Revenue Structure
- [New] Banish YouTube Shorts Forever with Ease
- Digital Domination Rise From Thousands to a Million on YouTube
- Audience Appreciation Assessment Self and Seekers Vs. Rival Repertoires for 2024
- [New] Do YouTubers Get Paid Monthly?
- [Updated] Cutting Edge Notebooks and Tools to Elevate Your Editing Game
- [New] Enhancing YouTube Videos Proper Lighting Methods
- 2024 Approved 8 Best Free Video Editing Software for YouTube
- [New] Boosting Viewership Responsibly Strategies That Work
- 2024 Approved Cutting-Edge Techniques for Resolving YouTube Short Issues
- [Updated] Discover 7 Premium Android AdBlocking Tools
- [New] DIY Delights in Motion Personalized Animation Artistry
- 3 Efficient Methods for Saving YouTube's Standardized Images for 2024
- Pursuing Your Vision Learn Professional Filmmaking on YouTube
- Simplifying the Process of Deleting YouTube Files
- Elevate Your Channel'enas Expensive? Check Out Our 11 Free Name Generators Guide
- [Updated] Deciphering the Complexity of Online Content Monetization
- Inside Out The Realities of YouTubing Earning
- The Definitive Guide for Choosing Best YouTube Visual Elements
- Becoming a Bull or Bear Best Stock Vids on YouTube for 2024
- In 2024, Enhancing Viewer Interest with Thumbnails
- [Updated] Capture the Season' Wardrobe Top 5 Winter YT Scenes
- [New] Avoiding the Blank Thumbnail Scenario in Shorts
- A Taste of Film Home Cook's Visual Journey for 2024
- 2024 Approved Enabling Autoplay YouTube Without Alerts
- In 2024, Discover 8 Essential Sites for Pristine Green Screen Images
- Captivating Your Audience YouTube Intro Excellence with iMovie
- [Updated] Cutting-Edge 8 Content Creators Skyrocketing Growth
- Discover the Best 8 Mirrorless Cameras That Transform Vlogging for 2024
- In 2024, Discover the Ultimate Tune Troupes on These 20 Premier YouTube Sounds
- In 2024, Discovering Where YouTube Video Management Happens
- 2024 Approved Earn Through Engagement Securing YouTube Partnership Membership
- 2024 Approved Critical Components Affecting YouTube Video Scores
- [Updated] 16 Crowning YouTube Opens for Enhanced Reach
- [Updated] 5 Innovative Apps to Design Stunning Openings
- 2024 Approved Channel Boosting Mastery Unveiling the Best 5 Video Marketing Strategies
- YouTube's Secret to Success A Compre FFive Essential Keyword Tools
- Bring Your YouTube Vision to Life with FREE Banner Resources for 2024
- [New] Essential Free Apps for YouTube to WAV Transformation
- [New] Cinematography Simplified Fades Made Easy
- All You Need To Know About Mega Greninja For Honor X9b | Dr.fone
- [New] In 2024, TwitReact Wisdom A Complete Reference Book
- [Updated] Fast Film Techniques Taking Screens on a Dell for 2024
- In 2024, Shaky Footage? No Problem! FCPX Stabilization Techniques
- New In 2024, Unlocking the Secrets of MP3 to MP4 Conversion Tips and Tricks
- Full Guide to Unlock Your Vivo Y100A
- 2024 Approved Save InstaStories Infinite The Liberation App
- 2024 Approved 6 Top Online MP4 Croppers
- 5 Best Route Generator Apps You Should Try On Lava Agni 2 5G | Dr.fone
- Discover the Ultimate List of Best-Rated Chromebook Drawers
- In 2024, Creating Captivating Slideshows on the Social Media Giant
- In 2024, Mastering Instagram Concealing Tags Efficiently
- [New] The Finest 12 Tycoons Your Pathway to Gaming Enthusiasm for 2024
- Comprehensive Guide Understanding Google Podcasts
- The Magnificent Art of Pokemon Go Streaming On Honor Magic 5 Lite? | Dr.fone
- Title: "Maximize Views with These Top-Rated Keyword Analysis Tools"
- Author: Brian
- Created at : 2024-05-25 12:22:04
- Updated at : 2024-05-26 12:22:04
- Link: https://youtube-video-recordings.techidaily.com/maximize-views-with-these-top-rated-keyword-analysis-tools/
- License: This work is licensed under CC BY-NC-SA 4.0.
