
:max_bytes(150000):strip_icc()/is-microsoft-teams-down-or-is-it-you-5105051-419830bc0e82459ba9b33af1cea82705.jpg)
"Mastering YouTube's Vista An In-Depth Tutorial on Video Submissions"
Mastering YouTube’s Vista: An In-Depth Tutorial on Video Submissions
How To Upload Videos to YouTube [a Step-by-Step Guide]

Richard Bennett
Mar 27, 2024• Proven solutions
Want to learn how to upload videos to YouTube? Millions of people watch YouTube every day. Creating and posting YouTube videos can be a lot of fun, and if you get a lot of views and become popular you can also make money. YouTube videos are a creative way to connect with people all around the world.
These simple steps can assist you in learning how to upload YouTube videos from a desktop computer. You are going to Learn:
Edit YouTube with Powerful Video Editor
As a YouTuber, it is necessary to have an easy-to-use video editor, especially for beginners. Download Filmora for free and start your editing journey happily.


Part 1: Basic Rules You Need to Know Before Uploading
Clicking the ‘upload’ button is easy, but during the upload process, there are things you can do to help your video get views and maintain its quality. You should also keep an eye on the length and file size limits. The more basic things you need to consider carefully when you upload are the title, description, and tags of your video. These are part of what determines if and where your video comes up in people’s search results. There are also slightly more advanced video specs, like your video’s resolution, which will be helpful for you to understand as somebody who will be producing video content frequently. These sorts of specs will affect how long it takes your videos to upload and how much of the quality they maintain.
1. How Long Can my Video Be?
By default, your YouTube videos can only be 15 minutes long. You can post longer videos by going to the upload page and clicking on ‘Increase your Limit’ at the bottom. After you have followed the steps to verify your account you will be able to post videos that are a maximum of 11 hours long.
2. How Big a File Can I Upload?
Your file size was capped at 20GB, initially. If you follow the same steps for posting videos longer than 15 minutes then you can also increase your maximum file size to 128GB.
3. Other Basics
After you click the ‘upload’ button on YouTube you are taken to a page where you choose a category for your video and add a title, description, and tags. These are all important for getting hits so you should put some thought into them.
Title: Keep your title under 70 characters so none of it disappears into a ‘…’. The best titles make people curious or elicit an emotional response. Terms like ‘video’, ‘how-to’, and ‘tutorial’ are often typed into people’s searches so if they apply to your video it can help to put them in the title.
Description: A short synopsis of your video which includes your most important keyword. You have about three lines before your text is hidden by a ‘show more’ tab. If you are including the URL of your channel or other videos then you should make sure they are above the ‘show more’.
Tags: Use a lot of them. These are the keywords and terms people will be searching for when they find your video. YouTube will suggest some after you start adding. A quick way to find good keywords to use is to search for videos similar to yours and check out their tags. A while ago YouTube started hiding video tags by default but you can download a free, YouTube-certified, extension for Google Chrome which will allow you to see them from vidIQ.com.
4. Digging Deeper
To get your viewers to subscribe to your channel you will need to make sure your videos are not losing quality when you upload them. Here are some things to be aware of if you want your videos to look great on YouTube.
Resolution: the number of pixels in your image. For example when a video has a resolution of 1080p that means it has a grid of pixels that is 1920 x 1080. The more pixels you have the sharper your image.
Bitrate: Bitrate is a measurement of how compressed your file is, and the less compressed it is the more information there is per frame. Higher bitrates mean larger file sizes.
Your resolution and bitrate should complement each other. If you have a higher bitrate than is needed for your video’s resolution your file will be unnecessarily large. If your bitrate is too low for your resolution then you will not see the quality you expect.
YouTube has a list of recommended resolutions and bitrates at support.google.com/youtube/answer/1722171.
Aspect Ratio: the dimensions of your video, in terms of width and height. YouTube’s aspect ratio is 16:9, so your videos should also be 16:9. If they are not then you will get black bars on either side of your video after you upload it. The most common way that people end up with the wrong aspect ratio is by creating videos on their smartphones and holding them up and down instead of sideways.
Part 2: Steps to Upload Videos to YouTube
Uploading YouTube Video on Desktop:
1. Sign in to your YouTube account
2. Hit the upload button
3. Select your video type (Public, Private, Unlisted)
4. Manage the upload
5. Choose your thumbnail
Step 1: Sign in to your YouTube account
In order to upload videos to YouTube, the very first thing you need to do is sign in. The sign-in button is located at the top right corner of the YouTube homepage. If you have multiple accounts registered to one device, you will be asked to choose one to log in to.

Step 2: Hit the upload button
It is a simple step that you will have to follow right after you log in to YouTube. As soon as you enter YouTube, after using your Google account and password for login, you will find the upload button in the top right corner of the screen. Click on this button and it will take you to the dedicated upload page.
Step 3: Select your video type (Public, Private, Unlisted)
Choose your audience. If you wish to make your video available to everyone on YouTube, simply go to the privacy settings and choose the “Public” option from the drop-down menu.
If you do not want your video to be searchable, but still want to be able to easily share a link to it with your friends and family, choose the “Unlisted” option.
Those who wish to keep their video personal can choose the “Private” option from the drop-down menu. You can still share a private video with a limited number of people (as long as they have Google accounts).
The “Scheduled” option is available for choosing a future date and time to make the video available to viewers. Once you have selected your privacy level, simply upload your video from your device storage.

Step 4: Manage the upload
As soon as you have confirmed your video upload, you will find a progress bar on the screen. It will take some time depending on factors such as the resolution of the video and how long it is. In the meanwhile, you can write a title, description and add relevant tags for your video so that YouTube knows what search results to include it in and viewers can find it. Remember that YouTube is the second biggest search engine on the Internet, so take some time to optimize your keywords .
Step 5: Choose your thumbnail
Once your video uploading is complete, it is time to choose a creative thumbnail for your video. The system provides you with three options to choose from automatically, all of which will be screenshots from your video. It is usually better toupload your own custom thumbnail , as thumbnails are a very important factor in attracting viewers. Hit the “Done” button or use the “Publish” button to finalize your upload.
That’s how to upload a video on YouTube! Any questions?
Richard Bennett
Richard Bennett is a writer and a lover of all things video.
Follow @Richard Bennett
Richard Bennett
Mar 27, 2024• Proven solutions
Want to learn how to upload videos to YouTube? Millions of people watch YouTube every day. Creating and posting YouTube videos can be a lot of fun, and if you get a lot of views and become popular you can also make money. YouTube videos are a creative way to connect with people all around the world.
These simple steps can assist you in learning how to upload YouTube videos from a desktop computer. You are going to Learn:
Edit YouTube with Powerful Video Editor
As a YouTuber, it is necessary to have an easy-to-use video editor, especially for beginners. Download Filmora for free and start your editing journey happily.
Part 1: Basic Rules You Need to Know Before Uploading
Clicking the ‘upload’ button is easy, but during the upload process, there are things you can do to help your video get views and maintain its quality. You should also keep an eye on the length and file size limits. The more basic things you need to consider carefully when you upload are the title, description, and tags of your video. These are part of what determines if and where your video comes up in people’s search results. There are also slightly more advanced video specs, like your video’s resolution, which will be helpful for you to understand as somebody who will be producing video content frequently. These sorts of specs will affect how long it takes your videos to upload and how much of the quality they maintain.
1. How Long Can my Video Be?
By default, your YouTube videos can only be 15 minutes long. You can post longer videos by going to the upload page and clicking on ‘Increase your Limit’ at the bottom. After you have followed the steps to verify your account you will be able to post videos that are a maximum of 11 hours long.
2. How Big a File Can I Upload?
Your file size was capped at 20GB, initially. If you follow the same steps for posting videos longer than 15 minutes then you can also increase your maximum file size to 128GB.
3. Other Basics
After you click the ‘upload’ button on YouTube you are taken to a page where you choose a category for your video and add a title, description, and tags. These are all important for getting hits so you should put some thought into them.
Title: Keep your title under 70 characters so none of it disappears into a ‘…’. The best titles make people curious or elicit an emotional response. Terms like ‘video’, ‘how-to’, and ‘tutorial’ are often typed into people’s searches so if they apply to your video it can help to put them in the title.
Description: A short synopsis of your video which includes your most important keyword. You have about three lines before your text is hidden by a ‘show more’ tab. If you are including the URL of your channel or other videos then you should make sure they are above the ‘show more’.
Tags: Use a lot of them. These are the keywords and terms people will be searching for when they find your video. YouTube will suggest some after you start adding. A quick way to find good keywords to use is to search for videos similar to yours and check out their tags. A while ago YouTube started hiding video tags by default but you can download a free, YouTube-certified, extension for Google Chrome which will allow you to see them from vidIQ.com.
4. Digging Deeper
To get your viewers to subscribe to your channel you will need to make sure your videos are not losing quality when you upload them. Here are some things to be aware of if you want your videos to look great on YouTube.
Resolution: the number of pixels in your image. For example when a video has a resolution of 1080p that means it has a grid of pixels that is 1920 x 1080. The more pixels you have the sharper your image.
Bitrate: Bitrate is a measurement of how compressed your file is, and the less compressed it is the more information there is per frame. Higher bitrates mean larger file sizes.
Your resolution and bitrate should complement each other. If you have a higher bitrate than is needed for your video’s resolution your file will be unnecessarily large. If your bitrate is too low for your resolution then you will not see the quality you expect.
YouTube has a list of recommended resolutions and bitrates at support.google.com/youtube/answer/1722171.
Aspect Ratio: the dimensions of your video, in terms of width and height. YouTube’s aspect ratio is 16:9, so your videos should also be 16:9. If they are not then you will get black bars on either side of your video after you upload it. The most common way that people end up with the wrong aspect ratio is by creating videos on their smartphones and holding them up and down instead of sideways.
Part 2: Steps to Upload Videos to YouTube
Uploading YouTube Video on Desktop:
1. Sign in to your YouTube account
2. Hit the upload button
3. Select your video type (Public, Private, Unlisted)
4. Manage the upload
5. Choose your thumbnail
Step 1: Sign in to your YouTube account
In order to upload videos to YouTube, the very first thing you need to do is sign in. The sign-in button is located at the top right corner of the YouTube homepage. If you have multiple accounts registered to one device, you will be asked to choose one to log in to.
Step 2: Hit the upload button
It is a simple step that you will have to follow right after you log in to YouTube. As soon as you enter YouTube, after using your Google account and password for login, you will find the upload button in the top right corner of the screen. Click on this button and it will take you to the dedicated upload page.
Step 3: Select your video type (Public, Private, Unlisted)
Choose your audience. If you wish to make your video available to everyone on YouTube, simply go to the privacy settings and choose the “Public” option from the drop-down menu.
If you do not want your video to be searchable, but still want to be able to easily share a link to it with your friends and family, choose the “Unlisted” option.
Those who wish to keep their video personal can choose the “Private” option from the drop-down menu. You can still share a private video with a limited number of people (as long as they have Google accounts).
The “Scheduled” option is available for choosing a future date and time to make the video available to viewers. Once you have selected your privacy level, simply upload your video from your device storage.
Step 4: Manage the upload
As soon as you have confirmed your video upload, you will find a progress bar on the screen. It will take some time depending on factors such as the resolution of the video and how long it is. In the meanwhile, you can write a title, description and add relevant tags for your video so that YouTube knows what search results to include it in and viewers can find it. Remember that YouTube is the second biggest search engine on the Internet, so take some time to optimize your keywords .
Step 5: Choose your thumbnail
Once your video uploading is complete, it is time to choose a creative thumbnail for your video. The system provides you with three options to choose from automatically, all of which will be screenshots from your video. It is usually better toupload your own custom thumbnail , as thumbnails are a very important factor in attracting viewers. Hit the “Done” button or use the “Publish” button to finalize your upload.
That’s how to upload a video on YouTube! Any questions?
Richard Bennett
Richard Bennett is a writer and a lover of all things video.
Follow @Richard Bennett
Less Is More: The Best Video URL Reducers Revealed
Top 5 YouTube Link Shortener You Must Try in 2024

Liza Brown
Mar 27, 2024• Proven solutions
Being one of the largest video-sharing platforms, Youtube is used throughout the world to share and find all kinds of material and content in form of videos. Because of its huge community, the videos of Youtube are shared on all platforms throughout the internet. If you are the one who often shares Youtube links with others then you must know how important it is to keep the links as short as possible. There are so many reasons for avoiding long links while sharing Youtube links with others. Whether it’s a blog, social media platform, or a chat, keeping the Youtube link while sharing it can positively impact the viewer. Several Youtube link shorteners can help you shorten the links and make them worthy of sharing. In this article, we will list down Top 5 Youtube link shorteners to help you choose the best. But before moving towards link shorteners, let’s discuss the benefit of using Youtube link shorteners.
Why should we use Youtube Link Shorteners?
One of the vital reasons to use Youtube Link Shortener is to increase the click-throughs and shares. Short links are more prone to getting clicks and shares because they look simple and professional as compare to long and stuffy links. If we compare both the links, the short version, and the long version, we will clearly see the difference. The short links look more beautiful and attractive as compare to the long ones. Which means it can attract more people to click and share.
Another big advantage of shortened links is their usability of social platforms such as Facebook, Instagram, LinkedIn, and others. These links take small space as well as help in making your post look appealing to the viewers.
1. Y2U
Platform:Website
Price: Free
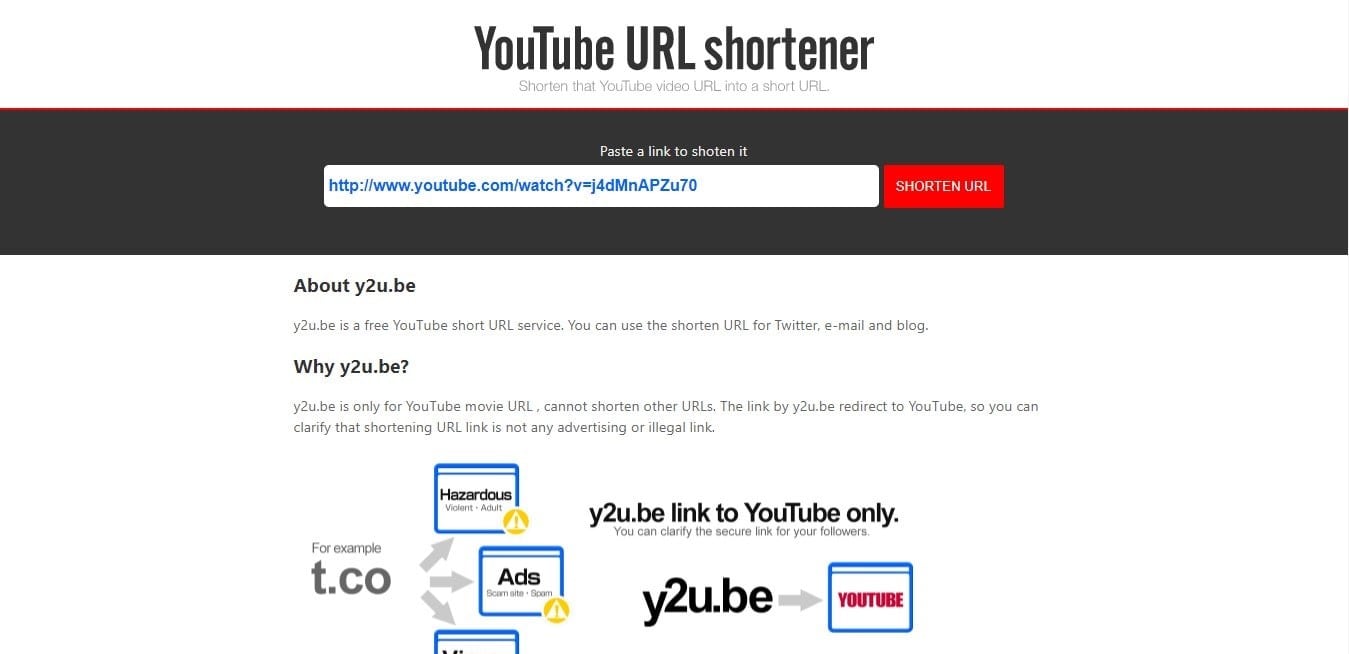
Y2U is a web-based platform that helps its user to convert long Youtube links into small and shareable links. It is a simple and easy-to-use Youtube link shortener. It converts the link into three forms, a short link, a very short link, and a QR code. You can use any of these links to share it with your friends or share it on social media platforms such as Facebook and Instagram Bios. It only requires you to paste a Youtube video link directly into this platform and click shorten URL. It allows the users to make their URL worthy to be shared on blogs, Twitter, and chats.
Features
- Simple and User-Friendly Interface
- Free to use Youtube link shortener
- Convert links to QR codes
- Make your links share-worthy
2. Bitly
Platform:Website
Price: Free - $199
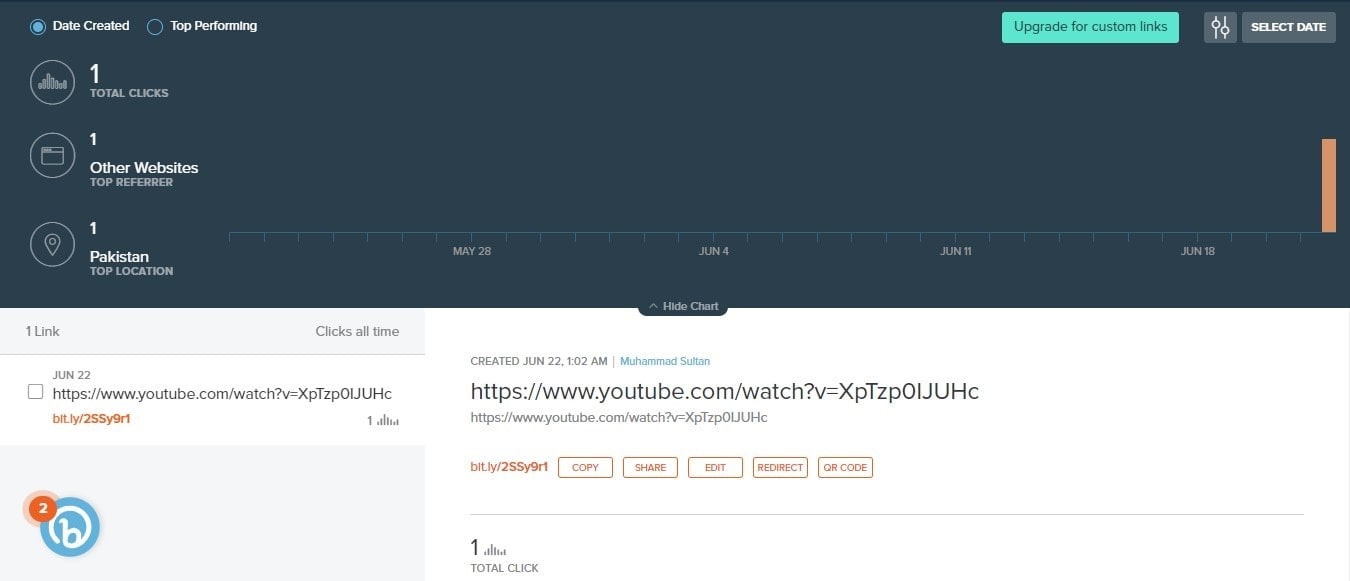
Bitly is more than just a simple Youtube link shortener. It contains a wide range of features and options to help its users brand their links, customize them, Analyze the results, and more. One of the best things about Bitly is its ability to track down each link that is shortened using this platform. It provides you with a full analysis of the links and how they are performing. You can use the basic features like the Youtube link shortening and data related to links for free. But it has other options as well that can be acquired by paying a small portion of the money to the platform. This marvelous platform worths each penny you spend on it. It not only makes the links short but also makes them look beautiful and attractive to the viewer.
Features
- Shorten your links with Traceability
- Analyze how your link is performing
- Count the number of clicks a particular link is getting
- Analyze the demographics of the clicks
3. RB.GY
Platform: Website
Price: Free - $9
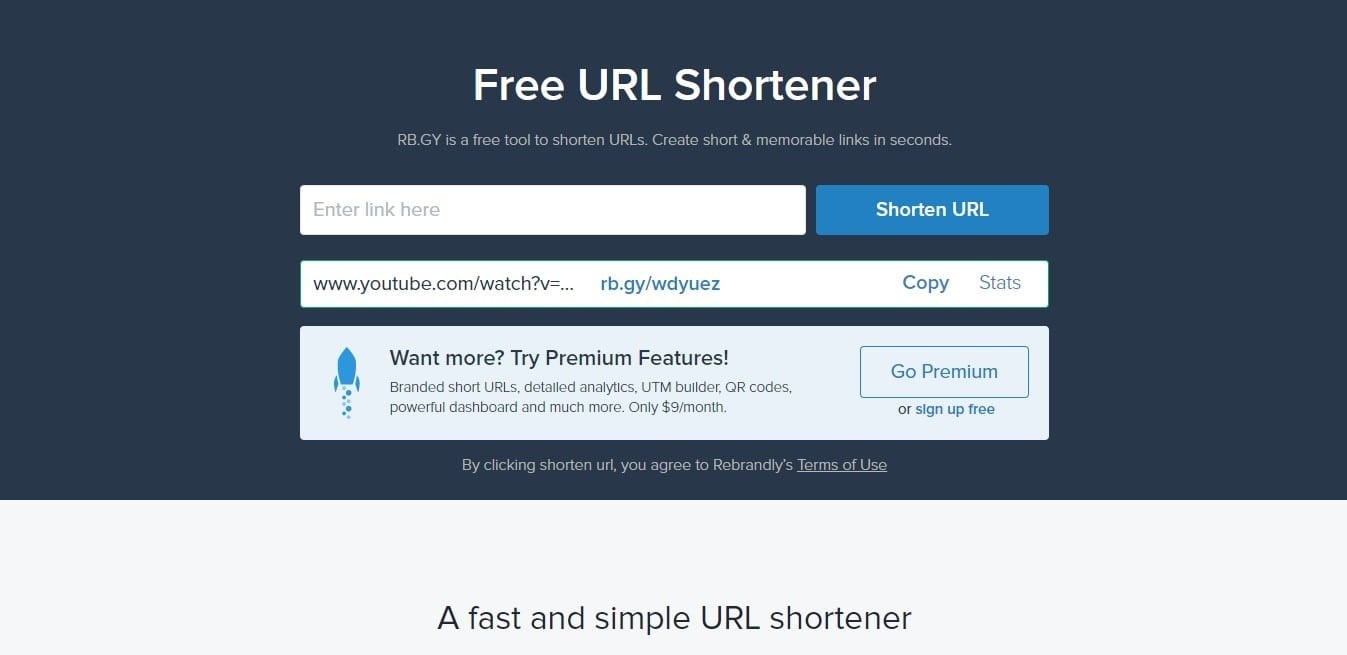
RG.GY is an amazing and simple Youtube link shortener that allows you to make the long and ugly Youtube link look small, attractive, and appealing. It also allows you to track down the links that you shorten using RB.GY. These short links can be used on blogs, SMS, social media platforms, emails, and ads for better results and increased click-throughs. If you are a brand and want your links to resemble and showcase your brand when you share them, then this platform can help you achieve this goal. It provides its users with branded domain for $2/year only. These branded links provide 39% more click-through rates than simply shortened links.
Features
- Create your own Branded and Short Youtube Links
- Increase the click-through rate by 39%
- Make your Youtube links look attractive
- Availability of both, Free and Paid version
4. Short.io
Platform: Website
Price: Free - $150
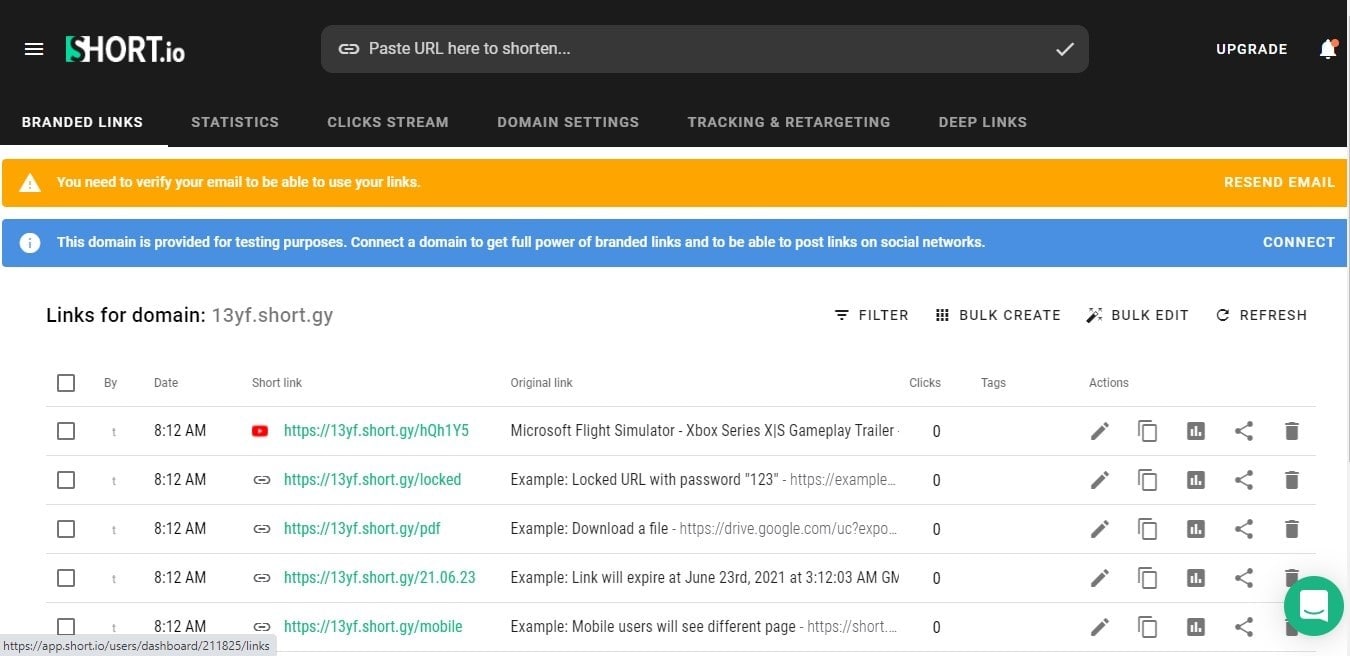
Short.io is a powerful and effective Youtube link shortener and link tacker. It provides its users with a wide range of facilities to shorten their links and track everything related to their links. It lets you check the number of clicks your link is getting, from which source you are getting a large number of clicks, the location of the one clicking it, and much more to be excited about. This platform allows you to add a chrome extension into your chrome browser to make the process of shortening and tracking the links easy and smooth. Its free version lets you access all the basic features. If you want to access more powerful and effective features, you have to subscribe to any packages ranging from $20 to $150, depending upon your requirements.
Features
- Powerful Youtube link shortener
- Wide range of features
- Track your link performance throughout the internet
5. Hyper Host
Platform: Website
Price: Free
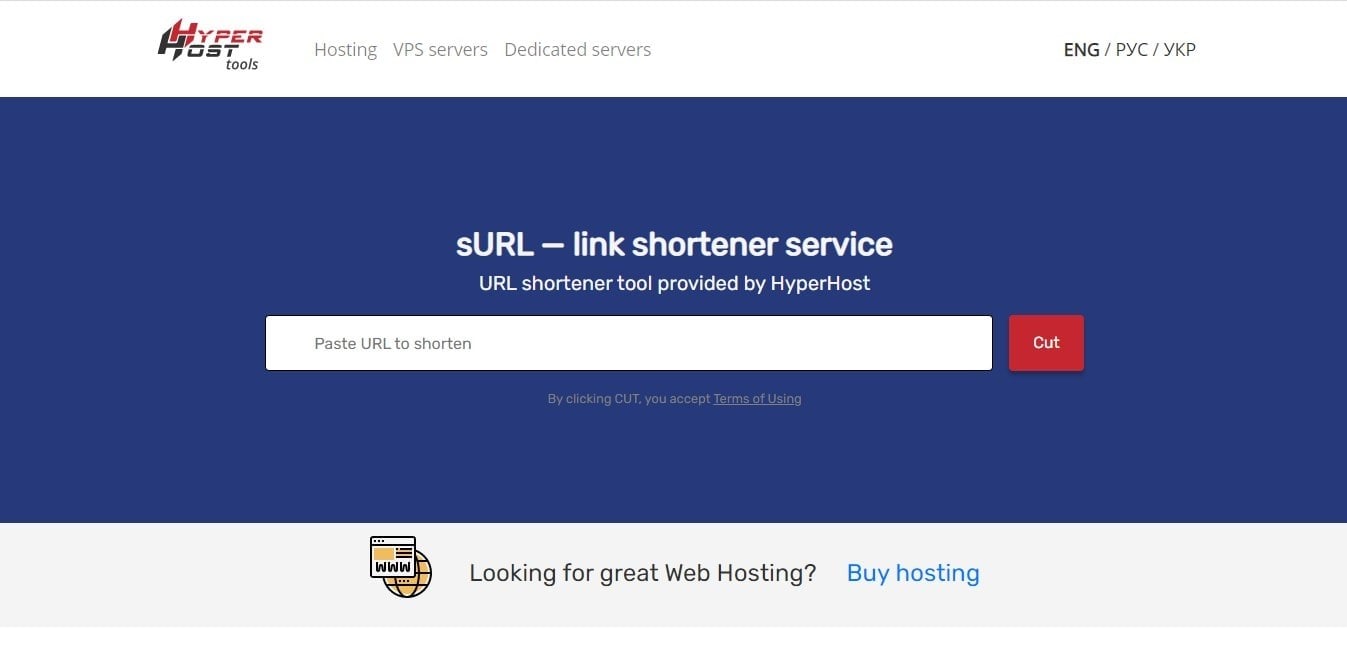
Hyper Host is the simplest and easy-to-use Youtube link shortener. You don’t have to sign up or provide any kind of information in order to use it. It allows you to shorten the links and helps you track the clicks on your links with their links statistics. It provides its user with a wide range of useful information such as the location of the click, which browser was used to access the link, and what was the operating system that brought you the click. It is a completely free-to-use platform.
Features
- User-friendly Interface
- Make your links attractive and small
- Analyze your links
- Track country, browser, and operating system
Conclusion
In this world of digitalization, every brand must have an online presence and Youtube is one of the biggest and most important Videos sharing platforms to utilize. All the above Youtube link shorteners are the best tools that you can find on the internet that will help you shorten the links and make Youtube links branded. Each tool has its own benefits and features. Choose any of these platforms based upon your requirement and need.
Liza Brown
Liza Brown is a writer and a lover of all things video.
Follow @Liza Brown
Liza Brown
Mar 27, 2024• Proven solutions
Being one of the largest video-sharing platforms, Youtube is used throughout the world to share and find all kinds of material and content in form of videos. Because of its huge community, the videos of Youtube are shared on all platforms throughout the internet. If you are the one who often shares Youtube links with others then you must know how important it is to keep the links as short as possible. There are so many reasons for avoiding long links while sharing Youtube links with others. Whether it’s a blog, social media platform, or a chat, keeping the Youtube link while sharing it can positively impact the viewer. Several Youtube link shorteners can help you shorten the links and make them worthy of sharing. In this article, we will list down Top 5 Youtube link shorteners to help you choose the best. But before moving towards link shorteners, let’s discuss the benefit of using Youtube link shorteners.
Why should we use Youtube Link Shorteners?
One of the vital reasons to use Youtube Link Shortener is to increase the click-throughs and shares. Short links are more prone to getting clicks and shares because they look simple and professional as compare to long and stuffy links. If we compare both the links, the short version, and the long version, we will clearly see the difference. The short links look more beautiful and attractive as compare to the long ones. Which means it can attract more people to click and share.
Another big advantage of shortened links is their usability of social platforms such as Facebook, Instagram, LinkedIn, and others. These links take small space as well as help in making your post look appealing to the viewers.
1. Y2U
Platform:Website
Price: Free
Y2U is a web-based platform that helps its user to convert long Youtube links into small and shareable links. It is a simple and easy-to-use Youtube link shortener. It converts the link into three forms, a short link, a very short link, and a QR code. You can use any of these links to share it with your friends or share it on social media platforms such as Facebook and Instagram Bios. It only requires you to paste a Youtube video link directly into this platform and click shorten URL. It allows the users to make their URL worthy to be shared on blogs, Twitter, and chats.
Features
- Simple and User-Friendly Interface
- Free to use Youtube link shortener
- Convert links to QR codes
- Make your links share-worthy
2. Bitly
Platform:Website
Price: Free - $199
Bitly is more than just a simple Youtube link shortener. It contains a wide range of features and options to help its users brand their links, customize them, Analyze the results, and more. One of the best things about Bitly is its ability to track down each link that is shortened using this platform. It provides you with a full analysis of the links and how they are performing. You can use the basic features like the Youtube link shortening and data related to links for free. But it has other options as well that can be acquired by paying a small portion of the money to the platform. This marvelous platform worths each penny you spend on it. It not only makes the links short but also makes them look beautiful and attractive to the viewer.
Features
- Shorten your links with Traceability
- Analyze how your link is performing
- Count the number of clicks a particular link is getting
- Analyze the demographics of the clicks
3. RB.GY
Platform: Website
Price: Free - $9
RG.GY is an amazing and simple Youtube link shortener that allows you to make the long and ugly Youtube link look small, attractive, and appealing. It also allows you to track down the links that you shorten using RB.GY. These short links can be used on blogs, SMS, social media platforms, emails, and ads for better results and increased click-throughs. If you are a brand and want your links to resemble and showcase your brand when you share them, then this platform can help you achieve this goal. It provides its users with branded domain for $2/year only. These branded links provide 39% more click-through rates than simply shortened links.
Features
- Create your own Branded and Short Youtube Links
- Increase the click-through rate by 39%
- Make your Youtube links look attractive
- Availability of both, Free and Paid version
4. Short.io
Platform: Website
Price: Free - $150
Short.io is a powerful and effective Youtube link shortener and link tacker. It provides its users with a wide range of facilities to shorten their links and track everything related to their links. It lets you check the number of clicks your link is getting, from which source you are getting a large number of clicks, the location of the one clicking it, and much more to be excited about. This platform allows you to add a chrome extension into your chrome browser to make the process of shortening and tracking the links easy and smooth. Its free version lets you access all the basic features. If you want to access more powerful and effective features, you have to subscribe to any packages ranging from $20 to $150, depending upon your requirements.
Features
- Powerful Youtube link shortener
- Wide range of features
- Track your link performance throughout the internet
5. Hyper Host
Platform: Website
Price: Free
Hyper Host is the simplest and easy-to-use Youtube link shortener. You don’t have to sign up or provide any kind of information in order to use it. It allows you to shorten the links and helps you track the clicks on your links with their links statistics. It provides its user with a wide range of useful information such as the location of the click, which browser was used to access the link, and what was the operating system that brought you the click. It is a completely free-to-use platform.
Features
- User-friendly Interface
- Make your links attractive and small
- Analyze your links
- Track country, browser, and operating system
Conclusion
In this world of digitalization, every brand must have an online presence and Youtube is one of the biggest and most important Videos sharing platforms to utilize. All the above Youtube link shorteners are the best tools that you can find on the internet that will help you shorten the links and make Youtube links branded. Each tool has its own benefits and features. Choose any of these platforms based upon your requirement and need.
Liza Brown
Liza Brown is a writer and a lover of all things video.
Follow @Liza Brown
Also read:
- Optimizing YouTube Videos with the Right Tags
- [New] Best Alternative to YouTube IOS & Android's 10 Leading Video Sites
- [Updated] A Guide to Essential ASMR Video Facts
- DSLR vs Mirrorless Optimal Choice for Video Production
- Understanding and Exploiting YouTube's Featured Slot for Maximum Reach
- In 2024, Discover the Top 8 Services to Amplify Video Content
- [Updated] Collaboration Techniques in Video Making, Viewership Up
- In 2024, Capturing Cultures A Step-by-Step Guide for Aspiring Travel Vloggers
- [New] Becoming an Economic Force A Guide to Earning on YouTube
- Unveiling Distinctions A Look at YouTube and DailyMention
- 2024 Approved A Beginner's Guide to Personal Brand Craftsmanship
- 2024 Approved Bridging Giants A Comprehensive Guide to Linking YouTube and TikTok
- Elite Streaming Sensations World's Most Popular Video Content Makers
- [Updated] Avoiding the Common Path The Route to Unique Streamer Identities
- Boost Your Chances Strategic Keywords for YouTubers
- Strategies to Increase Views via Thumbnails
- 2024 Approved Anime in the Sunshine The Best YouTubers for Positivity [Top 15]
- [Updated] Crafting Easy YouTube Animation Subscribe Bars in Filmora
- 2024 Approved Converting Your Twitch Showcase Into a YouTube Hit
- [Updated] Disrupt Bot Patterns for Natural Viewer Increase
- [Updated] Download YouTube Gallery Files Instantly
- [New] 15 Must-Have Openers for Maximum YouTube Engagement
- Expert Picks Best 7 Video Streaming Apps to Take Your YouTube Game Upward (iOS/Android)
- Demystifying the Process of Submitting Videos on YouTube for 2024
- [Updated] Securely Save Your Windows 8 Screenshots
- New The Best OGG Converters What Sets Them Apart
- 2024 Approved Unveiling the Most Effective Methods for Your HP Laptop Recordings
- In 2024, How Can Nokia G310Mirror Share to PC? | Dr.fone
- Why is iPogo not working On Apple iPhone SE (2020)? Fixed | Dr.fone
- How To Remove iCloud On iPhone 7 Plus Smoothly
- Updated In 2024, Get the Top 10 Best Video Editor Apps for Your Android Devices and Enjoy Editing Home Movies
- Green Background Blueprints Download Free, Practical Template Guides
- In 2024, How To Track IMEI Number Of Vivo Y27 4G Through Google Earth?
- The Essence of E-Story Creation Techniques
- How to Track a Lost Tecno Phantom V Fold for Free? | Dr.fone
- Breakdown The 10 Best Free Video Capturing Tools for 2024
- Updated In 2024, Mobile Time-Lapse Magic Top Apps for Creatives (2023 Edition)
- In 2024, Capture Without Capsule The No-Limit Story Saving App
- How To Change Your SIM PIN Code on Your Honor Magic 5 Pro Phone
- [Updated] 2023 | How to Upload Tiktok Videos on Chrome/Android/iPhone, In 2024
- Detailed Survey Gecata's Game Capture Utility for 2024
- Peals of Laughter Fun Tones Websites Unveiled
- In 2024, List of Pokémon Go Joysticks On OnePlus 11 5G | Dr.fone
- In 2024, How to Turn Off Google Location to Stop Tracking You on Xiaomi Redmi K70 | Dr.fone
- New A Dive Into Digital Audio Recording Alternatives to Vocaroo Explored
- How to Transfer Data from Realme C55 to Samsung Phone | Dr.fone
- [Updated] In 2024, Streamline Your Presentation Process Webcam Recording Tips
- Title: "Mastering YouTube's Vista An In-Depth Tutorial on Video Submissions"
- Author: Brian
- Created at : 2024-05-25 12:21:49
- Updated at : 2024-05-26 12:21:49
- Link: https://youtube-video-recordings.techidaily.com/mastering-youtubes-vista-an-in-depth-tutorial-on-video-submissions/
- License: This work is licensed under CC BY-NC-SA 4.0.
