
:max_bytes(150000):strip_icc()/work-from-home-final-cb19dcdff01545d693d7ecb1f9f9c9b2.jpg)
Mastering Vlogging with Top 12 Innovative Screen Swivel Cams
Mastering Vlogging with Top 12 Innovative Screen Swivel Cams
12 Best Vlogging Cameras with a Flip Screen

Richard Bennett
Nov 01, 2022• Proven solutions
A flip screen is a very important feature on a camera for vloggers. With a flip screen, you can preview whether or not your shot is composed the way you want it to be, all in real-time. Below is our top list and review of the twelve best vlogging cameras with a flip screen.
WHAT TO LOOK FOR IN A VLOGGING CAMERA
1. Fully articulated screen (flip screen)
2. Good continual autofocus while recording video
3. Good focus priority through face recognition
4. Touch to focus
5. Good low-light performance
6. external mic jack, hot/cold shoe bracket
7. optical image stabilization
8. good battery life
Check out my full list of 10 Things To Look For In A Vlogging Camera to understand the importance of these camera features.
THE 12 BEST VLOGGING CAMERAS WITH A FLIP SCREEN (2018)
| Camera | Release Date | Camera Type | Flip Screen Type | Mic Port | Price | |
|---|---|---|---|---|---|---|
| CanonEOSM50 | 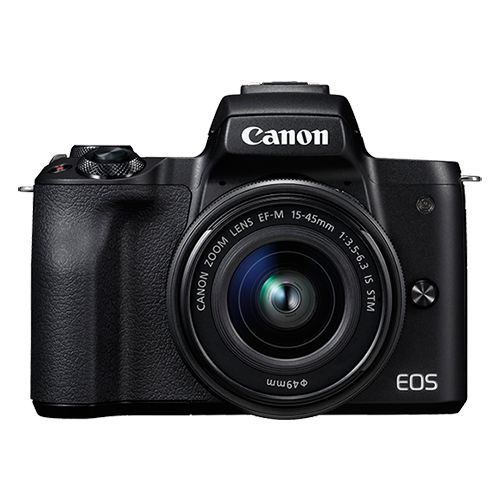 |
February2018 | Mirrorless | Fully Articulated | Yes | $- |
| PanasonicLumixDC-GH5S | 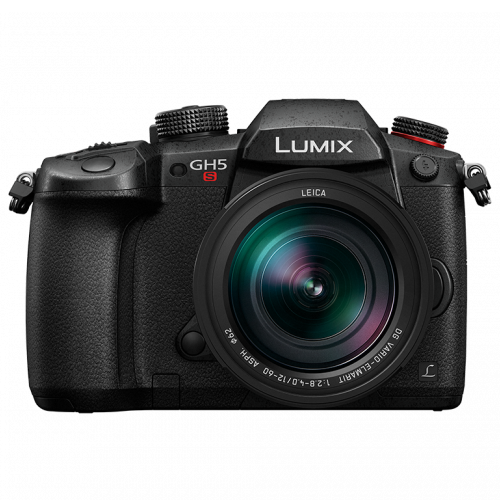 |
January2018 | Mirrorless | Fully Articulated | Yes | $$$ |
| CanonEOSM100 | 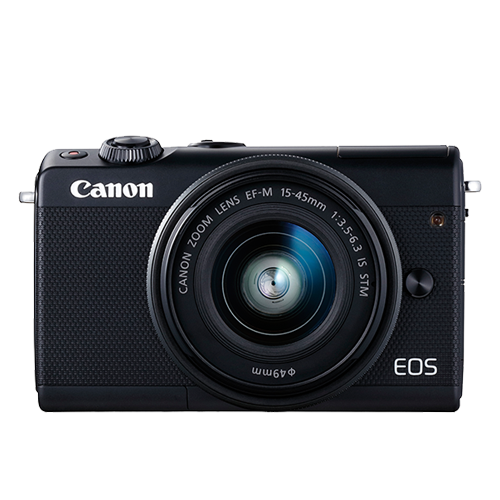 |
August2017 | Mirrorless | Flip Up | No | $ |
| CanonEOS6D Mark II | 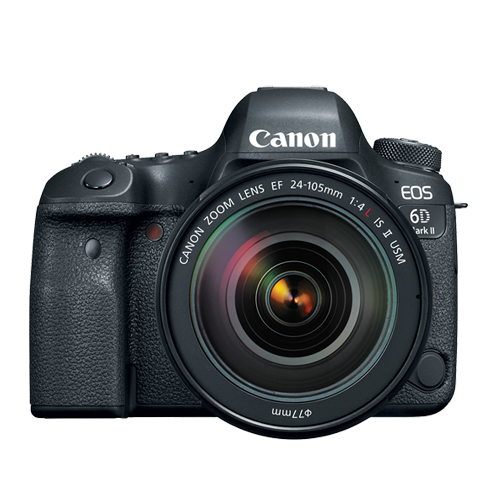 |
June2017 | Mid-size SLR | Fully Articulated | Yes | $$ |
| CanonEOS RebelSL2 |  |
June2017 | Compact SLR | Fully Articulated | Yes | $ |
| CanonEOS RebelT7i | 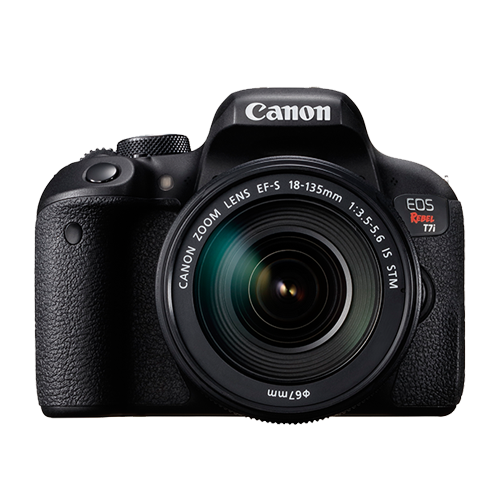 |
February2017 | Mid-size SLR | Fully Articulated | Yes | $- |
| CanonEOSM6 | 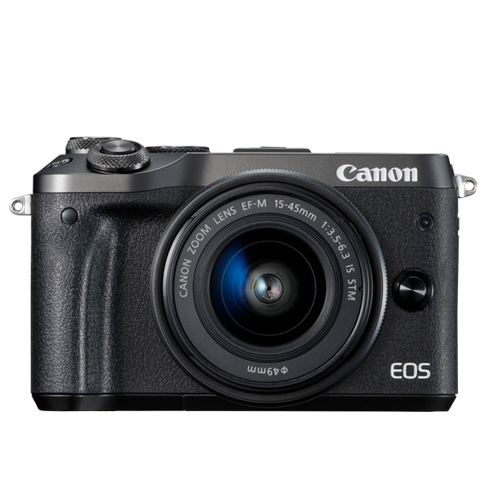 |
February2017 | Mirrorless | Flip Up | Yes | $ |
| NikonD5600 | 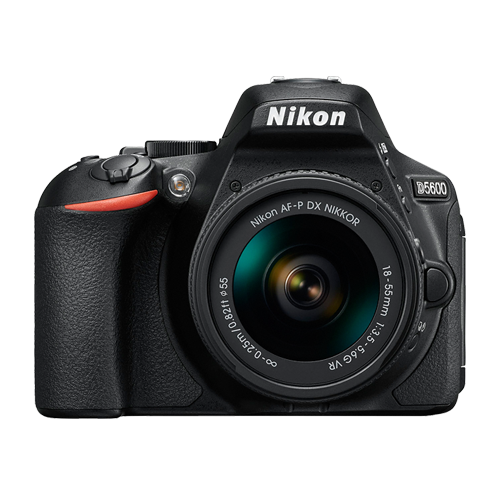 |
November2016 | Compact SLR | Fully Articulated | Yes | $- |
| SonyCyber-Shot DSCRX 100 V | 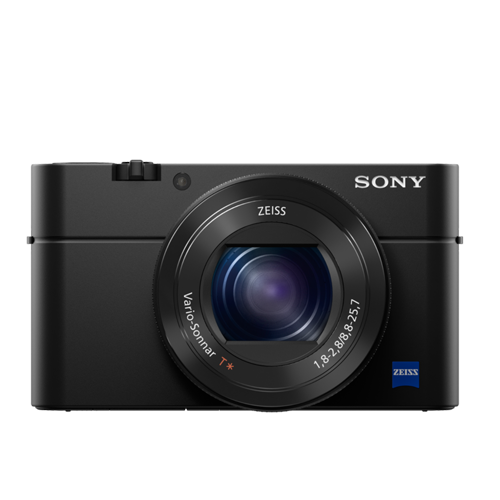 |
October2016 | Compact | Flip Up | No | $- |
| PanasonicLumixDMC-G85 | 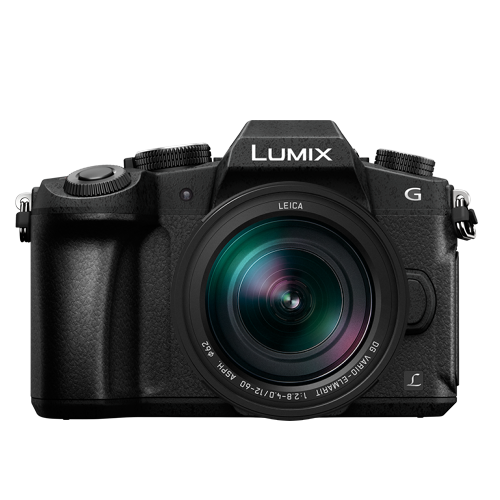 |
September2016 | Mirrorless | Flip Up | Yes | $- |
| CanonEOS80D | 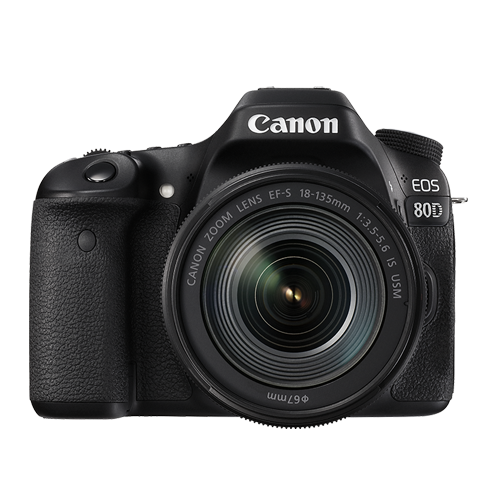 |
February2016 | Mid-size SLR | Fully Articulated | Yes | $$ |
| CanonPowerShotG7 X Mark II | 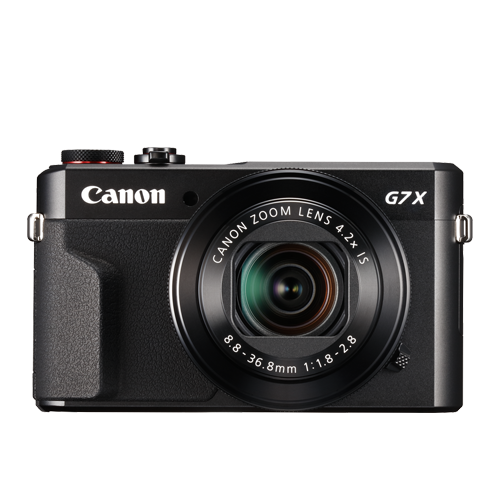 |
February2016 | Compact | Flip Up | No | $ |
|
Best daily vlogging camera with a flip screen: Sony Cyber-Shot DSC-RX 100 V If you want to use a compact camera with a flip screen, Sony’s Cyber-shot DSC-RX 100 V is an exceptional daily vlogging camera. This camera’s 20.1 MP Exmor RS BSI CMOS sensor with a maximum of 12800 in ISO sensitivity, can record footage in UHD 4K at 30 or 24 fps. The lens on this camera, a non-interchangeable Carl Zeiss Vario Sonnar T lens, performs well even under low-light conditions. With its fast hybrid AF system with 315 phase-detection points and an anti-motion blur mode, you can expect your shots to be accurately focused. The Sony RX 100 V packs so much power into such a small, portable camera, making it a great daily vlogging device. PROS - Light and easy to carry around - Produces high-res videos CONS - Short battery life - Lacking a touchscreen |
|---|---|
|
Best cheap vlogging camera with a flip screen: Canon EOS M100 The Canon EOS M100 is another great small vlogging camera with a flip screen. This mirrorless camera shoots up to full HD 1080p videos at 60 fps. Its 24.2 MP APS-C CMOS sensor and DIGIC 7 image processor will accurately lock the right focus and produce videos with rich detail. The camera’s ISO sensitivity goes as high as ISO 25600. Even in difficult light conditions, this camera will be able to capture a scene. You can control and navigate through the difficult functions of this camera using its 3-inch touchscreen LCD. This camera has a flip screen that flips upward so that you can see yourself while you vlog. With built-in Wi-Fi and NFC, you can also transfer your videos seamlessly to a computer without any cables. If you don’t want to spend a fortune but still want to produce videos with great picture quality, the Canon EOS M100 is the best entry-level camera for daily vlogging that’s currently on the market. PROS - Affordable - Great connectivity options CONS - Lacks advanced video recording features - No viewfinder |
|
Best entry-level mirrorless camera with a flip screen for vlogging: Canon EOS M100 The Canon EOS M100 is the best entry-level mirrorless camera with a flip screen for vlogging. In case you missed it, check out my review on the Canon EOS M100. |
|
Best mid-range mirrorless camera with a flip screen for vlogging: Canon EOS M50 The Canon EOS M50 is already regarded as one of the best mirrorless cameras for vlogging though it has only been on the market for just a few months. This mirrorless camera comes with the newer DIGIC 8 Image Processor that find a focus for your footage even better than the last generation’s image processor. You can crank up the ISO sensitivity to ISO 51200 with the Canon EOS M50. The Canon EOS M50 can shoot UHD 4K videos at 23.98 fps. You can also capture 720p slow-motion videos at 120 fps. PROS - Has an external microphone port - Has a 2.36m-dot OLED electronic viewfinder CONS - No image stabilization - Battery life could be longer |
|
Best professional mirrorless camera with a flip screen for vlogging: Panasonic Lumix DC-GH5S When Panasonic made its Lumix DC-GH5, it was a hybrid camera that performed equally well in both photo and video. In response to customers’ interest in a video-focused camera, Panasonic released the GH5S. This camera is equipped with a micro four-thirds sensor and can shoot UHD 4K and DCI videos at 60 fps, up to 150 Mbps. If you want to capture slow-motion footage, you can shoot full HD 1080p videos at 240 fps as well. With its 10.28MP multi-aspect ratio MOS sensor, you’ll be able to produce high-quality videos even under very challenging lighting conditions. In a fraction of a second, this camera can also automatically grab focus during your video with its advanced depth-from-focus technology. It is also equipped with a microphone jack so that you can record better audio while shooting with this camera. The GH5S has a fully articulated touchscreen so that you can compose your shot from any angle. PROS - ISO sensitivity goes up to 204800 - High video bit rates CONS - Expensive - The camera body weighs about 1.5 lbs |
|
Best entry-level DSLR camera with a flip screen for vlogging: Canon EOS SL2 If you’re looking for a low priced entry-level vlogging camera with a flip screen, the Canon EOS Rebel SL2 is the best option. You can precisely and quickly grab focus during video recording with its 9-point AF system and dual pixel CMOS AF technology. The camera powers these functions with its DIGIC 7 image processor. You can shoot up to full HD 1080p videos at 60 fps with its 24.2 MP APS-C CMOS sensor and crank the ISO up to ISO 51200 in case you need to shoot under low light conditions. If you want better audio for your vlogs, you can connect an external microphone to the SL2’s microphone jack. PROS - Microphone jack - Wi-Fi connectivity CONS - No 4K video support - Optical image stabilizer could be better |
|
Best mid-range DSLR camera with a flip screen for vlogging: Canon EOS 80D The 80D is the best camera to go with if you’re looking for a mid-range DLSR vlogging camera with a flip screen. It is equipped with a 24.2 MP APS-C CMOS sensor, comes with the DIGIC 6 image processor, and shoots up to full HD 1080p videos at 60 fps. For low lighting conditions, you can set the camera’s ISO to as high as ISO 25600. The 80D is great for autofocusing during video recording as it comes with a 45-point all cross phase detection autofocus system and a dual pixel CMOS AF system. PROS - Feature-rich - Continuous AF feature performs beautifully while recording high-res videos CONS - Just one SD card slot - PC sync connection features could be better |
|
Best professional DSLR camera with a flip screen for vlogging: Canon 6D Mark II The 6D Mark II is currently (at the time of writing this review) the only full-frame DSLR camera that comes with both a fully-articulated screen and a microphone jack. It is equipped with a 26.2 MP full-frame CMOS sensor, comes with the DIGIC 7 image processor, and shoots up to full HD 1080p videos at 60 fps. The 6D is also equipped with the same 45-point all cross-phase detection and dual pixel CMOS autofocusing system as the 80D. If you’re wanting to vlog with a full-frame camera, the 6D Mark II is the best option. PROS - ISO sensitivity goes up to 102400 - Amazing touchscreen controls CONS - No 4K video recording option - No USB 3.0 |
Want to compare even more cameras? Check out…
12 Best Vlogging Cameras (2018)
Top 11 Cheap Vlogging Cameras (2018)
7 Best DSLR Cameras For Vlogging (2018)
8 Best Mirrorless Cameras For Vlogging (2018)
Richard Bennett
Richard Bennett is a writer and a lover of all things video.
Follow @Richard Bennett
Richard Bennett
Nov 01, 2022• Proven solutions
A flip screen is a very important feature on a camera for vloggers. With a flip screen, you can preview whether or not your shot is composed the way you want it to be, all in real-time. Below is our top list and review of the twelve best vlogging cameras with a flip screen.
WHAT TO LOOK FOR IN A VLOGGING CAMERA
1. Fully articulated screen (flip screen)
2. Good continual autofocus while recording video
3. Good focus priority through face recognition
4. Touch to focus
5. Good low-light performance
6. external mic jack, hot/cold shoe bracket
7. optical image stabilization
8. good battery life
Check out my full list of 10 Things To Look For In A Vlogging Camera to understand the importance of these camera features.
THE 12 BEST VLOGGING CAMERAS WITH A FLIP SCREEN (2018)
| Camera | Release Date | Camera Type | Flip Screen Type | Mic Port | Price | |
|---|---|---|---|---|---|---|
| CanonEOSM50 | |
February2018 | Mirrorless | Fully Articulated | Yes | $- |
| PanasonicLumixDC-GH5S | |
January2018 | Mirrorless | Fully Articulated | Yes | $$$ |
| CanonEOSM100 | |
August2017 | Mirrorless | Flip Up | No | $ |
| CanonEOS6D Mark II | |
June2017 | Mid-size SLR | Fully Articulated | Yes | $$ |
| CanonEOS RebelSL2 | |
June2017 | Compact SLR | Fully Articulated | Yes | $ |
| CanonEOS RebelT7i | |
February2017 | Mid-size SLR | Fully Articulated | Yes | $- |
| CanonEOSM6 | |
February2017 | Mirrorless | Flip Up | Yes | $ |
| NikonD5600 | |
November2016 | Compact SLR | Fully Articulated | Yes | $- |
| SonyCyber-Shot DSCRX 100 V | |
October2016 | Compact | Flip Up | No | $- |
| PanasonicLumixDMC-G85 | |
September2016 | Mirrorless | Flip Up | Yes | $- |
| CanonEOS80D | |
February2016 | Mid-size SLR | Fully Articulated | Yes | $$ |
| CanonPowerShotG7 X Mark II | |
February2016 | Compact | Flip Up | No | $ |
|
Best daily vlogging camera with a flip screen: Sony Cyber-Shot DSC-RX 100 V If you want to use a compact camera with a flip screen, Sony’s Cyber-shot DSC-RX 100 V is an exceptional daily vlogging camera. This camera’s 20.1 MP Exmor RS BSI CMOS sensor with a maximum of 12800 in ISO sensitivity, can record footage in UHD 4K at 30 or 24 fps. The lens on this camera, a non-interchangeable Carl Zeiss Vario Sonnar T lens, performs well even under low-light conditions. With its fast hybrid AF system with 315 phase-detection points and an anti-motion blur mode, you can expect your shots to be accurately focused. The Sony RX 100 V packs so much power into such a small, portable camera, making it a great daily vlogging device. PROS - Light and easy to carry around - Produces high-res videos CONS - Short battery life - Lacking a touchscreen |
|---|---|
|
Best cheap vlogging camera with a flip screen: Canon EOS M100 The Canon EOS M100 is another great small vlogging camera with a flip screen. This mirrorless camera shoots up to full HD 1080p videos at 60 fps. Its 24.2 MP APS-C CMOS sensor and DIGIC 7 image processor will accurately lock the right focus and produce videos with rich detail. The camera’s ISO sensitivity goes as high as ISO 25600. Even in difficult light conditions, this camera will be able to capture a scene. You can control and navigate through the difficult functions of this camera using its 3-inch touchscreen LCD. This camera has a flip screen that flips upward so that you can see yourself while you vlog. With built-in Wi-Fi and NFC, you can also transfer your videos seamlessly to a computer without any cables. If you don’t want to spend a fortune but still want to produce videos with great picture quality, the Canon EOS M100 is the best entry-level camera for daily vlogging that’s currently on the market. PROS - Affordable - Great connectivity options CONS - Lacks advanced video recording features - No viewfinder |
|
Best entry-level mirrorless camera with a flip screen for vlogging: Canon EOS M100 The Canon EOS M100 is the best entry-level mirrorless camera with a flip screen for vlogging. In case you missed it, check out my review on the Canon EOS M100. |
|
Best mid-range mirrorless camera with a flip screen for vlogging: Canon EOS M50 The Canon EOS M50 is already regarded as one of the best mirrorless cameras for vlogging though it has only been on the market for just a few months. This mirrorless camera comes with the newer DIGIC 8 Image Processor that find a focus for your footage even better than the last generation’s image processor. You can crank up the ISO sensitivity to ISO 51200 with the Canon EOS M50. The Canon EOS M50 can shoot UHD 4K videos at 23.98 fps. You can also capture 720p slow-motion videos at 120 fps. PROS - Has an external microphone port - Has a 2.36m-dot OLED electronic viewfinder CONS - No image stabilization - Battery life could be longer |
|
Best professional mirrorless camera with a flip screen for vlogging: Panasonic Lumix DC-GH5S When Panasonic made its Lumix DC-GH5, it was a hybrid camera that performed equally well in both photo and video. In response to customers’ interest in a video-focused camera, Panasonic released the GH5S. This camera is equipped with a micro four-thirds sensor and can shoot UHD 4K and DCI videos at 60 fps, up to 150 Mbps. If you want to capture slow-motion footage, you can shoot full HD 1080p videos at 240 fps as well. With its 10.28MP multi-aspect ratio MOS sensor, you’ll be able to produce high-quality videos even under very challenging lighting conditions. In a fraction of a second, this camera can also automatically grab focus during your video with its advanced depth-from-focus technology. It is also equipped with a microphone jack so that you can record better audio while shooting with this camera. The GH5S has a fully articulated touchscreen so that you can compose your shot from any angle. PROS - ISO sensitivity goes up to 204800 - High video bit rates CONS - Expensive - The camera body weighs about 1.5 lbs |
|
Best entry-level DSLR camera with a flip screen for vlogging: Canon EOS SL2 If you’re looking for a low priced entry-level vlogging camera with a flip screen, the Canon EOS Rebel SL2 is the best option. You can precisely and quickly grab focus during video recording with its 9-point AF system and dual pixel CMOS AF technology. The camera powers these functions with its DIGIC 7 image processor. You can shoot up to full HD 1080p videos at 60 fps with its 24.2 MP APS-C CMOS sensor and crank the ISO up to ISO 51200 in case you need to shoot under low light conditions. If you want better audio for your vlogs, you can connect an external microphone to the SL2’s microphone jack. PROS - Microphone jack - Wi-Fi connectivity CONS - No 4K video support - Optical image stabilizer could be better |
|
Best mid-range DSLR camera with a flip screen for vlogging: Canon EOS 80D The 80D is the best camera to go with if you’re looking for a mid-range DLSR vlogging camera with a flip screen. It is equipped with a 24.2 MP APS-C CMOS sensor, comes with the DIGIC 6 image processor, and shoots up to full HD 1080p videos at 60 fps. For low lighting conditions, you can set the camera’s ISO to as high as ISO 25600. The 80D is great for autofocusing during video recording as it comes with a 45-point all cross phase detection autofocus system and a dual pixel CMOS AF system. PROS - Feature-rich - Continuous AF feature performs beautifully while recording high-res videos CONS - Just one SD card slot - PC sync connection features could be better |
|
Best professional DSLR camera with a flip screen for vlogging: Canon 6D Mark II The 6D Mark II is currently (at the time of writing this review) the only full-frame DSLR camera that comes with both a fully-articulated screen and a microphone jack. It is equipped with a 26.2 MP full-frame CMOS sensor, comes with the DIGIC 7 image processor, and shoots up to full HD 1080p videos at 60 fps. The 6D is also equipped with the same 45-point all cross-phase detection and dual pixel CMOS autofocusing system as the 80D. If you’re wanting to vlog with a full-frame camera, the 6D Mark II is the best option. PROS - ISO sensitivity goes up to 102400 - Amazing touchscreen controls CONS - No 4K video recording option - No USB 3.0 |
Want to compare even more cameras? Check out…
12 Best Vlogging Cameras (2018)
Top 11 Cheap Vlogging Cameras (2018)
7 Best DSLR Cameras For Vlogging (2018)
8 Best Mirrorless Cameras For Vlogging (2018)
Richard Bennett
Richard Bennett is a writer and a lover of all things video.
Follow @Richard Bennett
How to Make A YouTube Intro Video [2 Ways]
2024 | How to Make a YouTube Intro Video?
Richard Bennett
Mar 27, 2024• Proven solutions
Be it YouTube or any other streaming channel, or even for selling your videos on any e-commerce website, intros play a vital role in your brand promotion, and creating them is not as complicated as it sounds either.
The following sections describe in detail how to make a YouTube intro with Wondershare Filmora video editor, and keep it safe so it can be re-used easily in all your creations to maintain consistency and to give your brand a unique identity.
Part 1: How to Make a YouTube Intro Video with Filmora
With Wondershare Filmora, you can create your custom intros from scratch, i.e., even if you don’t have an existing image or footage to start with. You can follow the method given below to learn how to make YouTube intro with Filmora:
Step 1: Add Intro Background to Filmora
Launch Wondershare Filmora, go to Media tab at the top, select the Sample Colors category from the left pane.
Notice all the existing solid and gradient colors in the Media library in the right, hover the mouse over the tile of the color you want to use as a background, and click the + icon that appears in the center to add it to the timeline.

Note: The default duration of such solids is 5 seconds. You can increase or decrease this time by dragging the right handle of track in the timeline.
Alternatively, you can also use your own background image or video clip by selecting the Project Media category from the left pane, clicking anywhere inside the Media window, and then importing your favorite media file to Filmora. After importing, you can follow the procedure given above to add it to the timeline.
Step 2: Select and Add Audio/Sound Effect to YouTube Intro
With audio in the YouTube intro, your video will be more recognizable. If you have watched PewDiePie ‘s video, you’ll find that even though he changed the images on the intro often, he keeps the music and sound the same in the intro.

In Filmora, you can use the music and sound effect in the inbuilt audio library, double click the audio thumbnail from the library to listen to the soundtrack.
Repeat the process until you find the background music or sound effect that you can use in the intro. Once found, drag and drop it to the audio track below the video.

Note: You should keep the background and the audio at the same duration. For more details about audio editing in Filmora, please check this guide about how to edit audio .
Step 3: Add Text/Logo to Intro Video
In the intro video, you can add your channel name, company name, or other branding elements for brand awareness consideration.
Click Titles tab, hover the mouse over the tile with the text you want to use, and then drag and drop it to the track above the video.


To customize, double-click the title track in the timeline, use the new window that appears in the upper-left area of the interface to change, format, and animate the text as needed, and click OK from the bottom-right corner of the library.
Also, you need to adjust the position and duration of the title to get a better view.
In the intro video, it is recommended to add your logo or slogan as well. To add your logo, drag and drop it to the track above the video, and adjust its position and size. For more details, you can check the guide about How to Add Photo or Video to Watermark .
Step 4: Add Effects to YouTube Intro
Go to Effects tab, choose a category from the top-left pane, and click and drag your preferred effect from the Effects library to the timeline.
Adjust the playback duration by dragging the right handle of the track in the timeline as explained above. Optionally, double-click the Effects track to customize the appearance as needed.
Step 5: Export the Intro and Add to Shared Media
Once you are done creating your YouTube intro with all the required ingredients, click EXPORT from the top-center area of the interface, go to the Local tab on the Export box, choose your preferred output format from the left pane (the most common and widely used is MP4), adjust other preferences like destination location, resolution, framerate, etc. from the right pane of the box, and click EXPORT to export the YouTube intro.
Once exported, back on the main interface, select Media again from the standard toolbar, select the Shared Media container from the left pane, click anywhere inside the Media library, and import the YouTube intro video you just created to Shared Media so it can be reused every time you create a new video for the series.

Also, you can save the project, and then revise the element, effects or text to make a YouTube intro vibration.
You can find there are many video tutorials about how to use Filmora to make a YouTube intro, and below is one for you to have a quick glance.
Part 2: How to Make YouTube Intros with Templates
If the turnaround time of your project is about to end, and you need to hustle up, you can always use pre-built templates that not only expedite your creation process, they also look more professional because they are designed by the experts who already have decades of experience in the industry.
Besides the pre-programmed templates and effects in Filmora, you can find more visual effect packs in the effect store Filmstock .
You can learn how to make YouTube intro video in Filmora with a template downloaded from Filmstock.
Step 1: Visit Filmora Effects Page on Filmstock
Visit https://filmstock.wondershare.com/ and log in with the same WSID that you used on Filmora, and then click EFFECTS from the top of the webpage. Since Filmstock also provides templates for After Effects, you should select Filmora Effects to access the entire Filmora Effects library.

You can search the effects that you want in the Search bar, here, since I’m looking for effects for YouTube intro, I just enter “intro”. The effects related to intro will be displayed like below.
Step 2: Download Video Effect Packs for Filmora
Click your preferred intro effect template, click Download Now and follow the on-screen instructions to obtain and download the template.
After downloading, you will see these them in red circles under titles, transitions, or filters, based on the elements included in this effect pack. You can then add this downloaded titles or transitions to the intro video.

Looking for an online solution? Check the list of Top 10 Free Online YouTube Intro Makers .
Part 3: Creative Intro Makers Made with Filmora (Video Tutorial Included)
Both the above processes on how to make YouTube intro video are helpful as long as you use effective titles, decent effects, and extremely appealing color combinations. While the first method gives you full control over the creation as you can use all your imaginations to prepare one, the second method saves your time and yet lets you come up with a professionally-looking intro clip.
Below is a video tutorial from YouTuber Nash. He demonstrated how to create a YouTube Intro with the Sample Colors, Titles, filters and sound effects.
FAQs About YouTube Intro Video Making
- 1. What is a YouTube Intro Video?
A YouTube intro video is 5 seconds to 7 seconds short motion clip that comprises your company name and logo. Such intros help in your brand promotion and give any film or episode that follows them a unique identity. This allows audiences to recognize your organization, and with regular appearances, you can establish strong goodwill among your customers.
- 2. What Should I Put in a YouTube Intro Video?
A YouTube intro video should have your YouTube channel name, an effective and well-formatted text, brand logo, background music, effects, and a slight and simple animation.
Conclusion
To learn how to make a YouTube intro is easy, and things can get even simpler if you are using an efficient and robust post-production software like Wondershare Filmora, which not only allows you to create such clips from the scratch, it also enables you to access Filmstock’ online library to download more fantastic templates in order to expedite your workflow.
Richard Bennett
Richard Bennett is a writer and a lover of all things video.
Follow @Richard Bennett
Richard Bennett
Mar 27, 2024• Proven solutions
Be it YouTube or any other streaming channel, or even for selling your videos on any e-commerce website, intros play a vital role in your brand promotion, and creating them is not as complicated as it sounds either.
The following sections describe in detail how to make a YouTube intro with Wondershare Filmora video editor, and keep it safe so it can be re-used easily in all your creations to maintain consistency and to give your brand a unique identity.
Part 1: How to Make a YouTube Intro Video with Filmora
With Wondershare Filmora, you can create your custom intros from scratch, i.e., even if you don’t have an existing image or footage to start with. You can follow the method given below to learn how to make YouTube intro with Filmora:
Step 1: Add Intro Background to Filmora
Launch Wondershare Filmora, go to Media tab at the top, select the Sample Colors category from the left pane.
Notice all the existing solid and gradient colors in the Media library in the right, hover the mouse over the tile of the color you want to use as a background, and click the + icon that appears in the center to add it to the timeline.
Note: The default duration of such solids is 5 seconds. You can increase or decrease this time by dragging the right handle of track in the timeline.
Alternatively, you can also use your own background image or video clip by selecting the Project Media category from the left pane, clicking anywhere inside the Media window, and then importing your favorite media file to Filmora. After importing, you can follow the procedure given above to add it to the timeline.
Step 2: Select and Add Audio/Sound Effect to YouTube Intro
With audio in the YouTube intro, your video will be more recognizable. If you have watched PewDiePie ‘s video, you’ll find that even though he changed the images on the intro often, he keeps the music and sound the same in the intro.
In Filmora, you can use the music and sound effect in the inbuilt audio library, double click the audio thumbnail from the library to listen to the soundtrack.
Repeat the process until you find the background music or sound effect that you can use in the intro. Once found, drag and drop it to the audio track below the video.
Note: You should keep the background and the audio at the same duration. For more details about audio editing in Filmora, please check this guide about how to edit audio .
Step 3: Add Text/Logo to Intro Video
In the intro video, you can add your channel name, company name, or other branding elements for brand awareness consideration.
Click Titles tab, hover the mouse over the tile with the text you want to use, and then drag and drop it to the track above the video.
To customize, double-click the title track in the timeline, use the new window that appears in the upper-left area of the interface to change, format, and animate the text as needed, and click OK from the bottom-right corner of the library.
Also, you need to adjust the position and duration of the title to get a better view.
In the intro video, it is recommended to add your logo or slogan as well. To add your logo, drag and drop it to the track above the video, and adjust its position and size. For more details, you can check the guide about How to Add Photo or Video to Watermark .
Step 4: Add Effects to YouTube Intro
Go to Effects tab, choose a category from the top-left pane, and click and drag your preferred effect from the Effects library to the timeline.
Adjust the playback duration by dragging the right handle of the track in the timeline as explained above. Optionally, double-click the Effects track to customize the appearance as needed.
Step 5: Export the Intro and Add to Shared Media
Once you are done creating your YouTube intro with all the required ingredients, click EXPORT from the top-center area of the interface, go to the Local tab on the Export box, choose your preferred output format from the left pane (the most common and widely used is MP4), adjust other preferences like destination location, resolution, framerate, etc. from the right pane of the box, and click EXPORT to export the YouTube intro.
Once exported, back on the main interface, select Media again from the standard toolbar, select the Shared Media container from the left pane, click anywhere inside the Media library, and import the YouTube intro video you just created to Shared Media so it can be reused every time you create a new video for the series.
Also, you can save the project, and then revise the element, effects or text to make a YouTube intro vibration.
You can find there are many video tutorials about how to use Filmora to make a YouTube intro, and below is one for you to have a quick glance.
Part 2: How to Make YouTube Intros with Templates
If the turnaround time of your project is about to end, and you need to hustle up, you can always use pre-built templates that not only expedite your creation process, they also look more professional because they are designed by the experts who already have decades of experience in the industry.
Besides the pre-programmed templates and effects in Filmora, you can find more visual effect packs in the effect store Filmstock .
You can learn how to make YouTube intro video in Filmora with a template downloaded from Filmstock.
Step 1: Visit Filmora Effects Page on Filmstock
Visit https://filmstock.wondershare.com/ and log in with the same WSID that you used on Filmora, and then click EFFECTS from the top of the webpage. Since Filmstock also provides templates for After Effects, you should select Filmora Effects to access the entire Filmora Effects library.
You can search the effects that you want in the Search bar, here, since I’m looking for effects for YouTube intro, I just enter “intro”. The effects related to intro will be displayed like below.
Step 2: Download Video Effect Packs for Filmora
Click your preferred intro effect template, click Download Now and follow the on-screen instructions to obtain and download the template.
After downloading, you will see these them in red circles under titles, transitions, or filters, based on the elements included in this effect pack. You can then add this downloaded titles or transitions to the intro video.
Looking for an online solution? Check the list of Top 10 Free Online YouTube Intro Makers .
Part 3: Creative Intro Makers Made with Filmora (Video Tutorial Included)
Both the above processes on how to make YouTube intro video are helpful as long as you use effective titles, decent effects, and extremely appealing color combinations. While the first method gives you full control over the creation as you can use all your imaginations to prepare one, the second method saves your time and yet lets you come up with a professionally-looking intro clip.
Below is a video tutorial from YouTuber Nash. He demonstrated how to create a YouTube Intro with the Sample Colors, Titles, filters and sound effects.
FAQs About YouTube Intro Video Making
- 1. What is a YouTube Intro Video?
A YouTube intro video is 5 seconds to 7 seconds short motion clip that comprises your company name and logo. Such intros help in your brand promotion and give any film or episode that follows them a unique identity. This allows audiences to recognize your organization, and with regular appearances, you can establish strong goodwill among your customers.
- 2. What Should I Put in a YouTube Intro Video?
A YouTube intro video should have your YouTube channel name, an effective and well-formatted text, brand logo, background music, effects, and a slight and simple animation.
Conclusion
To learn how to make a YouTube intro is easy, and things can get even simpler if you are using an efficient and robust post-production software like Wondershare Filmora, which not only allows you to create such clips from the scratch, it also enables you to access Filmstock’ online library to download more fantastic templates in order to expedite your workflow.
Richard Bennett
Richard Bennett is a writer and a lover of all things video.
Follow @Richard Bennett
Also read:
- Best YouTube Live Streaming Software and Hardware You Should Know
- Explore the Top 10 YouTube-to-MP3 Services
- Audiences in Motion Analyzers for 2024
- A List of the Quickest Rising YouTube Spaces for Encouragement for 2024
- Venture Into Sub4sub Worldwide – Get This Prep Guide First!
- [Updated] A Compre Written by Daniel Kelley
- The Future of Development Understanding the Impact of Next-Gen Frameworks
- Digital Phenoms Who Has the Most Followers?
- Inside Tips for Maximizing Your Creator Studio Potential
- In 2024, Crafting the Perfect Pitch Inviting Listeners to Join Us
- In 2024, Broadcast Your Google Meet Directly to YouTube's Stage
- 2024 Approved Ace Your Edits YouTube Studio's Time-Saving Secrets Revealed
- The Key to Connecting Your YouTube Channel with a Facebook Page
- Bring Your YouTube Vision to Life with FREE Banner Resources for 2024
- Make Video Previews Stand Out with Neon Borders
- How to Clear the Clutter Blurring Backgrounds for Engaging YT
- New An Ultimate Guide of Best Narrator Voice Generators for 2024
- Updated 2024 Approved The Soundless Way Enhancing Your Video Experience on Windows 10 without Downloads
- [Updated] 2024 Approved When Does Instagram Get Most Active? A Comprehensive Look
- How to Unlock Samsung Galaxy S24+ Phone Password Without Factory Reset?
- How to sign Word 2007 electronically
- New In 2024, How to Create a DVD From Your Favorite Videos on Windows and Mac
- In 2024, Top 5 Infinix Hot 40 Pro Bypass FRP Tools for PC That Actually Work
- In 2024, 6 Proven Ways to Unlock Xiaomi Redmi Note 12R Phone When You Forget the Password
- New Syncing Symphony with Cinema Top 15 Online Platforms and Software for Audio-Visual Fusion in Media Projects
- [Updated] 2024 Approved Guide to Delivering Engaging PPT in Google Meet (Mobile/Desktop)
- 10 Easy-to-Use FRP Bypass Tools for Unlocking Google Accounts On Motorola Moto G84 5G
- [Updated] In 2024, Capturing Games A Guide to Options Other Than Game Bar
- [Updated] 2024 Approved Flavor Hits Top 10 TikTok Cooking Craze
- 2024 Approved Hasty Techniques for Removing Speech From Audio Files with Audacity
- Affordable Path to 4K Top Budget Cameras (<$1K) for 2024
- 2024 Approved Unveiling Advanced Game Recording Techniques in Windows 11
- Title: Mastering Vlogging with Top 12 Innovative Screen Swivel Cams
- Author: Brian
- Created at : 2024-05-25 12:21:17
- Updated at : 2024-05-26 12:21:17
- Link: https://youtube-video-recordings.techidaily.com/mastering-vlogging-with-top-12-innovative-screen-swivel-cams/
- License: This work is licensed under CC BY-NC-SA 4.0.
