
:max_bytes(150000):strip_icc():format(webp)/best-free-movies-on-youtube-5114491-12-811d37329347405eab1a368e3018dc54.jpg)
"Mastering the Art of Thumbnail Design Tips and Pitfalls"
Mastering the Art of Thumbnail Design: Tips and Pitfalls
How To Make Good YouTube Banner - Dos and Don’ts

Richard Bennett
Oct 26, 2023• Proven solutions
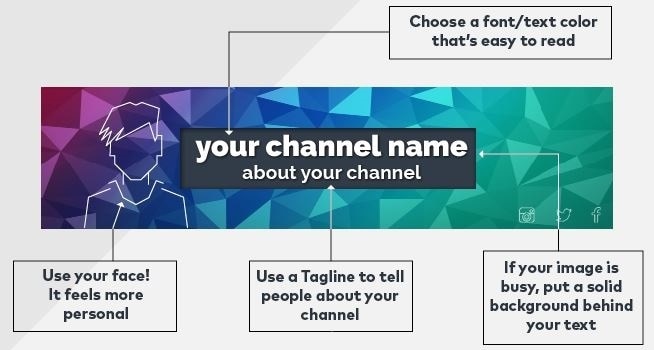
It’s important to learn how to make a good YouTube banner because, when you click into a channel, the first thing you usually see and pay attention to is the channel art.
Channel art gives viewers a first impression of who you are and allows viewers to know what your channel is all about. Channel art can be a great way to show creativity, and there are also ways you can design your banner to help your channel grow.
Here are the Dos and Don’ts of YouTube Channel Art.
- What Kind of Background Should I Use?
- Should I Use My Face?
- What Should I Write on Banner?
- How Can I Make My Channel Art Look Good?


Part 1: What Kind of Background Should I Use?
DO: High-Quality Photos
It’s easy to take pictures with our phones, but not all of these pictures will look great blown up for channel art.
When choosing great photos for your background, pick ones that are high quality and don’t become pixelated once they are blown up. There are tons of free stock photo websites out there to help you find a high-quality picture that’s perfect for your channel.
DON’T: Use Chaotic Patterns
Using patterns for the background of your channel banner can help your channel look super creative and stand out from others. However, if you use a pattern that is chaotic and hard on the eyes, you may not attract many subscribers. When using patterns, choose patterns that are not heavy in color and have too many lines or shapes. There should be an evenness to the shapes and negative space within the pattern itself. Try to stay away from patterns that are 3D which can conflict with the viewer’s eyesight and make them dizzy.
Part 2: Should I Use My Face?
Whether you should use your face on your channel banner depends on what your channel is about. If you have a channel focused on beauty, fashion, fitness, or family vlogs then it’s a good idea to include your face. It comes off personable and helps viewers relate to you. If you have a channel that is about something like gaming, tech reviews, or book reviews then it isn’t necessary to include your face because the focus of your content isn’t you as a personality.
If you do include pictures, here are some tips:
Don’t: Use Blurry Photos
If your photos are blurry, pixilated, or poor quality then don’t use them. Using blurry pictures comes off as unprofessional.
That doesn’t mean you have to hire a photographer to take pictures for your channel. The average smartphone takes really great pictures, so long as you have enough light. If you need a great picture, use a high-quality selfie or ask a friend to take a nice picture of you.
Don’t: Use Outdated Pictures
It is always best to use a current photo of yourself. Many times viewers will go and follow you on social media as well. If they see that you have current photos on your social media but not on your channel, they are become confused and perhaps lose interest.
Part 3: What Should I Write on My Banner?

Do: Include Your Channel Name
While including your channel name in your banner seems like a no brainer, it is often left out by aspiring YouTubers. Displaying your channel name in a large font allows it to be more visible for viewers - your channel name is already on the page, but it is underneath your channel art and doesn’t stand out.
Seeing your channel name included in your banner also helps viewers to know they are on the right page, if there are YouTubers out there with similar names to yours.
Do: Include Upload Days
Consistent upload days are highly important for gaining more views and subscribers. Including your exact upload days helps viewers know when they should expect new videos from you. I made the mistake of not including upload days when I first started my channel 3 years ago. I had drops in views because my subscribers didn’t know when I would upload videos.
If you find that you cannot stick to a certain upload day, try to include how often you will post instead. For example, you can say, “New Videos Posted Weekly.” Viewers will respect you more and even be more likely to subscribe when you tell them your upload days. They want a guarantee that you’re going to post again in the near future.
Do: Include Social Media
Social media accounts are important to include in your channel art because we live in a social media generation. People are on social media every second of the day. If you are looking to take your YouTube channel seriously, it is good practice to ask viewers to follow you on your social media.
Including social media icons in your channel art lets people know where they can find you. Another good reason to include your current social media in your banner is that sometimes you might join a new platform or quit an old one. You may be using Twitter for months and then decide that you like Facebook better. Your current social media handles keep subscribers from having to guess which one to follow you on.
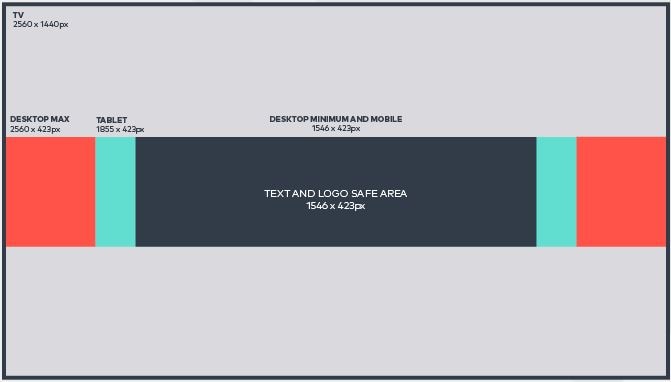
Make sure everything important fits in the safe area!
Do: Include Brief Channel Description or Tag Line
Aside from your channel name, you should also include a brief channel description or tag line to tell your viewers what your channel is all about. If you’re an aspiring beauty guru, you may include something like Makeup Tutorials, Product Reviews, or Mommy Makeovers. Or, you may include a cool tag line that describes the goal of your channel, like “Empowering Mother’s Through Makeup.”
I’ve noticed that YouTubers that use 2-3 descriptive words in their channel art make many different types of videos on their channel but they all full under those categories.
YouTubers that use tag lines are using their channel as a platform to carry out a specific mission on giving help or educating others.
Whether you decide to use descriptive words or a tag line, they will help your channel tremendously by setting expectations for your viewers.
Part 4: How Can I Make My Channel Art Look Good?
Do: Create Consistent Branding
Since becoming a YouTuber myself, I’ve come to learn that paying attention to your branding is very important. Focus attention to what colors and fonts you use. The colors you use for your channel can influence your audience to feel a certain way. For example, using yellow can show that you’re happy and upbeat while using blue can show you’re more calm and relaxed. Whatever color you choose, make sure it’s a true representation of who you are.
Using the right font can also be important to your channel. There are many different fonts available now. When choosing a font, choose one that goes with your channel that is easy to read. You might choose a very pretty cursive font, but if your viewers can’t read it, it can be useless.
Don’t: Include Images That Have Nothing to Do with Your Channel
This simple mistake can cost you many subscribers. For example, if your channel is about Beauty videos, then your channel art shouldn’t include pictures of food or you eating a burger. Your channel art is the first thing that viewers see when clicking on your page. You want them to instantly know what your channel is all about without having to find it in the description box. If your channel is about a few different things, then include all of those images in the channel art so they still know what your channel about. Just don’t confuse your viewers as to what your channel is really about.
Don’t: Have Images and Text That Cut Off
YouTube helps YouTubers by giving them a free channel art template to use as a guide when creating channel art. The template includes 3 different perspectives on how your channel art will be viewed by people looking at mobile devices, computer screens, and TVs. Many people make the mistake of creating art on the TV perspective which then cuts off images and text for the mobile and computer views. To save you the trouble of having images that cut off, it’s best to create your channel in the mobile dimensions that way it will be seen in the computer and TV dimensions with no problem.
Joshelle is a YouTuber from Atlanta, GA. She has a YouTube channel called ElleToshea where she shows viewers how to improve their homes and spaces on an affordable budget through DIY home decor. ElleToshea features minimalist home decor styles based off popular stores such as Anthropologie and Urban Outfitters.
Now that you know how to make a good YouTube banner, what will you do next?
Touch Up YouTube Videos with Filmora
Wondershare Filmora features lots of utilities for both video and audio editing. You can change the video speed or change the aspect ratio easily. Besides, there are plentiful filters, elements, effects and overlays built, so you can use them without costing any extra fee.
Richard Bennett
Richard Bennett is a writer and a lover of all things video.
Follow @Richard Bennett
Richard Bennett
Oct 26, 2023• Proven solutions
It’s important to learn how to make a good YouTube banner because, when you click into a channel, the first thing you usually see and pay attention to is the channel art.
Channel art gives viewers a first impression of who you are and allows viewers to know what your channel is all about. Channel art can be a great way to show creativity, and there are also ways you can design your banner to help your channel grow.
Here are the Dos and Don’ts of YouTube Channel Art.
- What Kind of Background Should I Use?
- Should I Use My Face?
- What Should I Write on Banner?
- How Can I Make My Channel Art Look Good?
Part 1: What Kind of Background Should I Use?
DO: High-Quality Photos
It’s easy to take pictures with our phones, but not all of these pictures will look great blown up for channel art.
When choosing great photos for your background, pick ones that are high quality and don’t become pixelated once they are blown up. There are tons of free stock photo websites out there to help you find a high-quality picture that’s perfect for your channel.
DON’T: Use Chaotic Patterns
Using patterns for the background of your channel banner can help your channel look super creative and stand out from others. However, if you use a pattern that is chaotic and hard on the eyes, you may not attract many subscribers. When using patterns, choose patterns that are not heavy in color and have too many lines or shapes. There should be an evenness to the shapes and negative space within the pattern itself. Try to stay away from patterns that are 3D which can conflict with the viewer’s eyesight and make them dizzy.
Part 2: Should I Use My Face?
Whether you should use your face on your channel banner depends on what your channel is about. If you have a channel focused on beauty, fashion, fitness, or family vlogs then it’s a good idea to include your face. It comes off personable and helps viewers relate to you. If you have a channel that is about something like gaming, tech reviews, or book reviews then it isn’t necessary to include your face because the focus of your content isn’t you as a personality.
If you do include pictures, here are some tips:
Don’t: Use Blurry Photos
If your photos are blurry, pixilated, or poor quality then don’t use them. Using blurry pictures comes off as unprofessional.
That doesn’t mean you have to hire a photographer to take pictures for your channel. The average smartphone takes really great pictures, so long as you have enough light. If you need a great picture, use a high-quality selfie or ask a friend to take a nice picture of you.
Don’t: Use Outdated Pictures
It is always best to use a current photo of yourself. Many times viewers will go and follow you on social media as well. If they see that you have current photos on your social media but not on your channel, they are become confused and perhaps lose interest.
Part 3: What Should I Write on My Banner?
Do: Include Your Channel Name
While including your channel name in your banner seems like a no brainer, it is often left out by aspiring YouTubers. Displaying your channel name in a large font allows it to be more visible for viewers - your channel name is already on the page, but it is underneath your channel art and doesn’t stand out.
Seeing your channel name included in your banner also helps viewers to know they are on the right page, if there are YouTubers out there with similar names to yours.
Do: Include Upload Days
Consistent upload days are highly important for gaining more views and subscribers. Including your exact upload days helps viewers know when they should expect new videos from you. I made the mistake of not including upload days when I first started my channel 3 years ago. I had drops in views because my subscribers didn’t know when I would upload videos.
If you find that you cannot stick to a certain upload day, try to include how often you will post instead. For example, you can say, “New Videos Posted Weekly.” Viewers will respect you more and even be more likely to subscribe when you tell them your upload days. They want a guarantee that you’re going to post again in the near future.
Do: Include Social Media
Social media accounts are important to include in your channel art because we live in a social media generation. People are on social media every second of the day. If you are looking to take your YouTube channel seriously, it is good practice to ask viewers to follow you on your social media.
Including social media icons in your channel art lets people know where they can find you. Another good reason to include your current social media in your banner is that sometimes you might join a new platform or quit an old one. You may be using Twitter for months and then decide that you like Facebook better. Your current social media handles keep subscribers from having to guess which one to follow you on.
Make sure everything important fits in the safe area!
Do: Include Brief Channel Description or Tag Line
Aside from your channel name, you should also include a brief channel description or tag line to tell your viewers what your channel is all about. If you’re an aspiring beauty guru, you may include something like Makeup Tutorials, Product Reviews, or Mommy Makeovers. Or, you may include a cool tag line that describes the goal of your channel, like “Empowering Mother’s Through Makeup.”
I’ve noticed that YouTubers that use 2-3 descriptive words in their channel art make many different types of videos on their channel but they all full under those categories.
YouTubers that use tag lines are using their channel as a platform to carry out a specific mission on giving help or educating others.
Whether you decide to use descriptive words or a tag line, they will help your channel tremendously by setting expectations for your viewers.
Part 4: How Can I Make My Channel Art Look Good?
Do: Create Consistent Branding
Since becoming a YouTuber myself, I’ve come to learn that paying attention to your branding is very important. Focus attention to what colors and fonts you use. The colors you use for your channel can influence your audience to feel a certain way. For example, using yellow can show that you’re happy and upbeat while using blue can show you’re more calm and relaxed. Whatever color you choose, make sure it’s a true representation of who you are.
Using the right font can also be important to your channel. There are many different fonts available now. When choosing a font, choose one that goes with your channel that is easy to read. You might choose a very pretty cursive font, but if your viewers can’t read it, it can be useless.
Don’t: Include Images That Have Nothing to Do with Your Channel
This simple mistake can cost you many subscribers. For example, if your channel is about Beauty videos, then your channel art shouldn’t include pictures of food or you eating a burger. Your channel art is the first thing that viewers see when clicking on your page. You want them to instantly know what your channel is all about without having to find it in the description box. If your channel is about a few different things, then include all of those images in the channel art so they still know what your channel about. Just don’t confuse your viewers as to what your channel is really about.
Don’t: Have Images and Text That Cut Off
YouTube helps YouTubers by giving them a free channel art template to use as a guide when creating channel art. The template includes 3 different perspectives on how your channel art will be viewed by people looking at mobile devices, computer screens, and TVs. Many people make the mistake of creating art on the TV perspective which then cuts off images and text for the mobile and computer views. To save you the trouble of having images that cut off, it’s best to create your channel in the mobile dimensions that way it will be seen in the computer and TV dimensions with no problem.
Joshelle is a YouTuber from Atlanta, GA. She has a YouTube channel called ElleToshea where she shows viewers how to improve their homes and spaces on an affordable budget through DIY home decor. ElleToshea features minimalist home decor styles based off popular stores such as Anthropologie and Urban Outfitters.
Now that you know how to make a good YouTube banner, what will you do next?
Touch Up YouTube Videos with Filmora
Wondershare Filmora features lots of utilities for both video and audio editing. You can change the video speed or change the aspect ratio easily. Besides, there are plentiful filters, elements, effects and overlays built, so you can use them without costing any extra fee.
Richard Bennett
Richard Bennett is a writer and a lover of all things video.
Follow @Richard Bennett
Essential Tips for Producing Engaging Educational Content for YouTube
Easy Ways to Make a Great Educational Video for YouTube

Marion Dubois
Oct 26, 2023• Proven solutions
YouTube is an app that makes it easy for teachers to carry out their work efficiently and conveniently. A teacher should start a YouTube channel because it is beneficial to their students and themselves. The materials or content dished on these channels helps give lessons and instructions in the absence of the teacher, give a detailed explanation and trigger the students’ interest.
Also, it archives all the lessons for a long time and makes them easily accessible by both the present, past, and future students. Students can quickly go back for a review for upcoming exams. Through feedbacks or comments, teachers can provide answers to students with the problem of clarity.
A teacher needs to know what an educational video is, what makes an excellent educational video, and how to make an educational video for YouTube before opening a YouTube channel. Now, let’s delve into it!
Part 1. What’s an Educational Video?
From the name “educational video,” you can coin out that it is a video made for the sole purpose of educating or passing out knowledge for the sake of learning. The primary purpose of these videos is to teach an audience about a particular problem or important topics they want to learn about.
Sometimes brands use this method to advertise their brand while being a source of information.
Part 2. What Makes a Good Educational Video?
An excellent educational video aids the learning process. It triggers learners in analyzing and evaluating concepts provided by the video. Videos are great educational tools that most teachers must adopt due to their role in facilitating the learning process.
To make a good educational video, you should keep the following points in mind:
- Keep your students engaged
An excellent educational video should be eye catchy and exciting to get your student’s undivided attention. You can achieve it in any way, one of which is that you need to put yourself into the teaching mode, which means that you should give out the impression of your excitement for the course content you are talking about. Ask them questions, let them feel involved in the process. Please don’t go ahead talking with a cold tune. It makes them tired of listening or seeing the video.
- Be sure to maintain a right-size of video length
It’s better shorter than longer. Have you ever seen a boring, long movie? It’s almost the same feeling you get seeing a long educational video.
The video should be straightforward to leverage the advantage of this form of learning. One needs to make this video of the right size for easy assimilation by the learner. Depending on the course topic, your video can be between 2 - 20 minutes long.
Most importantly, don’t try to do much and use more straightforward, understandable concepts.
- Stay focused
Making your videos focused and not running around many things helps it pass the information that plays a good role in video length management and engagement. Videos that try to divert from the topic may end up not hitting the nail on the head and not accomplishing their purpose.
- Center your interest on the student’s needs
Any educational content should be centered to meet the needs of the students. That goes beyond creating content, but covers the entirety of satisfying the needs of your learners.
Part 3. How to Make a Great Educational Video for YouTube?
The best and most recommendable video maker for making a great educational video is Wondershare Filmora.It is a video maker that enables you to create videos with effects like transition, filters, motion elements, and titles on your video.
Color grading and speed control of each clip on your video are possible using Filmora. You can apply other features like screen record, split-screen options, audio ducking, keyframing, motion tracking and more with an easy-to-use interface to fit the student’s interest.
To make a great educational video for YouTube, you can achieve this using Filmora. Follow the steps below.
Step 1. Launch Filmora and select the aspect ratio
Launch Filmora by double-clicking on the icon, and start working on a new project by selecting project aspect ratio.
Step 2. Create a new project and import footage
Click the “New Project” icon on the program’s welcome screen and wait for some time for the editor to load.
Then, move to choose your desired aspect ratio and click on the import footage icon located at the left corner of the video editor.
Step 3. Organize your project material
At the bottom of the “My Project” tab, click on “add a new folder”. In that new folder, arrange the footage alphabetically. This reduces time spent browsing files and increases efficiency.
Step 4. Preview and edit your video
Press the play icon to preview the video clip. Trim your video clip to the desired video size by dragging the end of the video clip left or right.
Then add customized text and add effects to the video if needed. An amazing effect can be added to each clip of the video to create an outstanding video.
Step 5. Export and share the video
When you’re okay with the already made video, click the Export button. Choose the YouTube option to upload it easily from the Filmora program.
Conclusion
Without a doubt, the process of creating an educational video requires that you pay attention to some things to create an excellent educational video that achieves the learning goal. Once you’ve learned what it means to make an educational video, how to go about it wouldn’t be something to worry about.
Thus, with the steps mentioned above, how to make a great educational video for YouTube has been answered. Now, you can go ahead and make amazing educational videos by yourself.
Marion Dubois
Marion Dubois is a writer and a lover of all things video.
Follow @Marion Dubois
Marion Dubois
Oct 26, 2023• Proven solutions
YouTube is an app that makes it easy for teachers to carry out their work efficiently and conveniently. A teacher should start a YouTube channel because it is beneficial to their students and themselves. The materials or content dished on these channels helps give lessons and instructions in the absence of the teacher, give a detailed explanation and trigger the students’ interest.
Also, it archives all the lessons for a long time and makes them easily accessible by both the present, past, and future students. Students can quickly go back for a review for upcoming exams. Through feedbacks or comments, teachers can provide answers to students with the problem of clarity.
A teacher needs to know what an educational video is, what makes an excellent educational video, and how to make an educational video for YouTube before opening a YouTube channel. Now, let’s delve into it!
Part 1. What’s an Educational Video?
From the name “educational video,” you can coin out that it is a video made for the sole purpose of educating or passing out knowledge for the sake of learning. The primary purpose of these videos is to teach an audience about a particular problem or important topics they want to learn about.
Sometimes brands use this method to advertise their brand while being a source of information.
Part 2. What Makes a Good Educational Video?
An excellent educational video aids the learning process. It triggers learners in analyzing and evaluating concepts provided by the video. Videos are great educational tools that most teachers must adopt due to their role in facilitating the learning process.
To make a good educational video, you should keep the following points in mind:
- Keep your students engaged
An excellent educational video should be eye catchy and exciting to get your student’s undivided attention. You can achieve it in any way, one of which is that you need to put yourself into the teaching mode, which means that you should give out the impression of your excitement for the course content you are talking about. Ask them questions, let them feel involved in the process. Please don’t go ahead talking with a cold tune. It makes them tired of listening or seeing the video.
- Be sure to maintain a right-size of video length
It’s better shorter than longer. Have you ever seen a boring, long movie? It’s almost the same feeling you get seeing a long educational video.
The video should be straightforward to leverage the advantage of this form of learning. One needs to make this video of the right size for easy assimilation by the learner. Depending on the course topic, your video can be between 2 - 20 minutes long.
Most importantly, don’t try to do much and use more straightforward, understandable concepts.
- Stay focused
Making your videos focused and not running around many things helps it pass the information that plays a good role in video length management and engagement. Videos that try to divert from the topic may end up not hitting the nail on the head and not accomplishing their purpose.
- Center your interest on the student’s needs
Any educational content should be centered to meet the needs of the students. That goes beyond creating content, but covers the entirety of satisfying the needs of your learners.
Part 3. How to Make a Great Educational Video for YouTube?
The best and most recommendable video maker for making a great educational video is Wondershare Filmora.It is a video maker that enables you to create videos with effects like transition, filters, motion elements, and titles on your video.
Color grading and speed control of each clip on your video are possible using Filmora. You can apply other features like screen record, split-screen options, audio ducking, keyframing, motion tracking and more with an easy-to-use interface to fit the student’s interest.
To make a great educational video for YouTube, you can achieve this using Filmora. Follow the steps below.
Step 1. Launch Filmora and select the aspect ratio
Launch Filmora by double-clicking on the icon, and start working on a new project by selecting project aspect ratio.
Step 2. Create a new project and import footage
Click the “New Project” icon on the program’s welcome screen and wait for some time for the editor to load.
Then, move to choose your desired aspect ratio and click on the import footage icon located at the left corner of the video editor.
Step 3. Organize your project material
At the bottom of the “My Project” tab, click on “add a new folder”. In that new folder, arrange the footage alphabetically. This reduces time spent browsing files and increases efficiency.
Step 4. Preview and edit your video
Press the play icon to preview the video clip. Trim your video clip to the desired video size by dragging the end of the video clip left or right.
Then add customized text and add effects to the video if needed. An amazing effect can be added to each clip of the video to create an outstanding video.
Step 5. Export and share the video
When you’re okay with the already made video, click the Export button. Choose the YouTube option to upload it easily from the Filmora program.
Conclusion
Without a doubt, the process of creating an educational video requires that you pay attention to some things to create an excellent educational video that achieves the learning goal. Once you’ve learned what it means to make an educational video, how to go about it wouldn’t be something to worry about.
Thus, with the steps mentioned above, how to make a great educational video for YouTube has been answered. Now, you can go ahead and make amazing educational videos by yourself.
Marion Dubois
Marion Dubois is a writer and a lover of all things video.
Follow @Marion Dubois
Also read:
- Budget-Friendly Bundles Startup Channels for Newcomers for 2024
- From Filming to Sharing A YouTube Video Edition
- [New] Channel Your Creativity Crafting YouTube Trailers in Filmora
- [Updated] Easy-Peasy YouTube Tutorials Making Content That Works for All
- [New] Convert Your Streaming Top Free Video to Audio Tools
- [New] Discovering Featured Social Media Exchange
- In 2024, Cutting Through Content Clutter YouTube Shorts Essentials
- [Updated] Elevating Your Content Strategy YouTube Keywords Explained
- Pioneering Visibility on YouTube Through Proven Methods
- In 2024, Clearing Your Browser's Watched Videos
- [Updated] Evaluating the Financial Giants Mr. Beast
- Boosting Viewership with Animated Subscribe Buttons in Filmora (Easy Guide) for 2024
- 2024 Approved Easy Guide Online Tools to Save Your YouTube Videos
- 10 Tips for Teachers Creating a YouTube Channel
- [Updated] Become the Brand You Want With Our Exclusive Set of FREE Graphics
- Leveraging Branding Skills Skyrocketing Your YouTube Subscriber Base
- In 2024, Crafting Success in YouTube's Creator Hub
- In 2024, Capture the Best Moments Select 6 Top-Ranked Short Video Download Tools
- In 2024, Direct YouTube to Dazzling Gif Creation with No Downloads
- [New] Dominance in Video Landscape Mirrorless vs DSLR Cameras
- [Updated] Amplify Your Earnings Universal Strategies for YouTube Revenue
- [New] Clip Conquest Top Tags for Dominating Video Trends on Social Media
- Upgrade Your Content Presentation with Top-Tier Templates
- The Essential List of Online Video Ripper Tools
- In 2024, 10 Best Desktop & Online GIF Tools Ranked
- YouTube Subscriber Chart - The 5 Most Subscribed YouTube Channels
- [New] Closing with Panache Free YouTube's #1 Six
- Step-by-Step Tutorial Download YouTube Videos in Pieces
- In 2024, A Step-by-Step Approach to Best YouTube Thumbnails
- Social Media Live Platforms FACEbook Vs. YOUTube Live & Twitter Periscope
- In 2024, Cut, Color & Compile A Deep Dive Into YouTube Studio Video Editing
- Audio Conversion Made Simple YouTube to MP3, Mac Edition for 2024
- 5 Critical Equipment Items to Start Your Channel Right for 2024
- Leveraging Tags Boost Engagement and Traffic for Videos
- How to Estimate Income From YouTube Video Snippets
- [Updated] Epic Video Artistry YouTube's Magicians
- In 2024, Channel-Building Through Characters and Plot Twists
- In 2024, Audio Integration Your YouTube Playlist
- The Novice's Route to Revenue in the YouTube Realm
- Updated In 2024, 10+ Alternatives to Windows Movie Maker Alternatives
- [New] 2024 Approved A Comprehensive Examination of OBS Recording Tech
- [New] Be the Best Lifeguard at Your Friends’ TikTok Shores for 2024
- [New] 2024 Approved Fixed Camera Resumes with OBS
- Updated 2024 Approved Get Ready for Slow Mo Magic Free Video Editing Tutorials with Filmora
- [New] 2024 Approved ChatCam Video Saver App
- [Updated] Sizzling Snaps From TikTok’s Culinary Kings & Queens for 2024
- In 2024, Premier Open-Source Windows/Mac Screenshots & Recorders
- Updated In 2024, A Closer Look at AVS Video Editor 2023 Features, Performance, and Value
- [New] Optimal Video Sizing for an Instagram Standout
- Use Device Manager to update your hardware drivers in Windows 10
- Top 4 Ways for Apple iPhone 11 Pro Max to Mac Mirroring | Dr.fone
- [New] Shortcut to Engagement Analyzing Facebook's Video Trends
- Title: "Mastering the Art of Thumbnail Design Tips and Pitfalls"
- Author: Brian
- Created at : 2024-05-25 12:20:59
- Updated at : 2024-05-26 12:20:59
- Link: https://youtube-video-recordings.techidaily.com/mastering-the-art-of-thumbnail-design-tips-and-pitfalls/
- License: This work is licensed under CC BY-NC-SA 4.0.
