Managing a Day Job and Your Thriving YouTube Channel
Managing a Day Job and Your Thriving YouTube Channel
How to balance YouTube with a Full-Time Job

Richard Bennett
Oct 26, 2023• Proven solutions
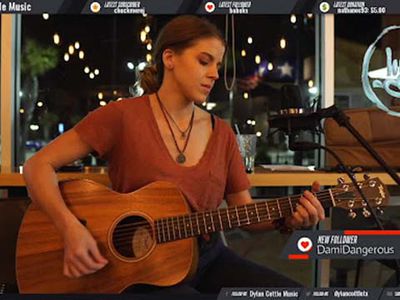
I’ve been on YouTube for two years now and it’s no secret that I’ve had my challenges balancing it with my full-time job — and avoiding YouTube burnout. I’m a Social Worker, which means I’m always juggling my time between conducting home visits, returning phone calls and emails, and round-the-clock documentation on my clients. YouTube can be a great source of passive income, but it takes time before you can make money on YouTube .
I’ve had to put a lot of effort into staying consistent with my YouTube channel. Through trial and error, I’ve learned some things that have worked tremendously, while others have been epic fails.
So, to save you and your viewers some of the same struggles, here are 5 tips I recommend for keeping your channel running successfully and having work-life balance!
1. Don’t force yourself to post on specific days
2. Keep track of all your ideas in one notebook planner
3. Check the weather forecast in advance
4. Create 3-5 videos in advance
5. Be creative! Create audios (audio-only videos)
1. Don’t force yourself to post on specific days
I know what you’re thinking - “What?! That’s insane.” The first piece of advice I received about YouTube was to create a schedule of days to post so your viewers look forward to videos. That just doesn’t work for me. Whenever I became too busy with work, I couldn’t stick to my typical Tuesday or Thursday schedule. I think it’s best to focus on how many times you can post in a week rather than a specific day. I try to post at least once a week and that’s my goal. You can always increase as your workload gets lighter or you when you are able to do YouTube full-time.
2. Keep track of all your ideas in one notebook planner
A notebook planner is essential for keeping my life organized and on track. When I first started my channel, I had a separate planner just for my YouTube videos – this didn’t work cause I never looked at it. It worked best when I kept track of my entire life, including YouTube, in one planner since I look at it every day. Then I could also see which days I wanted to post a video or see what topics worked best around specific holidays and such.
3. Check the weather forecast in advance
When starting a YouTube channel, many YouTubers like myself don’t have the money to afford all the fancy lighting you see other creators using. I use natural light , which means I have to make sure it’s going to be a sunny day or at least bright enough for my videos to be clear. I check the forecast for the week on Sunday evenings so I can plan out my best days to film, this keeps my video shooting schedule productive.
4. Create 3-5 videos in advance
This week I am on PTO (paid time off) which has given me a lot more time to film videos I can post for next month. Life happens and it can set you back on filming. If you happen to get a major break in your workweek, use the opportunity to film a bunch of videos, edit them, and have them waiting in your pocket. I filmed three videos in one day – I planned and set-up the night before, which made filming much smoother. Trust me, this tip works wonders!

5. Be creative! Create audios (audio-only videos)
In the event that life gets too crazy, it’s perfectly fine to do just audio. Many of us are always on the go which means it’s the perfect time to listen to great advice while driving to work, waiting on the bus, or working at the gym. Someone out there would love to hear your advice. I started to do this with my Tea Time Talk Audios and the response was great.
I hope these tips can help you on your journey with YouTube while still working a full-time job.
Make a YouTube Video with Wondershare Filmora
Wondershare Filmora is one application that people prefer over any other video editing application due to its easy-to-use editing tools and social media aimed settings. This application can help any beginner with a desire to shoot a movie, achieve his dream even without the availability of high-tech cameras or equipment in his hand. The features like video stabilization feature and lens correction allow removing the major defects that occur while capturing a video. A large number of filters in the application can be used to give the cinematic effect whether it be a short video or a long movie.
Just try it and create your own YouTube video!


Richard Bennett
Richard Bennett is a writer and a lover of all things video.
Follow @Richard Bennett
Richard Bennett
Oct 26, 2023• Proven solutions
I’ve been on YouTube for two years now and it’s no secret that I’ve had my challenges balancing it with my full-time job — and avoiding YouTube burnout. I’m a Social Worker, which means I’m always juggling my time between conducting home visits, returning phone calls and emails, and round-the-clock documentation on my clients. YouTube can be a great source of passive income, but it takes time before you can make money on YouTube .
I’ve had to put a lot of effort into staying consistent with my YouTube channel. Through trial and error, I’ve learned some things that have worked tremendously, while others have been epic fails.
So, to save you and your viewers some of the same struggles, here are 5 tips I recommend for keeping your channel running successfully and having work-life balance!
1. Don’t force yourself to post on specific days
2. Keep track of all your ideas in one notebook planner
3. Check the weather forecast in advance
4. Create 3-5 videos in advance
5. Be creative! Create audios (audio-only videos)
1. Don’t force yourself to post on specific days
I know what you’re thinking - “What?! That’s insane.” The first piece of advice I received about YouTube was to create a schedule of days to post so your viewers look forward to videos. That just doesn’t work for me. Whenever I became too busy with work, I couldn’t stick to my typical Tuesday or Thursday schedule. I think it’s best to focus on how many times you can post in a week rather than a specific day. I try to post at least once a week and that’s my goal. You can always increase as your workload gets lighter or you when you are able to do YouTube full-time.
2. Keep track of all your ideas in one notebook planner
A notebook planner is essential for keeping my life organized and on track. When I first started my channel, I had a separate planner just for my YouTube videos – this didn’t work cause I never looked at it. It worked best when I kept track of my entire life, including YouTube, in one planner since I look at it every day. Then I could also see which days I wanted to post a video or see what topics worked best around specific holidays and such.
3. Check the weather forecast in advance
When starting a YouTube channel, many YouTubers like myself don’t have the money to afford all the fancy lighting you see other creators using. I use natural light , which means I have to make sure it’s going to be a sunny day or at least bright enough for my videos to be clear. I check the forecast for the week on Sunday evenings so I can plan out my best days to film, this keeps my video shooting schedule productive.
4. Create 3-5 videos in advance
This week I am on PTO (paid time off) which has given me a lot more time to film videos I can post for next month. Life happens and it can set you back on filming. If you happen to get a major break in your workweek, use the opportunity to film a bunch of videos, edit them, and have them waiting in your pocket. I filmed three videos in one day – I planned and set-up the night before, which made filming much smoother. Trust me, this tip works wonders!
5. Be creative! Create audios (audio-only videos)
In the event that life gets too crazy, it’s perfectly fine to do just audio. Many of us are always on the go which means it’s the perfect time to listen to great advice while driving to work, waiting on the bus, or working at the gym. Someone out there would love to hear your advice. I started to do this with my Tea Time Talk Audios and the response was great.
I hope these tips can help you on your journey with YouTube while still working a full-time job.
Make a YouTube Video with Wondershare Filmora
Wondershare Filmora is one application that people prefer over any other video editing application due to its easy-to-use editing tools and social media aimed settings. This application can help any beginner with a desire to shoot a movie, achieve his dream even without the availability of high-tech cameras or equipment in his hand. The features like video stabilization feature and lens correction allow removing the major defects that occur while capturing a video. A large number of filters in the application can be used to give the cinematic effect whether it be a short video or a long movie.
Just try it and create your own YouTube video!
Richard Bennett
Richard Bennett is a writer and a lover of all things video.
Follow @Richard Bennett
Clear Cut Content: How to Minimize Unwanted Elements in Video
How to Blur Background of Your YouTube Video
Richard Bennett
Mar 27, 2024• Proven solutions
A lot of YouTubers like to vlog in front of blurred backgrounds. Blurring the background of your YouTube video is a fast way to make it look more professional – you stand out when you are entirely in focus, and everything behind you is blurry. Plus, it is an easy way to disguise the room you are vlogging from.

Even if your set is clean, there could be things like books behind you, which will distract viewers; they will be trying to read the spines. Blurring out the background of your shot makes your video look polished and keeps people’s focus entirely on you.
- Part 1: Blur YouTube Video Background in Shooting Videos
- Part 2: Add Tilt-Shift Effects to Video in Editing
Part 1: How to Blur Background of Your YouTube Video in Shooting Videos
Blurring your background is also how you create a beautiful bokeh lighting effect. Bokeh is when you blur lights in the background of your shot, creating halo-like circles of light. By attaching a filter with a shape cut out to the camera lens, you can even generate bokeh lights in other shapes, like hearts or stars.
Aperture refers to the hole in your lens which allows light into your camera. A narrow aperture lets in less light, and a wide aperture lets in more. The wider your aperture is, the shallower your depth of field will be. Widening your aperture also helps your camera perform better in low-light situations. Widening your aperture too much under the wrong circumstances can let in too much light and result in your footage being overexposed.
Depth of Field is the area of your image that is in focus. If you have a large depth of field, then objects close to and far away from your camera will all be in focus. Only a select area will be focused and the rest will be blurred if you have a shallow depth of field.
F-Stops are the measurement of an aperture’s width. The higher your f-stop, the narrower your aperture will be. To create a blurred background or a bokeh effect, you need a wide aperture, and thus a small f-stop. F-stops are written like ‘f/1.4’. You need an f-stop of less than f/4 to blur your background, and less than f/2.8 for bokeh.
1. Blurring and Bokeh
Blurred backgrounds and bokeh are very closely related. A bokeh effect is essentially a blurred background that includes lights.
To achieve a blurred background or a bokeh effect, you need to have a shallow depth of field. That means a wide aperture and a low f-stop.
2. How to Blur your Background
Place your subject – in the case of a vlog, your subject is probably yourself – in a shallow depth of field, and they will remain sharply in focus while everything behind them is blurred.
If the subject is yourself, you might need a helper to either operate your camera or stand in for you while you set up your camera. You will need to be able to check that the place you plan to stand or sit is in focus.
To get a shallow depth of field, make sure your aperture is wide. Do this by setting a low f-stop. Ideally, your f-stop will be 2.8 or lower, but if your camera cannot go that low, then f/3 or f/4 can also work.
Creating a bokeh effect is mostly the same, except that it works best when your subject/depth of field is very close to the camera, and you have a light source off in the background. Zoom Lenses do not usually have wide enough apertures to create bokeh backgrounds.
Blur Video Background in Post-Production with Wondershare Filmora Video Editor
If you need to blur the video background after shooting, you can use some video editing software to add the bokeh effect or the tilt-off effect in post-production. Here, I will show you how to do that in Filmora.
Filmora is one of the most widely used video editing software among YouTubers. Its user-friendly interface and tutorial guide enables green-hands to start video editing quickly. Besides, you can find many free filters, effects, and elements pre-programmed, so you can use them directly without looking for presets and templates somewhere else.
1. Add Bokeh Filter to Video in Filmora
There are about 20 bokeh effects available in filters and overlays. You can find them easily by typing bokeh in the search bar in Effects.
Note: you should select Included to see all bokeh effects pre-programmed in Filmora. If you need more visual effects, just go to the Filmstock effects store.

Double click the bokeh effect to preview the result, and if you find the bokeh effect fits the video, just drop it to the track above the video. And the bokeh filter or overlay will be applied to the video automatically.
2. Use Tilt-Shift Circle/Linear Effect to Blur Video Background
Filmora features two tilt effects, tilt-shift circle and tilt-shift linear, which allows you to highlight people in the video, blur, and conceal the video background.
Go to the Effects tab and then switch to the Utility menu under Included category.

Here, I will select the Tilt-Shift Circle effect and drop it to the track above the video. Now, you can adjust the size, position, and intensity of the tilt-shift circle effect

You see, the video background is blurred, and the people are highlighted. Now it’s your turn to download the Filmora video editor and try it yourself.
Richard Bennett
Richard Bennett is a writer and a lover of all things video.
Follow @Richard Bennett
Richard Bennett
Mar 27, 2024• Proven solutions
A lot of YouTubers like to vlog in front of blurred backgrounds. Blurring the background of your YouTube video is a fast way to make it look more professional – you stand out when you are entirely in focus, and everything behind you is blurry. Plus, it is an easy way to disguise the room you are vlogging from.
Even if your set is clean, there could be things like books behind you, which will distract viewers; they will be trying to read the spines. Blurring out the background of your shot makes your video look polished and keeps people’s focus entirely on you.
- Part 1: Blur YouTube Video Background in Shooting Videos
- Part 2: Add Tilt-Shift Effects to Video in Editing
Part 1: How to Blur Background of Your YouTube Video in Shooting Videos
Blurring your background is also how you create a beautiful bokeh lighting effect. Bokeh is when you blur lights in the background of your shot, creating halo-like circles of light. By attaching a filter with a shape cut out to the camera lens, you can even generate bokeh lights in other shapes, like hearts or stars.
Aperture refers to the hole in your lens which allows light into your camera. A narrow aperture lets in less light, and a wide aperture lets in more. The wider your aperture is, the shallower your depth of field will be. Widening your aperture also helps your camera perform better in low-light situations. Widening your aperture too much under the wrong circumstances can let in too much light and result in your footage being overexposed.
Depth of Field is the area of your image that is in focus. If you have a large depth of field, then objects close to and far away from your camera will all be in focus. Only a select area will be focused and the rest will be blurred if you have a shallow depth of field.
F-Stops are the measurement of an aperture’s width. The higher your f-stop, the narrower your aperture will be. To create a blurred background or a bokeh effect, you need a wide aperture, and thus a small f-stop. F-stops are written like ‘f/1.4’. You need an f-stop of less than f/4 to blur your background, and less than f/2.8 for bokeh.
1. Blurring and Bokeh
Blurred backgrounds and bokeh are very closely related. A bokeh effect is essentially a blurred background that includes lights.
To achieve a blurred background or a bokeh effect, you need to have a shallow depth of field. That means a wide aperture and a low f-stop.
2. How to Blur your Background
Place your subject – in the case of a vlog, your subject is probably yourself – in a shallow depth of field, and they will remain sharply in focus while everything behind them is blurred.
If the subject is yourself, you might need a helper to either operate your camera or stand in for you while you set up your camera. You will need to be able to check that the place you plan to stand or sit is in focus.
To get a shallow depth of field, make sure your aperture is wide. Do this by setting a low f-stop. Ideally, your f-stop will be 2.8 or lower, but if your camera cannot go that low, then f/3 or f/4 can also work.
Creating a bokeh effect is mostly the same, except that it works best when your subject/depth of field is very close to the camera, and you have a light source off in the background. Zoom Lenses do not usually have wide enough apertures to create bokeh backgrounds.
Blur Video Background in Post-Production with Wondershare Filmora Video Editor
If you need to blur the video background after shooting, you can use some video editing software to add the bokeh effect or the tilt-off effect in post-production. Here, I will show you how to do that in Filmora.
Filmora is one of the most widely used video editing software among YouTubers. Its user-friendly interface and tutorial guide enables green-hands to start video editing quickly. Besides, you can find many free filters, effects, and elements pre-programmed, so you can use them directly without looking for presets and templates somewhere else.
1. Add Bokeh Filter to Video in Filmora
There are about 20 bokeh effects available in filters and overlays. You can find them easily by typing bokeh in the search bar in Effects.
Note: you should select Included to see all bokeh effects pre-programmed in Filmora. If you need more visual effects, just go to the Filmstock effects store.
Double click the bokeh effect to preview the result, and if you find the bokeh effect fits the video, just drop it to the track above the video. And the bokeh filter or overlay will be applied to the video automatically.
2. Use Tilt-Shift Circle/Linear Effect to Blur Video Background
Filmora features two tilt effects, tilt-shift circle and tilt-shift linear, which allows you to highlight people in the video, blur, and conceal the video background.
Go to the Effects tab and then switch to the Utility menu under Included category.
Here, I will select the Tilt-Shift Circle effect and drop it to the track above the video. Now, you can adjust the size, position, and intensity of the tilt-shift circle effect
You see, the video background is blurred, and the people are highlighted. Now it’s your turn to download the Filmora video editor and try it yourself.
Richard Bennett
Richard Bennett is a writer and a lover of all things video.
Follow @Richard Bennett
Also read:
- [New] In 2024, Indie Developer Gaming Channels To Follow
- 2024 Approved A Visual Voyage Through Youtube's 2017 Data Deluge
- 2024 Approved Latest Podcast Question Bank for Engaging Audiences
- Advanced Text Search in EmEditor - Easily Locate Words and Phrases
- Audio Exploration The Comprehensible Review of Pazera
- Beats & Banners Discovering Premium DJ Templates for 2024
- Enlightenment Echoes Best Ed Tutorials YT for 2024
- Exclusive MCB Logo Designs and Templates for 2024
- Harnessing the Power of YouTube's SEO Keywords
- In 2024, How to Unlock Apple ID Activation Lock On iPhone X?
- Launchpad to Success The YouTube Entrepreneur's Guide
- Tutorial Purging Your YouTube Download History
- Wiederherstellung Gelöschter Bilddateien in Windows XP: Schritt-Für-Schritt-Anleitung
- Your Path to YouTube Prominence Effective Tactics Unveiled
- Title: Managing a Day Job and Your Thriving YouTube Channel
- Author: Brian
- Created at : 2024-10-30 18:26:01
- Updated at : 2024-11-04 23:31:03
- Link: https://youtube-video-recordings.techidaily.com/managing-a-day-job-and-your-thriving-youtube-channel/
- License: This work is licensed under CC BY-NC-SA 4.0.