
:max_bytes(150000):strip_icc()/nothing-phone-update-a48070f52beb4a9d8c8792a6e44bb927.jpg)
"Making a Mark on YouTube Proven Techniques From Creator Studio Experts"
Making a Mark on YouTube: Proven Techniques From Creator Studio Experts
YouTube Creator Studio is a powerful tool for content creators. It allows you to manage and optimize YouTube channels for better performance. With YouTube studio monetization features, you can keep track of your revenues. The creator study also allows you to manage your videos and see how well they are performing. This article explores the monetization Youtube Studio in detail, including how to access and use it.
YouTube Video Editor A cross-platform for creating YouTube-ready videos with monetization!
Free Download Free Download Learn More

Part 1. Introduction to YouTube Studio: Definition and Uses
Every creator is aware of YouTube Studio com monetization as a tool for managing YouTube. However, how much can you say about channel monetization YouTube Studio? Let’s have a look at what you need to know:
What is YouTube Studio?
YouTube Studio is a tool that allows creators and other users to manage their channels. Formerly known as YouTube Creator Studio, the tool helps you to edit and monitor the performance of your videos, You can also view and reply to comments, or even schedule content.

Uses of YouTube Studio
YouTube Studio is an essential tool for creators and brands. It helps them manage their presence on YouTube. Individuals can also grow their channels and track the progress they have made. Other people also use YouTube Studio as a hub to get a snapshot of their channel’s performance. It makes it easier to manage videos and offer opportunities for monetizing content through the YouTube Partner Program (YPP). The features that creators can access via the studio include:
- Manage the channel: YouTube Studio allows creators to customize their channel’s appearance, branding, description, and layout.
- Editing of videos: Options for editing videos in the Studio include details, end screens, thumbnails, uploading videos, subtitles, and adding or managing playlists.
- View your performance: Detailed insights are available about the performance of the videos, audience demographics, watch time, and more.
- YouTube Monetization: All the tools and settings for monetizing your videos and Shorts on YouTube are found on the Studio.
- Manage your comments: The comments section of the Studio allows you to view and reply to comments on your videos.
Part 2. Master Your YouTube Presence: Essential Steps to Dominate Creator Studio
Getting started with YouTube Creator Studio is simple. Log in to your YouTube, and click on the profile pic at the right corner of the page. Then select YouTube Studio from the dropdown menu.
Step-by-Step Guide for Using YouTube Creator Studio
Beginners may find it a bit tricky to navigate the YouTube Creator Studio. There are a lot of tools to explore, each with a unique function. Let’s break down the essentials to get you started.
Step 1Navigating the YouTube Studio

To launch the YouTube Creator Studio, head over to studio.youtube.com and sign in. Then click on your profile pic and select YouTube Studio. On the left-hand side of the Studio screen, browse to navigate the features.
Step 2Exploring the Creator Dashboard

The YouTube Creator Studio Dashboard provides all the handy information needed to create a growth strategy for your channel. You will see the analytics of your top videos and a summary of your views. You will also see your current subscribers watch time, and more:
- Review how your most recent video is performing
- Review personalized suggestions to grow your channel
- Check recent comments and respond appropriately
- Watch the latest updates from the YouTube team
- Look at important notifications to avoid copyright violations or monetization issues on time
- Explore the audio library to gain access to free soundtracks and music
Step 3Manage Your Content

Click on the Content tab on the dashboard. Manage your content by editing or just reviewing the performance of each video. You can also create playlists linked to the videos to choose watch time.
Step 4Monitoring Channel Performance

The YouTube Creator Studio Analytics provides a summary of your video metrics and reports. This will help you figure out what is working. The analytics also point out what needs to be improved to gain more views. Be sure to check views and watch time to get an accurate picture of the channel’s performance.
Step 5Review Your Studio Monetization Tab

The monetization tab shows the monetization status of your channel. On the left side of the dashboard, click Earn to access this feature. After being accepted to the YPP, you can make money from advertising revenue, merch shelf, channel membership, and the fan-funded program. Before monetization, this page shows how far you are to meet the eligibility criteria.
Importance of Verifying the YouTube Channel
After uploading your videos to YouTube Creator Studio, you need to optimize each for monetization. This ensures that the algorithm works in your favor. It is also important to create an AdSense Account and link it to your channel. This will:
- Increase your level of credibility because a verified YouTube channel is seen as more trustworthy by viewers
- Protect you and your channel from impersonation by preventing other users from creating fake accounts under your name.
- Unlock additional features such as the ability to lie stream in HD and customer the channel layout.
Linking your AdSense to the Account is also a crucial step towards getting paid for your creation on YouTube. It ensures that your earnings get to you. After joining the YPP, you are allowed to change your linked AdSense account if you already have one. You can also monetize more than one channel using the same AdSense account, and keep track of your earnings.
Part 3. Create YouTube-Ready Videos with Wondershare Filmora
The success of your YouTube channel largely depends on the quality of the videos uploaded. You need video editing software that will make your creator studio attractive even before opening individual videos. Wondershare Filmora is a top choice for many creators looking to outperform their competitors on YouTube. Explore the range of possibilities with Filmora ranging from creative video effects to stunning text animations.
Free Download For Win 7 or later(64-bit)
Free Download For macOS 10.14 or later
Making YouTube-ready videos with Filmora is quick and easy. You need to have great footage to start with. Then, explore the editing features that will make the video stand out. Let’s have a look at the steps involved:
Step 1Launch Filmora
Launch Filmora by double-clicking the desktop icon. On the welcome window, select the aspect ratio you want to use, and choose to create new project.

Step 2Create a New Project and Import Files
Once the editor loads, import the media files that you want to use in the project. Click om the import tab and select where you want to import the files from.

Step 3Organize Your Project Material
Manage the files you will be using in the editing project. Creating a folder for the project allows you to organize the file using different criteria such as type or purpose such as food footage.

Step 4Place Files on the Timeline
Time to start editing your video. Place the video and audio files on the timeline while removing the redundant parts. Use the drag-and-drop feature to edit the clips, one at a time, cutting out unneeded footage to have a clear story.

Step 5Apply Visual Effects
After removing the unwanted parts from the video clips, detach the audio and video files. Insert transitions between clips, add music, and use other visual effects on Filmora to make the video more exciting.

Step 6Conduct the Color Correction Process
The effects icon gives you access to filters and overlays to make your video colors more vivid. Select the filters of choice, and drag and drop it to where you want to use on the timeline.

Step 7Export and Share
Once you are satisfied with the video outcome, export it in MP4 format, ready for upload on YouTube. Save it in your local drive, and upload it to YouTube via the Creator Studio.

Conclusion
The YouTube Creator Studio allows you to manage your channel and content in a central location. You get access to all the essential features, including analytics and content editing. Also, manage the monetization of your videos and reply to comments. Good video editing software will play a crucial role in building your channel. We recommend exploring video editing features on Wondershare Filmora to make better videos for your channels. With most tasks now optimized, editing videos with Filmora is now easier and fun.
Free Download Free Download Learn More
Part 1. Introduction to YouTube Studio: Definition and Uses
Every creator is aware of YouTube Studio com monetization as a tool for managing YouTube. However, how much can you say about channel monetization YouTube Studio? Let’s have a look at what you need to know:
What is YouTube Studio?
YouTube Studio is a tool that allows creators and other users to manage their channels. Formerly known as YouTube Creator Studio, the tool helps you to edit and monitor the performance of your videos, You can also view and reply to comments, or even schedule content.
Uses of YouTube Studio
YouTube Studio is an essential tool for creators and brands. It helps them manage their presence on YouTube. Individuals can also grow their channels and track the progress they have made. Other people also use YouTube Studio as a hub to get a snapshot of their channel’s performance. It makes it easier to manage videos and offer opportunities for monetizing content through the YouTube Partner Program (YPP). The features that creators can access via the studio include:
- Manage the channel: YouTube Studio allows creators to customize their channel’s appearance, branding, description, and layout.
- Editing of videos: Options for editing videos in the Studio include details, end screens, thumbnails, uploading videos, subtitles, and adding or managing playlists.
- View your performance: Detailed insights are available about the performance of the videos, audience demographics, watch time, and more.
- YouTube Monetization: All the tools and settings for monetizing your videos and Shorts on YouTube are found on the Studio.
- Manage your comments: The comments section of the Studio allows you to view and reply to comments on your videos.
Part 2. Master Your YouTube Presence: Essential Steps to Dominate Creator Studio
Getting started with YouTube Creator Studio is simple. Log in to your YouTube, and click on the profile pic at the right corner of the page. Then select YouTube Studio from the dropdown menu.
Step-by-Step Guide for Using YouTube Creator Studio
Beginners may find it a bit tricky to navigate the YouTube Creator Studio. There are a lot of tools to explore, each with a unique function. Let’s break down the essentials to get you started.
Step 1Navigating the YouTube Studio
To launch the YouTube Creator Studio, head over to studio.youtube.com and sign in. Then click on your profile pic and select YouTube Studio. On the left-hand side of the Studio screen, browse to navigate the features.
Step 2Exploring the Creator Dashboard
The YouTube Creator Studio Dashboard provides all the handy information needed to create a growth strategy for your channel. You will see the analytics of your top videos and a summary of your views. You will also see your current subscribers watch time, and more:
- Review how your most recent video is performing
- Review personalized suggestions to grow your channel
- Check recent comments and respond appropriately
- Watch the latest updates from the YouTube team
- Look at important notifications to avoid copyright violations or monetization issues on time
- Explore the audio library to gain access to free soundtracks and music
Step 3Manage Your Content
Click on the Content tab on the dashboard. Manage your content by editing or just reviewing the performance of each video. You can also create playlists linked to the videos to choose watch time.
Step 4Monitoring Channel Performance
The YouTube Creator Studio Analytics provides a summary of your video metrics and reports. This will help you figure out what is working. The analytics also point out what needs to be improved to gain more views. Be sure to check views and watch time to get an accurate picture of the channel’s performance.
Step 5Review Your Studio Monetization Tab
The monetization tab shows the monetization status of your channel. On the left side of the dashboard, click Earn to access this feature. After being accepted to the YPP, you can make money from advertising revenue, merch shelf, channel membership, and the fan-funded program. Before monetization, this page shows how far you are to meet the eligibility criteria.
Importance of Verifying the YouTube Channel
After uploading your videos to YouTube Creator Studio, you need to optimize each for monetization. This ensures that the algorithm works in your favor. It is also important to create an AdSense Account and link it to your channel. This will:
- Increase your level of credibility because a verified YouTube channel is seen as more trustworthy by viewers
- Protect you and your channel from impersonation by preventing other users from creating fake accounts under your name.
- Unlock additional features such as the ability to lie stream in HD and customer the channel layout.
Linking your AdSense to the Account is also a crucial step towards getting paid for your creation on YouTube. It ensures that your earnings get to you. After joining the YPP, you are allowed to change your linked AdSense account if you already have one. You can also monetize more than one channel using the same AdSense account, and keep track of your earnings.
Part 3. Create YouTube-Ready Videos with Wondershare Filmora
The success of your YouTube channel largely depends on the quality of the videos uploaded. You need video editing software that will make your creator studio attractive even before opening individual videos. Wondershare Filmora is a top choice for many creators looking to outperform their competitors on YouTube. Explore the range of possibilities with Filmora ranging from creative video effects to stunning text animations.
Free Download For Win 7 or later(64-bit)
Free Download For macOS 10.14 or later
Making YouTube-ready videos with Filmora is quick and easy. You need to have great footage to start with. Then, explore the editing features that will make the video stand out. Let’s have a look at the steps involved:
Step 1Launch Filmora
Launch Filmora by double-clicking the desktop icon. On the welcome window, select the aspect ratio you want to use, and choose to create new project.
Step 2Create a New Project and Import Files
Once the editor loads, import the media files that you want to use in the project. Click om the import tab and select where you want to import the files from.
Step 3Organize Your Project Material
Manage the files you will be using in the editing project. Creating a folder for the project allows you to organize the file using different criteria such as type or purpose such as food footage.
Step 4Place Files on the Timeline
Time to start editing your video. Place the video and audio files on the timeline while removing the redundant parts. Use the drag-and-drop feature to edit the clips, one at a time, cutting out unneeded footage to have a clear story.
Step 5Apply Visual Effects
After removing the unwanted parts from the video clips, detach the audio and video files. Insert transitions between clips, add music, and use other visual effects on Filmora to make the video more exciting.
Step 6Conduct the Color Correction Process
The effects icon gives you access to filters and overlays to make your video colors more vivid. Select the filters of choice, and drag and drop it to where you want to use on the timeline.
Step 7Export and Share
Once you are satisfied with the video outcome, export it in MP4 format, ready for upload on YouTube. Save it in your local drive, and upload it to YouTube via the Creator Studio.
Conclusion
The YouTube Creator Studio allows you to manage your channel and content in a central location. You get access to all the essential features, including analytics and content editing. Also, manage the monetization of your videos and reply to comments. Good video editing software will play a crucial role in building your channel. We recommend exploring video editing features on Wondershare Filmora to make better videos for your channels. With most tasks now optimized, editing videos with Filmora is now easier and fun.
1 Choice: Transcribe YouTube Videos in a Flash
Have you ever wondered why there is a need to transcribe YouTube videos? Well, let us enlighten you! Turning content from YouTube to text is essential for numerous content creators as it allows them to gain more views. Recent studies have shown that around 33% of the audience watching YouTube videos do not necessarily watch them in English. So, by converting them to text, translation becomes a whole lot easier and subtitles can be generated more efficiently.
In this article, we will explore the procedure through how one can convert a YouTube video to text, and learn about numerous effective online YouTube video to text software.
In this article
01 How to Convert YouTube Video to Texts by Copy/Paste YouTube Transcript
02 Best YouTube Video to Text Converters Online
Part 1: How to Convert YouTube Video to Texts by Copy/Paste YouTube Transcript
When people think “Get the transcript from YouTube” they believe it is going to be a daunting and lengthy procedure. Well, let us tell you that it is certainly not! All you have to do is follow the steps outlined below to transcribe YouTube video to text - that too through the YouTube player itself.
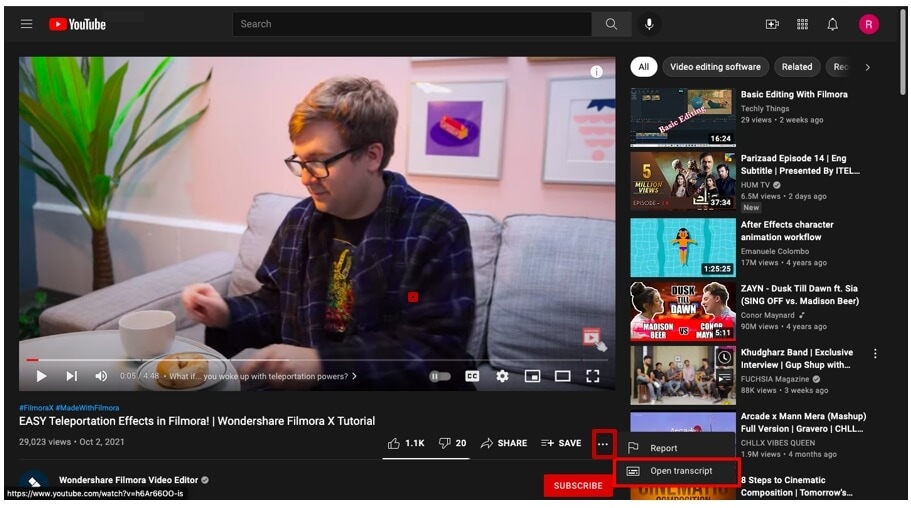
First what you have to do is open YouTube and select any video for which you require the transcript. Once you have selected the video, wait for it to load and then click the three dots located beneath the video, as shown in the image below.
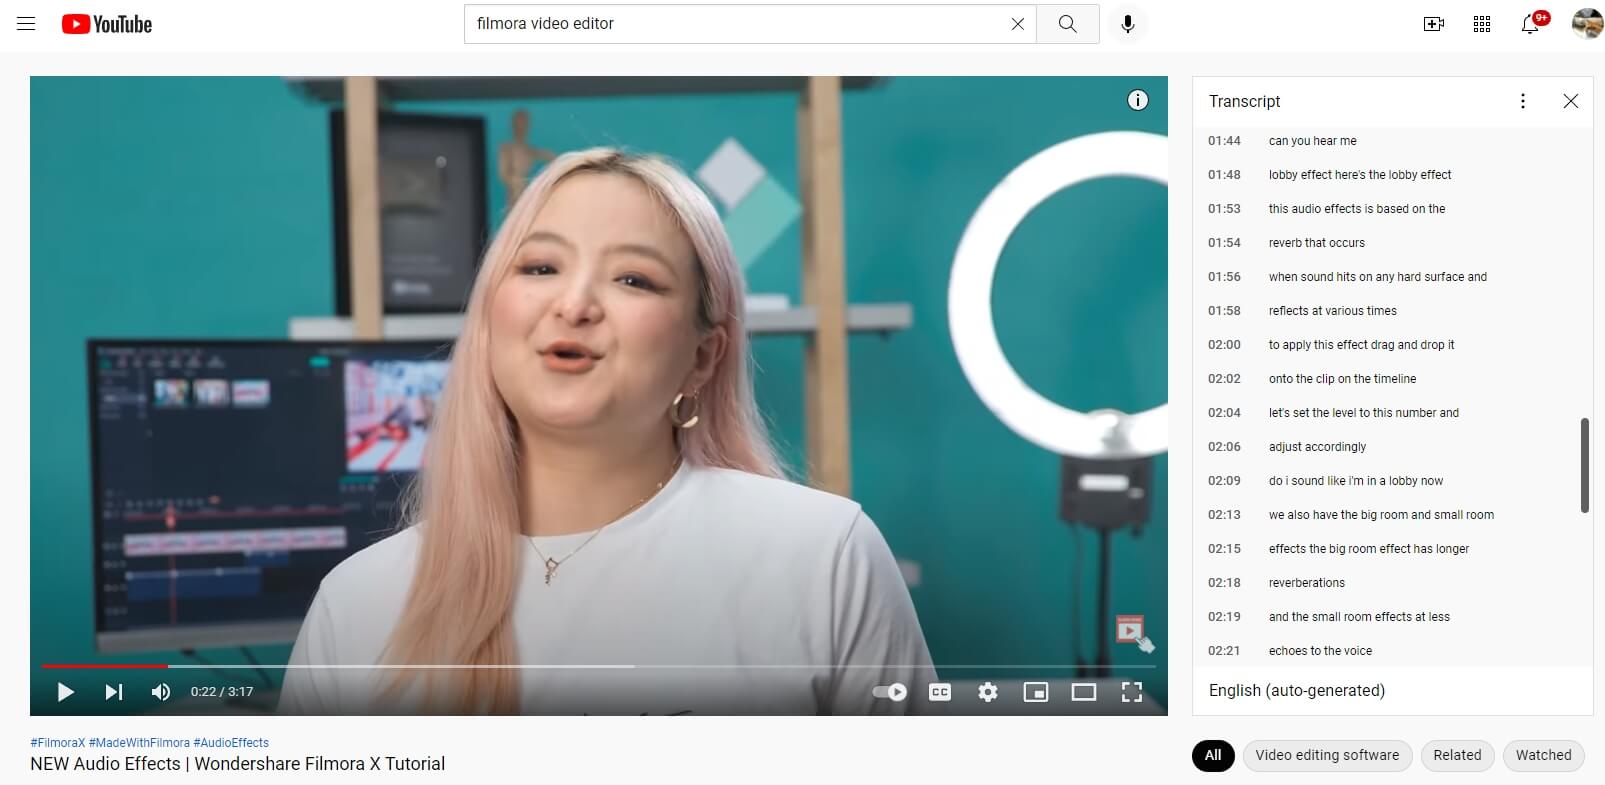
Following that, a menu will appear, just select the “Open Transcript” option and the transcription will open on the top right side of your screen.
Simply select the entire transcript using your mouse, then copy and paste it into a new Word Document or Google Document. If you don’t need the timestamps, you can click the three-dot icon to toggle timestamps off.

By following the steps outlined above, you can convert a YouTube video to text in less than five seconds!
Part 2: Best YouTube Video to Text Converters Online
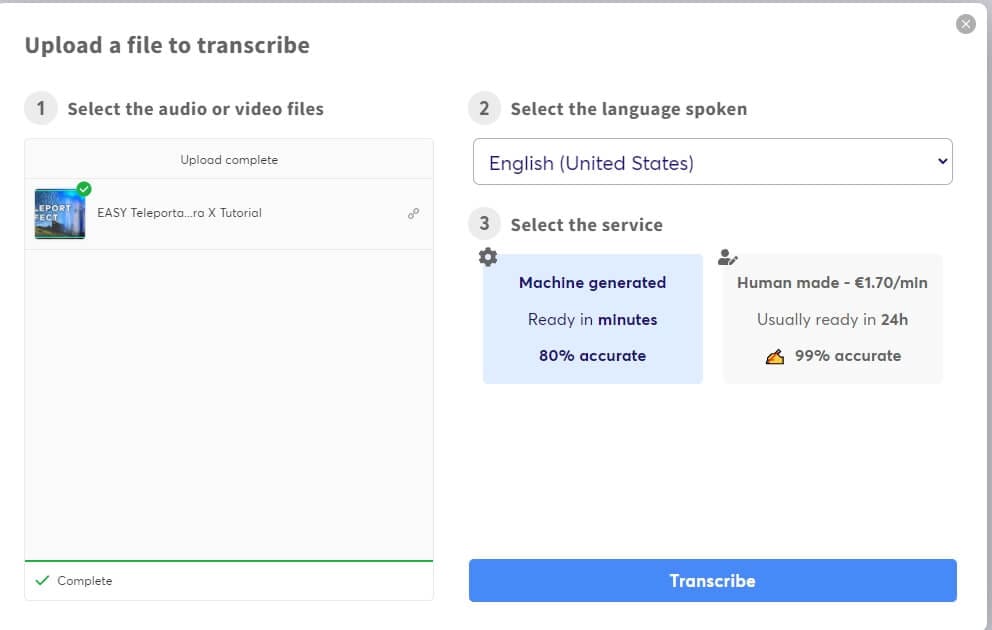
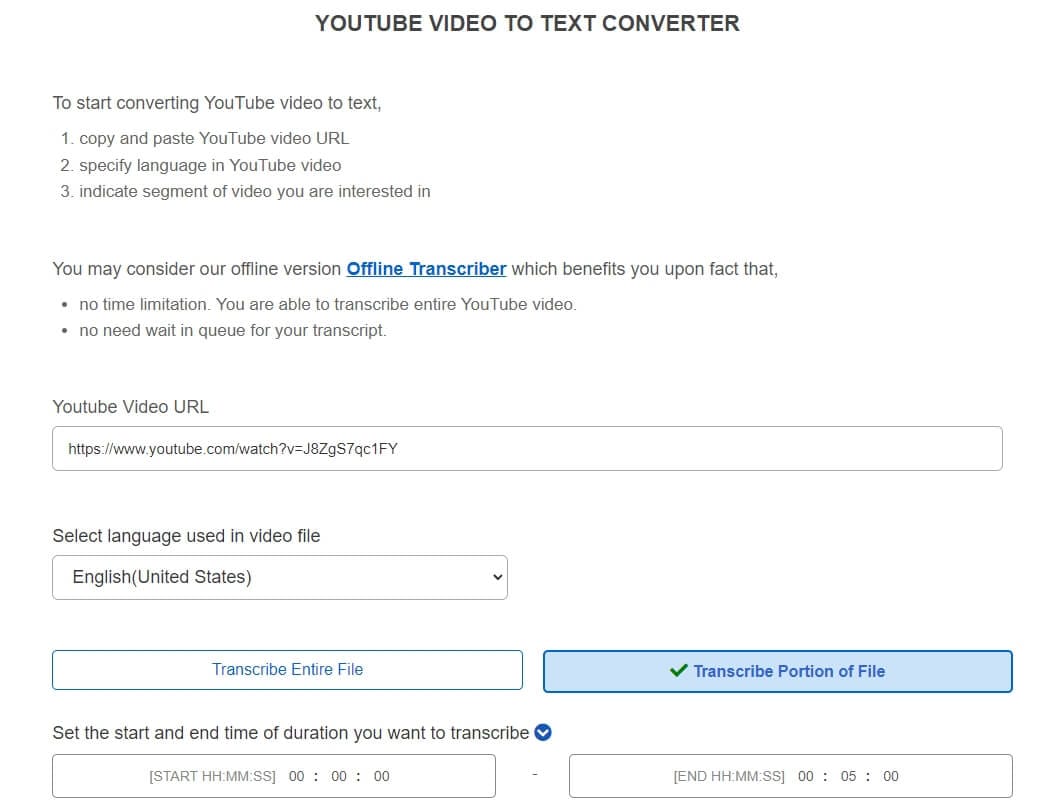
Aside from the basic method of getting the transcription from YouTube itself, many individuals make use of effective YouTube video to text converter online free. This allows them to get the complete video into text, small parts of the video to text, as well as options to convert the text into multiple languages. Below are some of the best software to convert YouTube video to text online.
1. Inqscribe
This high-quality cross-platform tool allows users to transcribe audio and video files into text . Whether it is a meeting recording or a YouTube video - you can convert them all to text. Making use of this free online software is extremely easy, all one has to do is just upload their file and click the process. Then the system will automatically transcribe the video into a text document for you. The software is uni code so all file formats are supported such as txt, XML, HTML, WebVTT, and more. The only drawback of this online software is that video files that are larger than a certain limit cannot be accepted.
2. Sonix
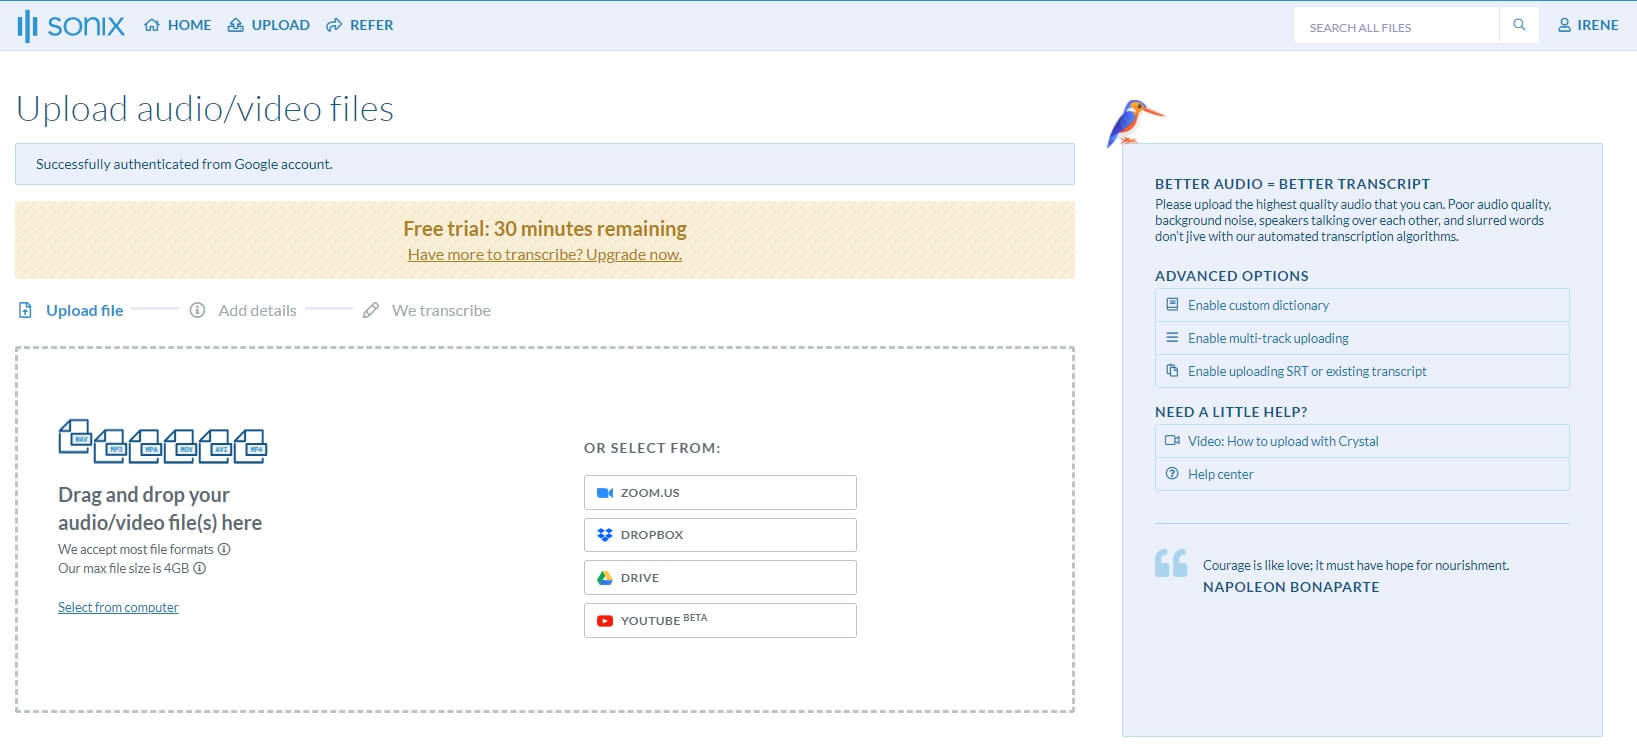
For individuals who have premium quality audio transcription, a tool by the name of Sonix is the right choice for you. This tool enables users to turn all types of YouTube videos into text. All they have to do is simply download the YouTube video they need to transcribe and then upload it to the online interface. From there, this software uses its comprehensive text reader to convert the video to text. This platform supports more than 40 different language choice inputs and outputs. Users are allowed to transcribe up to five videos for free, then they must pay a subscription fee.
3. Otter
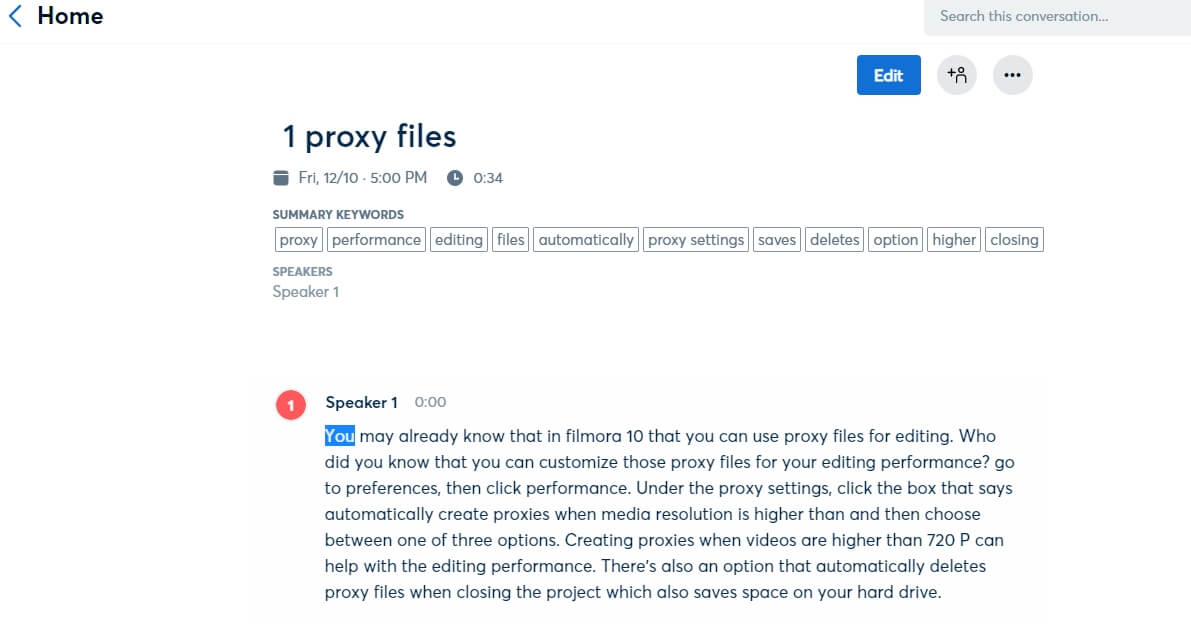
This video-to-text converter works best in real-time. Simply play the audio of a YouTube video and let Otter do its magic. In real-time it will convert audio into text. Moreover, if you would like to only convert some parts of the audio to text, that is possible with this tool as well.
All you need to do is play the audio accordingly and the text will automatically generate itself. The AVI (Ambient Voice Intelligence) of this tool allows it to accurately understand what the audio is saying to transcribe the video. While many do find this tool handy, learning how to use it can be a tiny bit tedious and confusing.
Note: Currently, Otter doesn’t support uploading YouTube video link, you may need to download the YouTube video first and then upload it from desktop.
4. oTranscribe
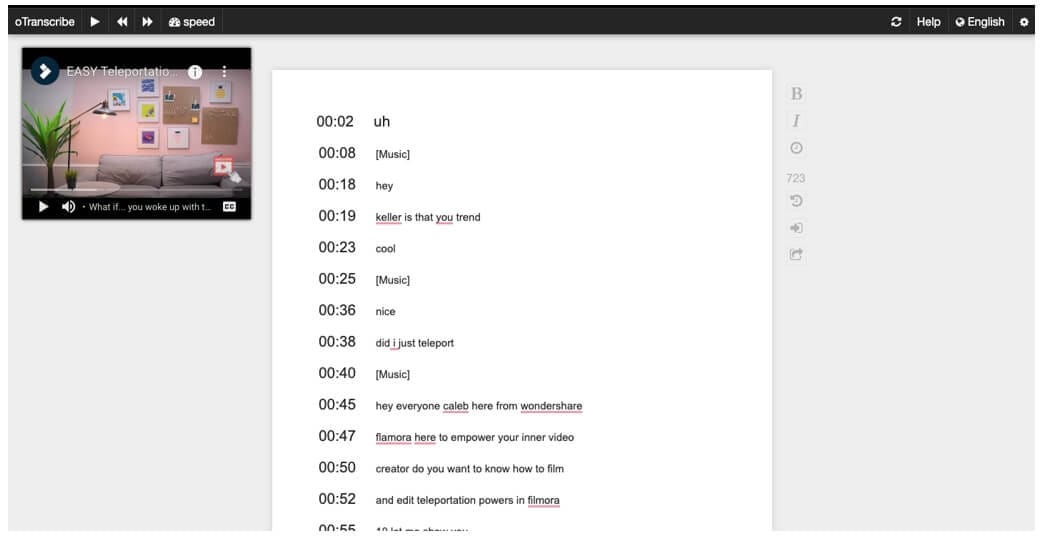
This online transcription tool is extremely easy and convenient to use - and it is entirely free! All you need to do is head on over to its homepage and drop a link to the YouTube video that you would like to transcribe. Then from there, you can access the video and text all at the same time, without having to switch between videos.
The best part is that you can record and translate text according to your need, cut and miss parts that you do not require. This tool supports all file formats which just adds to convince. The only challenge is that it will only accept videos and translate them into English.
5. Go Transcribe
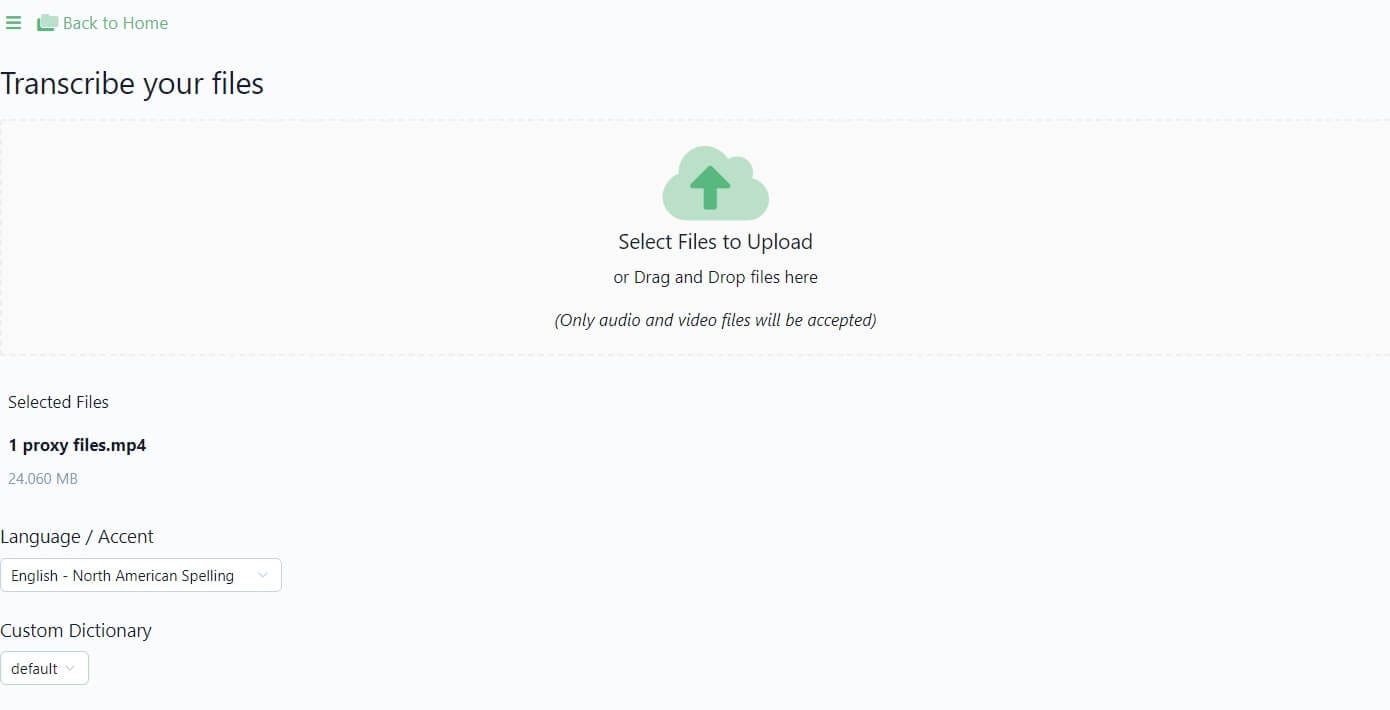
If you are looking to convert any sort of video format to text, then Go Transcribe might just be the tool that you require. This tool makes use of the latest voice technology to convert videos to text - and gives you the output in the form of an SRT, PDF, or DOC, which are all editable. All you need to do is upload the video in one of the formats below,
- 3PG
- FLV
- AVI
- MOV
- MPG
- MPEG
Then simply click the processing options and your video will be generated into a text file within minutes. However, this software may require a subscription fee.
files. Moreover, the output format is PDF which individuals cannot edit unless they convert the PDF to a TXT file online using different software.
6. Trint
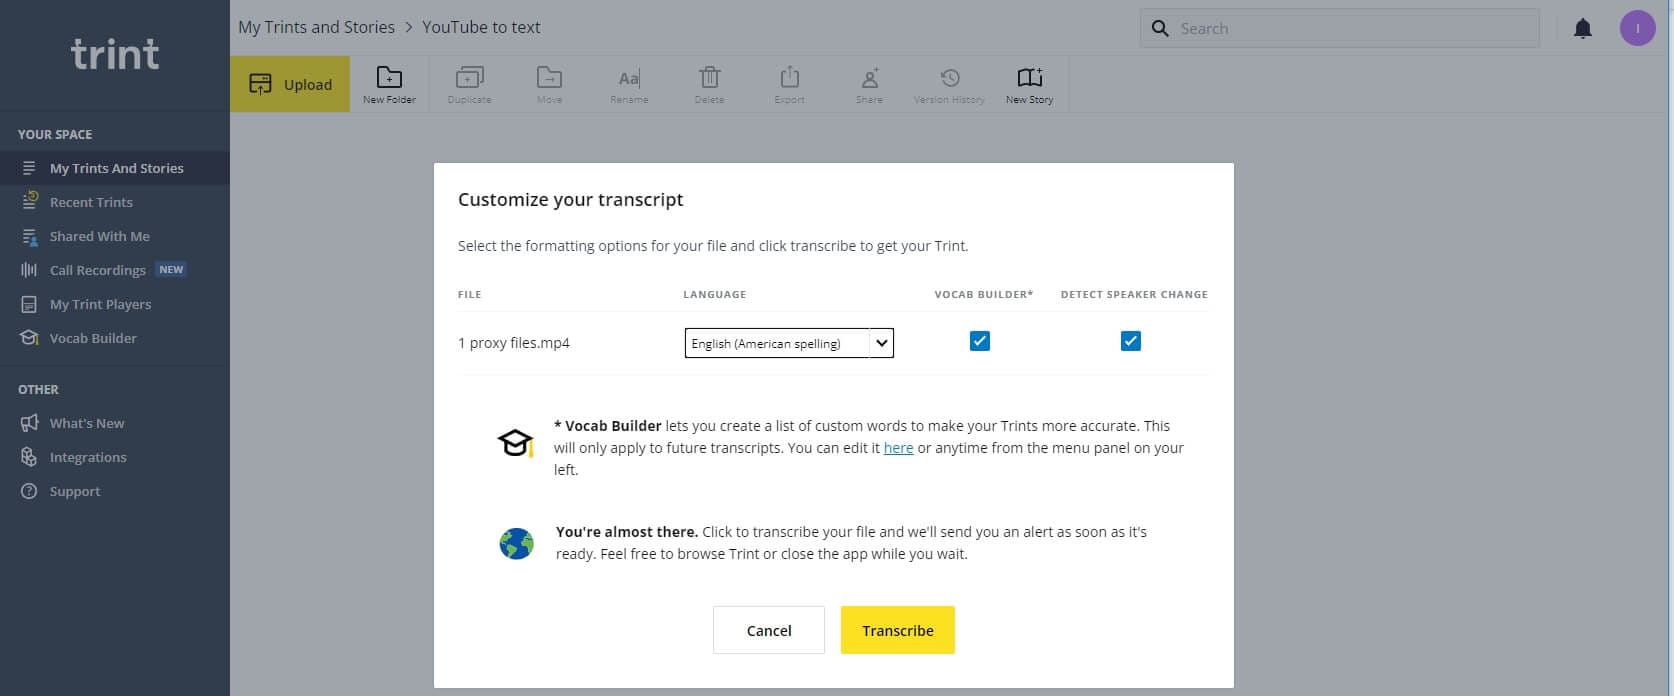
Turn your speech to text through magic - or in other words, through state-of-the-art technology. Trint is an online transcription tool that allows individuals to turn video files into text. People can download and upload numerous video files at once and turn them into text documents.
This is an extremely handy tool to have considering it comes with numerous options such as editing the text, only inducing certain parts of the video in the text, and so much more. This tool only has one shortcoming, it only accepts English language videos.
7. Happy Scribe
If you are wondering how, you will convert YouTube video to text, then we have just the answer for you. Make use of Happy Scribe to automatically transcribe all sorts of audio and video into comprehensive and readable text. You can get numerous features and options in this tool such as advanced grammatical functions as well as timestamps.
If your videos are in different languages, do not worry because Happy Scribe has more than 60 language formats. However, to make use of added features, individuals will need to pay for the tool and upgrade to the pro version.
8. 360Converter
360Converter, as its name suggests is a video to text converter which individuals can use online and offline. All you need to do is download and then upload the YouTube video that you would like to transcribe and the tool will automatically generate the text for you. The supported video formats include 3GP, MP4, MOV, AVI, and many more. This tool uses advanced technology to get accurate language and grammatical transcriptions, so everything is word to word - the exact same as the video. While this tool is extremely user-friendly, many state that it takes a while to process videos to text.
Key Takeaways!
Technology has come a long way which is why we now have numerous options available online to help us convert YouTube videos to text in less than 5-10 minutes. All you have to do is upload the file and let the tool do its magic! You can transcribe in different languages, segments, and so much more now!
Transform Long Videos into Short Ones Instantly
Turn long videos into viral clips. Effortlessly transform lengthy videos into engaging, shareable clips.

02 Best YouTube Video to Text Converters Online
Part 1: How to Convert YouTube Video to Texts by Copy/Paste YouTube Transcript
When people think “Get the transcript from YouTube” they believe it is going to be a daunting and lengthy procedure. Well, let us tell you that it is certainly not! All you have to do is follow the steps outlined below to transcribe YouTube video to text - that too through the YouTube player itself.
First what you have to do is open YouTube and select any video for which you require the transcript. Once you have selected the video, wait for it to load and then click the three dots located beneath the video, as shown in the image below.
Following that, a menu will appear, just select the “Open Transcript” option and the transcription will open on the top right side of your screen.
Simply select the entire transcript using your mouse, then copy and paste it into a new Word Document or Google Document. If you don’t need the timestamps, you can click the three-dot icon to toggle timestamps off.
By following the steps outlined above, you can convert a YouTube video to text in less than five seconds!
Part 2: Best YouTube Video to Text Converters Online
Aside from the basic method of getting the transcription from YouTube itself, many individuals make use of effective YouTube video to text converter online free. This allows them to get the complete video into text, small parts of the video to text, as well as options to convert the text into multiple languages. Below are some of the best software to convert YouTube video to text online.
1. Inqscribe
This high-quality cross-platform tool allows users to transcribe audio and video files into text . Whether it is a meeting recording or a YouTube video - you can convert them all to text. Making use of this free online software is extremely easy, all one has to do is just upload their file and click the process. Then the system will automatically transcribe the video into a text document for you. The software is uni code so all file formats are supported such as txt, XML, HTML, WebVTT, and more. The only drawback of this online software is that video files that are larger than a certain limit cannot be accepted.
2. Sonix
For individuals who have premium quality audio transcription, a tool by the name of Sonix is the right choice for you. This tool enables users to turn all types of YouTube videos into text. All they have to do is simply download the YouTube video they need to transcribe and then upload it to the online interface. From there, this software uses its comprehensive text reader to convert the video to text. This platform supports more than 40 different language choice inputs and outputs. Users are allowed to transcribe up to five videos for free, then they must pay a subscription fee.
3. Otter
This video-to-text converter works best in real-time. Simply play the audio of a YouTube video and let Otter do its magic. In real-time it will convert audio into text. Moreover, if you would like to only convert some parts of the audio to text, that is possible with this tool as well.
All you need to do is play the audio accordingly and the text will automatically generate itself. The AVI (Ambient Voice Intelligence) of this tool allows it to accurately understand what the audio is saying to transcribe the video. While many do find this tool handy, learning how to use it can be a tiny bit tedious and confusing.
Note: Currently, Otter doesn’t support uploading YouTube video link, you may need to download the YouTube video first and then upload it from desktop.
4. oTranscribe
This online transcription tool is extremely easy and convenient to use - and it is entirely free! All you need to do is head on over to its homepage and drop a link to the YouTube video that you would like to transcribe. Then from there, you can access the video and text all at the same time, without having to switch between videos.
The best part is that you can record and translate text according to your need, cut and miss parts that you do not require. This tool supports all file formats which just adds to convince. The only challenge is that it will only accept videos and translate them into English.
5. Go Transcribe
If you are looking to convert any sort of video format to text, then Go Transcribe might just be the tool that you require. This tool makes use of the latest voice technology to convert videos to text - and gives you the output in the form of an SRT, PDF, or DOC, which are all editable. All you need to do is upload the video in one of the formats below,
- 3PG
- FLV
- AVI
- MOV
- MPG
- MPEG
Then simply click the processing options and your video will be generated into a text file within minutes. However, this software may require a subscription fee.
files. Moreover, the output format is PDF which individuals cannot edit unless they convert the PDF to a TXT file online using different software.
6. Trint
Turn your speech to text through magic - or in other words, through state-of-the-art technology. Trint is an online transcription tool that allows individuals to turn video files into text. People can download and upload numerous video files at once and turn them into text documents.
This is an extremely handy tool to have considering it comes with numerous options such as editing the text, only inducing certain parts of the video in the text, and so much more. This tool only has one shortcoming, it only accepts English language videos.
7. Happy Scribe
If you are wondering how, you will convert YouTube video to text, then we have just the answer for you. Make use of Happy Scribe to automatically transcribe all sorts of audio and video into comprehensive and readable text. You can get numerous features and options in this tool such as advanced grammatical functions as well as timestamps.
If your videos are in different languages, do not worry because Happy Scribe has more than 60 language formats. However, to make use of added features, individuals will need to pay for the tool and upgrade to the pro version.
8. 360Converter
360Converter, as its name suggests is a video to text converter which individuals can use online and offline. All you need to do is download and then upload the YouTube video that you would like to transcribe and the tool will automatically generate the text for you. The supported video formats include 3GP, MP4, MOV, AVI, and many more. This tool uses advanced technology to get accurate language and grammatical transcriptions, so everything is word to word - the exact same as the video. While this tool is extremely user-friendly, many state that it takes a while to process videos to text.
Key Takeaways!
Technology has come a long way which is why we now have numerous options available online to help us convert YouTube videos to text in less than 5-10 minutes. All you have to do is upload the file and let the tool do its magic! You can transcribe in different languages, segments, and so much more now!
Transform Long Videos into Short Ones Instantly
Turn long videos into viral clips. Effortlessly transform lengthy videos into engaging, shareable clips.
Also read:
- [New] Engaging Audiences Writing Compelling Titles and Descriptions for YouTube
- Ranked The Best 7 Android AdBlockers for Screen Freedom
- Step-by-Step Guide to Unmicrophonic Audio Recording
- [Updated] Decoding YouTube's Clandestine Content with Orderliness
- [New] Building a YouTube Subscription Direct Link
- 2024 Approved Effortless Income Estimations for YouTubers
- 2024 Approved Ace Your Online Presence YouTube's Studio Command Center
- Charting the Course From Scale to Submillions in Youtube
- Exploring New Frontiers in Online Videos The Best Non-YouTube Alternatives
- In 2024, Boost Your Gaming Presence with These Top 14 Video Ideas
- Stepwise Strategies Building a Playlist on YouTube
- In 2024, Audience Connection – Mastering the Art of Viewpoint-Based YouTube Reaction Vids (2 POV Method)
- Cutting Edge Video Editing Mastering Green Screen Integration
- Masterclass in Time The Top 10 YouTube Channels For History Students
- Boosting YouTube Engagement Top 11 SEO Strategies Revealed
- Driving Income From Views on YouTube for 2024
- Secrets of Finding Exclusive YouTube Design Archives
- [New] Banish YouTube Shorts Forever with Ease
- Enable Quiet YouTube BGPlay for iPhone & Android for 2024
- [New] Cut to Impact In-Depth Youtube Video Editing Mastery
- Creative Vlog Ideas for Daily Use for 2024
- [New] Discover 8 Essential Sites for Pristine Green Screen Images
- 2024 Approved Dissecting the Revenue-Sharing Mechanisms in YouTube Shorts Economy
- [Updated] Content Distribution Showdown Vimeo vs YouTubes and DailyMotions
- Premier Service YouTube to Written Summary
- In 2024, Can You Receive a Monthly Check From YouTube?
- Premium Broadcasting Gear Top-Rated Software & Hardware for Youtubers
- Perfecting the Pathway of iMovie Content to YouTube
- [Updated] Brief Beatcasts Role of the Melody
- Exploring the YouTube Content Manager Toolkit
- [New] Embrace Serenity The 10 Best Online Yoga Masters Today
- Top 10 Most Watched YouTube Video in 24 Hours
- Strategies for Designing YouTube Video Flow
- Discovering Your Customized YouTube Playlist
- Transform Your Content to Stardom Studio Guide
- In 2024, Conquered Everlasting Deactivation of YouTube Shorts
- Indulge with Top YouTube Movies Guides
- YouTube Copyrights Demystified Understanding and Managing Strikes
- Expert Tips for Embedding Time Stamp Data on YouTube Videos (Desktop/Mobile)
- 2024 Approved Building a Studio-Quality Setup at Home
- Graphical Forecast The Dominant '23 Social Themes
- Unlocking the Secrets Elevating Your YouTube Presence in Gameplay
- [Updated] Deconstructing the Revenue Stream of TSeries in YouTube Economy
- Boosting Engagement with Effective YouTube Banners & Thumbnails
- The Endgame Permanently Blocking Access to YouTube Shorts
- In 2024, Best Practices for Secure YouTube MP4 Conversion
- Forgot Pattern Lock? Heres How You Can Unlock Honor X8b Pattern Lock Screen
- In 2024, 8 Ways to Transfer Photos from Nokia C300 to iPhone Easily | Dr.fone
- Spoofing Life360 How to Do it on Honor Magic 5? | Dr.fone
- [Updated] 2024 Approved Practical Guide to Swapping Gender Representation Online From Basics to Expertise
- In 2024, Top 4 SIM Location Trackers To Easily Find Your Lost Vivo S18e Device
- Prank Your Friends! Easy Ways to Fake and Share Google Maps Location On Google Pixel 8 Pro | Dr.fone
- In 2024, Discover Top iOS Video Downloads Facebook Edition
- [New] 2024 Approved Premium Console Emulation Choosing the Top 5 for Windows
- How to use iSpoofer on Huawei Nova Y71? | Dr.fone
- Mobile Mastery Using Phone as a Camera for Recording
- In 2024, How to Make Discord GIF Avatar in Depth Guide
- [Updated] 2024 Approved Social Sphere Score 10 Videos That Are Going Viral Today
- [New] Advanced Blur Selection for Digital Imagery
- In 2024, No-Cost Face Generation Top Online Platforms
- 2024 Approved Cracking the Code to Reinstating Your TikTok Profile
- In 2024, 2 Ways to Transfer Text Messages from Xiaomi Redmi K70E to iPhone 15/14/13/12/11/X/8/ | Dr.fone
- [New] 2024 Approved Audiophile's Selection 10 Advanced Recording Tools
- [Updated] 2024 Approved OBS Audio Fix Strategies Quickly
- Title: "Making a Mark on YouTube Proven Techniques From Creator Studio Experts"
- Author: Brian
- Created at : 2024-05-25 12:20:04
- Updated at : 2024-05-26 12:20:04
- Link: https://youtube-video-recordings.techidaily.com/making-a-mark-on-youtube-proven-techniques-from-creator-studio-experts/
- License: This work is licensed under CC BY-NC-SA 4.0.
