
"Makeup Mastery Manual Starting an Engaging Aesthetic Vlog"
Makeup Mastery Manual: Starting an Engaging Aesthetic Vlog
How To Be A Beauty Guru on YouTube: Beauty Vlogger Set Up

Richard Bennett
Mar 27, 2024• Proven solutions
Beauty Vlogs are some of the most popular channels on YouTube. These vlogs are all about aesthetics, so it is important that the videos themselves are beautiful. When you are giving out tips on makeup or hair you want to use a setup that will make your results look their very best.
YouTube Beauty Vlogger Set Up
It’s easy to put together your own Beauty Vlog setup. There are four main elements; lighting, beauty supplies, backgrounds, and audio. Here are some tips on building your beauty guru set:
1. Light It Up

Beauty Vlogs need to have great lighting so that everyone can clearly see what you are doing and how amazing it looks. Make sure you have even light over your whole face by ‘front lighting’ your vlog. Front lighting means having a light source right in front of you.
Depending on your budget, you can either use a window as a front light or buy a diva ring light.
Using a Window: Face the window while you vlog and be careful that the camera’s shadow is not visible in your shot. Avoid using a window the sun is shining directly into. You want softer, more diffused, light for a beauty vlog.
Using a Ring Light: Mount your camera either inside the ring or right behind it on a tripod. Ring lights are powerful options for illuminating your entire face, and they are very popular with makeup vloggers.
Front lighting can make you appear flat against your background, so it is also a good idea to set up a backlight behind you to make you pop out. Setting up lights on either side of you can also help add dimension to your shot.
Check this tutorial to know more details:
2. Organize Your Makeup
Having to search for makeup or reach across to where you are storing your curling iron will kill your vlogging momentum. Creating a great look is the fun part of beauty vlogging, and probably the part you want to focus on. Not looking for your missing brush. The best way to set yourself up for a beauty vlog is at a desk or table where you can lay everything out neatly right in front of you.
3. Alter Your Background
Making your vlog look more professional can be as easy as dressing up your background. You do not want there to be a lot of clutter behind you, but you don’t want to shoot with your back to a plain beige wall either. One simple way to keep your background beautiful, but not distracting, is to use a backdrop. Just hang a sheet or other piece of fabric behind you. You can even use patterns and change your backdrop to match your makeup in different videos.
Another great way to disguise the room you are vlogging in, and make sure nothing behind you distracts your viewers, is to blur your background. You really stand out when your background is blurry and you are in perfect focus.
4. Be Audible
You have a lot to say, so make sure people can hear you. Most cameras do not have great microphones, so you will need to use an external mic. To see what kinds of options you have make sure to read and watch “Best Microphone for YouTube - Top 5 Mics for YouTube Videos ”.
If you do not have access to an external mic then you may be able to get by without one for a while using software. Make sure there is no background noise competing with your voice, and download a free audio editing program called Audacity from Audacityteam.org. Using Audacity you will be able to improve a mediocre audio recording from your camera and make it usable. This is a popular option among YouTube gamers who record both video and audio from their webcams, but there is no reason it should not be useful for beauty gurus too.
Richard Bennett
Richard Bennett is a writer and a lover of all things video.
Follow @Richard Bennett
Richard Bennett
Mar 27, 2024• Proven solutions
Beauty Vlogs are some of the most popular channels on YouTube. These vlogs are all about aesthetics, so it is important that the videos themselves are beautiful. When you are giving out tips on makeup or hair you want to use a setup that will make your results look their very best.
YouTube Beauty Vlogger Set Up
It’s easy to put together your own Beauty Vlog setup. There are four main elements; lighting, beauty supplies, backgrounds, and audio. Here are some tips on building your beauty guru set:
1. Light It Up
Beauty Vlogs need to have great lighting so that everyone can clearly see what you are doing and how amazing it looks. Make sure you have even light over your whole face by ‘front lighting’ your vlog. Front lighting means having a light source right in front of you.
Depending on your budget, you can either use a window as a front light or buy a diva ring light.
Using a Window: Face the window while you vlog and be careful that the camera’s shadow is not visible in your shot. Avoid using a window the sun is shining directly into. You want softer, more diffused, light for a beauty vlog.
Using a Ring Light: Mount your camera either inside the ring or right behind it on a tripod. Ring lights are powerful options for illuminating your entire face, and they are very popular with makeup vloggers.
Front lighting can make you appear flat against your background, so it is also a good idea to set up a backlight behind you to make you pop out. Setting up lights on either side of you can also help add dimension to your shot.
Check this tutorial to know more details:
2. Organize Your Makeup
Having to search for makeup or reach across to where you are storing your curling iron will kill your vlogging momentum. Creating a great look is the fun part of beauty vlogging, and probably the part you want to focus on. Not looking for your missing brush. The best way to set yourself up for a beauty vlog is at a desk or table where you can lay everything out neatly right in front of you.
3. Alter Your Background
Making your vlog look more professional can be as easy as dressing up your background. You do not want there to be a lot of clutter behind you, but you don’t want to shoot with your back to a plain beige wall either. One simple way to keep your background beautiful, but not distracting, is to use a backdrop. Just hang a sheet or other piece of fabric behind you. You can even use patterns and change your backdrop to match your makeup in different videos.
Another great way to disguise the room you are vlogging in, and make sure nothing behind you distracts your viewers, is to blur your background. You really stand out when your background is blurry and you are in perfect focus.
4. Be Audible
You have a lot to say, so make sure people can hear you. Most cameras do not have great microphones, so you will need to use an external mic. To see what kinds of options you have make sure to read and watch “Best Microphone for YouTube - Top 5 Mics for YouTube Videos ”.
If you do not have access to an external mic then you may be able to get by without one for a while using software. Make sure there is no background noise competing with your voice, and download a free audio editing program called Audacity from Audacityteam.org. Using Audacity you will be able to improve a mediocre audio recording from your camera and make it usable. This is a popular option among YouTube gamers who record both video and audio from their webcams, but there is no reason it should not be useful for beauty gurus too.
Richard Bennett
Richard Bennett is a writer and a lover of all things video.
Follow @Richard Bennett
Richard Bennett
Mar 27, 2024• Proven solutions
Beauty Vlogs are some of the most popular channels on YouTube. These vlogs are all about aesthetics, so it is important that the videos themselves are beautiful. When you are giving out tips on makeup or hair you want to use a setup that will make your results look their very best.

YouTube Beauty Vlogger Set Up
It’s easy to put together your own Beauty Vlog setup. There are four main elements; lighting, beauty supplies, backgrounds, and audio. Here are some tips on building your beauty guru set:
1. Light It Up
Beauty Vlogs need to have great lighting so that everyone can clearly see what you are doing and how amazing it looks. Make sure you have even light over your whole face by ‘front lighting’ your vlog. Front lighting means having a light source right in front of you.
Depending on your budget, you can either use a window as a front light or buy a diva ring light.
Using a Window: Face the window while you vlog and be careful that the camera’s shadow is not visible in your shot. Avoid using a window the sun is shining directly into. You want softer, more diffused, light for a beauty vlog.
Using a Ring Light: Mount your camera either inside the ring or right behind it on a tripod. Ring lights are powerful options for illuminating your entire face, and they are very popular with makeup vloggers.
Front lighting can make you appear flat against your background, so it is also a good idea to set up a backlight behind you to make you pop out. Setting up lights on either side of you can also help add dimension to your shot.
Check this tutorial to know more details:
2. Organize Your Makeup
Having to search for makeup or reach across to where you are storing your curling iron will kill your vlogging momentum. Creating a great look is the fun part of beauty vlogging, and probably the part you want to focus on. Not looking for your missing brush. The best way to set yourself up for a beauty vlog is at a desk or table where you can lay everything out neatly right in front of you.
3. Alter Your Background
Making your vlog look more professional can be as easy as dressing up your background. You do not want there to be a lot of clutter behind you, but you don’t want to shoot with your back to a plain beige wall either. One simple way to keep your background beautiful, but not distracting, is to use a backdrop. Just hang a sheet or other piece of fabric behind you. You can even use patterns and change your backdrop to match your makeup in different videos.
Another great way to disguise the room you are vlogging in, and make sure nothing behind you distracts your viewers, is to blur your background. You really stand out when your background is blurry and you are in perfect focus.
4. Be Audible
You have a lot to say, so make sure people can hear you. Most cameras do not have great microphones, so you will need to use an external mic. To see what kinds of options you have make sure to read and watch “Best Microphone for YouTube - Top 5 Mics for YouTube Videos ”.
If you do not have access to an external mic then you may be able to get by without one for a while using software. Make sure there is no background noise competing with your voice, and download a free audio editing program called Audacity from Audacityteam.org. Using Audacity you will be able to improve a mediocre audio recording from your camera and make it usable. This is a popular option among YouTube gamers who record both video and audio from their webcams, but there is no reason it should not be useful for beauty gurus too.
Richard Bennett
Richard Bennett is a writer and a lover of all things video.
Follow @Richard Bennett
Mastering YouTube Pace Control: Top Tips for Slower Views (48 Chars)
YouTube Slow: How to Slow Down YouTube Videos [3 Ways]
Richard Bennett
Mar 27, 2024• Proven solutions
Have you ever wanted to learn something from a YouTube video, but found that the video is too fast? If you are wondering how to slow down YouTube videos, then you’re in the right place. Well, there are different ways to slow down YouTube videos and in this article, we will show you how to slow down the YouTube videos with 3 most effective ways: slow down the YouTube videos by changing playback video speed at playback, slow down YouTube video using YouTube’s Video Editor tools or change YouTube video speed to slow down or speed up with Wondershare Filmora video editor .
- Part 1: How to Play YouTube Videos in Slow Motion
- Part 2: Add Slow Motion with Wondershare Filmora (originally Wondershare Video Editor)
- Part 3: Add Slow Motion with YouTube Video Editor
Part 1: YouTube Slow Down: How to Play YouTube Videos in Slow Motion
While, you can now change the speed of any YouTube videos easily and watch YouTube videos in slow motion in a few steps. Below is how to slow down YouTube Videos:
- Open the video in YouTube
- Click the Settings icon on the bottom right and then you will see Autoplay, Annotations, Speed, Subtitles, and Quality options. By default, the speed is set to Normal. Click Speed and open the speed change options. The speed options are in multiples.
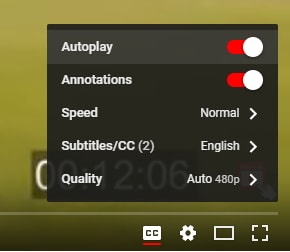
- Choose the target video speed from 0.25x, 0.5x, 0.75x to slow down the play back speed of the YouTube video. You can also select 1.25x, 1.5x, 1.75x or 2x to fast forward this YouTube video depending on how fast or slow you want the playback of the YouTube video to be.
- That’s it how to make a YouTube video slow down by changing the playback speed. If you selected 0.5X, you will see the playback speed is half of the original speed. You can now see the YouTube video is played back in a slower speed.
You May Also Like: Take good use of YouTube’s Enhancements feature to improve your video quality.
Besides, watching YouTube videos in slow motion, you can also make a slow motion video and upload to YouTube. The Flash from Zootopia is so impressive and you can see a lot of memes and gifs online about this funny cute sloth. In the following part, we will show you how to make a slow motion YouTube video like the sloth Flash in two ways by adding slow motion effects.
Part 2: Add Slow Motion to YT Videos with Wondershare Filmora video editor [3 Steps]
Wondershare Filmora is an easy-to-use yet powerful video editing tool to which let beginners edit their YouTube videos in minutes. It includes every classic video editing functions including adjust playback speed, trim, crop, rotate, split as well as many special editing features like Jump Cut, Mosaic Blur and Tilt Shift. Now let’s see how to add slow motion with this video editing software.


Step 1. Import Video Footage to Filmora Video Editor
First of all, you need to import all your video footage for YouTube videos to Filmora. If you want to slow down a video downloaded from online, like youtube, please make sure there is copyright issue for you to use the video before processing. In case that you want to download YouTube with free youtube downloader, you can try Wondershare Free Youtube Downloader and Video DownloadHelper (Firefox Add-on).
After downloading YouTube videos on hard disk, you can now import it to this YouTube video editor. The downloaded YouTube videos is usually in FLV format, and Filmora has a wide range of support for video formats, which includes FLV as well. You can either click “Import” on the primary windows and select YouTube FLV video file from your computer, or simply drag and drop YouTube FLV file to the User’s Album. Next, drag YouTube video from User’s Album to Timeline for editing.

Step 2. One click to add slow motion to YouTube video
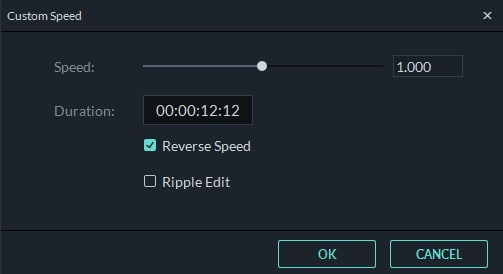
On the Timeline, click on the added YouTube video and select Speed and Duration to open up the video custom speed window. You will see the Speed option, Duration, Reverse Speed and Ripple Edit options. and the speed number indicates fast or slow motion. To slow down the YouTube video, drag the speed slider to left and you get a slow down version of the YouTube video. You can slow down the YouTube video in 0.01x. Click the OK button to save the slow motion settings and then click the Play button in the preview windows to have a look at the new YouTube slow down video. You can also change the duration of the YouTube video to change the YouTube video speed. For example, if you want to slow down a 30-second YouTube video to half speed, you can just enter the duration to 60 seconds to get a slow down motion effect.
With Filmora youtube video editor, you can also add the slow motion effects to some certain clips of the video footage. What you need to do is use the split feature to split the video first. Learn more details about How to Cut / Split / Trim Videos without Quality Loss
Step 3. Export slow down YouTube video
You could continue editing YouTube videos. When all done, click “Export” to save the result. You can save YouTube video in any popular formats on the computer by clicking “Format”. If you want to play YouTube video on iPod, iPhone, iPad, click “Device” and select your device. You can also share the YouTube video up to YouTube or Vimeo directly or burn YouTube video to DVD.

See, with Filmora video editor you can slow down YouTube videos with ease, what’s more, you can also apply reverse effects to play Youtube videos backwards. Download and try this YouTube Slow motion effect and you will master how to slow down YouTube videos.
Related:How to Make Slow/Fast Motion Videos
Part 3: Slow down YouTube videos with Slow Motion in YouTube Video Editor
Updated: From 20th September 2017 users will no longer be able to use the complimentary editing suite. Check the best YouTube video editor alternatives from this complete guide.
If you’ve ever been annoyed by the speed of your user-generated videos on YouTube, try out its own video editor. As YouTube has added a new “slow motion” tool to its YouTube Editor, it does pretty much exactly what it sounds like. Here is a simple guide on how to add slow motion with it.
Step 1: Get Access to YouTube Video Editor. You can either go directly to the URL, which is https://www.youtube.com/editor , or click “Upload”>”Edit” to the Video Editor tab.
Step 2: Drag your video on the timeline and double click it. In the pop up window, you will see the “Slow Motion” option. Enable it and then select how slow you want the video to be. This applies the effect to the entire video that you’ve selected.
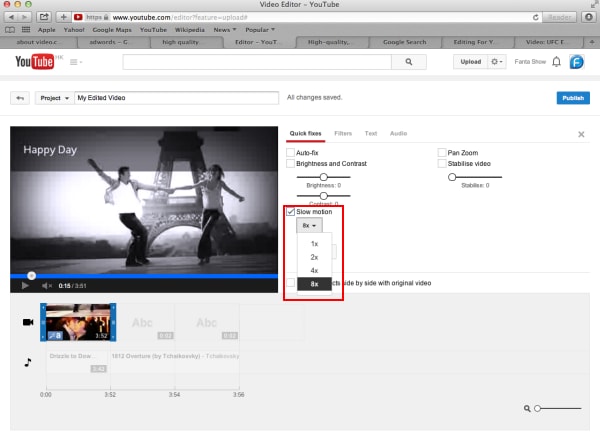
If you just want to slow down parts of the video, go back to the main editing tab, clip it from the original video using the slicing tool and add the slow-motion effect to that clip only. You can then arrange the different clips you have in the editor to create your final video.
Step 3: Tick the option “Preview effects side-by-side” with original video and then you can see how the original video plays compared to the one you’ve slowed down. If you’re happy with the result, hit “Done” to save the settings.
Conclusion
Above are the 3 ways that you can watch a YouTube video in slow motion, and slow down YouTube videos. You can directly change the playback speed of the YouTube video on Youtube, or download the YouTube video first and then slow down the speed of the YouTube video with some video editing software for YouTube like Filmora. No matter which way you prefer, we hope these information can help you slow down youtube videos.
Richard Bennett
Richard Bennett is a writer and a lover of all things video.
Follow @Richard Bennett
Richard Bennett
Mar 27, 2024• Proven solutions
Have you ever wanted to learn something from a YouTube video, but found that the video is too fast? If you are wondering how to slow down YouTube videos, then you’re in the right place. Well, there are different ways to slow down YouTube videos and in this article, we will show you how to slow down the YouTube videos with 3 most effective ways: slow down the YouTube videos by changing playback video speed at playback, slow down YouTube video using YouTube’s Video Editor tools or change YouTube video speed to slow down or speed up with Wondershare Filmora video editor .
- Part 1: How to Play YouTube Videos in Slow Motion
- Part 2: Add Slow Motion with Wondershare Filmora (originally Wondershare Video Editor)
- Part 3: Add Slow Motion with YouTube Video Editor
Part 1: YouTube Slow Down: How to Play YouTube Videos in Slow Motion
While, you can now change the speed of any YouTube videos easily and watch YouTube videos in slow motion in a few steps. Below is how to slow down YouTube Videos:
- Open the video in YouTube
- Click the Settings icon on the bottom right and then you will see Autoplay, Annotations, Speed, Subtitles, and Quality options. By default, the speed is set to Normal. Click Speed and open the speed change options. The speed options are in multiples.
- Choose the target video speed from 0.25x, 0.5x, 0.75x to slow down the play back speed of the YouTube video. You can also select 1.25x, 1.5x, 1.75x or 2x to fast forward this YouTube video depending on how fast or slow you want the playback of the YouTube video to be.
- That’s it how to make a YouTube video slow down by changing the playback speed. If you selected 0.5X, you will see the playback speed is half of the original speed. You can now see the YouTube video is played back in a slower speed.
You May Also Like: Take good use of YouTube’s Enhancements feature to improve your video quality.
Besides, watching YouTube videos in slow motion, you can also make a slow motion video and upload to YouTube. The Flash from Zootopia is so impressive and you can see a lot of memes and gifs online about this funny cute sloth. In the following part, we will show you how to make a slow motion YouTube video like the sloth Flash in two ways by adding slow motion effects.
Part 2: Add Slow Motion to YT Videos with Wondershare Filmora video editor [3 Steps]
Wondershare Filmora is an easy-to-use yet powerful video editing tool to which let beginners edit their YouTube videos in minutes. It includes every classic video editing functions including adjust playback speed, trim, crop, rotate, split as well as many special editing features like Jump Cut, Mosaic Blur and Tilt Shift. Now let’s see how to add slow motion with this video editing software.
Step 1. Import Video Footage to Filmora Video Editor
First of all, you need to import all your video footage for YouTube videos to Filmora. If you want to slow down a video downloaded from online, like youtube, please make sure there is copyright issue for you to use the video before processing. In case that you want to download YouTube with free youtube downloader, you can try Wondershare Free Youtube Downloader and Video DownloadHelper (Firefox Add-on).
After downloading YouTube videos on hard disk, you can now import it to this YouTube video editor. The downloaded YouTube videos is usually in FLV format, and Filmora has a wide range of support for video formats, which includes FLV as well. You can either click “Import” on the primary windows and select YouTube FLV video file from your computer, or simply drag and drop YouTube FLV file to the User’s Album. Next, drag YouTube video from User’s Album to Timeline for editing.
Step 2. One click to add slow motion to YouTube video
On the Timeline, click on the added YouTube video and select Speed and Duration to open up the video custom speed window. You will see the Speed option, Duration, Reverse Speed and Ripple Edit options. and the speed number indicates fast or slow motion. To slow down the YouTube video, drag the speed slider to left and you get a slow down version of the YouTube video. You can slow down the YouTube video in 0.01x. Click the OK button to save the slow motion settings and then click the Play button in the preview windows to have a look at the new YouTube slow down video. You can also change the duration of the YouTube video to change the YouTube video speed. For example, if you want to slow down a 30-second YouTube video to half speed, you can just enter the duration to 60 seconds to get a slow down motion effect.
With Filmora youtube video editor, you can also add the slow motion effects to some certain clips of the video footage. What you need to do is use the split feature to split the video first. Learn more details about How to Cut / Split / Trim Videos without Quality Loss
Step 3. Export slow down YouTube video
You could continue editing YouTube videos. When all done, click “Export” to save the result. You can save YouTube video in any popular formats on the computer by clicking “Format”. If you want to play YouTube video on iPod, iPhone, iPad, click “Device” and select your device. You can also share the YouTube video up to YouTube or Vimeo directly or burn YouTube video to DVD.
See, with Filmora video editor you can slow down YouTube videos with ease, what’s more, you can also apply reverse effects to play Youtube videos backwards. Download and try this YouTube Slow motion effect and you will master how to slow down YouTube videos.
Related:How to Make Slow/Fast Motion Videos
Part 3: Slow down YouTube videos with Slow Motion in YouTube Video Editor
Updated: From 20th September 2017 users will no longer be able to use the complimentary editing suite. Check the best YouTube video editor alternatives from this complete guide.
If you’ve ever been annoyed by the speed of your user-generated videos on YouTube, try out its own video editor. As YouTube has added a new “slow motion” tool to its YouTube Editor, it does pretty much exactly what it sounds like. Here is a simple guide on how to add slow motion with it.
Step 1: Get Access to YouTube Video Editor. You can either go directly to the URL, which is https://www.youtube.com/editor , or click “Upload”>”Edit” to the Video Editor tab.
Step 2: Drag your video on the timeline and double click it. In the pop up window, you will see the “Slow Motion” option. Enable it and then select how slow you want the video to be. This applies the effect to the entire video that you’ve selected.
If you just want to slow down parts of the video, go back to the main editing tab, clip it from the original video using the slicing tool and add the slow-motion effect to that clip only. You can then arrange the different clips you have in the editor to create your final video.
Step 3: Tick the option “Preview effects side-by-side” with original video and then you can see how the original video plays compared to the one you’ve slowed down. If you’re happy with the result, hit “Done” to save the settings.
Conclusion
Above are the 3 ways that you can watch a YouTube video in slow motion, and slow down YouTube videos. You can directly change the playback speed of the YouTube video on Youtube, or download the YouTube video first and then slow down the speed of the YouTube video with some video editing software for YouTube like Filmora. No matter which way you prefer, we hope these information can help you slow down youtube videos.
Richard Bennett
Richard Bennett is a writer and a lover of all things video.
Follow @Richard Bennett
Also read:
- [New] Discover Your Latest FB Watch List for 2024
- [Updated] In 2024, Efficient YouTube Ad Blocking on Chrome/Firefox/Android Devices
- 2024 Approved How to Make a Memorable Impact with Youtube's Minis
- 2024 Approved Pioneering Personalized Voices on PS Games
- 2024 Approved Quick & Reliable MP4 File Capture Tool
- Hands-On Evaluation: Combine Cutting-Edge Tech - Premium Sound Headset, Stunning Display Panel & Exceptional Quality Webcam
- In 2024, Empowering Audiences The Playlist Sharing Approach
- In 2024, How to Transfer Music from Oppo A18 to iPod | Dr.fone
- In 2024, Photo Mastery Top 8 Web-Based Creation Suite
- Instant Access to Free Qualcomm Atheros AR938X Driver Download - Here's How!
- Maximizing Visibility A Comprehensive Guide to YT Gaming Hashes
- Streamlining Revenue with YouTube's Mobile Monetization Features for Creators
- Unleashing Your Musical Voice A Compree Play-by-Play Guide for YouTube Playlist Crafting
- Title: Makeup Mastery Manual Starting an Engaging Aesthetic Vlog
- Author: Brian
- Created at : 2024-11-02 20:29:46
- Updated at : 2024-11-04 18:20:06
- Link: https://youtube-video-recordings.techidaily.com/makeup-mastery-manual-starting-an-engaging-aesthetic-vlog/
- License: This work is licensed under CC BY-NC-SA 4.0.