
:max_bytes(150000):strip_icc()/free-documentaries-online-56a324a85f9b58b7d0d0940c-5baba43ac9e77c0025106f12.jpg)
Make Video Previews Stand Out with Neon Borders
Make Video Previews Stand Out with Neon Borders
Your YouTube video, or any other clip published on any forum, gets a larger number of hits if it has an attractive thumbnail. And, the fact is, a thumbnail becomes 10x more attractive when the main character that the image has have a neon border around it.
With that said, in the following sections, you will learn a couple of methods on how to add a YouTube thumbnail border around the main characters and/or objects that are significant to the clip.
In this article
01 Add Glowing Neon Border to YouTube Thumbnail with Filmora
02 Add a Glowing Neon Border in YouTube Thumbnail with Canva
03 Outline a Person in a YouTube Thumbnail with Photoshop
Part 1: How to Add Neon Border to YouTube Thumbnail for Free with Filmora
Being one of the most versatile and intuitive post-production tools available in the market today, Wondershare Filmora X allows you to add a neon border to a YouTube thumbnail quite conveniently. You can learn how to get this done on Windows or Mac by following the steps given below.
For Win 7 or later (64-bit)
For macOS 10.12 or later
Step 1: Define Project Settings and Add Image to the Timeline
Launch Wondershare Filmora X on your PC (a MacBook Pro M1 is used here), ensure that the project aspect ratio is set to 16:9 (Widescreen) on the splash screen, and click New Project. On the main interface, click the Preview quality and display settings icon from the upper-right area of the Timeline, click Change Project Aspect Ratio, click to select 1280 x 720 (HD) from the Resolution menu of the Project Settings box, and click OK to save the custom project settings.

Then select My Media from the menu bar if not already selected, click Project Media from the navigation pane, and click Import from the Media box to select and import the image of the main character or object that you want to use in the thumbnail.

Now, drag the image from the Media box to the Timeline at the bottom.

Step 2: Clear Image Background, Add Border, and Add Custom Background
Go to Effects from the menu bar, click to select the Default tab and then AI Portrait from the navigation pane, and click and drag the Human Segmentation preset from the right box, and place it over the image track in the Timeline.

Double-click the image layer, scroll down the upper-left box to the Video Effects section, and use the Edge Thickness and Edge Feather sliders to adjust the character’s edges to make them as realistic as possible. Click OK when done.

Next, click and drag the Human Border preset over the image track in the Timeline, and follow the same procedure to customize the border. This will give the character a neon border effect.

Now, use the method explained earlier to import a custom image for the background, and drag and place it under the previous track in the Timeline.

If you are running the latest version of Filmora, you will find there are some neon light effects available under AI Portrait as well.

Step 3: Add Titles to Thumbnail
Go to Titles from the menu bar, click to select the Default tab and then Lower 3rds from the navigation pane, and click and drag your preferred lower-third preset from the right window to a separate layer in the Timeline. Double-click the lower-third layer, and use the available options in the upper-left window to change the text, its color, etc., and drag the textbox to place it to your preferred position on the image as well. Click OK to save the changes.
Next, click to select Titles from the navigation pane, and drag your preferred title from the right window to the upper-most track in the Timeline. Now use the method explained earlier to edit the text, its color, position, etc. to make it look professional.

For more tips and tricks for creating YouTube thumbnail, you can check this You Tube thumbnail creating guide.
Step 4: Get the Neon Border Thumbnail
Click the Snapshot (Camera) icon from the upper-right area of the Timeline, go to My Media from the menu bar, right-click the thumbnail of the screenshot you captured, and click Reveal in Finder (on Mac) or Reveal in Explorer (on Windows) to get to the folder the YouTube thumbnail border is saved in.

Part 2: How to Add a Glowing Neon Border in Your YouTube Thumbnail with Canva
Canva is another intuitive editing program that works on the web interface rather than having you download and install an app on your PC. You can add a neon border for YouTube thumbnails using Canva by following the instructions given below:
Step 1: Define Project Settings and Add a Background
After signing in to your Canva account, click Create a design from the top-right corner of the page, click Custom size from the bottom, define 1280 and 720 in the Width and Height fields on the box that appears respectively, and click Create new design.

Now, click to select Background from the navigation bar on the left (if the Background tool is not visible, click More and then choose Background from the expanded list), and click to select a background from the images available in the center pane.

Step 2: Upload an Image and Add Effects
Click Uploads from the navigation bar, click the More icon from the right of the Upload media button present at the top of the center pane, choose your preferred method to upload the image (with the transparent background) that you want to use, upload the image, and drag it from the center pane to the Canvas.
Note: You can use any of the tools available online to remove the background from your image for free.

To add a YouTube thumbnail border, make sure that the image that you added to the Canvas is selected, click the Duplicate icon from the upper-right area, and use the scaling handles of the copy of the image to increase its size a bit. Reposition the image back to its original location as well.
Then, click Edit image from the upper-left corner of the Canvas, click Duotone from the Edit image pane at the center, if need be, click See all, choose your preferred duotone effect to apply on the image, choose your preferred highlight and shadow colors from the box that appears next, and click Back from the top of the pane.

Next, click See all next to the Adjust section from the center pane, and drag the Blur slider to the right to increase the blur effect on the image.

Step 3: Position the Layers
While keeping the duplicate image selected, click the Position button from the upper-right area of the Canvas, and click Background to send the second image behind the first one to get the neon border effect for the photo.

Part 3: How to Outline a Person in a YouTube Thumbnail with Photoshop
Because YouTube thumbnails are nothing but static images, creating YouTube thumbnail border with Adobe Photoshop is comparatively easier. The process of doing this is given below:
Step 1: Define Document Preferences and Import an Image
Launch Adobe Photoshop on your PC, click Create new, and on the New Document customization box, define the width and height values to 1280 and 720 pixels respectively. Select Transparent from the Background Contents menu as well if not already selected. Click Create from the bottom to create a new Photoshop document with the specified document settings. Next, open the folder that contains the source image, drag the photo to Photoshop, and press Enter to place the photo.

Step 2: Remove Background from the Image
Make sure that the image layer is selected in the Layers panel on the right, go to Select from the menu bar at the top, and click Subject. From the bottom of the Layers panel, click the Add a mask icon to get rid of the background, leaving only the human on the Canvas.

Step 3: Add a Custom Background and an Outline Around the Subject
Use the method explained earlier to import a background image of your choice to Photoshop. Drag the background image layer to the bottom in the Layers panel. Double-click the masked layer, click to select Stroke from the left pane of the Layer Style box, and use the options available on the right to manage the size, color, position, etc. of the stroke that has been added around the human subject. Click OK when done, and then export the image normally to use it as a YouTube thumbnail border.

Summary
It is important to know that the default resolution of a YouTube thumbnail is 1280 x 720 pixels that is usually written and referred to as 720p. While adding a YouTube thumbnail border, it is also imperative to have a good sense of color combination and fonts. Furthermore, a decent tool like Wondershare Filmora X must be used to add an appealing neon border around the main subject in the thumbnail image easily and quickly.
02 Add a Glowing Neon Border in YouTube Thumbnail with Canva
03 Outline a Person in a YouTube Thumbnail with Photoshop
Part 1: How to Add Neon Border to YouTube Thumbnail for Free with Filmora
Being one of the most versatile and intuitive post-production tools available in the market today, Wondershare Filmora X allows you to add a neon border to a YouTube thumbnail quite conveniently. You can learn how to get this done on Windows or Mac by following the steps given below.
For Win 7 or later (64-bit)
For macOS 10.12 or later
Step 1: Define Project Settings and Add Image to the Timeline
Launch Wondershare Filmora X on your PC (a MacBook Pro M1 is used here), ensure that the project aspect ratio is set to 16:9 (Widescreen) on the splash screen, and click New Project. On the main interface, click the Preview quality and display settings icon from the upper-right area of the Timeline, click Change Project Aspect Ratio, click to select 1280 x 720 (HD) from the Resolution menu of the Project Settings box, and click OK to save the custom project settings.
Then select My Media from the menu bar if not already selected, click Project Media from the navigation pane, and click Import from the Media box to select and import the image of the main character or object that you want to use in the thumbnail.
Now, drag the image from the Media box to the Timeline at the bottom.
Step 2: Clear Image Background, Add Border, and Add Custom Background
Go to Effects from the menu bar, click to select the Default tab and then AI Portrait from the navigation pane, and click and drag the Human Segmentation preset from the right box, and place it over the image track in the Timeline.
Double-click the image layer, scroll down the upper-left box to the Video Effects section, and use the Edge Thickness and Edge Feather sliders to adjust the character’s edges to make them as realistic as possible. Click OK when done.
Next, click and drag the Human Border preset over the image track in the Timeline, and follow the same procedure to customize the border. This will give the character a neon border effect.
Now, use the method explained earlier to import a custom image for the background, and drag and place it under the previous track in the Timeline.
If you are running the latest version of Filmora, you will find there are some neon light effects available under AI Portrait as well.
Step 3: Add Titles to Thumbnail
Go to Titles from the menu bar, click to select the Default tab and then Lower 3rds from the navigation pane, and click and drag your preferred lower-third preset from the right window to a separate layer in the Timeline. Double-click the lower-third layer, and use the available options in the upper-left window to change the text, its color, etc., and drag the textbox to place it to your preferred position on the image as well. Click OK to save the changes.
Next, click to select Titles from the navigation pane, and drag your preferred title from the right window to the upper-most track in the Timeline. Now use the method explained earlier to edit the text, its color, position, etc. to make it look professional.
For more tips and tricks for creating YouTube thumbnail, you can check this You Tube thumbnail creating guide.
Step 4: Get the Neon Border Thumbnail
Click the Snapshot (Camera) icon from the upper-right area of the Timeline, go to My Media from the menu bar, right-click the thumbnail of the screenshot you captured, and click Reveal in Finder (on Mac) or Reveal in Explorer (on Windows) to get to the folder the YouTube thumbnail border is saved in.
Part 2: How to Add a Glowing Neon Border in Your YouTube Thumbnail with Canva
Canva is another intuitive editing program that works on the web interface rather than having you download and install an app on your PC. You can add a neon border for YouTube thumbnails using Canva by following the instructions given below:
Step 1: Define Project Settings and Add a Background
After signing in to your Canva account, click Create a design from the top-right corner of the page, click Custom size from the bottom, define 1280 and 720 in the Width and Height fields on the box that appears respectively, and click Create new design.
Now, click to select Background from the navigation bar on the left (if the Background tool is not visible, click More and then choose Background from the expanded list), and click to select a background from the images available in the center pane.
Step 2: Upload an Image and Add Effects
Click Uploads from the navigation bar, click the More icon from the right of the Upload media button present at the top of the center pane, choose your preferred method to upload the image (with the transparent background) that you want to use, upload the image, and drag it from the center pane to the Canvas.
Note: You can use any of the tools available online to remove the background from your image for free.
To add a YouTube thumbnail border, make sure that the image that you added to the Canvas is selected, click the Duplicate icon from the upper-right area, and use the scaling handles of the copy of the image to increase its size a bit. Reposition the image back to its original location as well.
Then, click Edit image from the upper-left corner of the Canvas, click Duotone from the Edit image pane at the center, if need be, click See all, choose your preferred duotone effect to apply on the image, choose your preferred highlight and shadow colors from the box that appears next, and click Back from the top of the pane.
Next, click See all next to the Adjust section from the center pane, and drag the Blur slider to the right to increase the blur effect on the image.
Step 3: Position the Layers
While keeping the duplicate image selected, click the Position button from the upper-right area of the Canvas, and click Background to send the second image behind the first one to get the neon border effect for the photo.
Part 3: How to Outline a Person in a YouTube Thumbnail with Photoshop
Because YouTube thumbnails are nothing but static images, creating YouTube thumbnail border with Adobe Photoshop is comparatively easier. The process of doing this is given below:
Step 1: Define Document Preferences and Import an Image
Launch Adobe Photoshop on your PC, click Create new, and on the New Document customization box, define the width and height values to 1280 and 720 pixels respectively. Select Transparent from the Background Contents menu as well if not already selected. Click Create from the bottom to create a new Photoshop document with the specified document settings. Next, open the folder that contains the source image, drag the photo to Photoshop, and press Enter to place the photo.
Step 2: Remove Background from the Image
Make sure that the image layer is selected in the Layers panel on the right, go to Select from the menu bar at the top, and click Subject. From the bottom of the Layers panel, click the Add a mask icon to get rid of the background, leaving only the human on the Canvas.
Step 3: Add a Custom Background and an Outline Around the Subject
Use the method explained earlier to import a background image of your choice to Photoshop. Drag the background image layer to the bottom in the Layers panel. Double-click the masked layer, click to select Stroke from the left pane of the Layer Style box, and use the options available on the right to manage the size, color, position, etc. of the stroke that has been added around the human subject. Click OK when done, and then export the image normally to use it as a YouTube thumbnail border.
Summary
It is important to know that the default resolution of a YouTube thumbnail is 1280 x 720 pixels that is usually written and referred to as 720p. While adding a YouTube thumbnail border, it is also imperative to have a good sense of color combination and fonts. Furthermore, a decent tool like Wondershare Filmora X must be used to add an appealing neon border around the main subject in the thumbnail image easily and quickly.
Essential 12 Flipscreen Cam Titles for Optimal Vlogging
12 Best Vlogging Cameras with a Flip Screen

Richard Bennett
Nov 01, 2022• Proven solutions
A flip screen is a very important feature on a camera for vloggers. With a flip screen, you can preview whether or not your shot is composed the way you want it to be, all in real-time. Below is our top list and review of the twelve best vlogging cameras with a flip screen.
WHAT TO LOOK FOR IN A VLOGGING CAMERA
1. Fully articulated screen (flip screen)
2. Good continual autofocus while recording video
3. Good focus priority through face recognition
4. Touch to focus
5. Good low-light performance
6. external mic jack, hot/cold shoe bracket
7. optical image stabilization
8. good battery life
Check out my full list of 10 Things To Look For In A Vlogging Camera to understand the importance of these camera features.
THE 12 BEST VLOGGING CAMERAS WITH A FLIP SCREEN (2018)
| Camera | Release Date | Camera Type | Flip Screen Type | Mic Port | Price | |
|---|---|---|---|---|---|---|
| CanonEOSM50 | 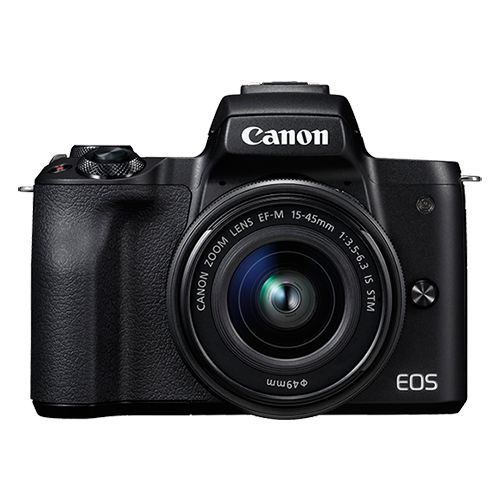 |
February2018 | Mirrorless | Fully Articulated | Yes | $- |
| PanasonicLumixDC-GH5S | 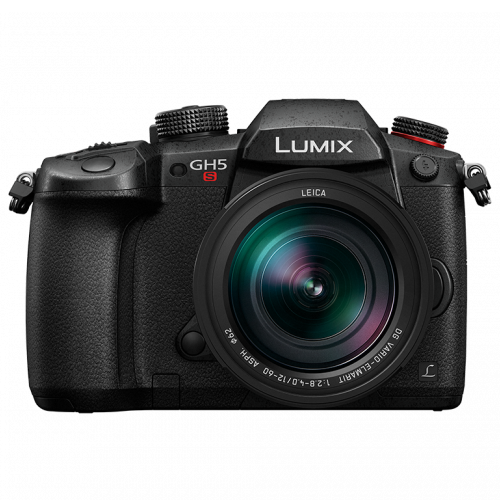 |
January2018 | Mirrorless | Fully Articulated | Yes | $$$ |
| CanonEOSM100 | 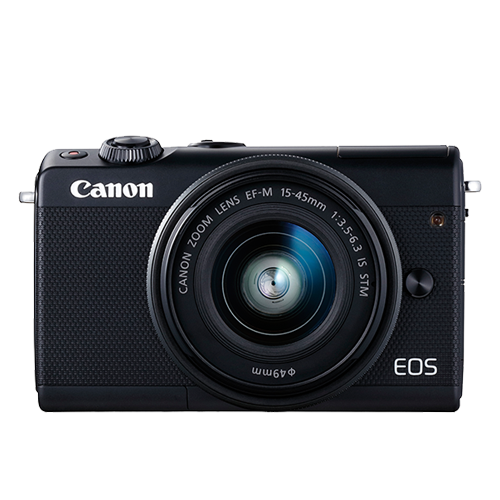 |
August2017 | Mirrorless | Flip Up | No | $ |
| CanonEOS6D Mark II | 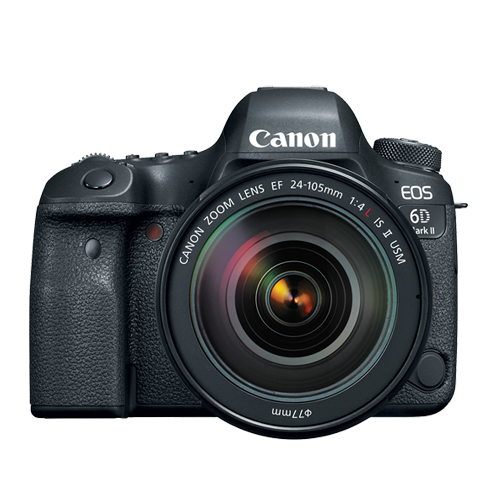 |
June2017 | Mid-size SLR | Fully Articulated | Yes | $$ |
| CanonEOS RebelSL2 |  |
June2017 | Compact SLR | Fully Articulated | Yes | $ |
| CanonEOS RebelT7i | 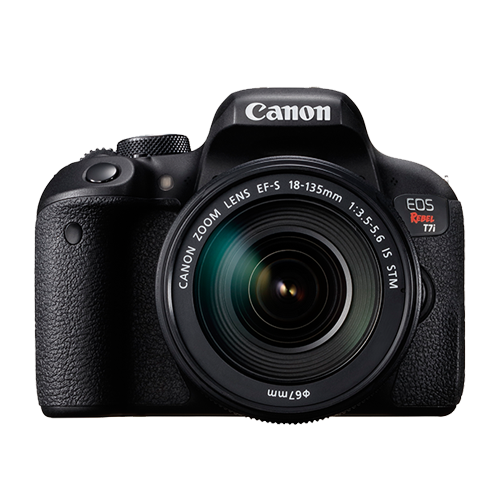 |
February2017 | Mid-size SLR | Fully Articulated | Yes | $- |
| CanonEOSM6 | 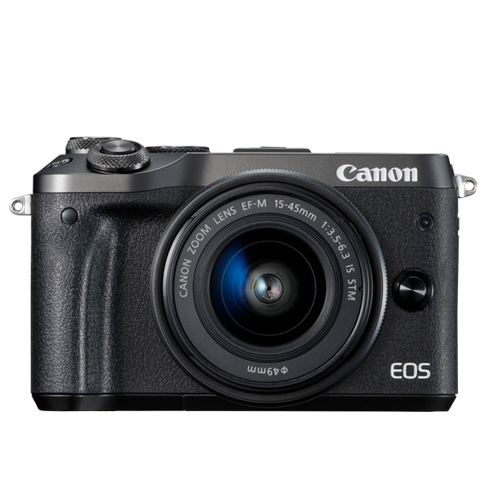 |
February2017 | Mirrorless | Flip Up | Yes | $ |
| NikonD5600 | 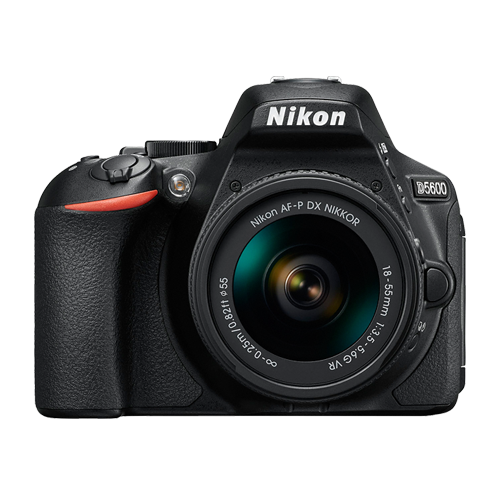 |
November2016 | Compact SLR | Fully Articulated | Yes | $- |
| SonyCyber-Shot DSCRX 100 V | 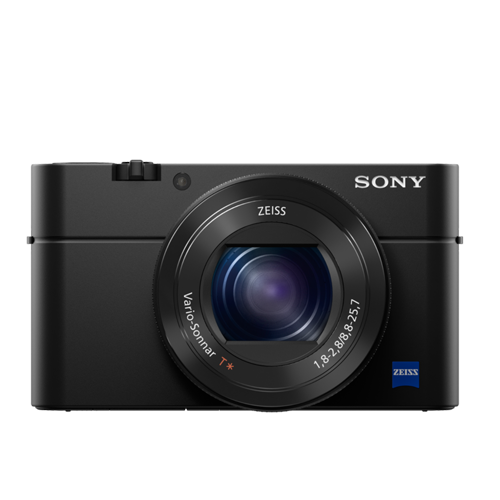 |
October2016 | Compact | Flip Up | No | $- |
| PanasonicLumixDMC-G85 | 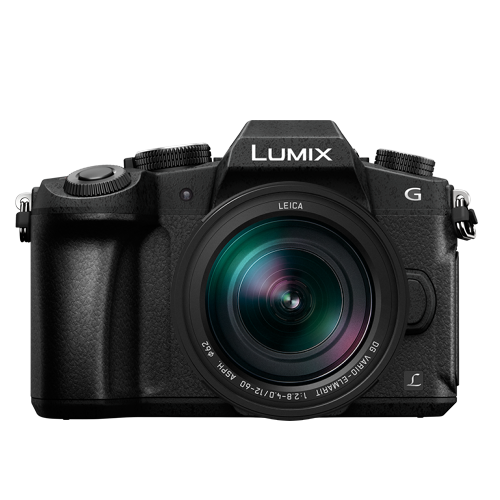 |
September2016 | Mirrorless | Flip Up | Yes | $- |
| CanonEOS80D | 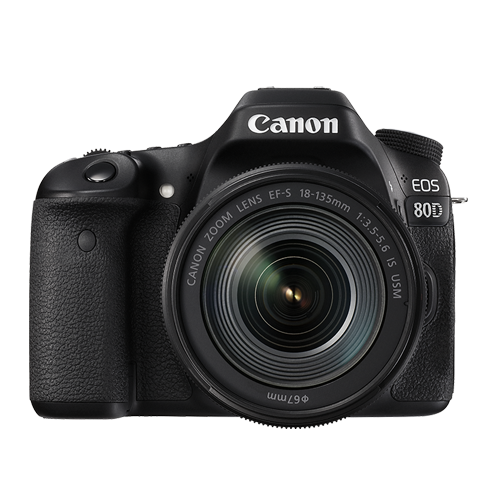 |
February2016 | Mid-size SLR | Fully Articulated | Yes | $$ |
| CanonPowerShotG7 X Mark II | 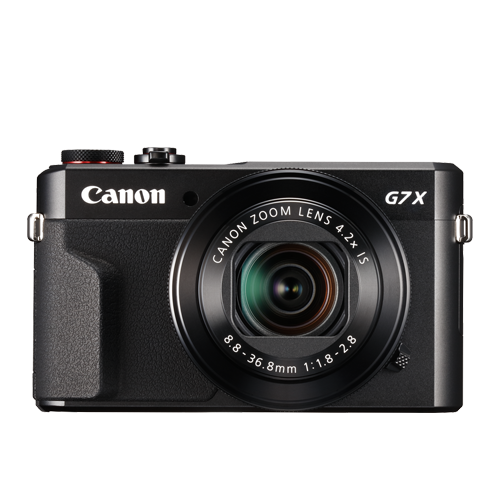 |
February2016 | Compact | Flip Up | No | $ |
|
Best daily vlogging camera with a flip screen: Sony Cyber-Shot DSC-RX 100 V If you want to use a compact camera with a flip screen, Sony’s Cyber-shot DSC-RX 100 V is an exceptional daily vlogging camera. This camera’s 20.1 MP Exmor RS BSI CMOS sensor with a maximum of 12800 in ISO sensitivity, can record footage in UHD 4K at 30 or 24 fps. The lens on this camera, a non-interchangeable Carl Zeiss Vario Sonnar T lens, performs well even under low-light conditions. With its fast hybrid AF system with 315 phase-detection points and an anti-motion blur mode, you can expect your shots to be accurately focused. The Sony RX 100 V packs so much power into such a small, portable camera, making it a great daily vlogging device. PROS - Light and easy to carry around - Produces high-res videos CONS - Short battery life - Lacking a touchscreen |
|---|---|
|
Best cheap vlogging camera with a flip screen: Canon EOS M100 The Canon EOS M100 is another great small vlogging camera with a flip screen. This mirrorless camera shoots up to full HD 1080p videos at 60 fps. Its 24.2 MP APS-C CMOS sensor and DIGIC 7 image processor will accurately lock the right focus and produce videos with rich detail. The camera’s ISO sensitivity goes as high as ISO 25600. Even in difficult light conditions, this camera will be able to capture a scene. You can control and navigate through the difficult functions of this camera using its 3-inch touchscreen LCD. This camera has a flip screen that flips upward so that you can see yourself while you vlog. With built-in Wi-Fi and NFC, you can also transfer your videos seamlessly to a computer without any cables. If you don’t want to spend a fortune but still want to produce videos with great picture quality, the Canon EOS M100 is the best entry-level camera for daily vlogging that’s currently on the market. PROS - Affordable - Great connectivity options CONS - Lacks advanced video recording features - No viewfinder |
|
Best entry-level mirrorless camera with a flip screen for vlogging: Canon EOS M100 The Canon EOS M100 is the best entry-level mirrorless camera with a flip screen for vlogging. In case you missed it, check out my review on the Canon EOS M100. |
|
Best mid-range mirrorless camera with a flip screen for vlogging: Canon EOS M50 The Canon EOS M50 is already regarded as one of the best mirrorless cameras for vlogging though it has only been on the market for just a few months. This mirrorless camera comes with the newer DIGIC 8 Image Processor that find a focus for your footage even better than the last generation’s image processor. You can crank up the ISO sensitivity to ISO 51200 with the Canon EOS M50. The Canon EOS M50 can shoot UHD 4K videos at 23.98 fps. You can also capture 720p slow-motion videos at 120 fps. PROS - Has an external microphone port - Has a 2.36m-dot OLED electronic viewfinder CONS - No image stabilization - Battery life could be longer |
|
Best professional mirrorless camera with a flip screen for vlogging: Panasonic Lumix DC-GH5S When Panasonic made its Lumix DC-GH5, it was a hybrid camera that performed equally well in both photo and video. In response to customers’ interest in a video-focused camera, Panasonic released the GH5S. This camera is equipped with a micro four-thirds sensor and can shoot UHD 4K and DCI videos at 60 fps, up to 150 Mbps. If you want to capture slow-motion footage, you can shoot full HD 1080p videos at 240 fps as well. With its 10.28MP multi-aspect ratio MOS sensor, you’ll be able to produce high-quality videos even under very challenging lighting conditions. In a fraction of a second, this camera can also automatically grab focus during your video with its advanced depth-from-focus technology. It is also equipped with a microphone jack so that you can record better audio while shooting with this camera. The GH5S has a fully articulated touchscreen so that you can compose your shot from any angle. PROS - ISO sensitivity goes up to 204800 - High video bit rates CONS - Expensive - The camera body weighs about 1.5 lbs |
|
Best entry-level DSLR camera with a flip screen for vlogging: Canon EOS SL2 If you’re looking for a low priced entry-level vlogging camera with a flip screen, the Canon EOS Rebel SL2 is the best option. You can precisely and quickly grab focus during video recording with its 9-point AF system and dual pixel CMOS AF technology. The camera powers these functions with its DIGIC 7 image processor. You can shoot up to full HD 1080p videos at 60 fps with its 24.2 MP APS-C CMOS sensor and crank the ISO up to ISO 51200 in case you need to shoot under low light conditions. If you want better audio for your vlogs, you can connect an external microphone to the SL2’s microphone jack. PROS - Microphone jack - Wi-Fi connectivity CONS - No 4K video support - Optical image stabilizer could be better |
|
Best mid-range DSLR camera with a flip screen for vlogging: Canon EOS 80D The 80D is the best camera to go with if you’re looking for a mid-range DLSR vlogging camera with a flip screen. It is equipped with a 24.2 MP APS-C CMOS sensor, comes with the DIGIC 6 image processor, and shoots up to full HD 1080p videos at 60 fps. For low lighting conditions, you can set the camera’s ISO to as high as ISO 25600. The 80D is great for autofocusing during video recording as it comes with a 45-point all cross phase detection autofocus system and a dual pixel CMOS AF system. PROS - Feature-rich - Continuous AF feature performs beautifully while recording high-res videos CONS - Just one SD card slot - PC sync connection features could be better |
|
Best professional DSLR camera with a flip screen for vlogging: Canon 6D Mark II The 6D Mark II is currently (at the time of writing this review) the only full-frame DSLR camera that comes with both a fully-articulated screen and a microphone jack. It is equipped with a 26.2 MP full-frame CMOS sensor, comes with the DIGIC 7 image processor, and shoots up to full HD 1080p videos at 60 fps. The 6D is also equipped with the same 45-point all cross-phase detection and dual pixel CMOS autofocusing system as the 80D. If you’re wanting to vlog with a full-frame camera, the 6D Mark II is the best option. PROS - ISO sensitivity goes up to 102400 - Amazing touchscreen controls CONS - No 4K video recording option - No USB 3.0 |
Want to compare even more cameras? Check out…
12 Best Vlogging Cameras (2018)
Top 11 Cheap Vlogging Cameras (2018)
7 Best DSLR Cameras For Vlogging (2018)
8 Best Mirrorless Cameras For Vlogging (2018)
Richard Bennett
Richard Bennett is a writer and a lover of all things video.
Follow @Richard Bennett
Richard Bennett
Nov 01, 2022• Proven solutions
A flip screen is a very important feature on a camera for vloggers. With a flip screen, you can preview whether or not your shot is composed the way you want it to be, all in real-time. Below is our top list and review of the twelve best vlogging cameras with a flip screen.
WHAT TO LOOK FOR IN A VLOGGING CAMERA
1. Fully articulated screen (flip screen)
2. Good continual autofocus while recording video
3. Good focus priority through face recognition
4. Touch to focus
5. Good low-light performance
6. external mic jack, hot/cold shoe bracket
7. optical image stabilization
8. good battery life
Check out my full list of 10 Things To Look For In A Vlogging Camera to understand the importance of these camera features.
THE 12 BEST VLOGGING CAMERAS WITH A FLIP SCREEN (2018)
| Camera | Release Date | Camera Type | Flip Screen Type | Mic Port | Price | |
|---|---|---|---|---|---|---|
| CanonEOSM50 | |
February2018 | Mirrorless | Fully Articulated | Yes | $- |
| PanasonicLumixDC-GH5S | |
January2018 | Mirrorless | Fully Articulated | Yes | $$$ |
| CanonEOSM100 | |
August2017 | Mirrorless | Flip Up | No | $ |
| CanonEOS6D Mark II | |
June2017 | Mid-size SLR | Fully Articulated | Yes | $$ |
| CanonEOS RebelSL2 | |
June2017 | Compact SLR | Fully Articulated | Yes | $ |
| CanonEOS RebelT7i | |
February2017 | Mid-size SLR | Fully Articulated | Yes | $- |
| CanonEOSM6 | |
February2017 | Mirrorless | Flip Up | Yes | $ |
| NikonD5600 | |
November2016 | Compact SLR | Fully Articulated | Yes | $- |
| SonyCyber-Shot DSCRX 100 V | |
October2016 | Compact | Flip Up | No | $- |
| PanasonicLumixDMC-G85 | |
September2016 | Mirrorless | Flip Up | Yes | $- |
| CanonEOS80D | |
February2016 | Mid-size SLR | Fully Articulated | Yes | $$ |
| CanonPowerShotG7 X Mark II | |
February2016 | Compact | Flip Up | No | $ |
|
Best daily vlogging camera with a flip screen: Sony Cyber-Shot DSC-RX 100 V If you want to use a compact camera with a flip screen, Sony’s Cyber-shot DSC-RX 100 V is an exceptional daily vlogging camera. This camera’s 20.1 MP Exmor RS BSI CMOS sensor with a maximum of 12800 in ISO sensitivity, can record footage in UHD 4K at 30 or 24 fps. The lens on this camera, a non-interchangeable Carl Zeiss Vario Sonnar T lens, performs well even under low-light conditions. With its fast hybrid AF system with 315 phase-detection points and an anti-motion blur mode, you can expect your shots to be accurately focused. The Sony RX 100 V packs so much power into such a small, portable camera, making it a great daily vlogging device. PROS - Light and easy to carry around - Produces high-res videos CONS - Short battery life - Lacking a touchscreen |
|---|---|
|
Best cheap vlogging camera with a flip screen: Canon EOS M100 The Canon EOS M100 is another great small vlogging camera with a flip screen. This mirrorless camera shoots up to full HD 1080p videos at 60 fps. Its 24.2 MP APS-C CMOS sensor and DIGIC 7 image processor will accurately lock the right focus and produce videos with rich detail. The camera’s ISO sensitivity goes as high as ISO 25600. Even in difficult light conditions, this camera will be able to capture a scene. You can control and navigate through the difficult functions of this camera using its 3-inch touchscreen LCD. This camera has a flip screen that flips upward so that you can see yourself while you vlog. With built-in Wi-Fi and NFC, you can also transfer your videos seamlessly to a computer without any cables. If you don’t want to spend a fortune but still want to produce videos with great picture quality, the Canon EOS M100 is the best entry-level camera for daily vlogging that’s currently on the market. PROS - Affordable - Great connectivity options CONS - Lacks advanced video recording features - No viewfinder |
|
Best entry-level mirrorless camera with a flip screen for vlogging: Canon EOS M100 The Canon EOS M100 is the best entry-level mirrorless camera with a flip screen for vlogging. In case you missed it, check out my review on the Canon EOS M100. |
|
Best mid-range mirrorless camera with a flip screen for vlogging: Canon EOS M50 The Canon EOS M50 is already regarded as one of the best mirrorless cameras for vlogging though it has only been on the market for just a few months. This mirrorless camera comes with the newer DIGIC 8 Image Processor that find a focus for your footage even better than the last generation’s image processor. You can crank up the ISO sensitivity to ISO 51200 with the Canon EOS M50. The Canon EOS M50 can shoot UHD 4K videos at 23.98 fps. You can also capture 720p slow-motion videos at 120 fps. PROS - Has an external microphone port - Has a 2.36m-dot OLED electronic viewfinder CONS - No image stabilization - Battery life could be longer |
|
Best professional mirrorless camera with a flip screen for vlogging: Panasonic Lumix DC-GH5S When Panasonic made its Lumix DC-GH5, it was a hybrid camera that performed equally well in both photo and video. In response to customers’ interest in a video-focused camera, Panasonic released the GH5S. This camera is equipped with a micro four-thirds sensor and can shoot UHD 4K and DCI videos at 60 fps, up to 150 Mbps. If you want to capture slow-motion footage, you can shoot full HD 1080p videos at 240 fps as well. With its 10.28MP multi-aspect ratio MOS sensor, you’ll be able to produce high-quality videos even under very challenging lighting conditions. In a fraction of a second, this camera can also automatically grab focus during your video with its advanced depth-from-focus technology. It is also equipped with a microphone jack so that you can record better audio while shooting with this camera. The GH5S has a fully articulated touchscreen so that you can compose your shot from any angle. PROS - ISO sensitivity goes up to 204800 - High video bit rates CONS - Expensive - The camera body weighs about 1.5 lbs |
|
Best entry-level DSLR camera with a flip screen for vlogging: Canon EOS SL2 If you’re looking for a low priced entry-level vlogging camera with a flip screen, the Canon EOS Rebel SL2 is the best option. You can precisely and quickly grab focus during video recording with its 9-point AF system and dual pixel CMOS AF technology. The camera powers these functions with its DIGIC 7 image processor. You can shoot up to full HD 1080p videos at 60 fps with its 24.2 MP APS-C CMOS sensor and crank the ISO up to ISO 51200 in case you need to shoot under low light conditions. If you want better audio for your vlogs, you can connect an external microphone to the SL2’s microphone jack. PROS - Microphone jack - Wi-Fi connectivity CONS - No 4K video support - Optical image stabilizer could be better |
|
Best mid-range DSLR camera with a flip screen for vlogging: Canon EOS 80D The 80D is the best camera to go with if you’re looking for a mid-range DLSR vlogging camera with a flip screen. It is equipped with a 24.2 MP APS-C CMOS sensor, comes with the DIGIC 6 image processor, and shoots up to full HD 1080p videos at 60 fps. For low lighting conditions, you can set the camera’s ISO to as high as ISO 25600. The 80D is great for autofocusing during video recording as it comes with a 45-point all cross phase detection autofocus system and a dual pixel CMOS AF system. PROS - Feature-rich - Continuous AF feature performs beautifully while recording high-res videos CONS - Just one SD card slot - PC sync connection features could be better |
|
Best professional DSLR camera with a flip screen for vlogging: Canon 6D Mark II The 6D Mark II is currently (at the time of writing this review) the only full-frame DSLR camera that comes with both a fully-articulated screen and a microphone jack. It is equipped with a 26.2 MP full-frame CMOS sensor, comes with the DIGIC 7 image processor, and shoots up to full HD 1080p videos at 60 fps. The 6D is also equipped with the same 45-point all cross-phase detection and dual pixel CMOS autofocusing system as the 80D. If you’re wanting to vlog with a full-frame camera, the 6D Mark II is the best option. PROS - ISO sensitivity goes up to 102400 - Amazing touchscreen controls CONS - No 4K video recording option - No USB 3.0 |
Want to compare even more cameras? Check out…
12 Best Vlogging Cameras (2018)
Top 11 Cheap Vlogging Cameras (2018)
7 Best DSLR Cameras For Vlogging (2018)
8 Best Mirrorless Cameras For Vlogging (2018)
Richard Bennett
Richard Bennett is a writer and a lover of all things video.
Follow @Richard Bennett
Also read:
- [Updated] Digital Dazzle Fine-Tuning Video Chrominance for Beauty
- Channeling Wealth Through Beauty Online Platforms for 2024
- Creating Impact with High-Converting YouTube Advertising Banners for 2024
- 2024 Approved Data Deluge Infographics on YouTube's Intriguing Insights
- Optimizing Your Live Content From Twitch to YouTube Platform
- [Updated] Essential Tips for WireCast Live Streaming to Youtube
- [New] 2023'S Favorite Animated Channels on YouTube (Daytime Vibes)
- In 2024, Captivate Audiences Techniques for Livestreaming Video in Spherical Views on YouTube
- 2024 Approved Discovering Artistic Expression Top Film Tips on YouTube
- [New] Anime's Best of 2023 on YouTube A Guide to Your Daily Dose
- Explore the Best (and Easiest) YouTube-to-Mp3 Conversion Tech
- In 2024, 10 FREE YouTube Playlist Downloaders [Online/PC/Android/iOS]2
- 2024 Approved Editing Engine Room
- Shifting Paradigms Non-Youtube Video Hosts
- [Updated] Efficiently Isolate Key Moments in YouTube Footage
- Interactive Engagement Adding Emojis to Youtubes' Comments
- Tips to Develop Engaging Lifestyle Enlightenment Vids
- 11 Popular Video Extractors Online
- Boost Your Mobile Film Game Best 9 Camera Add-Ons For Vloggers
- Updated 2024 Approved Lip Sync Videos Are a Great Source of Fun, and Producing Them Doesnt Require You to Have a Professional Video or Sound Equipment. In This Article, We Are Going to Introduce You to some of the Best Li
- [New] Best in Class Meme Modification Software
- In 2024, Full Guide to Fix iToolab AnyGO Not Working On Motorola Moto G Stylus (2023) | Dr.fone
- [Updated] 2024 Approved From Last Minute to First Impression How to Rewind Video on Instagram
- [Updated] 2024 Approved Professional FB Cover Setups to Skyrocket Engagement
- Prevent Cross-Site Tracking on Poco X5 Pro and Browser | Dr.fone
- 2024 Approved Have You Ever Wondered How to Add Camera Shake to Video in Adobe After Effects? Let Us Share with You some Tips and Tricks on How to Do Just That
- In 2024, Overcome Low-Quality Feed Fix Blurry Videos on Social Media
- Propel Your Social Media Success Best 6 Apps for Instagram Reels
- The Ultimate Guide to TV and FB Live Synergy
- How To Transfer WhatsApp From iPhone 7 to other iPhone 12 Pro devices? | Dr.fone
- [New] Rhythm & Flow Explore Easy, Trending TikTok Moves for 2024
- [New] How to Capture Your Feed on Devices Using OBS Studio for 2024
- 9 Best Phone Monitoring Apps for Realme Narzo 60 5G | Dr.fone
- In 2024, How to Remove Forgotten PIN Of Your Vivo T2 5G
- Top Tools for Taming the Unwanted Visage in Photos
- In 2024, Life360 Circle Everything You Need to Know On Apple iPhone 6s | Dr.fone
- [New] The Crème De La Reading List TikTok-Endorsed Bestsellers
- Title: Make Video Previews Stand Out with Neon Borders
- Author: Brian
- Created at : 2024-05-25 12:20:01
- Updated at : 2024-05-26 12:20:01
- Link: https://youtube-video-recordings.techidaily.com/make-video-previews-stand-out-with-neon-borders/
- License: This work is licensed under CC BY-NC-SA 4.0.
