
:max_bytes(150000):strip_icc()/The-Conjuring-3-3d34f5a-scaled-96b4939261ee4274a8be036e7e6aa405.jpeg)
"Jump Into Sub4sub - Guide Awaits to Ensure Success"
Jump Into Sub4sub - Guide Awaits to Ensure Success
Create High-Quality Video - Wondershare Filmora
An easy and powerful YouTube video editor
Numerous video and audio effects to choose from
Detailed tutorials provided by the official channel
YouTube streaming service is a beehive of activities. Promoters strive for a higher number of subscribers to boost their content. Several ways are available for you to increase the number of subscribers and visitors to your site. YouTube sub for sub is one common practice for this noble cause. In this practice, a person subscribes, in anticipation of the recipient subscribing back as well.
However, the practice may not give your channel that genuine growth. The subscribers may not even watch your videos or care much about leaving comments or other engagements. All in all, the aim is to hit a certain number of subscribers so that you can get into the recommended territory and probably start earning. But are there other options to increase YouTube subscriptions apart from Sub4Sub? Be genuine and use real avenues to rise to the top. This article corresponds adequately on the matter by giving you alternative ways to gain real subscribers who will stick around to grow your channel.

In this article
03 Tips & tricks to use sub for sub
04 Additional thoughts - Should we rely on subforsub to get more subscribers?
What is sub for sub?
Subforsub means a subscription for a subscription. In this practice, there are subscribers and subscriptions. Those who subscribe to you on YouTube are the subscribers while those whom you subscribe to, are the subscriptions. Both video makers’ subscribers are, therefore, increased equally and doesn’t give each other a competitive advantage against the other member. Sub for sub was founded in Germany, 4 years ago. It is easy to use and free platform that takes only about 5 minutes to contact a subscriber and complete the initiative. To get started, a user signs up and creates a new account on the home page. You can then reach out to other members for a subscription.
How does sub for sub work?
With YouTube sub for sub, you market your YouTube channel to get more subscribers. Simply sub to one another’s channel and they sub back.
You can do this on different channels such as YouTube live videos, among other channels. But again, these subscribers are not so much concerned about getting the real subs. What matters is that you get 1,000 subscribers to enable you to monetize on YouTube. However, YouTube also has its measures in place, and manipulating the matrix is one of which they don’t advocate for. But in most cases, subforsub participants operate fake YouTube accounts and you can find one person corresponding up to 5 accounts to gain subscriptions. This isn’t good for your rating as you don’t get real subscribers but you only boost the number of subscribers. And since they don’t watch your videos, neither will they share them with other viewers.
Tips & tricks to use sub for sub
Subforsub isn’t genuine and all you get is bot subscribers who don’t engage. However, you can use available tricks to gain popularity.
- Using fake accounts

A user should only run one genuine YouTube account. However, the trick that most subscribers use to gain more subs is by creating other additional fake accounts to gain more subs in return. But again, it is not a guarantee as some subscribers may not sub back to all the accounts.
- Subscribers don’t watch the videos
Perhaps there is no time for subscribers to watch the potential sub videos before subscribing. Your mission is to gain as many subs as possible even if your watch time doesn’t go up. This doesn’t bring any positivity to your channel rather an increased number of subscribers.
- Reach out to friends
You can also boost your sub for sub by reaching out to friends to inform them of your channel and ask for subscriptions in return for theirs as well. This, however, could be a slow process as not all your friends will be attracted to what you do.
- Don’t do subforsub for followers
A subforsub may not give you followers parse. So, don’t get into it for genuine followers. Those who sub to your channel won’t follow you in most cases. Rather, they might unsubscribe after a short duration of time.
- Use channel branding
This trick will glue viewers to your channel. These can include banner art to welcome everyone who clicks into your channel.
Additional thoughts - Should we rely on subforsub to get more subscribers?
You should not rely on subforsub as it doesn’t give the real figures but manipulates the outcome. Nonetheless, you need real subscribers to climb the YouTube ladder. That’s the best way to push the YouTube algorithm. There are genuine aspects of gaining subscribers to grow your channel.
Get to social media platforms

These include Facebook, Instagram, WhatsApp, and other sites. Introduce your YouTube channel to your followers and remind them to subscribe. Likewise, demonstrate why your channel is worth subscribing to.
Upload content consistently
Ensure your upload schedule is consistent and you’ll see viewers having a reason to subscribe to your channel. Once you introduce your channel with the first video, post a second and third video to build more momentum on your potential subscribers.
Incorporate YouTube stories
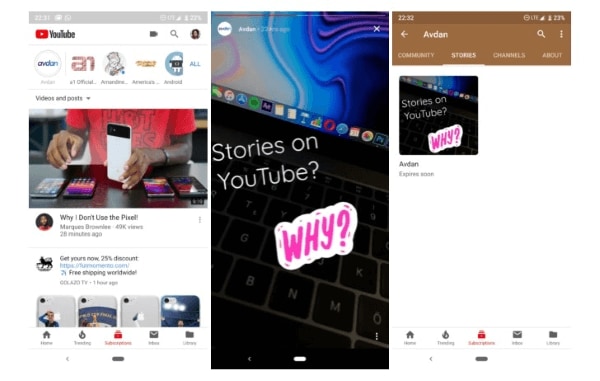
Stories can be a good starting point for those who have not subscribed to your content yet despite watching. Short video stories will attract viewers’ attention and want to get more from your channel.
Use Calls to Action

Ask your audience to subscribe after watching your videos. A great idea is to use animation or graphics to attract the viewers’ attention instantly. Other free options like green screen are also available for use.
Make it easy for viewers to understand your channel
You can make it easy by giving your viewers a guided tour. By this, they’ll know where to find important sections like comments. You can also create a channel banner that tells your audience what you do. They’ll soon familiarize themselves with your channel and be friends in no time.
Build a relationship with your audience
It is good to connect with your audience in various aspects. Expressing yourself probably in front of a camera has a deeper impact. You can also use illustrations to bring out your points for a quick understanding. Engaging them in the process is the best way to make them feel like they belong and eventually turn into subscribers.
Focus on the video that’s working for you
You should know which video is working and which is not. Judge and put more emphasis on the video that’s working for you. Check out which videos turn viewers into subscribers as that’s your main aim. More so, be creative and innovative.
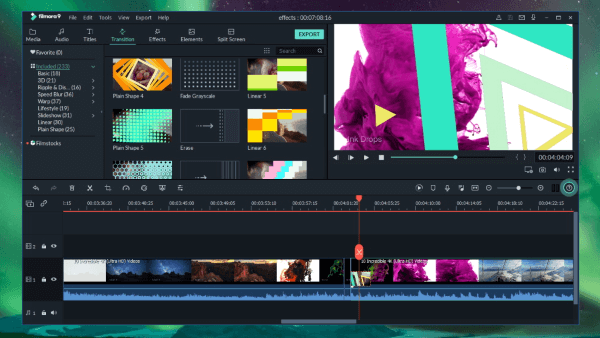
A video editor is worth a try – Filmora
Since creativity is paramount, engaging a video editor tool will make you achieve your goal in a few clicks. Filmora Video Editor will transform your videos into magical content. It comes with powerful editing tools to make your video stand tall from the rest. You will also manage to import and export your videos in various formats for easy access on different platforms and devices. Whether you wish to create a tutorial for learning or promotional purposes, Filmora will give you exceptional results. The steps are as easy as 1-2-3 and the process is effective. Check out its key features to help you produce quality videos.
For Win 7 or later (64-bit)
For macOS 10.12 or later
Key Features of Filmora Video Editor
- 4K editing support: Quality and sharp videos are attractive to viewers. Filmora lets you edit and export your videos at high resolutions of up to 4K.
- Noise removal: Make your videos noise-free by removing unwanted background sounds. Viewers won’t be destructed and can concentrate more on the important aspects of the video.
- Speed control: There are important sections of your video that you may wish to emphasize more. You can slow down the speed in such sections for your viewers to understand them in detail. Nonetheless, you can speed up certain parts that don’t require too much emphasis.
- Reverse: What about being creative using this feature. Simply flip your clips and play them backward with this feature.
- Preview frame by frame: Focus on precise editing by using this feature. It lets you move to any section of the frame at a time to ascertain that the final product will be the best.
- Audio separation: Do it in a few clicks. Detach audio from video and put any other background music depending on the theme of that moment.
Conclusion
● You may gain subscribers from the YouTube sub for sub but you will be violating YouTube’s terms of service. Additionally, the YouTube algorithm will eventually notice that your subscribers are not watching your videos. It will presume that you are buying subscribers, which is illegal in the long run. Be smart and engage the Filmora video editor. It works in simple steps to create wanting videos that will upsell your brand. Editing isn’t a worry either as it presents you with numerous stunning effects to transform your video to a compelling piece of art.
YouTube streaming service is a beehive of activities. Promoters strive for a higher number of subscribers to boost their content. Several ways are available for you to increase the number of subscribers and visitors to your site. YouTube sub for sub is one common practice for this noble cause. In this practice, a person subscribes, in anticipation of the recipient subscribing back as well.
However, the practice may not give your channel that genuine growth. The subscribers may not even watch your videos or care much about leaving comments or other engagements. All in all, the aim is to hit a certain number of subscribers so that you can get into the recommended territory and probably start earning. But are there other options to increase YouTube subscriptions apart from Sub4Sub? Be genuine and use real avenues to rise to the top. This article corresponds adequately on the matter by giving you alternative ways to gain real subscribers who will stick around to grow your channel.
In this article
03 Tips & tricks to use sub for sub
04 Additional thoughts - Should we rely on subforsub to get more subscribers?
What is sub for sub?
Subforsub means a subscription for a subscription. In this practice, there are subscribers and subscriptions. Those who subscribe to you on YouTube are the subscribers while those whom you subscribe to, are the subscriptions. Both video makers’ subscribers are, therefore, increased equally and doesn’t give each other a competitive advantage against the other member. Sub for sub was founded in Germany, 4 years ago. It is easy to use and free platform that takes only about 5 minutes to contact a subscriber and complete the initiative. To get started, a user signs up and creates a new account on the home page. You can then reach out to other members for a subscription.
How does sub for sub work?
With YouTube sub for sub, you market your YouTube channel to get more subscribers. Simply sub to one another’s channel and they sub back.
You can do this on different channels such as YouTube live videos, among other channels. But again, these subscribers are not so much concerned about getting the real subs. What matters is that you get 1,000 subscribers to enable you to monetize on YouTube. However, YouTube also has its measures in place, and manipulating the matrix is one of which they don’t advocate for. But in most cases, subforsub participants operate fake YouTube accounts and you can find one person corresponding up to 5 accounts to gain subscriptions. This isn’t good for your rating as you don’t get real subscribers but you only boost the number of subscribers. And since they don’t watch your videos, neither will they share them with other viewers.
Tips & tricks to use sub for sub
Subforsub isn’t genuine and all you get is bot subscribers who don’t engage. However, you can use available tricks to gain popularity.
- Using fake accounts
A user should only run one genuine YouTube account. However, the trick that most subscribers use to gain more subs is by creating other additional fake accounts to gain more subs in return. But again, it is not a guarantee as some subscribers may not sub back to all the accounts.
- Subscribers don’t watch the videos
Perhaps there is no time for subscribers to watch the potential sub videos before subscribing. Your mission is to gain as many subs as possible even if your watch time doesn’t go up. This doesn’t bring any positivity to your channel rather an increased number of subscribers.
- Reach out to friends
You can also boost your sub for sub by reaching out to friends to inform them of your channel and ask for subscriptions in return for theirs as well. This, however, could be a slow process as not all your friends will be attracted to what you do.
- Don’t do subforsub for followers
A subforsub may not give you followers parse. So, don’t get into it for genuine followers. Those who sub to your channel won’t follow you in most cases. Rather, they might unsubscribe after a short duration of time.
- Use channel branding
This trick will glue viewers to your channel. These can include banner art to welcome everyone who clicks into your channel.
Additional thoughts - Should we rely on subforsub to get more subscribers?
You should not rely on subforsub as it doesn’t give the real figures but manipulates the outcome. Nonetheless, you need real subscribers to climb the YouTube ladder. That’s the best way to push the YouTube algorithm. There are genuine aspects of gaining subscribers to grow your channel.
Get to social media platforms
These include Facebook, Instagram, WhatsApp, and other sites. Introduce your YouTube channel to your followers and remind them to subscribe. Likewise, demonstrate why your channel is worth subscribing to.
Upload content consistently
Ensure your upload schedule is consistent and you’ll see viewers having a reason to subscribe to your channel. Once you introduce your channel with the first video, post a second and third video to build more momentum on your potential subscribers.
Incorporate YouTube stories
Stories can be a good starting point for those who have not subscribed to your content yet despite watching. Short video stories will attract viewers’ attention and want to get more from your channel.
Use Calls to Action
Ask your audience to subscribe after watching your videos. A great idea is to use animation or graphics to attract the viewers’ attention instantly. Other free options like green screen are also available for use.
Make it easy for viewers to understand your channel
You can make it easy by giving your viewers a guided tour. By this, they’ll know where to find important sections like comments. You can also create a channel banner that tells your audience what you do. They’ll soon familiarize themselves with your channel and be friends in no time.
Build a relationship with your audience
It is good to connect with your audience in various aspects. Expressing yourself probably in front of a camera has a deeper impact. You can also use illustrations to bring out your points for a quick understanding. Engaging them in the process is the best way to make them feel like they belong and eventually turn into subscribers.
Focus on the video that’s working for you
You should know which video is working and which is not. Judge and put more emphasis on the video that’s working for you. Check out which videos turn viewers into subscribers as that’s your main aim. More so, be creative and innovative.
A video editor is worth a try – Filmora
Since creativity is paramount, engaging a video editor tool will make you achieve your goal in a few clicks. Filmora Video Editor will transform your videos into magical content. It comes with powerful editing tools to make your video stand tall from the rest. You will also manage to import and export your videos in various formats for easy access on different platforms and devices. Whether you wish to create a tutorial for learning or promotional purposes, Filmora will give you exceptional results. The steps are as easy as 1-2-3 and the process is effective. Check out its key features to help you produce quality videos.
For Win 7 or later (64-bit)
For macOS 10.12 or later
Key Features of Filmora Video Editor
- 4K editing support: Quality and sharp videos are attractive to viewers. Filmora lets you edit and export your videos at high resolutions of up to 4K.
- Noise removal: Make your videos noise-free by removing unwanted background sounds. Viewers won’t be destructed and can concentrate more on the important aspects of the video.
- Speed control: There are important sections of your video that you may wish to emphasize more. You can slow down the speed in such sections for your viewers to understand them in detail. Nonetheless, you can speed up certain parts that don’t require too much emphasis.
- Reverse: What about being creative using this feature. Simply flip your clips and play them backward with this feature.
- Preview frame by frame: Focus on precise editing by using this feature. It lets you move to any section of the frame at a time to ascertain that the final product will be the best.
- Audio separation: Do it in a few clicks. Detach audio from video and put any other background music depending on the theme of that moment.
Conclusion
● You may gain subscribers from the YouTube sub for sub but you will be violating YouTube’s terms of service. Additionally, the YouTube algorithm will eventually notice that your subscribers are not watching your videos. It will presume that you are buying subscribers, which is illegal in the long run. Be smart and engage the Filmora video editor. It works in simple steps to create wanting videos that will upsell your brand. Editing isn’t a worry either as it presents you with numerous stunning effects to transform your video to a compelling piece of art.
Beat Your Content Up a Notch: Music Addition in YouTube Videos
How to Add Music to YouTubeVideo with YouTube Video Editor

Richard Bennett
Mar 27, 2024• Proven solutions
Adding the right music to your YouTube can significantly increase its entertainment value. Professional video maker will not play a music background while shooting the video; they do it during the editing process. You can remove the background noisy during editing and add your own music sound during editing, but you can also upload the video to YouTube first and then choose the right music for your video in YouTube. In this article, we are going to show you how to add or change music to your YouTube videos in YouTube platform after uploading and how to add music to YouTube Video with royalty free music in Audio Library.
You may also like: How to edit YouTube videos >>
Before we get started, there is a better way on how to add music to YouTube Video. You may use Wondershare Filmora to better manage your video. It allows you to import any track you want in different format including but not limited to MP3, WAV, FLAC and others. They also have a huge and better collection of royalty-free music. Compared to YouTube Video Editor where you have a pretty limited audio mix manager, the Filmora comes with an audio equalizer. You may also detach the music easily or add multiple tracks on a single video. You can also import the video that you created in different format or upload it directly to YouTube.
 Download Mac Version ](https://tools.techidaily.com/wondershare/filmora/download/ )
Part 1: How to Add Music to YouTube Video
We’re going to offer you two ways to add music to YouTube video with YouTube built-in video editing features.
Section 1: Using Video Manager
There are thousands of royalty free songs that you can use in the YouTube video. You can choose from different genres and moods songs with different duration as well. Here is how to add music to YouTube videos in Video Manager tab.
Step 1 Sign in
The first thing you need to do when you want to know how to add music to YouTube Video is to sign into your account on YouTube. Go to the official site of YouTube and click the sign-in option found at the upper right corner of your screen. You will then be asked to enter your Gmail account and your password. After you managed to sign in, you should be able to see your profile picture on the upper right corner of the page. Click your picture, and you will be able to see the Creator Studio Option. Click that button.

Step 2 Choosing the Video
Start Browsing Your Video Channel. You may do this by clicking on the Video Tab on your Profile Page or Clicking the Video Manager option located at the left bar. You will then be redirected to the videos that you uploaded. Choose your video that you want to have background music.

Step 3 Choosing the Music
Click the Edit option that is located next to the video that you want to edit. This will open the online video editing tool of YouTube. Located on top of the page are the different commands that you can execute to edit the video; you may enhance, add audio, put annotation, create cards, add subtitle and add copyright. Click the Audio Option. It will lead you to a library of music that you may add to your video.

Step 4 Finding the Right Music
The next thing to do on how to add music to YouTube Video is to find an appropriate music for your video. You also need to make sure that the length of the track will perfectly match the length of your video. To do this, Click on the drop down menu that says ‘Top Tracks’ and you will see the different genre of music. In case you already have music in your mind, simply type the title of the song on the search bar and hit enter.

Additional Tip: Not satisfied with the track? Try the sound effects by going at YouTube Audio Library . You can create an advance search by customizing the result based on popularity, duration, instrument, mood and genre.
Step 5 Adding the Selected Music
Before you decided to add the music to your video, make sure that it fits the duration of your video. In case you want to know how to add music to YouTube Video, you should do nothing more than to click the ADD TO VIDEO button and it will be automatically integrated into your video.
Step 6 Editing the Music
- After you successfully integrate the music to the video, you will see the title of the music under your video. You also have additional tools that you can use. Let us take a look at the Position audio and the slide bar option a little closer.

- Once You Click the Position Audio Button, you will be able to customize and position your integrated music as well as compress the length of the music. To trim the music, simply put your pointer either at the end or the beginning of the music. When you want to move the audio, you may just drag the music.
- The ‘Only Music’ option located at the left side of the Position Audio can be used to adjust the volume of the music. In case you want to remove the original sound from the video, drag the pointer at the right most.
Step 7 Saving the Changes
When you save the edited video, you can save it as a separate video, or you can overwrite the existing video.
Additional Reminder: You can’t add multiple audio tracks in one video with youtube video editor, if you want to get an advanced audio editing, check this article How to mix audio tracks into one file for video
Section 2: Using Audio Library
Since YouTube has shut down the Video Editor module in 2017, you can now add music in YouTube Video Editor Module. Though there are plentiful video editing software for YouTube videos , you can also download Free Music and Sound Effects in YouTube Audio Library first and then add it to your video clips. Here is how to add music to YouTube video with YouTube Audio Library.
Step 1 Click on Audio Library
This time instead of clicking the Video Manager option, you will have to click on the Create option and choose Audio Library.

Step 2 Download target free music or sound effect
In YouTube Audio Library, you will find some free music sounds and sound effects available. You can search music in the library and filter genre, duration, mood, attribution and instrument properties. Click the download icon to download this royalty free music and sound effect to your computer. And then you can combine the audio and video and make it as a video with music sound. You can download multiple audio files and then add multiple songs to the YouTube video.

Step 3 Add Music to Video and Edit the music track
There are numerous video editors that you can add the downloaded music from YouTube Audio Library to the video. You can check our guide abouthow to edit YouTube videos in Windows Movie Maker orhow to add music to video in iMovie . While, as we described before, Filmora video editor is one of the best video editor for YouTubers. And here is how to add music to YouTube videos with Filmora . You can edit the treble, bass, pan and volume. However, it is impossible for you to position the music in a desired spot. If you want to get more control on your audio tracks, please read this article to know how to add audio effects to your video
Importing the video and audio
Importing media files to Filmora is easy. After launching Filmora, import all the files to the media library first and then drag and drop the target video and audio to the timeline. One of the best things of using Filmora to edit YouTube video is there is a built-in Music Library which including some royalty free music sound and sound effects as well.

Detach the original audio from video [Optional]
If you want to remove the recorded original audio file from video , just right click the video and then select Audio Detach option and the audio will be separated from the video automatically and then delete the audio.
What’s more, you can also use Filmora to remove the background noise and then keep the original audio as well.
Edit the Music

In Filmora, you can change the video and audio speed, add fade in and fade out to the music and change the music sound.
Read More to Get: 10 Best Music Video Makers >>
Watch the video below to check how to empower your imagination with Filmora

Richard Bennett
Richard Bennett is a writer and a lover of all things video.
Follow @Richard Bennett
Richard Bennett
Mar 27, 2024• Proven solutions
Adding the right music to your YouTube can significantly increase its entertainment value. Professional video maker will not play a music background while shooting the video; they do it during the editing process. You can remove the background noisy during editing and add your own music sound during editing, but you can also upload the video to YouTube first and then choose the right music for your video in YouTube. In this article, we are going to show you how to add or change music to your YouTube videos in YouTube platform after uploading and how to add music to YouTube Video with royalty free music in Audio Library.
You may also like: How to edit YouTube videos >>
Before we get started, there is a better way on how to add music to YouTube Video. You may use Wondershare Filmora to better manage your video. It allows you to import any track you want in different format including but not limited to MP3, WAV, FLAC and others. They also have a huge and better collection of royalty-free music. Compared to YouTube Video Editor where you have a pretty limited audio mix manager, the Filmora comes with an audio equalizer. You may also detach the music easily or add multiple tracks on a single video. You can also import the video that you created in different format or upload it directly to YouTube.
Download Mac Version ](https://tools.techidaily.com/wondershare/filmora/download/ )
Part 1: How to Add Music to YouTube Video
We’re going to offer you two ways to add music to YouTube video with YouTube built-in video editing features.
Section 1: Using Video Manager
There are thousands of royalty free songs that you can use in the YouTube video. You can choose from different genres and moods songs with different duration as well. Here is how to add music to YouTube videos in Video Manager tab.
Step 1 Sign in
The first thing you need to do when you want to know how to add music to YouTube Video is to sign into your account on YouTube. Go to the official site of YouTube and click the sign-in option found at the upper right corner of your screen. You will then be asked to enter your Gmail account and your password. After you managed to sign in, you should be able to see your profile picture on the upper right corner of the page. Click your picture, and you will be able to see the Creator Studio Option. Click that button.
Step 2 Choosing the Video
Start Browsing Your Video Channel. You may do this by clicking on the Video Tab on your Profile Page or Clicking the Video Manager option located at the left bar. You will then be redirected to the videos that you uploaded. Choose your video that you want to have background music.
Step 3 Choosing the Music
Click the Edit option that is located next to the video that you want to edit. This will open the online video editing tool of YouTube. Located on top of the page are the different commands that you can execute to edit the video; you may enhance, add audio, put annotation, create cards, add subtitle and add copyright. Click the Audio Option. It will lead you to a library of music that you may add to your video.
Step 4 Finding the Right Music
The next thing to do on how to add music to YouTube Video is to find an appropriate music for your video. You also need to make sure that the length of the track will perfectly match the length of your video. To do this, Click on the drop down menu that says ‘Top Tracks’ and you will see the different genre of music. In case you already have music in your mind, simply type the title of the song on the search bar and hit enter.
Additional Tip: Not satisfied with the track? Try the sound effects by going at YouTube Audio Library . You can create an advance search by customizing the result based on popularity, duration, instrument, mood and genre.
Step 5 Adding the Selected Music
Before you decided to add the music to your video, make sure that it fits the duration of your video. In case you want to know how to add music to YouTube Video, you should do nothing more than to click the ADD TO VIDEO button and it will be automatically integrated into your video.
Step 6 Editing the Music
- After you successfully integrate the music to the video, you will see the title of the music under your video. You also have additional tools that you can use. Let us take a look at the Position audio and the slide bar option a little closer.
- Once You Click the Position Audio Button, you will be able to customize and position your integrated music as well as compress the length of the music. To trim the music, simply put your pointer either at the end or the beginning of the music. When you want to move the audio, you may just drag the music.
- The ‘Only Music’ option located at the left side of the Position Audio can be used to adjust the volume of the music. In case you want to remove the original sound from the video, drag the pointer at the right most.
Step 7 Saving the Changes
When you save the edited video, you can save it as a separate video, or you can overwrite the existing video.
Additional Reminder: You can’t add multiple audio tracks in one video with youtube video editor, if you want to get an advanced audio editing, check this article How to mix audio tracks into one file for video
Section 2: Using Audio Library
Since YouTube has shut down the Video Editor module in 2017, you can now add music in YouTube Video Editor Module. Though there are plentiful video editing software for YouTube videos , you can also download Free Music and Sound Effects in YouTube Audio Library first and then add it to your video clips. Here is how to add music to YouTube video with YouTube Audio Library.
Step 1 Click on Audio Library
This time instead of clicking the Video Manager option, you will have to click on the Create option and choose Audio Library.
Step 2 Download target free music or sound effect
In YouTube Audio Library, you will find some free music sounds and sound effects available. You can search music in the library and filter genre, duration, mood, attribution and instrument properties. Click the download icon to download this royalty free music and sound effect to your computer. And then you can combine the audio and video and make it as a video with music sound. You can download multiple audio files and then add multiple songs to the YouTube video.
Step 3 Add Music to Video and Edit the music track
There are numerous video editors that you can add the downloaded music from YouTube Audio Library to the video. You can check our guide abouthow to edit YouTube videos in Windows Movie Maker orhow to add music to video in iMovie . While, as we described before, Filmora video editor is one of the best video editor for YouTubers. And here is how to add music to YouTube videos with Filmora . You can edit the treble, bass, pan and volume. However, it is impossible for you to position the music in a desired spot. If you want to get more control on your audio tracks, please read this article to know how to add audio effects to your video
Importing the video and audio
Importing media files to Filmora is easy. After launching Filmora, import all the files to the media library first and then drag and drop the target video and audio to the timeline. One of the best things of using Filmora to edit YouTube video is there is a built-in Music Library which including some royalty free music sound and sound effects as well.
Detach the original audio from video [Optional]
If you want to remove the recorded original audio file from video , just right click the video and then select Audio Detach option and the audio will be separated from the video automatically and then delete the audio.
What’s more, you can also use Filmora to remove the background noise and then keep the original audio as well.
Edit the Music
In Filmora, you can change the video and audio speed, add fade in and fade out to the music and change the music sound.
Read More to Get: 10 Best Music Video Makers >>
Watch the video below to check how to empower your imagination with Filmora
Richard Bennett
Richard Bennett is a writer and a lover of all things video.
Follow @Richard Bennett
Also read:
- 2024 Approved Convert Spotify Playlist To YouTube 5 Best Tools
- Feast of Fame Top 30 Show Titles to Sizzle Viewership
- [Updated] Break Bot Patterns, Enhance Organic Video Reach
- In 2024, Boost Your Revenue Yielding Earnings From YouTube at 500 Followers
- [New] Curating the Best Video Game Openers on YT No Money, Max Impact?
- [Updated] 14- YouTube AdSense Earnings How Much Does AdSense Pay per 1,000 Views
- Maximizing Impact with Your YouTube Commercial
- In 2024, Easy Start The Definitive Guide to Free Channel Openers
- Step-By-Step Guide to Captivating YouTube Live Thumbnails
- 2024 Approved Creating Profit on YouTube The Ultimate List of Top Business Channels
- [New] Accelerate Thumbnail Designs for Professional Valorant Portraits
- 7 Comedy YouTube Video Ideas That Funny People Can Try
- [Updated] Cutting-Edge Taggification Top 7 Affordable Online Extractors for YouTube
- Maximizing YouTube Experience Through a Subscription
- From Novice to Pro Mastering the Craft of YT Shorts
- In 2024, Enhancing Video Discoverability with Ideal Thumbnail Widths and Height
- Dimensions for YouTube Shorts, Facebook, Instagram and Other Social Apps
- Finding the Central Node of YouTube Video Management
- Plating Perfection 30 Unique and Appealing Recipe Channels
- [Updated] 9 Premier Apps for Extracting and Saving YouTube Videos on Android
- [Updated] Crafting Compelling Proposals A FameBit Guide to Channel Ads
- Demystifying YouTube Edits An In-Depth Analysis and Review for 2024
- [Updated] Can You Legally Capture Video From YouTube?
- Exploring New Frontiers in Online Videos The Best Non-YouTube Alternatives
- Turning Traffic Into Cash Calculating the Essential Youtube Number
- [New] Diving Deep YouTube's Best Immersive Experiences
- Cementing Climactic Conclusions for 2024
- Designing Memorable Try-On Videos for Online Audiences
- Examining the Potential of 4-Second Subscriptions
- [New] Access Unlimited Free, High-Quality Green Screen Footage Online
- Ultimate Choice 5 Sound Devices for Streamers
- Beginner's Guide Adding Text Overlays on YouTube
- [New] Crafting Success Pushing Your Video Into Top Charts
- 2024 Approved Curate a Perfect Playlist on YouTube A Step-by-Step Guide
- Updated Excellence in Audio Manipulation IOS Devices Top Selection for 2024
- [Updated] How to Install and Use Snapchat on Your Mac?
- Updated 2024 Approved Essential Web-Based Utilities for Enhancing Sound Clarity
- New Virtual Error Sounds Library 2023 – Complimentary Access and Downloads
- Proven Tactic for Weaving GoPro Content in Cohesive Virtual Spherical Films
- New In 2024, Essential Mobile Audio Cutting Software The Ultimate List for iPhones and Tablets
- Unmatched Stability The Top 10 Camera Gimbals Ranking #1-#10
- [Updated] Perfecting Music in Instagram Videos & Stories
- [Updated] In 2024, Unlocking Full Potential Advanced NVIDIA Recorder Tips
- [New] 8 Premier Online Photo Frame Creators Revealed
- Updated 2024 Approved Unmissable 4K Footage The Best of the Best
- Speedy Streams IOS Media on Your PC
- Is GSM Flasher ADB Legit? Full Review To Bypass Your Vivo Y200FRP Lock
- 2024 Approved Efficiently Capturing Footage for Ideal Snaps via Mac
- Want to Uninstall Google Play Service from Poco X6? Here is How | Dr.fone
- 2024 Approved Tunefab vs Competitors Screen Recorder Showdown
- 2024 Approved Full Screen Fiasco Resolved in Obs
- [Updated] Instagram Video Performance Mobile & Desktop Strategies for 2024
- In 2024, Simple and Effective Ways to Change Your Country on YouTube App Of your Oppo A18 | Dr.fone
- Title: "Jump Into Sub4sub - Guide Awaits to Ensure Success"
- Author: Brian
- Created at : 2024-05-25 12:18:25
- Updated at : 2024-05-26 12:18:25
- Link: https://youtube-video-recordings.techidaily.com/jump-into-sub4sub-guide-awaits-to-ensure-success/
- License: This work is licensed under CC BY-NC-SA 4.0.
