
:max_bytes(150000):strip_icc()/PS5-Slim-ff00c195f61a42309972eefc60cb0fb0.jpg)
"Interactive Subscription Buttons - Filmora's Guide to Animated Sign-Up Bars"
Interactive Subscription Buttons - Filmora’s Guide to Animated Sign-Up Bars
How to Make Your YouTube Animated Subscribe Button Easily With Filmora

Richard Bennett
Mar 27, 2024• Proven solutions
The main goal of every content creator is to increase its audience to expand its reach and views. To do so, it’s essential to provide something unique and different to the viewer. Without providing them the content they are looking for, it is impossible to grow your channel and reach. Once your content is ready and you are getting many views, it is essential to make these potential viewers your permanent viewers. The animated subscribe button will help you achieve this goal. While your viewers are watching your videos, you must remind them about subscribing to your channel for receiving such incredible content in the future. Subscribe animation plays a vital role in converting your viewers into subscribers.
There are so many platforms on the internet from where you can get Youtube subscribe button animation free, and you can also purchase these subscribe png gifs. But creating your own animated subscribe button can make you stand out from the crowd and make your videos unique and exclusive. Because it enables you to design it the way you want according to your brand, so, let’s create your own subscribe animation using Wondershare Filmora .
Step-By-Step guide
Step 1: To get started,open Filmora X. On your upper left corner, click on the “Sample Colors,” select the Green color and drag it to Video Track into the timeline. We are using a Green background to easily remove it using the green screen feature in Filmora to use it in our future projects after exporting it, without creating it again. Adjust the duration of this track according to your requirement. In my case, I am trying to make an animated subscribe button of 5 seconds.
Step 2: Lock this track by clicking on the lock icon to work on subscribe animation without disturbing the background easily.
Step 3: Now it’s time to design the subscribe png gif. Go to the Sample colors again and drag the red color into the time above the green background.
Step 4: Double click on the red color in the timeline and adjust its size. Make it look like a subscribe button that is a rectangle and place it at the bottom center of the background. You can put it anywhere you want it to appear in your future videos.
Step 5: Now, let’s add Subscribe text into the button. Go to the Title and select any style that you like. “Basic 6” will work perfectly fine for this purpose. Drag and drop it into the timeline above all tracks.
Step 6: Double click on the Title on the timeline and edit it with “Subscribe” and place it under the red rectangle and click OK.
Step 7: We have put a cursor that can click on the animated subscribe button. You can use Google Search to find a transparent cursor. Make sure to save it in png format. Download it and import it into Filmora.
Step 8: Drag and drop the cursor into the timeline and place it above all the other three tracks to make it prominent. Adjust the size of the cursor place it on the Subscribe button where you want it to appear.
Step 9: Now, it’s time to animate the design using keyframes. First of all, let’s animate the red rectangle. Double click on the red color on the timeline. Go to the ‘Animation’ tab and then click ‘Customize.’ Move to the 1 second in the timeline and click ‘Add.’
Step 10: Now go back to the beginning in the timeline and adjust the scale to 0%. It will make the rectangle pop up when you play the clip.
Step 11: Text needs to be animated as well to match it with the rectangle. Double click on the text in the timeline and click ‘ADVANCED.’
Step 12: In this Advance text editor, go to the ‘Animation’ tab and select any animation that you like. On the timeline under the preview screen, adjusts the dark areas according to the time you set on the rectangle, which was 1 second. We want the text to appear on the screen in 1 second, like the rectangle. Also, adjust the ending time when you want the text to disappear again. We have set it on 4 seconds. Which means it will start to fade after 4 seconds.
Step 13: Now, to animate the mouse cursor, we will use the same process we used for a rectangle that is key framing. Double click on the cursor track on the timeline and move the time on your timeline to a point when you want the cursor to appear. Now add a key frame by clicking ‘Add’.
Step 14: Now jump back to a point in your timeline, when the cursor will start appearing from outside the screen. Move the cursor outside the screen from where you want it to start moving toward the subscribe animation.
Step 15: To animate the click of the cursor, move ahead a little bit into your timeline and scale down the cursor to around 70%. Move it a little further and scale it up to 100%.
Step 16: You can add the sound of mouse click to make it more realistic. You can find this sound anywhere on the internet. Download it and import it into Filmora. Now place it into the timeline where it can match the movement of the cursor.
Step 17: Now it’s time to make this subscribe animation button disappear. Move forward into the time to the end, at around 4 seconds. Double click on the red button in the timeline and add a key frame at its actual scale.
Step 18: After that, move further in the timeline to the end and make its scale 0. It will make it disappear.
Step 19: Do the same with the cursor. Double click on the cursor in the time and add a key frame at its actual position.
Step 20: Move ahead when you want it to disappear. Move the cursor out of the screen and click ‘OK’.
Step 21: Your Subscribe png gif is ready to be exported and used in your videos. Click on export and choose from various formats and options to choose from while exporting it.
You may also like: How to Get People to Subscribe Channel
Conclusion:Your own Animated Subscribe Button is ready to be used in your future videos and projects. This is a ready-to-use subscribe button that can be easily used using the green screen effect in Filmora. Just import the clip, remove the green screen, and you are good to go. You can also customize this Subscribe Animation using your channel and more. Keep experimenting with new things using Filmora.


Richard Bennett
Richard Bennett is a writer and a lover of all things video.
Follow @Richard Bennett
Richard Bennett
Mar 27, 2024• Proven solutions
The main goal of every content creator is to increase its audience to expand its reach and views. To do so, it’s essential to provide something unique and different to the viewer. Without providing them the content they are looking for, it is impossible to grow your channel and reach. Once your content is ready and you are getting many views, it is essential to make these potential viewers your permanent viewers. The animated subscribe button will help you achieve this goal. While your viewers are watching your videos, you must remind them about subscribing to your channel for receiving such incredible content in the future. Subscribe animation plays a vital role in converting your viewers into subscribers.
There are so many platforms on the internet from where you can get Youtube subscribe button animation free, and you can also purchase these subscribe png gifs. But creating your own animated subscribe button can make you stand out from the crowd and make your videos unique and exclusive. Because it enables you to design it the way you want according to your brand, so, let’s create your own subscribe animation using Wondershare Filmora .
Step-By-Step guide
Step 1: To get started,open Filmora X. On your upper left corner, click on the “Sample Colors,” select the Green color and drag it to Video Track into the timeline. We are using a Green background to easily remove it using the green screen feature in Filmora to use it in our future projects after exporting it, without creating it again. Adjust the duration of this track according to your requirement. In my case, I am trying to make an animated subscribe button of 5 seconds.
Step 2: Lock this track by clicking on the lock icon to work on subscribe animation without disturbing the background easily.
Step 3: Now it’s time to design the subscribe png gif. Go to the Sample colors again and drag the red color into the time above the green background.
Step 4: Double click on the red color in the timeline and adjust its size. Make it look like a subscribe button that is a rectangle and place it at the bottom center of the background. You can put it anywhere you want it to appear in your future videos.
Step 5: Now, let’s add Subscribe text into the button. Go to the Title and select any style that you like. “Basic 6” will work perfectly fine for this purpose. Drag and drop it into the timeline above all tracks.
Step 6: Double click on the Title on the timeline and edit it with “Subscribe” and place it under the red rectangle and click OK.
Step 7: We have put a cursor that can click on the animated subscribe button. You can use Google Search to find a transparent cursor. Make sure to save it in png format. Download it and import it into Filmora.
Step 8: Drag and drop the cursor into the timeline and place it above all the other three tracks to make it prominent. Adjust the size of the cursor place it on the Subscribe button where you want it to appear.
Step 9: Now, it’s time to animate the design using keyframes. First of all, let’s animate the red rectangle. Double click on the red color on the timeline. Go to the ‘Animation’ tab and then click ‘Customize.’ Move to the 1 second in the timeline and click ‘Add.’
Step 10: Now go back to the beginning in the timeline and adjust the scale to 0%. It will make the rectangle pop up when you play the clip.
Step 11: Text needs to be animated as well to match it with the rectangle. Double click on the text in the timeline and click ‘ADVANCED.’
Step 12: In this Advance text editor, go to the ‘Animation’ tab and select any animation that you like. On the timeline under the preview screen, adjusts the dark areas according to the time you set on the rectangle, which was 1 second. We want the text to appear on the screen in 1 second, like the rectangle. Also, adjust the ending time when you want the text to disappear again. We have set it on 4 seconds. Which means it will start to fade after 4 seconds.
Step 13: Now, to animate the mouse cursor, we will use the same process we used for a rectangle that is key framing. Double click on the cursor track on the timeline and move the time on your timeline to a point when you want the cursor to appear. Now add a key frame by clicking ‘Add’.
Step 14: Now jump back to a point in your timeline, when the cursor will start appearing from outside the screen. Move the cursor outside the screen from where you want it to start moving toward the subscribe animation.
Step 15: To animate the click of the cursor, move ahead a little bit into your timeline and scale down the cursor to around 70%. Move it a little further and scale it up to 100%.
Step 16: You can add the sound of mouse click to make it more realistic. You can find this sound anywhere on the internet. Download it and import it into Filmora. Now place it into the timeline where it can match the movement of the cursor.
Step 17: Now it’s time to make this subscribe animation button disappear. Move forward into the time to the end, at around 4 seconds. Double click on the red button in the timeline and add a key frame at its actual scale.
Step 18: After that, move further in the timeline to the end and make its scale 0. It will make it disappear.
Step 19: Do the same with the cursor. Double click on the cursor in the time and add a key frame at its actual position.
Step 20: Move ahead when you want it to disappear. Move the cursor out of the screen and click ‘OK’.
Step 21: Your Subscribe png gif is ready to be exported and used in your videos. Click on export and choose from various formats and options to choose from while exporting it.
You may also like: How to Get People to Subscribe Channel
Conclusion:Your own Animated Subscribe Button is ready to be used in your future videos and projects. This is a ready-to-use subscribe button that can be easily used using the green screen effect in Filmora. Just import the clip, remove the green screen, and you are good to go. You can also customize this Subscribe Animation using your channel and more. Keep experimenting with new things using Filmora.
Richard Bennett
Richard Bennett is a writer and a lover of all things video.
Follow @Richard Bennett
Strategic Insightfulness: Comparing Your Channel to Competitors’ Crafts
YouTube Analytics – How to analyze your and Competitor’s YouTube Video
Richard Bennett
Mar 27, 2024• Proven solutions
Tracking your brand’s YouTube metrics is not enough to ensure success in YouTube. Unless you garner deep insights of your competitors. You must be thinking how can you gauge their company insights using YouTube and track the data movement as well. There is nothing to worry about, we have got you covered. We will show you how to analyze your own channel as well as that of your competitors’ YouTube analytics. Let’s now explore about it!
How to analyze your own YouTube channel/video?
It is important to have reliable YouTube analytics tools for your brand, as videos on YouTube are searchable through Google. They contribute to generate organic traffic for you using both Google and YouTube as a medium. YouTube has a default dedicated analytics mechanism to measure how the video fares in YouTube to gain the most out of it.
Here we have collated the broadly used YouTube insights to ensure that your highly equipped, SEO compatible video engages more audience and performs well. The matrix sums up the most essential parts of YouTube analytics. Let’s go through them.
1. Views
Though, views determine the number of people clicked on a certain video on YouTube, it’s impossible to figure out whether the video has been watched till the end or not. Moreover, they can be altered through clickbait tricks and hence YouTube doesn’t solely put much value on them.
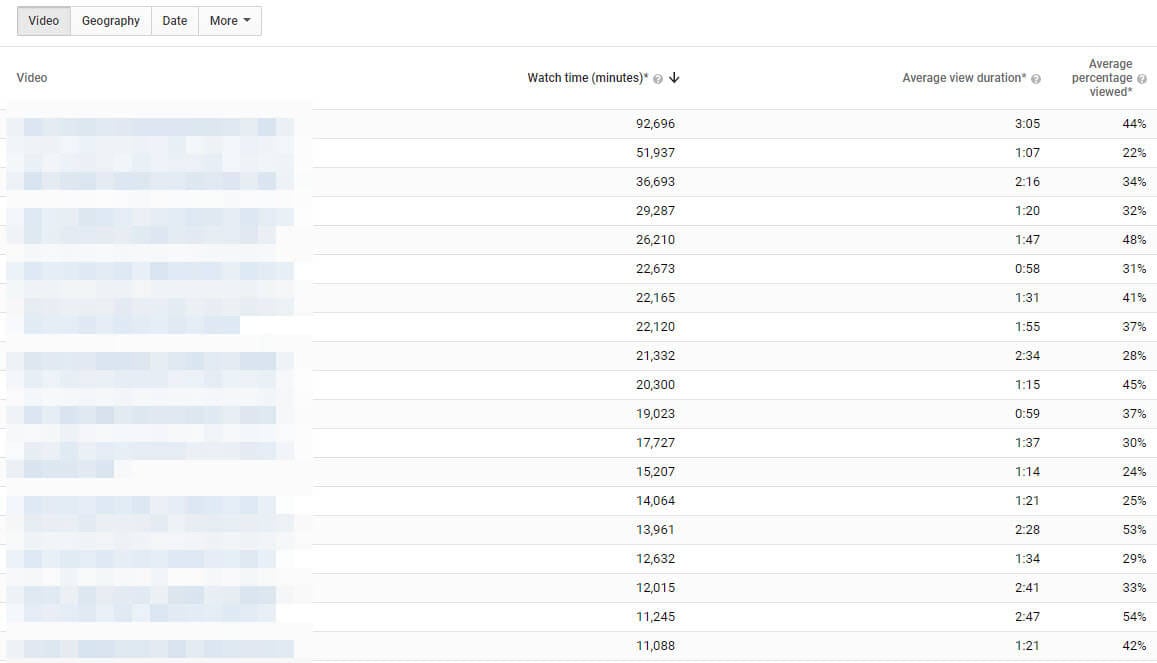
Views along with watch time turn out to be the best bet. Watch time sums up the total amount of time spent (in terms of minutes) on your brand’ videos. With the updated dashboard it becomes easy to get the YouTube analytics and gauge the video’s performance. Using the average view duration, you can know whether your video is being watched till the end or not.
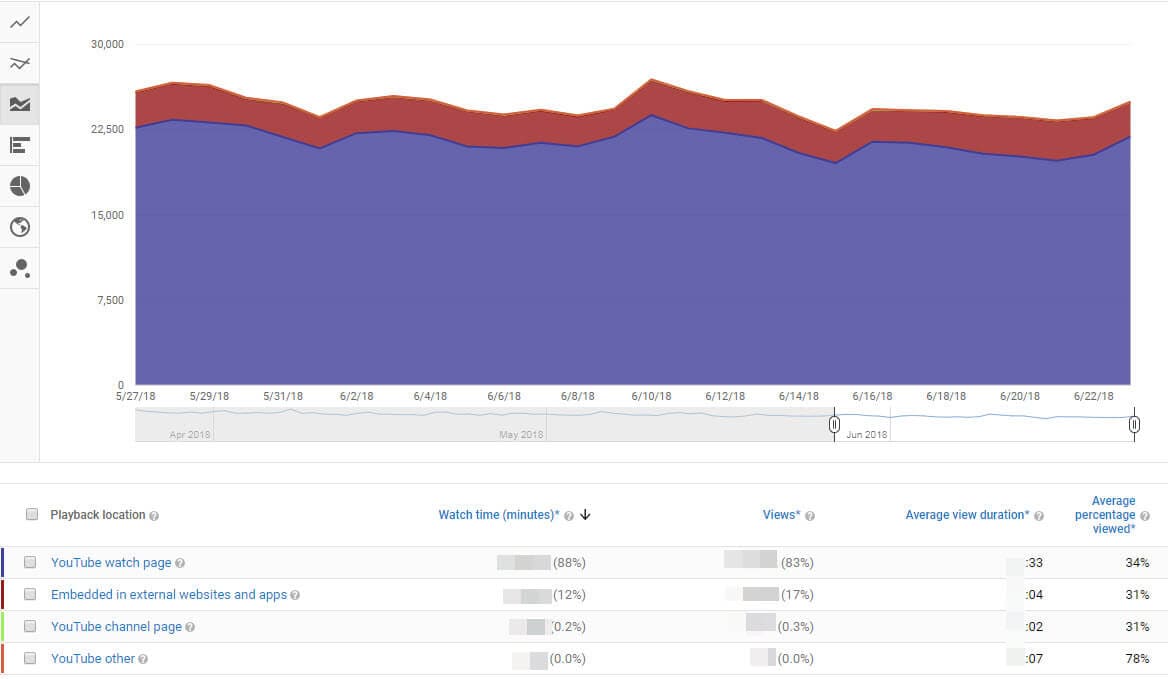
2. Playback Location
As ‘Playback locations’ of YouTube videos can reveal where does all the traffic come from, it would help your channel figure out for which location the video has fared well. It will guide you to reach the backlinks locations/sites. Knowing the popular locations for your YouTube video being played, you can know whether YouTube is the search engine or they have been diverted from somewhere else. Depending on the video playing locations, the views will be segregated in to embedded video, YouTube watch page, mobile devices, and YouTube channel page. Understanding location specific views would help you decide where should you focus to enhance the performance of your video.
3. Demographics
The demographics page helps you get YouTube insights, using them you can know the audience in a gender and location specific manner. For local businesses targeting a certain region, YouTube analytics would prove to be a boon. You can also know the geography and device used by the viewers with this feature. Understanding the gender and location of people will help you create dedicated product videos that would be helpful to them.

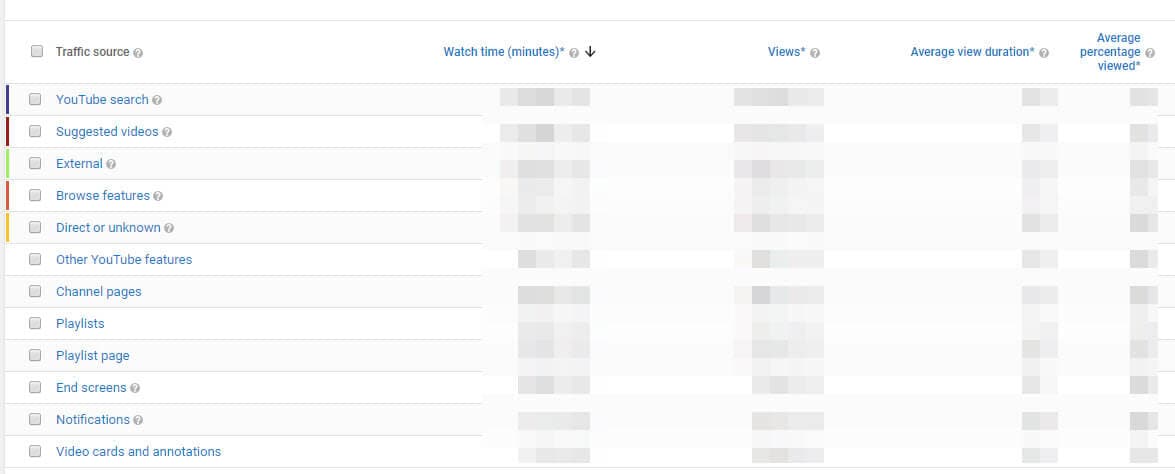
4. Traffic sources
Understanding the source of your YouTube video’s traffic would help you track the prominent keywords that viewers use for landing at your YouTube video. You can figure out their choice and their search patterns this way. The YouTube insights will show you whether the viewers found your video by searching YouTube, a channel on YouTube, through suggested videos, or an external link. The YouTube Analytics tool’s panel would assist you in finalizing the most beneficial traffic source for your brand. You can optimize your video and keyword strategy with this.
5. Audience Retention
This data explains how far your video has engaged your audience. Along with views, the duration that a viewer is on your video weighs too. From the audience retention page, you can find out the specific time that a viewer has exited your video and see what made them do so. There are 2 types of audience retention features – absolute audience retention and relative audience retention.
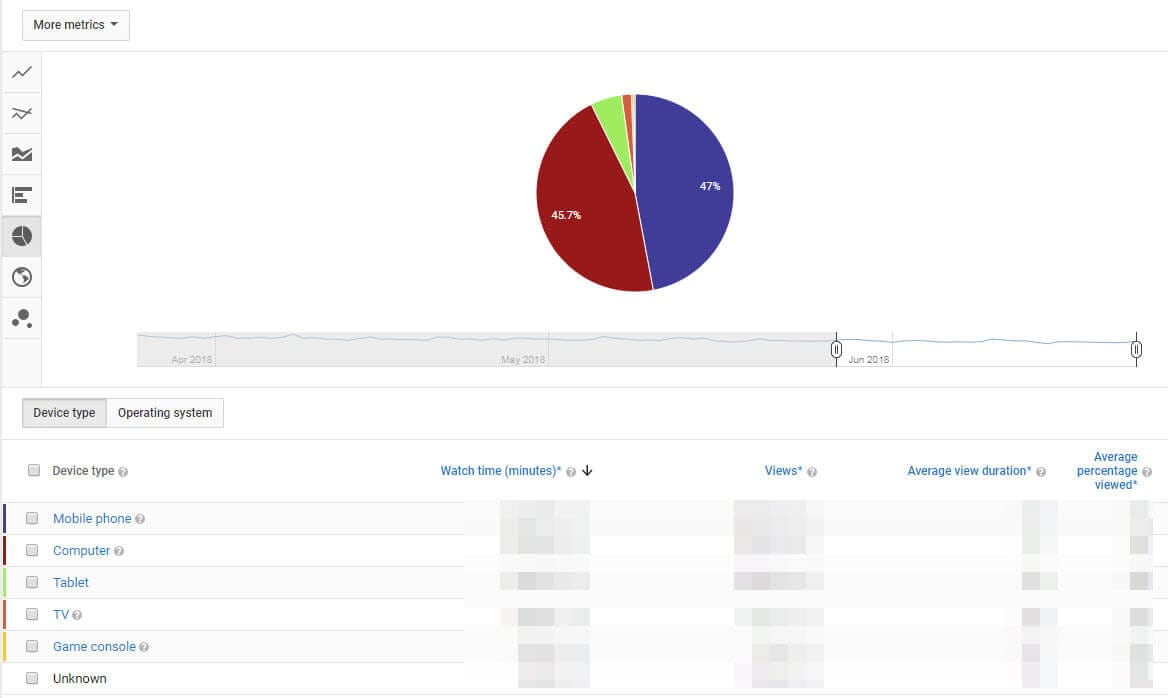
6. Devices
It is important to know which device is being used to watch the video. The metrics is distributed among mobile phones, computer, TV, tablet etc. you will be able to understand whether your video needs to be optimized for a certain video or not.
7. Likes and dislikes
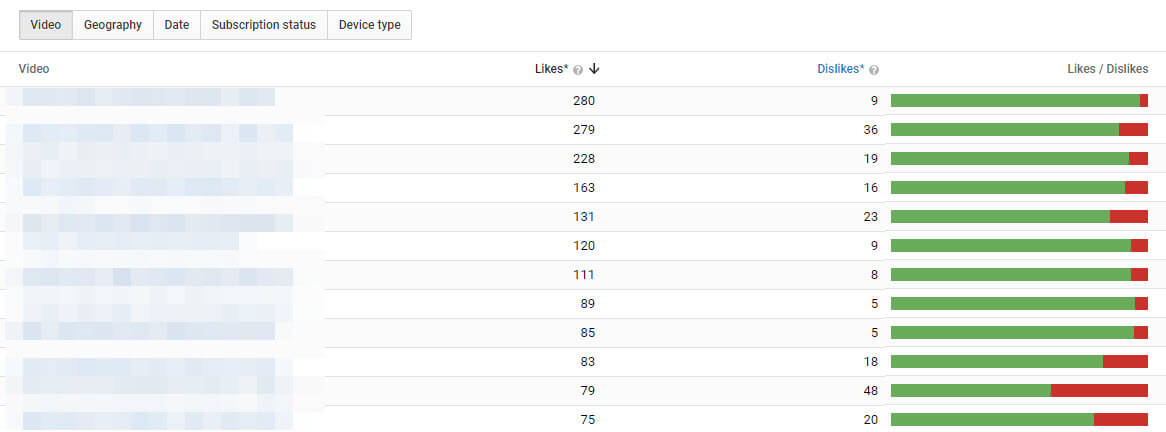
YouTube insights gauge the audience acceptance for your video by the number of likes and dislikes. Videos with a huge number of like implies that it is loved by people, though, the quality of video can’t exactly be defined by the number of likes or dislikes. Even the best quality video created for asking opinions about a certain situation/issue might be good enough but still get dislikes.
8. Subscribers
YouTube analytics help you determine the engagement metrics to explain the origin of your subscribers. It includes both their geo-location, the date of subscription, and the source/medium they used to land with your video on YouTube. You can observe the number of people subscribing and unsubscribing from your YouTube channel.
The subscription stream enables your audience to get suggestions for new videos from your channel and offer better exposure to the service and products you offer.
You May Also Like : How to Get More Subscribers
9. Annotations
While considering YouTube Analytics, it is essential to understand that there are annotations to guide viewers to your business site for more content. It is not necessary that the content is video only, it might include a blog post as well. This will let you understand the click through rate and ‘close’ rates for every annotation. This in turn will assist you in optimizing how to reach your audience and where to place the annotations.

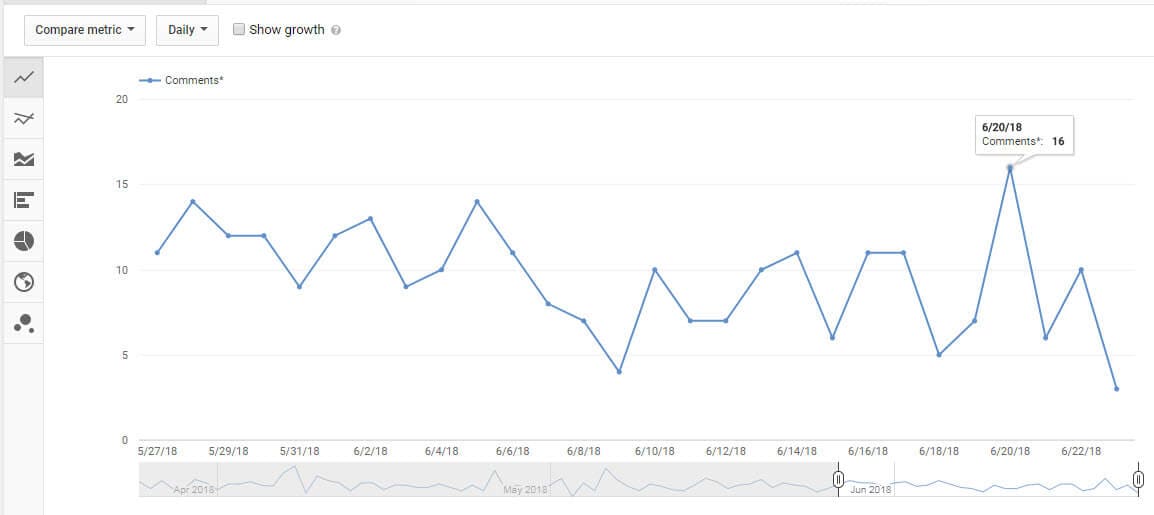
10. Comments
Audience engagement on any YouTube video can easily be gauged by using the vital aspect known as comments. Either it touched a chord in their heart, inspired or motivated them, or simply made them smile, the comments will say it all. Sometimes the audience simply taps ‘Like’ in place of commenting at their convenient.
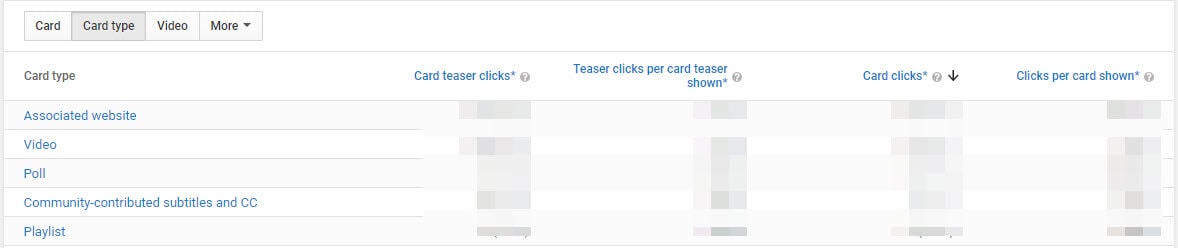
11. Cards
Cards is a new feature in YouTube analytics and aimed at replacing annotations. This will improve user interactivity of any video and accelerate the engagement. They will act as call to action for informing visitors regarding playlists, videos, merchandising, fan funding, and associated website etc.
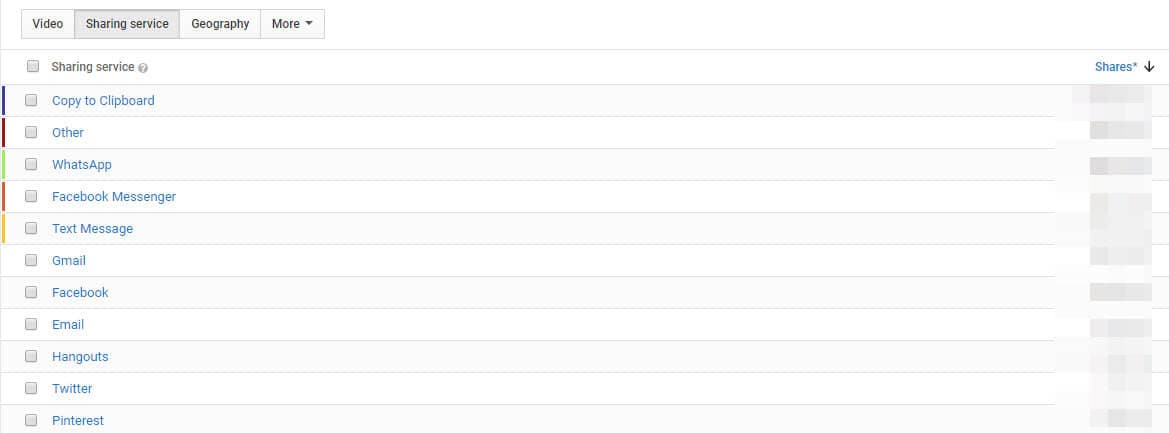
12. Sharing
This aspect sums up the amount of shares of the YouTube video across different social networks along with the share date. Google ranking is influenced with the share numbers, as higher the number more the chances of unique backlinks for your videos.
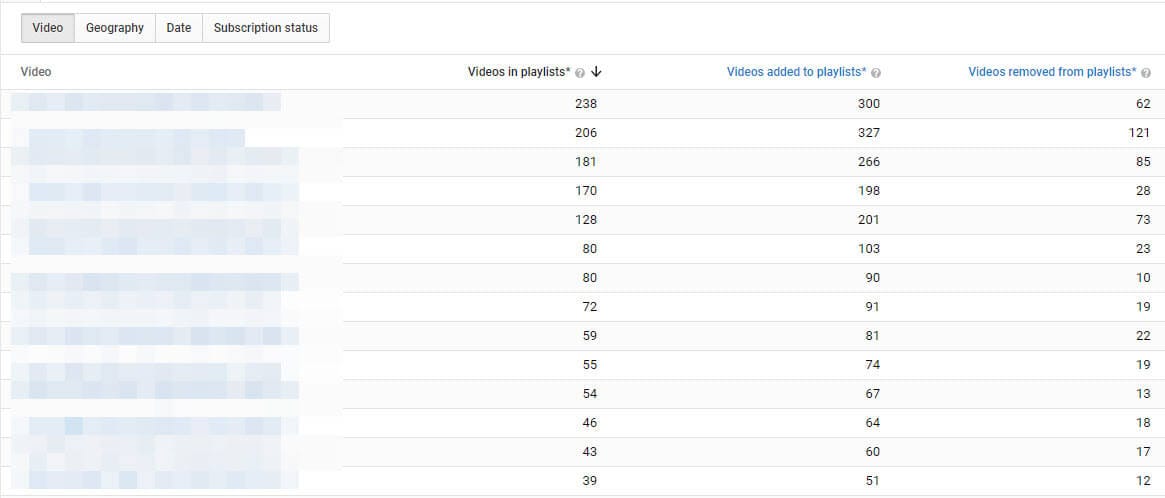
13. Videos in playlists
Favorites has been renamed to ‘Videos in playlists’. Your reach broadens as people keep marking your videos as favorites on their playlist. This is visible to the public on the YouTube channel itself.
How to analyze your competitors
Although, you can’t see the dashboard data of your competitor, there are still some ways to observe and study your competitors’ successful videos and from their views, favorites, ratings, and comments find out the driving force behind it.
For example, reading the comments and see what they are saying. Notice both the positive and negative ones so that you can incorporate the ideas in your videos. You can also make a better video by understanding what a specific demographic region is fond of watching in the said niche.
Or you can use those analyzing tools below to discover the more stats of your competitors.
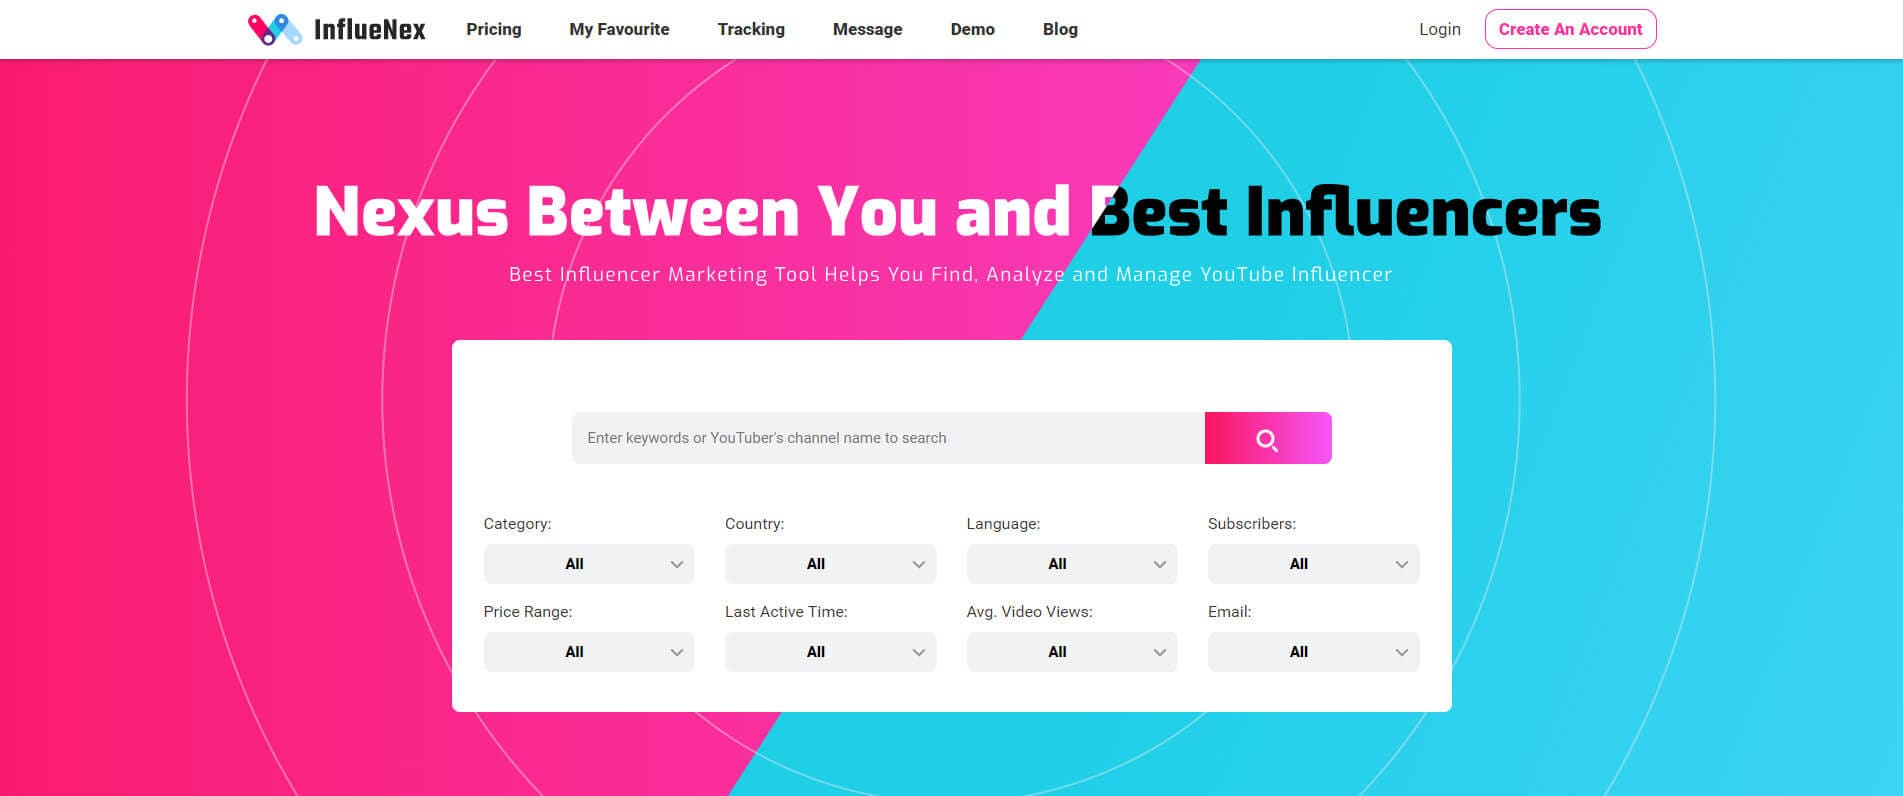
1. InflueNex
InflueNex is a helpful influencer marketing tool for Analyzing, searching, and managing YouTubers. With the help of this YouTube analytics tool, you’re able to learn your competitors’ channels and videos with detailed information.
2. Rival IQ
This YouTube analytics tool helps you increase social media engagement, conduct competitive analysis to track competition, discovers new content ideas for your target audience. You can use it to leverage your foothold in YouTube.
3. SocialBlade
SocialBlade helps you gain YouTube insights and enables you to understand how your rival brands fare. You can learn from them and enhance your own strategy to beat them.
Read More to Get: 5 Methods to Go Frame by Frame on YouTube Video >>
Richard Bennett
Richard Bennett is a writer and a lover of all things video.
Follow @Richard Bennett
Richard Bennett
Mar 27, 2024• Proven solutions
Tracking your brand’s YouTube metrics is not enough to ensure success in YouTube. Unless you garner deep insights of your competitors. You must be thinking how can you gauge their company insights using YouTube and track the data movement as well. There is nothing to worry about, we have got you covered. We will show you how to analyze your own channel as well as that of your competitors’ YouTube analytics. Let’s now explore about it!
How to analyze your own YouTube channel/video?
It is important to have reliable YouTube analytics tools for your brand, as videos on YouTube are searchable through Google. They contribute to generate organic traffic for you using both Google and YouTube as a medium. YouTube has a default dedicated analytics mechanism to measure how the video fares in YouTube to gain the most out of it.
Here we have collated the broadly used YouTube insights to ensure that your highly equipped, SEO compatible video engages more audience and performs well. The matrix sums up the most essential parts of YouTube analytics. Let’s go through them.
1. Views
Though, views determine the number of people clicked on a certain video on YouTube, it’s impossible to figure out whether the video has been watched till the end or not. Moreover, they can be altered through clickbait tricks and hence YouTube doesn’t solely put much value on them.
Views along with watch time turn out to be the best bet. Watch time sums up the total amount of time spent (in terms of minutes) on your brand’ videos. With the updated dashboard it becomes easy to get the YouTube analytics and gauge the video’s performance. Using the average view duration, you can know whether your video is being watched till the end or not.
2. Playback Location
As ‘Playback locations’ of YouTube videos can reveal where does all the traffic come from, it would help your channel figure out for which location the video has fared well. It will guide you to reach the backlinks locations/sites. Knowing the popular locations for your YouTube video being played, you can know whether YouTube is the search engine or they have been diverted from somewhere else. Depending on the video playing locations, the views will be segregated in to embedded video, YouTube watch page, mobile devices, and YouTube channel page. Understanding location specific views would help you decide where should you focus to enhance the performance of your video.
3. Demographics
The demographics page helps you get YouTube insights, using them you can know the audience in a gender and location specific manner. For local businesses targeting a certain region, YouTube analytics would prove to be a boon. You can also know the geography and device used by the viewers with this feature. Understanding the gender and location of people will help you create dedicated product videos that would be helpful to them.
4. Traffic sources
Understanding the source of your YouTube video’s traffic would help you track the prominent keywords that viewers use for landing at your YouTube video. You can figure out their choice and their search patterns this way. The YouTube insights will show you whether the viewers found your video by searching YouTube, a channel on YouTube, through suggested videos, or an external link. The YouTube Analytics tool’s panel would assist you in finalizing the most beneficial traffic source for your brand. You can optimize your video and keyword strategy with this.
5. Audience Retention
This data explains how far your video has engaged your audience. Along with views, the duration that a viewer is on your video weighs too. From the audience retention page, you can find out the specific time that a viewer has exited your video and see what made them do so. There are 2 types of audience retention features – absolute audience retention and relative audience retention.
6. Devices
It is important to know which device is being used to watch the video. The metrics is distributed among mobile phones, computer, TV, tablet etc. you will be able to understand whether your video needs to be optimized for a certain video or not.
7. Likes and dislikes
YouTube insights gauge the audience acceptance for your video by the number of likes and dislikes. Videos with a huge number of like implies that it is loved by people, though, the quality of video can’t exactly be defined by the number of likes or dislikes. Even the best quality video created for asking opinions about a certain situation/issue might be good enough but still get dislikes.
8. Subscribers
YouTube analytics help you determine the engagement metrics to explain the origin of your subscribers. It includes both their geo-location, the date of subscription, and the source/medium they used to land with your video on YouTube. You can observe the number of people subscribing and unsubscribing from your YouTube channel.
The subscription stream enables your audience to get suggestions for new videos from your channel and offer better exposure to the service and products you offer.
You May Also Like : How to Get More Subscribers
9. Annotations
While considering YouTube Analytics, it is essential to understand that there are annotations to guide viewers to your business site for more content. It is not necessary that the content is video only, it might include a blog post as well. This will let you understand the click through rate and ‘close’ rates for every annotation. This in turn will assist you in optimizing how to reach your audience and where to place the annotations.
10. Comments
Audience engagement on any YouTube video can easily be gauged by using the vital aspect known as comments. Either it touched a chord in their heart, inspired or motivated them, or simply made them smile, the comments will say it all. Sometimes the audience simply taps ‘Like’ in place of commenting at their convenient.
11. Cards
Cards is a new feature in YouTube analytics and aimed at replacing annotations. This will improve user interactivity of any video and accelerate the engagement. They will act as call to action for informing visitors regarding playlists, videos, merchandising, fan funding, and associated website etc.
12. Sharing
This aspect sums up the amount of shares of the YouTube video across different social networks along with the share date. Google ranking is influenced with the share numbers, as higher the number more the chances of unique backlinks for your videos.
13. Videos in playlists
Favorites has been renamed to ‘Videos in playlists’. Your reach broadens as people keep marking your videos as favorites on their playlist. This is visible to the public on the YouTube channel itself.
How to analyze your competitors
Although, you can’t see the dashboard data of your competitor, there are still some ways to observe and study your competitors’ successful videos and from their views, favorites, ratings, and comments find out the driving force behind it.
For example, reading the comments and see what they are saying. Notice both the positive and negative ones so that you can incorporate the ideas in your videos. You can also make a better video by understanding what a specific demographic region is fond of watching in the said niche.
Or you can use those analyzing tools below to discover the more stats of your competitors.
1. InflueNex
InflueNex is a helpful influencer marketing tool for Analyzing, searching, and managing YouTubers. With the help of this YouTube analytics tool, you’re able to learn your competitors’ channels and videos with detailed information.
2. Rival IQ
This YouTube analytics tool helps you increase social media engagement, conduct competitive analysis to track competition, discovers new content ideas for your target audience. You can use it to leverage your foothold in YouTube.
3. SocialBlade
SocialBlade helps you gain YouTube insights and enables you to understand how your rival brands fare. You can learn from them and enhance your own strategy to beat them.
Read More to Get: 5 Methods to Go Frame by Frame on YouTube Video >>
Richard Bennett
Richard Bennett is a writer and a lover of all things video.
Follow @Richard Bennett
Also read:
- UltimateSoundEdit Pro Professional PC Film Crafting
- [Updated] Breakthrough Strategies for Peak Video Viewership Times
- [Updated] 2024 YouTube Business Boost Enrolling in the Partner Program Now
- Craft Stellar YouTube Thumbnails with These 8 Software Alternatives
- In 2024, Easily Transform YouTube Music Into MP3 for Mac OS
- [Updated] Apex Top YouTube Videos Watch Count Heaven
- In 2024, Capture Every Angle – How to Create Dynamic, Viewpoint-Driven Reaction Vids for YouTube Success
- Setting Sail on the Content Sea Your YouTube Account
- In 2024, Are There Risks to Influencing View Counts Financially?
- In 2024, Creating Memorable YouTube Shorts - 10 Must-Do Tips
- Strategies for Amplifying Your YT Viewership Quickly
- 2024 Approved Breakthrough YouTube Success Essential Tips From Creator Studio Guide
- An Intro to Discovering YouTube Studio Content Creator's Dreamland
- How to Make a Cooking Video in Steps - an Ultimate Guide
- [New] DIY Tips for Affordable YouTube Intro/End Videos
- Decoding the Functionality of YouTube's Media Hub
- From Novice to Content Creator Your YouTube Journey Begins
- [New] Elevate Video Consumption Constructing an Ideal 'Watch Later' List on YouTube
- Explore 9 Simple & Economical Editing Solutions for Your Projects
- Essential Anime Youtube Channels for Daily Happiness for 2024
- Customize Your YouTube Watch Experience (Speed Settings) for 2024
- [New] Boost YouTube Videos' Appeal - 3 Ways to Incorporate Neon Borders
- Maximizing Engagement YouTube Links as a Catalyst
- [New] 8 Unbeatable Zero-Price Software Choices For Online Media Makers
- [Updated] Essential Economic Education Top 15 YouTube Picks
- Pro Video Editing Made Simple The Best Online Video Length Reducers
- [New] Achieve Wider Exposure by Transferring Twitch Broadcasts to YouTube
- [New] Enhance Discoverability with Effective Video Tags
- 2024 Approved Boost Your Channels with These 10 Artisan Banner Creators
- 2024 Approved Boosting Your YouTube with Partner Videos
- Creating on the Side Balancing Employment with YouTube for 2024
- The Detailed Breakdown of YouTube Money
- Unlocking Creative Potential Embedding Online Videos in Slideshows
- 2024 Approved Essential Strategies for Professional-Grade Video Editing
- 2024 Approved Elevate Your Video Popularity Essential SEO Techniques for Success
- Channel Buying Made Simple A Beginner’s Toolkit
- Enhancing YT Experience Handling Several Videos at a Time
- [Updated] Anatomy of an Anti-Viewer Cutting Edge Strategies for Reversed YouTube Videos
- Updated Best 12 Best Freeze Frame Video Editing Examples
- [Updated] In 2024, Your Step-by-Step Path to a Top Facebook Music Video
- Nokia 105 Classic Screen Unresponsive? Heres How to Fix It | Dr.fone
- 2024 Approved Unleash Your Creativity Why Final Cut Pro Trumps Final Cut Express
- In 2024, A Comprehensive Guide to iCloud Unlock From Apple iPhone 13 Online
- Clearer Sounds, Cleaner Listening Approaches to Dismiss Environmental Hiss and Hum for 2024
- [New] Crafting Soft Endings on Soundscapes with Audacity
- In 2024, A Complete Guide to Integrating Azure's Speech Recognition Service
- In 2024, The Blueprint of Visual Communication InstaVideo Marketing Mastery
- Spoofing Life360 How to Do it on ZTE Nubia Z60 Ultra? | Dr.fone
- In 2024, The Ultimate Guide to Get the Rare Candy on Pokemon Go Fire Red On Vivo Y36i | Dr.fone
- In 2024, How to get the dragon scale and evolution-enabled pokemon On Samsung Galaxy A34 5G? | Dr.fone
- Title: "Interactive Subscription Buttons - Filmora's Guide to Animated Sign-Up Bars"
- Author: Brian
- Created at : 2024-05-25 12:17:50
- Updated at : 2024-05-26 12:17:50
- Link: https://youtube-video-recordings.techidaily.com/interactive-subscription-buttons-filmoras-guide-to-animated-sign-up-bars/
- License: This work is licensed under CC BY-NC-SA 4.0.
