
:max_bytes(150000):strip_icc():format(webp)/woman-with-remote-cropped-getty-169707531-5b2ebd5943a1030036b1eb56.jpg)
In 2024, Enlightening Your YouTube Footage with Proper Lighting
Enlightening Your YouTube Footage with Proper Lighting
How To Light Your YouTube Video

Richard Bennett
Oct 26, 2023• Proven solutions
When it comes to sensitivity to light, no consumer-level camera sensor comes close in performance to the human eye. Many newbies to videography, though, don’t think about this when they use their camera indoors and discover that their recorded footage appears too dark.
If you want to use your camera indoors as many YouTubers do, you’ll need to have extra light. But the solution is not as simple as surrounding yourself with lamps that are all randomly placed.
Below, I’ll go into detail on how you can set up your lighting equipment to make your YouTube videos look good.
| Table of Contents Using Light You Already Have Window LightingHome Lighting Home Studio Lighting Light Control3-Point Lighting4-Point Lighting |
|---|
Part 1: Using Light You Already Have
Most beginner YouTubers light their videos with what they already have. That’s what I did to start as well. In the past, my video recording space consisted of natural sunlight coming from my window and ceiling light for times when the sunlight wasn’t strong enough.
1. Window Lighting
The best thing about window lighting is that it’s free. The worst thing about it is that it’s uncontrollable. The amount of light you get in your video can vary with all the changes in the weather.
Window lighting for me was especially difficult to work with because I live in a very rainy and cloudy city, Vancouver, Canada, where we pretty much just get three months of good sun.

Above are two freeze frames from one of Daniel’s past window-lit vlogs. Although these two frames are both from the same vlog, you can see that the image on the right looks brighter due to clearer skies at that moment. These varying amounts of light is what you will have to deal with if you choose to light your YouTube video with window lighting.
2. Home Lighting
Home lighting is another source of light that many new YouTubers use. In the past, when my window light wasn’t strong enough to light my video recording space, I would turn on the ceiling light.

Notice how the color of Daniel’s skin looks much more orange here (above) than the color of the skin in the two side-by-side window lighting examples? The side of the face also appears to look bluer. This all happened because he mixed up different color temperatures shining out of the two lights (cooler window light and warmer ceiling light).
Most home lighting is warmer in its color temperature. If you want to use your home lights without everything being orange-tinted, you’ll need to switch out your light bulbs for daytime LED light bulbs.
Ceiling lights are also typically situated in the center of a room in order to light an entire room evenly. This is not likely to be the best location for your filming video. Since the ceiling light was directly above the face in the above example, you can see harder shadows beneath his cheeks.
Part 2: Home Studio Lighting
If you rather not deal with all the window and home lighting challenges, you can set up studio lighting in your home.
1. Light Control
The first thing you’ll want to do to set up studio lighting in your home is to pick a room to film in and eliminate as much external lighting as you can. Use blinds, curtains, towels, or any thick fabric to block sunlight from shining into your room.
2. 3-Point Lighting
The most common setup for studio lighting is 3-point lighting. For this kind of lighting you’ll need three lights: a key light, a fill light, and a back light (also called a hair light).

Out of the three lights, the key light should be the brightest. When it is positioned to the left of you (as shown in the diagram above) your right side will have shadows.
To minimize the shadows on your right side, use a weaker light as a fill light. You don’t want your fill light to completely eliminate all your shadows or else your shot will look flat.
Lastly, a backlight positioned behind you can give an appealing highlight to the ends of your head and even help to separate your hair from blending into your background if both happen to be dark.
3. 4-Point Lighting
As a YouTuber, you may not only want yourself to be seen optimally with proper lighting, but you may also want your background to be seen optimally, especially if you’ve taken the time to decorate it for your audience.
What you’ll need to ensure that your background is sufficiently lit is 4-point lighting setup. The 4-point lighting setup is the same as a 3-point lighting setup, but with an additional light shining at your background.
For more information on lighting equipment, check out my Top 17 Video Lighting Equipment For YouTubers .
Touch Up YouTube Videos with Filmora
Filmora is one of the best video editing software for YouTube beginners to start the YouTube channel. So, if you find the lighting isn’t perfect after recording, you can use the Auto Color Enhancement feature in Filmora to adjust the color with one-click. Or, you can change the white balance, Light, color, and HSL manually. Filmora also features some presets and LUTs templates , which allows you to apply pre-programmed effects to video for color correction faster.


Richard Bennett
Richard Bennett is a writer and a lover of all things video.
Follow @Richard Bennett
Richard Bennett
Oct 26, 2023• Proven solutions
When it comes to sensitivity to light, no consumer-level camera sensor comes close in performance to the human eye. Many newbies to videography, though, don’t think about this when they use their camera indoors and discover that their recorded footage appears too dark.
If you want to use your camera indoors as many YouTubers do, you’ll need to have extra light. But the solution is not as simple as surrounding yourself with lamps that are all randomly placed.
Below, I’ll go into detail on how you can set up your lighting equipment to make your YouTube videos look good.
| Table of Contents Using Light You Already Have Window LightingHome Lighting Home Studio Lighting Light Control3-Point Lighting4-Point Lighting |
|---|
Part 1: Using Light You Already Have
Most beginner YouTubers light their videos with what they already have. That’s what I did to start as well. In the past, my video recording space consisted of natural sunlight coming from my window and ceiling light for times when the sunlight wasn’t strong enough.
1. Window Lighting
The best thing about window lighting is that it’s free. The worst thing about it is that it’s uncontrollable. The amount of light you get in your video can vary with all the changes in the weather.
Window lighting for me was especially difficult to work with because I live in a very rainy and cloudy city, Vancouver, Canada, where we pretty much just get three months of good sun.
Above are two freeze frames from one of Daniel’s past window-lit vlogs. Although these two frames are both from the same vlog, you can see that the image on the right looks brighter due to clearer skies at that moment. These varying amounts of light is what you will have to deal with if you choose to light your YouTube video with window lighting.
2. Home Lighting
Home lighting is another source of light that many new YouTubers use. In the past, when my window light wasn’t strong enough to light my video recording space, I would turn on the ceiling light.
Notice how the color of Daniel’s skin looks much more orange here (above) than the color of the skin in the two side-by-side window lighting examples? The side of the face also appears to look bluer. This all happened because he mixed up different color temperatures shining out of the two lights (cooler window light and warmer ceiling light).
Most home lighting is warmer in its color temperature. If you want to use your home lights without everything being orange-tinted, you’ll need to switch out your light bulbs for daytime LED light bulbs.
Ceiling lights are also typically situated in the center of a room in order to light an entire room evenly. This is not likely to be the best location for your filming video. Since the ceiling light was directly above the face in the above example, you can see harder shadows beneath his cheeks.
Part 2: Home Studio Lighting
If you rather not deal with all the window and home lighting challenges, you can set up studio lighting in your home.
1. Light Control
The first thing you’ll want to do to set up studio lighting in your home is to pick a room to film in and eliminate as much external lighting as you can. Use blinds, curtains, towels, or any thick fabric to block sunlight from shining into your room.
2. 3-Point Lighting
The most common setup for studio lighting is 3-point lighting. For this kind of lighting you’ll need three lights: a key light, a fill light, and a back light (also called a hair light).
Out of the three lights, the key light should be the brightest. When it is positioned to the left of you (as shown in the diagram above) your right side will have shadows.
To minimize the shadows on your right side, use a weaker light as a fill light. You don’t want your fill light to completely eliminate all your shadows or else your shot will look flat.
Lastly, a backlight positioned behind you can give an appealing highlight to the ends of your head and even help to separate your hair from blending into your background if both happen to be dark.
3. 4-Point Lighting
As a YouTuber, you may not only want yourself to be seen optimally with proper lighting, but you may also want your background to be seen optimally, especially if you’ve taken the time to decorate it for your audience.
What you’ll need to ensure that your background is sufficiently lit is 4-point lighting setup. The 4-point lighting setup is the same as a 3-point lighting setup, but with an additional light shining at your background.
For more information on lighting equipment, check out my Top 17 Video Lighting Equipment For YouTubers .
Touch Up YouTube Videos with Filmora
Filmora is one of the best video editing software for YouTube beginners to start the YouTube channel. So, if you find the lighting isn’t perfect after recording, you can use the Auto Color Enhancement feature in Filmora to adjust the color with one-click. Or, you can change the white balance, Light, color, and HSL manually. Filmora also features some presets and LUTs templates , which allows you to apply pre-programmed effects to video for color correction faster.
Richard Bennett
Richard Bennett is a writer and a lover of all things video.
Follow @Richard Bennett
Affordable YouTube Intro Designs and Templates
How to Make a Cool Intro for YouTube? [+Free Templates]
Richard Bennett
Mar 27, 2024• Proven solutions
For a professional presence on YouTube intro is a must. It is for the same reason that how to make an intro is one of the most popular topic now.
It is the impression that will make sure that the users are attracted. The video’s success greatly depends upon the intro as it will allow the users to get the idea.
The good news is that YouTube intro making is not a complex process due to some software and websites offering the services, which we will discuss in this article.
You will learn :
- What Is YouTube Intro?
- Why You Need a YouTube Intro?
- How to Make Your Own Perfect YouTube Intro Easily?
- Key Takeaways to Create Great Attractive YouTube Intro
- Popular YouTube Intro Styles and Templates
Wondershare Filmstock Gaming Video Editing Skils ](https://filmstock.wondershare.com/creative-theme-game?source%5Fchannel=seo%5Farticle?spm=rs.filmora%5Fweb )
What Is YouTube Intro?
YouTube Intro is a short clip at the start of the video that introduces the maker as well as the topic under discussion. It can be rightfully called as the trademark of your channel. The intro tells the user who you really are. This is the only part of the video that is brief and allows the users to get the first impact of you.
There are thousands of software programs and websites that allow you to get breathtaking animated intros. You can use any of the intro templates to make your first impression the best of all. The user will get to know more about you and will also subscribe to your channel.
There are certain creators that divide the intro into different sections.
Making an intro has never been as easy as it is now. Kudos to the programs that are available online as well as offline.
Why You Need a YouTube Intro?
There are many reasons for which you need YouTube intro. Some reasons are mentioned as under for you better understanding.
- It will get you the relevant traffic
The intro will let the users know what your channel is all about. It will, in turn, get you the best and the most relevant leads. If you are running eCommerce business then the intro will get you into the limelight that you deserve.
- It makes a difference
It simply means that you will see a change in traffic as well as in the overall growth of your channel. You will also see the difference in the working of the channel. A good intro will bring in the relevant audience and this, in turn, will make sure that you get new ideas to make your channel stand out.
- Recognition
An intro makes sure that you get the recognition that you desire. It will also make sure that you get the best and the most advanced outcome that is related to your business. Getting recognition is like a dream come true for the vloggers.
It will make sure that the revenue bases, as well as the sales, are increased. The potential customers will only subscribe to your services and channel if your intro is relevant. Also, you need to keep it short and highly targeted.
How to Make Your Own Perfect YouTube Intro Using Filmora?
With the best and the most advanced techniques, Filmora is a program that will let you create the intro which is just awesome. The program is easy to use and will also make sure that you get to know its features in great detail. The interface, as well as the format support, is awesome.
You need not be a tech-savvy person to operate the program as it is self-explanatory. Fimora has been highly regarded as one of the best programs. It is all because of the viability that it provides to its users.
Features of the program
- The program supports a wide range of formats. You can export as well as import files in a wide range of formats.
- The user interface is intuitive and easy to understand. The graphical properties will make sure that you understand the working of it easily.
- There are more than 300 effects on the program that will make sure to get you the specialized experience you want to have with your channel.
- The intro can be directly uploaded to YouTube and there is no need to export and upload separately.
- The tech specialties of the program are highly in line with the current trends. Apart from intro making, there is a wide range of functions that the program can perform.
The Process to create your own YouTube intro by Filmora?
If you want to make intro using Filmora then it is advised to follow the steps as under to get the best outcome.
Step 1: Click on import or import media files on the main interface to make sure that the intro material is imported to the program.

Step 2: Head over to “Title” and you can add them to you YouTube intro with ease:
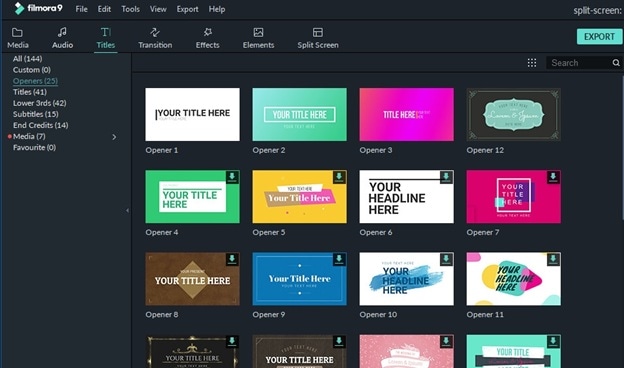
Step 3: To add opener you need to head to “Opener” under Titles and right-click the one you want to select. Click apply and it will be added to the timeline.
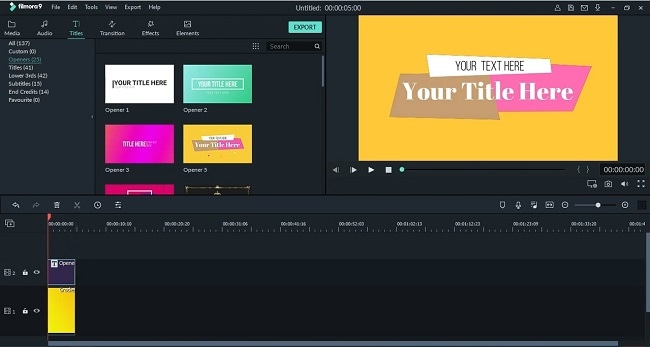
Step 4: You can also change the duration of the title effects. Drag its edge on the timeline you can also click the clock icon and enter new duration.
Step 5: Under the style tab you can change the font, text type, and other settings.

Step 6: To edit the intro, even more, click the “Advanced” button to access the advanced editing panel. Add text boxes, shapes and other effects from here.
Step 7: Under “Effects” you can access the filters and overlays to add to your project.
Step 8: The default length of the filter is 5 seconds that can be extended by dragging its corners on to the timeline.
Step 9: Under the audio heading you can change the volume of the sound of your intro to the level you want.
Step 10: You can also stabilize the video by right-clicking it in the timeline and then going to properties. You will see the stabilization editing panel.
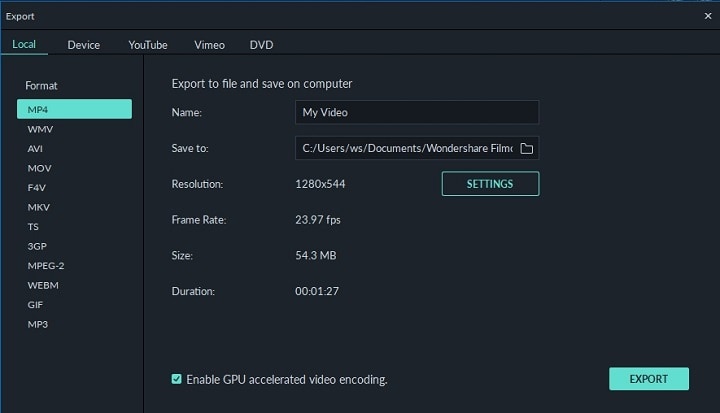
Step 11: Once the editing has been done you just need to click Export on the toolbar. Under the window that appears you can export the intro with respect to device, format, and can also burn it onto the DVD. If you want you can also directly upload the intro to YouTube and other social media platforms.
It’s very easy right? Download Filmora and make a click-driven intro now!
Key Takeaways to Create Great Attractive YouTube Intro
There are certain sections that will make sure that you get the best YouTube intro of all time. It is also important as the intro is regarded as the face of your channel. It will allow you to get the attention for your channel. Some important points are as under.
1. It must be to the point
If you want to impress your audience then remember that you only have 10 – 20 seconds. The longer the intro the bore it is. It must be highly relevant and must make sure that the users get the point of your channel. It will let you thrive a lot.
If for any reason there is an element of confusion within your intro it will never do well. If you want to know how to make an intro for YouTube then it is advised to keep reading on. This article will surely help you a lot.
2. Short means Sweet
The point is that your intro should be to the point. It means that you must never prolong your intro for any reason. Again here comes the element of relevancy.
It means that you must keep your intro as short as possible as it allows you to capture the audience in a far better manner. A short intro will make sure that you are getting the attention that you need when it comes to your channel. So it will boost your channel traffic a lot.
3. It must be in line with your channel theme
Again it is critical that your intro is relevant to your channel. It means that the intro made should represent your channel’s content instead of anything else. It will make sure that you get the best and most relevant audience.
This will once again boost your channel as well as traffic surge will also occur. You will get the best outcome that will make it possible for you to channel the traffic wherever you want. This, in turn, will also boost your channel revenue in case of monetization.
4. Awesome Music
It is the most important part that will impact your YouTube intro. Good music will make sure that you get the best outcome and the users are attracted. There are many YouTube channels that were only recognized as their music was awesome.
5. Clean Visuals
HD and the high quality intro is the key to your channel’s success. It is highly regarded as the best way to attract people. You must spend time to make sure that it looks great and to the point. This is one of the ways to make sure that your intro looks good and awesome.
6. Technically Sound
It is again important to note that technically the intro that has been made is sound and is to the point. From transitions to fade and from animations to PIP there are a lot of details that should be taken care of. It will make sure that you get the intro that is highly professional and specialized.
Popular YouTube Intro Styles and Templates
If you think making a intro yourself is too complex and time-consuming, I also find some popular YouTube intro templates for you. Some of the coolest YouTube intro styles are as follows.
1. Logo and URL Style
This is one of the most common and frequently used YouTube intro style. There are many templates that are associated with it. Some of these are mentioned as under. These effects are mostly used if you are running a tech channel but the use is not limited to this alone.
- Logo & URL Liquid effect Intro Video Template
- Logo Focus Intro Video Template
- Unveiling Logo & URL Intro Video Template
- Logo Sketch Intro Video Template
- Logo Art Intro Video Template
2. Promotional Style
For promotion, there are tons of intros that are available online and anyone can be used. The content creation with such templates is easy. It is because there are many changes that can be done to promote your channel. The best part of these templates is that they are highly customizable.
These templates can also be used to create art for the outros as well that will further solidify the channel. Promoting products at the start and end of the YouTube channel is simply an awesome and fun factor. Some of the coolest templates that can be used in this regard are as follows.
- YouTube Promo Kit by Pixrate
- Broadcast Package by Motionbear
- Typo Opener by BLAQMATRIX
- Promo Intro by 7 Roads
- Upbeat Opener by MBR effects
3. Gaming Intro Styles
It is s well-known fact that the gaming industry is booming. There are literally hundreds of gaming channels on YouTube that are working just awesome. The kiddos are earning are a lot with the channel and the future is also bright.
To get the best gaming intro you need to focus on the outcome on the gaming brand you are trying to promote. Some of the coolest gaming channel intros that could be used to get the work done are as follows.
Conclusion
This article has taught you well how to make an intro with ease and perfection. The different templates are available online which can be used to make awesome YouTube intros. The best software that you can find on the market is the Wondershare Filmora which makes the process a lot easier.
The program is known for the awesome workability as well as viability kudos to the developers of this awesome software. It is also recommended sharing this article on social media such as Facebook and Twitter so that the others can also benefit from it. It will also help others in creating awesome YouTube tutorials.
Richard Bennett
Richard Bennett is a writer and a lover of all things video.
Follow @Richard Bennett
Richard Bennett
Mar 27, 2024• Proven solutions
For a professional presence on YouTube intro is a must. It is for the same reason that how to make an intro is one of the most popular topic now.
It is the impression that will make sure that the users are attracted. The video’s success greatly depends upon the intro as it will allow the users to get the idea.
The good news is that YouTube intro making is not a complex process due to some software and websites offering the services, which we will discuss in this article.
You will learn :
- What Is YouTube Intro?
- Why You Need a YouTube Intro?
- How to Make Your Own Perfect YouTube Intro Easily?
- Key Takeaways to Create Great Attractive YouTube Intro
- Popular YouTube Intro Styles and Templates
Wondershare Filmstock Gaming Video Editing Skils ](https://filmstock.wondershare.com/creative-theme-game?source%5Fchannel=seo%5Farticle?spm=rs.filmora%5Fweb )
What Is YouTube Intro?
YouTube Intro is a short clip at the start of the video that introduces the maker as well as the topic under discussion. It can be rightfully called as the trademark of your channel. The intro tells the user who you really are. This is the only part of the video that is brief and allows the users to get the first impact of you.
There are thousands of software programs and websites that allow you to get breathtaking animated intros. You can use any of the intro templates to make your first impression the best of all. The user will get to know more about you and will also subscribe to your channel.
There are certain creators that divide the intro into different sections.
Making an intro has never been as easy as it is now. Kudos to the programs that are available online as well as offline.
Why You Need a YouTube Intro?
There are many reasons for which you need YouTube intro. Some reasons are mentioned as under for you better understanding.
- It will get you the relevant traffic
The intro will let the users know what your channel is all about. It will, in turn, get you the best and the most relevant leads. If you are running eCommerce business then the intro will get you into the limelight that you deserve.
- It makes a difference
It simply means that you will see a change in traffic as well as in the overall growth of your channel. You will also see the difference in the working of the channel. A good intro will bring in the relevant audience and this, in turn, will make sure that you get new ideas to make your channel stand out.
- Recognition
An intro makes sure that you get the recognition that you desire. It will also make sure that you get the best and the most advanced outcome that is related to your business. Getting recognition is like a dream come true for the vloggers.
It will make sure that the revenue bases, as well as the sales, are increased. The potential customers will only subscribe to your services and channel if your intro is relevant. Also, you need to keep it short and highly targeted.
How to Make Your Own Perfect YouTube Intro Using Filmora?
With the best and the most advanced techniques, Filmora is a program that will let you create the intro which is just awesome. The program is easy to use and will also make sure that you get to know its features in great detail. The interface, as well as the format support, is awesome.
You need not be a tech-savvy person to operate the program as it is self-explanatory. Fimora has been highly regarded as one of the best programs. It is all because of the viability that it provides to its users.
Features of the program
- The program supports a wide range of formats. You can export as well as import files in a wide range of formats.
- The user interface is intuitive and easy to understand. The graphical properties will make sure that you understand the working of it easily.
- There are more than 300 effects on the program that will make sure to get you the specialized experience you want to have with your channel.
- The intro can be directly uploaded to YouTube and there is no need to export and upload separately.
- The tech specialties of the program are highly in line with the current trends. Apart from intro making, there is a wide range of functions that the program can perform.
The Process to create your own YouTube intro by Filmora?
If you want to make intro using Filmora then it is advised to follow the steps as under to get the best outcome.
Step 1: Click on import or import media files on the main interface to make sure that the intro material is imported to the program.
Step 2: Head over to “Title” and you can add them to you YouTube intro with ease:
Step 3: To add opener you need to head to “Opener” under Titles and right-click the one you want to select. Click apply and it will be added to the timeline.
Step 4: You can also change the duration of the title effects. Drag its edge on the timeline you can also click the clock icon and enter new duration.
Step 5: Under the style tab you can change the font, text type, and other settings.
Step 6: To edit the intro, even more, click the “Advanced” button to access the advanced editing panel. Add text boxes, shapes and other effects from here.
Step 7: Under “Effects” you can access the filters and overlays to add to your project.
Step 8: The default length of the filter is 5 seconds that can be extended by dragging its corners on to the timeline.
Step 9: Under the audio heading you can change the volume of the sound of your intro to the level you want.
Step 10: You can also stabilize the video by right-clicking it in the timeline and then going to properties. You will see the stabilization editing panel.
Step 11: Once the editing has been done you just need to click Export on the toolbar. Under the window that appears you can export the intro with respect to device, format, and can also burn it onto the DVD. If you want you can also directly upload the intro to YouTube and other social media platforms.
It’s very easy right? Download Filmora and make a click-driven intro now!
Key Takeaways to Create Great Attractive YouTube Intro
There are certain sections that will make sure that you get the best YouTube intro of all time. It is also important as the intro is regarded as the face of your channel. It will allow you to get the attention for your channel. Some important points are as under.
1. It must be to the point
If you want to impress your audience then remember that you only have 10 – 20 seconds. The longer the intro the bore it is. It must be highly relevant and must make sure that the users get the point of your channel. It will let you thrive a lot.
If for any reason there is an element of confusion within your intro it will never do well. If you want to know how to make an intro for YouTube then it is advised to keep reading on. This article will surely help you a lot.
2. Short means Sweet
The point is that your intro should be to the point. It means that you must never prolong your intro for any reason. Again here comes the element of relevancy.
It means that you must keep your intro as short as possible as it allows you to capture the audience in a far better manner. A short intro will make sure that you are getting the attention that you need when it comes to your channel. So it will boost your channel traffic a lot.
3. It must be in line with your channel theme
Again it is critical that your intro is relevant to your channel. It means that the intro made should represent your channel’s content instead of anything else. It will make sure that you get the best and most relevant audience.
This will once again boost your channel as well as traffic surge will also occur. You will get the best outcome that will make it possible for you to channel the traffic wherever you want. This, in turn, will also boost your channel revenue in case of monetization.
4. Awesome Music
It is the most important part that will impact your YouTube intro. Good music will make sure that you get the best outcome and the users are attracted. There are many YouTube channels that were only recognized as their music was awesome.
5. Clean Visuals
HD and the high quality intro is the key to your channel’s success. It is highly regarded as the best way to attract people. You must spend time to make sure that it looks great and to the point. This is one of the ways to make sure that your intro looks good and awesome.
6. Technically Sound
It is again important to note that technically the intro that has been made is sound and is to the point. From transitions to fade and from animations to PIP there are a lot of details that should be taken care of. It will make sure that you get the intro that is highly professional and specialized.
Popular YouTube Intro Styles and Templates
If you think making a intro yourself is too complex and time-consuming, I also find some popular YouTube intro templates for you. Some of the coolest YouTube intro styles are as follows.
1. Logo and URL Style
This is one of the most common and frequently used YouTube intro style. There are many templates that are associated with it. Some of these are mentioned as under. These effects are mostly used if you are running a tech channel but the use is not limited to this alone.
- Logo & URL Liquid effect Intro Video Template
- Logo Focus Intro Video Template
- Unveiling Logo & URL Intro Video Template
- Logo Sketch Intro Video Template
- Logo Art Intro Video Template
2. Promotional Style
For promotion, there are tons of intros that are available online and anyone can be used. The content creation with such templates is easy. It is because there are many changes that can be done to promote your channel. The best part of these templates is that they are highly customizable.
These templates can also be used to create art for the outros as well that will further solidify the channel. Promoting products at the start and end of the YouTube channel is simply an awesome and fun factor. Some of the coolest templates that can be used in this regard are as follows.
- YouTube Promo Kit by Pixrate
- Broadcast Package by Motionbear
- Typo Opener by BLAQMATRIX
- Promo Intro by 7 Roads
- Upbeat Opener by MBR effects
3. Gaming Intro Styles
It is s well-known fact that the gaming industry is booming. There are literally hundreds of gaming channels on YouTube that are working just awesome. The kiddos are earning are a lot with the channel and the future is also bright.
To get the best gaming intro you need to focus on the outcome on the gaming brand you are trying to promote. Some of the coolest gaming channel intros that could be used to get the work done are as follows.
Conclusion
This article has taught you well how to make an intro with ease and perfection. The different templates are available online which can be used to make awesome YouTube intros. The best software that you can find on the market is the Wondershare Filmora which makes the process a lot easier.
The program is known for the awesome workability as well as viability kudos to the developers of this awesome software. It is also recommended sharing this article on social media such as Facebook and Twitter so that the others can also benefit from it. It will also help others in creating awesome YouTube tutorials.
Richard Bennett
Richard Bennett is a writer and a lover of all things video.
Follow @Richard Bennett
Also read:
- High-Quality YouTube Images Download Without Any Cost
- Building a Billion-View Empire Your Step-by-Step Youtube Strategy for 2024
- Streamline Your Content with These Top Video Cutters Online
- Clear Up Your YouTube Vision Issues for 2024
- 2024 Approved Accelerated Learning for Chromakey Artistry
- How to Smoothly View YouTube Videos without Borders?
- 2024 Approved Beyond Audience Counting The Intricacies of YouTube’s Metrics
- Mac Users Mastering Chic Videos for Your First YouTube Post
- In 2024, Behind the Scenes Choosing Ideal Winter Backdrops
- Maximize Video Discoverability Key YouTube SEO Techniques
- Seamless Transformation Top Tools for YouTube Videos
- 2024 Approved Discovering the Speedy Scaling Channels Among YouTube Titans
- [New] 11 FREE YouTube Playlist Downloaders [Online/PC/Android/iOS]
- In 2024, Deciding the Optimal Social Media Platform TikTok Vs. YouTube Shorts
- In 2024, Crafting the Perfect YouTube Channel Url A Quick Guide
- Subscription Rate Monitoring Software
- Best Movie Swaps Top 7 Alternate Films for 2024
- Elevate Your Video Entrance with These Tools
- In 2024, Earning at Age Ten The Extraordinary Financial Rise of Ryan Kaji
- 2024 Approved Charting the Differences in YouTube's Ownership and CC Models
- Building Inspiring Lifestyle Content for Viewers for 2024
- 2024 Approved Best YouTube Video Ideas to Spark Inspiration [For YouTube Channels]
- 2024 Approved Creating Content with Confidence Free YouTube Training
- Exploring Subscriptions The Value of YouTube Premium
- Academic Journey Across Time Top 10 History YouTubers
- Counterclockwise Content YouTube Replay Methods for 2024
- [New] Ajey's YouTube Earnings Insight - 2023
- [New] Capture Clarity High-Quality Screen Recordings for YouTubers (PC/Mac)
- [New] Banish Odd Greens in Your YouTube Videos Using Mac Techniques
- Transform Clips Into Content From Premiere to YouTube
- PureDownload Free YouTube File Acquisition
- Transform Into an Ultimate Hit Essential SEO Tips for YouTube Videos
- 2024 Approved Channel Name Genius Brainstorming Like a Pro
- How to Boost Your YouTube Revenue From Mobile - A Comprehensive Guide
- Transform Your Food Blog Into an Engaging Mukbang Show
- Spotlight Play How to Stand Out with YouTube Gaming
- Top 14 YouTube Titles to Skyrocket Your Gaming Channel's Popularity
- The 8 Best No-Cost Editing Software for Social Media
- Clip Weaver Workshop
- 2024 Approved Conveniently Share Your Videos YouTube Shorts Mobile/Computer Tips
- 2024 Approved The Top English Voice Generator To Convert Text Into Desired Accent
- [New] In 2024, Leveraging FaceTime's Features for Exceptional Audio Capturing
- [New] In 2024, Banish Soundless Tweets Live the Sounds
- [Updated] In 2024, Mastering Video Record with VLC
- How to use iSpoofer on Oppo Find X7 Ultra? | Dr.fone
- Updated In 2024, Making Triggered Memes with Filmora Video Editor
- Paint Picture Humor
- Updated In 2024, Amazon Live for Beginners Features, Pro Tips & Future Trends
- [Updated] 2024 Approved Mystery Behind Missing Facebook Video Suggests
- [Updated] In 2024, Pro Video Guide Crafting Engaging Screencasts
- [Updated] Little Drivers' Lively Gameplay for 2024
- What You Want To Know About Two-Factor Authentication for iCloud From your iPhone 14 Pro Max
- [New] Simplified Guide to Recording PC Screens for HP Users for 2024
- New 2024 Approved The Best Free MPEG Video Merging Solutions
- FRP Hijacker by Hagard Download and Bypass your Vivo Y27 4G FRP Locks
- In 2024, How to Unlock Your Apple iPhone 8 Passcode 4 Easy Methods (With or Without iTunes)
- Digital Diagnostics VLL App Examination
- Discover the Best Tools to Monitor and Boost TikTok Engagement for 2024
- [Updated] Joining Google Meet From Computer/Phone for 2024
- Updated Proven Choices Selecting the Top 6 Costless Cloud-Based Sound Editors for 2024
- Updated Find Cricket Sound Effect
- 7 Ways to Unlock a Locked Xiaomi 13 Ultra Phone
- [Updated] 2024 Approved The Swift Steps to Stellar Screen Names on Discord
- Top Online Video Background Changers Transform Your Videos with Ease for 2024
- [Updated] Crafting Memorable Moments Leading Tools for TikTok Video to GIF Transformation
- [New] 2024 Approved Unveiling the Techniques for Autoplay YouTube Videos on FB
- 2024 Approved Outwit Facebook Vids Ad-Blocking Basics
- How To Bypass the Required Apple Store Verification For Apple iPhone 7 | Dr.fone
- Title: In 2024, Enlightening Your YouTube Footage with Proper Lighting
- Author: Brian
- Created at : 2024-05-25 12:15:23
- Updated at : 2024-05-26 12:15:23
- Link: https://youtube-video-recordings.techidaily.com/in-2024-enlightening-your-youtube-footage-with-proper-lighting/
- License: This work is licensed under CC BY-NC-SA 4.0.
