
"In 2024, Elevating Your YouTube Experience Tips on Channel Art and Sizes"
Elevating Your YouTube Experience: Tips on Channel Art and Sizes
Best YouTube Banner Size and Channel Art Dimension (The Ultimate Guide)

Richard Bennett
Oct 26, 2023• Proven solutions
YouTube is a social platform that relies on visually exciting material to attract the audience. Just like a book with an appealing cover compels a person to pick it up and read, it is significant to display and advertise your YouTube channel in a way that makes viewers click and browse through the channel.
Despite creating a beautiful banner on your desktop screen, it might end up distorted on a mobile screen if the recommended sizes for all kinds of gadgets are not followed. Hence, choosing your YouTube channel art dimension is essential since it is the viewer’s first impression. To commence with, you must be careful about your YouTube banner size and channel art dimensions. Are you wondering how to create the perfect banner or cover photo as we know it? Worry not as we are going to tell you the exact details to achieve an ideal YouTube banner size that fits all devices from computers to phones.
- Part 1: The Recommended YouTube Banner Size
- Part 2: The Best YouTube Banner Size on Different Devices
- Part 3: The Best YouTube Video Maker–Wondershare Filmora
Part 1: The Recommended YouTube Banner Size
According to YouTube’s official standards, the recommended banner size is 2560×1440 pixels. However, the minimum image dimensions are 2048×1152 pixels. To ensure that your text is visible regardless of the screen size, sticking to the “safe area” of 2560×423 pixels is the best option. Why are these sizes significant? Well, it’s essential to keep in mind the fact that people worldwide will be using different kinds of gadgets to access YouTube, and it is crucial to optimize your YouTube banner size for it to be ideal.
Part 2: The Best YouTube Banner Size on Different Devices
For the best results on all devices, your YouTube banner size should be:
YouTube Channel Art/Banner Dimensions Displayed on TVs
2560 x 1440 px 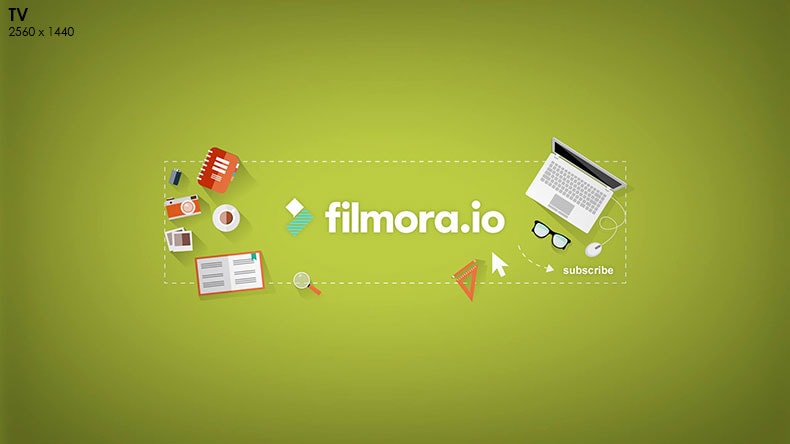
YouTube will display your entire channel art on TVs 
Here’s what our YouTube channel art example would look like on a TV.
YouTube Channel Art/Banner Dimensions Displayed on Smaller Desktop Monitors and Mobile Phones
1546 x 423 px 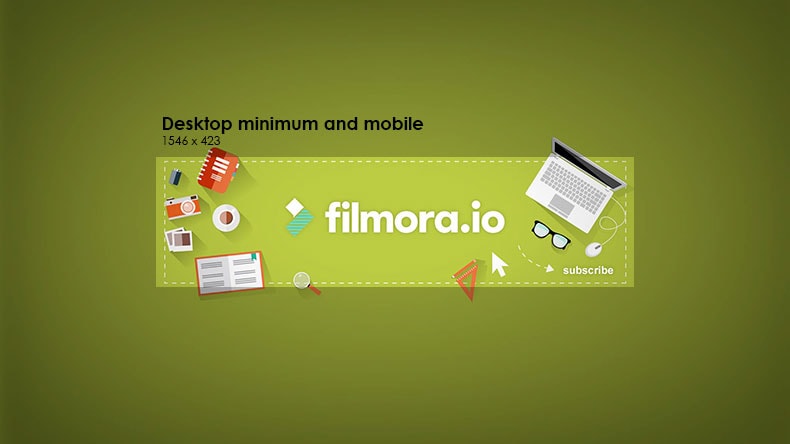
On small desktop monitors and mobile devices, YouTube will display less than 20% of your entire channel art, the center area measuring a width of 1546 pixels and a height of 423 pixels. You want to make sure that your text and logo make it into this part.

Here’s what our YouTube channel art example would look like on a mobile phone.
YouTube Channel Art/Banner Dimensions Displayed on Tablets
1855 x 423 px 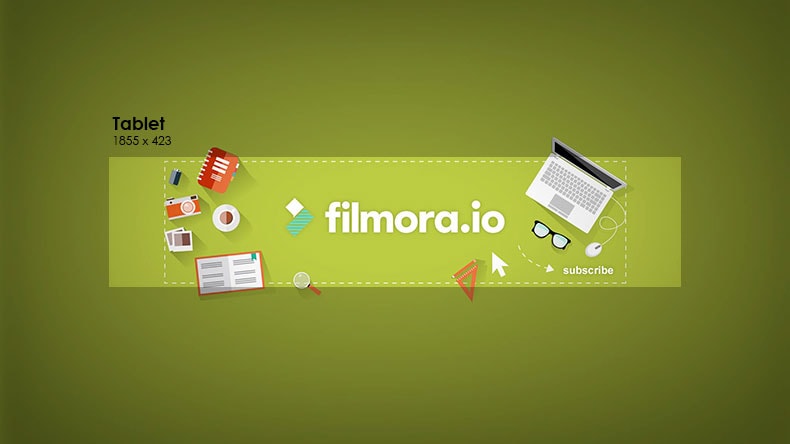
On tablet devices, YouTube will display around 20% more of your channel art, just to the sides of your smaller desktop monitor and mobile device area.

Here’s what our YouTube channel art example would look like on a tablet device.
YouTube Channel Art/Banner Dimensions Displayed on Larger Desktop Monitors
2560 x 423 px 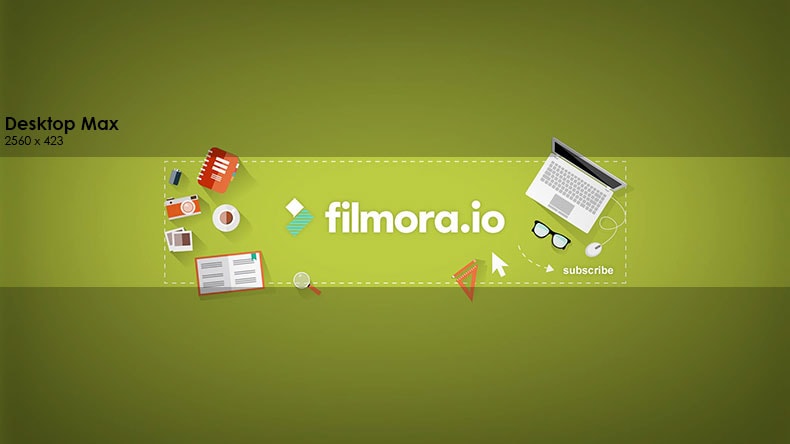
On larger desktop monitors, YouTube will display the entire width of your channel art but not the upper and lower part.

Here’s what our YouTube channel art example would look like on a large desktop monitor.
By following these dimensions in the design of your YouTube channel art/banner, you can be sure to have a responsive image that works best across different devices.
Have you ever had trouble with your YouTube banner size?
If you’d like to make your own channel art, check out our list of Top 9 YouTube Channel Art Makers .
Part 3: The Best YouTube Video Maker–Wondershare Filmora
Want to create a spectacular YouTube video with excellent graphics but lack the expertise? Don’t stress! Wondershare Filmora is here to save the day with its incredible video editing features. Despite the professional outcome it provides, it has been customized for easy use by the beginners.


Key Features:
- Supports GIF and 4K Resolution with advanced text editing features.
- Directly import files from any social media platform, for example, Facebook.
- Transform your video by layering multiple video clips and adding titles, filters, and overlays.
- Time-lapse, noise reduction, and split-screen preset available.
Compatibility:
- Windows: Microsoft Windows 7/Windows 8/Windows 10 (64 bit OS recommended).
- Processor: Intel i3 or better multicore processor, 2GHz or above.
- RAM: 4 GB RAM (8GB required for HD and 4K videos).
To Sum Up
So, are you ready to optimize your channel by following the YouTube banner size’s basic requirements? We hope you are now aware of the importance your YouTube channel art dimension has.
Also, for your channel to be distinctive and attractive enough, it must be edited, which is now relatively easy through video editing apps like the Wondershare Filmora. What are you waiting for? Invest in this pocket-friendly application to create stunning videos in no time and take your channel to the next level.
Richard Bennett
Richard Bennett is a writer and a lover of all things video.
Follow @Richard Bennett
Richard Bennett
Oct 26, 2023• Proven solutions
YouTube is a social platform that relies on visually exciting material to attract the audience. Just like a book with an appealing cover compels a person to pick it up and read, it is significant to display and advertise your YouTube channel in a way that makes viewers click and browse through the channel.
Despite creating a beautiful banner on your desktop screen, it might end up distorted on a mobile screen if the recommended sizes for all kinds of gadgets are not followed. Hence, choosing your YouTube channel art dimension is essential since it is the viewer’s first impression. To commence with, you must be careful about your YouTube banner size and channel art dimensions. Are you wondering how to create the perfect banner or cover photo as we know it? Worry not as we are going to tell you the exact details to achieve an ideal YouTube banner size that fits all devices from computers to phones.
- Part 1: The Recommended YouTube Banner Size
- Part 2: The Best YouTube Banner Size on Different Devices
- Part 3: The Best YouTube Video Maker–Wondershare Filmora
Part 1: The Recommended YouTube Banner Size
According to YouTube’s official standards, the recommended banner size is 2560×1440 pixels. However, the minimum image dimensions are 2048×1152 pixels. To ensure that your text is visible regardless of the screen size, sticking to the “safe area” of 2560×423 pixels is the best option. Why are these sizes significant? Well, it’s essential to keep in mind the fact that people worldwide will be using different kinds of gadgets to access YouTube, and it is crucial to optimize your YouTube banner size for it to be ideal.
Part 2: The Best YouTube Banner Size on Different Devices
For the best results on all devices, your YouTube banner size should be:
YouTube Channel Art/Banner Dimensions Displayed on TVs
2560 x 1440 px
YouTube will display your entire channel art on TVs
Here’s what our YouTube channel art example would look like on a TV.
YouTube Channel Art/Banner Dimensions Displayed on Smaller Desktop Monitors and Mobile Phones
1546 x 423 px
On small desktop monitors and mobile devices, YouTube will display less than 20% of your entire channel art, the center area measuring a width of 1546 pixels and a height of 423 pixels. You want to make sure that your text and logo make it into this part.
Here’s what our YouTube channel art example would look like on a mobile phone.
YouTube Channel Art/Banner Dimensions Displayed on Tablets
1855 x 423 px
On tablet devices, YouTube will display around 20% more of your channel art, just to the sides of your smaller desktop monitor and mobile device area.
Here’s what our YouTube channel art example would look like on a tablet device.
YouTube Channel Art/Banner Dimensions Displayed on Larger Desktop Monitors
2560 x 423 px
On larger desktop monitors, YouTube will display the entire width of your channel art but not the upper and lower part.
Here’s what our YouTube channel art example would look like on a large desktop monitor.
By following these dimensions in the design of your YouTube channel art/banner, you can be sure to have a responsive image that works best across different devices.
Have you ever had trouble with your YouTube banner size?
If you’d like to make your own channel art, check out our list of Top 9 YouTube Channel Art Makers .
Part 3: The Best YouTube Video Maker–Wondershare Filmora
Want to create a spectacular YouTube video with excellent graphics but lack the expertise? Don’t stress! Wondershare Filmora is here to save the day with its incredible video editing features. Despite the professional outcome it provides, it has been customized for easy use by the beginners.
Key Features:
- Supports GIF and 4K Resolution with advanced text editing features.
- Directly import files from any social media platform, for example, Facebook.
- Transform your video by layering multiple video clips and adding titles, filters, and overlays.
- Time-lapse, noise reduction, and split-screen preset available.
Compatibility:
- Windows: Microsoft Windows 7/Windows 8/Windows 10 (64 bit OS recommended).
- Processor: Intel i3 or better multicore processor, 2GHz or above.
- RAM: 4 GB RAM (8GB required for HD and 4K videos).
To Sum Up
So, are you ready to optimize your channel by following the YouTube banner size’s basic requirements? We hope you are now aware of the importance your YouTube channel art dimension has.
Also, for your channel to be distinctive and attractive enough, it must be edited, which is now relatively easy through video editing apps like the Wondershare Filmora. What are you waiting for? Invest in this pocket-friendly application to create stunning videos in no time and take your channel to the next level.
Richard Bennett
Richard Bennett is a writer and a lover of all things video.
Follow @Richard Bennett
Boosting Narrative Pace in Vlogging Through Jump Cuts
How To Use Jump Cuts in Your Vlog 
Richard Bennett
Mar 27, 2024• Proven solutions
A common problem for new YouTubers and Vlogers is that they cannot get through a recording without feeling like they have messed up and need to restart. It can be extremely discouraging at first. More experienced vloggers know that mistakes happen and they are no reason to stop recording. Instead of trying to record a perfect clip it is common for vloggers to remove errors from their videos in editing using jump cuts.
How To Use Jump Cuts in Your Vlog
1. What is a Jump Cut?
A jump cut is when you jump from one part of your clip to a later part of that same clip, cutting out the section in-between.
In movies or tv shows jump cuts can be distracting. In vlogs it is the exact opposite; jump cuts are used to remove distractions. It is not strange for a YouTube video to contain a lot of jump cuts. If you go and re-watch a video by your favorite vlogger you will probably notice that every once in a while the vlogger is suddenly sitting differently or that something else has suddenly changed. That is a jump cut, and chances are you did not even think twice about it when you first watched the video.
2. When to use Jump Cuts in your Youtube Video
There are a lot of things you might want to take out of your clips using jump cuts. Here are some examples:
Repetition: You may have had to repeat yourself because you misspoke. Or, you might watch your clip back and realize that two sections you intended – perhaps even scripted – are very similar and you only need one.
Off-Topic Tangents: Once you get comfortable talking to the camera it is easy to find yourself getting off-topic while recording. These tangents might be funny or feel important, but you should still cut them out of your final video. Rather than scrapping them completely, though, consider giving your tangent its very own video. Successful vloggers post new videos frequently, after all.
Silence: Use jump cuts to take out any pauses in your video. Every period of silence is an opportunity for viewers to get distracted and decide to click on something else. Adding music to the background of your video can help with shorter pauses, but cutting out any silence is still a good way to go.
In the video tutorial below, we will share with you some practical and creative jump cuts tips that you can try in video editing. And most of the jump cuts are done with the cutting features in Filmora . You can download the free trial version below by clicking the Free Download button based on your system.
Download Mac Version ](https://tools.techidaily.com/wondershare/filmora/download/ )
3. How to Make Jump Cuts in Vlog & YouTube Videos
You can make jump cuts in almost every editing program, from free software like Windows Movie Maker to professional programs like Adobe Premiere. Remember no matter which video editing software you are using to edit your videos with jump cut, you need to ensure that the software can scroll through your video clips and audio files frame-by-frame. And some video editors may only allow you to scroll video footage frame by frame. This tutorial is for Filmora Video Editor (Now upgraded to Filmora), but many of the same steps will apply to other software.
Download Mac Version ](https://tools.techidaily.com/wondershare/filmora/download/ )
You may also like: How to trim and cut videos in Windows Movie Maker for Free
Open up Filmora Video Editor and add a clip into the timeline. Watch it through, and then revisit sections where you think you might want to make cuts.
Find a place in your clip that has silence and use the scissors icon to cut your clip into two. Then start playing your clip and pause as soon as you hear sound.
Make sure your clip is selected, and then go back frame by frame until you hear nothing.
Use the scissors icon to make another cut. You will now have three clips; one before the silence, the silent pause, and the section where sound starts again. Delete the quiet middle clip.
4. Keep video shorter for more views
The videos that get the most views on YouTube are an average of three minutes long. People will use the length of a video as a reason not to click on it. Viewers are also more likely to get distracted and stop watching longer videos before they are over. That does not mean you should not take as long as you need to properly explain your ideas, just that you should be careful your video is not longer than it needs to be. It is common for youtubers to use only about a third of the clip they record. The rest is removed using jump cuts.
Filmora video editor will help you to be more creative in video editing and saving your time at the same time. Download and leave a comment below about how do you like it.
Richard Bennett
Richard Bennett is a writer and a lover of all things video.
Follow @Richard Bennett
Richard Bennett
Mar 27, 2024• Proven solutions
A common problem for new YouTubers and Vlogers is that they cannot get through a recording without feeling like they have messed up and need to restart. It can be extremely discouraging at first. More experienced vloggers know that mistakes happen and they are no reason to stop recording. Instead of trying to record a perfect clip it is common for vloggers to remove errors from their videos in editing using jump cuts.
How To Use Jump Cuts in Your Vlog
1. What is a Jump Cut?
A jump cut is when you jump from one part of your clip to a later part of that same clip, cutting out the section in-between.
In movies or tv shows jump cuts can be distracting. In vlogs it is the exact opposite; jump cuts are used to remove distractions. It is not strange for a YouTube video to contain a lot of jump cuts. If you go and re-watch a video by your favorite vlogger you will probably notice that every once in a while the vlogger is suddenly sitting differently or that something else has suddenly changed. That is a jump cut, and chances are you did not even think twice about it when you first watched the video.
2. When to use Jump Cuts in your Youtube Video
There are a lot of things you might want to take out of your clips using jump cuts. Here are some examples:
Repetition: You may have had to repeat yourself because you misspoke. Or, you might watch your clip back and realize that two sections you intended – perhaps even scripted – are very similar and you only need one.
Off-Topic Tangents: Once you get comfortable talking to the camera it is easy to find yourself getting off-topic while recording. These tangents might be funny or feel important, but you should still cut them out of your final video. Rather than scrapping them completely, though, consider giving your tangent its very own video. Successful vloggers post new videos frequently, after all.
Silence: Use jump cuts to take out any pauses in your video. Every period of silence is an opportunity for viewers to get distracted and decide to click on something else. Adding music to the background of your video can help with shorter pauses, but cutting out any silence is still a good way to go.
In the video tutorial below, we will share with you some practical and creative jump cuts tips that you can try in video editing. And most of the jump cuts are done with the cutting features in Filmora . You can download the free trial version below by clicking the Free Download button based on your system.
Download Mac Version ](https://tools.techidaily.com/wondershare/filmora/download/ )
3. How to Make Jump Cuts in Vlog & YouTube Videos
You can make jump cuts in almost every editing program, from free software like Windows Movie Maker to professional programs like Adobe Premiere. Remember no matter which video editing software you are using to edit your videos with jump cut, you need to ensure that the software can scroll through your video clips and audio files frame-by-frame. And some video editors may only allow you to scroll video footage frame by frame. This tutorial is for Filmora Video Editor (Now upgraded to Filmora), but many of the same steps will apply to other software.
Download Mac Version ](https://tools.techidaily.com/wondershare/filmora/download/ )
You may also like: How to trim and cut videos in Windows Movie Maker for Free
Open up Filmora Video Editor and add a clip into the timeline. Watch it through, and then revisit sections where you think you might want to make cuts.
Find a place in your clip that has silence and use the scissors icon to cut your clip into two. Then start playing your clip and pause as soon as you hear sound.
Make sure your clip is selected, and then go back frame by frame until you hear nothing.
Use the scissors icon to make another cut. You will now have three clips; one before the silence, the silent pause, and the section where sound starts again. Delete the quiet middle clip.
4. Keep video shorter for more views
The videos that get the most views on YouTube are an average of three minutes long. People will use the length of a video as a reason not to click on it. Viewers are also more likely to get distracted and stop watching longer videos before they are over. That does not mean you should not take as long as you need to properly explain your ideas, just that you should be careful your video is not longer than it needs to be. It is common for youtubers to use only about a third of the clip they record. The rest is removed using jump cuts.
Filmora video editor will help you to be more creative in video editing and saving your time at the same time. Download and leave a comment below about how do you like it.
Richard Bennett
Richard Bennett is a writer and a lover of all things video.
Follow @Richard Bennett
Also read:
- [New] Capture the Moment IPhone X's Revolutionary Camera
- [New] Designing a Personalized YouTube Subscribe Link
- [Updated] Digital Dividends The Creator's Guide to Monetization
- 2024 Approved Vibing with Visuals Merging Music and Imagery on IG
- 4 Ways to Fix Android Blue Screen of Death On Oppo Reno 8T | Dr.fone
- A Journey Through Dutch Language's Past
- Comparing YouTube Policies with Creative Commons
- Effective Methods for Moving Preinstalled Software Between Drives Using Windows 11 Features
- Enrich Your Presentations - Include YouTube Videos in Slate for 2024
- From Chat Room to Screen Step-by-Step Google Meet YouTube Streams
- In 2024, Delightful, No-Cost Access to YouTube's Nine Full-Length Yule Celebrations
- In 2024, Discover 9 Affordable Online Editors for YouTube
- In 2024, From TikTok to Twitter A Step-by-Step Guide
- In 2024, Proven Ways in How To Hide Location on Life360 For Itel A05s | Dr.fone
- In 2024, Top 7 Phone Number Locators To Track Samsung Galaxy S24 Location | Dr.fone
- Preventing Locked Status: Tips for Windows Users (153 Chars)
- Title: In 2024, Elevating Your YouTube Experience Tips on Channel Art and Sizes
- Author: Brian
- Created at : 2024-10-31 23:35:49
- Updated at : 2024-11-04 23:33:57
- Link: https://youtube-video-recordings.techidaily.com/in-2024-elevating-your-youtube-experience-tips-on-channel-art-and-sizes/
- License: This work is licensed under CC BY-NC-SA 4.0.