
:max_bytes(150000):strip_icc()/GettyImages-488000125-58b6dea85f9b586046485413-5c659d39c9e77c0001755243.jpg)
"In 2024, Elevating Slideshows Incorporate YouTube Videos"
Elevating Slideshows: Incorporate YouTube Videos
Create High-Quality Video - Wondershare Filmora
An easy and powerful YouTube video editor
Numerous video and audio effects to choose from
Detailed tutorials provided by the official channel
Google Slide presentation is a powerful tool for creators to keep their audience engaged. This online platform lets you create and demonstrate your ideas. It will capture your viewers’ attention from the very beginning. It also doesn’t matter whatever learning style you engage. Adding YouTube videos to Google Slide will appeal to all levels of individuals.
More so, it is the best way to provide a break for both the audience and the creator. You can break Google Slide presentations with videos to offer some break. Viewers and the presenter get a breather in the process. The presenter can take a short break from speaking while the video plays. Let’s now dive into how to embed a YouTube video in Google Slides.

In this article
01 Why should we add a video to Google Slides?
02 How to add a YouTube video to Google Slide
03 How to choose the right video for your Slides?
Why should we add a video to Google Slides?
There is a great impact of adding video to Google Slides.
For attention
Videos will automatically awaken you, especially if your thoughts have started to sway during a presentation. A video has a direct way of showing creativity. The audience automatically connects the dots between the video and the presentation lines alike.
To stimulate discussion
A picture is worth a thousand words. There is a way that an added video will help the audience connect to the day’s topic. It will bring up several ideas and stir up discussion with the presenter.
Easy following
With videos embedded in Google Slide, viewers will find it easy to understand and digest. Videos automatically eliminate boredom and make any topic interesting.
How to add a YouTube video to Google Slide
Use these two methods to add a YouTube video to Google Slides. Via the Search and Direct link.
Method 1. Embed YouTube video to Google Slide by search and selection
Google has owned YouTube since the year 2006. You can, therefore, integrate Google’s products with YouTube easily.
Step 1. First, go to the slide where you want to embed your video.
Step 2. Then choose the “Insert” option from the menu bar and hit the “Video” option.

Step 3. It would be best if you now viewed the “YouTube” search bar to type in the video you want to embed. You can use keywords to search for the video in question and view instant search results.
Step 4. Then select the video you want to embed, and you’ll see it appear on the “Slide.”

Step 5. Format your video. Remember that the entire video will be embedded. You don’t necessarily need the whole video. It is time to select just a brief but relevant clip from the video to use. Then position your video to the right point using the axes from the exact starting point to the finished part you want the video to appear in.
Method 2. Embed YouTube video to Google Slide by direct link
You can engage this method if you want to include the entire video.
Step 1. Get the URL of the specific YouTube video that you want to use.

Step 2. Then go to your browser’s “Address bar” to copy the YouTube link.
Step 3. Next, open the “Presentation” slide to put your video to.
Step 4. Choose the “Insert” tab from the menu bar.
Step 5. Then hit on the “Video” option from the drop-down menu that appears.
Step 6. A new window will open automatically. Choose the “By URL” tab.
Step 7. Then paste the YouTube video URL in the “Paste YouTube URL Here” bar section.

Step 8. Wait for the video file to load and press the “Select” option. The video will immediately appear in the presentation slide. Just drag and drop the video in your preferred position.
Note: You can do a few edits inside the application. Set the timer when your video should start and when to stop. You can also adjust the video player size.
How to choose the right video for your Slides?
Not all videos will make an impact on your Google Slide. You need to use the best shot that adds value to your presentation. These guidelines will help you to settle on the best video.
Be Professional – choose the best video for your presentation. Remember that the video is part of the presentation and carries more weight. Settling for quality video will bring out the professionalism in you.
Relevant – how do you know that what you are showing your audience corresponds to the presentation piece? Ensure that the video you add has something to do with the Google Slide presentation topic. The two should naturally flow to make it easy to understand the whole concept.
Precise – your presentation is not about the video. The ideal length should not exceed 60 seconds. The longer the video, the greater the chance for your audience to lose track along the way.
Know every footage you are working with – this will help you pick the best shots for your presentation. So, learn every aspect of the video before settling down to use it.
Add new content – even though one content may suit several presentations, don’t rely on the same piece each time. Your audience will want to feel something fresh each time you are presenting. So, compose different videos for different scenarios to make that big impact.
Create an eye-catching video for your Slides with Filmora
The video quality matters when it comes to creating your Slides. The best video creator – Filmora – works in simple steps to give you an eye-catching video. It will create videos for all scenarios like marketing, tutorial, gaming, etc.
Key features of Filmora
- It offers you advanced video effects like filters, motion elements, etc
- You can multiply your fun with multiple screens with the Split Screen feature
- Easily change backgrounds using the Green Screen feature
- The speed control lets you fast forward or slow down a special moment
- Import your video clips to social media platforms
- You can also adjust the audio of your tracks using the Audio Mixer feature
Follow this guide to create a video for your slide with Filmora
Step 1. Launch Filmora
First, begin by downloading and installing Filmora on your computer device. Once installed, launch it and allow it to run. You can either create a new project or open an existing project to work on.
Step 2. Create a new project
Here, click on the “New Project” tab on the app’s welcome screen. The editor should load immediately. Then proceed to register the product. Just hit on the “Register” tab.
Step 3. Import video
Check the upper left corner of your screen to see the “Import” tab. Click on it and choose the “Import Media Files” option. Next, navigate to the location of your computer’s local list to select the clip or video you want to edit. Then, hit the “Import” button to add the video to the timeline for editing.
Step 4. Edit video
Drag and drop the raw footage to Filmora’s timeline to begin editing. Here, you can trim, add other video clips, merge, and add effects as you wish. Likewise, you can add opening titles, subtitles, and end credits to your video. More so, this tool offers different templates to use. Just drag and drop the templates you wish to use to a specific location on the timeline.
Step 5. Preview your file
Last but not least, you can preview your files. Click on the “Play” tab to start previewing your video clips. The main essence of this part is to allow you to make the necessary changes to your clips if there is a need.
Step 6. Export and Share
With Filmora, you can export your file to various social media platforms. But first, go to the “Output window” and select the video file format to use. This software supports several output formats to apply to any platform and device. Just click on the “Format” tab and choose the file format to use. Then also change the resolution and other parameters like frame rate and channel of your video in the “Settings” section. Finally, share your video to your YouTube channel and get ready to add the video to the Google Slide presentation.
For Win 7 or later (64-bit)
For macOS 10.12 or later
Conclusion
● You now know how to put a YouTube video in Google Slides the simple way. You can search for your YouTube videos or directly use the URL link. Whatever the case, remember that it’s the quality of your video that carries more weight. Thanks to the availability of third-party apps that you can use to create and improve the quality of your videos.
● Filmora is at your service to create high-resolution videos that you can export in any format to your YouTube channel. The tool is intuitive, and it won’t matter whether you haven’t tried it before. It is a perfect choice for both professionals and first-time users.
Google Slide presentation is a powerful tool for creators to keep their audience engaged. This online platform lets you create and demonstrate your ideas. It will capture your viewers’ attention from the very beginning. It also doesn’t matter whatever learning style you engage. Adding YouTube videos to Google Slide will appeal to all levels of individuals.
More so, it is the best way to provide a break for both the audience and the creator. You can break Google Slide presentations with videos to offer some break. Viewers and the presenter get a breather in the process. The presenter can take a short break from speaking while the video plays. Let’s now dive into how to embed a YouTube video in Google Slides.
In this article
01 Why should we add a video to Google Slides?
02 How to add a YouTube video to Google Slide
03 How to choose the right video for your Slides?
Why should we add a video to Google Slides?
There is a great impact of adding video to Google Slides.
For attention
Videos will automatically awaken you, especially if your thoughts have started to sway during a presentation. A video has a direct way of showing creativity. The audience automatically connects the dots between the video and the presentation lines alike.
To stimulate discussion
A picture is worth a thousand words. There is a way that an added video will help the audience connect to the day’s topic. It will bring up several ideas and stir up discussion with the presenter.
Easy following
With videos embedded in Google Slide, viewers will find it easy to understand and digest. Videos automatically eliminate boredom and make any topic interesting.
How to add a YouTube video to Google Slide
Use these two methods to add a YouTube video to Google Slides. Via the Search and Direct link.
Method 1. Embed YouTube video to Google Slide by search and selection
Google has owned YouTube since the year 2006. You can, therefore, integrate Google’s products with YouTube easily.
Step 1. First, go to the slide where you want to embed your video.
Step 2. Then choose the “Insert” option from the menu bar and hit the “Video” option.
Step 3. It would be best if you now viewed the “YouTube” search bar to type in the video you want to embed. You can use keywords to search for the video in question and view instant search results.
Step 4. Then select the video you want to embed, and you’ll see it appear on the “Slide.”
Step 5. Format your video. Remember that the entire video will be embedded. You don’t necessarily need the whole video. It is time to select just a brief but relevant clip from the video to use. Then position your video to the right point using the axes from the exact starting point to the finished part you want the video to appear in.
Method 2. Embed YouTube video to Google Slide by direct link
You can engage this method if you want to include the entire video.
Step 1. Get the URL of the specific YouTube video that you want to use.
Step 2. Then go to your browser’s “Address bar” to copy the YouTube link.
Step 3. Next, open the “Presentation” slide to put your video to.
Step 4. Choose the “Insert” tab from the menu bar.
Step 5. Then hit on the “Video” option from the drop-down menu that appears.
Step 6. A new window will open automatically. Choose the “By URL” tab.
Step 7. Then paste the YouTube video URL in the “Paste YouTube URL Here” bar section.
Step 8. Wait for the video file to load and press the “Select” option. The video will immediately appear in the presentation slide. Just drag and drop the video in your preferred position.
Note: You can do a few edits inside the application. Set the timer when your video should start and when to stop. You can also adjust the video player size.
How to choose the right video for your Slides?
Not all videos will make an impact on your Google Slide. You need to use the best shot that adds value to your presentation. These guidelines will help you to settle on the best video.
Be Professional – choose the best video for your presentation. Remember that the video is part of the presentation and carries more weight. Settling for quality video will bring out the professionalism in you.
Relevant – how do you know that what you are showing your audience corresponds to the presentation piece? Ensure that the video you add has something to do with the Google Slide presentation topic. The two should naturally flow to make it easy to understand the whole concept.
Precise – your presentation is not about the video. The ideal length should not exceed 60 seconds. The longer the video, the greater the chance for your audience to lose track along the way.
Know every footage you are working with – this will help you pick the best shots for your presentation. So, learn every aspect of the video before settling down to use it.
Add new content – even though one content may suit several presentations, don’t rely on the same piece each time. Your audience will want to feel something fresh each time you are presenting. So, compose different videos for different scenarios to make that big impact.
Create an eye-catching video for your Slides with Filmora
The video quality matters when it comes to creating your Slides. The best video creator – Filmora – works in simple steps to give you an eye-catching video. It will create videos for all scenarios like marketing, tutorial, gaming, etc.
Key features of Filmora
- It offers you advanced video effects like filters, motion elements, etc
- You can multiply your fun with multiple screens with the Split Screen feature
- Easily change backgrounds using the Green Screen feature
- The speed control lets you fast forward or slow down a special moment
- Import your video clips to social media platforms
- You can also adjust the audio of your tracks using the Audio Mixer feature
Follow this guide to create a video for your slide with Filmora
Step 1. Launch Filmora
First, begin by downloading and installing Filmora on your computer device. Once installed, launch it and allow it to run. You can either create a new project or open an existing project to work on.
Step 2. Create a new project
Here, click on the “New Project” tab on the app’s welcome screen. The editor should load immediately. Then proceed to register the product. Just hit on the “Register” tab.
Step 3. Import video
Check the upper left corner of your screen to see the “Import” tab. Click on it and choose the “Import Media Files” option. Next, navigate to the location of your computer’s local list to select the clip or video you want to edit. Then, hit the “Import” button to add the video to the timeline for editing.
Step 4. Edit video
Drag and drop the raw footage to Filmora’s timeline to begin editing. Here, you can trim, add other video clips, merge, and add effects as you wish. Likewise, you can add opening titles, subtitles, and end credits to your video. More so, this tool offers different templates to use. Just drag and drop the templates you wish to use to a specific location on the timeline.
Step 5. Preview your file
Last but not least, you can preview your files. Click on the “Play” tab to start previewing your video clips. The main essence of this part is to allow you to make the necessary changes to your clips if there is a need.
Step 6. Export and Share
With Filmora, you can export your file to various social media platforms. But first, go to the “Output window” and select the video file format to use. This software supports several output formats to apply to any platform and device. Just click on the “Format” tab and choose the file format to use. Then also change the resolution and other parameters like frame rate and channel of your video in the “Settings” section. Finally, share your video to your YouTube channel and get ready to add the video to the Google Slide presentation.
For Win 7 or later (64-bit)
For macOS 10.12 or later
Conclusion
● You now know how to put a YouTube video in Google Slides the simple way. You can search for your YouTube videos or directly use the URL link. Whatever the case, remember that it’s the quality of your video that carries more weight. Thanks to the availability of third-party apps that you can use to create and improve the quality of your videos.
● Filmora is at your service to create high-resolution videos that you can export in any format to your YouTube channel. The tool is intuitive, and it won’t matter whether you haven’t tried it before. It is a perfect choice for both professionals and first-time users.
CarryMinati: Financial Triumphs with Ajey Nagar
If you have been following the who’s who of YouTube, then Ajey Nagar, also popularly known as CarryMinati is definitely not a new name for you and you must also be well aware of CarryMinati YouTube income. And, if you have not heard of this name before, then it is high time to know about this YouTube influencer who is an Asian and Indian sensation.
Getting excited, we too!!! So, in this article, we will learn all about who is Ajey Nagar, what is CarryMinati, what makes this man so popular, what is his CarryMinati monthly income, his personal life, and much more.
Part 1: Who is CarryMinati?
You may wonder who this simple-looking, young boy is, right?

Yes, he is one of the India’s biggest YouTuber- Ajey Nagar. He shared a shoulder with Tom Cruise while promoting Mission Impossible 6 in Paris.
In this part of the topic, we are going to get deep knowledge about the personal, professional and financial information related to Carryminati.
| Nickname | CarryMinati |
|---|---|
| Real Name | Ajey Nagar |
| Net Worth (2022) | 31 Crores ($4 Million) |
| Monthly Income | Rs. 16+ Lakh |
| Yearly Income | Rs. 3+ Crore |
| Biography | |
| Date of Birth | 12th June 1999 |
| Gender | Male |
| Nationality | Indian |
| Height | 165 cm |
| Profession | YouTube |
| YouTube Channel | CarryMinati and CarryisLive |
| Awards and Recognition | Listed in TIME’s 10 next-generation leaders in the year 2019Listed in Forbes 30 Under 30 Asia in 2020 |
So, by now we know that CarryMinati aka Ajay Nagar is quite popular on YouTube. But, what does this popularity gets him in terms of money? Yes, this is an interesting question and the answer for this, you can check out in the next part of the topic.
Part 2: CarryMinati YouTube earning and stats
Let’s now deep digger into the financial aspects and other related stats related to CarryMinati. So, if you are eager to know how much CarryMinati earn from YouTube, we will give you to the nearest exact figures. Who does not like numbers, they are interesting facts, isn’tead.
A major part of Ajay Nagar’s income comes from YouTube videos and in addition to this, his popularity makes him earn from YouTube sponsors, collaborations, tie-up videos, brand endorsements, and advertising.
| Estimated Monthly Earnings in USD/Indian Rupees | Rs. 16+ Lakhs |
|---|---|
| Estimated yearly Earnings in USD/Indian Rupees | $ 4 Million/ Rs. 3+ Crores |
| Videos About | Roasting, Comedy, Sketches, Satire, and Gaming |
| Total Video Uploads | Over 176 |
| Subscribers | CarryMinati- 36.6millionCarryisLive- 11.3 million |
| Video Views | CarryMinati- 2.9 billion+CarryisLive- 1.3 billion+ |
| Last 30 Days Views | 35 M+ |
The statistics related to the views and income about CarryMinati are quite interesting and this makes everyone curious about what makes the channel and this person so popular on YouTube. If you too have been curious about the same, head to our next section.
Part 3: Why is Carry Minati trending on YouTube?
Just like the statistics, the facts related to CarryMinati’s popularity are equally interesting. Every YouTube channel or an influencer who is popular and trending have their own uniqueness and when it comes to CarrayMinati aka Ajay Nagar, there are several factors that makes him a sensation. Shortlisted some of them are as below.
Exclusive personality of Ajay Naga
Ajay Nagar has an exclusive personality that acts like a magnet that attracts viewers. His way of speaking and interacting with the audience has earned him a fan base across the globe.
Engaging and interactive video
The videos of CarryMinati are engaging and interactive which keeps the audience interested throughout.
Rib-tickling humour
The way the humour is added to the videos is simply amazing and definitely makes the viewers laugh a lot.
Relatable and authentic video content
Viewers of different ages and genres can easily relate to the videos created by CarryMinati and also found them to be authentic and different from the other channels.
Checkout his video on Social Media Culture that how interestingly he engages people with the relatable topics, and you will know what makes this man different from the others.
Most popular videos of CarryMinati
Though almost all videos by CarryMinati gain popularity, listed below are the top ones to date.
The End (The video was uploaded on 8th May 2020 and had over 65 million views with 8 lacs comments and over 10 million likes.) This was a roasting video by CarryMinati that gained immense popularity, but was later pulled down by YouTube stating it to be against the harassment policy of YouTube and for violating the guidelines of the community.

This video is about the Indian Film Industry and the awards given to the stars. Carryinati has interesting roasted the stars and receiving awards.
PUBG India: Life Battle Royale
https://www.youtube.com/embed/10y9yefd%5FxY
It is an interesting video of around 17 minutes where Ajay Nagar has acted along with other people to create a fun plot based of PUBG game.
Bonus Tip: How to be a YouTuber and Make Videos like Carryminati
We have learned that CarryMinati has become the name it is, all because of the excellent videos it creates. Though it may sound simple, video creation requires a lot of skills, patience, and the help of expert tools.
A lot of people have some excellent themes and ideas in their minds, but they do not know how to weave them all into an interesting video and here the need for an expert tool like Wondershare Filmora arises. So, if you also have some video creation plans in mind but have been holding them back, it’s time to bring them to reality using Filmora.
Wondershare Filmora is an excellent Windows and Mac-based software that helps in creating eye-catchy videos using multiple features supported by the program. From basic to advanced, no matter what type of video creation requirements you are looking for, Wondershare Filmora will take due care of the same.
Key features of the software
- Support to all types of video files and formats including 4K and also comes with a huge collection of stock footage.
- Support advanced features like PIP, green screen, split-screen, AI portrait, auto reframe, screen recorder, speed ramping, masking, and more.
- Allows adding visual effects and transitions and also allows uploading the created videos to YouTube and Facebook.
Wondershare Filmora supports a wide range of video editing features including basic editing, advanced editing, AI-based tools, and much more. The complete features can be checked in the Wondershare Filmora Video Editing Guide.
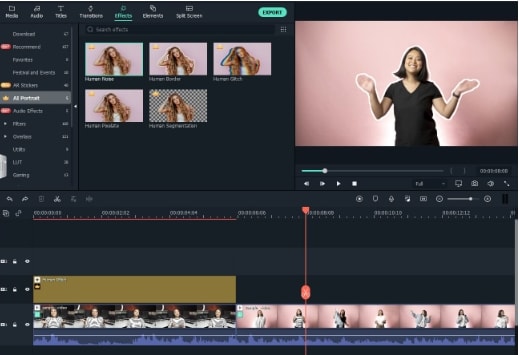
AI-based features are the highlight of this software and for your reference, listed below are the steps for the AI Portrait function. Using this feature, the background of a video can be removed easily without using the green screen or the chroma key.
Steps to use AI Portrait in Wondershare Filmora
Free Download For Win 7 or later(64-bit)
Free Download For macOS 10.14 or later
Step1 Launch the installed software on your system and add the media file to the software timeline.

Step2 Next, go to Effects > Ai Portrait, and the options of the features can be checked here. Click on the thumbnail and the feature can be viewed in the preview window.
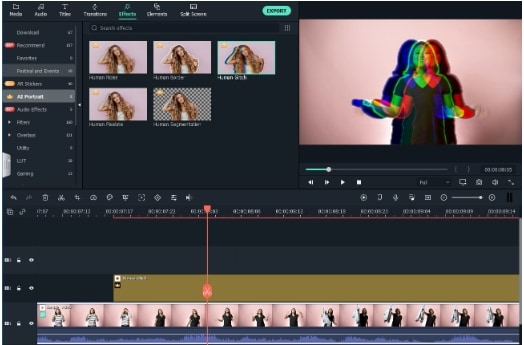
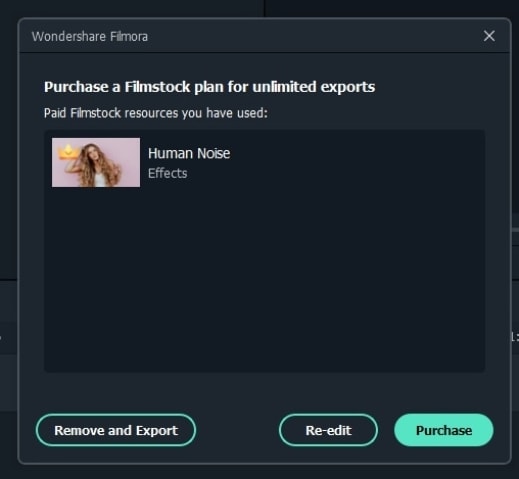
Step3 Drag the selected Portrait to the timeline and from the pop-up window choose to Purchase the additional module. You can check the result by playing the video. If needed multiple AI Portraits can be added to the video.
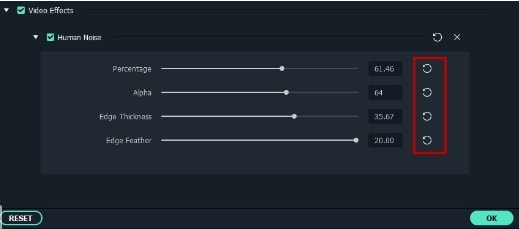
Step4 If further customization is needed, you can even adjust the AI Portrait settings.
Step5 When finally, all the settings are done, click on the Export button to save the file.
Hot FAQs on CarryMinati
Below we have answered some hot frequently asked questions about CarryMinati.
1. Is Carry Minati married?
No, till date, CarryMinati aka Ajay Nagar is not married.
2. How much CarryMinati earn from 1 video?
Calculating the income from a YouTube video can be a complicated task that depends on several factors like views, likes, ads in the video, and more.
3. Which actors has Carry Minati interviewed?
Carry Minati has interviewed popular actors like Tom Cruise, Tessa Thompson, Henry Cavil, and others celebrities.

Final Words
Gone are the days when only high posts at big-shot companies can bring in money and proving this right is CarryMinati who is not only earning big but has also earned worldwide fans and has created a name for himself. With his comic skits and engaging videos, this popular YouTube influencer is growing and stretching his wings.
If you too have got inspired and looking forward to starting with some interesting videos, we suggest downloading Wondershare Filmora which will let you create a professional video with ease.
Free Download For Win 7 or later(64-bit)
Free Download For macOS 10.14 or later
So, by now we know that CarryMinati aka Ajay Nagar is quite popular on YouTube. But, what does this popularity gets him in terms of money? Yes, this is an interesting question and the answer for this, you can check out in the next part of the topic.
Part 2: CarryMinati YouTube earning and stats
Let’s now deep digger into the financial aspects and other related stats related to CarryMinati. So, if you are eager to know how much CarryMinati earn from YouTube, we will give you to the nearest exact figures. Who does not like numbers, they are interesting facts, isn’tead.
A major part of Ajay Nagar’s income comes from YouTube videos and in addition to this, his popularity makes him earn from YouTube sponsors, collaborations, tie-up videos, brand endorsements, and advertising.
| Estimated Monthly Earnings in USD/Indian Rupees | Rs. 16+ Lakhs |
|---|---|
| Estimated yearly Earnings in USD/Indian Rupees | $ 4 Million/ Rs. 3+ Crores |
| Videos About | Roasting, Comedy, Sketches, Satire, and Gaming |
| Total Video Uploads | Over 176 |
| Subscribers | CarryMinati- 36.6millionCarryisLive- 11.3 million |
| Video Views | CarryMinati- 2.9 billion+CarryisLive- 1.3 billion+ |
| Last 30 Days Views | 35 M+ |
The statistics related to the views and income about CarryMinati are quite interesting and this makes everyone curious about what makes the channel and this person so popular on YouTube. If you too have been curious about the same, head to our next section.
Part 3: Why is Carry Minati trending on YouTube?
Just like the statistics, the facts related to CarryMinati’s popularity are equally interesting. Every YouTube channel or an influencer who is popular and trending have their own uniqueness and when it comes to CarrayMinati aka Ajay Nagar, there are several factors that makes him a sensation. Shortlisted some of them are as below.
Exclusive personality of Ajay Naga
Ajay Nagar has an exclusive personality that acts like a magnet that attracts viewers. His way of speaking and interacting with the audience has earned him a fan base across the globe.
Engaging and interactive video
The videos of CarryMinati are engaging and interactive which keeps the audience interested throughout.
Rib-tickling humour
The way the humour is added to the videos is simply amazing and definitely makes the viewers laugh a lot.
Relatable and authentic video content
Viewers of different ages and genres can easily relate to the videos created by CarryMinati and also found them to be authentic and different from the other channels.
Checkout his video on Social Media Culture that how interestingly he engages people with the relatable topics, and you will know what makes this man different from the others.
Most popular videos of CarryMinati
Though almost all videos by CarryMinati gain popularity, listed below are the top ones to date.
The End (The video was uploaded on 8th May 2020 and had over 65 million views with 8 lacs comments and over 10 million likes.) This was a roasting video by CarryMinati that gained immense popularity, but was later pulled down by YouTube stating it to be against the harassment policy of YouTube and for violating the guidelines of the community.
This video is about the Indian Film Industry and the awards given to the stars. Carryinati has interesting roasted the stars and receiving awards.
PUBG India: Life Battle Royale
https://www.youtube.com/embed/10y9yefd%5FxY
It is an interesting video of around 17 minutes where Ajay Nagar has acted along with other people to create a fun plot based of PUBG game.
Bonus Tip: How to be a YouTuber and Make Videos like Carryminati
We have learned that CarryMinati has become the name it is, all because of the excellent videos it creates. Though it may sound simple, video creation requires a lot of skills, patience, and the help of expert tools.
A lot of people have some excellent themes and ideas in their minds, but they do not know how to weave them all into an interesting video and here the need for an expert tool like Wondershare Filmora arises. So, if you also have some video creation plans in mind but have been holding them back, it’s time to bring them to reality using Filmora.
Wondershare Filmora is an excellent Windows and Mac-based software that helps in creating eye-catchy videos using multiple features supported by the program. From basic to advanced, no matter what type of video creation requirements you are looking for, Wondershare Filmora will take due care of the same.
Key features of the software
- Support to all types of video files and formats including 4K and also comes with a huge collection of stock footage.
- Support advanced features like PIP, green screen, split-screen, AI portrait, auto reframe, screen recorder, speed ramping, masking, and more.
- Allows adding visual effects and transitions and also allows uploading the created videos to YouTube and Facebook.
Wondershare Filmora supports a wide range of video editing features including basic editing, advanced editing, AI-based tools, and much more. The complete features can be checked in the Wondershare Filmora Video Editing Guide.
AI-based features are the highlight of this software and for your reference, listed below are the steps for the AI Portrait function. Using this feature, the background of a video can be removed easily without using the green screen or the chroma key.
Steps to use AI Portrait in Wondershare Filmora
Free Download For Win 7 or later(64-bit)
Free Download For macOS 10.14 or later
Step1 Launch the installed software on your system and add the media file to the software timeline.
Step2 Next, go to Effects > Ai Portrait, and the options of the features can be checked here. Click on the thumbnail and the feature can be viewed in the preview window.
Step3 Drag the selected Portrait to the timeline and from the pop-up window choose to Purchase the additional module. You can check the result by playing the video. If needed multiple AI Portraits can be added to the video.
Step4 If further customization is needed, you can even adjust the AI Portrait settings.
Step5 When finally, all the settings are done, click on the Export button to save the file.
Hot FAQs on CarryMinati
Below we have answered some hot frequently asked questions about CarryMinati.
1. Is Carry Minati married?
No, till date, CarryMinati aka Ajay Nagar is not married.
2. How much CarryMinati earn from 1 video?
Calculating the income from a YouTube video can be a complicated task that depends on several factors like views, likes, ads in the video, and more.
3. Which actors has Carry Minati interviewed?
Carry Minati has interviewed popular actors like Tom Cruise, Tessa Thompson, Henry Cavil, and others celebrities.
Final Words
Gone are the days when only high posts at big-shot companies can bring in money and proving this right is CarryMinati who is not only earning big but has also earned worldwide fans and has created a name for himself. With his comic skits and engaging videos, this popular YouTube influencer is growing and stretching his wings.
If you too have got inspired and looking forward to starting with some interesting videos, we suggest downloading Wondershare Filmora which will let you create a professional video with ease.
Free Download For Win 7 or later(64-bit)
Free Download For macOS 10.14 or later
Also read:
- Unveiling the Ideal YouTube Subset of Viewers
- Unveiling the Leading Free Stock Video and Image Archives
- Tactical Video Takedown A Guide to Judging Ownership and Opposition
- In 2024, 10 Essential Tips for Achieving Wealth Through YouTube Video Views
- [New] Controlling YouTube's Playback Speed - Mobile and PC
- Efficient Content Management Rank of the Top 10 YouTube Trimmers
- Saturating the Market Precision in Sharing Through Shorts
- Best of Breed Top 10 YouTube Stations for Journalism for 2024
- Monthly Earnings From YouTube for Creators
- Essential 7 DSLRs to Elevate Virtual Presentations & Broadcasts
- In 2024, Easy Steps to Directly Share Videos From iPhone/iPad
- Mouthwatering Masters Culinary YouTube Experts
- 2024 Approved Enhance Videos Naturally - Free 9 YouTube Thumbnail Crafting Tips
- [New] Channel Your Inner DJ Discover These Innovative 20 Music Sources on YouTube
- Guide on Transforming YouTube Videos Into MP3 Using Safe Procedures
- 2024 Approved Creative Reactors The 10 Premier Video Responses
- 2024 Approved Deciphering the Language of YouTube Thumbnails Effectiveness
- Unleash Creativity Unlimited Samples of 50 YouTube Banners for Free
- Channel Riches Anywhere Adopting YouTube Analytics & Monetization
- In 2024, Elevate Your Video Game The Best of 8 Mirrorless Cams
- [New] Break Down The Essentials of YouTube Sharing on Facebook
- Breaking Free From YouTube The Best 27 Online Video Sites Compared for 2024
- 2024 Approved Elevate Your Content Game Perfectly Tailored YouTube Shorts Thumbnails
- Broadcast Repeat Looping YouTube Video Magic for Your Setup for 2024
- Probing Into YouTube Discussions
- Examining YouTube's Highlighted Comment Mechanics
- [New] Crafting Superior YouTube Ads A Showcase of Mastery
- [New] Best iPhone & Android Photo & Video Capture Applications Reviewed
- [Updated] Epicurean Elites Top Food Vloggers You Can't Miss
- A Dive Into History The Definitive List of Student-Friendly Channels #1-10 for 2024
- Coherent and Curated YouTube Playlists Online & Mobile Assembly Guide for 2024
- Simple Steps for a Memorable YouTube Channel URL
- Essential Knowledge The Do's and Don'ts on YouTube for 2024
- [New] How to Edit Uploaded/ Published YouTube Videos
- [New] Direct Hit The Techno-Friendly Way to Upload Your Short Clips
- 2024 Approved Enriching Youtube Channels Amp up with Songs
- [New] Essential Guide Top 10 Free YouTube-to-MP3 Tools
- 2024 Approved Cut Costs, Enhance Visuals – Free Banners for Video Makers
- Employing Google Trends to Discover Compelling Video Themes
- Avoid Common Pitfalls with Proper Use of YouTube Tags for 2024
- In 2024, Empowerment in Entertainment Top 10 Inspirational Women
- [New] Clearing Up Your Video Quality Issues
- The Youtube Inversion Creative Tactics to Watch Videos Backwards
- [New] Chilling Yet Heating Top 5 Winter Scenes for Vids
- Driving Traffic to Long-Form Videos via Shorts for 2024
- Boosting Channel Traffic with YouTube Backlink Tactics for 2024
- Custom Coverage Made Simple Fast-Track Your YouTube Shorts Design for 2024
- Enchanting Editing YouTube's Best Video Magic Hits
- Explore 6 Alternative Platforms for High-Quality YouTube Graphics
- Tecno Pop 7 Pro Bootloop Problem, How to Fix it Without Data Loss | Dr.fone
- In 2024, Unlocking an iCloud Locked iPad and iPhone 15 Pro
- Comprehensive Guide to Live-Streaming with OBS and Platforms for 2024
- Updated 2024 Approved Best 10 Animated DP for WhatsApp
- In 2024, Additional Tips About Sinnoh Stone For Nokia C300 | Dr.fone
- In 2024, Precision and Power A Filmmaker's Guide to Professional Voice-Over Techniques
- In 2024, Screen Recorder Essentials Top 10 Tools Compared
- [Updated] In 2024, Dive Into Retro Gaming The 5 Highest-Rated Android PS2 Emulators
- In 2024, Create Stunning Invites Top 10 Free Video Makers
- Complete Breakdown Enhancing Your Experience with Advanced Mobizen Techniques for 2024
- How to Downgrade iPhone 14 Pro Max without Data Loss? | Dr.fone
- Simplified Guide Turning Videos Upside Down with VLC
- [Updated] 15 Techniques to Ensure Facebook Videos Are Spotlighted
- [Updated] Precision Capturing for Your PS3 Gaming Adventures for 2024
- What is the best Pokemon for pokemon pvp ranking On Google Pixel Fold? | Dr.fone
- [New] In 2024, Expert Advice Achieving Professional-Level Facecam Cinematography
- Title: "In 2024, Elevating Slideshows Incorporate YouTube Videos"
- Author: Brian
- Created at : 2024-05-25 12:13:58
- Updated at : 2024-05-26 12:13:58
- Link: https://youtube-video-recordings.techidaily.com/in-2024-elevating-slideshows-incorporate-youtube-videos/
- License: This work is licensed under CC BY-NC-SA 4.0.
