
:max_bytes(150000):strip_icc()/KhangVuong-d90c802b819741a297291d835e7762e4.jpeg)
"In 2024, Elevate Your Videography Premiere to YouTube Upload"
Elevate Your Videography: Premiere to YouTube Upload
How Do I Use Adobe Premiere To Upload YouTube Videos?

Benjamin Arango
Mar 27, 2024• Proven solutions
Whilst getting the editing and post work just right on any project is what we all aim for, the ultimate aim is for other people to see our creations, and the most popular way to achieve that is YouTube . Chances are, if you are producing video, you will be putting some of it on YouTube at some point, so let’s have a look at the most efficient way to get your work from Premiere to YouTube.
Check if your computer meet the Premiere System Requirements >>
This is a basic tutorial about Adobe Premiere, professional video editing software. However, if video editing is new to you, consider Wondershare Filmora , which is a powerful but easy-to-use tool for users just starting out. Download the free trial version below.
 Download Mac Version ](https://tools.techidaily.com/wondershare/filmora/download/ )
How Do I Use Adobe Premiere To Upload YouTube Videos
1. Master Copy
Before exporting your work, it is important to first create a master copy of your project that is ‘as is’, in that it reflects the settings and codecs used in the original footage.
To do this you simply select the sequence within the Timeline or in the Project Panel, and go through the menu tree via File > Export > Media to bring up the export dialogue.

To create your Master Copy, simply select the first option of ‘Match Sequence Settings’, this exports a file that is of the same quality as your original footage, essentially producing a digital copy of the work for archiving before anything else is done.
With you work safe and secure it is now time to look at ensuring the project is suitable for YouTube. With our sequence selected in the Timeline or Project Panel again, we go through the same File > Export > Media path to bring up the media export dialogue as before.
2. Container
The first option we have to consider is the file format that our finished video needs to be in. Here you should refer to YouTube for its guidelines, whilst they do accept a number of file formats, digging through the YouTube help system to find the settings for highest quality we find that they recommend MPEG4 as the container, using the codec.

We can also see further recommended settings in this screenshot that will be covered later.
The good news is that Premiere automatically selects the appropriate container for us when we select our codec, however it is worth knowing the file type YouTube is expecting just to check yourself.
3. Video Codec
So having established that YouTube recommends the MPEG4 container using the codec, the first option we need to look for in the media export dialogue is to select the appropriate Format.
This is the first drop down in the dialogue box, and in this case we simply select from the list.

Once you select you can check the ‘output name’ field and see that premiere is automatically set the output file to .mp4 which is exactly what we need.
4. Preset
The next field we come to is the ‘Preset’ dropdown menu. This is a major help to most people, as Adobe have very kindly included large numbers of presets to quickly adapt video settings to suit specific uses. They vary depending on the exact version of Premiere you are using, and each format type does have its own list of presets, as we can see has a large number for YouTube, but also has many presets for specific devices (presets for iPad, Kindle, Nook, various other tablets and phones, Vimeo and a host of others) to make getting the right settings that bit easier for us.

It is important here to select the correct preset from the various YouTube options. You want to select the resolution and frame rate that match your source file, for the best results. So, if your source file is 1080p with a frame rate of 29.97 fps then that is the YouTube setting you would select.
Once a preset is selected a summary of the settings is displayed below, normally these will be well suited to your project, however you can fine tune anything you wish by selecting the video or audio tabs at the bottom which give you the chance to adjust each parameter individually. If you do this, you can save these changes as a custom preset by clicking the button at the side of the Preset dropdown menu and simply use it on later projects by selecting it from the list the same as any other, a great time saving tool.

5. Rendering
Once you are satisfied with the settings, either from the Preset alone or if you have adjusted anything yourself, you are nearly ready to render the file and export it.
For YouTube it is recommended you select the ‘Use Maximum Render Quality’ option to maintain the best output you can, it does add time to the render process but if you value the quality of your work it is worthwhile.
Finally you can choose a suitable filename and the destination of the file by clicking on the ‘Output Name’ field.
I normally use a filename that includes the destination medium so I can differentiate between different versions of a project and know which one to upload where, in this case I include ‘youtube’, but if I were planning on uploading clips of the project to vimeo as well for instance there may be a cut of the project with ‘vimeo’ in the name too. The destination is personal preference, because I do use filenames to differentiate versions I can put the various iterations into a single project file, others have folder structures for each type of file , so all YouTube output goes into a single folder and so on, how you organize is entirely dependent on how you work.

Once those are selected clicking ‘Export’ starts the rendering process, and eventually (how long depends on the speed of your computer and the size and type of file involved), you will end up with your YouTube optimized video in the location you chose.
Here I created 4 key frames that let the ‘Animation’ object move around the ‘Demo Text’ Object and finally come to rest below it. Whilst this type of effect does look very effective on screen, such is the ease of use of After Effects it really is just a few minutes work to achieve.
Learn more details about How to add text in Premiere >>
6. Uploading
Now you have your file, the next step is to go to your YouTube account and log in if you need to.
On the top of your homepage on the right is the upload button, selecting that brings up the select file menu as below.

You can either drag your file into the window or click on it to open a standard file browser to locate the desired file, click and the upload will begin. The dropdown underneath allows you to set the video as Public, Unlisted or Private. You can change this at any time once the video is uploaded as well.
This opens the upload progress window, where you can add in a name, description and tags as well as add the video to a playlist or adjust the privacy settings as the video is uploading.

Once the upload as finished, you can do final adjustments to settings and choose a thumbnail for the video. The final step is to click the ‘Publish’ button and your video will be processed and go live.

Benjamin Arango
Benjamin Arango is a writer and a lover of all things video.
Follow @Benjamin Arango
Benjamin Arango
Mar 27, 2024• Proven solutions
Whilst getting the editing and post work just right on any project is what we all aim for, the ultimate aim is for other people to see our creations, and the most popular way to achieve that is YouTube . Chances are, if you are producing video, you will be putting some of it on YouTube at some point, so let’s have a look at the most efficient way to get your work from Premiere to YouTube.
Check if your computer meet the Premiere System Requirements >>
This is a basic tutorial about Adobe Premiere, professional video editing software. However, if video editing is new to you, consider Wondershare Filmora , which is a powerful but easy-to-use tool for users just starting out. Download the free trial version below.
Download Mac Version ](https://tools.techidaily.com/wondershare/filmora/download/ )
How Do I Use Adobe Premiere To Upload YouTube Videos
1. Master Copy
Before exporting your work, it is important to first create a master copy of your project that is ‘as is’, in that it reflects the settings and codecs used in the original footage.
To do this you simply select the sequence within the Timeline or in the Project Panel, and go through the menu tree via File > Export > Media to bring up the export dialogue.
To create your Master Copy, simply select the first option of ‘Match Sequence Settings’, this exports a file that is of the same quality as your original footage, essentially producing a digital copy of the work for archiving before anything else is done.
With you work safe and secure it is now time to look at ensuring the project is suitable for YouTube. With our sequence selected in the Timeline or Project Panel again, we go through the same File > Export > Media path to bring up the media export dialogue as before.
2. Container
The first option we have to consider is the file format that our finished video needs to be in. Here you should refer to YouTube for its guidelines, whilst they do accept a number of file formats, digging through the YouTube help system to find the settings for highest quality we find that they recommend MPEG4 as the container, using the codec.
We can also see further recommended settings in this screenshot that will be covered later.
The good news is that Premiere automatically selects the appropriate container for us when we select our codec, however it is worth knowing the file type YouTube is expecting just to check yourself.
3. Video Codec
So having established that YouTube recommends the MPEG4 container using the codec, the first option we need to look for in the media export dialogue is to select the appropriate Format.
This is the first drop down in the dialogue box, and in this case we simply select from the list.
Once you select you can check the ‘output name’ field and see that premiere is automatically set the output file to .mp4 which is exactly what we need.
4. Preset
The next field we come to is the ‘Preset’ dropdown menu. This is a major help to most people, as Adobe have very kindly included large numbers of presets to quickly adapt video settings to suit specific uses. They vary depending on the exact version of Premiere you are using, and each format type does have its own list of presets, as we can see has a large number for YouTube, but also has many presets for specific devices (presets for iPad, Kindle, Nook, various other tablets and phones, Vimeo and a host of others) to make getting the right settings that bit easier for us.
It is important here to select the correct preset from the various YouTube options. You want to select the resolution and frame rate that match your source file, for the best results. So, if your source file is 1080p with a frame rate of 29.97 fps then that is the YouTube setting you would select.
Once a preset is selected a summary of the settings is displayed below, normally these will be well suited to your project, however you can fine tune anything you wish by selecting the video or audio tabs at the bottom which give you the chance to adjust each parameter individually. If you do this, you can save these changes as a custom preset by clicking the button at the side of the Preset dropdown menu and simply use it on later projects by selecting it from the list the same as any other, a great time saving tool.
5. Rendering
Once you are satisfied with the settings, either from the Preset alone or if you have adjusted anything yourself, you are nearly ready to render the file and export it.
For YouTube it is recommended you select the ‘Use Maximum Render Quality’ option to maintain the best output you can, it does add time to the render process but if you value the quality of your work it is worthwhile.
Finally you can choose a suitable filename and the destination of the file by clicking on the ‘Output Name’ field.
I normally use a filename that includes the destination medium so I can differentiate between different versions of a project and know which one to upload where, in this case I include ‘youtube’, but if I were planning on uploading clips of the project to vimeo as well for instance there may be a cut of the project with ‘vimeo’ in the name too. The destination is personal preference, because I do use filenames to differentiate versions I can put the various iterations into a single project file, others have folder structures for each type of file , so all YouTube output goes into a single folder and so on, how you organize is entirely dependent on how you work.
Once those are selected clicking ‘Export’ starts the rendering process, and eventually (how long depends on the speed of your computer and the size and type of file involved), you will end up with your YouTube optimized video in the location you chose.
Here I created 4 key frames that let the ‘Animation’ object move around the ‘Demo Text’ Object and finally come to rest below it. Whilst this type of effect does look very effective on screen, such is the ease of use of After Effects it really is just a few minutes work to achieve.
Learn more details about How to add text in Premiere >>
6. Uploading
Now you have your file, the next step is to go to your YouTube account and log in if you need to.
On the top of your homepage on the right is the upload button, selecting that brings up the select file menu as below.
You can either drag your file into the window or click on it to open a standard file browser to locate the desired file, click and the upload will begin. The dropdown underneath allows you to set the video as Public, Unlisted or Private. You can change this at any time once the video is uploaded as well.
This opens the upload progress window, where you can add in a name, description and tags as well as add the video to a playlist or adjust the privacy settings as the video is uploading.
Once the upload as finished, you can do final adjustments to settings and choose a thumbnail for the video. The final step is to click the ‘Publish’ button and your video will be processed and go live.
Benjamin Arango
Benjamin Arango is a writer and a lover of all things video.
Follow @Benjamin Arango
Channel Makeovers Made Easy - Top 10 Online Tools for Artists
Youtube Banners Makers: 10+ Online Tools to Create Channel Art

Richard Bennett
Mar 27, 2024• Proven solutions
If you want to have more fans on your YouTube channel, it becomes really important to make your channel more attractive and fresh. YouTube banner is one of the important factors which represents the style, quality, and taste of your channel. Fortunately, there are many tools on the market that can help you make attractive banners. Therefore, we have brought you 10+ best-known YouTube banner makers that can enhance the beauty of your channel with their exceptionally amazing features. We will also let you know how to make a YouTube banner. Let’s explore.
You may also like: How to add custom thumbnails to YouTube videos >>
- Part 1: YouTube Banner Dimensions You Should Know
- Part 2: How to Make a YouTube Banner with Canva for Free
- Part 3: 10+ Best YouTube Banner Makers
Part 1: YouTube Banner Dimensions You Should Know
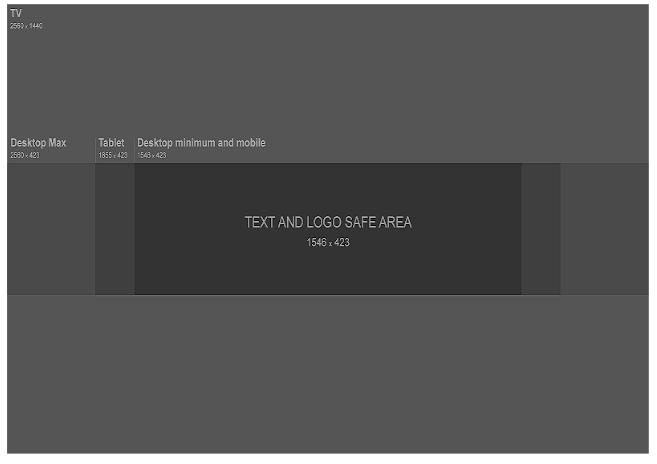
YouTube banner dimensions varied on different platforms, so you need to make the YouTube banner look great on desktop, tablet, and phone. According to Google , the recommended dimension is 2560 x 1440 px as the YouTube banner will be cropped if its size is too large. Minimum dimension is 2048 x 1152 px for uploading. The maximum width is 2560 x 423 px. The largest file size is 6MB. You can also add links to your own social media on YouTube banner, so it is a great place to recommend your other social media.
Part 2: How to Make a YouTube Banner with Canva for Free
There are so many tools that you can make a YouTube banner in the market, but it is not easy to find the right tool to make a banner if you can’t find the right tools. We have listed one way to make a YouTube banner below. You can use Wondershare Filmora to edit YouTube videos as it is designed to be a YouTube editor. Besides the basic editing including cropping/trimming and adding transitions, you can use it to add various text, more than 300 effects/filters, free audio, and more. It is also easy to make a YouTube intro. Download it to have a try!
Download Mac Version ](https://tools.techidaily.com/wondershare/filmora/download/ )
Step 1: Choose your template and layout
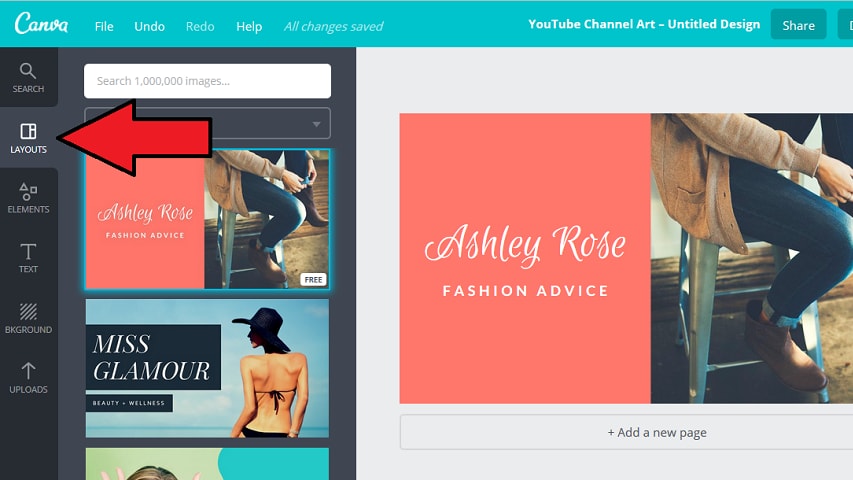
Canva is an online tool to make YouTube banner, so first you need to open it up . You are asked to log in.
After you’ve signed up for Canva you will see a variety of different templates. Scroll through them until you find YouTube Channel Art under Social Media & Email Headers.
This template will be the right size for a YouTube banner, but it will not show you the ‘safe zones’. Your banner will show up differently depending on the screen a viewer is watching on. Click here to download YouTube’s official template, which displays safe zones. You will be able to use it as a reference.
And Canva also provides you with sample layouts that you can build off of. They will include stock photos and text. Most are free, but some might cost a dollar.
If the one you happen to like isn’t free, don’t worry. It’s actually just the specific stock images being used in the example that cost money, and you’re probably planning on replacing those anyways.
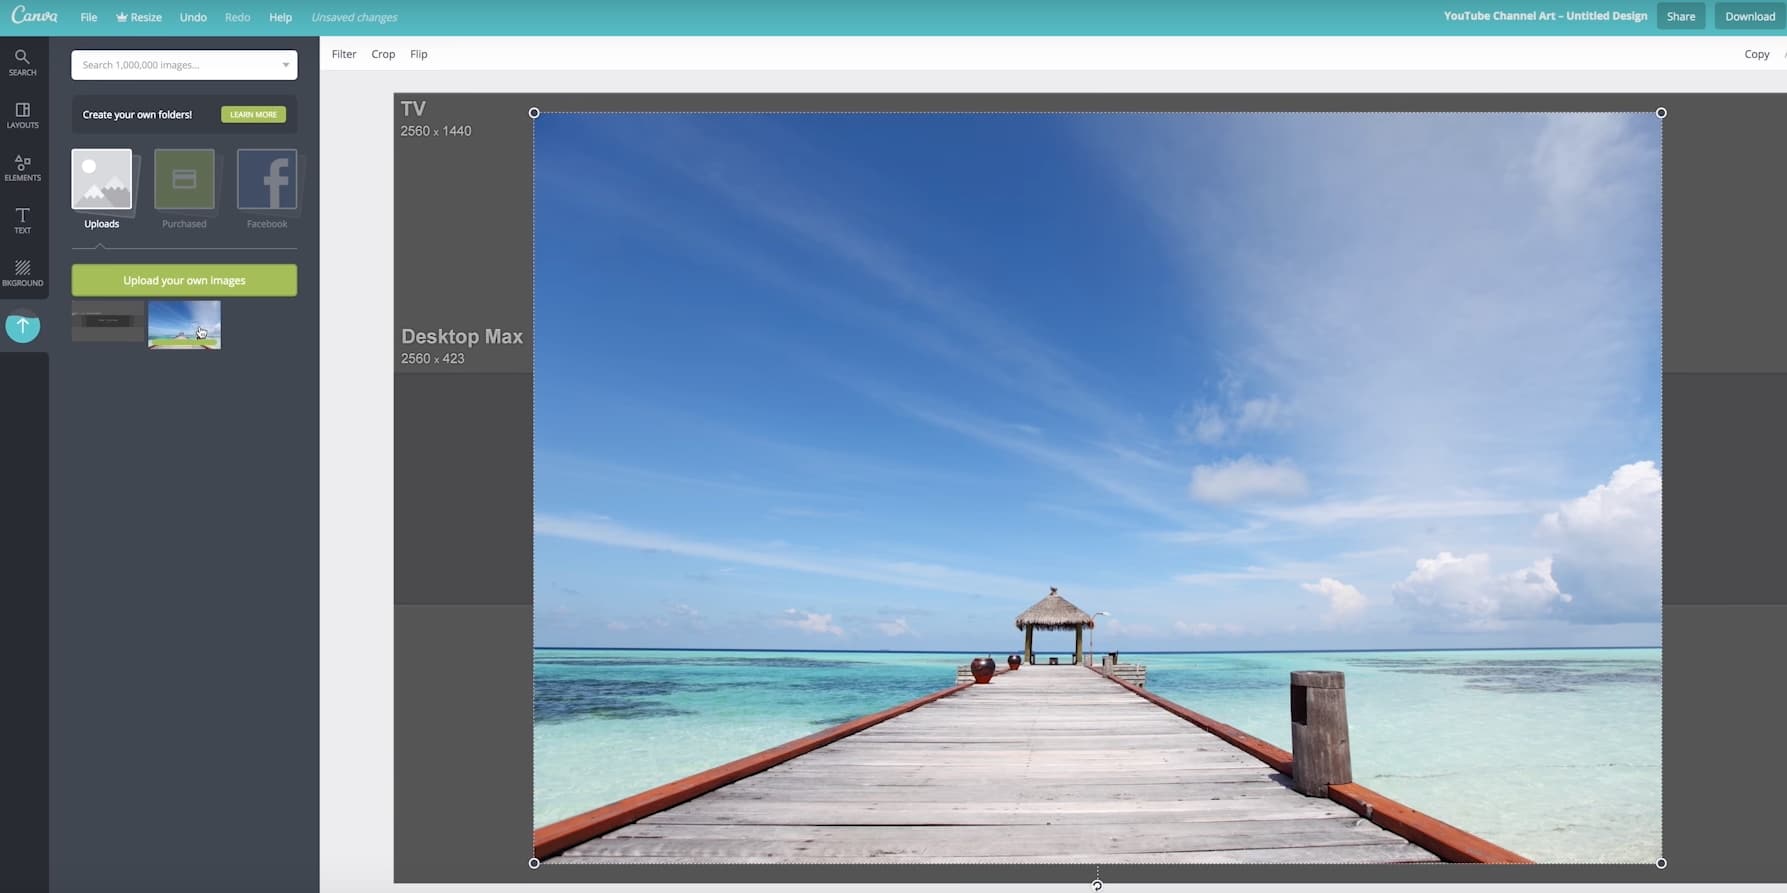
Step 2: Import your image
Canva provides a selection of stock images you can use for free. You can find them by clicking on Elements in the menu on the far left, and then clicking on Free Photos.
If you’d rather use your own images, click on Upload at the bottom of that same menu on the left. You’ll have the option of uploading images from your computer or importing them from Facebook.
After you have found the image you want to use or loaded it into Canva, click on it and it will appear in your layout.
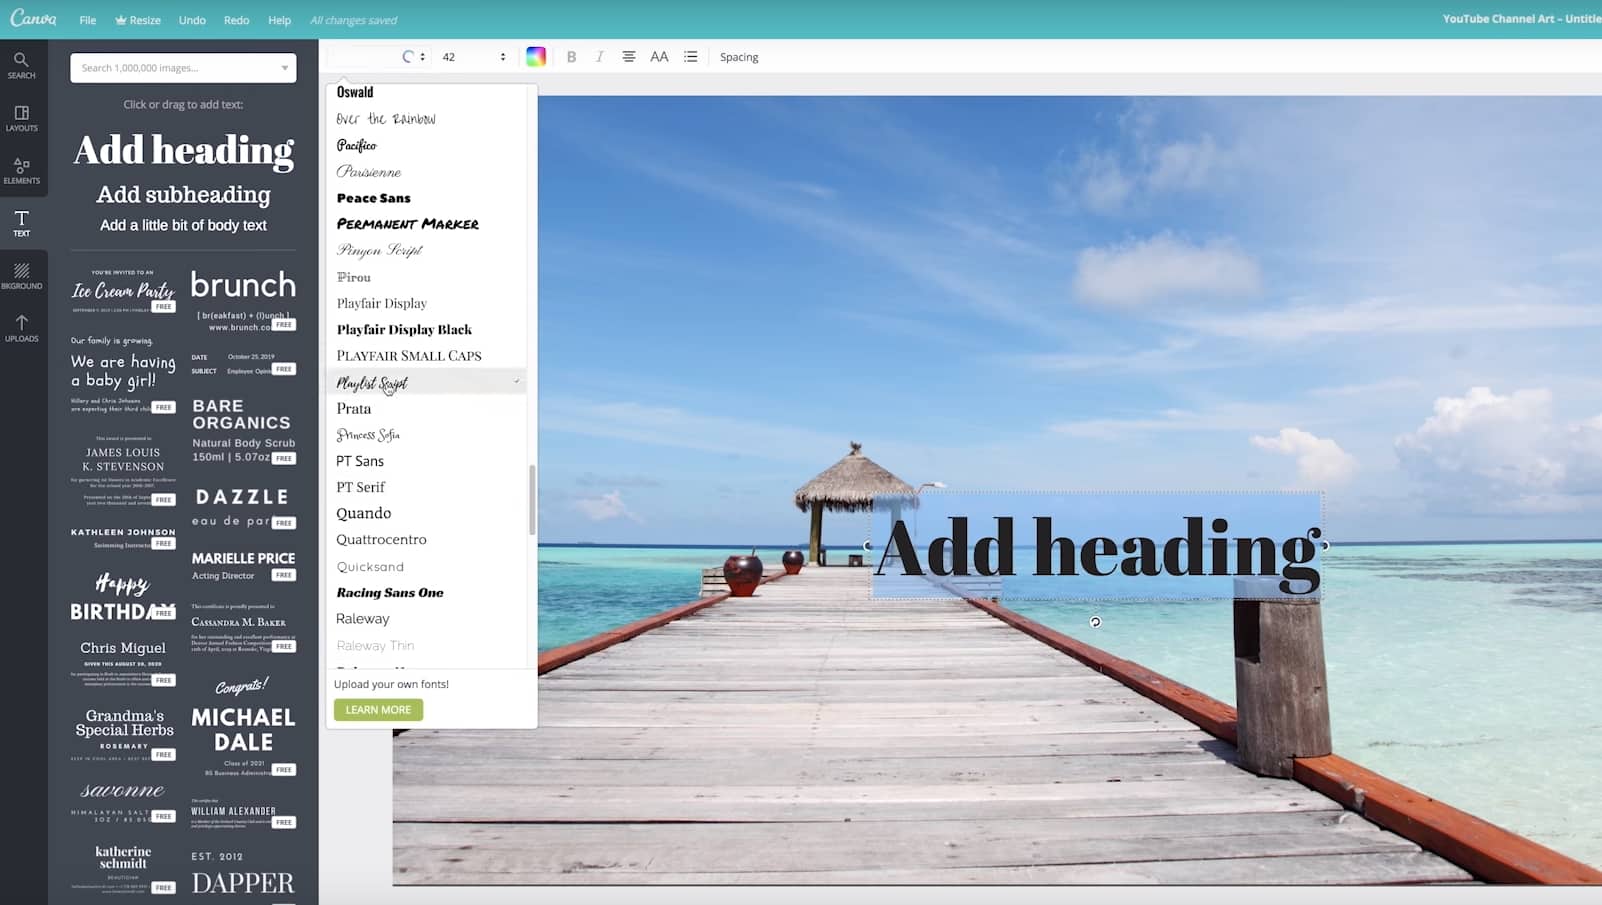
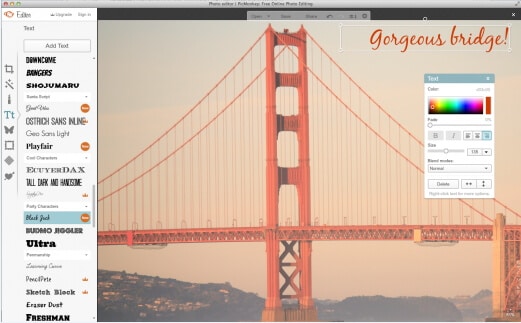
Step 3: Add text to YouTube banner
You can add various text after it is imported. There are lots of text templates in Canva, so just pick the one you like. You can also change text color and transparency to make it look great. Now to place it in the right position.
Step 4: Edit other elements
The layout you chose might include things like borders or backgrounds behind the text. You can change the colors of any of these just by clicking on them, then clicking on the color swatch in the top left corner of your design area.

Step 5: Download YouTube banner
Once you finish the editing, there is a download button in the top right corner of your screen. Click on it when you are finished to save your new channel art to your computer. It supports JPEG, PNG, and PDF. Now upload it to YouTube. So simple. Isn’t it?

Part 3: 10+ Best YouTube Banner Makers
1. Canva:
Canva is probably the most popular site for making channel art, for good reason. It has over 8000 templates for different kinds of graphics, including YouTube channel art, and there’s a huge variety of stock photos available either for free or $1. On Canva, creating your perfect banner is as easy as dragging and dropping images into a pre-built layout. Resizing is automatic, and you can flip/rotate or apply filters in just a few clicks
Pros: It contains millions of stock images, about 100 professional layouts, and lots of stunning filters.
Cons: Some high-quality images can be accessed only after payment of $1.
Price: The best thing to know is that this tool is available for free.
2. Wondershare PixStudio

Wondershare PixStudio is an all-in-one and powerful online graphic design maker for everyone. It has various types of templates for YouTube Thumbnails, Logos, Posters, etc. You can create a beautiful design by simply dragging and dropping the elements and photos. The online platform is free to use all templates, just One-Click to download your creations, and share to your Facebook, Instagram Story, and YouTube Thumbnails, etc. immediately.
Pros:
- Various types of templates
- Simple and Fast Design
- Background remover
Cons: The features of removing background be used after payment of $7.99 per month.
Price: The best thing to know is that this tool is available for free.
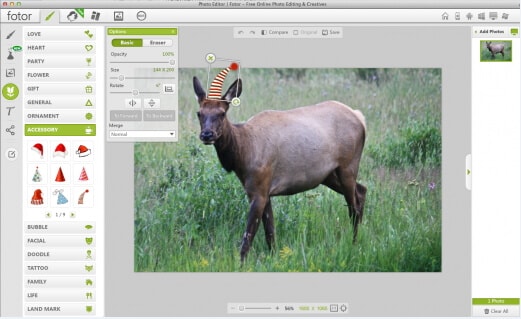
3. Fotor:
The makers of Fotor describe it as a ‘revolutionary photo editor and graphic designer’, and it is certainly a powerful tool. Fotor allows you to do a lot of fine editing on your photos – brightness, saturation, and color temperature are just a few of the things you can adjust – and its design feature is perfect for YouTube channel art.
Fotor has templates for YouTube channel art and a lot of fun sticker-like graphics. The Design interface is very similar to Canva, if slightly more complicated.
Pros: Complete art can be created within a few minutes and contains dozens of templates.
Cons: Little difficult to use for beginners.
Price: Free
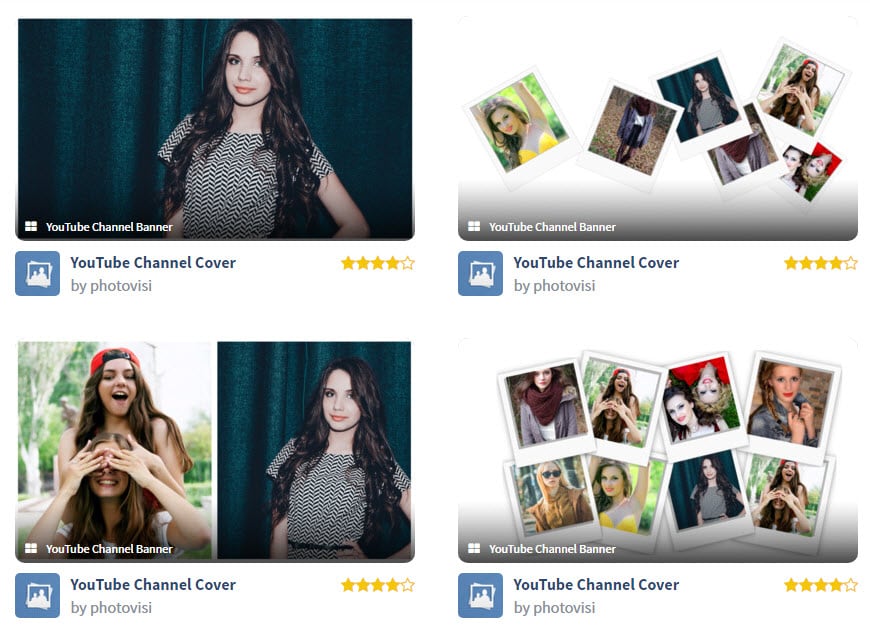
4. Photovisi:
It is a great source of inspiration for your YouTube channel where you can easily design, save and share your customized banner.
Pros: It automatically adjusts the size of the banner to the required format and is loaded with unlimited themes. Works on Android, Windows, Mac, and iOS.
Cons: Demand some special skills for usage.
Price: It is available for free at the official website
5. iKomee:
It is possible to have customized results for your YouTube banner designing using the iKomee platform where few minutes are enough to create wonders. It is one of the most loved tools of all professionals.
Pros: Contains lots of cool templates for channel art.
Cons: Limited themes and layouts.
Price: Available for free.

6. Banners Nack:
Here is one of the most wonderful YouTube banner maker for you that can be accessed online with easy to use interface where one can design animated, static HTML5 with interactive banner ads.
Pros: Professional, easy to use platform with rich quality fonts, stock images, and animated effects.
Cons: Little costly.
Price: Users can go ahead with premium plans where the basic plan is worth $12/month and a professional plan is $18/month with a business plan offer of $24 per month.
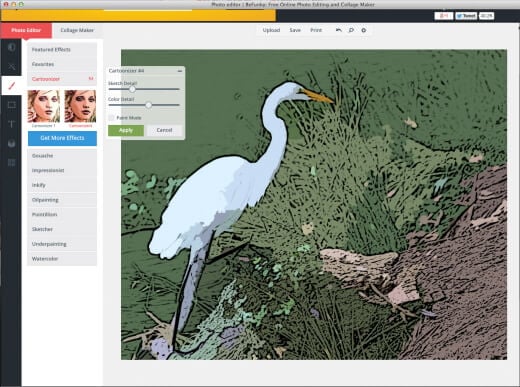
7. BeFunky:
BeFunky allows users to create meaningful banners for YouTube business building. The platform consists of numerous effortless options for banner designs and the drag and drops features make everything much easier. It is possible to boost traffic on your YouTube channel with this highly ranked banner maker.
Pros: Four-step banner-making process that can be followed by beginners too.
Cons: The uploading and downloading process takes more time due to heavy projects.
Price: Get started for free.
8. Picmonkey:
With PicMonkey.com you will be able to get customized, readymade banners with a perfect look. It is much easier to make selections for fonts, colors, and graphics with advanced templates here.
Pros: The best platform to enhance your creativity; users will be able to get perfect sharpness of quality.
Cons: File size is more for output banner and special features can be accessed only after payment.
Price: Free trial.
9. iPiccy:
The number of steps to be followed for designing a YouTube banner here completely depends upon your demand of end banner design type. Generally, four-step method is capable enough to provide you professional output with proper cropping dimensions and small file size for download
Pros: Various additional features are available like adding text etc so that highly customized designs can be created for YouTube Banners.
Cons: Demands more time of the user for making quality banner.
Price: Get started for free within a few seconds.
10. Adobe Spark:
Adobe Spark is one of the amazing online YouTube banner makers that helps you create the desired banner for your YouTube channel with ease. All that you need to do is browse to the site and pick the ‘YouTube channel art’ option to get the YouTube banner of the right size, though there are other options as well. Due to its easily customizable features, you can alter or change the background completely and try different color combinations to match your brand’s logo.
Pros:
- The drag-n-drop feature of Adobe Spark enables you to craft eye-catching and engaging banners effortlessly.
- Adobe Spark offers you the freedom to experiment with unlimited alterations in alignments, text, layouts, and themes like a trusted YouTube banner creator.
Cons: Though Adobe Spark is free, it annoys the users when it automatically adds Adobe Spark’s watermark logo to your creation. To get it removed, you must be an active subscriber of Adobe products.

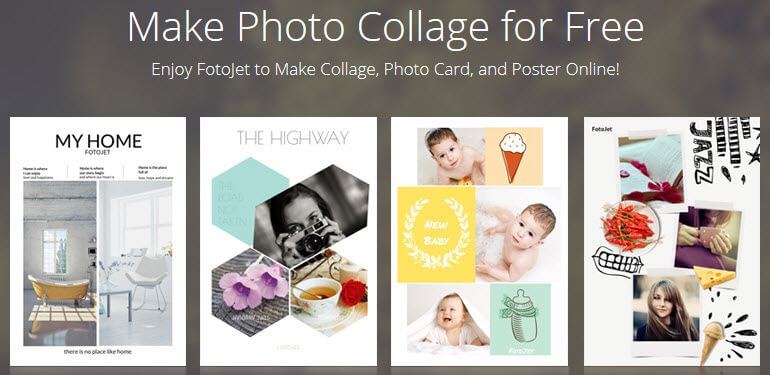
11. Fotojet:
FotoJet being a reliable YouTube banner maker assists you in creating personalized banners using numerous free templates. You get hold of interesting YouTube banner without toiling with the intricacies of graphic designing. Impressing your visitors with your unique and brand new banner from FotoJet YouTube banner creator is class apart.
Pros: It offers you the flexibility to add anything and everything on your channel art and upload it on YouTube right away.
Cons: Similar to Adobe Spark, FotoJet too adds a watermark logo of its name to your creation which is again a bit of nuisance.
Conclusion
Want to make your YouTube video more attractive and beautiful? Wondershare Filmora is such video editing software designed for YouTube creators. It not only allows you to cut, trim, crop, zoom, reverse, rotate the video clips, but also makes the advanced features like green screen, PIP, tilt-shift, and mosaic easy like a piece of cake. With Wondershare Filmora, you can ignite your YouTube videos with over 300 effects like Fashion, Beauty, BlockBuster, Travel, etc.
Richard Bennett
Richard Bennett is a writer and a lover of all things video.
Follow @Richard Bennett
Richard Bennett
Mar 27, 2024• Proven solutions
If you want to have more fans on your YouTube channel, it becomes really important to make your channel more attractive and fresh. YouTube banner is one of the important factors which represents the style, quality, and taste of your channel. Fortunately, there are many tools on the market that can help you make attractive banners. Therefore, we have brought you 10+ best-known YouTube banner makers that can enhance the beauty of your channel with their exceptionally amazing features. We will also let you know how to make a YouTube banner. Let’s explore.
You may also like: How to add custom thumbnails to YouTube videos >>
- Part 1: YouTube Banner Dimensions You Should Know
- Part 2: How to Make a YouTube Banner with Canva for Free
- Part 3: 10+ Best YouTube Banner Makers
Part 1: YouTube Banner Dimensions You Should Know
YouTube banner dimensions varied on different platforms, so you need to make the YouTube banner look great on desktop, tablet, and phone. According to Google , the recommended dimension is 2560 x 1440 px as the YouTube banner will be cropped if its size is too large. Minimum dimension is 2048 x 1152 px for uploading. The maximum width is 2560 x 423 px. The largest file size is 6MB. You can also add links to your own social media on YouTube banner, so it is a great place to recommend your other social media.
Part 2: How to Make a YouTube Banner with Canva for Free
There are so many tools that you can make a YouTube banner in the market, but it is not easy to find the right tool to make a banner if you can’t find the right tools. We have listed one way to make a YouTube banner below. You can use Wondershare Filmora to edit YouTube videos as it is designed to be a YouTube editor. Besides the basic editing including cropping/trimming and adding transitions, you can use it to add various text, more than 300 effects/filters, free audio, and more. It is also easy to make a YouTube intro. Download it to have a try!
Download Mac Version ](https://tools.techidaily.com/wondershare/filmora/download/ )
Step 1: Choose your template and layout
Canva is an online tool to make YouTube banner, so first you need to open it up . You are asked to log in.
After you’ve signed up for Canva you will see a variety of different templates. Scroll through them until you find YouTube Channel Art under Social Media & Email Headers.
This template will be the right size for a YouTube banner, but it will not show you the ‘safe zones’. Your banner will show up differently depending on the screen a viewer is watching on. Click here to download YouTube’s official template, which displays safe zones. You will be able to use it as a reference.
And Canva also provides you with sample layouts that you can build off of. They will include stock photos and text. Most are free, but some might cost a dollar.
If the one you happen to like isn’t free, don’t worry. It’s actually just the specific stock images being used in the example that cost money, and you’re probably planning on replacing those anyways.
Step 2: Import your image
Canva provides a selection of stock images you can use for free. You can find them by clicking on Elements in the menu on the far left, and then clicking on Free Photos.
If you’d rather use your own images, click on Upload at the bottom of that same menu on the left. You’ll have the option of uploading images from your computer or importing them from Facebook.
After you have found the image you want to use or loaded it into Canva, click on it and it will appear in your layout.
Step 3: Add text to YouTube banner
You can add various text after it is imported. There are lots of text templates in Canva, so just pick the one you like. You can also change text color and transparency to make it look great. Now to place it in the right position.
Step 4: Edit other elements
The layout you chose might include things like borders or backgrounds behind the text. You can change the colors of any of these just by clicking on them, then clicking on the color swatch in the top left corner of your design area.
Step 5: Download YouTube banner
Once you finish the editing, there is a download button in the top right corner of your screen. Click on it when you are finished to save your new channel art to your computer. It supports JPEG, PNG, and PDF. Now upload it to YouTube. So simple. Isn’t it?
Part 3: 10+ Best YouTube Banner Makers
1. Canva:
Canva is probably the most popular site for making channel art, for good reason. It has over 8000 templates for different kinds of graphics, including YouTube channel art, and there’s a huge variety of stock photos available either for free or $1. On Canva, creating your perfect banner is as easy as dragging and dropping images into a pre-built layout. Resizing is automatic, and you can flip/rotate or apply filters in just a few clicks
Pros: It contains millions of stock images, about 100 professional layouts, and lots of stunning filters.
Cons: Some high-quality images can be accessed only after payment of $1.
Price: The best thing to know is that this tool is available for free.
2. Wondershare PixStudio
Wondershare PixStudio is an all-in-one and powerful online graphic design maker for everyone. It has various types of templates for YouTube Thumbnails, Logos, Posters, etc. You can create a beautiful design by simply dragging and dropping the elements and photos. The online platform is free to use all templates, just One-Click to download your creations, and share to your Facebook, Instagram Story, and YouTube Thumbnails, etc. immediately.
Pros:
- Various types of templates
- Simple and Fast Design
- Background remover
Cons: The features of removing background be used after payment of $7.99 per month.
Price: The best thing to know is that this tool is available for free.
3. Fotor:
The makers of Fotor describe it as a ‘revolutionary photo editor and graphic designer’, and it is certainly a powerful tool. Fotor allows you to do a lot of fine editing on your photos – brightness, saturation, and color temperature are just a few of the things you can adjust – and its design feature is perfect for YouTube channel art.
Fotor has templates for YouTube channel art and a lot of fun sticker-like graphics. The Design interface is very similar to Canva, if slightly more complicated.
Pros: Complete art can be created within a few minutes and contains dozens of templates.
Cons: Little difficult to use for beginners.
Price: Free
4. Photovisi:
It is a great source of inspiration for your YouTube channel where you can easily design, save and share your customized banner.
Pros: It automatically adjusts the size of the banner to the required format and is loaded with unlimited themes. Works on Android, Windows, Mac, and iOS.
Cons: Demand some special skills for usage.
Price: It is available for free at the official website
5. iKomee:
It is possible to have customized results for your YouTube banner designing using the iKomee platform where few minutes are enough to create wonders. It is one of the most loved tools of all professionals.
Pros: Contains lots of cool templates for channel art.
Cons: Limited themes and layouts.
Price: Available for free.
6. Banners Nack:
Here is one of the most wonderful YouTube banner maker for you that can be accessed online with easy to use interface where one can design animated, static HTML5 with interactive banner ads.
Pros: Professional, easy to use platform with rich quality fonts, stock images, and animated effects.
Cons: Little costly.
Price: Users can go ahead with premium plans where the basic plan is worth $12/month and a professional plan is $18/month with a business plan offer of $24 per month.
7. BeFunky:
BeFunky allows users to create meaningful banners for YouTube business building. The platform consists of numerous effortless options for banner designs and the drag and drops features make everything much easier. It is possible to boost traffic on your YouTube channel with this highly ranked banner maker.
Pros: Four-step banner-making process that can be followed by beginners too.
Cons: The uploading and downloading process takes more time due to heavy projects.
Price: Get started for free.
8. Picmonkey:
With PicMonkey.com you will be able to get customized, readymade banners with a perfect look. It is much easier to make selections for fonts, colors, and graphics with advanced templates here.
Pros: The best platform to enhance your creativity; users will be able to get perfect sharpness of quality.
Cons: File size is more for output banner and special features can be accessed only after payment.
Price: Free trial.
9. iPiccy:
The number of steps to be followed for designing a YouTube banner here completely depends upon your demand of end banner design type. Generally, four-step method is capable enough to provide you professional output with proper cropping dimensions and small file size for download
Pros: Various additional features are available like adding text etc so that highly customized designs can be created for YouTube Banners.
Cons: Demands more time of the user for making quality banner.
Price: Get started for free within a few seconds.
10. Adobe Spark:
Adobe Spark is one of the amazing online YouTube banner makers that helps you create the desired banner for your YouTube channel with ease. All that you need to do is browse to the site and pick the ‘YouTube channel art’ option to get the YouTube banner of the right size, though there are other options as well. Due to its easily customizable features, you can alter or change the background completely and try different color combinations to match your brand’s logo.
Pros:
- The drag-n-drop feature of Adobe Spark enables you to craft eye-catching and engaging banners effortlessly.
- Adobe Spark offers you the freedom to experiment with unlimited alterations in alignments, text, layouts, and themes like a trusted YouTube banner creator.
Cons: Though Adobe Spark is free, it annoys the users when it automatically adds Adobe Spark’s watermark logo to your creation. To get it removed, you must be an active subscriber of Adobe products.
11. Fotojet:
FotoJet being a reliable YouTube banner maker assists you in creating personalized banners using numerous free templates. You get hold of interesting YouTube banner without toiling with the intricacies of graphic designing. Impressing your visitors with your unique and brand new banner from FotoJet YouTube banner creator is class apart.
Pros: It offers you the flexibility to add anything and everything on your channel art and upload it on YouTube right away.
Cons: Similar to Adobe Spark, FotoJet too adds a watermark logo of its name to your creation which is again a bit of nuisance.
Conclusion
Want to make your YouTube video more attractive and beautiful? Wondershare Filmora is such video editing software designed for YouTube creators. It not only allows you to cut, trim, crop, zoom, reverse, rotate the video clips, but also makes the advanced features like green screen, PIP, tilt-shift, and mosaic easy like a piece of cake. With Wondershare Filmora, you can ignite your YouTube videos with over 300 effects like Fashion, Beauty, BlockBuster, Travel, etc.
Richard Bennett
Richard Bennett is a writer and a lover of all things video.
Follow @Richard Bennett
Also read:
- Digital Alchemy Unveiling the Best Edits
- 2024 Approved Conceal, Don't Reveal How to Blur Faces Online
- Digital Deck of Cards YouTube's Milestone Challenges for 2024
- 2024 Approved Ahead of the Curve in Sub4sub Land This Is Your Guide First
- Mastering YouTube Shorts Key Facts
- In 2024, Enriching Youtube Channels Amp up with Songs
- Elevating Your Teaching Toolkit How to Craft Exceptional Videos for Learning
- [New] Elevate Your YouTube Creation by Merging Media and Music
- In 2024, Beginner's Ultimate List of YouTube Production Tools
- Essential Tips for YouTube Thumbnail Size
- [Updated] Earnings Update Navigating YouTube Monetization
- [Updated] Best Microphone for Different YouTube Channel Types
- 2024 Approved Engage and Inspire Viewers - Animated Subscribers in Filmora Explained
- Efficient Processes for Sharing 4K Footage with a Global Audience for 2024
- 2024 Approved Audiovisual Alchemy Formulating Your YouTube Playlist
- In 2024, Cut to Impact In-Depth Youtube Video Editing Mastery
- Pioneering Resources Leading Free Video Openers Guide
- Unraveling the Process of Uploading 360° Footage to YouTube
- [New] Boosting Visuals Mastering YouTube's Video Enhancement Tools
- [Updated] Decoding the Visual Language of Live Videos on YouTube
- In 2024, A Look at Earnings Understanding Your Monthly Income From YouTube's AdSense
- Team Videography Methods for Channel Expansion
- Reverse Viewing Crafts Creative Youtube Video Methods
- Seamless Channel Transitions with Customized End Screens
- In 2024, How to Create a YouTube Music Playlist
- Legal Steps for Overcoming a YouTube Copyright Strike
- [Updated] A Deep Dive Into the World of Youtube's Minis
- The Ultimate Strategy for Increasing YouTube Traffic
- 2024 Approved You Cannot Just Copy and Paste the Data From a DVD or Blu-Ray to a Computer Since You Need a File Conversion Software in Order to Change the Format of a Video File. In This Article, We Are Going to Ta
- New In 2024, Streamlining the Transformation Turning Audacity Sessions Into MP3 Audio
- [Updated] Leading Platforms Enhancing Online Collaboration for 2024
- 2024 Approved Insightful Guide to Using ShowMore for Professional Screen Recording
- Mastering 3D LUT Filters A Photo Editing Essential
- [New] Creating Square Instagram Video Tutorial Using iMovie for 2024
- Fix the Error of Unfortunately the Process.com.android.phone Has Stopped on Honor X50 | Dr.fone
- In 2024, How to Access Your iPhone 13 When You Forget the Passcode? | Dr.fone
- Dive Into Sound Design Focus on Audition's Fade In
- [Updated] Audio Quality Boost for Skype Calls
- 4 Easy Ways to Screen Record Lenovo Laptop
- [Updated] 2024 Approved From Novice to Expert Perfecting Mac Audio with Audacity
- 5 Easy Ways to Change Location on YouTube TV On Samsung Galaxy A54 5G | Dr.fone
- [New] In 2024, Seeking Authentic PS2 Play? Check Out the 5 Best Android Simulators!
- [New] A Deep Dive Into Ideal Instagram Post Times
- [Updated] Unveiling the Mysteries of IG Metrics An Essential Toolkit for Marketers for 2024
- New From Sketch to Screen 10 Best Cartoon Animation Apps for Mobile for 2024
- Video Grabber Tool Decompiler
- IPhone Shot Perfection with iOS 11 Innovations
- Enhancing Interior Luminosity Naturally
- Harmony Helpers The Premier Sync Edit Software for Video Rhythms, 2023 Release
- In 2024, Life360 Circle Everything You Need to Know On Apple iPhone 12 Pro Max | Dr.fone
- New 2024 Approved How Different YouTube Aspect Ratio Affect Video Style
- [New] Visual Storytelling for Social Media Editing VT Videos in FCPX for 2024
- [New] Simplified Guide Uploading URLs to Instagram Media
- Title: "In 2024, Elevate Your Videography Premiere to YouTube Upload"
- Author: Brian
- Created at : 2024-05-25 12:13:46
- Updated at : 2024-05-26 12:13:46
- Link: https://youtube-video-recordings.techidaily.com/in-2024-elevate-your-videography-premiere-to-youtube-upload/
- License: This work is licensed under CC BY-NC-SA 4.0.
