
:max_bytes(150000):strip_icc()/Screenshot2023-09-12at11.09.47AM-38f91827e46a496885224d0485b2ed35.png)
"In 2024, Elevate Your Brand Explore These 10 Essential YouTube Creators"
Elevate Your Brand: Explore These 10 Essential YouTube Creators
Youtube Banners Makers: 10+ Online Tools to Create Channel Art

Richard Bennett
Mar 27, 2024• Proven solutions
If you want to have more fans on your YouTube channel, it becomes really important to make your channel more attractive and fresh. YouTube banner is one of the important factors which represents the style, quality, and taste of your channel. Fortunately, there are many tools on the market that can help you make attractive banners. Therefore, we have brought you 10+ best-known YouTube banner makers that can enhance the beauty of your channel with their exceptionally amazing features. We will also let you know how to make a YouTube banner. Let’s explore.
You may also like: How to add custom thumbnails to YouTube videos >>
- Part 1: YouTube Banner Dimensions You Should Know
- Part 2: How to Make a YouTube Banner with Canva for Free
- Part 3: 10+ Best YouTube Banner Makers
Part 1: YouTube Banner Dimensions You Should Know
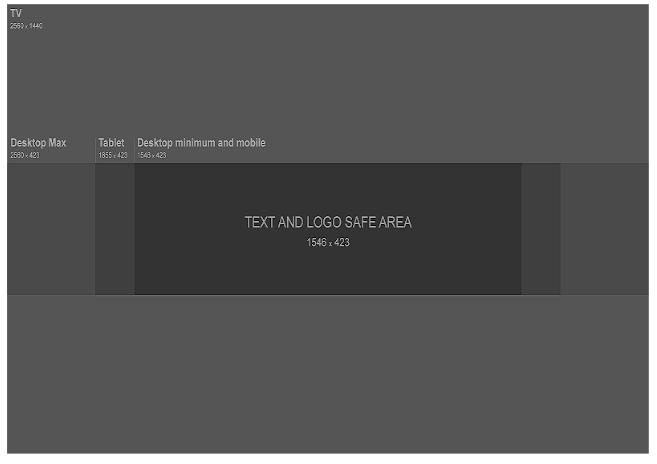
YouTube banner dimensions varied on different platforms, so you need to make the YouTube banner look great on desktop, tablet, and phone. According to Google , the recommended dimension is 2560 x 1440 px as the YouTube banner will be cropped if its size is too large. Minimum dimension is 2048 x 1152 px for uploading. The maximum width is 2560 x 423 px. The largest file size is 6MB. You can also add links to your own social media on YouTube banner, so it is a great place to recommend your other social media.
Part 2: How to Make a YouTube Banner with Canva for Free
There are so many tools that you can make a YouTube banner in the market, but it is not easy to find the right tool to make a banner if you can’t find the right tools. We have listed one way to make a YouTube banner below. You can use Wondershare Filmora to edit YouTube videos as it is designed to be a YouTube editor. Besides the basic editing including cropping/trimming and adding transitions, you can use it to add various text, more than 300 effects/filters, free audio, and more. It is also easy to make a YouTube intro. Download it to have a try!
 Download Mac Version ](https://tools.techidaily.com/wondershare/filmora/download/ )
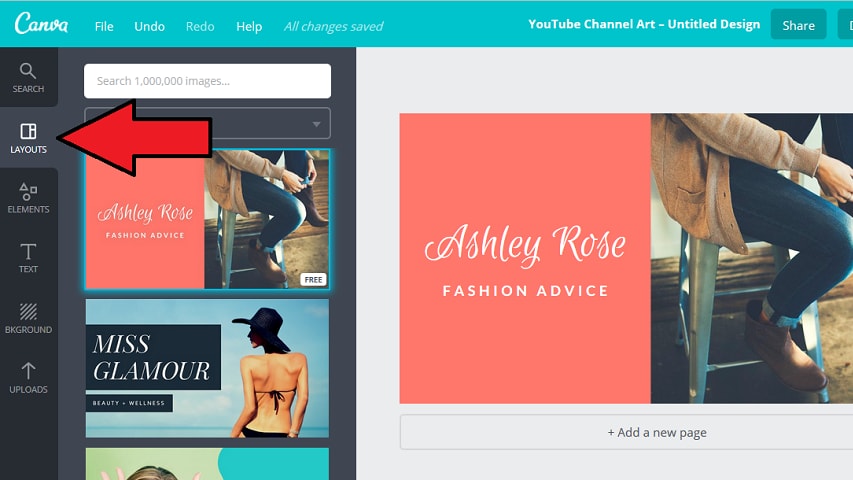
Step 1: Choose your template and layout
Canva is an online tool to make YouTube banner, so first you need to open it up . You are asked to log in.
After you’ve signed up for Canva you will see a variety of different templates. Scroll through them until you find YouTube Channel Art under Social Media & Email Headers.
This template will be the right size for a YouTube banner, but it will not show you the ‘safe zones’. Your banner will show up differently depending on the screen a viewer is watching on. Click here to download YouTube’s official template, which displays safe zones. You will be able to use it as a reference.
And Canva also provides you with sample layouts that you can build off of. They will include stock photos and text. Most are free, but some might cost a dollar.
If the one you happen to like isn’t free, don’t worry. It’s actually just the specific stock images being used in the example that cost money, and you’re probably planning on replacing those anyways.
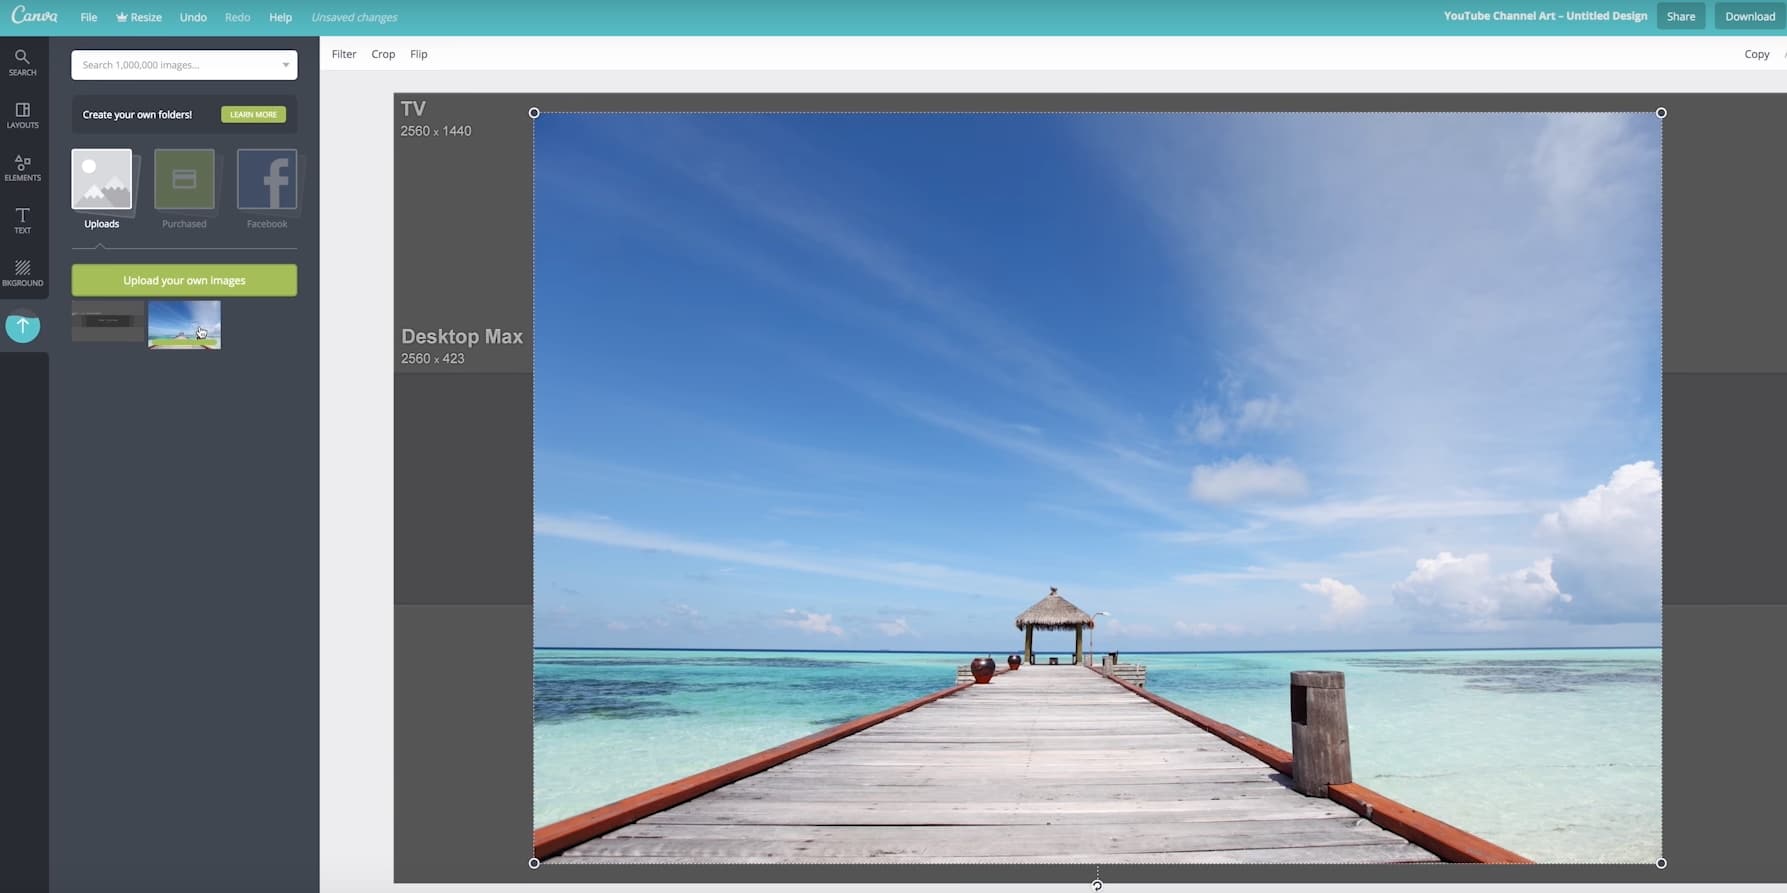
Step 2: Import your image
Canva provides a selection of stock images you can use for free. You can find them by clicking on Elements in the menu on the far left, and then clicking on Free Photos.
If you’d rather use your own images, click on Upload at the bottom of that same menu on the left. You’ll have the option of uploading images from your computer or importing them from Facebook.
After you have found the image you want to use or loaded it into Canva, click on it and it will appear in your layout.
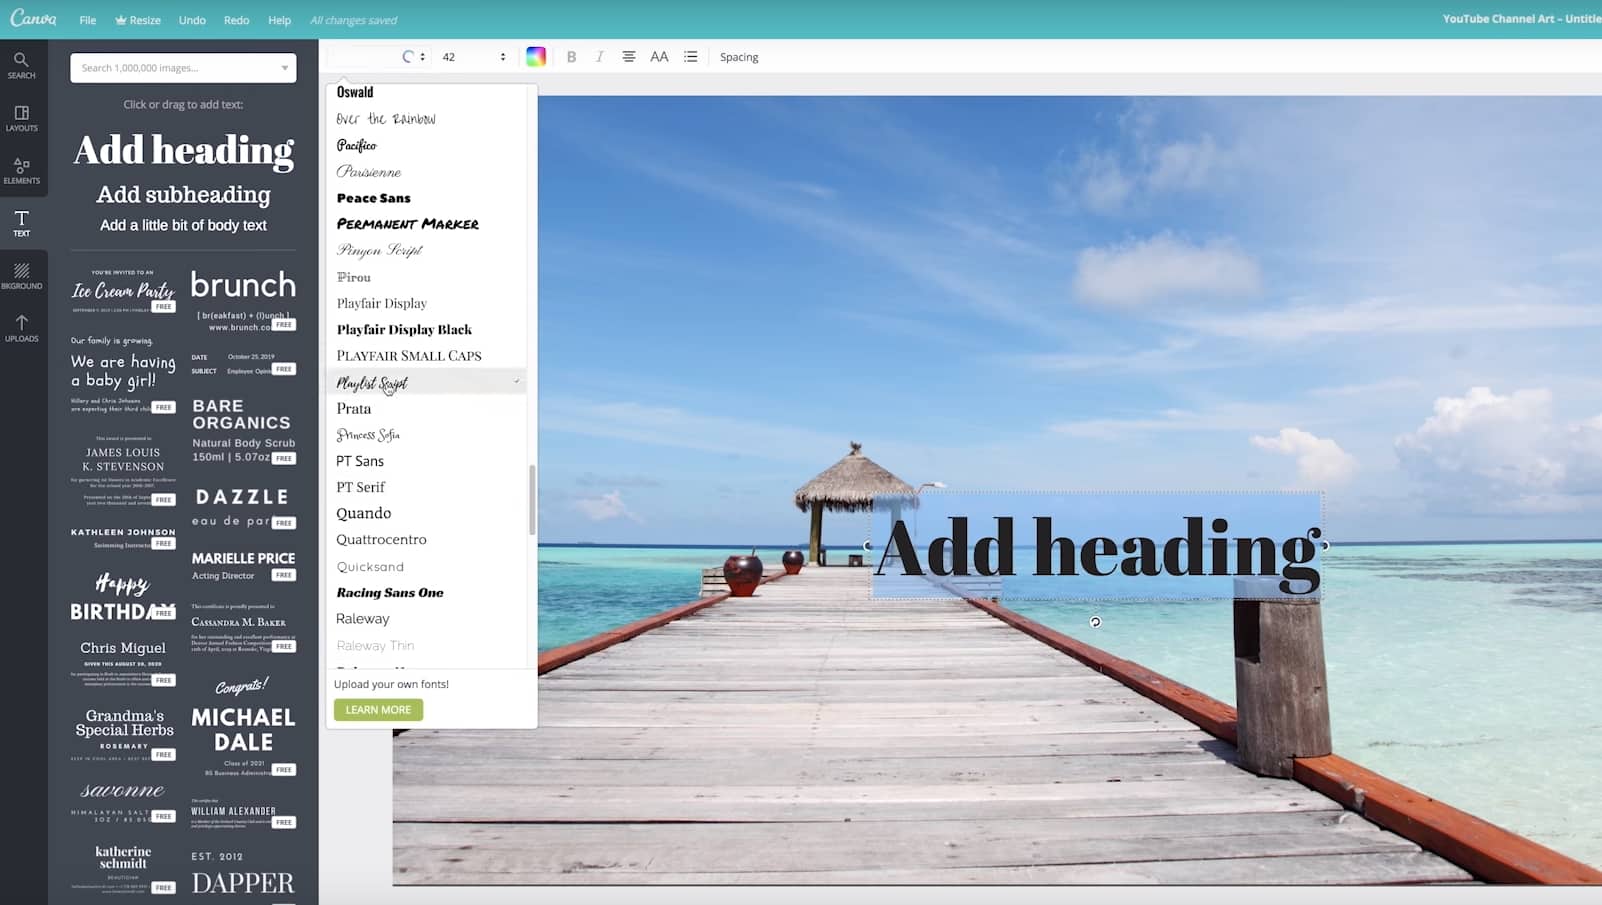
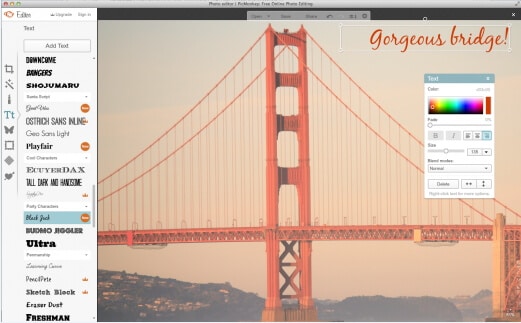
Step 3: Add text to YouTube banner
You can add various text after it is imported. There are lots of text templates in Canva, so just pick the one you like. You can also change text color and transparency to make it look great. Now to place it in the right position.
Step 4: Edit other elements
The layout you chose might include things like borders or backgrounds behind the text. You can change the colors of any of these just by clicking on them, then clicking on the color swatch in the top left corner of your design area.

Step 5: Download YouTube banner
Once you finish the editing, there is a download button in the top right corner of your screen. Click on it when you are finished to save your new channel art to your computer. It supports JPEG, PNG, and PDF. Now upload it to YouTube. So simple. Isn’t it?

Part 3: 10+ Best YouTube Banner Makers
1. Canva:
Canva is probably the most popular site for making channel art, for good reason. It has over 8000 templates for different kinds of graphics, including YouTube channel art, and there’s a huge variety of stock photos available either for free or $1. On Canva, creating your perfect banner is as easy as dragging and dropping images into a pre-built layout. Resizing is automatic, and you can flip/rotate or apply filters in just a few clicks
Pros: It contains millions of stock images, about 100 professional layouts, and lots of stunning filters.
Cons: Some high-quality images can be accessed only after payment of $1.
Price: The best thing to know is that this tool is available for free.
2. Wondershare PixStudio

Wondershare PixStudio is an all-in-one and powerful online graphic design maker for everyone. It has various types of templates for YouTube Thumbnails, Logos, Posters, etc. You can create a beautiful design by simply dragging and dropping the elements and photos. The online platform is free to use all templates, just One-Click to download your creations, and share to your Facebook, Instagram Story, and YouTube Thumbnails, etc. immediately.
Pros:
- Various types of templates
- Simple and Fast Design
- Background remover
Cons: The features of removing background be used after payment of $7.99 per month.
Price: The best thing to know is that this tool is available for free.
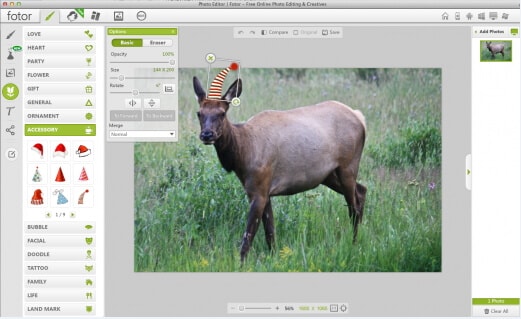
3. Fotor:
The makers of Fotor describe it as a ‘revolutionary photo editor and graphic designer’, and it is certainly a powerful tool. Fotor allows you to do a lot of fine editing on your photos – brightness, saturation, and color temperature are just a few of the things you can adjust – and its design feature is perfect for YouTube channel art.
Fotor has templates for YouTube channel art and a lot of fun sticker-like graphics. The Design interface is very similar to Canva, if slightly more complicated.
Pros: Complete art can be created within a few minutes and contains dozens of templates.
Cons: Little difficult to use for beginners.
Price: Free
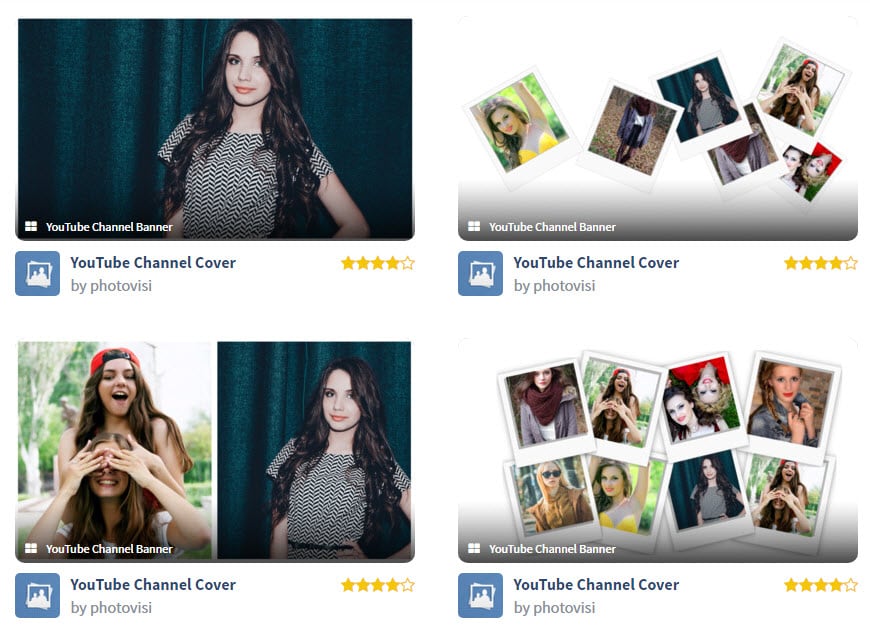
4. Photovisi:
It is a great source of inspiration for your YouTube channel where you can easily design, save and share your customized banner.
Pros: It automatically adjusts the size of the banner to the required format and is loaded with unlimited themes. Works on Android, Windows, Mac, and iOS.
Cons: Demand some special skills for usage.
Price: It is available for free at the official website
5. iKomee:
It is possible to have customized results for your YouTube banner designing using the iKomee platform where few minutes are enough to create wonders. It is one of the most loved tools of all professionals.
Pros: Contains lots of cool templates for channel art.
Cons: Limited themes and layouts.
Price: Available for free.

6. Banners Nack:
Here is one of the most wonderful YouTube banner maker for you that can be accessed online with easy to use interface where one can design animated, static HTML5 with interactive banner ads.
Pros: Professional, easy to use platform with rich quality fonts, stock images, and animated effects.
Cons: Little costly.
Price: Users can go ahead with premium plans where the basic plan is worth $12/month and a professional plan is $18/month with a business plan offer of $24 per month.
7. BeFunky:
BeFunky allows users to create meaningful banners for YouTube business building. The platform consists of numerous effortless options for banner designs and the drag and drops features make everything much easier. It is possible to boost traffic on your YouTube channel with this highly ranked banner maker.
Pros: Four-step banner-making process that can be followed by beginners too.
Cons: The uploading and downloading process takes more time due to heavy projects.
Price: Get started for free.
8. Picmonkey:
With PicMonkey.com you will be able to get customized, readymade banners with a perfect look. It is much easier to make selections for fonts, colors, and graphics with advanced templates here.
Pros: The best platform to enhance your creativity; users will be able to get perfect sharpness of quality.
Cons: File size is more for output banner and special features can be accessed only after payment.
Price: Free trial.
9. iPiccy:
The number of steps to be followed for designing a YouTube banner here completely depends upon your demand of end banner design type. Generally, four-step method is capable enough to provide you professional output with proper cropping dimensions and small file size for download
Pros: Various additional features are available like adding text etc so that highly customized designs can be created for YouTube Banners.
Cons: Demands more time of the user for making quality banner.
Price: Get started for free within a few seconds.
10. Adobe Spark:
Adobe Spark is one of the amazing online YouTube banner makers that helps you create the desired banner for your YouTube channel with ease. All that you need to do is browse to the site and pick the ‘YouTube channel art’ option to get the YouTube banner of the right size, though there are other options as well. Due to its easily customizable features, you can alter or change the background completely and try different color combinations to match your brand’s logo.
Pros:
- The drag-n-drop feature of Adobe Spark enables you to craft eye-catching and engaging banners effortlessly.
- Adobe Spark offers you the freedom to experiment with unlimited alterations in alignments, text, layouts, and themes like a trusted YouTube banner creator.
Cons: Though Adobe Spark is free, it annoys the users when it automatically adds Adobe Spark’s watermark logo to your creation. To get it removed, you must be an active subscriber of Adobe products.

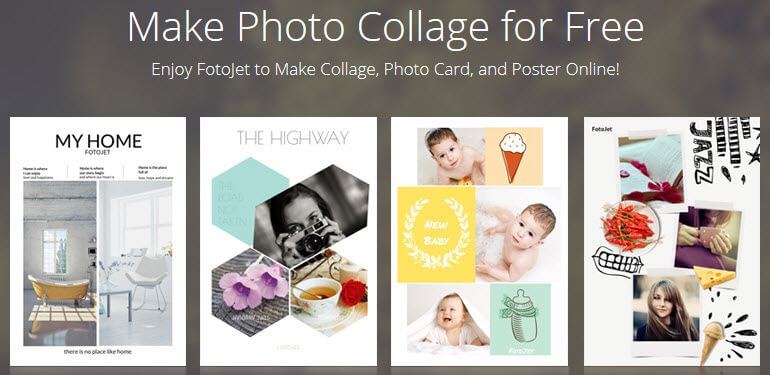
11. Fotojet:
FotoJet being a reliable YouTube banner maker assists you in creating personalized banners using numerous free templates. You get hold of interesting YouTube banner without toiling with the intricacies of graphic designing. Impressing your visitors with your unique and brand new banner from FotoJet YouTube banner creator is class apart.
Pros: It offers you the flexibility to add anything and everything on your channel art and upload it on YouTube right away.
Cons: Similar to Adobe Spark, FotoJet too adds a watermark logo of its name to your creation which is again a bit of nuisance.
Conclusion
Want to make your YouTube video more attractive and beautiful? Wondershare Filmora is such video editing software designed for YouTube creators. It not only allows you to cut, trim, crop, zoom, reverse, rotate the video clips, but also makes the advanced features like green screen, PIP, tilt-shift, and mosaic easy like a piece of cake. With Wondershare Filmora, you can ignite your YouTube videos with over 300 effects like Fashion, Beauty, BlockBuster, Travel, etc.

Richard Bennett
Richard Bennett is a writer and a lover of all things video.
Follow @Richard Bennett
Richard Bennett
Mar 27, 2024• Proven solutions
If you want to have more fans on your YouTube channel, it becomes really important to make your channel more attractive and fresh. YouTube banner is one of the important factors which represents the style, quality, and taste of your channel. Fortunately, there are many tools on the market that can help you make attractive banners. Therefore, we have brought you 10+ best-known YouTube banner makers that can enhance the beauty of your channel with their exceptionally amazing features. We will also let you know how to make a YouTube banner. Let’s explore.
You may also like: How to add custom thumbnails to YouTube videos >>
- Part 1: YouTube Banner Dimensions You Should Know
- Part 2: How to Make a YouTube Banner with Canva for Free
- Part 3: 10+ Best YouTube Banner Makers
Part 1: YouTube Banner Dimensions You Should Know
YouTube banner dimensions varied on different platforms, so you need to make the YouTube banner look great on desktop, tablet, and phone. According to Google , the recommended dimension is 2560 x 1440 px as the YouTube banner will be cropped if its size is too large. Minimum dimension is 2048 x 1152 px for uploading. The maximum width is 2560 x 423 px. The largest file size is 6MB. You can also add links to your own social media on YouTube banner, so it is a great place to recommend your other social media.
Part 2: How to Make a YouTube Banner with Canva for Free
There are so many tools that you can make a YouTube banner in the market, but it is not easy to find the right tool to make a banner if you can’t find the right tools. We have listed one way to make a YouTube banner below. You can use Wondershare Filmora to edit YouTube videos as it is designed to be a YouTube editor. Besides the basic editing including cropping/trimming and adding transitions, you can use it to add various text, more than 300 effects/filters, free audio, and more. It is also easy to make a YouTube intro. Download it to have a try!
Download Mac Version ](https://tools.techidaily.com/wondershare/filmora/download/ )
Step 1: Choose your template and layout
Canva is an online tool to make YouTube banner, so first you need to open it up . You are asked to log in.
After you’ve signed up for Canva you will see a variety of different templates. Scroll through them until you find YouTube Channel Art under Social Media & Email Headers.
This template will be the right size for a YouTube banner, but it will not show you the ‘safe zones’. Your banner will show up differently depending on the screen a viewer is watching on. Click here to download YouTube’s official template, which displays safe zones. You will be able to use it as a reference.
And Canva also provides you with sample layouts that you can build off of. They will include stock photos and text. Most are free, but some might cost a dollar.
If the one you happen to like isn’t free, don’t worry. It’s actually just the specific stock images being used in the example that cost money, and you’re probably planning on replacing those anyways.
Step 2: Import your image
Canva provides a selection of stock images you can use for free. You can find them by clicking on Elements in the menu on the far left, and then clicking on Free Photos.
If you’d rather use your own images, click on Upload at the bottom of that same menu on the left. You’ll have the option of uploading images from your computer or importing them from Facebook.
After you have found the image you want to use or loaded it into Canva, click on it and it will appear in your layout.
Step 3: Add text to YouTube banner
You can add various text after it is imported. There are lots of text templates in Canva, so just pick the one you like. You can also change text color and transparency to make it look great. Now to place it in the right position.
Step 4: Edit other elements
The layout you chose might include things like borders or backgrounds behind the text. You can change the colors of any of these just by clicking on them, then clicking on the color swatch in the top left corner of your design area.
Step 5: Download YouTube banner
Once you finish the editing, there is a download button in the top right corner of your screen. Click on it when you are finished to save your new channel art to your computer. It supports JPEG, PNG, and PDF. Now upload it to YouTube. So simple. Isn’t it?
Part 3: 10+ Best YouTube Banner Makers
1. Canva:
Canva is probably the most popular site for making channel art, for good reason. It has over 8000 templates for different kinds of graphics, including YouTube channel art, and there’s a huge variety of stock photos available either for free or $1. On Canva, creating your perfect banner is as easy as dragging and dropping images into a pre-built layout. Resizing is automatic, and you can flip/rotate or apply filters in just a few clicks
Pros: It contains millions of stock images, about 100 professional layouts, and lots of stunning filters.
Cons: Some high-quality images can be accessed only after payment of $1.
Price: The best thing to know is that this tool is available for free.
2. Wondershare PixStudio
Wondershare PixStudio is an all-in-one and powerful online graphic design maker for everyone. It has various types of templates for YouTube Thumbnails, Logos, Posters, etc. You can create a beautiful design by simply dragging and dropping the elements and photos. The online platform is free to use all templates, just One-Click to download your creations, and share to your Facebook, Instagram Story, and YouTube Thumbnails, etc. immediately.
Pros:
- Various types of templates
- Simple and Fast Design
- Background remover
Cons: The features of removing background be used after payment of $7.99 per month.
Price: The best thing to know is that this tool is available for free.
3. Fotor:
The makers of Fotor describe it as a ‘revolutionary photo editor and graphic designer’, and it is certainly a powerful tool. Fotor allows you to do a lot of fine editing on your photos – brightness, saturation, and color temperature are just a few of the things you can adjust – and its design feature is perfect for YouTube channel art.
Fotor has templates for YouTube channel art and a lot of fun sticker-like graphics. The Design interface is very similar to Canva, if slightly more complicated.
Pros: Complete art can be created within a few minutes and contains dozens of templates.
Cons: Little difficult to use for beginners.
Price: Free
4. Photovisi:
It is a great source of inspiration for your YouTube channel where you can easily design, save and share your customized banner.
Pros: It automatically adjusts the size of the banner to the required format and is loaded with unlimited themes. Works on Android, Windows, Mac, and iOS.
Cons: Demand some special skills for usage.
Price: It is available for free at the official website
5. iKomee:
It is possible to have customized results for your YouTube banner designing using the iKomee platform where few minutes are enough to create wonders. It is one of the most loved tools of all professionals.
Pros: Contains lots of cool templates for channel art.
Cons: Limited themes and layouts.
Price: Available for free.
6. Banners Nack:
Here is one of the most wonderful YouTube banner maker for you that can be accessed online with easy to use interface where one can design animated, static HTML5 with interactive banner ads.
Pros: Professional, easy to use platform with rich quality fonts, stock images, and animated effects.
Cons: Little costly.
Price: Users can go ahead with premium plans where the basic plan is worth $12/month and a professional plan is $18/month with a business plan offer of $24 per month.
7. BeFunky:
BeFunky allows users to create meaningful banners for YouTube business building. The platform consists of numerous effortless options for banner designs and the drag and drops features make everything much easier. It is possible to boost traffic on your YouTube channel with this highly ranked banner maker.
Pros: Four-step banner-making process that can be followed by beginners too.
Cons: The uploading and downloading process takes more time due to heavy projects.
Price: Get started for free.
8. Picmonkey:
With PicMonkey.com you will be able to get customized, readymade banners with a perfect look. It is much easier to make selections for fonts, colors, and graphics with advanced templates here.
Pros: The best platform to enhance your creativity; users will be able to get perfect sharpness of quality.
Cons: File size is more for output banner and special features can be accessed only after payment.
Price: Free trial.
9. iPiccy:
The number of steps to be followed for designing a YouTube banner here completely depends upon your demand of end banner design type. Generally, four-step method is capable enough to provide you professional output with proper cropping dimensions and small file size for download
Pros: Various additional features are available like adding text etc so that highly customized designs can be created for YouTube Banners.
Cons: Demands more time of the user for making quality banner.
Price: Get started for free within a few seconds.
10. Adobe Spark:
Adobe Spark is one of the amazing online YouTube banner makers that helps you create the desired banner for your YouTube channel with ease. All that you need to do is browse to the site and pick the ‘YouTube channel art’ option to get the YouTube banner of the right size, though there are other options as well. Due to its easily customizable features, you can alter or change the background completely and try different color combinations to match your brand’s logo.
Pros:
- The drag-n-drop feature of Adobe Spark enables you to craft eye-catching and engaging banners effortlessly.
- Adobe Spark offers you the freedom to experiment with unlimited alterations in alignments, text, layouts, and themes like a trusted YouTube banner creator.
Cons: Though Adobe Spark is free, it annoys the users when it automatically adds Adobe Spark’s watermark logo to your creation. To get it removed, you must be an active subscriber of Adobe products.
11. Fotojet:
FotoJet being a reliable YouTube banner maker assists you in creating personalized banners using numerous free templates. You get hold of interesting YouTube banner without toiling with the intricacies of graphic designing. Impressing your visitors with your unique and brand new banner from FotoJet YouTube banner creator is class apart.
Pros: It offers you the flexibility to add anything and everything on your channel art and upload it on YouTube right away.
Cons: Similar to Adobe Spark, FotoJet too adds a watermark logo of its name to your creation which is again a bit of nuisance.
Conclusion
Want to make your YouTube video more attractive and beautiful? Wondershare Filmora is such video editing software designed for YouTube creators. It not only allows you to cut, trim, crop, zoom, reverse, rotate the video clips, but also makes the advanced features like green screen, PIP, tilt-shift, and mosaic easy like a piece of cake. With Wondershare Filmora, you can ignite your YouTube videos with over 300 effects like Fashion, Beauty, BlockBuster, Travel, etc.
Richard Bennett
Richard Bennett is a writer and a lover of all things video.
Follow @Richard Bennett
Audiovisual Attraction: 3 Approaches to Neon-Bordered YouTubes
Your YouTube video, or any other clip published on any forum, gets a larger number of hits if it has an attractive thumbnail. And, the fact is, a thumbnail becomes 10x more attractive when the main character that the image has have a neon border around it.
With that said, in the following sections, you will learn a couple of methods on how to add a YouTube thumbnail border around the main characters and/or objects that are significant to the clip.
In this article
01 Add Glowing Neon Border to YouTube Thumbnail with Filmora
02 Add a Glowing Neon Border in YouTube Thumbnail with Canva
03 Outline a Person in a YouTube Thumbnail with Photoshop
Part 1: How to Add Neon Border to YouTube Thumbnail for Free with Filmora
Being one of the most versatile and intuitive post-production tools available in the market today, Wondershare Filmora X allows you to add a neon border to a YouTube thumbnail quite conveniently. You can learn how to get this done on Windows or Mac by following the steps given below.
For Win 7 or later (64-bit)
For macOS 10.12 or later
Step 1: Define Project Settings and Add Image to the Timeline
Launch Wondershare Filmora X on your PC (a MacBook Pro M1 is used here), ensure that the project aspect ratio is set to 16:9 (Widescreen) on the splash screen, and click New Project. On the main interface, click the Preview quality and display settings icon from the upper-right area of the Timeline, click Change Project Aspect Ratio, click to select 1280 x 720 (HD) from the Resolution menu of the Project Settings box, and click OK to save the custom project settings.

Then select My Media from the menu bar if not already selected, click Project Media from the navigation pane, and click Import from the Media box to select and import the image of the main character or object that you want to use in the thumbnail.

Now, drag the image from the Media box to the Timeline at the bottom.

Step 2: Clear Image Background, Add Border, and Add Custom Background
Go to Effects from the menu bar, click to select the Default tab and then AI Portrait from the navigation pane, and click and drag the Human Segmentation preset from the right box, and place it over the image track in the Timeline.

Double-click the image layer, scroll down the upper-left box to the Video Effects section, and use the Edge Thickness and Edge Feather sliders to adjust the character’s edges to make them as realistic as possible. Click OK when done.

Next, click and drag the Human Border preset over the image track in the Timeline, and follow the same procedure to customize the border. This will give the character a neon border effect.

Now, use the method explained earlier to import a custom image for the background, and drag and place it under the previous track in the Timeline.

If you are running the latest version of Filmora, you will find there are some neon light effects available under AI Portrait as well.

Step 3: Add Titles to Thumbnail
Go to Titles from the menu bar, click to select the Default tab and then Lower 3rds from the navigation pane, and click and drag your preferred lower-third preset from the right window to a separate layer in the Timeline. Double-click the lower-third layer, and use the available options in the upper-left window to change the text, its color, etc., and drag the textbox to place it to your preferred position on the image as well. Click OK to save the changes.
Next, click to select Titles from the navigation pane, and drag your preferred title from the right window to the upper-most track in the Timeline. Now use the method explained earlier to edit the text, its color, position, etc. to make it look professional.

For more tips and tricks for creating YouTube thumbnail, you can check this You Tube thumbnail creating guide.
Step 4: Get the Neon Border Thumbnail
Click the Snapshot (Camera) icon from the upper-right area of the Timeline, go to My Media from the menu bar, right-click the thumbnail of the screenshot you captured, and click Reveal in Finder (on Mac) or Reveal in Explorer (on Windows) to get to the folder the YouTube thumbnail border is saved in.

Part 2: How to Add a Glowing Neon Border in Your YouTube Thumbnail with Canva
Canva is another intuitive editing program that works on the web interface rather than having you download and install an app on your PC. You can add a neon border for YouTube thumbnails using Canva by following the instructions given below:
Step 1: Define Project Settings and Add a Background
After signing in to your Canva account, click Create a design from the top-right corner of the page, click Custom size from the bottom, define 1280 and 720 in the Width and Height fields on the box that appears respectively, and click Create new design.

Now, click to select Background from the navigation bar on the left (if the Background tool is not visible, click More and then choose Background from the expanded list), and click to select a background from the images available in the center pane.

Step 2: Upload an Image and Add Effects
Click Uploads from the navigation bar, click the More icon from the right of the Upload media button present at the top of the center pane, choose your preferred method to upload the image (with the transparent background) that you want to use, upload the image, and drag it from the center pane to the Canvas.
Note: You can use any of the tools available online to remove the background from your image for free.

To add a YouTube thumbnail border, make sure that the image that you added to the Canvas is selected, click the Duplicate icon from the upper-right area, and use the scaling handles of the copy of the image to increase its size a bit. Reposition the image back to its original location as well.
Then, click Edit image from the upper-left corner of the Canvas, click Duotone from the Edit image pane at the center, if need be, click See all, choose your preferred duotone effect to apply on the image, choose your preferred highlight and shadow colors from the box that appears next, and click Back from the top of the pane.

Next, click See all next to the Adjust section from the center pane, and drag the Blur slider to the right to increase the blur effect on the image.

Step 3: Position the Layers
While keeping the duplicate image selected, click the Position button from the upper-right area of the Canvas, and click Background to send the second image behind the first one to get the neon border effect for the photo.

Part 3: How to Outline a Person in a YouTube Thumbnail with Photoshop
Because YouTube thumbnails are nothing but static images, creating YouTube thumbnail border with Adobe Photoshop is comparatively easier. The process of doing this is given below:
Step 1: Define Document Preferences and Import an Image
Launch Adobe Photoshop on your PC, click Create new, and on the New Document customization box, define the width and height values to 1280 and 720 pixels respectively. Select Transparent from the Background Contents menu as well if not already selected. Click Create from the bottom to create a new Photoshop document with the specified document settings. Next, open the folder that contains the source image, drag the photo to Photoshop, and press Enter to place the photo.

Step 2: Remove Background from the Image
Make sure that the image layer is selected in the Layers panel on the right, go to Select from the menu bar at the top, and click Subject. From the bottom of the Layers panel, click the Add a mask icon to get rid of the background, leaving only the human on the Canvas.

Step 3: Add a Custom Background and an Outline Around the Subject
Use the method explained earlier to import a background image of your choice to Photoshop. Drag the background image layer to the bottom in the Layers panel. Double-click the masked layer, click to select Stroke from the left pane of the Layer Style box, and use the options available on the right to manage the size, color, position, etc. of the stroke that has been added around the human subject. Click OK when done, and then export the image normally to use it as a YouTube thumbnail border.

Summary
It is important to know that the default resolution of a YouTube thumbnail is 1280 x 720 pixels that is usually written and referred to as 720p. While adding a YouTube thumbnail border, it is also imperative to have a good sense of color combination and fonts. Furthermore, a decent tool like Wondershare Filmora X must be used to add an appealing neon border around the main subject in the thumbnail image easily and quickly.
02 Add a Glowing Neon Border in YouTube Thumbnail with Canva
03 Outline a Person in a YouTube Thumbnail with Photoshop
Part 1: How to Add Neon Border to YouTube Thumbnail for Free with Filmora
Being one of the most versatile and intuitive post-production tools available in the market today, Wondershare Filmora X allows you to add a neon border to a YouTube thumbnail quite conveniently. You can learn how to get this done on Windows or Mac by following the steps given below.
For Win 7 or later (64-bit)
For macOS 10.12 or later
Step 1: Define Project Settings and Add Image to the Timeline
Launch Wondershare Filmora X on your PC (a MacBook Pro M1 is used here), ensure that the project aspect ratio is set to 16:9 (Widescreen) on the splash screen, and click New Project. On the main interface, click the Preview quality and display settings icon from the upper-right area of the Timeline, click Change Project Aspect Ratio, click to select 1280 x 720 (HD) from the Resolution menu of the Project Settings box, and click OK to save the custom project settings.
Then select My Media from the menu bar if not already selected, click Project Media from the navigation pane, and click Import from the Media box to select and import the image of the main character or object that you want to use in the thumbnail.
Now, drag the image from the Media box to the Timeline at the bottom.
Step 2: Clear Image Background, Add Border, and Add Custom Background
Go to Effects from the menu bar, click to select the Default tab and then AI Portrait from the navigation pane, and click and drag the Human Segmentation preset from the right box, and place it over the image track in the Timeline.
Double-click the image layer, scroll down the upper-left box to the Video Effects section, and use the Edge Thickness and Edge Feather sliders to adjust the character’s edges to make them as realistic as possible. Click OK when done.
Next, click and drag the Human Border preset over the image track in the Timeline, and follow the same procedure to customize the border. This will give the character a neon border effect.
Now, use the method explained earlier to import a custom image for the background, and drag and place it under the previous track in the Timeline.
If you are running the latest version of Filmora, you will find there are some neon light effects available under AI Portrait as well.
Step 3: Add Titles to Thumbnail
Go to Titles from the menu bar, click to select the Default tab and then Lower 3rds from the navigation pane, and click and drag your preferred lower-third preset from the right window to a separate layer in the Timeline. Double-click the lower-third layer, and use the available options in the upper-left window to change the text, its color, etc., and drag the textbox to place it to your preferred position on the image as well. Click OK to save the changes.
Next, click to select Titles from the navigation pane, and drag your preferred title from the right window to the upper-most track in the Timeline. Now use the method explained earlier to edit the text, its color, position, etc. to make it look professional.
For more tips and tricks for creating YouTube thumbnail, you can check this You Tube thumbnail creating guide.
Step 4: Get the Neon Border Thumbnail
Click the Snapshot (Camera) icon from the upper-right area of the Timeline, go to My Media from the menu bar, right-click the thumbnail of the screenshot you captured, and click Reveal in Finder (on Mac) or Reveal in Explorer (on Windows) to get to the folder the YouTube thumbnail border is saved in.
Part 2: How to Add a Glowing Neon Border in Your YouTube Thumbnail with Canva
Canva is another intuitive editing program that works on the web interface rather than having you download and install an app on your PC. You can add a neon border for YouTube thumbnails using Canva by following the instructions given below:
Step 1: Define Project Settings and Add a Background
After signing in to your Canva account, click Create a design from the top-right corner of the page, click Custom size from the bottom, define 1280 and 720 in the Width and Height fields on the box that appears respectively, and click Create new design.
Now, click to select Background from the navigation bar on the left (if the Background tool is not visible, click More and then choose Background from the expanded list), and click to select a background from the images available in the center pane.
Step 2: Upload an Image and Add Effects
Click Uploads from the navigation bar, click the More icon from the right of the Upload media button present at the top of the center pane, choose your preferred method to upload the image (with the transparent background) that you want to use, upload the image, and drag it from the center pane to the Canvas.
Note: You can use any of the tools available online to remove the background from your image for free.
To add a YouTube thumbnail border, make sure that the image that you added to the Canvas is selected, click the Duplicate icon from the upper-right area, and use the scaling handles of the copy of the image to increase its size a bit. Reposition the image back to its original location as well.
Then, click Edit image from the upper-left corner of the Canvas, click Duotone from the Edit image pane at the center, if need be, click See all, choose your preferred duotone effect to apply on the image, choose your preferred highlight and shadow colors from the box that appears next, and click Back from the top of the pane.
Next, click See all next to the Adjust section from the center pane, and drag the Blur slider to the right to increase the blur effect on the image.
Step 3: Position the Layers
While keeping the duplicate image selected, click the Position button from the upper-right area of the Canvas, and click Background to send the second image behind the first one to get the neon border effect for the photo.
Part 3: How to Outline a Person in a YouTube Thumbnail with Photoshop
Because YouTube thumbnails are nothing but static images, creating YouTube thumbnail border with Adobe Photoshop is comparatively easier. The process of doing this is given below:
Step 1: Define Document Preferences and Import an Image
Launch Adobe Photoshop on your PC, click Create new, and on the New Document customization box, define the width and height values to 1280 and 720 pixels respectively. Select Transparent from the Background Contents menu as well if not already selected. Click Create from the bottom to create a new Photoshop document with the specified document settings. Next, open the folder that contains the source image, drag the photo to Photoshop, and press Enter to place the photo.
Step 2: Remove Background from the Image
Make sure that the image layer is selected in the Layers panel on the right, go to Select from the menu bar at the top, and click Subject. From the bottom of the Layers panel, click the Add a mask icon to get rid of the background, leaving only the human on the Canvas.
Step 3: Add a Custom Background and an Outline Around the Subject
Use the method explained earlier to import a background image of your choice to Photoshop. Drag the background image layer to the bottom in the Layers panel. Double-click the masked layer, click to select Stroke from the left pane of the Layer Style box, and use the options available on the right to manage the size, color, position, etc. of the stroke that has been added around the human subject. Click OK when done, and then export the image normally to use it as a YouTube thumbnail border.
Summary
It is important to know that the default resolution of a YouTube thumbnail is 1280 x 720 pixels that is usually written and referred to as 720p. While adding a YouTube thumbnail border, it is also imperative to have a good sense of color combination and fonts. Furthermore, a decent tool like Wondershare Filmora X must be used to add an appealing neon border around the main subject in the thumbnail image easily and quickly.
Also read:
- In 2024, Efficient Trimming Made Simple with Top 10 Software
- ASMR Viewers' Essentials Explained
- The Ultimate Guide Online Audio Recordings From YouTube
- Enhancing Video Success Top 8 YT Thumbnail Strategies for 2024
- 2024 Approved Efficiently Broadcasting Twitch Streams to YouTube Audiences
- Discovering the Hidden Truth Behind YouTube's Viewer Numbers for 2024
- [New] Comprehensive Instructions for Disposing of Video Downloads
- [New] Building a Successful YouTube Channel Sidestep These 8 Frequent Faux Pas
- Quality Audio Awaits with These Premium ASMR Mics
- 2024 Approved Dailymotion vs YouTube Monetization Which Is More Profitable?
- [Updated] Best Practices for YouTube Video Brightness and Contrast
- In 2024, Digital Diving Into YouTube’s Veiled Video Vaults
- Your Youtubian Beginnings Establishing Your Channel, Earning Earnings
- Boosting Earnings in the Quick Flicks of YouTube Shorts for 2024
- 10+ Incredible Free YouTube Intro Makers for 2024
- In 2024, A Step-by-Step Manual for YouTube Shorts Templates Perfection
- In 2024, 80+ Catchy Cooking Channel Names to Attract More Audience
- [New] Accelerate Your Content's View Count 1K+ in Time
- [New] Budget-Friendly Tactics to Increase Your YouTube Video Impact
- 2024 Approved Channel Transformation Through Strategic Use of YouTube Outros
- [New] Bridging the Budget Barrier Channel Size Doesn't Matter
- A Beginner’s Guide to Interpreting Youtube Analytics Scores for 2024
- [New] Elevating Video Marketing with YouTube Thumbnails
- [Updated] Top Tactics 3 Ways to Record and Keep Your Live Discord Events Alive
- How to Look at Comments on YouTube
- How to Mirror Apple iPhone SE to Roku? | Dr.fone
- Troubleshooting Missing Video Display on Sony A6400
- In 2024, 8 Safe and Effective Methods to Unlock Your iPhone 12 Pro Without a Passcode
- Delete Gmail Account With/Without Password On Oppo Reno 8T
- Read This Guide to Find a Reliable Alternative to Fake GPS On Apple iPhone 11 | Dr.fone
- Updated In 2024, Uncover Joke-Infused Audio Artifacts
- In 2024, Unlock Samsung Galaxy A25 5G Phone Password Without Factory Reset Full Guide Here
- Myth-Busting Realities of Instagram Story Followers
- In 2024, How to Track WhatsApp Messages on Apple iPhone 14 Plus Without Them Knowing? | Dr.fone
- The Essential Tutorial for Facebook Live on Roku TV for 2024
- Unlock Poco Phone Password Without Factory Reset Full Guide Here
- Inside the High-Definition World of Nikon J5
- [New] Ultimate Guide to Vimeo Extractors Top 10 Web Tools Reviewed for 2024
- Updated 2024 Approved Mac Video Editing Essentials Best Software Options
- 2024 Approved How to Notice Unregistered Users on Snapchat
- In 2024, How to Change Lock Screen Wallpaper on Samsung Galaxy M14 4G
- In 2024, The 6 Best SIM Unlock Services That Actually Work On Your Xiaomi Redmi Note 12 4G Device
- Title: "In 2024, Elevate Your Brand Explore These 10 Essential YouTube Creators"
- Author: Brian
- Created at : 2024-05-25 12:13:23
- Updated at : 2024-05-26 12:13:23
- Link: https://youtube-video-recordings.techidaily.com/in-2024-elevate-your-brand-explore-these-10-essential-youtube-creators/
- License: This work is licensed under CC BY-NC-SA 4.0.
