
:max_bytes(150000):strip_icc():format(webp)/the-17-best-graphic-design-software-2024-1dd6c15b34124b25b65e4b096e4e6ba4.jpg)
In 2024, Effortlessly Blend Your YT Video with GS
Effortlessly Blend Your YT Video with GS
Create High-Quality Video - Wondershare Filmora
An easy and powerful YouTube video editor
Numerous video and audio effects to choose from
Detailed tutorials provided by the official channel
Advances in filmmaking have brought many concepts into reality. And the green screen is one common practice. Green screen technology is a technique where you use two images or video streams to composite them together. You can use any background images, either foreground or behind the actors. For YouTube, you can use green screen subscribe to facilitate video Call To Action. A green screen easily produces impossible scenes and expands filming ideas. Everything done at the Studio is also the best way to protect actors from hazardous environments.
More so, the best trick is to allow actors to appear together on the screen even when the scenes were captured separately. And did you know that subscribe green screen makes it easy to add YouTube Call To Action and direct viewers on what to do?

Methods to add a subscribe button to your video
Viewers are not likely to subscribe to any channel if they are not guided. One best method is to engage a subscribe button to your video and draw the attention of as many as possible.
1 Use Subscribe Green Screen
Put your green screen to work by subscribing to it. Follow these steps to produce eye-catching videos, with a call to action closing point.
Step 1. Set screen
You need to create a background at the Studio – and that’s the green screen. Keenly hand it on a frame before you start filming. Also, note that no wrinkles or fold-ups are visible.

Step 2. Adjust lighting
Lighting is important to facilitate high-resolution video output quality. Put appropriate lighting settings to avoid directional shadows and get the best results.
Step 3. Set up the subject
Give ample space between the subject and the green screen for an effective outcome. If they are too close, there will be a reflection of the green screen on the subject. It isn’t professional as it will be hard when it comes to matching to a different background.

Step 4. Start filming
Begin to film your video and ensure you take various shots for comparison. It is good to film at different angles to see what works best.
Step 5. Polish the rough cut
Tune all the footage to perfect video clips. It will save your efforts when keying out green screen footage. Remove the unwanted parts by trimming. You can also do other edits like merge and split where necessary.
Step 6. Key out the footage and edit the green screen
Your footage is now ready, and you are now free to edit the green screen. It is better to engage reliable editing software to remove the green traces in the shot.
Step 7. Paste the new background
Any background concept can now fit in. Add your desired background video or image in a new layer below the subject. You can continue to make other necessary adjustments like sharpness and hue for reality.
Step 8. Add Call To Action
Finally, tell your viewers to subscribe to your YouTube channel while watching the video. You can also introduce your other channels that aren’t yet known or those that have not reached 1,000 subscribers.
2 Using YouTube Studio
You can also enable the green screen to subscribe via the YouTube Studio. It is a YouTube application that provides you with the tools you need to create a successful YouTube channel. You can manage your videos, respond to comments and even add adverts to your content for pay. Here are the steps to add subscribe button.
Step 1. First, go directly to “studio.youtube.com” or click on your profile picture on the YouTube page to launch YT Studio.

Step 2. Click on the “Menu” option and choose the “Settings”> “Channel” option.

Step 3. Then select the “Choose” image and select which subscribe button image you wish to use as your branding watermark. You can easily get one on the Google images section.
Step 4. Next, choose the display time for the branding watermark. It could be a custom start time if you want the branding watermark to start showing at a specific time. You can also choose “End or video” for it to appear at the last 10 to 15 seconds of your video. Likewise, the branding watermark can show throughout the video if you choose the “Entire video” option.
Step 5. Finally, save the changes. Voila! Viewers can subscribe to your channel easily, with a single click of a button.
3 Using Subscribe Effects
You can also use the subscribers’ effects to add a Call To Action. Remember, your main aim is to increase the audience to your channel. And in most cases, viewers forget to subscribe even though they love your video. Perhaps they don’t understand the importance it holds to your channel. You can do this using a reliable video editor software – Filmora.
Filmora is a sophisticated tool that is easy to use and export your videos to your computer and upload them to YouTube. It has over 300 effects for YouTubers and comprises exclusive overlays for any scene. Follow these steps to add the subscribe button with subscribe effects.
Key Features of Filmora
- Edit and export your videos at up to 4K resolution
- Supports GIF animation, which you can use for CTA
- It has an advanced text editor
- Easily remove background noise for a polished video sound
- It has an audio equalizer functionality for audio uniformity
- It has the video stabilization functionality
For Win 7 or later (64-bit)
For macOS 10.12 or later
Step 1. Launch Filmora
Open Filmora on your computer, then navigate to the upper left corner of the screen. Click on the “Sample Colors” and select the “Green color.” Next, drag it to video track into the timeline. Then adjust the duration of your video track to your preference.

Step 2. Design the subscribe GIF animation
Use a different color shade to design the subscribe GIF animation. Take “Red” in this case as it smartly blends with the green color that we choose earlier. Drag the red color above the green background.

Step 3. Adjust the red box
Make the added color red button look like a subscribe button. Then place it at any point you want it to appear in front of the background.
Step 4. Add the subscribe text
Write a text into the button. Filmora offers you various styles of text to choose from. You can select the text style you want to use, then drag and drop it into the timeline.

Step 5. Edit title with “Subscribe”
Edit your text with the word “Subscribe,” then place it under the red rectangle and hit the “OK” button.
Step 6. Animate the “Subscribe” button
Double click on the “Red” button. Just go to the “Animate” tab and click on the “Customize” option. Next, click on the “Add” button.

Step 7. Animate text as well
Go to the “Text” option in the timeline and click on “Advanced” text editor. Then go to the “Animation” tab and select the animation you wish to use. Here, you can adjust your text’s start and ending time when you want it to start fading.
Step 8. Export GIF
Your Subscribe GIF is now ready to be exported to your video. Hit the “Export” button and select which format to export it in.

Extra Tip: Ways to Include Calls to Action on videos
Know how to include CTA in your video marketing strategy to boost your subscribers.
- Include Annotations
Annotations are eye-catching and a quick reminder for viewers. You have a variety to choose from, like bubbles, shoutouts, etc. They are used to remind you to subscribe to the channel, view another video, or comment after watching it. - Edit CTAs in your video
It lets the viewer know what to do next before the video ends. The likely reminder is to subscribe to the channel. They could also be reminded to watch the next video or leave a comment. - YouTube Ad Overlays also work
However, ad overlay is for content creators with Google AdWords enabled on their YT channel. Adding an Ad Overlay will link you to any part of the web. Do you want to know the best part? No cost at all! You only need to pay for the views you buy during your video promotion.
Conclusion
● The best strategy to get viewers to subscribe to your YouTube channel is to engage a Call To Action. A bigger number of subscribers guarantees more watch time and the possible growth of your channel. Subscribe green screen even makes it perfect as far as video creation is concerned. You can get different video background ideas and make every scene look authentic. You can engage a third-party tool like Filmora. It will effortlessly add a green screen subscribe in a few steps. Likewise, you can add annotations and other text styles to enhance your look.
Advances in filmmaking have brought many concepts into reality. And the green screen is one common practice. Green screen technology is a technique where you use two images or video streams to composite them together. You can use any background images, either foreground or behind the actors. For YouTube, you can use green screen subscribe to facilitate video Call To Action. A green screen easily produces impossible scenes and expands filming ideas. Everything done at the Studio is also the best way to protect actors from hazardous environments.
More so, the best trick is to allow actors to appear together on the screen even when the scenes were captured separately. And did you know that subscribe green screen makes it easy to add YouTube Call To Action and direct viewers on what to do?
Methods to add a subscribe button to your video
Viewers are not likely to subscribe to any channel if they are not guided. One best method is to engage a subscribe button to your video and draw the attention of as many as possible.
1 Use Subscribe Green Screen
Put your green screen to work by subscribing to it. Follow these steps to produce eye-catching videos, with a call to action closing point.
Step 1. Set screen
You need to create a background at the Studio – and that’s the green screen. Keenly hand it on a frame before you start filming. Also, note that no wrinkles or fold-ups are visible.
Step 2. Adjust lighting
Lighting is important to facilitate high-resolution video output quality. Put appropriate lighting settings to avoid directional shadows and get the best results.
Step 3. Set up the subject
Give ample space between the subject and the green screen for an effective outcome. If they are too close, there will be a reflection of the green screen on the subject. It isn’t professional as it will be hard when it comes to matching to a different background.
Step 4. Start filming
Begin to film your video and ensure you take various shots for comparison. It is good to film at different angles to see what works best.
Step 5. Polish the rough cut
Tune all the footage to perfect video clips. It will save your efforts when keying out green screen footage. Remove the unwanted parts by trimming. You can also do other edits like merge and split where necessary.
Step 6. Key out the footage and edit the green screen
Your footage is now ready, and you are now free to edit the green screen. It is better to engage reliable editing software to remove the green traces in the shot.
Step 7. Paste the new background
Any background concept can now fit in. Add your desired background video or image in a new layer below the subject. You can continue to make other necessary adjustments like sharpness and hue for reality.
Step 8. Add Call To Action
Finally, tell your viewers to subscribe to your YouTube channel while watching the video. You can also introduce your other channels that aren’t yet known or those that have not reached 1,000 subscribers.
2 Using YouTube Studio
You can also enable the green screen to subscribe via the YouTube Studio. It is a YouTube application that provides you with the tools you need to create a successful YouTube channel. You can manage your videos, respond to comments and even add adverts to your content for pay. Here are the steps to add subscribe button.
Step 1. First, go directly to “studio.youtube.com” or click on your profile picture on the YouTube page to launch YT Studio.
Step 2. Click on the “Menu” option and choose the “Settings”> “Channel” option.
Step 3. Then select the “Choose” image and select which subscribe button image you wish to use as your branding watermark. You can easily get one on the Google images section.
Step 4. Next, choose the display time for the branding watermark. It could be a custom start time if you want the branding watermark to start showing at a specific time. You can also choose “End or video” for it to appear at the last 10 to 15 seconds of your video. Likewise, the branding watermark can show throughout the video if you choose the “Entire video” option.
Step 5. Finally, save the changes. Voila! Viewers can subscribe to your channel easily, with a single click of a button.
3 Using Subscribe Effects
You can also use the subscribers’ effects to add a Call To Action. Remember, your main aim is to increase the audience to your channel. And in most cases, viewers forget to subscribe even though they love your video. Perhaps they don’t understand the importance it holds to your channel. You can do this using a reliable video editor software – Filmora.
Filmora is a sophisticated tool that is easy to use and export your videos to your computer and upload them to YouTube. It has over 300 effects for YouTubers and comprises exclusive overlays for any scene. Follow these steps to add the subscribe button with subscribe effects.
Key Features of Filmora
- Edit and export your videos at up to 4K resolution
- Supports GIF animation, which you can use for CTA
- It has an advanced text editor
- Easily remove background noise for a polished video sound
- It has an audio equalizer functionality for audio uniformity
- It has the video stabilization functionality
For Win 7 or later (64-bit)
For macOS 10.12 or later
Step 1. Launch Filmora
Open Filmora on your computer, then navigate to the upper left corner of the screen. Click on the “Sample Colors” and select the “Green color.” Next, drag it to video track into the timeline. Then adjust the duration of your video track to your preference.
Step 2. Design the subscribe GIF animation
Use a different color shade to design the subscribe GIF animation. Take “Red” in this case as it smartly blends with the green color that we choose earlier. Drag the red color above the green background.
Step 3. Adjust the red box
Make the added color red button look like a subscribe button. Then place it at any point you want it to appear in front of the background.
Step 4. Add the subscribe text
Write a text into the button. Filmora offers you various styles of text to choose from. You can select the text style you want to use, then drag and drop it into the timeline.
Step 5. Edit title with “Subscribe”
Edit your text with the word “Subscribe,” then place it under the red rectangle and hit the “OK” button.
Step 6. Animate the “Subscribe” button
Double click on the “Red” button. Just go to the “Animate” tab and click on the “Customize” option. Next, click on the “Add” button.
Step 7. Animate text as well
Go to the “Text” option in the timeline and click on “Advanced” text editor. Then go to the “Animation” tab and select the animation you wish to use. Here, you can adjust your text’s start and ending time when you want it to start fading.
Step 8. Export GIF
Your Subscribe GIF is now ready to be exported to your video. Hit the “Export” button and select which format to export it in.
Extra Tip: Ways to Include Calls to Action on videos
Know how to include CTA in your video marketing strategy to boost your subscribers.
- Include Annotations
Annotations are eye-catching and a quick reminder for viewers. You have a variety to choose from, like bubbles, shoutouts, etc. They are used to remind you to subscribe to the channel, view another video, or comment after watching it. - Edit CTAs in your video
It lets the viewer know what to do next before the video ends. The likely reminder is to subscribe to the channel. They could also be reminded to watch the next video or leave a comment. - YouTube Ad Overlays also work
However, ad overlay is for content creators with Google AdWords enabled on their YT channel. Adding an Ad Overlay will link you to any part of the web. Do you want to know the best part? No cost at all! You only need to pay for the views you buy during your video promotion.
Conclusion
● The best strategy to get viewers to subscribe to your YouTube channel is to engage a Call To Action. A bigger number of subscribers guarantees more watch time and the possible growth of your channel. Subscribe green screen even makes it perfect as far as video creation is concerned. You can get different video background ideas and make every scene look authentic. You can engage a third-party tool like Filmora. It will effortlessly add a green screen subscribe in a few steps. Likewise, you can add annotations and other text styles to enhance your look.
Continuous Streams: Perfect Loops of YouTube Videos for TVs
Loop is a YouTube video format that allows viewers to watch a continuous sequence of videos. Loop is similar to traditional YouTube videos, but it can be played on a TV screen like a traditional TV show. Loop is a great way to keep viewers engaged with your content. It’s like a one-stop shop for all your content needs. You can use it to promote your latest video series.
Why looping YouTube videos on a TV is a great idea? First, it can be a fun way to watch your favorite videos without having to worry about the time. Second, it can be a way to save money on your cable. By watching your favorite videos on loop, you can cut down on the number of times you need to watch them.
If you are watching a series of videos, for example, looping them can help you to remember what happened in each one. Secondly, it can help you to learn new information more easily. If you are watching a tutorial or a video about a new topic, looping can help you to remember the details better.
Free Download For Win 7 or later(64-bit)
Free Download For macOS 10.14 or later


Part 1: How to Create a Loop Video for YouTube
There is a lot of debate around whether or not creating a loop video is necessary for success on YouTube. Some people believe that it’s not necessary, while others believe that it is a must. The main benefit of creating a loop video is that it helps to keep your audience engaged. It also helps to create a sense of continuity between your videos.
Creating a loop video for your YouTube channel increases engagement because viewers can watch the video over and over again. This can lead to more clicks on your ads, which can lead to more revenue. It can also increase your subscribers and views. Maybe some people want to watch the same video multiple times in a row without having to keep pressing the play button on the remote.
Filmora is the best video loop editor:
If you need a powerful video editing tool that will let you create high-quality clips with multiple loops, look no further than Filmora . This software allows you to make various loops of your videos for use in social media, on your website or wherever desired. Plus, with Filmora, there is no limit on the number of loops you can create.
Loop video works well for corporate presentations, tutorials, explainer videos, and much more. You can create looping videos by choosing from one of Filmora’s many templates or creating your own. It’s easy to get started with looping video editing in Filmora! Some people want to watch a video while they do other things, like work on the computer.
Filmora is incredibly easy to use. You can quickly create videos by importing footage, editing and adding effects, and exporting your videos. Plus, the software has several built-in tools that let you customize your videos further. It has many features that make it an excellent choice for anyone looking to create high-quality videos quickly and easily.
How can we loop a video on Filmora? Follow these steps to create a looping video on Filmora:
Step 1 Download the Filmora and create a project
Free Download For Win 7 or later(64-bit)
Free Download For macOS 10.14 or later
You can download the Filmora for free. After installation of this software open it and click on Create New Project. Filmora is not only the video maker or editor, you can also add text and music to your videos, and share them on social media or with friends.

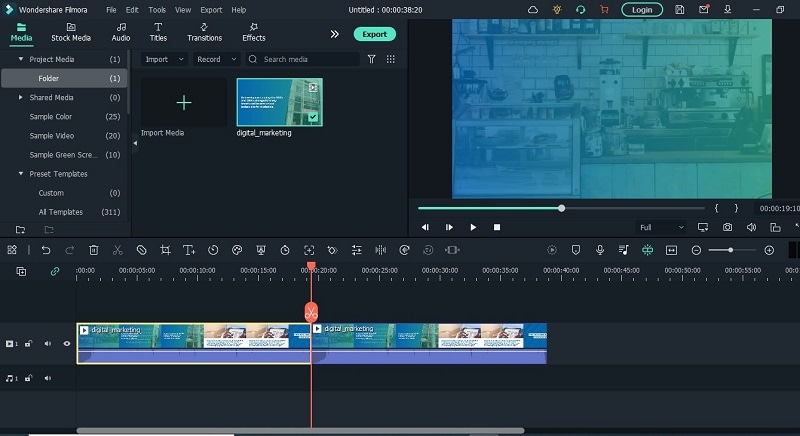
Step 2 Open the video and make copies
Open the video in your timeline. All you need to do is right-click on the video and click on copy. Then simply click or press Ctrl+V on your keyboard and do that for times. You can make as many copies as you want. Then you will have the same clip over and over again which creates the loop effect.
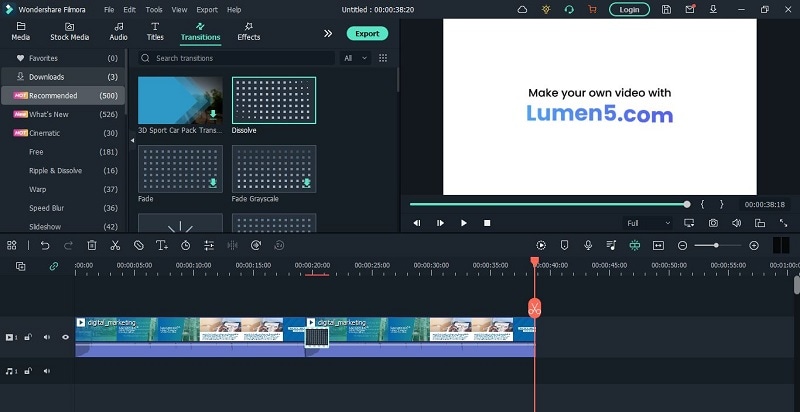
Step 3 Add Transition or any title in the video
After making copies of your video. Add some transitions in your video. Adding transitions to videos can help to keep your videos looking polished and professional. Not only do transitions add an extra layer of visual interest, but they can also help to underscore specific points in your video.
Benefits to create loop video on Filmora
There are many benefits to creating looping videos, especially when using a tool like Filmora. Loop videos are great for social media since they can be set to play on a loop and are viewable without sound. They’re also perfect for short attention spans since you can watch them over and over again without getting bored.
This can be useful for marketing purposes, as it can keep people interested in your video content. Additionally, looping can create a more engaging video experience for viewers, as it keeps them engaged by playing the same clip over and over again. You can easily add captions, and titles to your loop video.
When viewers can pause, rewind, and playback a video over and over again, they are more engaged with it. This increases the chances that they will watch the entire video, and may even share it with friends. You can create a sense of community and connection with your customers. And best of all? You can keep the magic going by adding sound effects and music!
Part 2: Loop a YouTube Video on TV from a Mobile
One of the great features of YouTube is that you can loop YouTube videos on your TV. This means that you can watch a video over and over again without having to fast forward through it. This is great for kids who are constantly asking to watch the same video over and over again. You can also use this feature to watch videos that you have missed.
There is something about relaxing music on the loop that can help to take the edge off. Whether it’s to help you wind down before bed, or to help you relax after a long day, there’s no doubt that looping YouTube on TV can be helpful. Whether you’re looking for something light and calming, or something to help you wind down after a long day, there’s sure to be something on YouTube that can fit the bill.
Let’s have a look at some steps that how to repeat YouTube videos on smart TV.
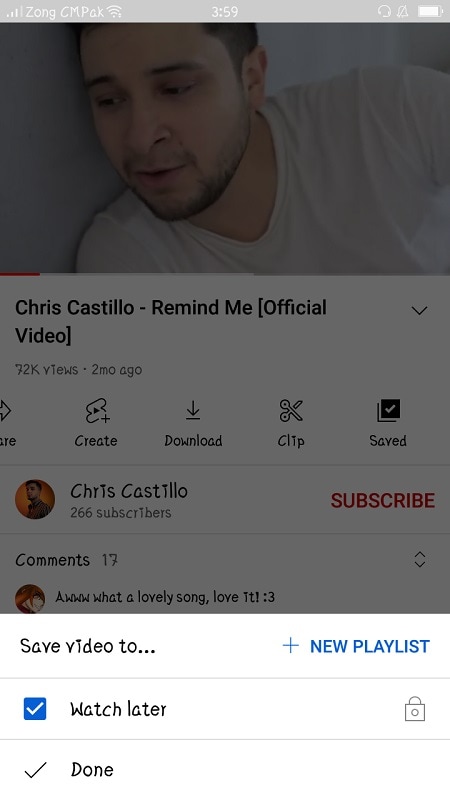
Step 1 Create a Playlist of one or multiple videos
The YouTube app is available on the google play store. You can easily download it from your mobile phones, android, etc. When you open a video on YouTube, several options will appear (like, share, subscribe). You can save the video in your existing playlist or you can create a new playlist.
Step 2 Go to the library and select the loop symbol
Click on library this will take you to a list of libraries that have YouTube collections. This can be a great way to find new material to watch, or to find old material that you may have missed. Play back the playlist that you want to loop on the smart TV.
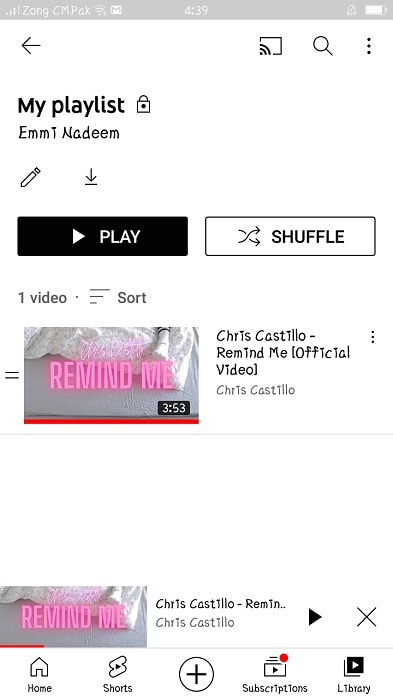
Step 3 Loop the playlist and send the list to the TV
Play the list and click on the loop symbol. At last, launch the YouTube video on your TV. The video will start playing in a loop. It can only be stopped from your mobile phone on which you start playing the list.
Why you might want to loop a YouTube video on a smart TV?
Some people want to watch a video over and over again without having to wait for it to load each time. Looping in a YouTube video can help you do this. Another reason to loop a YouTube video on your TV is if you want to watch it while you are doing something else. YouTube only loops the playlist.
Looping a YouTube video on your TV can also be useful if you have a lot of videos that you want to watch but don’t have enough time for. Looping YouTube videos on your television is a great way to keep your young ones entertained and engaged. Not only are they getting their daily dose of educational content, but they are also being kept enertained.
Wondershare Filmora Loop YouTube videos on PC and Mac with simple clicks.
Free Download Free Download Learn More

![]()
Conclusion
Looping YouTube videos on smart TV is an excellent way to watch the content you love, no matter where you are. While it may be true that loop YouTube videos on a smart TV are not imminent, there are some major benefits to be gained from implementing the new technology.
It’s easy to do, and it can be a great way to spend time with family members and friends. Looping YouTube videos on a smart TV is a great way to add some fun and excitement to your experience. The best part is, there are no limitations or restrictions you can loop as many videos as you want, and watch them in any order!
Free Download For Win 7 or later(64-bit)
Free Download For macOS 10.14 or later
Part 1: How to Create a Loop Video for YouTube
There is a lot of debate around whether or not creating a loop video is necessary for success on YouTube. Some people believe that it’s not necessary, while others believe that it is a must. The main benefit of creating a loop video is that it helps to keep your audience engaged. It also helps to create a sense of continuity between your videos.
Creating a loop video for your YouTube channel increases engagement because viewers can watch the video over and over again. This can lead to more clicks on your ads, which can lead to more revenue. It can also increase your subscribers and views. Maybe some people want to watch the same video multiple times in a row without having to keep pressing the play button on the remote.
Filmora is the best video loop editor:
If you need a powerful video editing tool that will let you create high-quality clips with multiple loops, look no further than Filmora . This software allows you to make various loops of your videos for use in social media, on your website or wherever desired. Plus, with Filmora, there is no limit on the number of loops you can create.
Loop video works well for corporate presentations, tutorials, explainer videos, and much more. You can create looping videos by choosing from one of Filmora’s many templates or creating your own. It’s easy to get started with looping video editing in Filmora! Some people want to watch a video while they do other things, like work on the computer.
Filmora is incredibly easy to use. You can quickly create videos by importing footage, editing and adding effects, and exporting your videos. Plus, the software has several built-in tools that let you customize your videos further. It has many features that make it an excellent choice for anyone looking to create high-quality videos quickly and easily.
How can we loop a video on Filmora? Follow these steps to create a looping video on Filmora:
Step 1 Download the Filmora and create a project
Free Download For Win 7 or later(64-bit)
Free Download For macOS 10.14 or later
You can download the Filmora for free. After installation of this software open it and click on Create New Project. Filmora is not only the video maker or editor, you can also add text and music to your videos, and share them on social media or with friends.
Step 2 Open the video and make copies
Open the video in your timeline. All you need to do is right-click on the video and click on copy. Then simply click or press Ctrl+V on your keyboard and do that for times. You can make as many copies as you want. Then you will have the same clip over and over again which creates the loop effect.
Step 3 Add Transition or any title in the video
After making copies of your video. Add some transitions in your video. Adding transitions to videos can help to keep your videos looking polished and professional. Not only do transitions add an extra layer of visual interest, but they can also help to underscore specific points in your video.
Benefits to create loop video on Filmora
There are many benefits to creating looping videos, especially when using a tool like Filmora. Loop videos are great for social media since they can be set to play on a loop and are viewable without sound. They’re also perfect for short attention spans since you can watch them over and over again without getting bored.
This can be useful for marketing purposes, as it can keep people interested in your video content. Additionally, looping can create a more engaging video experience for viewers, as it keeps them engaged by playing the same clip over and over again. You can easily add captions, and titles to your loop video.
When viewers can pause, rewind, and playback a video over and over again, they are more engaged with it. This increases the chances that they will watch the entire video, and may even share it with friends. You can create a sense of community and connection with your customers. And best of all? You can keep the magic going by adding sound effects and music!
Part 2: Loop a YouTube Video on TV from a Mobile
One of the great features of YouTube is that you can loop YouTube videos on your TV. This means that you can watch a video over and over again without having to fast forward through it. This is great for kids who are constantly asking to watch the same video over and over again. You can also use this feature to watch videos that you have missed.
There is something about relaxing music on the loop that can help to take the edge off. Whether it’s to help you wind down before bed, or to help you relax after a long day, there’s no doubt that looping YouTube on TV can be helpful. Whether you’re looking for something light and calming, or something to help you wind down after a long day, there’s sure to be something on YouTube that can fit the bill.
Let’s have a look at some steps that how to repeat YouTube videos on smart TV.
Step 1 Create a Playlist of one or multiple videos
The YouTube app is available on the google play store. You can easily download it from your mobile phones, android, etc. When you open a video on YouTube, several options will appear (like, share, subscribe). You can save the video in your existing playlist or you can create a new playlist.
Step 2 Go to the library and select the loop symbol
Click on library this will take you to a list of libraries that have YouTube collections. This can be a great way to find new material to watch, or to find old material that you may have missed. Play back the playlist that you want to loop on the smart TV.
Step 3 Loop the playlist and send the list to the TV
Play the list and click on the loop symbol. At last, launch the YouTube video on your TV. The video will start playing in a loop. It can only be stopped from your mobile phone on which you start playing the list.
Why you might want to loop a YouTube video on a smart TV?
Some people want to watch a video over and over again without having to wait for it to load each time. Looping in a YouTube video can help you do this. Another reason to loop a YouTube video on your TV is if you want to watch it while you are doing something else. YouTube only loops the playlist.
Looping a YouTube video on your TV can also be useful if you have a lot of videos that you want to watch but don’t have enough time for. Looping YouTube videos on your television is a great way to keep your young ones entertained and engaged. Not only are they getting their daily dose of educational content, but they are also being kept enertained.
Wondershare Filmora Loop YouTube videos on PC and Mac with simple clicks.
Free Download Free Download Learn More
![]()
Conclusion
Looping YouTube videos on smart TV is an excellent way to watch the content you love, no matter where you are. While it may be true that loop YouTube videos on a smart TV are not imminent, there are some major benefits to be gained from implementing the new technology.
It’s easy to do, and it can be a great way to spend time with family members and friends. Looping YouTube videos on a smart TV is a great way to add some fun and excitement to your experience. The best part is, there are no limitations or restrictions you can loop as many videos as you want, and watch them in any order!
Also read:
- [Updated] A Complete List of Creative and Catchy YouTube Channel Titles for Modern Blogging (Maximum Length 156 Characters)
- Elevate Views Premium Hashtags to Spark Virality in Video Snippets for 2024
- Top 10 YouTube Video Editing Tips for Beginner Editors
- Boost Engagement Through Best Thumbnail Practices for 2024
- [New] Deciphering the Code Understanding What 'Unlisted' On YouTube Means
- [Updated] Elite Videography The Top Tools For YouTube Content
- Critical Selection The Best 10 Video Cards for Seamless Playback
- Clip Weaver Workshop
- Triple Threat Viewership on Youtube & Twitch Duo
- Get More Eyeballs Perfect Your YouTube Description Templates for Viewer Attraction
- In 2024, 27 Superb Non-YouTube Platforms for Your Videos
- Transformative Media Tools Best Online Video to Text Systems
- A Beginner's Guide to Personal Brand Craftsmanship
- Pursuing Your Vision Learn Professional Filmmaking on YouTube
- In 2024, Deception's Toll Consequences of Fake Supporters in Video Markets
- Access Your Favorites Anytime The Leading 6 Free Video Downloaders
- 2024 Approved Boosting Audience Size A Comprehensive Guide to YouTube Shorts Success
- Increase Your Online Presence YouTube Methods
- [Updated] Enhancing YouTube Music Soundscape
- 2024 Approved Brief but Impactful Which Social Platform Leads for Short Video Content?
- Crafting a Viral Path Best Hashtags for YouTube Riches for 2024
- Maximize Impact Sharing YouTube Videos on Social Media (FB)
- Instrument Innovations See the Top 15 Music Tech Tutorials on YouTube
- 2024 Approved Beginner's Bane The Top 8 Youtube Errors You Shouldn't Commit
- In 2024, Effortless Guide to Free Melodies in YouTube Productions
- In 2024, Crack the Code of Content Top 6 YouTuber Personality Tests Revealed
- In 2024, Cutting Edge Video Editing Mastering Green Screen Integration
- In 2024, Enhance Your Presence Best Free Tools for Intriguing Openings
- Effective, Legal Strategies for Content Visibility
- 2024 Approved Essential History Series YouTube Recommendations for Learners
- Celebratory Moments Captured A List of the Most Beautiful Wedding Videos (8)
- Understanding YouTube's Revenue Streams
- [New] Decoding the Algorithm Behind YouTube Shorts
- In 2024, A Guide for Mobile Filmmakers on Crafting YouTube Thumbnails
- [Updated] Capturing Life in Motion Top 9 Smartphone Props for Dynamic Cinematography
- [Updated] Elevate Well-Being The Leading Online Yoga Vids
- In 2024, Enriched Viewing Experience with These Free Downloader Apps for YouTubes
- Ajey's YouTube Profit Milestones
- The Ultimate List of Free, User-Friendly Editing Apps
- 2024 Approved Amplify YouTube Visibility Crafting Effective Descriptions & Tags
- Crafting GIFs From YouTube Detailed Step-by-Step Guide for PC/Mobile
- Unleash Potential Access Premium Sound Effects
- [New] Broadview Networks Navigating MCN Choices
- Broadcasting Made Simple Directly Stream Google Meet to YouTube for 2024
- Explore Top 10 iPhone/Android Intro Creation Software
- Speedy Solutions for Disordering Your YouTube Queue
- Ignite Interest Essential YouTube Video Concepts
- Breaking Down Barriers to Inaccessible YouTube Content
- Effortless Guide to Secure and Free YouTube Music Downloads for 2024
- 2024 Approved Boosting Popularity on TikTok Top 7 Essential Apps & Strategies
- Updated 2024 Approved Powerful Set of Male to Female Voice Change Technologies Enhancing Eloquence with Higher Pitches
- X-Audio Enhancer for Computer Use for 2024
- New 2024 Approved From Flat to Fabulous How to Add 3D Effects to Your Windows Videos
- Updated In 2024, Top 5 Tools to Convert Text to Audio Online for Free
- In 2024, Visualizing Stories Turning Your Favorite Vimeo Into Dynamic GIFs
- New 2024 Approved Cutting Edge Audio Editing with Sony Vegas Pro – Complete Guide
- In 2024, 2 Ways to Transfer Text Messages from Lava Yuva 2 to iPhone 15/14/13/12/11/X/8/ | Dr.fone
- How to use Pokemon Go Joystick on Vivo Y100? | Dr.fone
- In 2024, Direct Save + Alternative Pathways Your Instagram Video Guide
- Updated In 2024, Dynamic Voice Tribute Tools Discover the Best Options Available Online and on Computers
- How to Hide/Fake Snapchat Location on Your Oppo Reno 8T | Dr.fone
- [New] 2024 Approved From Casual to Expert Your Path with OBS Gaming Capture
- [New] Composing Persuasive Podcast Introductions
- Recorders Unite, Compete
- Superior Global Stage Viewings
- [Updated] Cheap Cam Recorders That Deliver Big on Performance
- New If You Do Not Know How to QuickTime Trim Video Clips, You Are in the Right Place. We Have Provided Information that Will Help You Trim Videos with This Application and Make Them Engaging for Viewers
- A Comprehensive Guide to iCloud Unlock From Apple iPhone 13 Pro Max Online
- Things You Should Know When Unlocking Total Wireless Of iPhone XS Max | Dr.fone
- [Updated] 2024 Approved Breaking Barriers A Comprehensive Guide to Dispute Reporting Without Confrontation on Discord
- In 2024, No Watermarks, Just Pure TikTok Videos
- In 2024, 4 Feasible Ways to Fake Location on Facebook For your Realme GT Neo 5 SE | Dr.fone
- In 2024, Record the Essence of Your FACEbook Page
- In 2024, Overview of the Best Xiaomi Redmi Note 13 Pro+ 5G Screen Mirroring App | Dr.fone
- 2024 Approved Refresh Your Virtual Space in Google Meet, PC & Mobile Way
- [New] Dissecting the Emerging Trends in Facebook Short Videos for 2024
- [New] Enhance Discord Conversations A Recorder's Insight for 2024
- Optimal MKV Watcher for Laptops
- [New] 2024 Approved Scrutinized Screen Recording Tools Top 8 Picks
- [Updated] 10 Facebook Jail Secrets to Avoid Being Blocked / Get Out of It
- 2024 Approved Online Workshop Replay
- 2024 Approved AI's Pioneering Role in Generating Podcast Names
- In 2024, Top Apps and Online Tools To Track Infinix Zero 30 5G Phone With/Without IMEI Number
- In 2024, How to Send and Fake Live Location on Facebook Messenger Of your OnePlus Nord 3 5G | Dr.fone
- 2024 Approved From Screen to Video How to Record Your Desktop with Filmora Scrn
- Unlock the Power of Shotcut The Ultimate Guide to Rotating Videos for 2024
- [Updated] How to Send Gif on Snapchat [Stey-by-Stey Guide] for 2024
- [New] 2024 Approved Leading Tech Essential Video Recorders of the Net
- Bring Your Vision to Life Best 1080P Video Editing Programs
- Top 9 Expert-Picked Smartphone Chat Apps for Business Use
- New Want to Learn How to Create the Random Letter Reveal Intro? Read Through the Stages of Preparing This Effect via Filmora in This Guide
- [Updated] 2024 Approved Clandestine Scrollers of Fb Stories
- Harnessing Your Creative Energy The Path to Wealth on TikTok
- Title: In 2024, Effortlessly Blend Your YT Video with GS
- Author: Brian
- Created at : 2024-05-25 12:13:04
- Updated at : 2024-05-26 12:13:04
- Link: https://youtube-video-recordings.techidaily.com/in-2024-effortlessly-blend-your-yt-video-with-gs/
- License: This work is licensed under CC BY-NC-SA 4.0.
