
:max_bytes(150000):strip_icc():format(webp)/duetinslides-fd2c11f1a91a4d7388cc25f2f4719cca.jpg)
In 2024, Effortless Video Upload From Apple Devices to YouTube Channel
Effortless Video Upload From Apple Devices to YouTube Channel
Create High-Quality Video - Wondershare Filmora
An easy and powerful YouTube video editor
Numerous video and audio effects to choose from
Detailed tutorials provided by the official channel
Initially, iOS users had the option to load videos directly to YouTube via the tap-to-upload feature. However, this option is missing in the recent iOS devices versions. Therefore, many users search for possible ways to post a video on YouTube from iPhone. For this, you have to put some considerations into place before moving on. The video title length should not exceed 100 characters, while the description is maintained at 5,000 characters. Also, ensure the video length doesn’t exceed 15 minutes. Let’s roll out the best ways to upload your videos and make that big catch on subscribers.

In this article
01 [ How to upload a video to YouTube from iPhone or iPad](#Part 1)
02 [Why your phone doesn’t post videos to YouTube](#Part 2)
03 [Make your YouTube video better with Filmora](#Part 3)
How to upload a video to YouTube from iPhone or iPad
Are you ready to start on that big adventure and share your videos on YouTube? Follow these steps to learn how to upload a video to YouTube from your iPhone.
Method 1: Upload using the YouTube iOS app
Using the YouTube app is the simplest way to upload your YouTube videos. The YouTube app should be installed on your iOS device.
Step 1. Launch the YouTube app on your device, then sign in to your account. If you don’t have an account yet, you will need to “Sign up” for a new one before continuing the upload process.
Step 2. Click on the “+” icon found at the bottom of the screen.
Step 3. Then choose the “Upload a video” option from the populated list of options.
Step 4. Check out the pop-up that appears and “Allow access” to it.
Step 5. Edit your video to your preference by trimming or cropping as you desire. Then click on the “Next” option.

Step 6. Add “title and description” to your video. Remember, the title should contain less than 100 characters and the description no more than 500 characters.
Step 7. Then set the visibility mode as “Public” to enable you to share your video over the internet.
Step 8. Click on the “Upload” button to finally upload your video to YouTube.

Method 2: Upload using Photo App
The Photo App has a “Share” option that you can use to upload your videos to YouTube. Here is the guide.
Step 1. Go to your iOS device and tap on the “Photos” app.
Step 2. Then tap on the “Videos Folder” to locate the video you wish to upload to YouTube.

Step 3. Next, tap on the video that you want to upload.
Step 4. Then tap on the “Share” icon located at the bottom left of your iOS device screen.
Step 5. You’ll then access a “Share” menu from where you have various share options for your video.
Step 6. Choose the “YouTube” option to continue to share your video there. At this juncture, ensure you have logged in to your Google Account.

Step 7. You need to provide a “Title” and “Description” of your video. Then go to the “Privacy” Options and make your video “Public.”
Step 8. Finally, tap on the “Publish” tab found at the top-right corner of your screen to make your video viewable by the public.

Method 3: Upload video to YouTube using Safari
Safari is another alternative method to upload a video to YouTube.
Step 1. First, go to “youtube.com” on Safari and sign in.

Step 2. Then tap on the “account” icon at the top right side of the screen.
Step 3. Hit on the “Upload” icon and wait to be redirected to the YouTube Studio desktop site.
Step 4. Click on the “Select Files” option.
Step 5. Choose the video you wish to add to YouTube from the “Photo” library and tap on the “Add” button.

Step 6. Add your video’s “title and description” and hit the “Next” button.
Step 7. Tap on the “Next” button once more to go to the “Visibility” page.
Step 8. Select the “Public” option to upload your video to the public.
Why your phone doesn’t post videos to YouTube
Despite learning how to upload to YouTube from iPhone, you may be perplexed to realize that your phone refuses to post videos to YouTube. What could be the reason?
1) YouTube issues
In most cases, the problem doesn’t arise from your phone but from YouTube. This streaming app may also experience some hitches along the way. Remember that even if your phone sync with your YouTube account to upload videos from the “Camera Roll,” YouTube isn’t managed from the Camera Roll but the YouTube app directly. You can solve the issue by signing out of your YouTube account and signing back in.
2) Connection Strength
Some videos may appear quite large and cause a time-out during the upload process. Check your Wi-Fi or internet connection strength to determine if it needs a boost or wait until the streaming strength is strong for a quick upload. Test your internet speed by searching “internet test speed” on Google. Then click the “Run Speed Test” in the search box. A window will open and give you an estimate of the Mbps that your connection is operating at. If too low, switch to other alternatives.
3) Verify your YouTube account
Verifying your account will help you to enjoy YouTube’s full features. It’s then that you’ll manage to upload videos without any drawbacks. Also, that’s when you’ll manage to upload longer videos that go beyond the 15-minute duration.
4) Pay attention to the video size
There is a limit for videos to post to YouTube. If it is too large or long, the upload will cancel before completion.
5) Be patient
YouTube can save your partial upload for 24 hours. So, you can continue to upload from where you left. Learn to be patient as there could be a surge of user traffic, especially during evenings.
Make your YouTube video better with Filmora
Good video quality will make you go miles ahead of your marketing gig. You can use Filmora mobile application to make your videos look better before uploading them to YouTube. This intuitive video editing app has advanced features and several ways to compose creative videos.
- Stunning video effects that let you add animated text to video
- Easily record your voice-overs with its perfect sound effects
- Split functionality that allows you to slice your video footage into two or more separate video clips
- Playback your clips in reverse and adjust the speed for fast or slow motion
- Select the best aspect ratio for your video
- Advanced camera to create emoji selfies and other video beautification
- Directly share your videos to social media sites like YouTube and Facebook.
Check out the steps to edit your video with Filmora on your iOS device
Step 1. Download and install Filmora
For iOS devices, go to the “Apple Store” to download and install the app. Also, allow it to access your videos, camera, and pictures in the process.
Step 2. Import video
You may already have a video in your library that you wish to upload to YouTube. Nonetheless, you can shoot a video afresh to add. To shoot one, you need to settle on a topic before recording and downloading other images you may need. Ensure you watch what you are filming and use adequate lighting during the shooting process.
Next, begin to import your video file. Just open the application and select the “Create new video” option. Then choose the “Video” icon and select a folder that contains the video to be added. Hit the “Add” button from the bottom right corner.
Step 3. Edit video
Filmora has several editing features to make your video better. Use the “Edit tools” feature to turn your video into an impeccable piece. Easily add filters, adjust the speed, or create subtitles, among other functions. You can also split, trim, or delete the unwanted clip parts.
It is important to add a title and description to your video. Just use the “Titles” button to add the title. Other precepts that you can add include transitions, sound like voice-over,
Step 4. Export and share
You’ve just finished creating and editing your video. Click on the “Save” tab and let the application export your video. Then select the “Save to Camera Roll” option to save the video to your iPhone. Finally, you can upload and share the video directly to your YouTube account.
Conclusion
● However, it appears to be a difficult task; you must have found relief after going through these procedures. You don’t need prior knowledge on how to upload a video to YouTube from your iPhone. Several options are at your disposal. You can use the Safari, YouTube app, or the Photo app to upload your videos. The better part is that you can create top-notch videos with Filmora. This mobile video editing app has a lot to offer, ensuring quality content.
Initially, iOS users had the option to load videos directly to YouTube via the tap-to-upload feature. However, this option is missing in the recent iOS devices versions. Therefore, many users search for possible ways to post a video on YouTube from iPhone. For this, you have to put some considerations into place before moving on. The video title length should not exceed 100 characters, while the description is maintained at 5,000 characters. Also, ensure the video length doesn’t exceed 15 minutes. Let’s roll out the best ways to upload your videos and make that big catch on subscribers.
In this article
01 [ How to upload a video to YouTube from iPhone or iPad](#Part 1)
02 [Why your phone doesn’t post videos to YouTube](#Part 2)
03 [Make your YouTube video better with Filmora](#Part 3)
How to upload a video to YouTube from iPhone or iPad
Are you ready to start on that big adventure and share your videos on YouTube? Follow these steps to learn how to upload a video to YouTube from your iPhone.
Method 1: Upload using the YouTube iOS app
Using the YouTube app is the simplest way to upload your YouTube videos. The YouTube app should be installed on your iOS device.
Step 1. Launch the YouTube app on your device, then sign in to your account. If you don’t have an account yet, you will need to “Sign up” for a new one before continuing the upload process.
Step 2. Click on the “+” icon found at the bottom of the screen.
Step 3. Then choose the “Upload a video” option from the populated list of options.
Step 4. Check out the pop-up that appears and “Allow access” to it.
Step 5. Edit your video to your preference by trimming or cropping as you desire. Then click on the “Next” option.
Step 6. Add “title and description” to your video. Remember, the title should contain less than 100 characters and the description no more than 500 characters.
Step 7. Then set the visibility mode as “Public” to enable you to share your video over the internet.
Step 8. Click on the “Upload” button to finally upload your video to YouTube.
Method 2: Upload using Photo App
The Photo App has a “Share” option that you can use to upload your videos to YouTube. Here is the guide.
Step 1. Go to your iOS device and tap on the “Photos” app.
Step 2. Then tap on the “Videos Folder” to locate the video you wish to upload to YouTube.
Step 3. Next, tap on the video that you want to upload.
Step 4. Then tap on the “Share” icon located at the bottom left of your iOS device screen.
Step 5. You’ll then access a “Share” menu from where you have various share options for your video.
Step 6. Choose the “YouTube” option to continue to share your video there. At this juncture, ensure you have logged in to your Google Account.
Step 7. You need to provide a “Title” and “Description” of your video. Then go to the “Privacy” Options and make your video “Public.”
Step 8. Finally, tap on the “Publish” tab found at the top-right corner of your screen to make your video viewable by the public.
Method 3: Upload video to YouTube using Safari
Safari is another alternative method to upload a video to YouTube.
Step 1. First, go to “youtube.com” on Safari and sign in.
Step 2. Then tap on the “account” icon at the top right side of the screen.
Step 3. Hit on the “Upload” icon and wait to be redirected to the YouTube Studio desktop site.
Step 4. Click on the “Select Files” option.
Step 5. Choose the video you wish to add to YouTube from the “Photo” library and tap on the “Add” button.
Step 6. Add your video’s “title and description” and hit the “Next” button.
Step 7. Tap on the “Next” button once more to go to the “Visibility” page.
Step 8. Select the “Public” option to upload your video to the public.
Why your phone doesn’t post videos to YouTube
Despite learning how to upload to YouTube from iPhone, you may be perplexed to realize that your phone refuses to post videos to YouTube. What could be the reason?
1) YouTube issues
In most cases, the problem doesn’t arise from your phone but from YouTube. This streaming app may also experience some hitches along the way. Remember that even if your phone sync with your YouTube account to upload videos from the “Camera Roll,” YouTube isn’t managed from the Camera Roll but the YouTube app directly. You can solve the issue by signing out of your YouTube account and signing back in.
2) Connection Strength
Some videos may appear quite large and cause a time-out during the upload process. Check your Wi-Fi or internet connection strength to determine if it needs a boost or wait until the streaming strength is strong for a quick upload. Test your internet speed by searching “internet test speed” on Google. Then click the “Run Speed Test” in the search box. A window will open and give you an estimate of the Mbps that your connection is operating at. If too low, switch to other alternatives.
3) Verify your YouTube account
Verifying your account will help you to enjoy YouTube’s full features. It’s then that you’ll manage to upload videos without any drawbacks. Also, that’s when you’ll manage to upload longer videos that go beyond the 15-minute duration.
4) Pay attention to the video size
There is a limit for videos to post to YouTube. If it is too large or long, the upload will cancel before completion.
5) Be patient
YouTube can save your partial upload for 24 hours. So, you can continue to upload from where you left. Learn to be patient as there could be a surge of user traffic, especially during evenings.
Make your YouTube video better with Filmora
Good video quality will make you go miles ahead of your marketing gig. You can use Filmora mobile application to make your videos look better before uploading them to YouTube. This intuitive video editing app has advanced features and several ways to compose creative videos.
- Stunning video effects that let you add animated text to video
- Easily record your voice-overs with its perfect sound effects
- Split functionality that allows you to slice your video footage into two or more separate video clips
- Playback your clips in reverse and adjust the speed for fast or slow motion
- Select the best aspect ratio for your video
- Advanced camera to create emoji selfies and other video beautification
- Directly share your videos to social media sites like YouTube and Facebook.
Check out the steps to edit your video with Filmora on your iOS device
Step 1. Download and install Filmora
For iOS devices, go to the “Apple Store” to download and install the app. Also, allow it to access your videos, camera, and pictures in the process.
Step 2. Import video
You may already have a video in your library that you wish to upload to YouTube. Nonetheless, you can shoot a video afresh to add. To shoot one, you need to settle on a topic before recording and downloading other images you may need. Ensure you watch what you are filming and use adequate lighting during the shooting process.
Next, begin to import your video file. Just open the application and select the “Create new video” option. Then choose the “Video” icon and select a folder that contains the video to be added. Hit the “Add” button from the bottom right corner.
Step 3. Edit video
Filmora has several editing features to make your video better. Use the “Edit tools” feature to turn your video into an impeccable piece. Easily add filters, adjust the speed, or create subtitles, among other functions. You can also split, trim, or delete the unwanted clip parts.
It is important to add a title and description to your video. Just use the “Titles” button to add the title. Other precepts that you can add include transitions, sound like voice-over,
Step 4. Export and share
You’ve just finished creating and editing your video. Click on the “Save” tab and let the application export your video. Then select the “Save to Camera Roll” option to save the video to your iPhone. Finally, you can upload and share the video directly to your YouTube account.
Conclusion
● However, it appears to be a difficult task; you must have found relief after going through these procedures. You don’t need prior knowledge on how to upload a video to YouTube from your iPhone. Several options are at your disposal. You can use the Safari, YouTube app, or the Photo app to upload your videos. The better part is that you can create top-notch videos with Filmora. This mobile video editing app has a lot to offer, ensuring quality content.
Premier 10 Decibel Boosters: MacOS to Mobile Devices
Best 10 YouTube Volume Boosters for Windows, macOS, Android, and iPhone

Shanoon Cox
Mar 27, 2024• Proven solutions
Have you ever listened to a YouTube video on max volume but still the sound wasn’t audible - even after turning up the YouTube volume as well as device audio? It is super annoying and inconvenient when you increase volume to max yet the video remains inaudible. YouTube volume issue could be due to various reasons such as poor audio quality of the built-in speakers or low original video sound. Well, there is a simple way to combat this problem i.e., sound booster. You can set different volume levels for the YouTube app on your PC or smartphone’s native volume controls. There are different YouTube volume boosters for Android, Windows, macOS, and iOS devices.
From listening to your favorite podcast to watching vlogs with your friends, you can use the best volume booster apps to increase the media sound volume and quality!
- Part 1: Best YouTube Volume Boosters for Windows and macOS
- Part 2: Best YouTube Volume Boosters for Android and iOS
- Part 3: Best YouTube Video Editing Software-Wondershare Filmora (Bonus Tip)
Part 1: Best YouTube Volume Boosters for Windows and macOS
Let’s introduce the best YouTube volume boosters for Windows and macOS:
1. FxSound (Windows and Mac)
FxSound is a very powerful tool that is made for Windows and macOS to enhance and boost the quality and volume of sound. This app comes with many features. For example, this audio software provides better sound quality, volume booster, and sound effects. Now you can listen to music, watch movies and play games without any distortion. Easily boost base, get customized effects and play with custom presets. You can download this app for your PC for free through the official website. People like this equalizer because it can make any audio format sound good even if it is 100 years old!

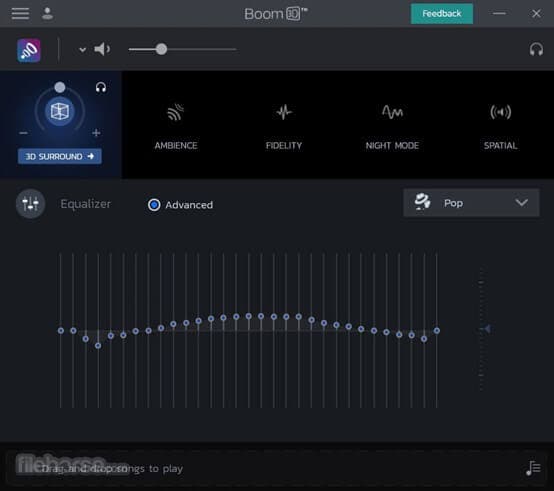
2. Boom 3D (Windows and macOS)
Boom 3D is a very popular app among many Windows and macOS users. This software is designed to help improve the audio on speakers or headphones that are connected to your computer. Boom 3D audio booster software also works with the Bluetooth devices that are connected to your PC. It can make any sound louder, clearer, and much better without buying any external devices. It provides us a 3D audio experience and works with any music player, video player, etc.!
3. Chrome Volume Booster Plugin (Windows)
This plugin has been rated 5 stars on the chrome web store as it is the best plugin for boosting up your volume on windows PC. This booster is so easy to download; you just have to go to the chrome web store and add the extension to your Google Chrome Browser. After adding it you can simply click on the icon and boost your volume up to 1000%! This plugin is free in the chrome store, just add it and choose how much louder you want your sound to be.

4. Letasoft Sound Booster (Windows)
Letasoft Sound Booster can only be used on windows. You can download it through the official website of Letasoft. It comes with a 14 days free trial period but after that, you have to buy their license to keep using it. This software is made to be used as an extra amplifier to boost up the volume of your audio or video if you think it is too low. The Letasoft Sound Booster app is very easy to use as you can control the volume from the slider. Moreover, it auto-starts and has no sound distortion.

5. Froyosoft Sound Booster (Mac)
Froyosoft Sound Booster is made for macOS users so they can boost video and audio file volumes. Individual application volumes can also be adjusted with the help of the Froyosoft Sound Booster. The good thing about this booster is that it is free for all users and it is 100% safe - you will not get any virus on your PC. You can download it from their website and increase the volume as high as you want to. So, get ready to get a clear and enhanced sound with the help of this app!

Part 2: Best YouTube Volume Boosters for Android and iOS
Following are the best YouTube sound boosters for Android and iOS devices:
1. AmpMe (Android and iOS)
With the help of AmpMe, you can start your little party through music apps. You don’t just get to listen to music but you can also chat with your friends - yup that’s right, it is a two-in-one app! The AmpMe app helps you to play the same music with your friends at the same time. It is one of the best volume booster apps that is available for both Android and iOS. It uses Bluetooth to connect with several devices, and the more the devices the higher the volume of the music. AmpMe offers a free trial and it costs $9.99 per week.

2. Super Volume Booster (Android)
To enjoy your music more than ever, you need a good volume enhancer. And, what can be better than an app that is free and boosts your audio? Android users are in luck because Super Volume Booster is a user-friendly app that allows you to increase the volume of YouTube and other apps. It gives you the best music experience. Moreover, it is clean, simple and has a one-touch operation. Not to forget that it has amazing reviews on Playstore. This app also increases the bass and also supports headphones and Bluetooth.

3. Volume Booster GOODEV (Android)
Volume Booster GOODEV is another app that boosts up the audio for you from 20 to 30% more! If you want to listen to an audiobook, watch a YouTube video or a movie on Netflix, volume Booster GOODEV can help you increase the volume of any media on any app! The volume can get so high that it might be dangerous for your ears so be careful. It offers a sound equalizer and is simple to use.

4. Volume Booster - Equalizer FX (iOS)
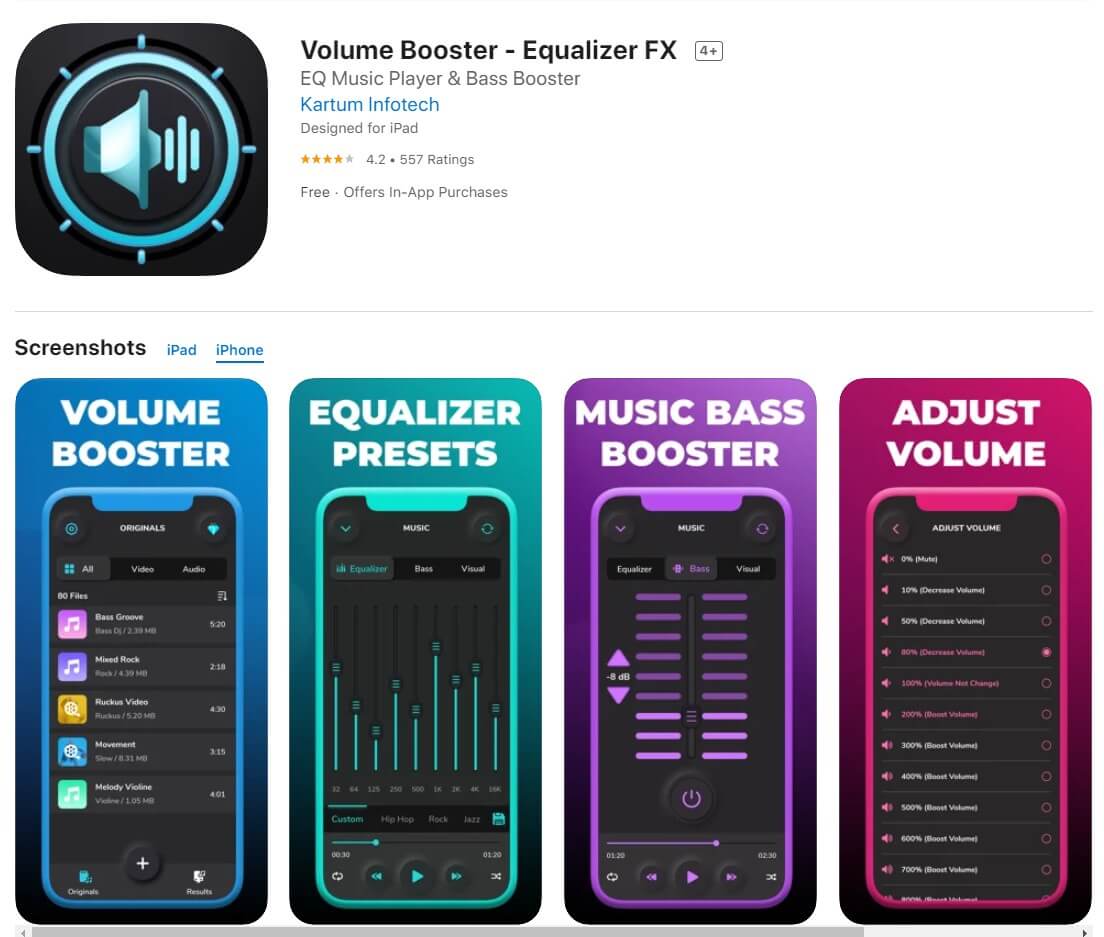
Volume Booster Equalizer FX can increase your volume higher than the default audio controller. With the help of this app, your device’s speaker will give the best result. You can adjust the sound effect levels according to your need. It makes the sound quality better and boosts up the volume with a single tap. You can get a weekly, monthly or yearly subscription. It is a great premium YouTube Volume booster for all iOS devices.
5. Max Volume Booster (iOS)
Max Volume Booster, as the name shows, boosts the volume to the maximum. You can find this app in the AppStore for free but it offers a premium version as well. With the help of the premium version, you can get an ad-free experience with no time limit. You can decrease or increase the volume based on your needs. Max Volume Booster gives you the experience and you will get addicted to it because it is a high-quality YouTube volume booster.

Part 3: Best YouTube Video Editing Software-Wondershare Filmora (Bonus Tip)
Wondershare Filmora is one of the most popular and user-friendly video editing software available. From beginners to pros, this app world for all. With Filmora you can create home videos, vlogs, Instagram reels, tutorials, guides, podcasts, and more! Wondershare Filmora is also the best YouTube video editor you will find! From editing to volume booster, you will find all the tools to create the perfect YouTube videos.


Here are some of the key features of Filmora that can help YouTubers make their YouTube videos:
- Offers multiple drawing video editing tools like speed control, volume booster, and color grading
- Offers special effects to enhance the appearance of your videos
- Allows you to custom create different animations
- Green Screen feature to help you change backgrounds and make the perfect videos
- Cross-platform accessibility as you can use it on both Windows and Mac
- Supports multiple file formats
- Ultra 4k HD support for the best quality of videos
- Free download and super easy to use with an intuitive interface
- Anyone can use it whether beginner or pro
- Online customer support available 24/7
Summing up
Stop worrying about low audio. Use one of the YouTube volume booster apps mentioned in this article. If you are making vlogs, tutorials, and other YouTube content, you can increase volume and create ideal videos with Wondershare video editor. So, to create the perfect videos with high-quality sound get Wondershare Filmora!
Shanoon Cox
Shanoon Cox is a writer and a lover of all things video.
Follow @Shanoon Cox
Shanoon Cox
Mar 27, 2024• Proven solutions
Have you ever listened to a YouTube video on max volume but still the sound wasn’t audible - even after turning up the YouTube volume as well as device audio? It is super annoying and inconvenient when you increase volume to max yet the video remains inaudible. YouTube volume issue could be due to various reasons such as poor audio quality of the built-in speakers or low original video sound. Well, there is a simple way to combat this problem i.e., sound booster. You can set different volume levels for the YouTube app on your PC or smartphone’s native volume controls. There are different YouTube volume boosters for Android, Windows, macOS, and iOS devices.
From listening to your favorite podcast to watching vlogs with your friends, you can use the best volume booster apps to increase the media sound volume and quality!
- Part 1: Best YouTube Volume Boosters for Windows and macOS
- Part 2: Best YouTube Volume Boosters for Android and iOS
- Part 3: Best YouTube Video Editing Software-Wondershare Filmora (Bonus Tip)
Part 1: Best YouTube Volume Boosters for Windows and macOS
Let’s introduce the best YouTube volume boosters for Windows and macOS:
1. FxSound (Windows and Mac)
FxSound is a very powerful tool that is made for Windows and macOS to enhance and boost the quality and volume of sound. This app comes with many features. For example, this audio software provides better sound quality, volume booster, and sound effects. Now you can listen to music, watch movies and play games without any distortion. Easily boost base, get customized effects and play with custom presets. You can download this app for your PC for free through the official website. People like this equalizer because it can make any audio format sound good even if it is 100 years old!
2. Boom 3D (Windows and macOS)
Boom 3D is a very popular app among many Windows and macOS users. This software is designed to help improve the audio on speakers or headphones that are connected to your computer. Boom 3D audio booster software also works with the Bluetooth devices that are connected to your PC. It can make any sound louder, clearer, and much better without buying any external devices. It provides us a 3D audio experience and works with any music player, video player, etc.!
3. Chrome Volume Booster Plugin (Windows)
This plugin has been rated 5 stars on the chrome web store as it is the best plugin for boosting up your volume on windows PC. This booster is so easy to download; you just have to go to the chrome web store and add the extension to your Google Chrome Browser. After adding it you can simply click on the icon and boost your volume up to 1000%! This plugin is free in the chrome store, just add it and choose how much louder you want your sound to be.
4. Letasoft Sound Booster (Windows)
Letasoft Sound Booster can only be used on windows. You can download it through the official website of Letasoft. It comes with a 14 days free trial period but after that, you have to buy their license to keep using it. This software is made to be used as an extra amplifier to boost up the volume of your audio or video if you think it is too low. The Letasoft Sound Booster app is very easy to use as you can control the volume from the slider. Moreover, it auto-starts and has no sound distortion.
5. Froyosoft Sound Booster (Mac)
Froyosoft Sound Booster is made for macOS users so they can boost video and audio file volumes. Individual application volumes can also be adjusted with the help of the Froyosoft Sound Booster. The good thing about this booster is that it is free for all users and it is 100% safe - you will not get any virus on your PC. You can download it from their website and increase the volume as high as you want to. So, get ready to get a clear and enhanced sound with the help of this app!
Part 2: Best YouTube Volume Boosters for Android and iOS
Following are the best YouTube sound boosters for Android and iOS devices:
1. AmpMe (Android and iOS)
With the help of AmpMe, you can start your little party through music apps. You don’t just get to listen to music but you can also chat with your friends - yup that’s right, it is a two-in-one app! The AmpMe app helps you to play the same music with your friends at the same time. It is one of the best volume booster apps that is available for both Android and iOS. It uses Bluetooth to connect with several devices, and the more the devices the higher the volume of the music. AmpMe offers a free trial and it costs $9.99 per week.
2. Super Volume Booster (Android)
To enjoy your music more than ever, you need a good volume enhancer. And, what can be better than an app that is free and boosts your audio? Android users are in luck because Super Volume Booster is a user-friendly app that allows you to increase the volume of YouTube and other apps. It gives you the best music experience. Moreover, it is clean, simple and has a one-touch operation. Not to forget that it has amazing reviews on Playstore. This app also increases the bass and also supports headphones and Bluetooth.
3. Volume Booster GOODEV (Android)
Volume Booster GOODEV is another app that boosts up the audio for you from 20 to 30% more! If you want to listen to an audiobook, watch a YouTube video or a movie on Netflix, volume Booster GOODEV can help you increase the volume of any media on any app! The volume can get so high that it might be dangerous for your ears so be careful. It offers a sound equalizer and is simple to use.
4. Volume Booster - Equalizer FX (iOS)
Volume Booster Equalizer FX can increase your volume higher than the default audio controller. With the help of this app, your device’s speaker will give the best result. You can adjust the sound effect levels according to your need. It makes the sound quality better and boosts up the volume with a single tap. You can get a weekly, monthly or yearly subscription. It is a great premium YouTube Volume booster for all iOS devices.
5. Max Volume Booster (iOS)
Max Volume Booster, as the name shows, boosts the volume to the maximum. You can find this app in the AppStore for free but it offers a premium version as well. With the help of the premium version, you can get an ad-free experience with no time limit. You can decrease or increase the volume based on your needs. Max Volume Booster gives you the experience and you will get addicted to it because it is a high-quality YouTube volume booster.
Part 3: Best YouTube Video Editing Software-Wondershare Filmora (Bonus Tip)
Wondershare Filmora is one of the most popular and user-friendly video editing software available. From beginners to pros, this app world for all. With Filmora you can create home videos, vlogs, Instagram reels, tutorials, guides, podcasts, and more! Wondershare Filmora is also the best YouTube video editor you will find! From editing to volume booster, you will find all the tools to create the perfect YouTube videos.
Here are some of the key features of Filmora that can help YouTubers make their YouTube videos:
- Offers multiple drawing video editing tools like speed control, volume booster, and color grading
- Offers special effects to enhance the appearance of your videos
- Allows you to custom create different animations
- Green Screen feature to help you change backgrounds and make the perfect videos
- Cross-platform accessibility as you can use it on both Windows and Mac
- Supports multiple file formats
- Ultra 4k HD support for the best quality of videos
- Free download and super easy to use with an intuitive interface
- Anyone can use it whether beginner or pro
- Online customer support available 24/7
Summing up
Stop worrying about low audio. Use one of the YouTube volume booster apps mentioned in this article. If you are making vlogs, tutorials, and other YouTube content, you can increase volume and create ideal videos with Wondershare video editor. So, to create the perfect videos with high-quality sound get Wondershare Filmora!
Shanoon Cox
Shanoon Cox is a writer and a lover of all things video.
Follow @Shanoon Cox
Also read:
- 2024 Approved Decoding Your YouTube's View-Zero Dilemma 10 Insights
- [New] DIY YouTube Thumbnails Made Simple
- Thumbnail Triumphs A Smartphone Guide to Engaging YouTube Videos
- A Beginner’s Pathway Building a Simple YouTube Signup
- Building on Your Content A Guide to Stellar Videography Closures
- The Money Trail Exploring Mr. Beast's Path
- In 2024, Best Stream Tech Innovative Hardware & Software Guide for Youtubers
- International Ranks YouTube Stars With the Most Loyal Viewers
- [New] How to Edit Audio on YouTube
- Unleash Your YouTube Potential with Detailed and Lengthier Content
- Earth's Richest Digital Content Wizard
- [Updated] Crafting YouTube Trailers A Filmora Guide
- The Creative Summit Top Talent Junction
- 2024 Approved Avoid Mainstream Underrated Movies of the Year
- The Ultimate Guide to Selecting From the Top 9 FREE YouTube Tools
- [Updated] Crack the Code of Content Top 6 YouTuber Personality Tests Revealed
- In 2024, Decoding the Core Contrasts Between YouTube and DailyMention
- In 2024, Brief but Impactful Music Shorts on YouTube Unveiled
- Top 10 Free Movies to Watch on YouTube
- [New] Core ASMR Platforms Explored
- Audio Amplified Today's Hits Backdropping YT Shorts
- Boosting YouTube Ad Revenue Keeping CC Active
- Navigating YouTube Strikes Understanding and Resolving Copyright Issues
- 2024 Approved Direct Conversion of Spotify Music 5 Tools for YouTube Streaming
- Engaging Viewers at the End of a YT Video for 2024
- [New] A Step-by-Step Guide to Elevate Your Stream on YouTube
- The Power Play Joining a Music Company Network in the Age of Streaming
- [New] Defeating Darkness in Youtube Videos
- Ultimate Picks for Costless Subtitle Extraction Tools
- In 2024, Avoiding Pitfalls Smart Strategies for Acquiring Youtubes
- [New] A Comprehensive Guide to Maximizing Channels' Earnings Through Trailers
- Comprehensively Understanding YouTube's Aspect Ratio Ecosystem for 2024
- 1-#5 Best Editors Apart From YouTube Platform
- [Updated] In 2024, Essential Guide to Cheap Video Conferencing Tools for Computers
- In 2024, How to Detect and Stop mSpy from Spying on Your Samsung Galaxy A05s | Dr.fone
- [New] In the Spotlight Top Viewers' Choice for 2024
- ChuckleCraft Suite
- [New] From Concept to Completion An Instagram Video Strategy Manual
- 2024 Approved 13 Creative Ways to Save and Store Online Audio Broadcasts
- [New] 2024 Approved In Search for Auditory Perfection? Try These Top-Rated Discord Bots
- [Updated] No Money? No Problem! Guide to Flying Solo in Google Meet for 2024
- [Updated] In 2024, Render Your Social Media Footage
- Expert Analysis Top 5 High-End Recording Apps
- New In 2024, Cohesion Through Channels The Process of Amalgamating Audio Sources Into One File
- [Updated] A Closer Examination The Finest Mac Recording Software for 2024
- Updated Tune-Infused Photography Link Free Audio to Images
- In 2024, Rank of 15 Innovative Live-Stream Applications Beyond OBS
- [New] Spotlight on Today’s Viral TikTok Experiments
- New How to Make A Jaw-Dropping Time Lapse Video? Full Guide
- Maximizing Your Monetary Gains on Social Media with Snapchat
- Perfect Playback Overcoming Mutes on LinkedIn Video Posts
- In 2024, Is GSM Flasher ADB Legit? Full Review To Bypass Your Oppo Find X7 Phone FRP Lock
- [Updated] In 2024, Direct Pathway Streamlined Capturing Techniques (Dell)
- Updated 2024 Approved Create Stunning Animations On-the-Go Top Mobile Apps
- In 2024, Top 5 Tracking Apps to Track Nokia C210 without Them Knowing | Dr.fone
- How To Revive Your Bricked Oppo Find X6 in Minutes | Dr.fone
- The Ultimate Guide to Converting YouTube Videos to MP3 Expert Reviews for 2024
- Transform Your iPhone Videos Shorten & Resize with Ease
- [Updated] Elevating Your Instagram Conversations An In-Depth Guide
- [Updated] High-Quality Webcam Videos with Best Editors
- [Updated] Unleashing the Power of Whiteboards in Google Meet on Diverse Devices for Seamless Engagement
- Updated In 2024, The Cloud Stop Motion Handbook Features, Guidelines, and Top Alternatives
- Title: In 2024, Effortless Video Upload From Apple Devices to YouTube Channel
- Author: Brian
- Created at : 2024-05-25 12:13:00
- Updated at : 2024-05-26 12:13:00
- Link: https://youtube-video-recordings.techidaily.com/in-2024-effortless-video-upload-from-apple-devices-to-youtube-channel/
- License: This work is licensed under CC BY-NC-SA 4.0.
