
:max_bytes(150000):strip_icc():format(webp)/d-link-default-password-list-2619152-d6281a924f45426f879c8707220ce92d.png)
In 2024, Effortless Fusion of YouTube Audio with iMovie Masterpieces
Effortless Fusion of YouTube Audio with iMovie Masterpieces
How to Add Music to iMovie from YouTube?

Marion Dubois
Nov 07, 2023• Proven solutions
Adding background music to videos makes the video more unique and interesting to see. iMovie is a professional video editing tool that lets you pimp your videos the way you want it with your desired music and other sound effects. With the introduction of background music, your video would become unique and stand out.
Though it is not easy to find the right music for your background music, YouTube is a good place to search for good sounds. That’s why in this article, we’ll see how to add music to iMovie from YouTube.
- Is It Possible to Add Music to iMovie from YouTube?
- Add YouTube Music to iMovie from iPhone & Mac [All-In-One Platform]
- How to Add Music to iMovie from YouTube on iPhone?
- How to Put Music from YouTube to iMovie on Mac?
Part 1. Is It Possible to Add Music to iMovie from YouTube?
iMovie is a tool developed by Apple for video editing designed to help users create unique, fun videos quickly. This outstanding video editor works only on Apple devices which includes macOS, iOS, and iPadOS. It embodies excellent tools for a media organization, color grading, soundtracks, and green-screen effects for your videos. To crown it all, it supports a few media formats.
If your media source is unavailable on your device, it could be since iMovie doesn’t support the format, or it may be under the protection of Digital Rights Management.
Now, even though you’ve downloaded the songs from YouTube to listen to them offline, you are allowed to stream them within the music player only and not apply them to other media forms.
So, if you want to add YouTube music to iMovie, you must remove the DRM restrictions first before converting the YouTube song to a format supported by iMovie. A professional YouTube music downloader can help you with all of this.
Part 2. Add YouTube Music to iMovie from iPhone & Mac
Here is an all-in-one method that to add a YouTube song to iMovie whether through iPhone or Mac. First, record the YouTube music, then add extracted audio files to iMovie.
Step 1: First download and install Filmora Video Editor from the button below and use the built-in ‘Screen Recorder‘ tool to record the YouTube video/music that you want to rip the audio from.
For Win 7 or later (64-bit)
 Secure Download
For macOS 10.14 or later
Secure Download


Step 2: Import the recorded video to Filmora, right click on the video track and select ‘Detach Audio‘ to seperate the audio track and the video track. Select the audio track and click the ‘Export‘ button to save ripped audio files.
Step 3: And now, you can use the extracted YouTube audio files to iMovie for forther editing. Plus, Filmora Video Editor provides with a music library, where you can choose background music or sound effect for your project according to your needs. It is also an expert in creating videos, worth to have a try!
Tips You May Not Want to Miss
Filmora is the best iMovie alternative on the market, which provides the best methods, tools, and techniques to add music to videos, video cutting easily, joining, inversion, and editing. It allows you to easily make movies, edit audio, apply effects and share your new movies on YouTube, Vimeo, DVD, TV, iPhone, iPad, iPod, etc.
Therefore, if you are using Filmora, adding music to videos is just a piece of cake. Just select the audio clip in the timeline, click the “Video and Audio Effects” button, and go to the “Audio Effects” option. Now you can freely choose any audio effect.
For Win 7 or later (64-bit)
Secure Download
For macOS 10.14 or later
Secure Download
Part 3. How to Add Music to iMovie from YouTube on iPhone?
In this part, let us read the most straightforward tutorial on how to add music from YouTube to iMovie on iPhone.
First Download Music from YouTube on iPhone
Downloading YouTube videos on your iPhone is confusing since Apple provides the apps available in the App store. If you jailbreak your phone, there are various other options, but here’s the simplest way if you don’t want to go that route.
Step 1: Download the app Documents by Readdle.
Step 2: Select the compass icon and go to https://www.videosolo.com/online-video-downloader/

Step 3: Paste a YouTube video link in the text box and select “Download”. After some seconds, the video will decode and produce a list of different output quality and format options.
Step 4: Hit the “Download” on the preferred output option.
Step 5: Enter a name and download location for the video.
Step 6: Hit the Downloads tab in the bottom navigation bar to view your downloaded videos within the Documents app.
Step 7: Go back to the Documents app home screen to save your downloaded video and open your Downloads folder.
Step 8: Look for the video you wish to edit and tap the three dots icon on it.
Step 9: Hit the Share button and then Save Video.
Step 10: You can search the downloaded YouTube videos in the Photos app.
Add Downloaded Music to iMovie
Step 1: Launch iMovie and Create a Project
Open the iMovie app and pick the “+” icon to create a project. Then, select a movie file from the media to which you want to add the music and add it to the created project.
Step2: Create Movie
Immediately the movie is added to the project, click on the “Create Movie”, enhance the quality of your video using any of iMovie’s many themes, and add the correct ambiance. Click on the icon like a gear and toggle “Theme Music”. Now you have to choose the theme you desire for your video.
Step 3: Select My Music
Now, it’s time to add audio of your choice, and if you don’t want to select from your existing collection, tap on the “+” icon below on the left side of your screen. Next, choose “Audio” and then select “My Music”.
Step 4: Select Audio from Playlist
Select from the playlist, artist, individual songs, or select from the albums you already have on your device and click on the “+” icon to add to your video. It is important to note that you cannot add multiple songs at once. Just add and adjust the sound as desired.
Finally, after the song has been added to the video successfully, export it to your gallery using the “Export” button and save it on your phone.

Filmora Video Editor
Best iMovie Alternative - Filmora Video Editor
Filmora Video Editor is an expert in creating and editing videos, it offers a ChatGPT plug-in and AI tools to enhance your creative vision. Make your idea into reality.
Try It Free Try It Free Try It Free Learn More >
Part 4. How to Add Music to iMovie from YouTube on Mac?
It is elementary to use YouTube songs in iMovie on Mac. You can easily drag the YouTube music file into your project from the Finder and the desktop. The YouTube music added into the project timeline behaves differently depending on the place you added them.
Download Music from YouTube on Mac
Various programs and tools can assist you in downloading YouTube videos on a Mac.
A straightforward way is to use the inbuilt screen capture tool of macOS. Hit the Command + Shift + 5 tabs to bring up the screen recording options.
You can either record an entire screen or choose a window and alter the options to add audio from your Mac’s internal microphone.

The ideal tool or app for downloading YouTube videos on Mac in high-tech quality is a 4K Video Downloader.
It’s free for a max of 30 downloads per day, or you can upgrade to one of its premium plans. The software can also download videos in around 8K quality and various other high-tech formats. And 4K Video Downloader can also grab whole playlists of YouTube.
Here’s how to use it:
Step 1: Launch the 4K Video Downloader and open the program.
Step 2: Find a YouTube video and copy the link.
Step 3: Hit the Paste Link button in the menu.
Step 4: Select the Download button after choosing from the list of quality and format options.
Step 5: Download the video and then click the three-dot icon, so you can play.
How to Add Music to iMovie
Step 1: Add YouTube Music to the Clip
To add a YouTube music file to a particular video clip, drag the YouTube music file under the video clip so that a bar appears. Next, release the button when you see the green “Add” symbol to set the music as a background song in your iMovie project.
To add a YouTube music file to the iMovie project: drag and drop the YouTube music file to your project, release the mouse button once you see the green color. Add a symbol to add a YouTube song to the iMovie project as background music.
Step 2: Add YouTube Music File to the iMovie Project
Just drag and drop the YouTube video file to your project. Then, release the button once you see the green “Add” sign to add background music from the YouTube file to your project.
Conclusion
So, guys, now, can you add music from YouTube to iMovie? I’m pretty sure you have a positive answer as you saw how to add music to iMovie from YouTube using a simple step method. Moreover, have fun and create magic with your discovery of Filmora Video Editor , as it allows you to explore its numerous features to make a movie.
For Win 7 or later (64-bit)
Secure Download
For macOS 10.14 or later
Secure Download
Marion Dubois
Marion Dubois is a writer and a lover of all things video.
Follow @Marion Dubois
Marion Dubois
Nov 07, 2023• Proven solutions
Adding background music to videos makes the video more unique and interesting to see. iMovie is a professional video editing tool that lets you pimp your videos the way you want it with your desired music and other sound effects. With the introduction of background music, your video would become unique and stand out.
Though it is not easy to find the right music for your background music, YouTube is a good place to search for good sounds. That’s why in this article, we’ll see how to add music to iMovie from YouTube.
- Is It Possible to Add Music to iMovie from YouTube?
- Add YouTube Music to iMovie from iPhone & Mac [All-In-One Platform]
- How to Add Music to iMovie from YouTube on iPhone?
- How to Put Music from YouTube to iMovie on Mac?
Part 1. Is It Possible to Add Music to iMovie from YouTube?
iMovie is a tool developed by Apple for video editing designed to help users create unique, fun videos quickly. This outstanding video editor works only on Apple devices which includes macOS, iOS, and iPadOS. It embodies excellent tools for a media organization, color grading, soundtracks, and green-screen effects for your videos. To crown it all, it supports a few media formats.
If your media source is unavailable on your device, it could be since iMovie doesn’t support the format, or it may be under the protection of Digital Rights Management.
Now, even though you’ve downloaded the songs from YouTube to listen to them offline, you are allowed to stream them within the music player only and not apply them to other media forms.
So, if you want to add YouTube music to iMovie, you must remove the DRM restrictions first before converting the YouTube song to a format supported by iMovie. A professional YouTube music downloader can help you with all of this.
Part 2. Add YouTube Music to iMovie from iPhone & Mac
Here is an all-in-one method that to add a YouTube song to iMovie whether through iPhone or Mac. First, record the YouTube music, then add extracted audio files to iMovie.
Step 1: First download and install Filmora Video Editor from the button below and use the built-in ‘Screen Recorder‘ tool to record the YouTube video/music that you want to rip the audio from.
For Win 7 or later (64-bit)
Secure Download
For macOS 10.14 or later
Secure Download
Step 2: Import the recorded video to Filmora, right click on the video track and select ‘Detach Audio‘ to seperate the audio track and the video track. Select the audio track and click the ‘Export‘ button to save ripped audio files.
Step 3: And now, you can use the extracted YouTube audio files to iMovie for forther editing. Plus, Filmora Video Editor provides with a music library, where you can choose background music or sound effect for your project according to your needs. It is also an expert in creating videos, worth to have a try!
Tips You May Not Want to Miss
Filmora is the best iMovie alternative on the market, which provides the best methods, tools, and techniques to add music to videos, video cutting easily, joining, inversion, and editing. It allows you to easily make movies, edit audio, apply effects and share your new movies on YouTube, Vimeo, DVD, TV, iPhone, iPad, iPod, etc.
Therefore, if you are using Filmora, adding music to videos is just a piece of cake. Just select the audio clip in the timeline, click the “Video and Audio Effects” button, and go to the “Audio Effects” option. Now you can freely choose any audio effect.
For Win 7 or later (64-bit)
Secure Download
For macOS 10.14 or later
Secure Download
Part 3. How to Add Music to iMovie from YouTube on iPhone?
In this part, let us read the most straightforward tutorial on how to add music from YouTube to iMovie on iPhone.
First Download Music from YouTube on iPhone
Downloading YouTube videos on your iPhone is confusing since Apple provides the apps available in the App store. If you jailbreak your phone, there are various other options, but here’s the simplest way if you don’t want to go that route.
Step 1: Download the app Documents by Readdle.
Step 2: Select the compass icon and go to https://www.videosolo.com/online-video-downloader/
Step 3: Paste a YouTube video link in the text box and select “Download”. After some seconds, the video will decode and produce a list of different output quality and format options.
Step 4: Hit the “Download” on the preferred output option.
Step 5: Enter a name and download location for the video.
Step 6: Hit the Downloads tab in the bottom navigation bar to view your downloaded videos within the Documents app.
Step 7: Go back to the Documents app home screen to save your downloaded video and open your Downloads folder.
Step 8: Look for the video you wish to edit and tap the three dots icon on it.
Step 9: Hit the Share button and then Save Video.
Step 10: You can search the downloaded YouTube videos in the Photos app.
Add Downloaded Music to iMovie
Step 1: Launch iMovie and Create a Project
Open the iMovie app and pick the “+” icon to create a project. Then, select a movie file from the media to which you want to add the music and add it to the created project.
Step2: Create Movie
Immediately the movie is added to the project, click on the “Create Movie”, enhance the quality of your video using any of iMovie’s many themes, and add the correct ambiance. Click on the icon like a gear and toggle “Theme Music”. Now you have to choose the theme you desire for your video.
Step 3: Select My Music
Now, it’s time to add audio of your choice, and if you don’t want to select from your existing collection, tap on the “+” icon below on the left side of your screen. Next, choose “Audio” and then select “My Music”.
Step 4: Select Audio from Playlist
Select from the playlist, artist, individual songs, or select from the albums you already have on your device and click on the “+” icon to add to your video. It is important to note that you cannot add multiple songs at once. Just add and adjust the sound as desired.
Finally, after the song has been added to the video successfully, export it to your gallery using the “Export” button and save it on your phone.
Filmora Video Editor
Best iMovie Alternative - Filmora Video Editor
Filmora Video Editor is an expert in creating and editing videos, it offers a ChatGPT plug-in and AI tools to enhance your creative vision. Make your idea into reality.
Try It Free Try It Free Try It Free Learn More >
Part 4. How to Add Music to iMovie from YouTube on Mac?
It is elementary to use YouTube songs in iMovie on Mac. You can easily drag the YouTube music file into your project from the Finder and the desktop. The YouTube music added into the project timeline behaves differently depending on the place you added them.
Download Music from YouTube on Mac
Various programs and tools can assist you in downloading YouTube videos on a Mac.
A straightforward way is to use the inbuilt screen capture tool of macOS. Hit the Command + Shift + 5 tabs to bring up the screen recording options.
You can either record an entire screen or choose a window and alter the options to add audio from your Mac’s internal microphone.
The ideal tool or app for downloading YouTube videos on Mac in high-tech quality is a 4K Video Downloader.
It’s free for a max of 30 downloads per day, or you can upgrade to one of its premium plans. The software can also download videos in around 8K quality and various other high-tech formats. And 4K Video Downloader can also grab whole playlists of YouTube.
Here’s how to use it:
Step 1: Launch the 4K Video Downloader and open the program.
Step 2: Find a YouTube video and copy the link.
Step 3: Hit the Paste Link button in the menu.
Step 4: Select the Download button after choosing from the list of quality and format options.
Step 5: Download the video and then click the three-dot icon, so you can play.
How to Add Music to iMovie
Step 1: Add YouTube Music to the Clip
To add a YouTube music file to a particular video clip, drag the YouTube music file under the video clip so that a bar appears. Next, release the button when you see the green “Add” symbol to set the music as a background song in your iMovie project.
To add a YouTube music file to the iMovie project: drag and drop the YouTube music file to your project, release the mouse button once you see the green color. Add a symbol to add a YouTube song to the iMovie project as background music.
Step 2: Add YouTube Music File to the iMovie Project
Just drag and drop the YouTube video file to your project. Then, release the button once you see the green “Add” sign to add background music from the YouTube file to your project.
Conclusion
So, guys, now, can you add music from YouTube to iMovie? I’m pretty sure you have a positive answer as you saw how to add music to iMovie from YouTube using a simple step method. Moreover, have fun and create magic with your discovery of Filmora Video Editor , as it allows you to explore its numerous features to make a movie.
For Win 7 or later (64-bit)
Secure Download
For macOS 10.14 or later
Secure Download
Marion Dubois
Marion Dubois is a writer and a lover of all things video.
Follow @Marion Dubois
Mastering Vlogs: The Finest Camera Selections of the Year
Best Cameras for Vlogging

Liza Brown
Jan 10, 2024• Proven solutions
It can be challenging to make a decision on purchasing a camera when there’s just so many on the market. Camera manufacturers are racing to update their product line with all the new camera technology advancements. To simplify your search for the ultimate vlogging camera, we’ve come up with a top twelve list.
If you’re looking for a specific type of vlogging camera, check out our other posts on vlogging cameras:
Top 11 Cheap Vlogging Cameras (2024)
7 Best DSLR Cameras For Vlogging (2024)
8 Best Mirrorless Cameras For Vlogging (2024)
12 Best Vlogging Cameras With A Flip Screen (2024)
WHAT TO LOOK FOR IN A VLOGGING CAMERA
1. Fully articulated screen (flip screen)
2. Good continual autofocus while recording video
3. Good focus priority through face recognition
4. Touch to focus
5. Good low-light performance
6. external mic jack, hot/cold shoe bracket
7. optical image stabilization
8. good battery life
Check out my full list of 10 Things To Look For In A Vlogging Camera to understand the importance of these camera features.
12 BEST VLOGGING CAMERAS (2024)
| Camera | Release Date | Camera Type | Flip Screen | Mic Port | Price | |
|---|---|---|---|---|---|---|
| CanonEOSM50 |  |
February2018 | Mirrorless | Fully Articulated | Yes | $- |
| PanasonicLumixDC-GH5S | 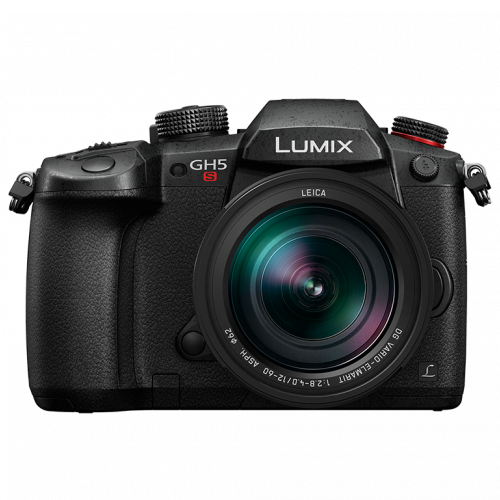 |
January2018 | Mirrorless | Fully Articulated | Yes | $$$ |
| SonyAlphaa7R III | 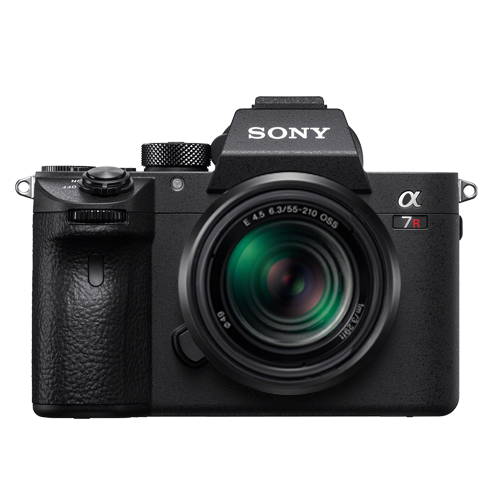 |
October2017 | Mirrorless | Tilting | Yes | $$$ |
| CanonEOSM100 | 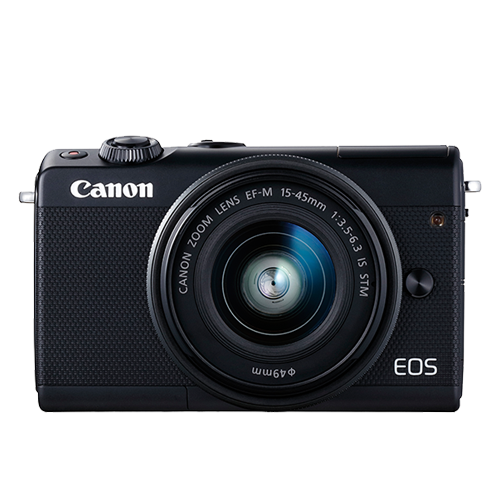 |
August2017 | Mirrorless | Flip Up | No | $ |
| CanonEOS6D Mark II | 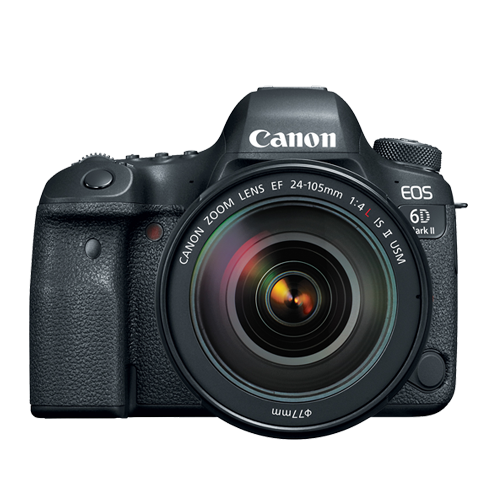 |
June2017 | Mid-size SLR | Fully Articulated | Yes | $$ |
| CanonEOS RebelSL2 | 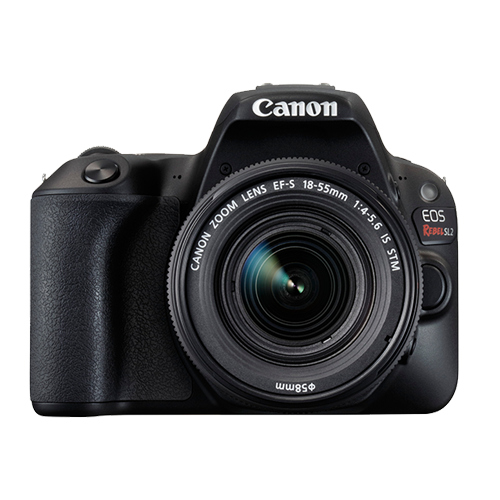 |
June2017 | Compact SLR | Fully Articulated | Yes | $ |
| CanonEOSM6 | 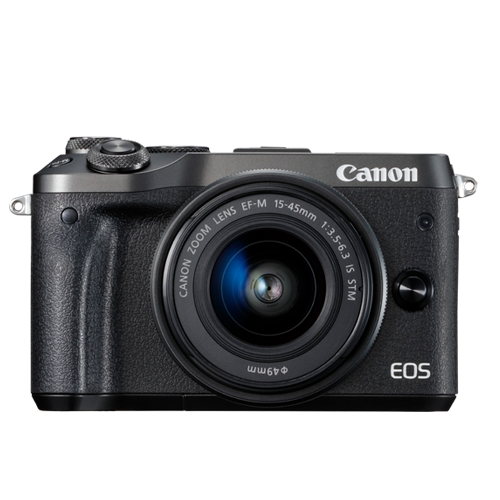 |
February2017 | Mirrorless | Flip Up | Yes | $ |
| SonyCyber-Shot DSCRX 100 V | 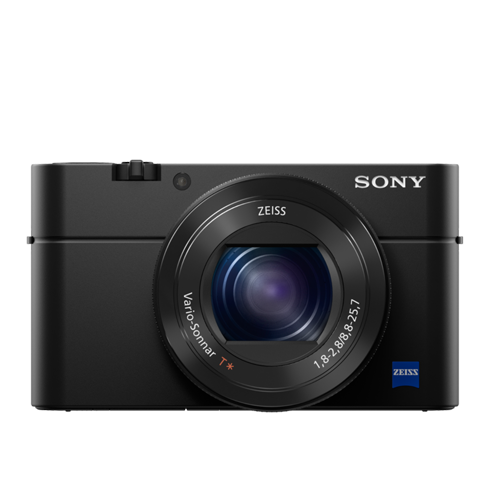 |
October2016 | Compact | Flip Up | No | $- |
| SonyAlphaa6500 | 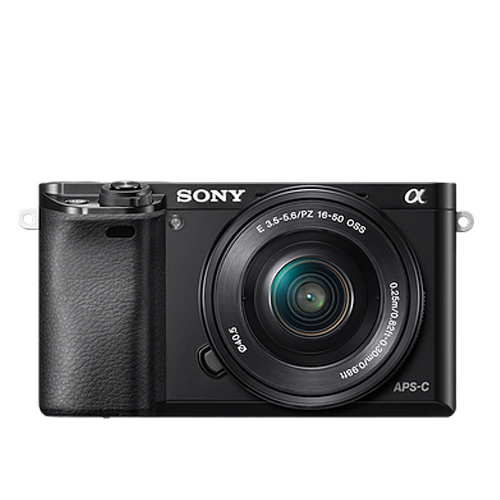 |
October2016 | Mirrorless | Tilting | Yes | $$- |
| PanasonicLumix DMCLX10 | 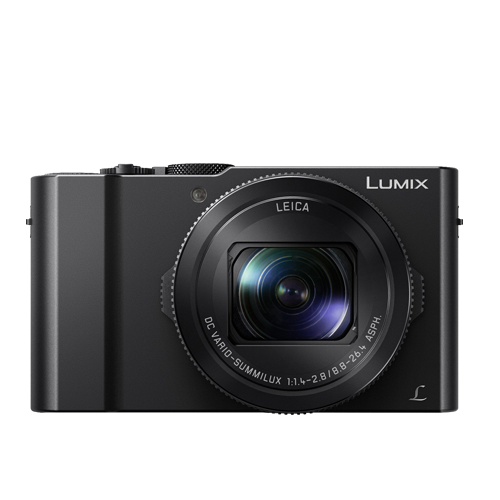 |
September2016 | Compact | Flip Up | No | $ |
| CanonEOS80D | 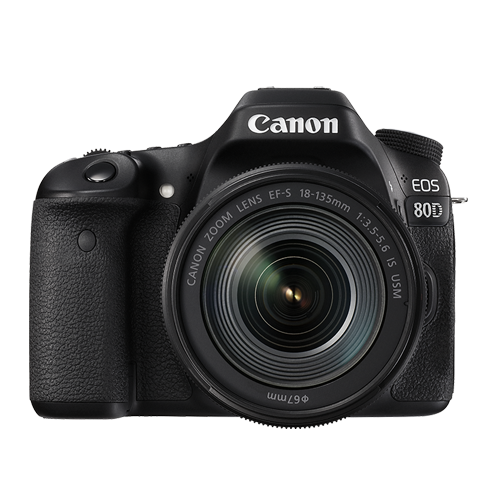 |
February2016 | Mid-size SLR | Fully Articulated | Yes | $$ |
| CanonPowerShotG7 X Mark II | 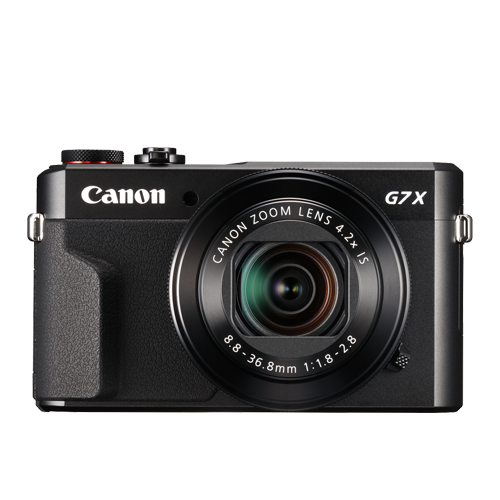 |
February2016 | Compact | Flip Up | No | $ |
At first, you can have a look at the below video.
What Gear Do Creators Actually Use | Vidcon 2023 | Sony vs Canon
|
Best daily vlogging camera: Sony Cyber-Shot DSC-RX 100 V You don’t have to be a filmmaking pro if you want to use a compact camera to record all sorts of videos. Sony’s Cyber-shot series is famous for its cutting-edge features and the DSC-RX 100 V model is not an exception. This camera is equipped with a 20.1 MP Exmor RS BSI CMOS Sensor that supports ISO sensitivities up to ISO 12800. You can record footage in UHD 4K at 30 or 24 fps, although with a five-minute limit, as well as Full HD videos at a maximum of 960 fps when recording in the HFR mode. The Sony Cyber-shot DSC-RX 100 V ships with a non-interchangeable Carl Zeiss Vario Sonnar T lens that performs well under low-light conditions and in broad daylight. The camera features a fast hybrid AF system with 315 phase-detection points and an anti-motion blur mode that allows you to keep the subjects of your vlogs in focus throughout your recording. DSC RX-100 V’s multi-functionality makes it one of the best cameras for daily vlogging, especially for vloggers who are planning on shooting vlogs in various locations. PROS - Light and easy to carry around - Produces high-res videos CONS - Short battery life - Lacking a touchscreen |
|---|---|
|
Best cheap vlogging camera: Canon EOS M100 Canon’s EOS M100 is small and powerful. This mirrorless camera produces full HD videos at 60 fps. It doesn’t, however, shoot 4K footage. The 24.2 MP APS-C CMOS sensor and the DIGIC 7 image processor ensure that your vlogs are always in focus and rich in detail. The Canon EOS M100 provides great ISO sensitivity options, offering ISO values as high as 25600, making it a great option for vloggers that often shoot their videos under difficult light conditions. The 3-inch touchscreen LCD lets you control focus points, navigate through the camera’s menu, or watch videos you’ve created. The screen can also be tilted in the upward direction to provide you a better preview of the shot you’re recording. The camera has a built-in Wi-Fi with NFC so you can transfer your videos seamlessly to a computer and have fun in the process. The Canon EOS M100 is currently one of the best entry-level cameras for daily vlogging on the market because it produces videos in great picture quality that you don’t have to spend a fortune for. PROS - Affordable - Great connectivity options CONS - Lacks advanced video recording features - No viewfinder |
|
Best entry-level mirrorless camera for vlogging: Canon EOS M100 The Canon EOS M100 wins this category as well in our books because it’s a powerful, feature-rich camera that’s also very affordable. In case you missed it, check out my review on the Canon EOS M100. |
|
Best mid-range mirrorless camera for vlogging: Canon EOS M50 The EOS M50 has been on the market for just a few months and it is already regarded as one of the best mirrorless cameras for vlogging. Its 24.1 MP APS-C CMOS sensor and DIGIC 8 Image Processor are improved versions of those in the Canon EOS M100 model. With the Canon EOS M50, you can crank up the ISO sensitivity to 51200. This camera uses the Canon EF lens mount, so you can choose the lens that best suits your needs. The Canon EOS M50 can capture UHD 4K videos at 23.98 fps, and it also lets you record 120 fps slow-motion videos at 720p. PROS - Has an external microphone port - Has a 2.36m-dot OLED electronic viewfinder CONS - No image stabilization - Battery life could be longer |
|
Best professional mirrorless camera for vlogging: Panasonic Lumix DC-GH5S The Panasonic’s GH series was made famous by the LUMIX DMC-GH4 model that will be remembered as the world’s first mirrorless interchangeable lens camera to offer the 4K video recording option. That’s why it comes as no surprise that the GH5S mirrorless micro four-thirds camera can record UHD 4K as well as DCI videos at 60 fps, and 150 Mbps. The full HD 1080p at 240 fps video recording option is also available if you want to capture slow-motion footage for your vlogs. The camera’s 10.28MP multi-aspect ratio MOS sensor enhances its low-light performance and produces high-quality videos even under very challenging lighting conditions. Recording the audio with an external microphone is one of the many advantages offered by the Lumix DC-GH5S, while the Advanced Depth-From-Focus technology is used to automatically focus the video in a fraction of a second. The GH5S’ touchscreen can be rotated in any direction, so you can clearly see your shot no matter where you are. There’s very little doubt that the GH5S is the best professional-level mirrorless camera for vlogging that will help you capture stunning vlogs. PROS - ISO sensitivity goes up to 204800 - High video bit rates CONS - Expensive - The camera body weighs about 1.5 lbs |
|
Best entry-level DSLR camera for vlogging: Canon EOS SL2 The Canon EOS Rebel SL2 is a great entry-level vlogging camera that delivers great power at a low price. The Canon EOS Rebel SL2 has a DIGIC 7 image processor and a 24.2 MP APS-C CMOS sensor that lets you extend the ISO value to 51200 and shoot your vlogs even under low light conditions. This camera can capture full HD 1080p videos at 60 fps, and it features a 9-point AF system and dual pixel CMOS AF technologies that provide precise and quick focusing even when there is not much light. The SL2 also has a microphone jack you can connect an external microphone too for better audio. PROS - Microphone jack - Wi-Fi connectivity CONS - No 4K video support - Optical image stabilizer could be better |
|
Best mid-range DSLR camera for vlogging: Canon EOS 80D The Canon EOS 80D is a feature-rich, mid-range DSLR camera great for vlogging. The 80D lets you capture full HD 1080p videos at 60 fps. It doesn’t provide support for 4K videos, though. The ISO on this camera can be set up to 25600. The 24.2 MP APS-C CMOS sensor and the DIGIC 6 image processor reduce the need for high ISO values, though, as they enable the camera to capture visually stunning footage even when the light in the shot is far from perfect. The 80D’s 45-point all cross phase detection autofocus system and its dual pixel CMOS AF system enable you to produce sharp images without having to pull-focus yourself. The various-angle 3-inch 1.04M-dot ClearView II LCD touchscreen display, as well as the pentaprism type intelligent viewfinder, let you compose shots effortlessly. PROS - Feature-rich - Continuous AF feature performs beautifully while recording high-res videos CONS - Just one SD card slot - PC sync connection features could be better |
|
Best professional DSLR camera for vlogging: Canon 6D Mark II The Canon EOS 6D Mark II is the best professional DSLR camera for vlogging. It is the only DSLR camera on the market (as of writing this review) that comes with a full-frame sensor along with a fully-articulated screen and a microphone jack. The camera’s 26.2 MP full-frame CMOS sensor can take in much more light, giving you the option to shoot with higher quality bokeh (unfocused areas appearing more blurry) and find focus much more quickly and accurately in more challenging lighting conditions. With this camera, you can shoot up to full HD 1080p videos at a maximum of 60 fps. Although the 6D Mark II comes with the same 45-point all cross-type autofocusing system as Canon’s crop sensor 80D camera, the 6D Mark II is equipped with the improved DIGIC 7 image processor unlike the 80D’s DIGIC 6 image processor. If you’re wanting to shoot your vlogs with a full-frame, The 6D Mark II is a great option. PROS - ISO sensitivity goes up to 102400 - Amazing touchscreen controls CONS - No 4K video recording option - No USB 3.0 |
Liza Brown
Liza Brown is a writer and a lover of all things video.
Follow @Liza Brown
Liza Brown
Jan 10, 2024• Proven solutions
It can be challenging to make a decision on purchasing a camera when there’s just so many on the market. Camera manufacturers are racing to update their product line with all the new camera technology advancements. To simplify your search for the ultimate vlogging camera, we’ve come up with a top twelve list.
If you’re looking for a specific type of vlogging camera, check out our other posts on vlogging cameras:
Top 11 Cheap Vlogging Cameras (2024)
7 Best DSLR Cameras For Vlogging (2024)
8 Best Mirrorless Cameras For Vlogging (2024)
12 Best Vlogging Cameras With A Flip Screen (2024)
WHAT TO LOOK FOR IN A VLOGGING CAMERA
1. Fully articulated screen (flip screen)
2. Good continual autofocus while recording video
3. Good focus priority through face recognition
4. Touch to focus
5. Good low-light performance
6. external mic jack, hot/cold shoe bracket
7. optical image stabilization
8. good battery life
Check out my full list of 10 Things To Look For In A Vlogging Camera to understand the importance of these camera features.
12 BEST VLOGGING CAMERAS (2024)
| Camera | Release Date | Camera Type | Flip Screen | Mic Port | Price | |
|---|---|---|---|---|---|---|
| CanonEOSM50 | |
February2018 | Mirrorless | Fully Articulated | Yes | $- |
| PanasonicLumixDC-GH5S | |
January2018 | Mirrorless | Fully Articulated | Yes | $$$ |
| SonyAlphaa7R III | |
October2017 | Mirrorless | Tilting | Yes | $$$ |
| CanonEOSM100 | |
August2017 | Mirrorless | Flip Up | No | $ |
| CanonEOS6D Mark II | |
June2017 | Mid-size SLR | Fully Articulated | Yes | $$ |
| CanonEOS RebelSL2 | |
June2017 | Compact SLR | Fully Articulated | Yes | $ |
| CanonEOSM6 | |
February2017 | Mirrorless | Flip Up | Yes | $ |
| SonyCyber-Shot DSCRX 100 V | |
October2016 | Compact | Flip Up | No | $- |
| SonyAlphaa6500 | |
October2016 | Mirrorless | Tilting | Yes | $$- |
| PanasonicLumix DMCLX10 | |
September2016 | Compact | Flip Up | No | $ |
| CanonEOS80D | |
February2016 | Mid-size SLR | Fully Articulated | Yes | $$ |
| CanonPowerShotG7 X Mark II | |
February2016 | Compact | Flip Up | No | $ |
At first, you can have a look at the below video.
What Gear Do Creators Actually Use | Vidcon 2023 | Sony vs Canon
|
Best daily vlogging camera: Sony Cyber-Shot DSC-RX 100 V You don’t have to be a filmmaking pro if you want to use a compact camera to record all sorts of videos. Sony’s Cyber-shot series is famous for its cutting-edge features and the DSC-RX 100 V model is not an exception. This camera is equipped with a 20.1 MP Exmor RS BSI CMOS Sensor that supports ISO sensitivities up to ISO 12800. You can record footage in UHD 4K at 30 or 24 fps, although with a five-minute limit, as well as Full HD videos at a maximum of 960 fps when recording in the HFR mode. The Sony Cyber-shot DSC-RX 100 V ships with a non-interchangeable Carl Zeiss Vario Sonnar T lens that performs well under low-light conditions and in broad daylight. The camera features a fast hybrid AF system with 315 phase-detection points and an anti-motion blur mode that allows you to keep the subjects of your vlogs in focus throughout your recording. DSC RX-100 V’s multi-functionality makes it one of the best cameras for daily vlogging, especially for vloggers who are planning on shooting vlogs in various locations. PROS - Light and easy to carry around - Produces high-res videos CONS - Short battery life - Lacking a touchscreen |
|---|---|
|
Best cheap vlogging camera: Canon EOS M100 Canon’s EOS M100 is small and powerful. This mirrorless camera produces full HD videos at 60 fps. It doesn’t, however, shoot 4K footage. The 24.2 MP APS-C CMOS sensor and the DIGIC 7 image processor ensure that your vlogs are always in focus and rich in detail. The Canon EOS M100 provides great ISO sensitivity options, offering ISO values as high as 25600, making it a great option for vloggers that often shoot their videos under difficult light conditions. The 3-inch touchscreen LCD lets you control focus points, navigate through the camera’s menu, or watch videos you’ve created. The screen can also be tilted in the upward direction to provide you a better preview of the shot you’re recording. The camera has a built-in Wi-Fi with NFC so you can transfer your videos seamlessly to a computer and have fun in the process. The Canon EOS M100 is currently one of the best entry-level cameras for daily vlogging on the market because it produces videos in great picture quality that you don’t have to spend a fortune for. PROS - Affordable - Great connectivity options CONS - Lacks advanced video recording features - No viewfinder |
|
Best entry-level mirrorless camera for vlogging: Canon EOS M100 The Canon EOS M100 wins this category as well in our books because it’s a powerful, feature-rich camera that’s also very affordable. In case you missed it, check out my review on the Canon EOS M100. |
|
Best mid-range mirrorless camera for vlogging: Canon EOS M50 The EOS M50 has been on the market for just a few months and it is already regarded as one of the best mirrorless cameras for vlogging. Its 24.1 MP APS-C CMOS sensor and DIGIC 8 Image Processor are improved versions of those in the Canon EOS M100 model. With the Canon EOS M50, you can crank up the ISO sensitivity to 51200. This camera uses the Canon EF lens mount, so you can choose the lens that best suits your needs. The Canon EOS M50 can capture UHD 4K videos at 23.98 fps, and it also lets you record 120 fps slow-motion videos at 720p. PROS - Has an external microphone port - Has a 2.36m-dot OLED electronic viewfinder CONS - No image stabilization - Battery life could be longer |
|
Best professional mirrorless camera for vlogging: Panasonic Lumix DC-GH5S The Panasonic’s GH series was made famous by the LUMIX DMC-GH4 model that will be remembered as the world’s first mirrorless interchangeable lens camera to offer the 4K video recording option. That’s why it comes as no surprise that the GH5S mirrorless micro four-thirds camera can record UHD 4K as well as DCI videos at 60 fps, and 150 Mbps. The full HD 1080p at 240 fps video recording option is also available if you want to capture slow-motion footage for your vlogs. The camera’s 10.28MP multi-aspect ratio MOS sensor enhances its low-light performance and produces high-quality videos even under very challenging lighting conditions. Recording the audio with an external microphone is one of the many advantages offered by the Lumix DC-GH5S, while the Advanced Depth-From-Focus technology is used to automatically focus the video in a fraction of a second. The GH5S’ touchscreen can be rotated in any direction, so you can clearly see your shot no matter where you are. There’s very little doubt that the GH5S is the best professional-level mirrorless camera for vlogging that will help you capture stunning vlogs. PROS - ISO sensitivity goes up to 204800 - High video bit rates CONS - Expensive - The camera body weighs about 1.5 lbs |
|
Best entry-level DSLR camera for vlogging: Canon EOS SL2 The Canon EOS Rebel SL2 is a great entry-level vlogging camera that delivers great power at a low price. The Canon EOS Rebel SL2 has a DIGIC 7 image processor and a 24.2 MP APS-C CMOS sensor that lets you extend the ISO value to 51200 and shoot your vlogs even under low light conditions. This camera can capture full HD 1080p videos at 60 fps, and it features a 9-point AF system and dual pixel CMOS AF technologies that provide precise and quick focusing even when there is not much light. The SL2 also has a microphone jack you can connect an external microphone too for better audio. PROS - Microphone jack - Wi-Fi connectivity CONS - No 4K video support - Optical image stabilizer could be better |
|
Best mid-range DSLR camera for vlogging: Canon EOS 80D The Canon EOS 80D is a feature-rich, mid-range DSLR camera great for vlogging. The 80D lets you capture full HD 1080p videos at 60 fps. It doesn’t provide support for 4K videos, though. The ISO on this camera can be set up to 25600. The 24.2 MP APS-C CMOS sensor and the DIGIC 6 image processor reduce the need for high ISO values, though, as they enable the camera to capture visually stunning footage even when the light in the shot is far from perfect. The 80D’s 45-point all cross phase detection autofocus system and its dual pixel CMOS AF system enable you to produce sharp images without having to pull-focus yourself. The various-angle 3-inch 1.04M-dot ClearView II LCD touchscreen display, as well as the pentaprism type intelligent viewfinder, let you compose shots effortlessly. PROS - Feature-rich - Continuous AF feature performs beautifully while recording high-res videos CONS - Just one SD card slot - PC sync connection features could be better |
|
Best professional DSLR camera for vlogging: Canon 6D Mark II The Canon EOS 6D Mark II is the best professional DSLR camera for vlogging. It is the only DSLR camera on the market (as of writing this review) that comes with a full-frame sensor along with a fully-articulated screen and a microphone jack. The camera’s 26.2 MP full-frame CMOS sensor can take in much more light, giving you the option to shoot with higher quality bokeh (unfocused areas appearing more blurry) and find focus much more quickly and accurately in more challenging lighting conditions. With this camera, you can shoot up to full HD 1080p videos at a maximum of 60 fps. Although the 6D Mark II comes with the same 45-point all cross-type autofocusing system as Canon’s crop sensor 80D camera, the 6D Mark II is equipped with the improved DIGIC 7 image processor unlike the 80D’s DIGIC 6 image processor. If you’re wanting to shoot your vlogs with a full-frame, The 6D Mark II is a great option. PROS - ISO sensitivity goes up to 102400 - Amazing touchscreen controls CONS - No 4K video recording option - No USB 3.0 |
Liza Brown
Liza Brown is a writer and a lover of all things video.
Follow @Liza Brown
Also read:
- The Ultimate Guide to YouTube Live Thumbnail
- The Top Ten Accelerating YouTube Sectors of Thought
- Effortlessly Create Engaging YouTube Thumbnails
- Liven Up Thumbnails Enchanted Settings
- In 2024, Deciphering YouTube Shorts A Comprehensive Overview
- How to Make a YouTube Thumbnail On Mac
- [Updated] A Journey Through Time Best History YouTubes for Scholars & Enthusiasts
- In 2024, Ethical Engagement Sustainable Strategies for Content Creeps
- In 2024, Discover the Top 9 Free Online Tools to Craft Your Logo
- In 2024, Building a Business From Blogs and Video Reviews
- YT Favorites Top 10 Music Videos & Their Reactions
- In 2024, Adding a Vibrancy Edge YouTube Thumbnails Meet Neons
- Video Quality Edge Mirrorless Versus DSLR Cameras
- [Updated] Demystifying Video Profit on YouTube
- Purity in Browsing Top 7 Selective Android AdBlocking Tools
- [Updated] Captivating Call-to-Action Designing a Dynamic Subscribe Buttons with Filmora
- Navigating Through Top 10 YouTube Mp3 Extractors
- Audience Allure Video Marketing Strategies for YouTube Trailers via Filmora for 2024
- In 2024, Elevate Vlogging Quality - The Ultimate 12 Recommended Cam Picks
- 2024 Approved Discover the Best 12 Free and Paid Video Game Openings for YT
- [New] Content Creator's Arena Vs. Beta Studio Evolutionary Path
- Pioneering Resources Leading Free Video Openers Guide
- 2024 Approved Evaluating Mr. Beast's Financial Heft
- Elevate Your YouTube Content With 7 Premium, Free Audio Sounds for 2024
- [Updated] Achieving Precise YouTube Content Extraction
- Demystifying YouTube Analytics Views, Subscriptions & Profits
- [Updated] Craft Compelling Content Essential Youtube Short Video Edits
- Unveiling the Power of a Sturdy Tripod in Video Content Production
- 2024 Approved Crafting Compelling FreeFire Vids with Strategy Guide
- [Updated] Boosting Income Through Effective Video Marketing
- The Ultimate Hack for Blocking YouTube Ads on All Browsers
- In 2024, Behind the Sequence Celebrating YouTube's Top Cosmetics Artists
- [New] Elevate Your Online Presence with Captivating Haul Videos
- [New] Calculating Earnings Ad Revenues in the World of YouTube?
- 2024 Approved 6 Easy, Free YouTube Closers for Your Videos (Top Picks)
- 2024 Approved Channel Aspirations – Reach and Secure 10K Views for YouTube Partner Perks
- [New] Academic History Lovers' Guide to Top YT Content
- [Updated] Boosting Engagement From the Start Premium, Paid-Free Intra Creators
- Boost Your YouTube Success with Free, High-Quality Audio for 2024
- 12 Simple Tricks to Make Your YouTube Videos Go Viral
- [New] Efficacy of Monetized YouTube Engagement for Content Creators?
- Explore 10 Premium YouTube-to-WebM Converter Tools
- In 2024, For People Wanting to Mock GPS on Xiaomi Redmi K70E Devices | Dr.fone
- 2024 Approved Best Free Subtitle Editing Software for Mac (Subtitle Edit Alternatives)
- [New] 2024 Approved Shadowy Snapshots Skills for Stunning Night Images
- How to Transfer Data from Honor 100 to Any iOS Devices | Dr.fone
- Updated Enhancing Voice Resonance with Filmoras Latest Features for 2024
- 2024 Approved Pairing Video Cameras with Desktop Captures
- Professional Techniques for Sims 4 Live-Action for 2024
- How to Bypass Google FRP Lock on Nokia C110 Devices
- Capture and Share The Ultimate Guide to PS4 Screenshot Sharing for 2024
- A Comprehensive Guide to iCloud Unlock On iPhone 14 Plus Online
- [Updated] Comparing Screen Recorders The Leader Vs. Contenders
- The Best Video Editing Software for Windows 10 Top 6 Options for 2024
- How to Fix iPhone 11 Pro Max Passcode not Working?
- [Updated] 2024 Approved Mobile Methods for Capturing Snapchat Content
- [Updated] In 2024, Laptop & Web Navigating Live Video Communication in WhatsApp
- Unlock Your Disabled Apple iPhone 14 Plus Without iTunes in 5 Ways
- In 2024, Things You Should Know When Unlocking Total Wireless Of iPhone 6 | Dr.fone
- Title: In 2024, Effortless Fusion of YouTube Audio with iMovie Masterpieces
- Author: Brian
- Created at : 2024-05-25 12:12:55
- Updated at : 2024-05-26 12:12:55
- Link: https://youtube-video-recordings.techidaily.com/in-2024-effortless-fusion-of-youtube-audio-with-imovie-masterpieces/
- License: This work is licensed under CC BY-NC-SA 4.0.
