
:max_bytes(150000):strip_icc()/Photos-b2b85ad036374eb1b6a01076ce3bbacd.jpg)
In 2024, Dive Into the World of Interactive Video Features on YouTube
Dive Into the World of Interactive Video Features on YouTube
How to Add YouTube Annotations and Cards?

Richard Bennett
Mar 27, 2024• Proven solutions
Update: YouTube has replaced annotation with end screen. You can find the latest informaiton about YouTube screen and YouTube cards here.
YouTube Cards and Annotations are very useful if you want to encourage your viewrs to take an action, like Subscribe, go to another video or associated website, etc. Today, we’re going to show you the differences between cards and annotations, and how to add them in YouTube videos.
Do you want to make your YouTube video more attractive? Wondershare Filmora is a such video editing software designed for YouTube creator. It not only allows you cut, trim, crop, zoom, reverse, rotate the video clips, but also makes the advanced features like green screen, PIP, tilt-shift and mosaic easy like a piece of cake. With Wondershare Filmora, you can ignite your YouTube videos with over 300 effects like Fashion, Beauty, Block Buster, Travel, etc.
 Download Mac Version ](https://tools.techidaily.com/wondershare/filmora/download/ )
The main difference between annotation and cards is their outlook. Cards are more graphical whereas annotations are text based. The cards slide in once you click the small “i” button on the video where as the annotation is there based on the timings set by the user. Moreover the main differences between the two are:
1. YouTube Cards are small and unobtrusive, unless a viewer chooses to click on them, which is why they are the better option when you are trying to get views on other videos. Irritating a few people with a big annotation might be worth it if you also draw other people’s attention to your cause or website, but it is not a good way to endear yourself to people you are trying to get views and subscriptions from. When a card is clicked a thumbnail will appear with a link to your additional content. YouTube Cards are often better than annotations for adding links to your videos because they look much tidier. Also, unlike annotations, cards will be visible to people watching your videos on their mobile devices.
2. You cannot use Cards just to insert notes into your videos, though, and you cannot adjust their size like you can with annotations. So, if you do need a link to be large and extremely noticeable, annotations might still be your best option. Cards and annotations can even be used in combination sometimes.
How to add YouTube Cards
YouTube Cards are similar to annotations but more interactive. They allow the owner of the video to add images and other links. A small box appears, clicking on which will activate the cards.
- Click on the “Video Manager” tab

- Click “Edit” tab under the video screen shot you want to add the card on
- Click on the “Cards” tab

- On the right panel click on “Add Card” drop down menu and select the type of card you want to add
- Click on the create button which will open the corresponding video
- Once you finish the subsequent information required click create card
- Select the timeline for the playhead to appear which leads to the card slide

- Apply changes and exit
How to add YouTube annotations
YouTube Annotation is addition of a text layer, link or hotspots over your video. They add interactive boxes which link to other websites or videos (any link you want).
- Click on the video manager tab
- Click edit tab under the video screen shot you want to add the annotation on
- Click on the “End screen & Annotation” tab

- On the right panel click on “+ Add Element” and select the kind of annotation you want to add
- Adjust the position of Annotation, you can drag the rectangle to locate it at any position of the video, move the slide to set the start and end time of the annotation

- Apply changes
The types of YouTube annotations:
1. Speech Bubbles
Speech Bubbles: look like the dialogue box in a comic strip. There is a tail which you can adjust so it looks like one of the people in your video is saying what is written in the annotation. Speech bubbles are great for adding in funny comments.
2. Notes
Notes: come in a limited selection of colors and can be adjusted to take up a maximum of 30% of your player screen. Sometimes you need a huge annotation to get an important point across, but using huge note annotations too often – especially near the beginnings of your videos – will annoy viewers. If you need a large note annotation make sure to place it later in your video, when a viewer will already be invested in what they are watching and less likely to click away.
3. Titles
Titles: are large pieces of text that go either at the beginning of your video or in-between different topics within your video. YouTube’s titles are not very nice to look at, but they are a decent option if you do not have access to video editing software.
4. Spotlights
Spotlights: have a subtle border and are completely clear inside. Your text only appears when a user hovers over the spotlight. Spotlights are great for turning elements within your video into links.
5. Labels
Labels: are completely transparent, like spotlights, but the user does not have to hover over them for your text to be visible.
6. Pauses
Pauses: are no longer available to add to your videos, although Pause Annotations added before they were removed still work. Pause Annotations used to stop your video for a set period of time when your annotation appeared.
If somebody watches your video and gets to the end then that means they enjoyed it and will probably be open to checking out more of your content. Rather than hoping that your other videos show up in the ‘Suggested Videos’ YouTube will show after yours has finished playing you should always include an outro, or ending card, after your video to recommend your own work. Annotations are used in a lot of successful YouTuber’s ending cards.
One form this takes is small Note annotations in the bottom corners of the screen, one linking to your previous video and one to the next. Sometimes your viewers might not necessarily get the most enjoyment out of your videos by watching them in order, though. Sometimes you want to link viewers to the videos that are most related to the one they just watched.
The best outros also include a subscribe button, which can be created using annotations. These annotations work best when combined with a verbal call to action. Make sure your outro lasts long enough for people to make the decision to subscribe or click another video.
No matter what kind of annotations you are using, you should never use more than two of them at a time anywhere except for your outro. You should also never place annotations at the very top of your screen, or in the middle at the bottom. If your video is embedding on a separate website then the player will cover annotations at the top of the screen, and ads might cover annotations placed in the bottom-middle of the screen. Keep in mind when using annotations that they will not be visible to users watching your videos on mobile devices. If mobile traffic is very important to you then consider using YouTube Cards.
Richard Bennett
Richard Bennett is a writer and a lover of all things video.
Follow @Richard Bennett
Richard Bennett
Mar 27, 2024• Proven solutions
Update: YouTube has replaced annotation with end screen. You can find the latest informaiton about YouTube screen and YouTube cards here.
YouTube Cards and Annotations are very useful if you want to encourage your viewrs to take an action, like Subscribe, go to another video or associated website, etc. Today, we’re going to show you the differences between cards and annotations, and how to add them in YouTube videos.
Do you want to make your YouTube video more attractive? Wondershare Filmora is a such video editing software designed for YouTube creator. It not only allows you cut, trim, crop, zoom, reverse, rotate the video clips, but also makes the advanced features like green screen, PIP, tilt-shift and mosaic easy like a piece of cake. With Wondershare Filmora, you can ignite your YouTube videos with over 300 effects like Fashion, Beauty, Block Buster, Travel, etc.
Download Mac Version ](https://tools.techidaily.com/wondershare/filmora/download/ )
The main difference between annotation and cards is their outlook. Cards are more graphical whereas annotations are text based. The cards slide in once you click the small “i” button on the video where as the annotation is there based on the timings set by the user. Moreover the main differences between the two are:
1. YouTube Cards are small and unobtrusive, unless a viewer chooses to click on them, which is why they are the better option when you are trying to get views on other videos. Irritating a few people with a big annotation might be worth it if you also draw other people’s attention to your cause or website, but it is not a good way to endear yourself to people you are trying to get views and subscriptions from. When a card is clicked a thumbnail will appear with a link to your additional content. YouTube Cards are often better than annotations for adding links to your videos because they look much tidier. Also, unlike annotations, cards will be visible to people watching your videos on their mobile devices.
2. You cannot use Cards just to insert notes into your videos, though, and you cannot adjust their size like you can with annotations. So, if you do need a link to be large and extremely noticeable, annotations might still be your best option. Cards and annotations can even be used in combination sometimes.
How to add YouTube Cards
YouTube Cards are similar to annotations but more interactive. They allow the owner of the video to add images and other links. A small box appears, clicking on which will activate the cards.
- Click on the “Video Manager” tab
- Click “Edit” tab under the video screen shot you want to add the card on
- Click on the “Cards” tab
- On the right panel click on “Add Card” drop down menu and select the type of card you want to add
- Click on the create button which will open the corresponding video
- Once you finish the subsequent information required click create card
- Select the timeline for the playhead to appear which leads to the card slide
- Apply changes and exit
How to add YouTube annotations
YouTube Annotation is addition of a text layer, link or hotspots over your video. They add interactive boxes which link to other websites or videos (any link you want).
- Click on the video manager tab
- Click edit tab under the video screen shot you want to add the annotation on
- Click on the “End screen & Annotation” tab
- On the right panel click on “+ Add Element” and select the kind of annotation you want to add
- Adjust the position of Annotation, you can drag the rectangle to locate it at any position of the video, move the slide to set the start and end time of the annotation
- Apply changes
The types of YouTube annotations:
1. Speech Bubbles
Speech Bubbles: look like the dialogue box in a comic strip. There is a tail which you can adjust so it looks like one of the people in your video is saying what is written in the annotation. Speech bubbles are great for adding in funny comments.
2. Notes
Notes: come in a limited selection of colors and can be adjusted to take up a maximum of 30% of your player screen. Sometimes you need a huge annotation to get an important point across, but using huge note annotations too often – especially near the beginnings of your videos – will annoy viewers. If you need a large note annotation make sure to place it later in your video, when a viewer will already be invested in what they are watching and less likely to click away.
3. Titles
Titles: are large pieces of text that go either at the beginning of your video or in-between different topics within your video. YouTube’s titles are not very nice to look at, but they are a decent option if you do not have access to video editing software.
4. Spotlights
Spotlights: have a subtle border and are completely clear inside. Your text only appears when a user hovers over the spotlight. Spotlights are great for turning elements within your video into links.
5. Labels
Labels: are completely transparent, like spotlights, but the user does not have to hover over them for your text to be visible.
6. Pauses
Pauses: are no longer available to add to your videos, although Pause Annotations added before they were removed still work. Pause Annotations used to stop your video for a set period of time when your annotation appeared.
If somebody watches your video and gets to the end then that means they enjoyed it and will probably be open to checking out more of your content. Rather than hoping that your other videos show up in the ‘Suggested Videos’ YouTube will show after yours has finished playing you should always include an outro, or ending card, after your video to recommend your own work. Annotations are used in a lot of successful YouTuber’s ending cards.
One form this takes is small Note annotations in the bottom corners of the screen, one linking to your previous video and one to the next. Sometimes your viewers might not necessarily get the most enjoyment out of your videos by watching them in order, though. Sometimes you want to link viewers to the videos that are most related to the one they just watched.
The best outros also include a subscribe button, which can be created using annotations. These annotations work best when combined with a verbal call to action. Make sure your outro lasts long enough for people to make the decision to subscribe or click another video.
No matter what kind of annotations you are using, you should never use more than two of them at a time anywhere except for your outro. You should also never place annotations at the very top of your screen, or in the middle at the bottom. If your video is embedding on a separate website then the player will cover annotations at the top of the screen, and ads might cover annotations placed in the bottom-middle of the screen. Keep in mind when using annotations that they will not be visible to users watching your videos on mobile devices. If mobile traffic is very important to you then consider using YouTube Cards.
Richard Bennett
Richard Bennett is a writer and a lover of all things video.
Follow @Richard Bennett
Unconventional Techniques for Rewinding Videos on YT
How to Reverse YouTube Video in Creative Ways
Richard Bennett
Mar 27, 2024• Proven solutions
It could be a film or a reversed meme, a boomerang video on Instagram, or a rewind effect in a playback action. The reversing results make the clip compelling and creative. At present, many video creators find YouTube as a suitable platform for such rewind effects as it has millions of diverse genre video clips. Although the mechanism behind such an act can be quite confusing, it is no more if you get to know how to reverse YouTube videos at ease. Yes, video reversers are created and developed for such a purpose, and you can read below to understand how to play YouTube videos backward.
- Part 1: How to Reverse YouTube Video in the Quickest Way?
- Part 2: Reverse YouTube Videos More Creatively
How to Reverse YouTube Video in the Quickest Way?
Let’s take a look at some online tools that can play YouTube videos backward.
2. Kapwing
Kapwing is an online video reverser shared stage where you can create images, videos, and GIFs to share on social media. It suits to be perfect for any content that performs varied tasks with video editor tools like trimmer, resizes, studio, subtitles, and audio addition. Kapwing is an all-in-one workspace asset that is a single secure place to place over your backup safely facilitated with cross-device capability. To whatever field of interest you might belong to from a school student, professional, media, or a design team, Kapwing is the right platform ease-to-use.
3. Clideo
Like Kapwing, Clideo is an online video reverser tool that does multiple tasking like video converter, file converter, audio joiner, video maker, and a slideshow maker. We have taken up Clideo in our list as it follows a simple interface and comes up with useful tools of the loop, stops motion, and meme required in the present video creation industry. Supporting all video formats like MPG, MOV, and VOB, Clideo is a fast editor with a high-level of data protection. Developed by Softo Ltd., Clideo has got more than 4.1M users and had made up 25M videos.
Now, let’s take a simple guide to reverse a YouTube video quickly with Clideo.
Step 1: Enter the link, https://clideo.com/reverse-video on your desired web browser like Chrome or Firefox.
Now add the files from your desktop or your smartphone from the “Choose File” option or the drop-down choose your convenient option like Dropbox, Google Drive, or YouTube URL to reverse the video.
Source: clideo.com
Step 2: Paste the YouTube link on the search box, and the video will process.
Step 3: The YouTube video will now start to play from backward where you can reverse the speed by changing the levels from 0.5X to 2X.
You can make a preview by playing or pausing the timeline of the YouTube video.
Once satisfied, hit the “Reverse” button on the right corner of the screen.
Step 4: Before downloading the revered Youtube video, you can play it once, and upon satisfaction, tap the “Download” button else you can go on with the “Back to edit” option.
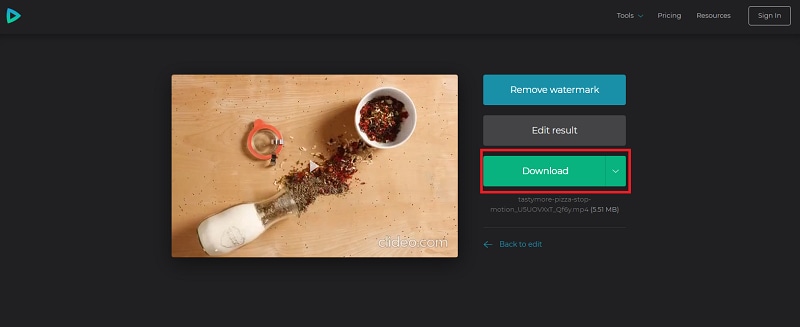
You can quickly reverse a YouTube video with Clideo in just three steps, along with a watermark removal facility.
Reverse YouTube Videos More Creatively
Want to embed more creativity in your YouTube video before reversing them? Get to know some of the YouTube video downloaders from this session.
Keepvid
Keepvid is an online video downloader that converts a video directly to MP4 & MP3. It allows you to download videos from 100+ sites, including YouTube, Facebook, Twitter, Vevo, Reddit, and BBC, irrespective of their video metadata. With Keepvid, you can listen to YouTube videos offline, save YouTube videos directly to MP3, download YouTube playlists everywhere, and anytime with the web-based lite-weight app.
YTD Video downloader
YTD video downloader has been in the market for years as a popular video downloader & converter. It is free to download software, allowing you to download video, audio, and playlist that could play offline. YTD video downloaded has gathered more than 200M users globally, supporting overall popular sites like Bing, Vimeo, TikTok, Yahoo, and Metacafe. With YTD, you can download the unlimited playlist and HD videos of 1080P at ultra-fast speed.
Want to reverse your YouTube video creatively and stunningly?
Wondershare Filmora is all you need, a complete pack of video/editing toolkit developed for the inspired that helps discover storytelling. It is a platform where you can create without limits, give life to your videos, craft fun in every clip, go beyond boundaries with endless possibilities, and make your epic story or adventure outstanding in the crowd. Filmora has a free version that allows you to access all the beautiful features like video reverse, ripple edit, trim, rotate, flip, zoom, edit, and audio ducking.
3.1How to Reverse Videos in Filmora?
Now that you have come to know about Filmora Wondershare, the best video reverser from the list, let’s directly jump over to a manual on how to reverse a YouTube video at ease.
Note: Before starting up, download and install the free version of Filmora on the device from https://filmora.wondershare.com/ .

Step 1: Open Filmora and click the “File” menu. Choose “New Project” from the drop-down.
Step 2: To import the YouTube video to the workplace, choose the “Import Media” option from the file menu.
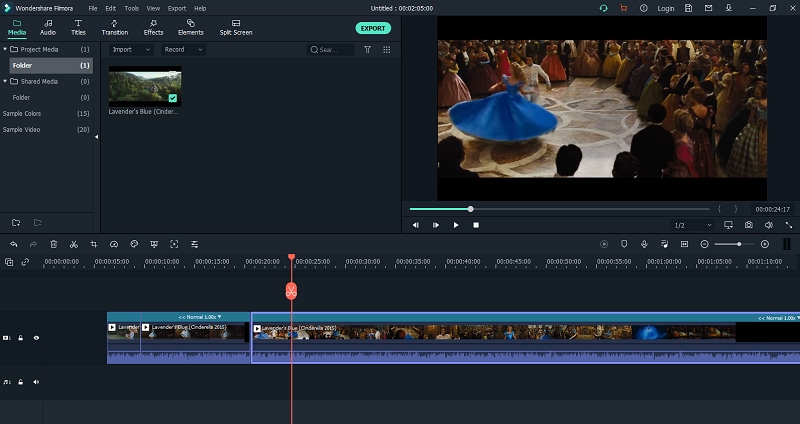
From the drop-down, you can import files or folders at your convenience.
Step 3: Once the video is loaded on the media library, right-click on the track timeline and select the “Speed and Duration” option.
Tick the “Reverse Speed” checkbox and then hit the “OK” button.
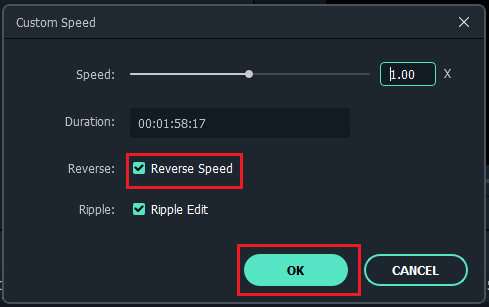
Step 4: Doing so will play the YouTube video backward, and you can see the progress on the preview window.
Step 5: You can perfect your creation with filters or effects offered with Filmora.
Once done, click the “Export” option that will allow you to save the file in your destined format and export it.
You can upload the reversed YouTube video directly to your YouTube account or other social media apps with Filmora.
3.2Tips for Customizing the Reversing Videos
1. Add filters & effects: Adding filters and effects like Mosaic and Amaro can uplift your reversed video and make them attractive. Filmora has 200+ filters, utilities, overlays, and LUT.
2. Render/Perfect the audio: Audio is the backbone of the video that provokes and makes the creation sound perfect and outstanding. 76 in-built audio tracks included in Filmora consisting of tender, sentimental, folk, rock, and young categories.
3. Transform your video with transitions: While various ordinary videos crowd the Internet, make yours unique by transforming them with 3D effects and a slideshow. Filmora comes with 233 transitions like 3D, warp, dissolve & ripple slideshow, lifestyle, and still a lot more.
4. Perform video editing tricks: While trim, cut & merge, crop & flip, resize, delete, and watermark are pre-defined and traditional editing tools, why don’t you try something new like creating freeze frames, accessing sample colors, and zoom in/out timeline where Filmora has a toolkit more than what you expect.
Conclusion
Thanks to the technology behind video reversers like Clideo and Kapwing that does a great job of reversing the YouTube video online quickly. The alternatives YTD downloader and Keepvid also facilitates downloading your favorite videos from 100+ video streaming sites. However, if you aspire to become a creative & professional video creator expert in the field, Filmora from Wondershare stands as the best choice for all. Lastly, also note the tips discussed, and use Filmora today for a brighter career tomorrow.
Richard Bennett
Richard Bennett is a writer and a lover of all things video.
Follow @Richard Bennett
Richard Bennett
Mar 27, 2024• Proven solutions
It could be a film or a reversed meme, a boomerang video on Instagram, or a rewind effect in a playback action. The reversing results make the clip compelling and creative. At present, many video creators find YouTube as a suitable platform for such rewind effects as it has millions of diverse genre video clips. Although the mechanism behind such an act can be quite confusing, it is no more if you get to know how to reverse YouTube videos at ease. Yes, video reversers are created and developed for such a purpose, and you can read below to understand how to play YouTube videos backward.
- Part 1: How to Reverse YouTube Video in the Quickest Way?
- Part 2: Reverse YouTube Videos More Creatively
How to Reverse YouTube Video in the Quickest Way?
Let’s take a look at some online tools that can play YouTube videos backward.
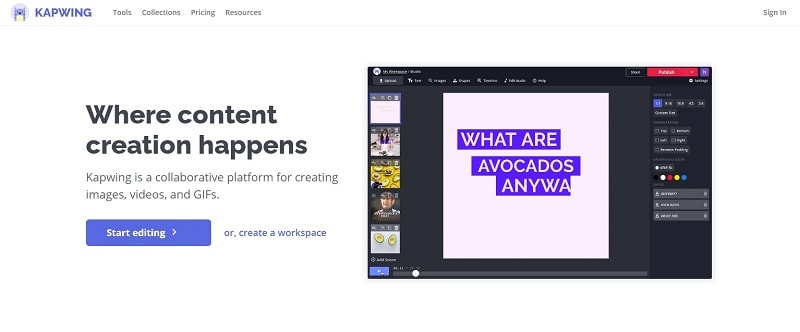
2. Kapwing
Kapwing is an online video reverser shared stage where you can create images, videos, and GIFs to share on social media. It suits to be perfect for any content that performs varied tasks with video editor tools like trimmer, resizes, studio, subtitles, and audio addition. Kapwing is an all-in-one workspace asset that is a single secure place to place over your backup safely facilitated with cross-device capability. To whatever field of interest you might belong to from a school student, professional, media, or a design team, Kapwing is the right platform ease-to-use.
3. Clideo
Like Kapwing, Clideo is an online video reverser tool that does multiple tasking like video converter, file converter, audio joiner, video maker, and a slideshow maker. We have taken up Clideo in our list as it follows a simple interface and comes up with useful tools of the loop, stops motion, and meme required in the present video creation industry. Supporting all video formats like MPG, MOV, and VOB, Clideo is a fast editor with a high-level of data protection. Developed by Softo Ltd., Clideo has got more than 4.1M users and had made up 25M videos.
Now, let’s take a simple guide to reverse a YouTube video quickly with Clideo.
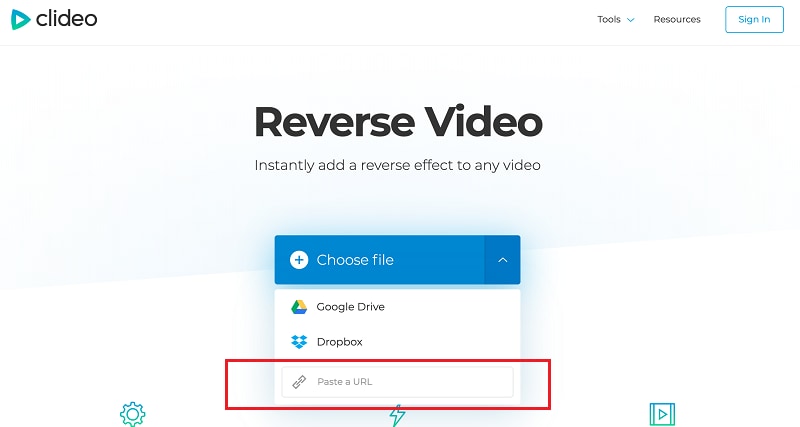
Step 1: Enter the link, https://clideo.com/reverse-video on your desired web browser like Chrome or Firefox.
Now add the files from your desktop or your smartphone from the “Choose File” option or the drop-down choose your convenient option like Dropbox, Google Drive, or YouTube URL to reverse the video.
Source: clideo.com
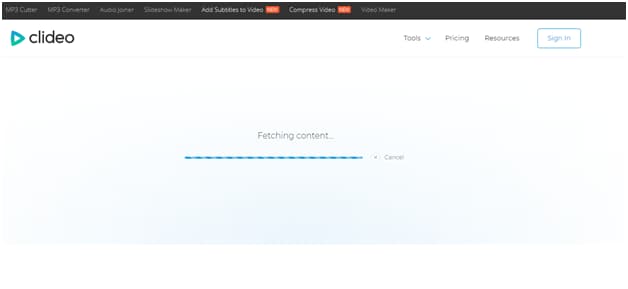
Step 2: Paste the YouTube link on the search box, and the video will process.
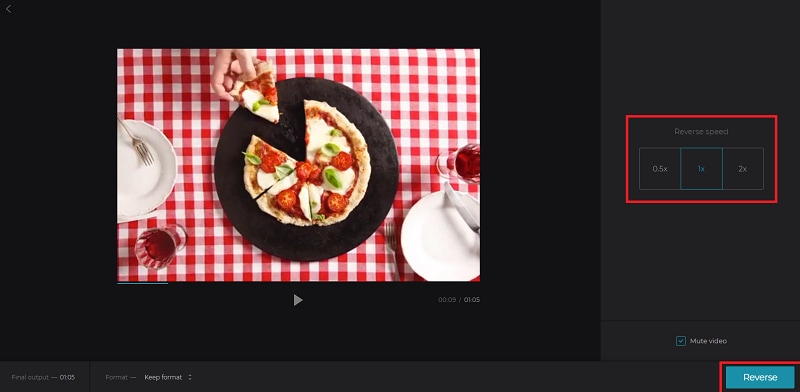
Step 3: The YouTube video will now start to play from backward where you can reverse the speed by changing the levels from 0.5X to 2X.
You can make a preview by playing or pausing the timeline of the YouTube video.
Once satisfied, hit the “Reverse” button on the right corner of the screen.
Step 4: Before downloading the revered Youtube video, you can play it once, and upon satisfaction, tap the “Download” button else you can go on with the “Back to edit” option.
You can quickly reverse a YouTube video with Clideo in just three steps, along with a watermark removal facility.
Reverse YouTube Videos More Creatively
Want to embed more creativity in your YouTube video before reversing them? Get to know some of the YouTube video downloaders from this session.
Keepvid
Keepvid is an online video downloader that converts a video directly to MP4 & MP3. It allows you to download videos from 100+ sites, including YouTube, Facebook, Twitter, Vevo, Reddit, and BBC, irrespective of their video metadata. With Keepvid, you can listen to YouTube videos offline, save YouTube videos directly to MP3, download YouTube playlists everywhere, and anytime with the web-based lite-weight app.
YTD Video downloader
YTD video downloader has been in the market for years as a popular video downloader & converter. It is free to download software, allowing you to download video, audio, and playlist that could play offline. YTD video downloaded has gathered more than 200M users globally, supporting overall popular sites like Bing, Vimeo, TikTok, Yahoo, and Metacafe. With YTD, you can download the unlimited playlist and HD videos of 1080P at ultra-fast speed.
Want to reverse your YouTube video creatively and stunningly?
Wondershare Filmora is all you need, a complete pack of video/editing toolkit developed for the inspired that helps discover storytelling. It is a platform where you can create without limits, give life to your videos, craft fun in every clip, go beyond boundaries with endless possibilities, and make your epic story or adventure outstanding in the crowd. Filmora has a free version that allows you to access all the beautiful features like video reverse, ripple edit, trim, rotate, flip, zoom, edit, and audio ducking.
3.1How to Reverse Videos in Filmora?
Now that you have come to know about Filmora Wondershare, the best video reverser from the list, let’s directly jump over to a manual on how to reverse a YouTube video at ease.
Note: Before starting up, download and install the free version of Filmora on the device from https://filmora.wondershare.com/ .
Step 1: Open Filmora and click the “File” menu. Choose “New Project” from the drop-down.
Step 2: To import the YouTube video to the workplace, choose the “Import Media” option from the file menu.
From the drop-down, you can import files or folders at your convenience.
Step 3: Once the video is loaded on the media library, right-click on the track timeline and select the “Speed and Duration” option.
Tick the “Reverse Speed” checkbox and then hit the “OK” button.
Step 4: Doing so will play the YouTube video backward, and you can see the progress on the preview window.
Step 5: You can perfect your creation with filters or effects offered with Filmora.
Once done, click the “Export” option that will allow you to save the file in your destined format and export it.
You can upload the reversed YouTube video directly to your YouTube account or other social media apps with Filmora.
3.2Tips for Customizing the Reversing Videos
1. Add filters & effects: Adding filters and effects like Mosaic and Amaro can uplift your reversed video and make them attractive. Filmora has 200+ filters, utilities, overlays, and LUT.
2. Render/Perfect the audio: Audio is the backbone of the video that provokes and makes the creation sound perfect and outstanding. 76 in-built audio tracks included in Filmora consisting of tender, sentimental, folk, rock, and young categories.
3. Transform your video with transitions: While various ordinary videos crowd the Internet, make yours unique by transforming them with 3D effects and a slideshow. Filmora comes with 233 transitions like 3D, warp, dissolve & ripple slideshow, lifestyle, and still a lot more.
4. Perform video editing tricks: While trim, cut & merge, crop & flip, resize, delete, and watermark are pre-defined and traditional editing tools, why don’t you try something new like creating freeze frames, accessing sample colors, and zoom in/out timeline where Filmora has a toolkit more than what you expect.
Conclusion
Thanks to the technology behind video reversers like Clideo and Kapwing that does a great job of reversing the YouTube video online quickly. The alternatives YTD downloader and Keepvid also facilitates downloading your favorite videos from 100+ video streaming sites. However, if you aspire to become a creative & professional video creator expert in the field, Filmora from Wondershare stands as the best choice for all. Lastly, also note the tips discussed, and use Filmora today for a brighter career tomorrow.
Richard Bennett
Richard Bennett is a writer and a lover of all things video.
Follow @Richard Bennett
Richard Bennett
Mar 27, 2024• Proven solutions
It could be a film or a reversed meme, a boomerang video on Instagram, or a rewind effect in a playback action. The reversing results make the clip compelling and creative. At present, many video creators find YouTube as a suitable platform for such rewind effects as it has millions of diverse genre video clips. Although the mechanism behind such an act can be quite confusing, it is no more if you get to know how to reverse YouTube videos at ease. Yes, video reversers are created and developed for such a purpose, and you can read below to understand how to play YouTube videos backward.
- Part 1: How to Reverse YouTube Video in the Quickest Way?
- Part 2: Reverse YouTube Videos More Creatively
How to Reverse YouTube Video in the Quickest Way?
Let’s take a look at some online tools that can play YouTube videos backward.
2. Kapwing
Kapwing is an online video reverser shared stage where you can create images, videos, and GIFs to share on social media. It suits to be perfect for any content that performs varied tasks with video editor tools like trimmer, resizes, studio, subtitles, and audio addition. Kapwing is an all-in-one workspace asset that is a single secure place to place over your backup safely facilitated with cross-device capability. To whatever field of interest you might belong to from a school student, professional, media, or a design team, Kapwing is the right platform ease-to-use.
3. Clideo
Like Kapwing, Clideo is an online video reverser tool that does multiple tasking like video converter, file converter, audio joiner, video maker, and a slideshow maker. We have taken up Clideo in our list as it follows a simple interface and comes up with useful tools of the loop, stops motion, and meme required in the present video creation industry. Supporting all video formats like MPG, MOV, and VOB, Clideo is a fast editor with a high-level of data protection. Developed by Softo Ltd., Clideo has got more than 4.1M users and had made up 25M videos.
Now, let’s take a simple guide to reverse a YouTube video quickly with Clideo.
Step 1: Enter the link, https://clideo.com/reverse-video on your desired web browser like Chrome or Firefox.
Now add the files from your desktop or your smartphone from the “Choose File” option or the drop-down choose your convenient option like Dropbox, Google Drive, or YouTube URL to reverse the video.
Source: clideo.com
Step 2: Paste the YouTube link on the search box, and the video will process.
Step 3: The YouTube video will now start to play from backward where you can reverse the speed by changing the levels from 0.5X to 2X.
You can make a preview by playing or pausing the timeline of the YouTube video.
Once satisfied, hit the “Reverse” button on the right corner of the screen.
Step 4: Before downloading the revered Youtube video, you can play it once, and upon satisfaction, tap the “Download” button else you can go on with the “Back to edit” option.
You can quickly reverse a YouTube video with Clideo in just three steps, along with a watermark removal facility.
Reverse YouTube Videos More Creatively
Want to embed more creativity in your YouTube video before reversing them? Get to know some of the YouTube video downloaders from this session.
Keepvid
Keepvid is an online video downloader that converts a video directly to MP4 & MP3. It allows you to download videos from 100+ sites, including YouTube, Facebook, Twitter, Vevo, Reddit, and BBC, irrespective of their video metadata. With Keepvid, you can listen to YouTube videos offline, save YouTube videos directly to MP3, download YouTube playlists everywhere, and anytime with the web-based lite-weight app.
YTD Video downloader
YTD video downloader has been in the market for years as a popular video downloader & converter. It is free to download software, allowing you to download video, audio, and playlist that could play offline. YTD video downloaded has gathered more than 200M users globally, supporting overall popular sites like Bing, Vimeo, TikTok, Yahoo, and Metacafe. With YTD, you can download the unlimited playlist and HD videos of 1080P at ultra-fast speed.
Want to reverse your YouTube video creatively and stunningly?
Wondershare Filmora is all you need, a complete pack of video/editing toolkit developed for the inspired that helps discover storytelling. It is a platform where you can create without limits, give life to your videos, craft fun in every clip, go beyond boundaries with endless possibilities, and make your epic story or adventure outstanding in the crowd. Filmora has a free version that allows you to access all the beautiful features like video reverse, ripple edit, trim, rotate, flip, zoom, edit, and audio ducking.
3.1How to Reverse Videos in Filmora?
Now that you have come to know about Filmora Wondershare, the best video reverser from the list, let’s directly jump over to a manual on how to reverse a YouTube video at ease.
Note: Before starting up, download and install the free version of Filmora on the device from https://filmora.wondershare.com/ .
Step 1: Open Filmora and click the “File” menu. Choose “New Project” from the drop-down.
Step 2: To import the YouTube video to the workplace, choose the “Import Media” option from the file menu.
From the drop-down, you can import files or folders at your convenience.
Step 3: Once the video is loaded on the media library, right-click on the track timeline and select the “Speed and Duration” option.
Tick the “Reverse Speed” checkbox and then hit the “OK” button.
Step 4: Doing so will play the YouTube video backward, and you can see the progress on the preview window.
Step 5: You can perfect your creation with filters or effects offered with Filmora.
Once done, click the “Export” option that will allow you to save the file in your destined format and export it.
You can upload the reversed YouTube video directly to your YouTube account or other social media apps with Filmora.
3.2Tips for Customizing the Reversing Videos
1. Add filters & effects: Adding filters and effects like Mosaic and Amaro can uplift your reversed video and make them attractive. Filmora has 200+ filters, utilities, overlays, and LUT.
2. Render/Perfect the audio: Audio is the backbone of the video that provokes and makes the creation sound perfect and outstanding. 76 in-built audio tracks included in Filmora consisting of tender, sentimental, folk, rock, and young categories.
3. Transform your video with transitions: While various ordinary videos crowd the Internet, make yours unique by transforming them with 3D effects and a slideshow. Filmora comes with 233 transitions like 3D, warp, dissolve & ripple slideshow, lifestyle, and still a lot more.
4. Perform video editing tricks: While trim, cut & merge, crop & flip, resize, delete, and watermark are pre-defined and traditional editing tools, why don’t you try something new like creating freeze frames, accessing sample colors, and zoom in/out timeline where Filmora has a toolkit more than what you expect.
Conclusion
Thanks to the technology behind video reversers like Clideo and Kapwing that does a great job of reversing the YouTube video online quickly. The alternatives YTD downloader and Keepvid also facilitates downloading your favorite videos from 100+ video streaming sites. However, if you aspire to become a creative & professional video creator expert in the field, Filmora from Wondershare stands as the best choice for all. Lastly, also note the tips discussed, and use Filmora today for a brighter career tomorrow.
Richard Bennett
Richard Bennett is a writer and a lover of all things video.
Follow @Richard Bennett
Also read:
- 2024 Approved Amplify Videographic Excellence - Choose From These 7 Audios
- Billion-Views Video Hall YouTube's Top Ever Watches for 2024
- [Updated] Bridging Platforms Loop-Ready Setups for YouTube and TV
- In 2024, ClipMaster Software
- In 2024, Dance Directives Finding Ideal DJ Templates
- [New] Crafting a YouTube Empire 26 Successful Techniques
- 9 Zero Price Programs to Take Your Videos From Average to Amazing
- [New] Effortless Guide for Turning YouTube Shorts Into Mp4 Videos
- How Frequent Uploads Can Skyro Cookie Sales on Your YouTube Channel
- Full Spectrum Review V-Tubers' Industry Landscape
- Bring Your GSlides to Life with YouTube Media
- Easy Techniques for Snagging YouTube Songs and Commentary
- Online Money Tally for YouTube Creators
- How to Share a Private YouTube Video?
- Essential Strategies for Viewing Your Subscribers
- Wow-Tastic Editing YouTube Edition of Greatest Magic Tricks
- Newly Eligible Users See Revenue Uplift
- Charting Your Course Through YouTube Compliance for 2024
- [New] DIY Dynamics Unlock Creative Animation Potential
- Leveraging Jump Cuts to Improve Video Flow
- 2024 Approved Best Alternative Top 10 FLV to YouTube Converter Apps
- In 2024, Elevating YouTube Productions with Effective Video Lighting
- 2024 Approved 15 Inspiring YouTube Guides for Aspiring Singers and Instrumentalists
- Harmonized Title System for Tech Ecosystems
- Efficient Trimming Made Simple with Top 10 Software
- Unlocking AdSense Potential in YouTube Content Creation
- Snapshot Sentence Maker
- Claim Cost-Free Visuals From Highest-Rated 4 YouTube Sources
- [New] Diverse Video Realms Sites Outshining Youtube
- 2024 Approved Educational History Vlogs - The Ultimate List
- 2024 Approved Essential Guide to Upgrade Your Shorts Into Premium Mp4 Files
- 2024 Approved Boost Your Video Impact Expert Tips on Using WM Maker
- Ranked The Best 7 Android AdBlockers for Screen Freedom
- 2024 Approved Ace the Game Crafting a Pro Gaming Channels Success Story
- [New] Clearing Tactics for YouTube's Stored Video Queue
- [New] Customizing Your Watch The Art of Altering YouTube Video Pace
- How to Create a YouTube Account
- Online Broadcast Battle FB LIVE & YT Live Vs. TweetStreams
- 2024 Approved Cash Rides High with Well-Crafted YouTube Shorts
- New In 2024, Quietude Quest A Complete Users Guide to Online Auditory Sanitization
- How to Easily Hard reset my Samsung Galaxy M14 4G | Dr.fone
- How to Unlock Itel A60s Phone without PIN
- 3 Ways to Live Stream on YouTube without 1000 Subscribers
- [Updated] 2024 Approved Capturing Desktop Image in Windows Versions (11-7)
- In 2024, Emojis Revealed A Closer Look at Snapchat's Hidden Language
- New Maximize Your GoPro Experience A Quik Review and Top PC Video Editing Solutions for 2024
- [Updated] Advanced Vision Systems with Green Promise for 2024
- Updated In 2024, Discover the Best Top-Rated Audio Conversion Tools Revealed
- Updated In 2024, Do You Know How AI Is Helping Video Editors and Enthusiasts? Many Video Editing Software Allows an Auto Reframe Option to Use that Can Help Manage Videos
- In 2024, How to Remove a Previously Synced Google Account from Your Vivo V30 Lite 5G
- The Most Useful Tips for Pokemon Go Ultra League On Apple iPhone 6s | Dr.fone
- In 2024, Android Unlock Code Sim Unlock Your Honor V Purse Phone and Remove Locked Screen
- Title: In 2024, Dive Into the World of Interactive Video Features on YouTube
- Author: Brian
- Created at : 2024-05-25 12:11:21
- Updated at : 2024-05-26 12:11:21
- Link: https://youtube-video-recordings.techidaily.com/in-2024-dive-into-the-world-of-interactive-video-features-on-youtube/
- License: This work is licensed under CC BY-NC-SA 4.0.
