
:max_bytes(150000):strip_icc()/find-lost-airpods-58fd18505f9b581d59a66e1d.jpg)
"In 2024, Cutting-Edge, Free, and Easy Top 11 YouTube Title Inventors"
Cutting-Edge, Free, and Easy: Top 11 YouTube Title Inventors
11 Best Free YouTube Name Generators You Should Try

Richard Bennett
Oct 26, 2023• Proven solutions
A YouTube name has great importance for a dedicated YouTuber. Whether you want to hold great brand value in the market or trying to come up with a funny, catchy name, here’s a list of name generator software tools to get you the best YouTube channel name.
There are so many options for personalizing a cool YouTube name so you can get ideas for a catchy name. Check out some of the most commonly used YouTube name generator software that has achieved higher ranking from professionals.
- Part 1: Best 7 Free YouTube Name Generators Online
- Part 2: Best 4 Free YouTube Name Generator Quizzes
Best YouTube Video Editor - Filmora
After you have created your YouTube channel, do you want to edit videos and upload your first video? Here we recommend using Filmora to easily edit YouTube videos.
You can use Filmora to make YouTube videos with built-in royalty-free audio. Filmroa9 also can help you make YouTube intros. It includes more than 500 templates, transition, effects, and text resources.
Filmora is the best choice to make a split-screen and green screen video for YouTubers. Download it now to have a try!


Part 1: Best 7 Free YouTube Name Generators Online
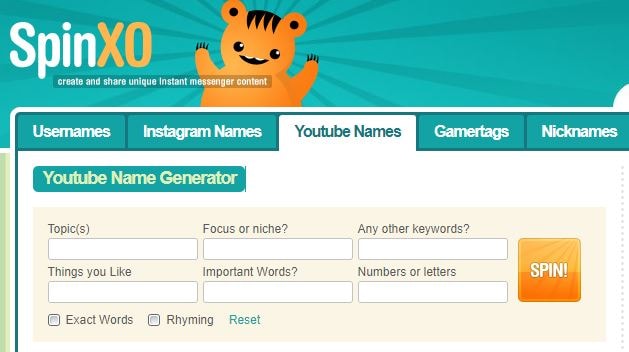
1. Spinxo
This platform allows users to find cool names as per their descriptions for characters, niche, etc. You can start the search with universal keywords as well as with a specific set of details. Spinxo also allows YouTubers to organize contests online to get the best name suggestions.
- Queries Needed: Queries can be raised on the basis of numbers of things you like such as Keywords, Niche, and Topics.
- Best for: Those who have few specific directions about the name.
- No. of Results: 30 names.
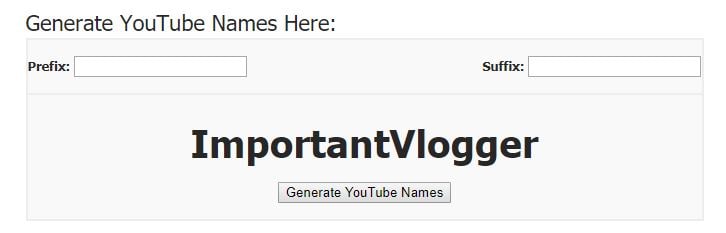
2. Name Generator
This name generator tool allows users to get the best combination of random names where details are more specific to a video related to your works like “vids,” “TV,” “director,” “channel,” etc. Every time you hit the generate button, it will bring out random names for selection.
- Queries Needed: Based on Suffix and Prefix
- Best for: Those who have particular directions with the name.
- No. of Results: 1
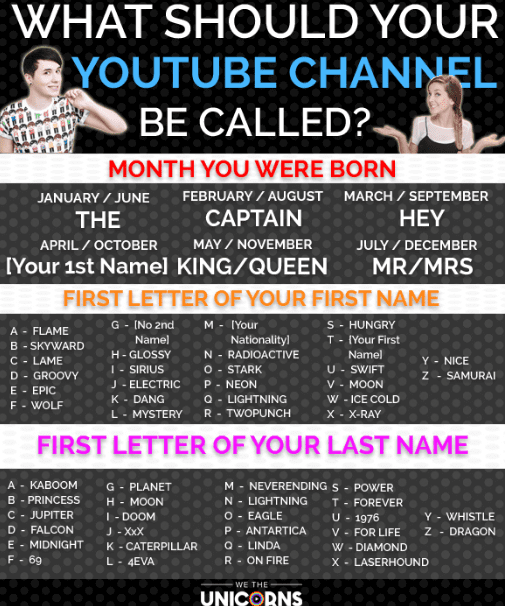
3. We the Unicorns
Here you will get fun-oriented suggestions for your YouTube names and the best part is that they have the ability to attract more audiences towards your platform. It uses details related to your birth, first name, and last name to create funny results.
- Queries Needed: NA
- Best for: Ultimate choice for those who need funny inspirations.
- No. of Results: A lot.
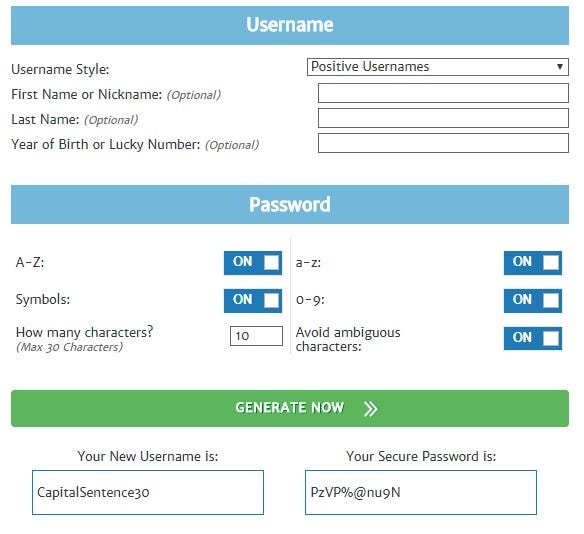
4. Speedy Password
Here you will be able to generate truly random, highly secure, funny passwords along with unique and funny YouTube usernames. Users simply need to update their preferences and it will display the best combinations.
- Queries Needed: Run queries on the basis of Keyword, Lucky Number, and Name Style.
- Best for: Those who follow certain directions for name generations.
- No. of Results: One name and one password.
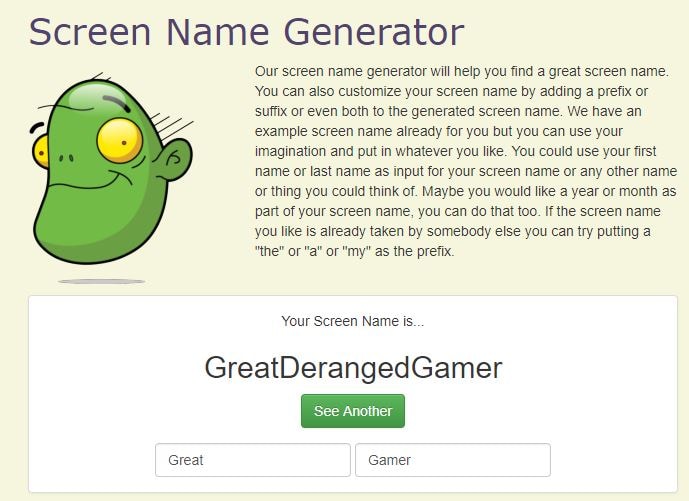
5.Screen Name Generator
Gamers will definitely love this name generator tool that works on the basis of the prefix provided by YouTubers. It has several categories like fantasy name generators, username generators, place name generators, thing name generators, etc.
- Queries Needed: One can enquire with suffix and prefix.
- Best for: Those who have a specific direction and need for the name.
- No. of Results: One name.
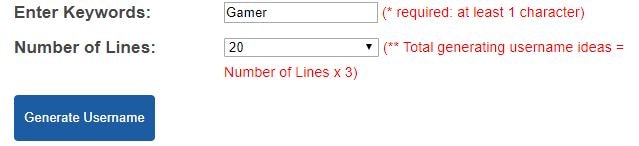
6.Username Generator
Username Generator makes it easier to find game-specific usernames. Users can enter keywords and number of lines as their preferences and soon the software will provide the most appropriate results.
- Queries Needed: Based on the keywords only.
- Best for: those of all genres.
- No. of Results: Hundreds of names.
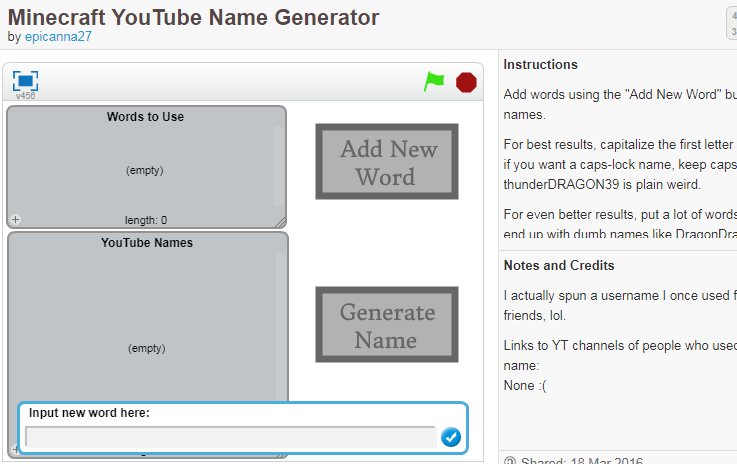
7.Scratch
With this tool, you can get names with caps specifications that look cool. You can pick game highlights for your channel name and in order to get much finer results one can prefer to put several words into the list.
- Queries Needed: Works with keywords only.
- Best for: Those of all genres.
- No. of Results: One name.
Part 2: Best 4 Free YouTube Name Generator Quizzes
8.ProProfs
It will help you get a unique YouTube name that matches your personality and your real name. You will get a kick out of the combination of questions served up in this quiz.
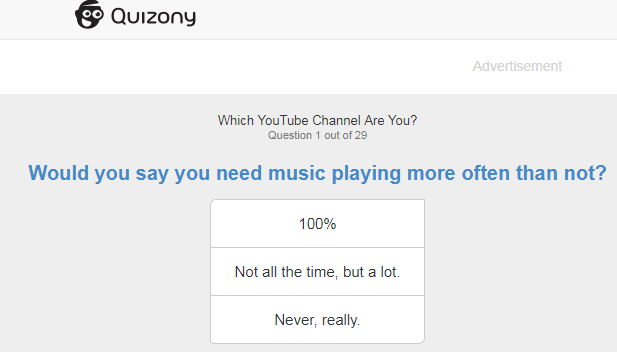
9.Quizony
A set of crazy questions will decide an interesting name for your game channel and it will be definitely loved by viewers.
10.Go to Quiz
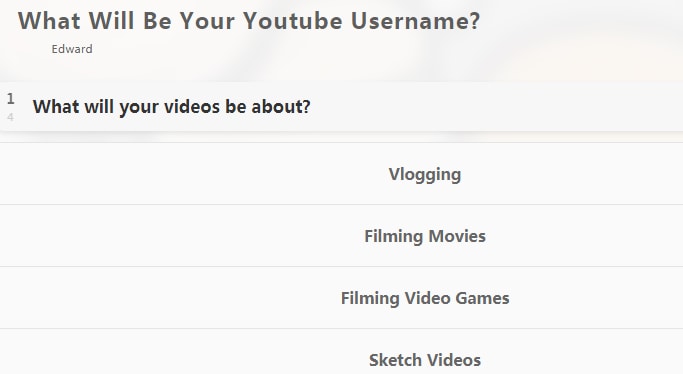
If you want to get rid of boring names and want to switch to something effective based on your hobbies, music preferences, grades and personality then Go to Quiz is the best platform for you.
11.QuizBone
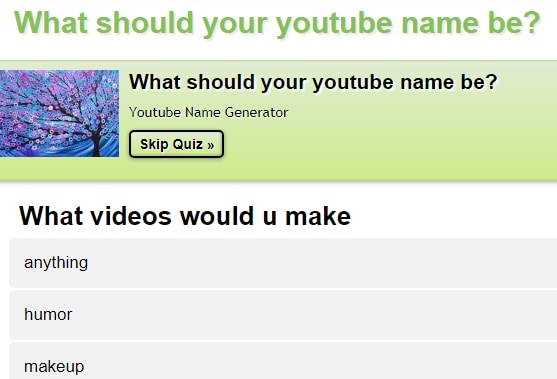
This YouTube name generator first asks you about your video content preferences, whether it is related to beauty, rants, giveaways, makeup, humor, or anything in a wide range and then produces relevant name that suits your personality as per quiz answers,
Think you got a funny or cool channel name? Share in the comments, and tell us if you’ve ever used a free YouTube name generator!
Richard Bennett
Richard Bennett is a writer and a lover of all things video.
Follow @Richard Bennett
Richard Bennett
Oct 26, 2023• Proven solutions
A YouTube name has great importance for a dedicated YouTuber. Whether you want to hold great brand value in the market or trying to come up with a funny, catchy name, here’s a list of name generator software tools to get you the best YouTube channel name.
There are so many options for personalizing a cool YouTube name so you can get ideas for a catchy name. Check out some of the most commonly used YouTube name generator software that has achieved higher ranking from professionals.
- Part 1: Best 7 Free YouTube Name Generators Online
- Part 2: Best 4 Free YouTube Name Generator Quizzes
Best YouTube Video Editor - Filmora
After you have created your YouTube channel, do you want to edit videos and upload your first video? Here we recommend using Filmora to easily edit YouTube videos.
You can use Filmora to make YouTube videos with built-in royalty-free audio. Filmroa9 also can help you make YouTube intros. It includes more than 500 templates, transition, effects, and text resources.
Filmora is the best choice to make a split-screen and green screen video for YouTubers. Download it now to have a try!
Part 1: Best 7 Free YouTube Name Generators Online
1. Spinxo
This platform allows users to find cool names as per their descriptions for characters, niche, etc. You can start the search with universal keywords as well as with a specific set of details. Spinxo also allows YouTubers to organize contests online to get the best name suggestions.
- Queries Needed: Queries can be raised on the basis of numbers of things you like such as Keywords, Niche, and Topics.
- Best for: Those who have few specific directions about the name.
- No. of Results: 30 names.
2. Name Generator
This name generator tool allows users to get the best combination of random names where details are more specific to a video related to your works like “vids,” “TV,” “director,” “channel,” etc. Every time you hit the generate button, it will bring out random names for selection.
- Queries Needed: Based on Suffix and Prefix
- Best for: Those who have particular directions with the name.
- No. of Results: 1
3. We the Unicorns
Here you will get fun-oriented suggestions for your YouTube names and the best part is that they have the ability to attract more audiences towards your platform. It uses details related to your birth, first name, and last name to create funny results.
- Queries Needed: NA
- Best for: Ultimate choice for those who need funny inspirations.
- No. of Results: A lot.
4. Speedy Password
Here you will be able to generate truly random, highly secure, funny passwords along with unique and funny YouTube usernames. Users simply need to update their preferences and it will display the best combinations.
- Queries Needed: Run queries on the basis of Keyword, Lucky Number, and Name Style.
- Best for: Those who follow certain directions for name generations.
- No. of Results: One name and one password.
5.Screen Name Generator
Gamers will definitely love this name generator tool that works on the basis of the prefix provided by YouTubers. It has several categories like fantasy name generators, username generators, place name generators, thing name generators, etc.
- Queries Needed: One can enquire with suffix and prefix.
- Best for: Those who have a specific direction and need for the name.
- No. of Results: One name.
6.Username Generator
Username Generator makes it easier to find game-specific usernames. Users can enter keywords and number of lines as their preferences and soon the software will provide the most appropriate results.
- Queries Needed: Based on the keywords only.
- Best for: those of all genres.
- No. of Results: Hundreds of names.
7.Scratch
With this tool, you can get names with caps specifications that look cool. You can pick game highlights for your channel name and in order to get much finer results one can prefer to put several words into the list.
- Queries Needed: Works with keywords only.
- Best for: Those of all genres.
- No. of Results: One name.
Part 2: Best 4 Free YouTube Name Generator Quizzes
8.ProProfs
It will help you get a unique YouTube name that matches your personality and your real name. You will get a kick out of the combination of questions served up in this quiz.
9.Quizony
A set of crazy questions will decide an interesting name for your game channel and it will be definitely loved by viewers.
10.Go to Quiz
If you want to get rid of boring names and want to switch to something effective based on your hobbies, music preferences, grades and personality then Go to Quiz is the best platform for you.
11.QuizBone
This YouTube name generator first asks you about your video content preferences, whether it is related to beauty, rants, giveaways, makeup, humor, or anything in a wide range and then produces relevant name that suits your personality as per quiz answers,
Think you got a funny or cool channel name? Share in the comments, and tell us if you’ve ever used a free YouTube name generator!
Richard Bennett
Richard Bennett is a writer and a lover of all things video.
Follow @Richard Bennett
Effective Engagement: Incorporating YouTube Videos Into Slides
Create High-Quality Video - Wondershare Filmora
An easy and powerful YouTube video editor
Numerous video and audio effects to choose from
Detailed tutorials provided by the official channel
Google Slide presentation is a powerful tool for creators to keep their audience engaged. This online platform lets you create and demonstrate your ideas. It will capture your viewers’ attention from the very beginning. It also doesn’t matter whatever learning style you engage. Adding YouTube videos to Google Slide will appeal to all levels of individuals.
More so, it is the best way to provide a break for both the audience and the creator. You can break Google Slide presentations with videos to offer some break. Viewers and the presenter get a breather in the process. The presenter can take a short break from speaking while the video plays. Let’s now dive into how to embed a YouTube video in Google Slides.

In this article
01 Why should we add a video to Google Slides?
02 How to add a YouTube video to Google Slide
03 How to choose the right video for your Slides?
Why should we add a video to Google Slides?
There is a great impact of adding video to Google Slides.
For attention
Videos will automatically awaken you, especially if your thoughts have started to sway during a presentation. A video has a direct way of showing creativity. The audience automatically connects the dots between the video and the presentation lines alike.
To stimulate discussion
A picture is worth a thousand words. There is a way that an added video will help the audience connect to the day’s topic. It will bring up several ideas and stir up discussion with the presenter.
Easy following
With videos embedded in Google Slide, viewers will find it easy to understand and digest. Videos automatically eliminate boredom and make any topic interesting.
How to add a YouTube video to Google Slide
Use these two methods to add a YouTube video to Google Slides. Via the Search and Direct link.
Method 1. Embed YouTube video to Google Slide by search and selection
Google has owned YouTube since the year 2006. You can, therefore, integrate Google’s products with YouTube easily.
Step 1. First, go to the slide where you want to embed your video.
Step 2. Then choose the “Insert” option from the menu bar and hit the “Video” option.

Step 3. It would be best if you now viewed the “YouTube” search bar to type in the video you want to embed. You can use keywords to search for the video in question and view instant search results.
Step 4. Then select the video you want to embed, and you’ll see it appear on the “Slide.”

Step 5. Format your video. Remember that the entire video will be embedded. You don’t necessarily need the whole video. It is time to select just a brief but relevant clip from the video to use. Then position your video to the right point using the axes from the exact starting point to the finished part you want the video to appear in.
Method 2. Embed YouTube video to Google Slide by direct link
You can engage this method if you want to include the entire video.
Step 1. Get the URL of the specific YouTube video that you want to use.

Step 2. Then go to your browser’s “Address bar” to copy the YouTube link.
Step 3. Next, open the “Presentation” slide to put your video to.
Step 4. Choose the “Insert” tab from the menu bar.
Step 5. Then hit on the “Video” option from the drop-down menu that appears.
Step 6. A new window will open automatically. Choose the “By URL” tab.
Step 7. Then paste the YouTube video URL in the “Paste YouTube URL Here” bar section.

Step 8. Wait for the video file to load and press the “Select” option. The video will immediately appear in the presentation slide. Just drag and drop the video in your preferred position.
Note: You can do a few edits inside the application. Set the timer when your video should start and when to stop. You can also adjust the video player size.
How to choose the right video for your Slides?
Not all videos will make an impact on your Google Slide. You need to use the best shot that adds value to your presentation. These guidelines will help you to settle on the best video.
Be Professional – choose the best video for your presentation. Remember that the video is part of the presentation and carries more weight. Settling for quality video will bring out the professionalism in you.
Relevant – how do you know that what you are showing your audience corresponds to the presentation piece? Ensure that the video you add has something to do with the Google Slide presentation topic. The two should naturally flow to make it easy to understand the whole concept.
Precise – your presentation is not about the video. The ideal length should not exceed 60 seconds. The longer the video, the greater the chance for your audience to lose track along the way.
Know every footage you are working with – this will help you pick the best shots for your presentation. So, learn every aspect of the video before settling down to use it.
Add new content – even though one content may suit several presentations, don’t rely on the same piece each time. Your audience will want to feel something fresh each time you are presenting. So, compose different videos for different scenarios to make that big impact.
Create an eye-catching video for your Slides with Filmora
The video quality matters when it comes to creating your Slides. The best video creator – Filmora – works in simple steps to give you an eye-catching video. It will create videos for all scenarios like marketing, tutorial, gaming, etc.
Key features of Filmora
- It offers you advanced video effects like filters, motion elements, etc
- You can multiply your fun with multiple screens with the Split Screen feature
- Easily change backgrounds using the Green Screen feature
- The speed control lets you fast forward or slow down a special moment
- Import your video clips to social media platforms
- You can also adjust the audio of your tracks using the Audio Mixer feature
Follow this guide to create a video for your slide with Filmora
Step 1. Launch Filmora
First, begin by downloading and installing Filmora on your computer device. Once installed, launch it and allow it to run. You can either create a new project or open an existing project to work on.
Step 2. Create a new project
Here, click on the “New Project” tab on the app’s welcome screen. The editor should load immediately. Then proceed to register the product. Just hit on the “Register” tab.
Step 3. Import video
Check the upper left corner of your screen to see the “Import” tab. Click on it and choose the “Import Media Files” option. Next, navigate to the location of your computer’s local list to select the clip or video you want to edit. Then, hit the “Import” button to add the video to the timeline for editing.
Step 4. Edit video
Drag and drop the raw footage to Filmora’s timeline to begin editing. Here, you can trim, add other video clips, merge, and add effects as you wish. Likewise, you can add opening titles, subtitles, and end credits to your video. More so, this tool offers different templates to use. Just drag and drop the templates you wish to use to a specific location on the timeline.
Step 5. Preview your file
Last but not least, you can preview your files. Click on the “Play” tab to start previewing your video clips. The main essence of this part is to allow you to make the necessary changes to your clips if there is a need.
Step 6. Export and Share
With Filmora, you can export your file to various social media platforms. But first, go to the “Output window” and select the video file format to use. This software supports several output formats to apply to any platform and device. Just click on the “Format” tab and choose the file format to use. Then also change the resolution and other parameters like frame rate and channel of your video in the “Settings” section. Finally, share your video to your YouTube channel and get ready to add the video to the Google Slide presentation.
For Win 7 or later (64-bit)
For macOS 10.12 or later
Conclusion
● You now know how to put a YouTube video in Google Slides the simple way. You can search for your YouTube videos or directly use the URL link. Whatever the case, remember that it’s the quality of your video that carries more weight. Thanks to the availability of third-party apps that you can use to create and improve the quality of your videos.
● Filmora is at your service to create high-resolution videos that you can export in any format to your YouTube channel. The tool is intuitive, and it won’t matter whether you haven’t tried it before. It is a perfect choice for both professionals and first-time users.
Google Slide presentation is a powerful tool for creators to keep their audience engaged. This online platform lets you create and demonstrate your ideas. It will capture your viewers’ attention from the very beginning. It also doesn’t matter whatever learning style you engage. Adding YouTube videos to Google Slide will appeal to all levels of individuals.
More so, it is the best way to provide a break for both the audience and the creator. You can break Google Slide presentations with videos to offer some break. Viewers and the presenter get a breather in the process. The presenter can take a short break from speaking while the video plays. Let’s now dive into how to embed a YouTube video in Google Slides.
In this article
01 Why should we add a video to Google Slides?
02 How to add a YouTube video to Google Slide
03 How to choose the right video for your Slides?
Why should we add a video to Google Slides?
There is a great impact of adding video to Google Slides.
For attention
Videos will automatically awaken you, especially if your thoughts have started to sway during a presentation. A video has a direct way of showing creativity. The audience automatically connects the dots between the video and the presentation lines alike.
To stimulate discussion
A picture is worth a thousand words. There is a way that an added video will help the audience connect to the day’s topic. It will bring up several ideas and stir up discussion with the presenter.
Easy following
With videos embedded in Google Slide, viewers will find it easy to understand and digest. Videos automatically eliminate boredom and make any topic interesting.
How to add a YouTube video to Google Slide
Use these two methods to add a YouTube video to Google Slides. Via the Search and Direct link.
Method 1. Embed YouTube video to Google Slide by search and selection
Google has owned YouTube since the year 2006. You can, therefore, integrate Google’s products with YouTube easily.
Step 1. First, go to the slide where you want to embed your video.
Step 2. Then choose the “Insert” option from the menu bar and hit the “Video” option.
Step 3. It would be best if you now viewed the “YouTube” search bar to type in the video you want to embed. You can use keywords to search for the video in question and view instant search results.
Step 4. Then select the video you want to embed, and you’ll see it appear on the “Slide.”
Step 5. Format your video. Remember that the entire video will be embedded. You don’t necessarily need the whole video. It is time to select just a brief but relevant clip from the video to use. Then position your video to the right point using the axes from the exact starting point to the finished part you want the video to appear in.
Method 2. Embed YouTube video to Google Slide by direct link
You can engage this method if you want to include the entire video.
Step 1. Get the URL of the specific YouTube video that you want to use.
Step 2. Then go to your browser’s “Address bar” to copy the YouTube link.
Step 3. Next, open the “Presentation” slide to put your video to.
Step 4. Choose the “Insert” tab from the menu bar.
Step 5. Then hit on the “Video” option from the drop-down menu that appears.
Step 6. A new window will open automatically. Choose the “By URL” tab.
Step 7. Then paste the YouTube video URL in the “Paste YouTube URL Here” bar section.
Step 8. Wait for the video file to load and press the “Select” option. The video will immediately appear in the presentation slide. Just drag and drop the video in your preferred position.
Note: You can do a few edits inside the application. Set the timer when your video should start and when to stop. You can also adjust the video player size.
How to choose the right video for your Slides?
Not all videos will make an impact on your Google Slide. You need to use the best shot that adds value to your presentation. These guidelines will help you to settle on the best video.
Be Professional – choose the best video for your presentation. Remember that the video is part of the presentation and carries more weight. Settling for quality video will bring out the professionalism in you.
Relevant – how do you know that what you are showing your audience corresponds to the presentation piece? Ensure that the video you add has something to do with the Google Slide presentation topic. The two should naturally flow to make it easy to understand the whole concept.
Precise – your presentation is not about the video. The ideal length should not exceed 60 seconds. The longer the video, the greater the chance for your audience to lose track along the way.
Know every footage you are working with – this will help you pick the best shots for your presentation. So, learn every aspect of the video before settling down to use it.
Add new content – even though one content may suit several presentations, don’t rely on the same piece each time. Your audience will want to feel something fresh each time you are presenting. So, compose different videos for different scenarios to make that big impact.
Create an eye-catching video for your Slides with Filmora
The video quality matters when it comes to creating your Slides. The best video creator – Filmora – works in simple steps to give you an eye-catching video. It will create videos for all scenarios like marketing, tutorial, gaming, etc.
Key features of Filmora
- It offers you advanced video effects like filters, motion elements, etc
- You can multiply your fun with multiple screens with the Split Screen feature
- Easily change backgrounds using the Green Screen feature
- The speed control lets you fast forward or slow down a special moment
- Import your video clips to social media platforms
- You can also adjust the audio of your tracks using the Audio Mixer feature
Follow this guide to create a video for your slide with Filmora
Step 1. Launch Filmora
First, begin by downloading and installing Filmora on your computer device. Once installed, launch it and allow it to run. You can either create a new project or open an existing project to work on.
Step 2. Create a new project
Here, click on the “New Project” tab on the app’s welcome screen. The editor should load immediately. Then proceed to register the product. Just hit on the “Register” tab.
Step 3. Import video
Check the upper left corner of your screen to see the “Import” tab. Click on it and choose the “Import Media Files” option. Next, navigate to the location of your computer’s local list to select the clip or video you want to edit. Then, hit the “Import” button to add the video to the timeline for editing.
Step 4. Edit video
Drag and drop the raw footage to Filmora’s timeline to begin editing. Here, you can trim, add other video clips, merge, and add effects as you wish. Likewise, you can add opening titles, subtitles, and end credits to your video. More so, this tool offers different templates to use. Just drag and drop the templates you wish to use to a specific location on the timeline.
Step 5. Preview your file
Last but not least, you can preview your files. Click on the “Play” tab to start previewing your video clips. The main essence of this part is to allow you to make the necessary changes to your clips if there is a need.
Step 6. Export and Share
With Filmora, you can export your file to various social media platforms. But first, go to the “Output window” and select the video file format to use. This software supports several output formats to apply to any platform and device. Just click on the “Format” tab and choose the file format to use. Then also change the resolution and other parameters like frame rate and channel of your video in the “Settings” section. Finally, share your video to your YouTube channel and get ready to add the video to the Google Slide presentation.
For Win 7 or later (64-bit)
For macOS 10.12 or later
Conclusion
● You now know how to put a YouTube video in Google Slides the simple way. You can search for your YouTube videos or directly use the URL link. Whatever the case, remember that it’s the quality of your video that carries more weight. Thanks to the availability of third-party apps that you can use to create and improve the quality of your videos.
● Filmora is at your service to create high-resolution videos that you can export in any format to your YouTube channel. The tool is intuitive, and it won’t matter whether you haven’t tried it before. It is a perfect choice for both professionals and first-time users.
Also read:
- [New] Enhancing YouTube Presence with Strategic Banners
- TV-Ready Recycling Replay YouTube Videos Efficiently
- How to Create a YouTube Account
- Enhance Privacy & Speed The Best 7 Android AdBlocks for 2024
- Free Uploads, More Views YouTube's Easily Overlooked Hacks
- [New] Deciphering YouTube's Subscriber Code
- Step-by-Step Process to Craft Memorable GIFs From Any YouTube Video on Devices
- 2024 Approved Elevate Your Content PC Video Editing for Effective YouTube Presentations
- Strategic Trailer Planning for Increased Channels' Profitability
- Crafting Powerful Partnerships A Guide to Choosing YouTube Allies for 2024
- Comprehensive Guide to YouTube's Best Anime Stations for 2024
- Enhance TV Screens With Automatic Loops of YouTube
- In 2024, Boost Engagement with Tailored Templates for Video Info
- Attract More Viewers Crafting Impressive Youtube Description with Custom Templates
- Engaging Audiences Triad of Effective Storytelling
- The Ultimate Guide to YouTube Keywords for Peak Performance
- [New] Dancing to the Tune YouTube's Hottest Music Video Responses, '23
- Boost Engagement with Tailored Templates for Video Info
- Get More Views with the Best YouTube Thumbnail Ideas
- 2024 Approved Add Visual Appeal with These Methods for YT Video Inclusion in PPT
- In 2024, Captivating Channels Spotlight on the Most Popular Female Creators
- In 2024, Conquering Cross-Platform Content Sharing YouTubes & FBs
- [New] A Guide to the Best Bridal Films (8 From YouTube + Vimeo)
- Enhance Your Channel's Voice Dive Into the World of Banner Makers (Apps) for 2024
- [Updated] Elevating Your Vlogs A List of the Top 12 Professional Cameras
- Blitz Broadcasting Channel Your Playlist Swiftly for 2024
- Dominating the Index YouTube SEO Tools That Work
- Compiling Leading Short-Form Video Editors IOS/Android Edition
- 2024 Approved Essential Guide to Mounting a Tripod for Vloggers
- In 2024, Eliminating Backlogged Videos From Your YouTube History
- Design Principles for Orderly YouTube Broadcasts
- In 2024, Efficient YouTube Ad Blocking on Chrome/Firefox/Android Devices
- Making an Impact Integrating Individual Thumbnails in Videos
- In 2024, Apex Top YouTube Videos Watch Count Heaven
- [Updated] 10 Essential Vlog Editing Hacks for Novice Creators
- Mindful Moments Elite Yoga Routines for Serenity
- [Updated] Discovering Top 10 Must-Watch Business Video Hubs
- [Updated] Crafting Closure Secrets of Spectacative Video Sign-Offs
- Elevate Video Popularity with Strategic #Hashtags for 2024
- [New] Escape the Top Chart Unexpected Flick Winners
- Best Tools for Transforming Your Spotify Mixes Into YouTube Channels
- Discovering Your Customized YouTube Playlist for 2024
- The Ultimate Guide to YouTube's Best VR Video Sets
- [New] Connecting YouTube & TikTok Your Ultimate Step-by-Step Walkthrough
- In 2024, Boosting Video Appeal Implementing Neon Borders in Thumbnails
- In 2024, Engaging Audienranz with Solo Visual Content
- A New Take on Favorite Movies - #7 Alternatives for 2024
- In 2024, 2 Ways to Monitor Nokia 150 (2023) Activity | Dr.fone
- How to Fake Snapchat Location without Jailbreak On Realme 12 Pro+ 5G | Dr.fone
- [New] Instagram Story Upgrade How to Add Music Effectively for 2024
- In 2024, All You Need To Know About Mega Greninja For Apple iPhone 14 Pro | Dr.fone
- [Updated] In 2024, Harvesting Hours Top 10 Friendly Farm Gaming Experiences
- In 2024, Premium 5 Dynamic Logo Animation Portfolios
- [Updated] Transform Your IGTV Videos with Top 10 Video Editors
- [Updated] Ultimate Guide to Gameplay in Simulated Liquids
- [Updated] In 2024, Tailored Video Edits for Exceptional Vimeo Content
- [New] In 2024, The Essential Guide to 15 Top Instagram Downloader Apps
- Is Your iPhone 6s Plus in Security Lockout? Proper Ways To Unlock
- All Things You Need to Know about Wipe Data/Factory Reset For OnePlus Ace 2V | Dr.fone
- In 2024, Top 9 Oppo Reno 11 5G Monitoring Apps for Parental Controls | Dr.fone
- [Updated] In 2024, Enhancing Chrome Performance for HD Facebook Content
- 10 Best Mobile Writing Tools for iOS/Android Images for 2024
- [Updated] In 2024, EliteMac Pro High-Definition Visuals + Audiophile Recordings
- Pokémon Go Cooldown Chart On Vivo V27 Pro | Dr.fone
- [New] Flavors Unleashed Premier TikTok Food Creators
- In 2024, Navigating Live TikTok Broadcasting on Your Computer
- Delete Gmail Account With/Without Password On Motorola Moto G13
- Boosting Engagement Learning to Modify Account Numbers
- [New] Unveiling the Best Practices in Recording Games on Steam
- Paws and Play Android’s Animal Simulator Choices
- A Detailed Analysis DJi's Raptor 4 VR Goggle Features
- How to Repair corrupt MP4 and MOV files of Poco M6 Pro 5G using Video Repair Utility on Mac?
- Video Excellence Redefined Smartphones That Deliver With Premium Stabilization
- Updated The Complete AIFF Converter Resource Tips, Tricks, and Recommendations for 2024
- In 2024, Boosting Your Voice's Impact – Free, User-Friendly Changes Available
- 2024 Approved Buggy FCPX? Reset and Reboot A Quick Fix for Common Problems
- [New] 2024 Approved Best of the Best Windows 11 Webcams for Recording
- [New] Becoming Professionally Active Registering a Business on IG
- Latest Guide How To Bypass Gionee F3 Pro FRP Without Computer
- How To Get Out of Recovery on iPhone 6s? | Dr.fone
- Title: "In 2024, Cutting-Edge, Free, and Easy Top 11 YouTube Title Inventors"
- Author: Brian
- Created at : 2024-05-25 12:08:59
- Updated at : 2024-05-26 12:08:59
- Link: https://youtube-video-recordings.techidaily.com/in-2024-cutting-edge-free-and-easy-top-11-youtube-title-inventors/
- License: This work is licensed under CC BY-NC-SA 4.0.
