
:max_bytes(150000):strip_icc()/GettyImages-578188655-5859a6685f9b586e028a9c96.jpg)
"In 2024, Cross-Platform Creative Dimensioning Techniques"
Cross-Platform Creative Dimensioning Techniques
Versatile Video Editor - Wondershare Filmora
An easy yet powerful editor
Numerous effects to choose from
Detailed tutorials provided by the official channel
The vertical video went to a mainstream media style. Nowadays, it’s common for online video, especially on social apps. Mobile video has become the most common way to watch online videos. It makes sense then that vertical is the preferred familiarization for videos. Users don’t want to twist their phones to watch a 30-second ad. Knowing YouTube shorts vertical size is important as well as Facebook vertical video specs.
Social juggernauts like Facebook and YouTube have adopted vertical video size or formats in current years. The newer social apps, like Snapchat and TikTok, use vertical video completely. While most platforms now prefer vertical video, they each have different patterns. Even Instagram vertical video dimensions premiere is different.
Users tinkering in video marketing know it’s essential to stay updated on social media video sizes across all platforms. But, we also know that it is time-consuming to dig through each technical specification of each social app. For that purpose, we have covered all network video sizes for each platform. So, browse the table of contents below and find the video dimensions, aspect ratios, and file sizes you need.
In this article
01 [What Vertical Video Size Do We Usually Use?](#Part 1)
02 [Vertical Video Dimension for Different Social Apps](#Part 2)
03 [Tips: How to Adjust Vertical Videos Size](#Part 3)
Part 1 What Vertical Video Size Do We Usually Use?
Videos come in different sizes. However, one principle is standard in creating them, the vertical video aspect ratio (width to height). This refers to how you compare and create the video height to video ratio (how you intend to record and produce your video).
Ideally, it is what you and viewers will see while watching your video. To create a perfect video, any video creator should decide on the relationship between the video height and width.
When creating YouTube vertical video dimensions, the width is usually longer than the height. Most television videos have a standard ratio of 4:3 and 16:9. However, social media videos are created using a 1:1 and 9:16 ratio.

A smartphone can shoot vertical videos perfectly, but some media players like cameras require editing and adjusting the sizes to get the correct aspect ratio. Experts won’t have difficulties adjusting horizontally shot videos, but an amateur will. Fortunately, you can avoid taking unprofessional shoots by focusing on the frame’s center to capture your subject wholly without clipping important aspects. While editing Facebook vertical video dimensions and other social apps, the results could vary depending on the editing software. But you can rotate the video within the software to get the correct dimensions lest you get ugly videos full of black backgrounds filling the frame.
Most cameras and video recorders have inbuilt settings that switch to aspect ratio when you start recording. And the good thing is that you can adjust the settings to your desired dimensions in the settings section. If you are shooting a vertical video without a preset aspect ratio, then:
- Shoot gently without switching your camera horizontally, especially if you are capturing a narrow view.
- Avoid fast spans as it appears intense on the camera that could result in blurry animations.
- Focus on what you are capturing, and if need be, zoom in to capture every essential detail.
The importance of applying aspect ratio in videos is to ensure your images and videos have excellent resolution. This way, you have a chance to present (market) your idea professionally.
Part 2 Vertical Video Dimension for Different Social Apps
Here is a guide on how to shoot vertical dimensions for various social apps –
1. YouTube Vertical Video Dimension Guide
It is common for viewers to switch to YouTube and watch videos, and this is why you need the work on the perfect YouTube vertical video size. Initially, you could display YouTube videos in different dimensions, but this is no longer the case since the app’s dynamic innovation to view animations in preferred sizes.

Usually, YouTube videos are recorded at a standard aspect ratio of 16: 9. It means that you cannot customize the dimensions as this is this ratio is the default.
Though the 16:9 dimensions are standard, you can also shoot your videos using different ratios like 1:1 (square), 4:3, or 9:16 (vertically). In this case, your video will fit different YouTube videos on each device but will display white or grey padding on the frames by default.
Manually adding padding to your videos reduces the ability to adjust them to different ratios on various devices. If you are yet to switch to YouTube vertical video dimensions, you are missing to increase brand awareness.
2. Facebook Vertical Video Dimension Guide
Facebook vertical video specs have mainly been using the 16:9 ratio. And since the app attracts billions of global users, it’s high time to optimize your snapshots and try posting in different formats.

For your next FB vertical video size for feed videos, think of square snapshots (1:1), 2:3, 4:5, or 16:9. If you love creating Facebook stories, you can stick to the 9:16 ratio. And for Facebook live videos, stick with the Facebook video vertical size, 16:9 dimensions. Note that most Facebook video posts will automatically have a standard measurement of 16:9.
3. Instagram Vertical Video Dimensions Guide
Since the inception of Instagram vertical video dimensions premiere, the ratio has always been 1:1. This dimension makes it optimal for phones and small-sized screens. Here is the ultimate guide for your new Instagram animations:
- 1:1 for square videos.
- 4:5 for portrait shots.
- 9:16 when shooting vertical animations.
If you are going live on Instagram, we recommend 9:16, while you can shoot in 1:1, 4:5, and 16:9 ratios for feed videos. For Instagram stories, we suggest 9:16, but you can always work around 1:1, 4:9, and 16:9.

4. Twitter Vertical Video Dimension Guide
Twitter is quite different when considering feed video dimensions; portrait and square. The former (portrait) is a favorite for ads and marketing videos display (increase brand visibility), whereas the latter is perfect for displaying videos on multiple devices.
Twitter videos can be perfect in the below dimensions:
- Promotional video ads 1:2 39 to 2.39:1
- Six-second short ads 1:2.39 – 2.39:1
- First video ads 1:2.39 – 2.39:1
- Personal portrait (vertical) videos 9:16
- Personal horizontal animations 1:2.39 – 2.39:1

5. WhatsApp Vertical Video Dimension Guide
Most people don’t know the importance of resizing WhatsApp videos. Sharing videos on your WhatsApp status is a marketing strategy, but you must resize your videos well. Most video WhatsApp vertical videos have 4:3 dimensions and a 1080 × 1920 pixels size.
Part 3 Tips: How to Adjust Vertical Videos Size
The smartphone has become the primary tool for taking photos or recording videos, but we hold our mobile phone in a different direction while shooting videos, which causes the wrong adjustment while uploading it. Fortunately, there are ways, and your video can fit any screen without any compromises. Bellow, we are going to tell you two methods to adjust vertical video size
Method 1: Filmora
Filmora allows users to rotate your video to any point they want. What’s more, you can zoom in or crop the undesired parts in the video with a snap. It also offers you preset aspect ratios like 16:9, 9:16; 4:5, 1:1, etc., to help you quickly find the perfect aspect ratio for YouTube, Instagram, and other social apps. Let’s see how to change video adjustment in Filmora.
How to crop aspect ratio at the starting interface:
In this method, you must upload the animation first. Follow these steps:
Step 1: Upload your video into the editing panel.
Step2: Scroll to the drop-down menu to see various dimensions (1:1. 4:3, 9:16, 16:9, and 21:9).
Step3: Select the desired ratio and apply.

Modifying aspect ratio in project settings:
This method allows you to preset the ratios before uploading your media. Most files are preset to a 4:3 ratio, but you can adjust as you wish. Note that uploading a video with other aspect ratios will automatically switch to the default one. However, you can change the ratio by clicking on the project settings tab.

Changing aspect ratio when editing:
You can crop your video after importing it to the Filmora panel using the crop and zoom tools.
Step 1: Right-click on the file in the panel.
Step 2: Select crop and zoom.
Step 3: Click on the desired ratio from the suggestions (16:9, 4:3, 1:1, and 9:16) and confirm the action by clicking OK.

You can also modify the aspect ratio manually, add filters, and blur the background to enhance resolution when editing.
Auto reframing:
Latest Filmora running versions like V10.5 have the auto-reframe feature that can help crop aspect ratio seamlessly. The good thing about this feature is that it detects any object and can remove it if need be. Plus, this video editor also comes with preset aspect ratios that conveniently suit different social apps.
You can auto reframe by:
Step 1: Import the video to the panel. Right-click on the file and select the auto-reframe icon.

Step 2: Choose the desired aspect ratio.

Step 3: Click the analyze icon and wait for the results in a preview window.
Step 4: Adjust the frame by dragging the box to balance the object or leave it if you love the results.

Step 5: When done, rename it and click the export feature to save your new file.

Step 6: Edit (add effects) as desired.
Modifying aspect ratio when exporting:
After saving your file, you can export it to your desired media display device and change the aspect ratio based on your platform settings, as discussed above.

Method 2: Final Cut Pro
Apple’s Final Cut Pro is a compelling software for video editing and compositing. The interface is designed similar with many other video editing programs such as Adobe Premiere and Combustion etc.
To prepare:
- Take vertical videos.
- Connect iPhone to an editing system.
- Enter a password on the iPhone.
- Started Final Cut Pro.
- Create a new library, named it “Vertical Video”.
Steps to adjust vertical video size with Final cut pro:
Step 1: To import the video clip, you want to edit, click on the File > Import Media. The connected iPhone screen appears in the top left corner. The circle icon shows that FCP is still collecting data from the phone and the pointing arrow allows to disconnect.
Step 2: When the iPhone is chosen in the sidebar, thumbnails appear at the bottom of the Media Import window. For example, you can see the four vertical video clips, choose one to edit.
Step 3: The iPhone compresses MP4 video. While editing a simple project, you don’t need to generate optimized media. However, optimizing media will save you time in the long run if you plan to add lots of effects.
Step 4: Now, generate a new project and apply the Automatic settings.
Step 5: Next, edit a vertical clip into the empty new project. Even if this isn’t the first clip you want the audience to see, it is essential because FCP uses this clip to configure the project settings.
Step 6: When that first video clip is edited into the timeline, this dialog arrives. Note that the frame size is already fixed by the size of the video you shot on the iPhone. Don’t change any settings. It allows FCP to automatically configure the project to match the specs of this clip. If you’ve done this correctly, your clip appears vertically in the Viewer.
Wondershare Filmora
Get started easily with Filmora’s powerful performance, intuitive interface, and countless effects!
Try It Free Try It Free Try It Free Learn More >

AI Portrait – The best feature of Wondershare Filmora for gameplay editing
The AI Portrait is a new add-on in Wondershare Filmora. It can easily remove video backgrounds without using a green screen or chroma key, allowing you to add borders, glitch effects, pixelated, noise, or segmentation video effects.

Conclusion
As you can tell, video dimensions significantly influence your media resolution and impact. Aspect ratio is the standard way to modify your media to fit YouTube, Instagram, Facebook, and other social apps. Changing dimensions is a DIY process; you can edit YouTube vertical video dimensions and other social apps like Facebook and Instagram through Filmora or Final Cut Pro.
The vertical video went to a mainstream media style. Nowadays, it’s common for online video, especially on social apps. Mobile video has become the most common way to watch online videos. It makes sense then that vertical is the preferred familiarization for videos. Users don’t want to twist their phones to watch a 30-second ad. Knowing YouTube shorts vertical size is important as well as Facebook vertical video specs.
Social juggernauts like Facebook and YouTube have adopted vertical video size or formats in current years. The newer social apps, like Snapchat and TikTok, use vertical video completely. While most platforms now prefer vertical video, they each have different patterns. Even Instagram vertical video dimensions premiere is different.
Users tinkering in video marketing know it’s essential to stay updated on social media video sizes across all platforms. But, we also know that it is time-consuming to dig through each technical specification of each social app. For that purpose, we have covered all network video sizes for each platform. So, browse the table of contents below and find the video dimensions, aspect ratios, and file sizes you need.
In this article
01 [What Vertical Video Size Do We Usually Use?](#Part 1)
02 [Vertical Video Dimension for Different Social Apps](#Part 2)
03 [Tips: How to Adjust Vertical Videos Size](#Part 3)
Part 1 What Vertical Video Size Do We Usually Use?
Videos come in different sizes. However, one principle is standard in creating them, the vertical video aspect ratio (width to height). This refers to how you compare and create the video height to video ratio (how you intend to record and produce your video).
Ideally, it is what you and viewers will see while watching your video. To create a perfect video, any video creator should decide on the relationship between the video height and width.
When creating YouTube vertical video dimensions, the width is usually longer than the height. Most television videos have a standard ratio of 4:3 and 16:9. However, social media videos are created using a 1:1 and 9:16 ratio.
A smartphone can shoot vertical videos perfectly, but some media players like cameras require editing and adjusting the sizes to get the correct aspect ratio. Experts won’t have difficulties adjusting horizontally shot videos, but an amateur will. Fortunately, you can avoid taking unprofessional shoots by focusing on the frame’s center to capture your subject wholly without clipping important aspects. While editing Facebook vertical video dimensions and other social apps, the results could vary depending on the editing software. But you can rotate the video within the software to get the correct dimensions lest you get ugly videos full of black backgrounds filling the frame.
Most cameras and video recorders have inbuilt settings that switch to aspect ratio when you start recording. And the good thing is that you can adjust the settings to your desired dimensions in the settings section. If you are shooting a vertical video without a preset aspect ratio, then:
- Shoot gently without switching your camera horizontally, especially if you are capturing a narrow view.
- Avoid fast spans as it appears intense on the camera that could result in blurry animations.
- Focus on what you are capturing, and if need be, zoom in to capture every essential detail.
The importance of applying aspect ratio in videos is to ensure your images and videos have excellent resolution. This way, you have a chance to present (market) your idea professionally.
Part 2 Vertical Video Dimension for Different Social Apps
Here is a guide on how to shoot vertical dimensions for various social apps –
1. YouTube Vertical Video Dimension Guide
It is common for viewers to switch to YouTube and watch videos, and this is why you need the work on the perfect YouTube vertical video size. Initially, you could display YouTube videos in different dimensions, but this is no longer the case since the app’s dynamic innovation to view animations in preferred sizes.
Usually, YouTube videos are recorded at a standard aspect ratio of 16: 9. It means that you cannot customize the dimensions as this is this ratio is the default.
Though the 16:9 dimensions are standard, you can also shoot your videos using different ratios like 1:1 (square), 4:3, or 9:16 (vertically). In this case, your video will fit different YouTube videos on each device but will display white or grey padding on the frames by default.
Manually adding padding to your videos reduces the ability to adjust them to different ratios on various devices. If you are yet to switch to YouTube vertical video dimensions, you are missing to increase brand awareness.
2. Facebook Vertical Video Dimension Guide
Facebook vertical video specs have mainly been using the 16:9 ratio. And since the app attracts billions of global users, it’s high time to optimize your snapshots and try posting in different formats.
For your next FB vertical video size for feed videos, think of square snapshots (1:1), 2:3, 4:5, or 16:9. If you love creating Facebook stories, you can stick to the 9:16 ratio. And for Facebook live videos, stick with the Facebook video vertical size, 16:9 dimensions. Note that most Facebook video posts will automatically have a standard measurement of 16:9.
3. Instagram Vertical Video Dimensions Guide
Since the inception of Instagram vertical video dimensions premiere, the ratio has always been 1:1. This dimension makes it optimal for phones and small-sized screens. Here is the ultimate guide for your new Instagram animations:
- 1:1 for square videos.
- 4:5 for portrait shots.
- 9:16 when shooting vertical animations.
If you are going live on Instagram, we recommend 9:16, while you can shoot in 1:1, 4:5, and 16:9 ratios for feed videos. For Instagram stories, we suggest 9:16, but you can always work around 1:1, 4:9, and 16:9.
4. Twitter Vertical Video Dimension Guide
Twitter is quite different when considering feed video dimensions; portrait and square. The former (portrait) is a favorite for ads and marketing videos display (increase brand visibility), whereas the latter is perfect for displaying videos on multiple devices.
Twitter videos can be perfect in the below dimensions:
- Promotional video ads 1:2 39 to 2.39:1
- Six-second short ads 1:2.39 – 2.39:1
- First video ads 1:2.39 – 2.39:1
- Personal portrait (vertical) videos 9:16
- Personal horizontal animations 1:2.39 – 2.39:1
5. WhatsApp Vertical Video Dimension Guide
Most people don’t know the importance of resizing WhatsApp videos. Sharing videos on your WhatsApp status is a marketing strategy, but you must resize your videos well. Most video WhatsApp vertical videos have 4:3 dimensions and a 1080 × 1920 pixels size.
Part 3 Tips: How to Adjust Vertical Videos Size
The smartphone has become the primary tool for taking photos or recording videos, but we hold our mobile phone in a different direction while shooting videos, which causes the wrong adjustment while uploading it. Fortunately, there are ways, and your video can fit any screen without any compromises. Bellow, we are going to tell you two methods to adjust vertical video size
Method 1: Filmora
Filmora allows users to rotate your video to any point they want. What’s more, you can zoom in or crop the undesired parts in the video with a snap. It also offers you preset aspect ratios like 16:9, 9:16; 4:5, 1:1, etc., to help you quickly find the perfect aspect ratio for YouTube, Instagram, and other social apps. Let’s see how to change video adjustment in Filmora.
How to crop aspect ratio at the starting interface:
In this method, you must upload the animation first. Follow these steps:
Step 1: Upload your video into the editing panel.
Step2: Scroll to the drop-down menu to see various dimensions (1:1. 4:3, 9:16, 16:9, and 21:9).
Step3: Select the desired ratio and apply.
Modifying aspect ratio in project settings:
This method allows you to preset the ratios before uploading your media. Most files are preset to a 4:3 ratio, but you can adjust as you wish. Note that uploading a video with other aspect ratios will automatically switch to the default one. However, you can change the ratio by clicking on the project settings tab.
Changing aspect ratio when editing:
You can crop your video after importing it to the Filmora panel using the crop and zoom tools.
Step 1: Right-click on the file in the panel.
Step 2: Select crop and zoom.
Step 3: Click on the desired ratio from the suggestions (16:9, 4:3, 1:1, and 9:16) and confirm the action by clicking OK.
You can also modify the aspect ratio manually, add filters, and blur the background to enhance resolution when editing.
Auto reframing:
Latest Filmora running versions like V10.5 have the auto-reframe feature that can help crop aspect ratio seamlessly. The good thing about this feature is that it detects any object and can remove it if need be. Plus, this video editor also comes with preset aspect ratios that conveniently suit different social apps.
You can auto reframe by:
Step 1: Import the video to the panel. Right-click on the file and select the auto-reframe icon.
Step 2: Choose the desired aspect ratio.
Step 3: Click the analyze icon and wait for the results in a preview window.
Step 4: Adjust the frame by dragging the box to balance the object or leave it if you love the results.
Step 5: When done, rename it and click the export feature to save your new file.
Step 6: Edit (add effects) as desired.
Modifying aspect ratio when exporting:
After saving your file, you can export it to your desired media display device and change the aspect ratio based on your platform settings, as discussed above.
Method 2: Final Cut Pro
Apple’s Final Cut Pro is a compelling software for video editing and compositing. The interface is designed similar with many other video editing programs such as Adobe Premiere and Combustion etc.
To prepare:
- Take vertical videos.
- Connect iPhone to an editing system.
- Enter a password on the iPhone.
- Started Final Cut Pro.
- Create a new library, named it “Vertical Video”.
Steps to adjust vertical video size with Final cut pro:
Step 1: To import the video clip, you want to edit, click on the File > Import Media. The connected iPhone screen appears in the top left corner. The circle icon shows that FCP is still collecting data from the phone and the pointing arrow allows to disconnect.
Step 2: When the iPhone is chosen in the sidebar, thumbnails appear at the bottom of the Media Import window. For example, you can see the four vertical video clips, choose one to edit.
Step 3: The iPhone compresses MP4 video. While editing a simple project, you don’t need to generate optimized media. However, optimizing media will save you time in the long run if you plan to add lots of effects.
Step 4: Now, generate a new project and apply the Automatic settings.
Step 5: Next, edit a vertical clip into the empty new project. Even if this isn’t the first clip you want the audience to see, it is essential because FCP uses this clip to configure the project settings.
Step 6: When that first video clip is edited into the timeline, this dialog arrives. Note that the frame size is already fixed by the size of the video you shot on the iPhone. Don’t change any settings. It allows FCP to automatically configure the project to match the specs of this clip. If you’ve done this correctly, your clip appears vertically in the Viewer.
Wondershare Filmora
Get started easily with Filmora’s powerful performance, intuitive interface, and countless effects!
Try It Free Try It Free Try It Free Learn More >
AI Portrait – The best feature of Wondershare Filmora for gameplay editing
The AI Portrait is a new add-on in Wondershare Filmora. It can easily remove video backgrounds without using a green screen or chroma key, allowing you to add borders, glitch effects, pixelated, noise, or segmentation video effects.
Conclusion
As you can tell, video dimensions significantly influence your media resolution and impact. Aspect ratio is the standard way to modify your media to fit YouTube, Instagram, Facebook, and other social apps. Changing dimensions is a DIY process; you can edit YouTube vertical video dimensions and other social apps like Facebook and Instagram through Filmora or Final Cut Pro.
Mastery Guide to YouTube SEO: Title, Tagging & Description Tactics
How to Optimize YouTube Tags/Title/Description for More Views

Richard Bennett
Mar 27, 2024• Proven solutions
Making awesome video content is just the first hurdle to overcome. Getting people to watch them is the next and a much bigger obstacle in your path. Just as a blogger must work hard to get people to read their blog, so a YouTuber needs to find ways to get more views on their videos.
For any piece of content on the internet, discoverability is key to exposure. After all, nobody will watch your video or read your blog if they can’t find it, right? A blogger would do this by lacing their content with SEO - search engine optimization. But how can a YouTuber do the same? The answer lies in something known as YouTube tags optimization. In this article, we will let you know how to add, edit and optimize YouTube tags easily for more views, and some tips on YouTube title and description.
Quick Jump Menu
- What are YouTube tags and why they are so important
- How to come up with YouTube tags and optimize them
- How to Tag YouTube and Add Title, Description
- How to Improve YouTube video Metadata: Tags, Title, Description
- Tips for Tagging YouTube and Writing Title, Description
Before we get started, I want to recommend the best video editing software for YouTubers - Wondershare Filmora , an easy to use while powerful video editor that allows you not only to cut, split, crop, resize, reverse your videos, but also offers you multiple video effects specially designed for Fashion, Beauty, Gaming, Travel, Education, etc. Check the video to know more fantastic features:
 Download Mac Version ](https://tools.techidaily.com/wondershare/filmora/download/ )
Part 1: What are YouTube tags and why they are so important
YouTube tags are used when you upload a video on YouTube. You need to specify the type of video. In other words, you need to describe your video with keywords. But you might think about why you need to add these words. YouTube can’t figure out what my videos are about? Unfortunately, YouTube can’t though its algorithm is much more advanced than before.
You must know the competition between videos is furious since 500 hours of video per minute are uploaded on YouTube . In this case, it is important to let the YouTube algorithm know your video by adding related tags to have a higher ranking. So the better tags we choose, the higher chance to rank in the top 1, which means you will get more views!
Using YouTube meta tags wisely can broaden your reach and help new people discover your content. However, don’t be tempted to insert irrelevant tags just because you know they are high traffic. You will be found out and penalized as a result. Just as you did with your description, research your keywords, place the most important ones first and use as many as you can.
What are the three YouTube tag types?
YouTube has three different types of tags and each of them has a specific purpose. The tags are-
Specific – The specific tag types are keywords-oriented. These keywords specifically pertain to the content of your video. In this tag type, the particular video is highlighted with the keyword tags. Often while typing the keywords in your mind, YouTube suggests phrases and keywords according to the content of your video. You may apply the suggestions and also add more general or common versions of the same keywords.
Compound – The compound tags are usually using more than two words. Many a time it is seen that users prefer tagging the complete title of the video. If you are using your video title as the compound tag, ensure that you do not include the prepositions like or, as, and, etc. This is because YouTube allows just 500 characters in the title and ignore the prepositions. It is always advised to use all the 500 characters YouTube has allowed without wasting the characters on prepositions as it will automatically be ignored.
Generic – The generic tags are the ones that describe the entire video in one or two words. These tags are used in all the videos of yours. These tags are used across your channel for all the videos you post. It is important to have such general constant tags.
Part 2: How to add YouTube tags and optimize them
The more relevant tags you add, the better it is. The best part is YouTube doesn’t restrict the number of tags but adding all is not possible and adding something irrelevant doesn’t make sense. So, your YouTube video tags must be the smart ones for more views. Educated tagging is what is required.
1. Brand-Specific Tags Addition - Every business wants their brand name to show up in the search results on YouTube and Google. Self-referencing your video or tagging your brand name in a number of variations is a smart way of letting others know your brand.
2. Using YouTube Auto Suggest – Play with the search option on YouTube and check out the YouTube suggestions when you search. Try to recognize the common videos that pop up while searching for something important and relevant to yours. Try searching for random keywords according to your YouTube search experience.
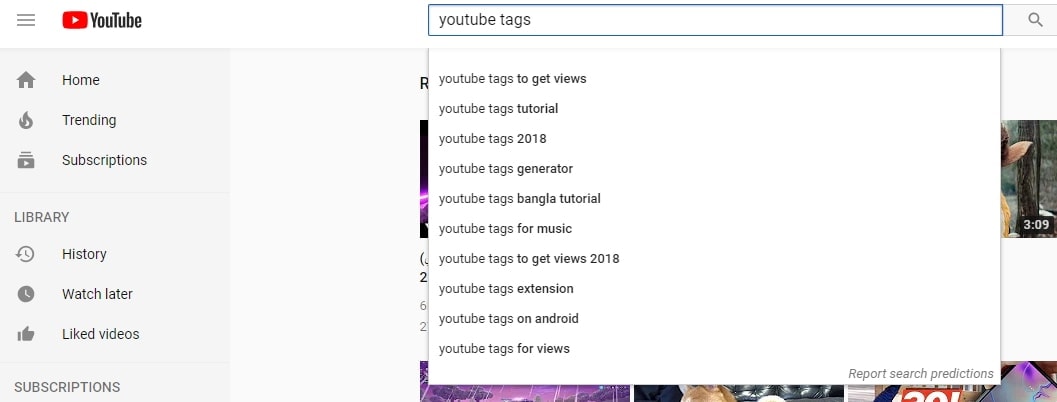
3. Use the YouTube Keyword Search Tool – Lastly, you may use the YouTube keyword suggestion tool. It helps you to extract the relevant keywords from the videos of your competitors and create suggestions according to the basic term provided by you.
4. Use Specific Tags - After using tools, you need to narrow down your tags specifically, like tags “learn 3D paper cutting”. The search volume may not be huge, but these kinds of tags can let YouTube know your video very well. Give it a try!
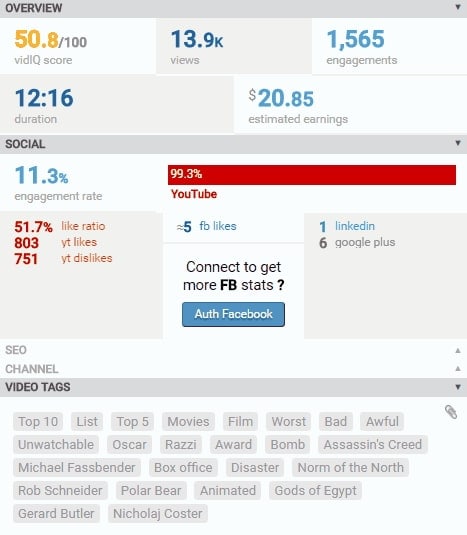
5. Check competitor’s Tags - When you check tags from other brands, it is not suggested to copy them all. What you need to do is find what you are missing and try to cover that area. However, only third-party tools can help you do that. In the market, VidIQ is highly used. It has a free version. Most of all data including tags can be found for higher views.
YouTube Tags Bonus Tips
Here you can learn some tips when optimizing tags. You can use singular and plural tags. Sometimes remember to add some misspelling tags because users tend to mistype some words, so it’s better to cover this kind of tag. You can get more information on misspelled words . More tips are listed below.
- Build on what you learned in your keyword research and use high traffic keywords as tags
- Use as many tags as possible, but without being spammy
- Build related playlists using particular tags
- Be generic; ‘big’, ‘funny’ and ‘sweet’ are fine, but ‘luscious’, ‘delightful’ and ‘splendid’ don’t make the best tags
- Put the most important tags first
- Mix single word tags with ‘long tail’ tags, e.g. ‘how to’
Part 3: How to Tag YouTube and Add Title, Description
For a New Video
- Step 1. The first thing you need to do is to sign in to your YouTube account .
- Step 2. Then click the Upload button that’s found on the top right corner of the window.

- Step 3. Then select the video that you want to upload. You will be asked to add a title, description, and tags.
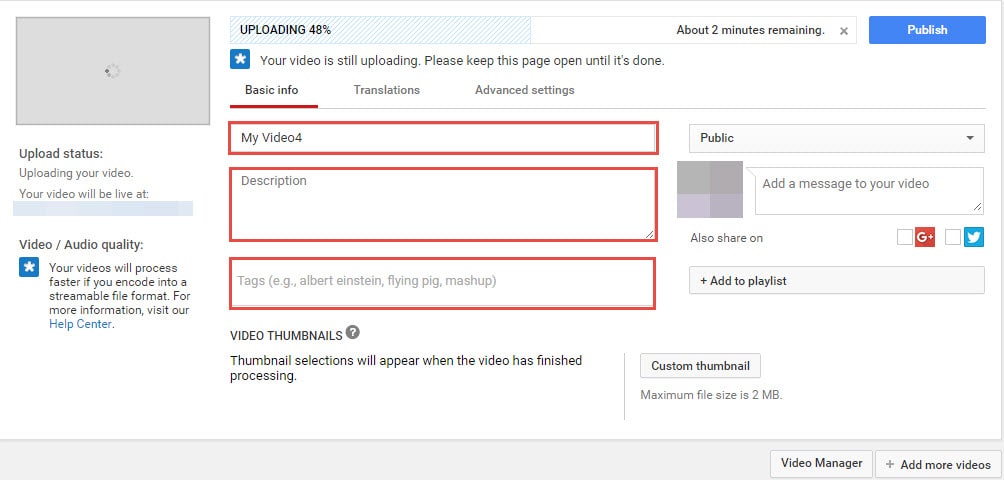
- Step 4. After uploading, you can still edit the YouTube title, description, and tags.
For a Published Video
There are times when you want to change the title, description or tag of an already published video. The good news is that YouTube allows you to re-edit them whenever you want to.
- Step 1. Log into your YouTube account
- Step 2. Click the account name found at the top right-hand corner of the screen. Then you will have a dropdown menu. Select Video Manager to show a list of your uploaded videos.

- Step 3. Click the Edit button that’s found right next to the video that you want to modify. In the Video Information, you can now change the title, description or any of the tags. Click on the Save Changes button when you are done.
Part 4: How to Improve YouTube Video Title and Description
Metadata on YouTube is where both the viewers and the platform itself can find out what your video is all about. It helps people search for your video, helps YouTube to categorize it correctly and, when done well, can broaden the reach of your content. YouTube meta consists of three main parts: tags, title and description. Here’s how you can use each of these three elements to create powerful metadata for your video:
1. Title
YouTube titles play a big part in the ranking factors for search. That means you’ve got to think about what the people most likely to want to see your video will type into the search bar, as well as the words that accurately describe your video.
For example, if you have a clip of your cat Fluffy climbing a tree, calling your video ‘Fluffy climbs a tree’ is not the best idea. Nobody knows who Fluffy is; it could be your rabbit, dog, daughter or feather duster for all the YouTube community knows, and nobody is going to be searching for it.
A better title would be ‘cat climbs a tree, but you could even improve on that. How about ‘funny cat climbs a tree’, which would capture all those people looking for funny cat videos. Or, even better, ‘funny Persian cat climbs a tree’, also capturing those people who adore Persian cats.
You can see how building awesome YouTube titles can happen organically like this, but it’s also worth doing your homework too. We have collected a handful of YouTube Keyword tools for you to improve your YouTube meta, so check out the suggestions and work forwards from there.
Best practices
- Research your keywords and include high traffic keywords at the start of the title
- Keep titles under 70 characters
- Branding, episode number, and other non-essential info should be at the end of the title
- Review your YouTube titles from time to time and update with new keywords as search trends change
- Avoid clickbait titles or misleading titles as this will affect your view time and subsequently your ranking in search
2. Description
Your description is a much longer piece of YouTube meta, so you can really go to town with your YouTube keywords here. You’ve got up to 5,000 characters to fill in, and we strongly advise that you aim to use every single one. This really is a golden opportunity, not only to get people motivated to watch all of your video, but also to be indexed correctly through well researched YouTube keywords.
You may have noticed that, on the search page itself, only a small part of the description actually shows up; 120 characters of it to be precise. This doesn’t affect indexing, but it does mean you have to plan your YouTube description carefully to really hook people into clicking through from just the first sentence or two.
Best practices
- Make the first sentence or two compelling and captivating to get people to click
- Research the best YouTube keywords to use to ensure your video is correctly indexed
- At the end of your YouTube description, include a call to action to direct viewers on what to do next (subscribe, click through to the website, look at a product, watch more videos, etc.)
- If your video is long, consider placing time codes in your description to help users jump to their areas of interest
- Add links to products showcased, your social channels, or website as you wish
- Don’t forget to credit any music you’ve used here
Part 5: Tips for Tagging YouTube and Writing Title, Description
So, now we’ve got the basics down, let’s move on to some top tips for getting your metadata just right:
- 1. Do not spam
Irrelevant keywords will not do you any favors in the long run. Using a popular search term such as ‘funny cat’ when actually it’s a video of you unboxing your product will simply irritate your viewers. You’ll get more views, but for shorter durations, and that will hurt not only your ranking but also your reputation. The people you want to draw in with your YouTube meta should be those who are genuinely interested in your videos, as these are the people who will share, comment and interact with you.
- 2. Don’t put tags in the description
YouTube has given you a place to put your tags, and that’s not in the description area of your meta. Placing tags in the description area is known as tag stuffing and can lead to videos being removed or penalized.
- 3. Update regularly
YouTube meta is not a static thing. Trends change, search statistics fluctuate, and the needs of your viewers alter as time goes on. For this reason, you should look to update your meta from time to time, at least once every six months or so. Re-research your keywords and optimize for today’s trending search terms.
You May Also Like: YouTube SEO Complete Guide
Conclusion
Take some time to perfect your meta on YouTube and see how many more views it helps you get. Let us know if you have any other tips for developing powerful metadata, and how optimizing your meta has worked for you!
Download Mac Version ](https://tools.techidaily.com/wondershare/filmora/download/ )
Richard Bennett
Richard Bennett is a writer and a lover of all things video.
Follow @Richard Bennett
Richard Bennett
Mar 27, 2024• Proven solutions
Making awesome video content is just the first hurdle to overcome. Getting people to watch them is the next and a much bigger obstacle in your path. Just as a blogger must work hard to get people to read their blog, so a YouTuber needs to find ways to get more views on their videos.
For any piece of content on the internet, discoverability is key to exposure. After all, nobody will watch your video or read your blog if they can’t find it, right? A blogger would do this by lacing their content with SEO - search engine optimization. But how can a YouTuber do the same? The answer lies in something known as YouTube tags optimization. In this article, we will let you know how to add, edit and optimize YouTube tags easily for more views, and some tips on YouTube title and description.
Quick Jump Menu
- What are YouTube tags and why they are so important
- How to come up with YouTube tags and optimize them
- How to Tag YouTube and Add Title, Description
- How to Improve YouTube video Metadata: Tags, Title, Description
- Tips for Tagging YouTube and Writing Title, Description
Before we get started, I want to recommend the best video editing software for YouTubers - Wondershare Filmora , an easy to use while powerful video editor that allows you not only to cut, split, crop, resize, reverse your videos, but also offers you multiple video effects specially designed for Fashion, Beauty, Gaming, Travel, Education, etc. Check the video to know more fantastic features:
Download Mac Version ](https://tools.techidaily.com/wondershare/filmora/download/ )
Part 1: What are YouTube tags and why they are so important
YouTube tags are used when you upload a video on YouTube. You need to specify the type of video. In other words, you need to describe your video with keywords. But you might think about why you need to add these words. YouTube can’t figure out what my videos are about? Unfortunately, YouTube can’t though its algorithm is much more advanced than before.
You must know the competition between videos is furious since 500 hours of video per minute are uploaded on YouTube . In this case, it is important to let the YouTube algorithm know your video by adding related tags to have a higher ranking. So the better tags we choose, the higher chance to rank in the top 1, which means you will get more views!
Using YouTube meta tags wisely can broaden your reach and help new people discover your content. However, don’t be tempted to insert irrelevant tags just because you know they are high traffic. You will be found out and penalized as a result. Just as you did with your description, research your keywords, place the most important ones first and use as many as you can.
What are the three YouTube tag types?
YouTube has three different types of tags and each of them has a specific purpose. The tags are-
Specific – The specific tag types are keywords-oriented. These keywords specifically pertain to the content of your video. In this tag type, the particular video is highlighted with the keyword tags. Often while typing the keywords in your mind, YouTube suggests phrases and keywords according to the content of your video. You may apply the suggestions and also add more general or common versions of the same keywords.
Compound – The compound tags are usually using more than two words. Many a time it is seen that users prefer tagging the complete title of the video. If you are using your video title as the compound tag, ensure that you do not include the prepositions like or, as, and, etc. This is because YouTube allows just 500 characters in the title and ignore the prepositions. It is always advised to use all the 500 characters YouTube has allowed without wasting the characters on prepositions as it will automatically be ignored.
Generic – The generic tags are the ones that describe the entire video in one or two words. These tags are used in all the videos of yours. These tags are used across your channel for all the videos you post. It is important to have such general constant tags.
Part 2: How to add YouTube tags and optimize them
The more relevant tags you add, the better it is. The best part is YouTube doesn’t restrict the number of tags but adding all is not possible and adding something irrelevant doesn’t make sense. So, your YouTube video tags must be the smart ones for more views. Educated tagging is what is required.
1. Brand-Specific Tags Addition - Every business wants their brand name to show up in the search results on YouTube and Google. Self-referencing your video or tagging your brand name in a number of variations is a smart way of letting others know your brand.
2. Using YouTube Auto Suggest – Play with the search option on YouTube and check out the YouTube suggestions when you search. Try to recognize the common videos that pop up while searching for something important and relevant to yours. Try searching for random keywords according to your YouTube search experience.
3. Use the YouTube Keyword Search Tool – Lastly, you may use the YouTube keyword suggestion tool. It helps you to extract the relevant keywords from the videos of your competitors and create suggestions according to the basic term provided by you.
4. Use Specific Tags - After using tools, you need to narrow down your tags specifically, like tags “learn 3D paper cutting”. The search volume may not be huge, but these kinds of tags can let YouTube know your video very well. Give it a try!
5. Check competitor’s Tags - When you check tags from other brands, it is not suggested to copy them all. What you need to do is find what you are missing and try to cover that area. However, only third-party tools can help you do that. In the market, VidIQ is highly used. It has a free version. Most of all data including tags can be found for higher views.
YouTube Tags Bonus Tips
Here you can learn some tips when optimizing tags. You can use singular and plural tags. Sometimes remember to add some misspelling tags because users tend to mistype some words, so it’s better to cover this kind of tag. You can get more information on misspelled words . More tips are listed below.
- Build on what you learned in your keyword research and use high traffic keywords as tags
- Use as many tags as possible, but without being spammy
- Build related playlists using particular tags
- Be generic; ‘big’, ‘funny’ and ‘sweet’ are fine, but ‘luscious’, ‘delightful’ and ‘splendid’ don’t make the best tags
- Put the most important tags first
- Mix single word tags with ‘long tail’ tags, e.g. ‘how to’
Part 3: How to Tag YouTube and Add Title, Description
For a New Video
- Step 1. The first thing you need to do is to sign in to your YouTube account .
- Step 2. Then click the Upload button that’s found on the top right corner of the window.
- Step 3. Then select the video that you want to upload. You will be asked to add a title, description, and tags.
- Step 4. After uploading, you can still edit the YouTube title, description, and tags.
For a Published Video
There are times when you want to change the title, description or tag of an already published video. The good news is that YouTube allows you to re-edit them whenever you want to.
- Step 1. Log into your YouTube account
- Step 2. Click the account name found at the top right-hand corner of the screen. Then you will have a dropdown menu. Select Video Manager to show a list of your uploaded videos.
- Step 3. Click the Edit button that’s found right next to the video that you want to modify. In the Video Information, you can now change the title, description or any of the tags. Click on the Save Changes button when you are done.
Part 4: How to Improve YouTube Video Title and Description
Metadata on YouTube is where both the viewers and the platform itself can find out what your video is all about. It helps people search for your video, helps YouTube to categorize it correctly and, when done well, can broaden the reach of your content. YouTube meta consists of three main parts: tags, title and description. Here’s how you can use each of these three elements to create powerful metadata for your video:
1. Title
YouTube titles play a big part in the ranking factors for search. That means you’ve got to think about what the people most likely to want to see your video will type into the search bar, as well as the words that accurately describe your video.
For example, if you have a clip of your cat Fluffy climbing a tree, calling your video ‘Fluffy climbs a tree’ is not the best idea. Nobody knows who Fluffy is; it could be your rabbit, dog, daughter or feather duster for all the YouTube community knows, and nobody is going to be searching for it.
A better title would be ‘cat climbs a tree, but you could even improve on that. How about ‘funny cat climbs a tree’, which would capture all those people looking for funny cat videos. Or, even better, ‘funny Persian cat climbs a tree’, also capturing those people who adore Persian cats.
You can see how building awesome YouTube titles can happen organically like this, but it’s also worth doing your homework too. We have collected a handful of YouTube Keyword tools for you to improve your YouTube meta, so check out the suggestions and work forwards from there.
Best practices
- Research your keywords and include high traffic keywords at the start of the title
- Keep titles under 70 characters
- Branding, episode number, and other non-essential info should be at the end of the title
- Review your YouTube titles from time to time and update with new keywords as search trends change
- Avoid clickbait titles or misleading titles as this will affect your view time and subsequently your ranking in search
2. Description
Your description is a much longer piece of YouTube meta, so you can really go to town with your YouTube keywords here. You’ve got up to 5,000 characters to fill in, and we strongly advise that you aim to use every single one. This really is a golden opportunity, not only to get people motivated to watch all of your video, but also to be indexed correctly through well researched YouTube keywords.
You may have noticed that, on the search page itself, only a small part of the description actually shows up; 120 characters of it to be precise. This doesn’t affect indexing, but it does mean you have to plan your YouTube description carefully to really hook people into clicking through from just the first sentence or two.
Best practices
- Make the first sentence or two compelling and captivating to get people to click
- Research the best YouTube keywords to use to ensure your video is correctly indexed
- At the end of your YouTube description, include a call to action to direct viewers on what to do next (subscribe, click through to the website, look at a product, watch more videos, etc.)
- If your video is long, consider placing time codes in your description to help users jump to their areas of interest
- Add links to products showcased, your social channels, or website as you wish
- Don’t forget to credit any music you’ve used here
Part 5: Tips for Tagging YouTube and Writing Title, Description
So, now we’ve got the basics down, let’s move on to some top tips for getting your metadata just right:
- 1. Do not spam
Irrelevant keywords will not do you any favors in the long run. Using a popular search term such as ‘funny cat’ when actually it’s a video of you unboxing your product will simply irritate your viewers. You’ll get more views, but for shorter durations, and that will hurt not only your ranking but also your reputation. The people you want to draw in with your YouTube meta should be those who are genuinely interested in your videos, as these are the people who will share, comment and interact with you.
- 2. Don’t put tags in the description
YouTube has given you a place to put your tags, and that’s not in the description area of your meta. Placing tags in the description area is known as tag stuffing and can lead to videos being removed or penalized.
- 3. Update regularly
YouTube meta is not a static thing. Trends change, search statistics fluctuate, and the needs of your viewers alter as time goes on. For this reason, you should look to update your meta from time to time, at least once every six months or so. Re-research your keywords and optimize for today’s trending search terms.
You May Also Like: YouTube SEO Complete Guide
Conclusion
Take some time to perfect your meta on YouTube and see how many more views it helps you get. Let us know if you have any other tips for developing powerful metadata, and how optimizing your meta has worked for you!
Download Mac Version ](https://tools.techidaily.com/wondershare/filmora/download/ )
Richard Bennett
Richard Bennett is a writer and a lover of all things video.
Follow @Richard Bennett
Also read:
- In 2024, Charting the Course to YouTube Livestream Mastery
- In 2024, Affluent Animator Architects
- [New] Best YouTube Shorts Video Editing Apps for iOS and Android
- Securing Your Spatial Content Mastering the Art of 360-Degree Video Filming & Uploading
- Essential Low-Cost Footage Source Directory
- 2024 Approved Cutting-Edge Conjurations in Filmmaking
- Accelerating or Slowing Down YouTube Videos Playback for 2024
- Expressing Emotionally Using Emojis for YT Comments
- Revenue Revolution How Carminati's YouTube Income Model Works
- The Art of Building Powerful YouTube Backlinks
- In 2024, Creative Vlog Ideas for Daily Use
- In 2024, Adjusting YouTube's Viewership Limits for Content
- Efficient Video Categorization with Tags
- [New] Craft Your Story Aspect Ratios for Powerful YT Thumbnails
- [New] Discerning T-Series' Profit Mechanisms From Youtube Views
- Bringing the Web to Reality Embedding YouTube Videos in Slides
- [New] Elevate, Create & Earn A Startup Guide for YouTube Channels
- [New] AdSense on YouTube Determining Your Income From 1K Viewer Engagement
- [New] Enhance Privacy & Speed The Best 7 Android AdBlocks
- Youtube's Monetization Value per Million Views
- Unveiling Vtubers Creation & Aspiring Participants?
- Elevating Profits via Celebrity Skincare Channels
- How to Transcribe a YouTube Video for FREE
- 2024 Approved Enriching Slides Video Incorporation From YouTube
- Unlock YouTube Success with Top 8 Thumbnail Strategies
- Why YouTube's Viewer Numbers Matter More Than You Think
- Elevating Video Revenue YouTube's Path
- 2024 Approved A Visual Voyage Through Youtube's 2017 Data Deluge
- 2024 Approved Charting a Course for Growth Precise YouTube Stats From Social Blade's Hub
- [Updated] Enigmatic Cuts YouTube Magicians at Work
- 10 Highest Performing Business YouTube Platforms Explained
- Unmatched YouTube Success 10 Unique Tips for Your Shorts
- 2024 Approved Elevate Entertainment A Thousand Gaming Channels
- Essential Game Streamers for Your Watchlist
- [Updated] Bypass Software for YouTube Downloads
- [New] Epicurean Epiphanies Filming Feast Creation
- 2024 Approved Elevating Your YouTube Stream The WireCast Way
- 2024 Approved Becoming a Leader in Video Marketing on YouTube
- Boost Eco-Ad Impact Combining Greener Gear & Subscriptions
- In 2024, Tips & Tricks to Add Tags to YouTube Video
- [Updated] Captivating Videos Start Here These 7 Royalty-Free Audios
- [Updated] Easy-Peasy YouTube Tutorials Making Content That Works for All
- [New] Convert Your Streaming Top Free Video to Audio Tools
- [Updated] Delightful Yuletide Cinema on YouTube Savor Nine Whole-Film Gems
- MediaMasher Deluxe
- 2024 Approved Decoding the Secrets of Highly Successful YouTube Shorts Templates
- 2024 Approved Dive Into the Depth of 4K Content Your Ultimate Guide for YouTube Submission
- 2024 Approved Adaptive Content Strategies for Optimal YouTube Performance
- YouTube's Top Marketing Moves for Business Growth Unveiled
- Easy Ways to Manage Your Xiaomi Redmi K70E Location Settings | Dr.fone
- 7 Solutions to Fix Error Code 963 on Google Play Of Honor Magic 6 Lite | Dr.fone
- [Updated] In 2024, Pro-Rated Screen Capture Software Top 11 Selections
- Produce High-Quality Videos on Your Mac Expert Techniques and Strategies for 2024
- [Updated] In 2024, Brisk Blueprints for Scribing Presentations
- [New] In 2024, Record Android Internal Voice 4 Easy, Rootless Techniques
- In 2024, 3 Ways to Track Vivo T2 5G without Them Knowing | Dr.fone
- [New] The Elite Compilation 9 Online Mic Recorders Ranked for 2024
- [Updated] Live Feed OBS on Instagram App for 2024
- Updated 2024 Approved All About Types of Motion Graphics
- [Updated] Pushing the Boundaries Animated FB Ads That Increase Return on Investment for 2024
- 3 Solutions to Find Your Infinix Hot 40 Pro Current Location of a Mobile Number | Dr.fone
- Best High-Quality Discord Music Bots | Updated for 2024
- In 2024, Universal Unlock Pattern for Samsung Galaxy M14 5G
- In 2024, How to Bypass Android Lock Screen Using Emergency Call On Vivo S18 Pro?
- [New] All About Creating Compelling TwitResponses for 2024
- In 2024, Does Xiaomi Redmi A2 Have Find My Friends? | Dr.fone
- New Maximize Your Viewing Experience with These 4 Pioneering Audio Boosters Online for 2024
- [Updated] In 2024, Practical Demonstrations Creating and Configuring Timer Modules in OBS
- 2024 Approved Navigating Facebook's High-Def Download Routes
- [New] In 2024, Capture & Share Your Mac Life, FREE!
- The Top Ten Ways to Propel Your TikTok Campaigns Forward
- In 2024, How to Change Google Play Location On Motorola Moto G Stylus (2023) | Dr.fone
- Revenue Protection
- Surfing Over The Invisible Barrier on TikTok for 2024
- [New] In 2024, Spotlight on TikTok's Newest Dance Moves
- 9 Best Phone Monitoring Apps for Huawei P60 | Dr.fone
- Title: "In 2024, Cross-Platform Creative Dimensioning Techniques"
- Author: Brian
- Created at : 2024-05-25 12:08:33
- Updated at : 2024-05-26 12:08:33
- Link: https://youtube-video-recordings.techidaily.com/in-2024-cross-platform-creative-dimensioning-techniques/
- License: This work is licensed under CC BY-NC-SA 4.0.
