
:max_bytes(150000):strip_icc()/PhiwathJittamas_GettyImages-1411973451_CROPPED-6da29e2c2807406bb9ac557cb2920e1d.jpg)
"In 2024, Crafting Engaging Content Add YouTube to Slides"
Crafting Engaging Content: Add YouTube to Slides
Create High-Quality Video - Wondershare Filmora
An easy and powerful YouTube video editor
Numerous video and audio effects to choose from
Detailed tutorials provided by the official channel
Google Slide presentation is a powerful tool for creators to keep their audience engaged. This online platform lets you create and demonstrate your ideas. It will capture your viewers’ attention from the very beginning. It also doesn’t matter whatever learning style you engage. Adding YouTube videos to Google Slide will appeal to all levels of individuals.
More so, it is the best way to provide a break for both the audience and the creator. You can break Google Slide presentations with videos to offer some break. Viewers and the presenter get a breather in the process. The presenter can take a short break from speaking while the video plays. Let’s now dive into how to embed a YouTube video in Google Slides.

In this article
01 Why should we add a video to Google Slides?
02 How to add a YouTube video to Google Slide
03 How to choose the right video for your Slides?
Why should we add a video to Google Slides?
There is a great impact of adding video to Google Slides.
For attention
Videos will automatically awaken you, especially if your thoughts have started to sway during a presentation. A video has a direct way of showing creativity. The audience automatically connects the dots between the video and the presentation lines alike.
To stimulate discussion
A picture is worth a thousand words. There is a way that an added video will help the audience connect to the day’s topic. It will bring up several ideas and stir up discussion with the presenter.
Easy following
With videos embedded in Google Slide, viewers will find it easy to understand and digest. Videos automatically eliminate boredom and make any topic interesting.
How to add a YouTube video to Google Slide
Use these two methods to add a YouTube video to Google Slides. Via the Search and Direct link.
Method 1. Embed YouTube video to Google Slide by search and selection
Google has owned YouTube since the year 2006. You can, therefore, integrate Google’s products with YouTube easily.
Step 1. First, go to the slide where you want to embed your video.
Step 2. Then choose the “Insert” option from the menu bar and hit the “Video” option.

Step 3. It would be best if you now viewed the “YouTube” search bar to type in the video you want to embed. You can use keywords to search for the video in question and view instant search results.
Step 4. Then select the video you want to embed, and you’ll see it appear on the “Slide.”

Step 5. Format your video. Remember that the entire video will be embedded. You don’t necessarily need the whole video. It is time to select just a brief but relevant clip from the video to use. Then position your video to the right point using the axes from the exact starting point to the finished part you want the video to appear in.
Method 2. Embed YouTube video to Google Slide by direct link
You can engage this method if you want to include the entire video.
Step 1. Get the URL of the specific YouTube video that you want to use.

Step 2. Then go to your browser’s “Address bar” to copy the YouTube link.
Step 3. Next, open the “Presentation” slide to put your video to.
Step 4. Choose the “Insert” tab from the menu bar.
Step 5. Then hit on the “Video” option from the drop-down menu that appears.
Step 6. A new window will open automatically. Choose the “By URL” tab.
Step 7. Then paste the YouTube video URL in the “Paste YouTube URL Here” bar section.

Step 8. Wait for the video file to load and press the “Select” option. The video will immediately appear in the presentation slide. Just drag and drop the video in your preferred position.
Note: You can do a few edits inside the application. Set the timer when your video should start and when to stop. You can also adjust the video player size.
How to choose the right video for your Slides?
Not all videos will make an impact on your Google Slide. You need to use the best shot that adds value to your presentation. These guidelines will help you to settle on the best video.
Be Professional – choose the best video for your presentation. Remember that the video is part of the presentation and carries more weight. Settling for quality video will bring out the professionalism in you.
Relevant – how do you know that what you are showing your audience corresponds to the presentation piece? Ensure that the video you add has something to do with the Google Slide presentation topic. The two should naturally flow to make it easy to understand the whole concept.
Precise – your presentation is not about the video. The ideal length should not exceed 60 seconds. The longer the video, the greater the chance for your audience to lose track along the way.
Know every footage you are working with – this will help you pick the best shots for your presentation. So, learn every aspect of the video before settling down to use it.
Add new content – even though one content may suit several presentations, don’t rely on the same piece each time. Your audience will want to feel something fresh each time you are presenting. So, compose different videos for different scenarios to make that big impact.
Create an eye-catching video for your Slides with Filmora
The video quality matters when it comes to creating your Slides. The best video creator – Filmora – works in simple steps to give you an eye-catching video. It will create videos for all scenarios like marketing, tutorial, gaming, etc.
Key features of Filmora
- It offers you advanced video effects like filters, motion elements, etc
- You can multiply your fun with multiple screens with the Split Screen feature
- Easily change backgrounds using the Green Screen feature
- The speed control lets you fast forward or slow down a special moment
- Import your video clips to social media platforms
- You can also adjust the audio of your tracks using the Audio Mixer feature
Follow this guide to create a video for your slide with Filmora
Step 1. Launch Filmora
First, begin by downloading and installing Filmora on your computer device. Once installed, launch it and allow it to run. You can either create a new project or open an existing project to work on.
Step 2. Create a new project
Here, click on the “New Project” tab on the app’s welcome screen. The editor should load immediately. Then proceed to register the product. Just hit on the “Register” tab.
Step 3. Import video
Check the upper left corner of your screen to see the “Import” tab. Click on it and choose the “Import Media Files” option. Next, navigate to the location of your computer’s local list to select the clip or video you want to edit. Then, hit the “Import” button to add the video to the timeline for editing.
Step 4. Edit video
Drag and drop the raw footage to Filmora’s timeline to begin editing. Here, you can trim, add other video clips, merge, and add effects as you wish. Likewise, you can add opening titles, subtitles, and end credits to your video. More so, this tool offers different templates to use. Just drag and drop the templates you wish to use to a specific location on the timeline.
Step 5. Preview your file
Last but not least, you can preview your files. Click on the “Play” tab to start previewing your video clips. The main essence of this part is to allow you to make the necessary changes to your clips if there is a need.
Step 6. Export and Share
With Filmora, you can export your file to various social media platforms. But first, go to the “Output window” and select the video file format to use. This software supports several output formats to apply to any platform and device. Just click on the “Format” tab and choose the file format to use. Then also change the resolution and other parameters like frame rate and channel of your video in the “Settings” section. Finally, share your video to your YouTube channel and get ready to add the video to the Google Slide presentation.
For Win 7 or later (64-bit)
For macOS 10.12 or later
Conclusion
● You now know how to put a YouTube video in Google Slides the simple way. You can search for your YouTube videos or directly use the URL link. Whatever the case, remember that it’s the quality of your video that carries more weight. Thanks to the availability of third-party apps that you can use to create and improve the quality of your videos.
● Filmora is at your service to create high-resolution videos that you can export in any format to your YouTube channel. The tool is intuitive, and it won’t matter whether you haven’t tried it before. It is a perfect choice for both professionals and first-time users.
Google Slide presentation is a powerful tool for creators to keep their audience engaged. This online platform lets you create and demonstrate your ideas. It will capture your viewers’ attention from the very beginning. It also doesn’t matter whatever learning style you engage. Adding YouTube videos to Google Slide will appeal to all levels of individuals.
More so, it is the best way to provide a break for both the audience and the creator. You can break Google Slide presentations with videos to offer some break. Viewers and the presenter get a breather in the process. The presenter can take a short break from speaking while the video plays. Let’s now dive into how to embed a YouTube video in Google Slides.
In this article
01 Why should we add a video to Google Slides?
02 How to add a YouTube video to Google Slide
03 How to choose the right video for your Slides?
Why should we add a video to Google Slides?
There is a great impact of adding video to Google Slides.
For attention
Videos will automatically awaken you, especially if your thoughts have started to sway during a presentation. A video has a direct way of showing creativity. The audience automatically connects the dots between the video and the presentation lines alike.
To stimulate discussion
A picture is worth a thousand words. There is a way that an added video will help the audience connect to the day’s topic. It will bring up several ideas and stir up discussion with the presenter.
Easy following
With videos embedded in Google Slide, viewers will find it easy to understand and digest. Videos automatically eliminate boredom and make any topic interesting.
How to add a YouTube video to Google Slide
Use these two methods to add a YouTube video to Google Slides. Via the Search and Direct link.
Method 1. Embed YouTube video to Google Slide by search and selection
Google has owned YouTube since the year 2006. You can, therefore, integrate Google’s products with YouTube easily.
Step 1. First, go to the slide where you want to embed your video.
Step 2. Then choose the “Insert” option from the menu bar and hit the “Video” option.
Step 3. It would be best if you now viewed the “YouTube” search bar to type in the video you want to embed. You can use keywords to search for the video in question and view instant search results.
Step 4. Then select the video you want to embed, and you’ll see it appear on the “Slide.”
Step 5. Format your video. Remember that the entire video will be embedded. You don’t necessarily need the whole video. It is time to select just a brief but relevant clip from the video to use. Then position your video to the right point using the axes from the exact starting point to the finished part you want the video to appear in.
Method 2. Embed YouTube video to Google Slide by direct link
You can engage this method if you want to include the entire video.
Step 1. Get the URL of the specific YouTube video that you want to use.
Step 2. Then go to your browser’s “Address bar” to copy the YouTube link.
Step 3. Next, open the “Presentation” slide to put your video to.
Step 4. Choose the “Insert” tab from the menu bar.
Step 5. Then hit on the “Video” option from the drop-down menu that appears.
Step 6. A new window will open automatically. Choose the “By URL” tab.
Step 7. Then paste the YouTube video URL in the “Paste YouTube URL Here” bar section.
Step 8. Wait for the video file to load and press the “Select” option. The video will immediately appear in the presentation slide. Just drag and drop the video in your preferred position.
Note: You can do a few edits inside the application. Set the timer when your video should start and when to stop. You can also adjust the video player size.
How to choose the right video for your Slides?
Not all videos will make an impact on your Google Slide. You need to use the best shot that adds value to your presentation. These guidelines will help you to settle on the best video.
Be Professional – choose the best video for your presentation. Remember that the video is part of the presentation and carries more weight. Settling for quality video will bring out the professionalism in you.
Relevant – how do you know that what you are showing your audience corresponds to the presentation piece? Ensure that the video you add has something to do with the Google Slide presentation topic. The two should naturally flow to make it easy to understand the whole concept.
Precise – your presentation is not about the video. The ideal length should not exceed 60 seconds. The longer the video, the greater the chance for your audience to lose track along the way.
Know every footage you are working with – this will help you pick the best shots for your presentation. So, learn every aspect of the video before settling down to use it.
Add new content – even though one content may suit several presentations, don’t rely on the same piece each time. Your audience will want to feel something fresh each time you are presenting. So, compose different videos for different scenarios to make that big impact.
Create an eye-catching video for your Slides with Filmora
The video quality matters when it comes to creating your Slides. The best video creator – Filmora – works in simple steps to give you an eye-catching video. It will create videos for all scenarios like marketing, tutorial, gaming, etc.
Key features of Filmora
- It offers you advanced video effects like filters, motion elements, etc
- You can multiply your fun with multiple screens with the Split Screen feature
- Easily change backgrounds using the Green Screen feature
- The speed control lets you fast forward or slow down a special moment
- Import your video clips to social media platforms
- You can also adjust the audio of your tracks using the Audio Mixer feature
Follow this guide to create a video for your slide with Filmora
Step 1. Launch Filmora
First, begin by downloading and installing Filmora on your computer device. Once installed, launch it and allow it to run. You can either create a new project or open an existing project to work on.
Step 2. Create a new project
Here, click on the “New Project” tab on the app’s welcome screen. The editor should load immediately. Then proceed to register the product. Just hit on the “Register” tab.
Step 3. Import video
Check the upper left corner of your screen to see the “Import” tab. Click on it and choose the “Import Media Files” option. Next, navigate to the location of your computer’s local list to select the clip or video you want to edit. Then, hit the “Import” button to add the video to the timeline for editing.
Step 4. Edit video
Drag and drop the raw footage to Filmora’s timeline to begin editing. Here, you can trim, add other video clips, merge, and add effects as you wish. Likewise, you can add opening titles, subtitles, and end credits to your video. More so, this tool offers different templates to use. Just drag and drop the templates you wish to use to a specific location on the timeline.
Step 5. Preview your file
Last but not least, you can preview your files. Click on the “Play” tab to start previewing your video clips. The main essence of this part is to allow you to make the necessary changes to your clips if there is a need.
Step 6. Export and Share
With Filmora, you can export your file to various social media platforms. But first, go to the “Output window” and select the video file format to use. This software supports several output formats to apply to any platform and device. Just click on the “Format” tab and choose the file format to use. Then also change the resolution and other parameters like frame rate and channel of your video in the “Settings” section. Finally, share your video to your YouTube channel and get ready to add the video to the Google Slide presentation.
For Win 7 or later (64-bit)
For macOS 10.12 or later
Conclusion
● You now know how to put a YouTube video in Google Slides the simple way. You can search for your YouTube videos or directly use the URL link. Whatever the case, remember that it’s the quality of your video that carries more weight. Thanks to the availability of third-party apps that you can use to create and improve the quality of your videos.
● Filmora is at your service to create high-resolution videos that you can export in any format to your YouTube channel. The tool is intuitive, and it won’t matter whether you haven’t tried it before. It is a perfect choice for both professionals and first-time users.
No. 1 Ranked: YouTube To Text Online Service
Have you ever wondered why there is a need to transcribe YouTube videos? Well, let us enlighten you! Turning content from YouTube to text is essential for numerous content creators as it allows them to gain more views. Recent studies have shown that around 33% of the audience watching YouTube videos do not necessarily watch them in English. So, by converting them to text, translation becomes a whole lot easier and subtitles can be generated more efficiently.
In this article, we will explore the procedure through how one can convert a YouTube video to text, and learn about numerous effective online YouTube video to text software.
In this article
01 How to Convert YouTube Video to Texts by Copy/Paste YouTube Transcript
02 Best YouTube Video to Text Converters Online
Part 1: How to Convert YouTube Video to Texts by Copy/Paste YouTube Transcript
When people think “Get the transcript from YouTube” they believe it is going to be a daunting and lengthy procedure. Well, let us tell you that it is certainly not! All you have to do is follow the steps outlined below to transcribe YouTube video to text - that too through the YouTube player itself.
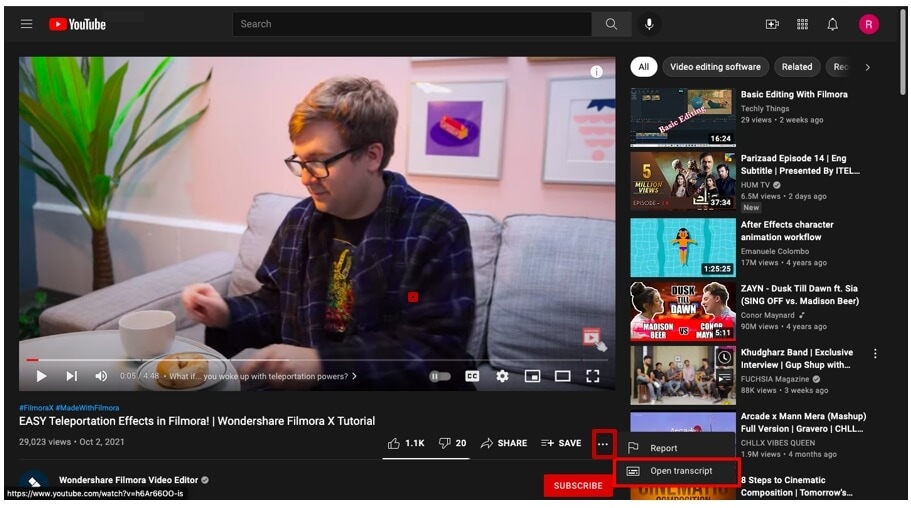
First what you have to do is open YouTube and select any video for which you require the transcript. Once you have selected the video, wait for it to load and then click the three dots located beneath the video, as shown in the image below.
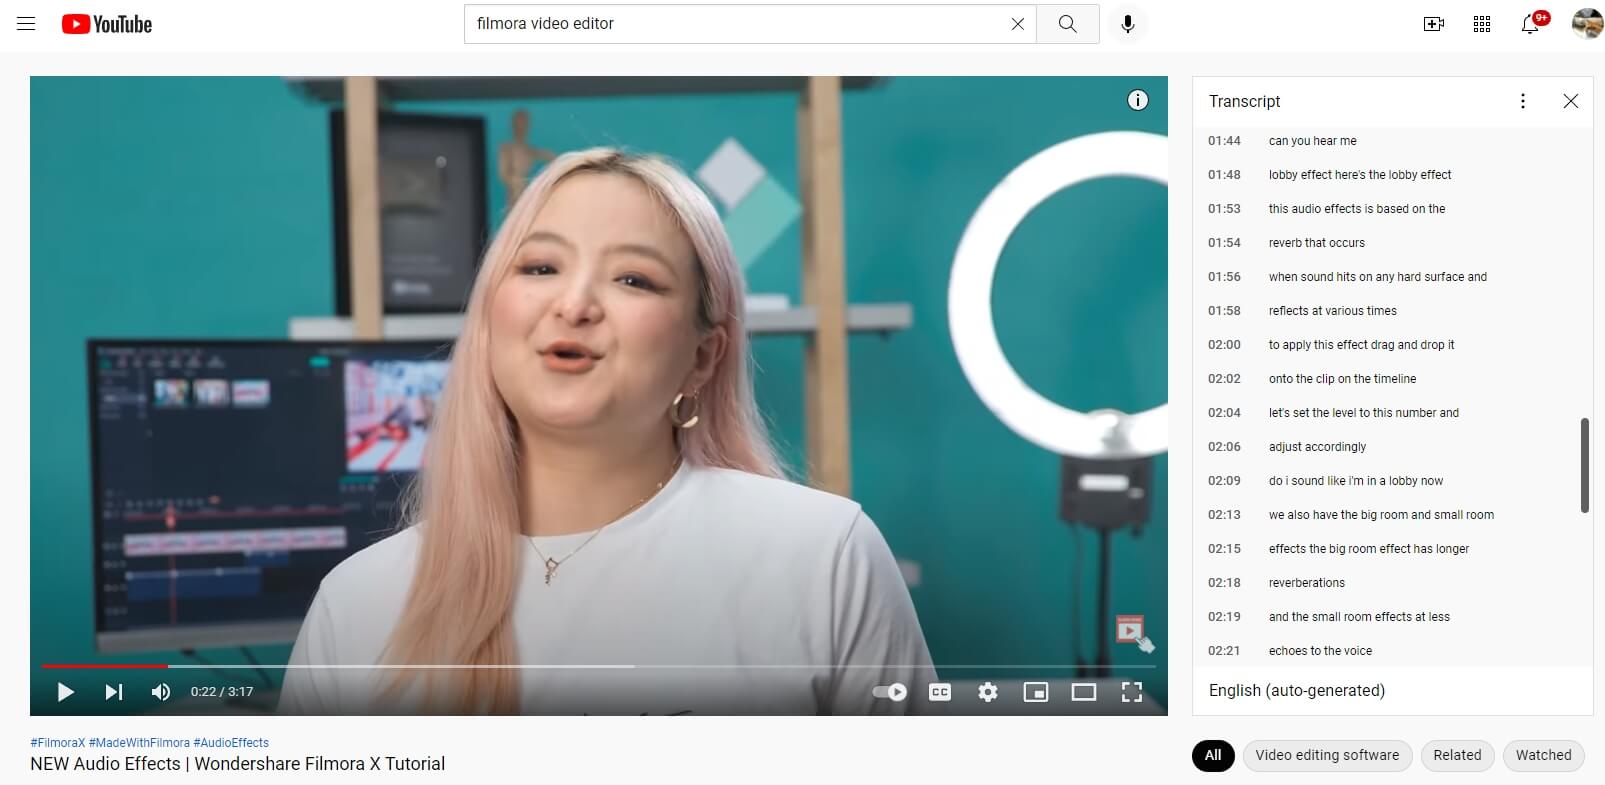
Following that, a menu will appear, just select the “Open Transcript” option and the transcription will open on the top right side of your screen.
Simply select the entire transcript using your mouse, then copy and paste it into a new Word Document or Google Document. If you don’t need the timestamps, you can click the three-dot icon to toggle timestamps off.

By following the steps outlined above, you can convert a YouTube video to text in less than five seconds!
Part 2: Best YouTube Video to Text Converters Online
Aside from the basic method of getting the transcription from YouTube itself, many individuals make use of effective YouTube video to text converter online free. This allows them to get the complete video into text, small parts of the video to text, as well as options to convert the text into multiple languages. Below are some of the best software to convert YouTube video to text online.
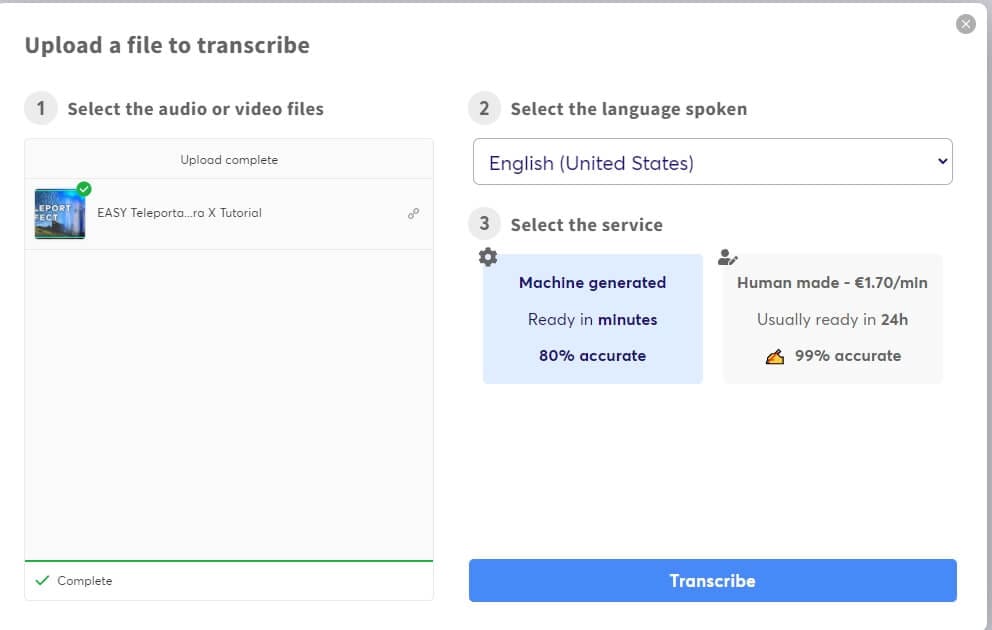
1. Inqscribe
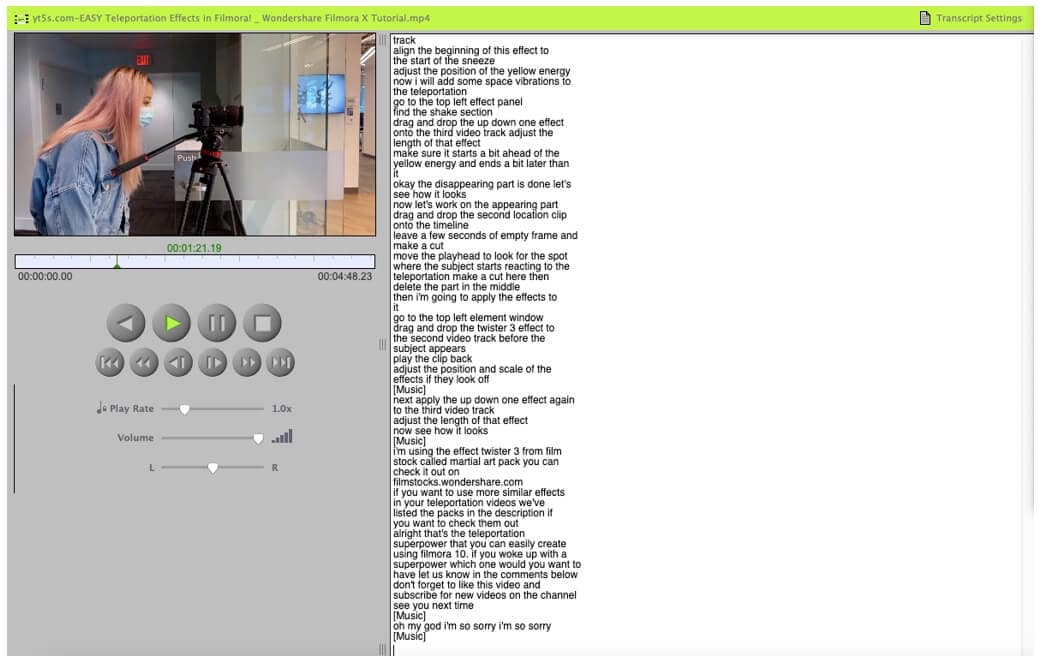
This high-quality cross-platform tool allows users to transcribe audio and video files into text . Whether it is a meeting recording or a YouTube video - you can convert them all to text. Making use of this free online software is extremely easy, all one has to do is just upload their file and click the process. Then the system will automatically transcribe the video into a text document for you. The software is uni code so all file formats are supported such as txt, XML, HTML, WebVTT, and more. The only drawback of this online software is that video files that are larger than a certain limit cannot be accepted.
2. Sonix
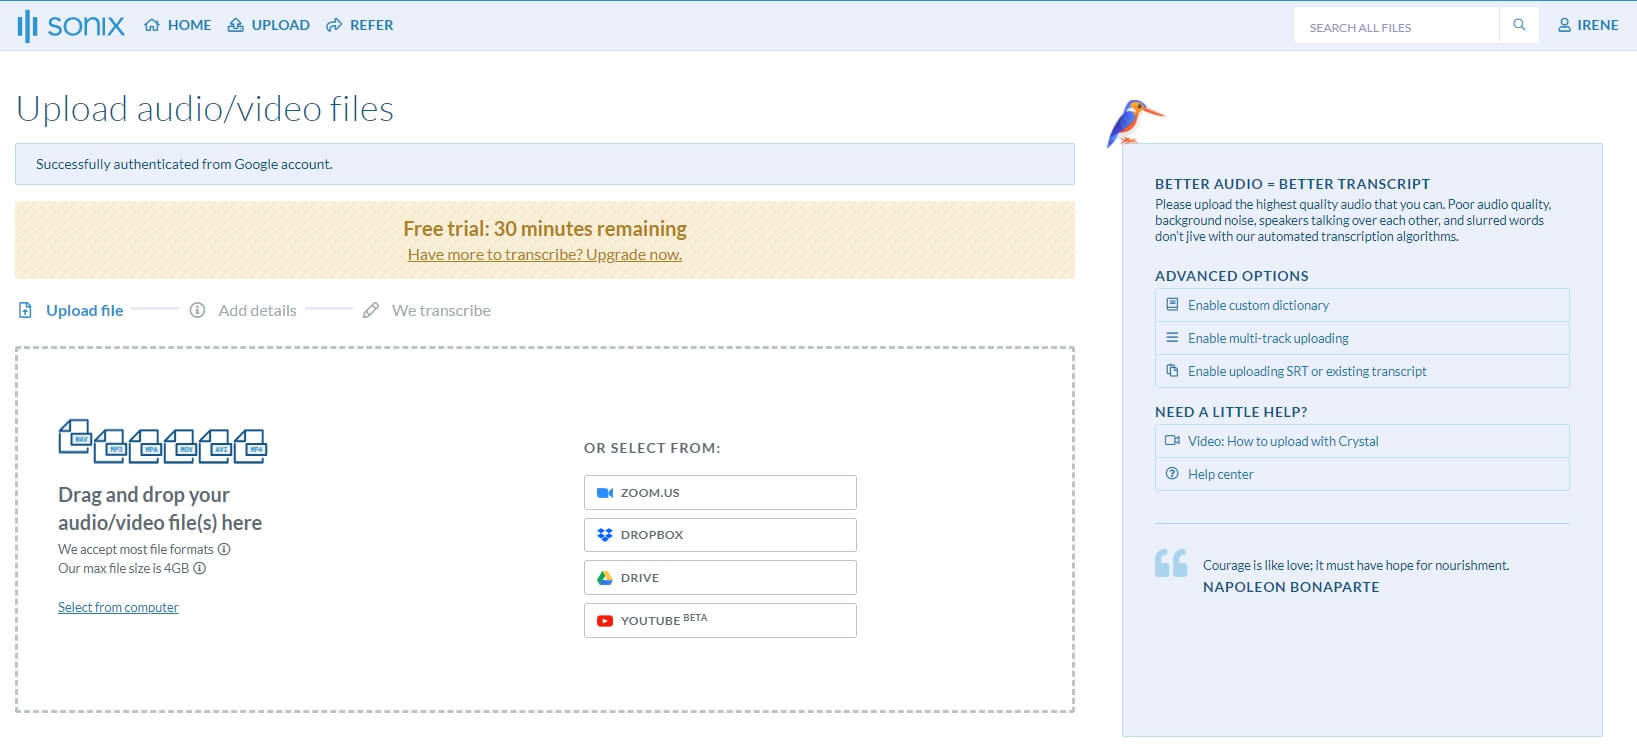
For individuals who have premium quality audio transcription, a tool by the name of Sonix is the right choice for you. This tool enables users to turn all types of YouTube videos into text. All they have to do is simply download the YouTube video they need to transcribe and then upload it to the online interface. From there, this software uses its comprehensive text reader to convert the video to text. This platform supports more than 40 different language choice inputs and outputs. Users are allowed to transcribe up to five videos for free, then they must pay a subscription fee.
3. Otter
This video-to-text converter works best in real-time. Simply play the audio of a YouTube video and let Otter do its magic. In real-time it will convert audio into text. Moreover, if you would like to only convert some parts of the audio to text, that is possible with this tool as well.
All you need to do is play the audio accordingly and the text will automatically generate itself. The AVI (Ambient Voice Intelligence) of this tool allows it to accurately understand what the audio is saying to transcribe the video. While many do find this tool handy, learning how to use it can be a tiny bit tedious and confusing.
Note: Currently, Otter doesn’t support uploading YouTube video link, you may need to download the YouTube video first and then upload it from desktop.
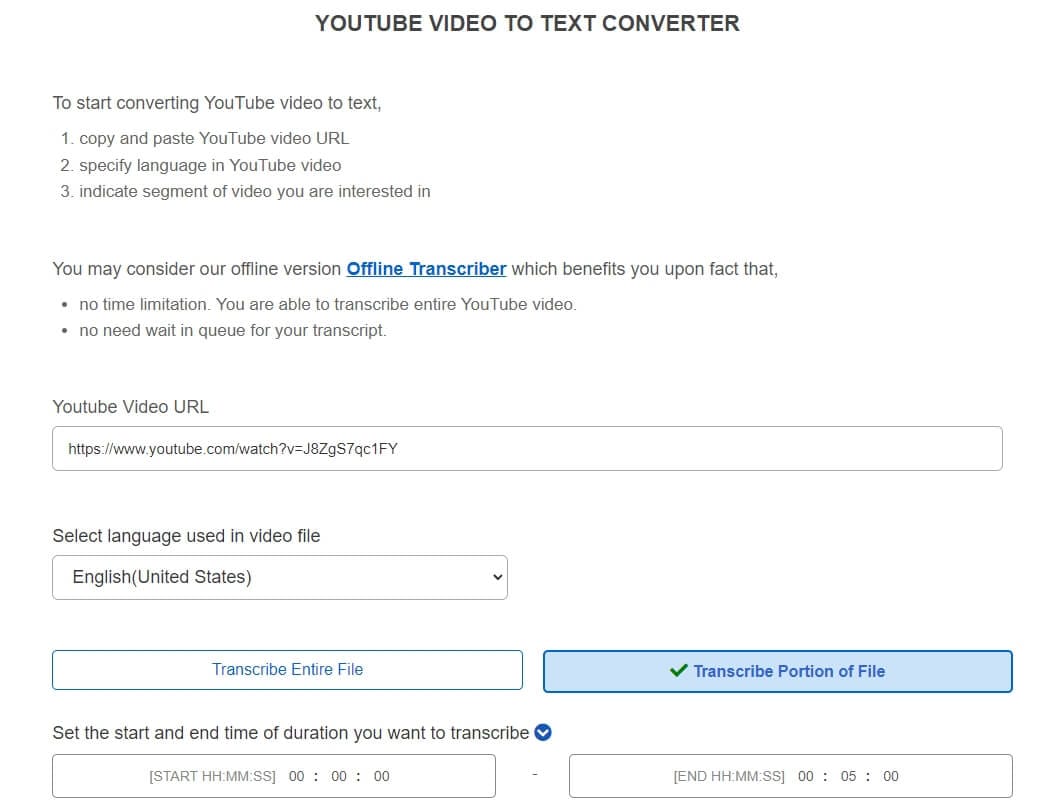
4. oTranscribe
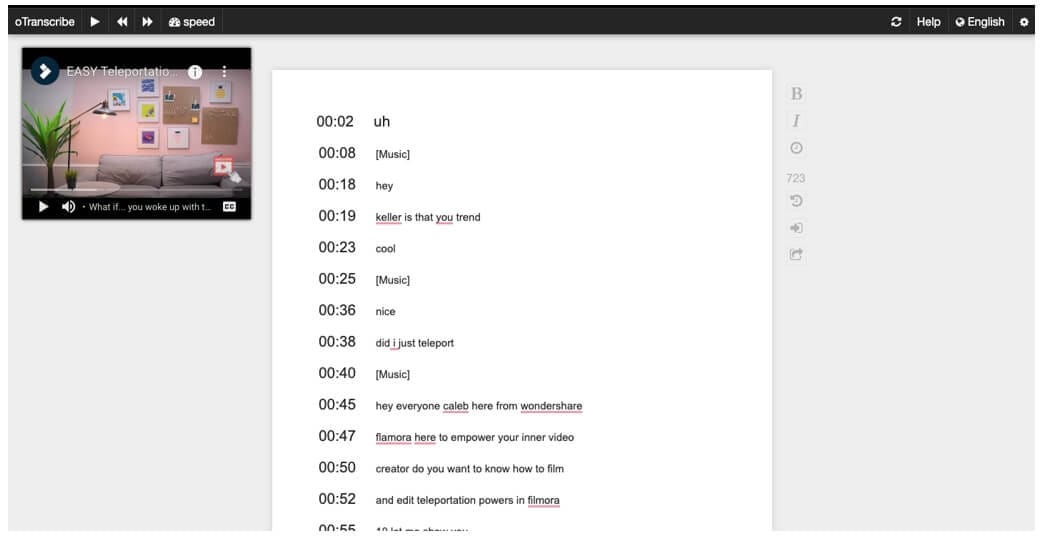
This online transcription tool is extremely easy and convenient to use - and it is entirely free! All you need to do is head on over to its homepage and drop a link to the YouTube video that you would like to transcribe. Then from there, you can access the video and text all at the same time, without having to switch between videos.
The best part is that you can record and translate text according to your need, cut and miss parts that you do not require. This tool supports all file formats which just adds to convince. The only challenge is that it will only accept videos and translate them into English.
5. Go Transcribe
If you are looking to convert any sort of video format to text, then Go Transcribe might just be the tool that you require. This tool makes use of the latest voice technology to convert videos to text - and gives you the output in the form of an SRT, PDF, or DOC, which are all editable. All you need to do is upload the video in one of the formats below,
- 3PG
- FLV
- AVI
- MOV
- MPG
- MPEG
Then simply click the processing options and your video will be generated into a text file within minutes. However, this software may require a subscription fee.
files. Moreover, the output format is PDF which individuals cannot edit unless they convert the PDF to a TXT file online using different software.
6. Trint
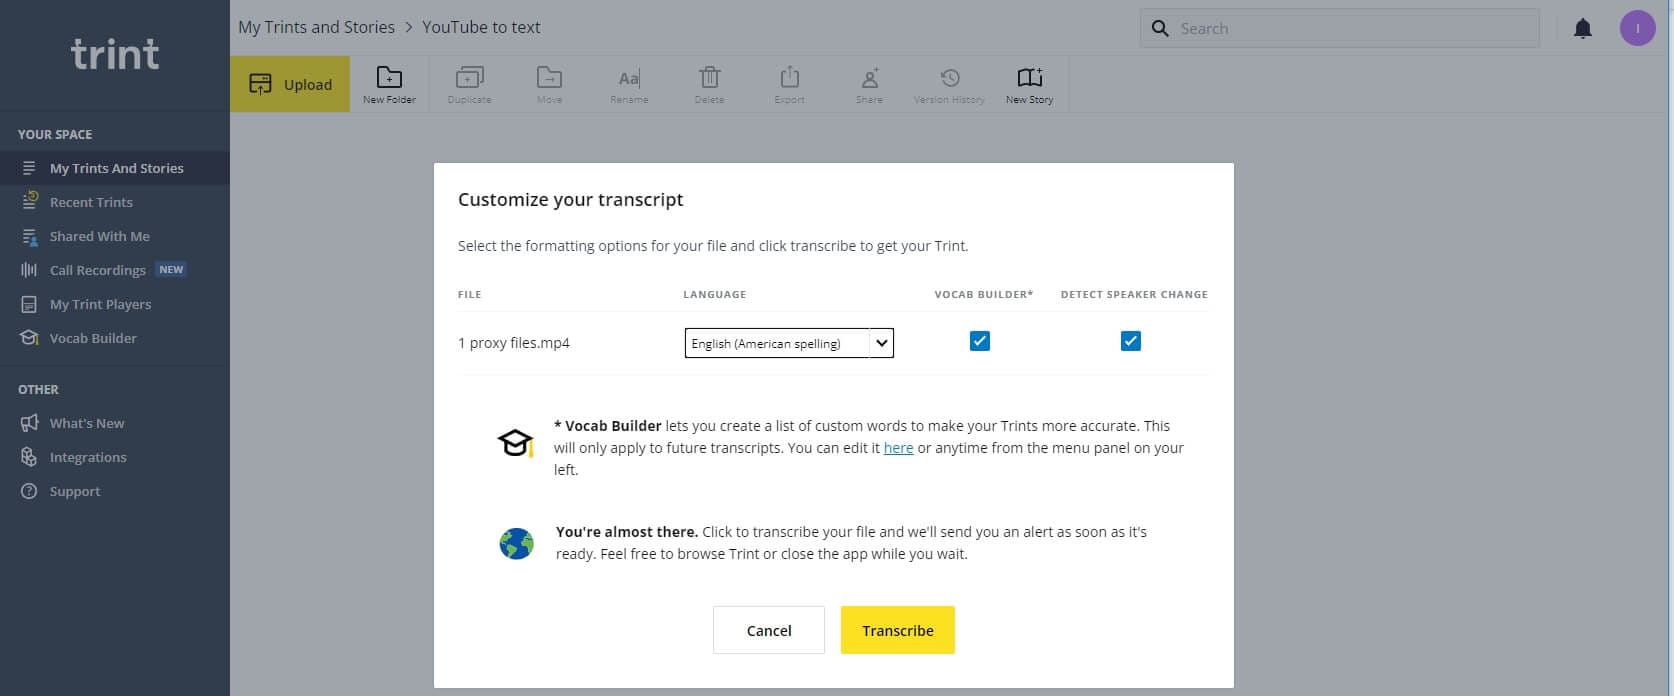
Turn your speech to text through magic - or in other words, through state-of-the-art technology. Trint is an online transcription tool that allows individuals to turn video files into text. People can download and upload numerous video files at once and turn them into text documents.
This is an extremely handy tool to have considering it comes with numerous options such as editing the text, only inducing certain parts of the video in the text, and so much more. This tool only has one shortcoming, it only accepts English language videos.
7. Happy Scribe
If you are wondering how, you will convert YouTube video to text, then we have just the answer for you. Make use of Happy Scribe to automatically transcribe all sorts of audio and video into comprehensive and readable text. You can get numerous features and options in this tool such as advanced grammatical functions as well as timestamps.
If your videos are in different languages, do not worry because Happy Scribe has more than 60 language formats. However, to make use of added features, individuals will need to pay for the tool and upgrade to the pro version.
8. 360Converter
360Converter, as its name suggests is a video to text converter which individuals can use online and offline. All you need to do is download and then upload the YouTube video that you would like to transcribe and the tool will automatically generate the text for you. The supported video formats include 3GP, MP4, MOV, AVI, and many more. This tool uses advanced technology to get accurate language and grammatical transcriptions, so everything is word to word - the exact same as the video. While this tool is extremely user-friendly, many state that it takes a while to process videos to text.
Key Takeaways!
Technology has come a long way which is why we now have numerous options available online to help us convert YouTube videos to text in less than 5-10 minutes. All you have to do is upload the file and let the tool do its magic! You can transcribe in different languages, segments, and so much more now!
Transform Long Videos into Short Ones Instantly
Turn long videos into viral clips. Effortlessly transform lengthy videos into engaging, shareable clips.

02 Best YouTube Video to Text Converters Online
Part 1: How to Convert YouTube Video to Texts by Copy/Paste YouTube Transcript
When people think “Get the transcript from YouTube” they believe it is going to be a daunting and lengthy procedure. Well, let us tell you that it is certainly not! All you have to do is follow the steps outlined below to transcribe YouTube video to text - that too through the YouTube player itself.
First what you have to do is open YouTube and select any video for which you require the transcript. Once you have selected the video, wait for it to load and then click the three dots located beneath the video, as shown in the image below.
Following that, a menu will appear, just select the “Open Transcript” option and the transcription will open on the top right side of your screen.
Simply select the entire transcript using your mouse, then copy and paste it into a new Word Document or Google Document. If you don’t need the timestamps, you can click the three-dot icon to toggle timestamps off.
By following the steps outlined above, you can convert a YouTube video to text in less than five seconds!
Part 2: Best YouTube Video to Text Converters Online
Aside from the basic method of getting the transcription from YouTube itself, many individuals make use of effective YouTube video to text converter online free. This allows them to get the complete video into text, small parts of the video to text, as well as options to convert the text into multiple languages. Below are some of the best software to convert YouTube video to text online.
1. Inqscribe
This high-quality cross-platform tool allows users to transcribe audio and video files into text . Whether it is a meeting recording or a YouTube video - you can convert them all to text. Making use of this free online software is extremely easy, all one has to do is just upload their file and click the process. Then the system will automatically transcribe the video into a text document for you. The software is uni code so all file formats are supported such as txt, XML, HTML, WebVTT, and more. The only drawback of this online software is that video files that are larger than a certain limit cannot be accepted.
2. Sonix
For individuals who have premium quality audio transcription, a tool by the name of Sonix is the right choice for you. This tool enables users to turn all types of YouTube videos into text. All they have to do is simply download the YouTube video they need to transcribe and then upload it to the online interface. From there, this software uses its comprehensive text reader to convert the video to text. This platform supports more than 40 different language choice inputs and outputs. Users are allowed to transcribe up to five videos for free, then they must pay a subscription fee.
3. Otter
This video-to-text converter works best in real-time. Simply play the audio of a YouTube video and let Otter do its magic. In real-time it will convert audio into text. Moreover, if you would like to only convert some parts of the audio to text, that is possible with this tool as well.
All you need to do is play the audio accordingly and the text will automatically generate itself. The AVI (Ambient Voice Intelligence) of this tool allows it to accurately understand what the audio is saying to transcribe the video. While many do find this tool handy, learning how to use it can be a tiny bit tedious and confusing.
Note: Currently, Otter doesn’t support uploading YouTube video link, you may need to download the YouTube video first and then upload it from desktop.
4. oTranscribe
This online transcription tool is extremely easy and convenient to use - and it is entirely free! All you need to do is head on over to its homepage and drop a link to the YouTube video that you would like to transcribe. Then from there, you can access the video and text all at the same time, without having to switch between videos.
The best part is that you can record and translate text according to your need, cut and miss parts that you do not require. This tool supports all file formats which just adds to convince. The only challenge is that it will only accept videos and translate them into English.
5. Go Transcribe
If you are looking to convert any sort of video format to text, then Go Transcribe might just be the tool that you require. This tool makes use of the latest voice technology to convert videos to text - and gives you the output in the form of an SRT, PDF, or DOC, which are all editable. All you need to do is upload the video in one of the formats below,
- 3PG
- FLV
- AVI
- MOV
- MPG
- MPEG
Then simply click the processing options and your video will be generated into a text file within minutes. However, this software may require a subscription fee.
files. Moreover, the output format is PDF which individuals cannot edit unless they convert the PDF to a TXT file online using different software.
6. Trint
Turn your speech to text through magic - or in other words, through state-of-the-art technology. Trint is an online transcription tool that allows individuals to turn video files into text. People can download and upload numerous video files at once and turn them into text documents.
This is an extremely handy tool to have considering it comes with numerous options such as editing the text, only inducing certain parts of the video in the text, and so much more. This tool only has one shortcoming, it only accepts English language videos.
7. Happy Scribe
If you are wondering how, you will convert YouTube video to text, then we have just the answer for you. Make use of Happy Scribe to automatically transcribe all sorts of audio and video into comprehensive and readable text. You can get numerous features and options in this tool such as advanced grammatical functions as well as timestamps.
If your videos are in different languages, do not worry because Happy Scribe has more than 60 language formats. However, to make use of added features, individuals will need to pay for the tool and upgrade to the pro version.
8. 360Converter
360Converter, as its name suggests is a video to text converter which individuals can use online and offline. All you need to do is download and then upload the YouTube video that you would like to transcribe and the tool will automatically generate the text for you. The supported video formats include 3GP, MP4, MOV, AVI, and many more. This tool uses advanced technology to get accurate language and grammatical transcriptions, so everything is word to word - the exact same as the video. While this tool is extremely user-friendly, many state that it takes a while to process videos to text.
Key Takeaways!
Technology has come a long way which is why we now have numerous options available online to help us convert YouTube videos to text in less than 5-10 minutes. All you have to do is upload the file and let the tool do its magic! You can transcribe in different languages, segments, and so much more now!
Transform Long Videos into Short Ones Instantly
Turn long videos into viral clips. Effortlessly transform lengthy videos into engaging, shareable clips.
Also read:
- Maximizing Impact with Your YouTube Commercial
- 2024 Approved Elevate Your Brand Discovering the Essential 5 YouTube Strategies
- 2024 Approved DIY Guide Zero Cost YouTube Intros & Template Usage
- Cutting-Edge Computers Notebook Recommendations for Editors
- Cured Non-Appearance of Tiny Vid Content for 2024
- In 2024, Discovering Youtube's Green Magic for Effective Filming
- A Professional's Approach to Video Editing on YouTube
- [New] Digital Converters Showcase Optimal YTVideo Text Extraction
- Entering the VTuber Universe Beginning Stages & Possibilities, In 2024
- Dissecting YouTube's Criteria for Featured Community Inputs for 2024
- Decoding the Art of ASMR Filmmaking Techniques for 2024
- 2024 Approved A Step-by-Step Guide to YouTube to IGTV Conversion
- [Updated] Designing Direct URLs for Automatic Content Subscription
- [Updated] Charting a Course for Revenue with YTP2024 Insights
- 2024 Approved Boost Views Through Effective YouTube Thumbnail Selection
- [Updated] 20 YouTube Time Savers That Will Skyrocket Engagement Rates
- How to Insert YouTube Links for an Engaging PPT Experience
- 2024 Approved Boost Your YouTube Success with Free, High-Quality Audio
- [Updated] Essential Football Info YouTube Trend Infographics
- In 2024, Deciphering YouTube Shorts A Comprehensive Overview
- Unleash Creativity in YouTube Short Video Production
- 2024 Approved Ethical Approaches to Extract MP4 From YouTube
- [New] A Detailed Exploration YouTube's Visionary Suite
- 2024 Approved Design Principles for Eye-Catching YT Previews
- [Updated] Achieving Precise YouTube Content Extraction
- __Local Labor Costs__ The Availability and Rates of Skilled Electricians in the Area Can Affect Labor Costs Significantly
- Ultimate List Free YouTube Gallery Downloader Tools
- In 2024, Boost Channels and Views Through Savvy YouTube Analysis
- [New] 2023'S Favorite Animated Channels on YouTube (Daytime Vibes)
- Personalizing YouTube's Auto-Subscribe Page
- [New] 10+ Best Free Video Editing Programs of 2023
- The Professional's Guide Adding YouTube to Google Slides
- [Updated] Curated Collection Best Free Footage Websites Ranked
- Skyrocket Your View Count YouTube Success via Sony Vegas Editing
- In 2024, Animated Text That Jumps Master Class with Easy Steps
- Engaging Everyone How to Multistream Effectively on YouTube and Twitch for 2024
- [Updated] 10 Stellar Tools That Amplify Your Video's YouTube Presence
- Launchpad to Success The YouTube Entrepreneur's Guide
- How to Transfer Text Messages from Motorola Moto G24 to New Phone | Dr.fone
- How to Fix My Apple iPhone 6 Plus Location Is Wrong | Dr.fone
- How To Recover Apple iPhone 15 Pro Data From iCloud? | Dr.fone
- [Updated] Maximize Your Mac's Video Recording Potential for 2024
- In 2024, Pro Video Capture Solutions on Mac Beyond the Bandicamp Era
- Cut to Perfection Advanced Guide to Cropping Videos for Instagram for 2024
- Streamlining Roblox Games on Mac for Recording
- Updated The Ultimate Guide to Converting MP4 to MP3 Best Converters and Methods for 2024
- Proven Ways in How To Hide Location on Life360 For Vivo X Fold 2 | Dr.fone
- [Updated] Peeling Back Layers The Hidden Meanings of Everyday Emojis
- What is the best Pokemon for pokemon pvp ranking On Tecno Spark Go (2024)? | Dr.fone
- 2024 Approved How to Craft Engaging Narratives for Facebook Reels
- Redmi Note 12T Pro Unlock Tool - Remove android phone password, PIN, Pattern and fingerprint
- 2024 Approved How to Make GIF Instagram | Quick Tips
- [Updated] 2024 Approved From Raw Footage to Social Stardom The Art of Video Cropping on Instagram
- In 2024, Exploring the Essence of Vimeo A Leader in Video Platforms
- [Updated] 2024 Approved Story Savers Unleashed Instagram's Free Limit Breaker
- New 2024 Approved Say Goodbye to Shaky Videos 5 Free Android Apps to Try
- 2024 Approved Elite Group Chat & Webcams The Best Selection
- The Ultimate Free Voice Changer Guide for Discord Users
- [New] Tricks to Improve Mobile Streaming Quality on Chrome Browser for 2024
- Possible solutions to restore deleted videos from Redmi A2+
- Facebook Video Downloader & MP3 Maker for the Modern Age for 2024
- Ways to trade pokemon go from far away On Apple iPhone 15 Plus? | Dr.fone
- Title: "In 2024, Crafting Engaging Content Add YouTube to Slides"
- Author: Brian
- Created at : 2024-05-25 12:07:57
- Updated at : 2024-05-26 12:07:57
- Link: https://youtube-video-recordings.techidaily.com/in-2024-crafting-engaging-content-add-youtube-to-slides/
- License: This work is licensed under CC BY-NC-SA 4.0.
