
:max_bytes(150000):strip_icc()/what-is-apple-tv-1994193-f05afc8429e74037b282259526cd6ead.png)
"In 2024, Craft Your Vision Best Cameras for Video Creators"
Craft Your Vision: Best Cameras for Video Creators
The Best Cameras for YouTube from Beginners to Professionals

Max Wales
Mar 27, 2024• Proven solutions
Whether you’re a beginner or a pro as a YouTuber, your YouTube equipment shouldn’t be the thing that holds you back from becoming a YouTube star. But, how do you find the best camera for making YouTube videos? What options do you have?
In this article, we’re going to explore some of the best cameras for YouTube. We’ll label each one based on what we believe is best for particular uses, so that you can better parse what it is that you want to purchase. All of this is in hopes that you can find the video camera for YouTube that is right for you and what you need.
Part 1: 7 Best Best Camera for Youtube to Make Videos
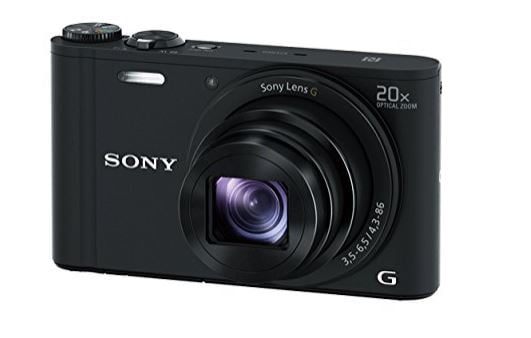
1. Sony DSC WX350 Digital Camera – Best Point and Shoot Video Camera
Specifications:
- 40x clear image zoom; 20x optical zoom
- Lock-on Auto Focus
- Wi-Fi with NFC3 connectivity for mobile devices
- 4 megapixels
- CMOS sensor that provides top quality images, even in low lighting
- Motion shot video with up to 4k quality output
Description: Have you been looking for a 20x zoom camera that fits in your pocket ? Get the best pictures with the Sony DSC WX350. This camera offers both still photos and video recording, using technology that minimizes how much the camera shakes, even if you’re filming on the go.
Pros: The image stabilizer makes this one of the best cameras for making YouTube videos out there, alongside of the 20x optical zoom. The battery life is quite long as well, which means you can get a lot of content done without any problems. Lastly, you can film in HD, which makes any YouTube influencer happy.
Cons: The LED screen can be quite dim, so it’s hard to see it when you’re out in bright sunlight; be sure you make adjustments before you go outside. There is also not your typical viewfinder installed, so experienced videographers may not like using it.
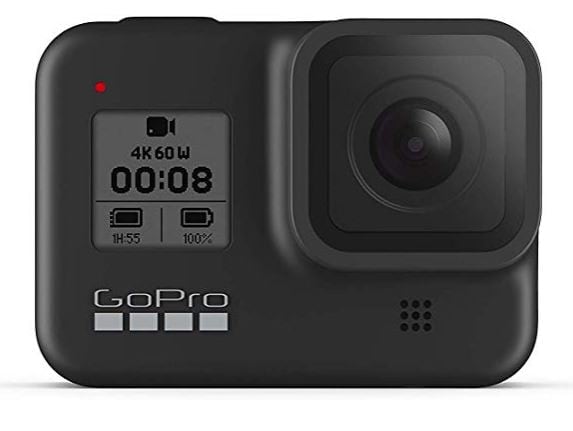
2. GoPro HERO8 Action Camera - Best Wearable Sports Camera
Specifications:
- Up to 60 FPS
- 4k and HD capabilities
- HyperSmooth 2.0 stabilization options.
- Optional Battery Mod available.
- Integrated Mount
- Crisp, easy to use and navigate LCD.
Description: If you need an on-the-go video camera for YouTube, there’s nothing better than a GoPro. With their HERO series of GoPros, they have all sorts of great features that allow you to capture the smoothest video, even when you’re out and on the go. Their top end stabilization makes their cameras the best for the active YouTuber.
Pros: The rugged, waterproof design of the HERO7 is a great option for anyone who is looking to be on the go with their YouTube. The integrated mount makes it simple for anyone who wants to put it on a selfie stick or something else, and it even has a companion app for easy, on the go editing!
Cons: The Wi-Fi capabilities are great, but the video transfer can take a bit of time due to how large the files may be. So, if you’re uploading the transfer, you may want to consider using the USB port instead. Also, the memory card slot is in an awkward place near the mount, so those with larger fingers may have trouble putting a card in there.
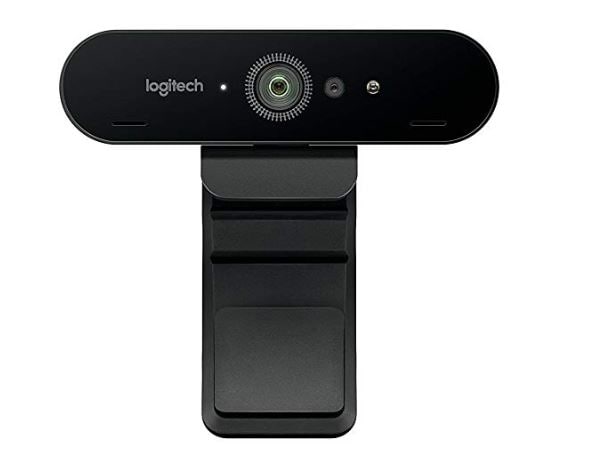
3. Logitech BRIO HD Webcam for Video – Best Video Recording and Streaming Camera
Specifications:
- 5x zoom
- Premium glass lens
- 4k image sensor for videoing and HDR with autofocus
- Light exposure automatically adjusts for whatever lighting that you’re filming in.
- Streaming and recording available.
- Enterprise ready for any use.
- Plug and play software automatically installs upon first use.
- Cover clip so you can cover the camera quickly, when needed.
Description: If you need an easy to use, simple to install option for filming and streaming from your computer, then this Logitech is the best camera for YouTube videos of this type. With multiple features and a design that has been made for streamers like you, you’ll always be able to just turn it on, make adjustments with ease, and get streaming in no time.
Pros: The camera is incredibly easy to use and install; it connects to your PC with a USB type C to USB type 3.0 cord (backwards compatible to 2.0). You can easily tinker with all of the settings and such in the included software.
Cons: The arm is designed for thick edges; those with flat monitors or borderless monitors may find that it’s difficult to attach it to your monitor. The software is easy to use, but it’s missing a handful of settings that more experienced streamers would want to have available. There is a crop out background feature, but it can be hard to find and use.
4. PANASONIC Lumix G7 4K Digital Camera - Best Mirrorless Camera for Professionals

Specifications:
- 16 megapixels
- No pass filter with four thirds sensor
- Wi-Fi capability
- 4k and HD video capture available at 30 frames per second.
- Aperture and shutter settings are adjusted via knobs, not menus.
- 3 inch tilt and swivel display
- High resolution viewfinder
Description: If you want to have professional looking photos and videos, the PANASONIC Lumix G7 4K is a solid choice for a mirrorless camera. All of the controls make it easy to get things the way that you want it, and it comes with multiple ports so that you can plug it into any device and get it ready to go.
Pros: This one of the best 4k video options out there, and you don’t need to spend an arm and a leg on it. The dual control dials and the variable touch LCD allow for maximum control, making it simple to film what you want with minimal editing after you’ve filmed.
Cons: There is a tracking focus, which can be good, but it makes the burst rate (which helps with motion blur) a lot slower. It does have a plastic build, rather than metal, so it’s not as heavy duty as other options. And, you need to purchase it with everything included, instead of just purchasing the body.
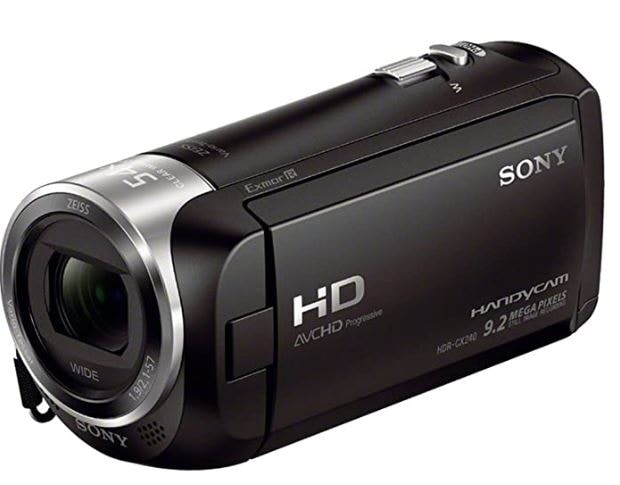
5. Sony CX405 Full HD - Best Camcorder (Only) for Video
Specifications:
- 60x clear image zoom with Zeiss Lens
- 50 Mbps XAVC
- MP4 and AVCHD codecs
- SteadyShot image stabilization
- Built-in USB cable
- Face detection and noise reduction
- 7 picture effects for video
Description: If you’re looking for the best cheap camera for YouTube, this is a pretty solid option. It has a Carl Zeiss lens (low light capable) and SteadyShot technology for stabilization. It’s the starter camera that beginners dream of due to its ease of use and affordability.
Pros: The image stabilization is some of the best out there, and it’s got a user friendly interface. Dual recording options make for great YouTube and other social media use. Lightweight makes it easy to take anywhere.
Cons: Connectivity ports are in strange spots, and can be hard to get to. You cannot add an external mic, so you have to use the on-board ones. After extensive use of the ports, the on-board USB cable may have some issues with connectivity over time.
6. DJI OSMO Handheld Gimbal – Best Easy to Use Holder for Camera Phone for Beginners
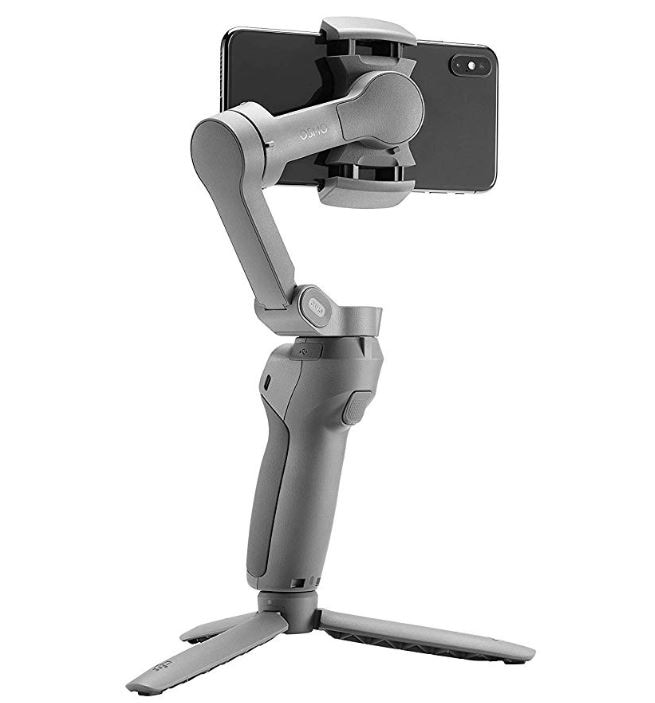
Specifications:
- 3 axis Gimbal that reduces shaky footage
- Ultra-responsive design reacts in real time.
- Easily folds up for maximum portability
- Battery operated ensures that you don’t always need a connection
- Comfortable grip allows you to use the gimbal without discomfort or pain.
Description: If your phone is currently the best camera for YouTube videos, then the DJI OSMO Handheld Gimbal makes it really easy for you to use it on the go. This has been designed to keep your camera flat, no matter where you’re moving, and it helps you take some pretty great shots. This is an option if you need freedom in your movement.
Pros: The DJI OSMO Handheld Gimbal is really easy to use and compatible with most mobile phones that are out there. With multiple settings and options, you can easily turn your phone into the very best option for getting footage, even if your regular video camera isn’t nearby.
Cons: Some people note that it doesn’t work with wide-screen mobile devices or “phablets” as they are called. Another complaint is that it can be difficult to get used the construction of the Gimbal, but that’s something that you can sort out with practice.
7. Canon Digital SLR Camera Kit – Best Cheap SLR Choice
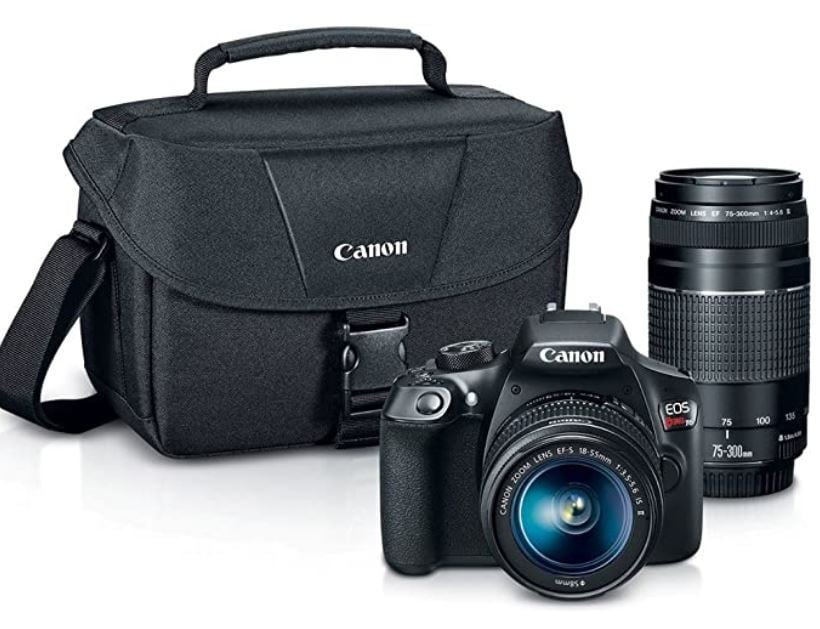
Specifications:
- Wi-Fi and NFC built in for ease of video and photo transfer
- 18 Megapixel
- Image sensor with an IS of 100 to 6400 (and the option to expand to 12800)
- Full HD videos with manual controls for focus and exposure
- 3 inch LCD monitor turns and adjusts as needed.
- Interchangeable lens, Bayonet mount for tripods and selfie sticks.
Description: The Canon Digital SLR Camera Kit is an all-in-one kit that makes it simple for you to start making videos right out of the bag. Complete with everything that you need in order to use an SLR well, you’ll find it’s quite simple to get the hang of, and that you have a lot of flexibility in how you use it.
Pros: The Canon Digital SLR Camera Kit has Wi-Fi capability, offers a great auto focus and is made from heavy duty materials. Plus, it can shoot stills, video, and rolls, which makes it really versatile for anyone.
Cons: This particular set doesn’t have Bluetooth with it, so you can’t connect a remote. Its lens is interchangeable, but you can only use Canon lenses and flashes with it, so that decreases the number of options you have here.
Want to know more about camera? Watch this!
What Gear Do Creators Actually Use | Vidcon 2023 | Sony vs Canon
Part 2: Frequently Asked Questions
1. What is a good camera for YouTube beginners?
Sony DSCHX80/B Point & Shoot Camera is the best cheap camera for YouTube that you can find if you’re on any sort of budget. It has a 60x clear image zoom and incredibly versatile video with multiple viewfinder and autofocus options. It’s selfie ready with a multi-angle LCD display and you can customize your setting sin whatever way that you wish to do so. It also comes with pretty much anything that you need in the box, so you’re ready to start filming as soon as you charge it.
2. What equipment do you need to start a YouTube channel?
- A camera that meets all of your needs and purposes.
- A microphone that is easy to use and produces high quality audio options.
- A sturdy, reliable tripod that is compatible with your camera
- Lighting equipment for the space that you’re filming in.
- An idea as to what you’re going to do and how you’d like to proceed.
3. What software do YouTubers use to edit videos?
There are a number of different options that you can consider if you’re looking to edit your videos well. Here is a quick list of some of the top options that you’ll see them using alongside of the best cameras for YouTube
Beginners
- Filmora : A simple to download and use option which can create high-quality videos in just a few clicks.
- iMovie: Only for Macs, this is a simple to use, intuitively designed video editor has a lot of features, and comes pre-installed on most Macs.
- Adobe Rush: Adobe Rush is a simple to use, browser based, video editing program that is also available as a phone app.
Professional
- Adobe Premiere: One of the top programs out there for editing video, this is part of the Adobe series and has endless options and features.
- Final Cut Pro: A Mac-Only, high end video editing software, many people who use the best YouTube camera also use this.
Max Wales
Max Wales is a writer and a lover of all things video.
Follow @Max Wales
Max Wales
Mar 27, 2024• Proven solutions
Whether you’re a beginner or a pro as a YouTuber, your YouTube equipment shouldn’t be the thing that holds you back from becoming a YouTube star. But, how do you find the best camera for making YouTube videos? What options do you have?
In this article, we’re going to explore some of the best cameras for YouTube. We’ll label each one based on what we believe is best for particular uses, so that you can better parse what it is that you want to purchase. All of this is in hopes that you can find the video camera for YouTube that is right for you and what you need.
Part 1: 7 Best Best Camera for Youtube to Make Videos
1. Sony DSC WX350 Digital Camera – Best Point and Shoot Video Camera
Specifications:
- 40x clear image zoom; 20x optical zoom
- Lock-on Auto Focus
- Wi-Fi with NFC3 connectivity for mobile devices
- 4 megapixels
- CMOS sensor that provides top quality images, even in low lighting
- Motion shot video with up to 4k quality output
Description: Have you been looking for a 20x zoom camera that fits in your pocket ? Get the best pictures with the Sony DSC WX350. This camera offers both still photos and video recording, using technology that minimizes how much the camera shakes, even if you’re filming on the go.
Pros: The image stabilizer makes this one of the best cameras for making YouTube videos out there, alongside of the 20x optical zoom. The battery life is quite long as well, which means you can get a lot of content done without any problems. Lastly, you can film in HD, which makes any YouTube influencer happy.
Cons: The LED screen can be quite dim, so it’s hard to see it when you’re out in bright sunlight; be sure you make adjustments before you go outside. There is also not your typical viewfinder installed, so experienced videographers may not like using it.
2. GoPro HERO8 Action Camera - Best Wearable Sports Camera
Specifications:
- Up to 60 FPS
- 4k and HD capabilities
- HyperSmooth 2.0 stabilization options.
- Optional Battery Mod available.
- Integrated Mount
- Crisp, easy to use and navigate LCD.
Description: If you need an on-the-go video camera for YouTube, there’s nothing better than a GoPro. With their HERO series of GoPros, they have all sorts of great features that allow you to capture the smoothest video, even when you’re out and on the go. Their top end stabilization makes their cameras the best for the active YouTuber.
Pros: The rugged, waterproof design of the HERO7 is a great option for anyone who is looking to be on the go with their YouTube. The integrated mount makes it simple for anyone who wants to put it on a selfie stick or something else, and it even has a companion app for easy, on the go editing!
Cons: The Wi-Fi capabilities are great, but the video transfer can take a bit of time due to how large the files may be. So, if you’re uploading the transfer, you may want to consider using the USB port instead. Also, the memory card slot is in an awkward place near the mount, so those with larger fingers may have trouble putting a card in there.
3. Logitech BRIO HD Webcam for Video – Best Video Recording and Streaming Camera
Specifications:
- 5x zoom
- Premium glass lens
- 4k image sensor for videoing and HDR with autofocus
- Light exposure automatically adjusts for whatever lighting that you’re filming in.
- Streaming and recording available.
- Enterprise ready for any use.
- Plug and play software automatically installs upon first use.
- Cover clip so you can cover the camera quickly, when needed.
Description: If you need an easy to use, simple to install option for filming and streaming from your computer, then this Logitech is the best camera for YouTube videos of this type. With multiple features and a design that has been made for streamers like you, you’ll always be able to just turn it on, make adjustments with ease, and get streaming in no time.
Pros: The camera is incredibly easy to use and install; it connects to your PC with a USB type C to USB type 3.0 cord (backwards compatible to 2.0). You can easily tinker with all of the settings and such in the included software.
Cons: The arm is designed for thick edges; those with flat monitors or borderless monitors may find that it’s difficult to attach it to your monitor. The software is easy to use, but it’s missing a handful of settings that more experienced streamers would want to have available. There is a crop out background feature, but it can be hard to find and use.
4. PANASONIC Lumix G7 4K Digital Camera - Best Mirrorless Camera for Professionals
Specifications:
- 16 megapixels
- No pass filter with four thirds sensor
- Wi-Fi capability
- 4k and HD video capture available at 30 frames per second.
- Aperture and shutter settings are adjusted via knobs, not menus.
- 3 inch tilt and swivel display
- High resolution viewfinder
Description: If you want to have professional looking photos and videos, the PANASONIC Lumix G7 4K is a solid choice for a mirrorless camera. All of the controls make it easy to get things the way that you want it, and it comes with multiple ports so that you can plug it into any device and get it ready to go.
Pros: This one of the best 4k video options out there, and you don’t need to spend an arm and a leg on it. The dual control dials and the variable touch LCD allow for maximum control, making it simple to film what you want with minimal editing after you’ve filmed.
Cons: There is a tracking focus, which can be good, but it makes the burst rate (which helps with motion blur) a lot slower. It does have a plastic build, rather than metal, so it’s not as heavy duty as other options. And, you need to purchase it with everything included, instead of just purchasing the body.
5. Sony CX405 Full HD - Best Camcorder (Only) for Video
Specifications:
- 60x clear image zoom with Zeiss Lens
- 50 Mbps XAVC
- MP4 and AVCHD codecs
- SteadyShot image stabilization
- Built-in USB cable
- Face detection and noise reduction
- 7 picture effects for video
Description: If you’re looking for the best cheap camera for YouTube, this is a pretty solid option. It has a Carl Zeiss lens (low light capable) and SteadyShot technology for stabilization. It’s the starter camera that beginners dream of due to its ease of use and affordability.
Pros: The image stabilization is some of the best out there, and it’s got a user friendly interface. Dual recording options make for great YouTube and other social media use. Lightweight makes it easy to take anywhere.
Cons: Connectivity ports are in strange spots, and can be hard to get to. You cannot add an external mic, so you have to use the on-board ones. After extensive use of the ports, the on-board USB cable may have some issues with connectivity over time.
6. DJI OSMO Handheld Gimbal – Best Easy to Use Holder for Camera Phone for Beginners
Specifications:
- 3 axis Gimbal that reduces shaky footage
- Ultra-responsive design reacts in real time.
- Easily folds up for maximum portability
- Battery operated ensures that you don’t always need a connection
- Comfortable grip allows you to use the gimbal without discomfort or pain.
Description: If your phone is currently the best camera for YouTube videos, then the DJI OSMO Handheld Gimbal makes it really easy for you to use it on the go. This has been designed to keep your camera flat, no matter where you’re moving, and it helps you take some pretty great shots. This is an option if you need freedom in your movement.
Pros: The DJI OSMO Handheld Gimbal is really easy to use and compatible with most mobile phones that are out there. With multiple settings and options, you can easily turn your phone into the very best option for getting footage, even if your regular video camera isn’t nearby.
Cons: Some people note that it doesn’t work with wide-screen mobile devices or “phablets” as they are called. Another complaint is that it can be difficult to get used the construction of the Gimbal, but that’s something that you can sort out with practice.
7. Canon Digital SLR Camera Kit – Best Cheap SLR Choice
Specifications:
- Wi-Fi and NFC built in for ease of video and photo transfer
- 18 Megapixel
- Image sensor with an IS of 100 to 6400 (and the option to expand to 12800)
- Full HD videos with manual controls for focus and exposure
- 3 inch LCD monitor turns and adjusts as needed.
- Interchangeable lens, Bayonet mount for tripods and selfie sticks.
Description: The Canon Digital SLR Camera Kit is an all-in-one kit that makes it simple for you to start making videos right out of the bag. Complete with everything that you need in order to use an SLR well, you’ll find it’s quite simple to get the hang of, and that you have a lot of flexibility in how you use it.
Pros: The Canon Digital SLR Camera Kit has Wi-Fi capability, offers a great auto focus and is made from heavy duty materials. Plus, it can shoot stills, video, and rolls, which makes it really versatile for anyone.
Cons: This particular set doesn’t have Bluetooth with it, so you can’t connect a remote. Its lens is interchangeable, but you can only use Canon lenses and flashes with it, so that decreases the number of options you have here.
Want to know more about camera? Watch this!
What Gear Do Creators Actually Use | Vidcon 2023 | Sony vs Canon
Part 2: Frequently Asked Questions
1. What is a good camera for YouTube beginners?
Sony DSCHX80/B Point & Shoot Camera is the best cheap camera for YouTube that you can find if you’re on any sort of budget. It has a 60x clear image zoom and incredibly versatile video with multiple viewfinder and autofocus options. It’s selfie ready with a multi-angle LCD display and you can customize your setting sin whatever way that you wish to do so. It also comes with pretty much anything that you need in the box, so you’re ready to start filming as soon as you charge it.
2. What equipment do you need to start a YouTube channel?
- A camera that meets all of your needs and purposes.
- A microphone that is easy to use and produces high quality audio options.
- A sturdy, reliable tripod that is compatible with your camera
- Lighting equipment for the space that you’re filming in.
- An idea as to what you’re going to do and how you’d like to proceed.
3. What software do YouTubers use to edit videos?
There are a number of different options that you can consider if you’re looking to edit your videos well. Here is a quick list of some of the top options that you’ll see them using alongside of the best cameras for YouTube
Beginners
- Filmora : A simple to download and use option which can create high-quality videos in just a few clicks.
- iMovie: Only for Macs, this is a simple to use, intuitively designed video editor has a lot of features, and comes pre-installed on most Macs.
- Adobe Rush: Adobe Rush is a simple to use, browser based, video editing program that is also available as a phone app.
Professional
- Adobe Premiere: One of the top programs out there for editing video, this is part of the Adobe series and has endless options and features.
- Final Cut Pro: A Mac-Only, high end video editing software, many people who use the best YouTube camera also use this.
Max Wales
Max Wales is a writer and a lover of all things video.
Follow @Max Wales
Bridge the Gap: How to Multistream for a Wider, Diverse Audience
Youtube Video Maker - Wondershare Filmora
Provide abundant video effects - A creative video editor
Powerful color correction and grading
Detailed tutorials provided by the official channel
As the world has progressed, a great deal has changed, and it has transformed into a digital hub. People have started to use different platforms to entertain themselves, watch their favorite content online, gaming, music, sports, or any other form of entertainment.
Cross-platform streaming is a concept people have started to follow especially when it comes to gaming. The audience has a wide variety of choices when it comes to viewing live content online.
YouTube and Twitch are two major platforms streamers use to publish their content online for their targeted audience. They need to stream their content on YouTube and Twitch simultaneously as it engages a wider range of audiences worldwide, and newer streamers can benefit from it.
In this article
Part 1: How Can You Stream on Twitch and YouTube at the Same Time?
Part 2: How to Multi-stream using Streamlabs Prime
Part 3: Bonus Tips | Enlarge your Live Stream Performance!
Part 1: How Can You Stream on Twitch and YouTube at the Same Time?
To stream simultaneously on multiple platforms, a certain program or application is required to provide you with the required tools to enable you to broadcast your content. Several programs provide the option to stream to multiple websites at the same time e.g., Restream, Streamlabs Prime, and MelonApp.
Restream
Restream.io is a service that provides you with the option to broadcast your content to more than 30 different platforms including Twitch and YouTube. When you log in, you can choose the channels you wish to broadcast on and restream will issue a unique key for you.

After you have selected your desired selection, go to your broadcasting software, and choose Restream.io as your preferred service and insert your unique key provided by Restream.
Restream will let you use their services for free provided you use it with their watermark. It is recommended for newer users but if you wish to remove the watermark and go ad-free you will have to upgrade your plan.
Below is a step-by-step guide to help you stream using Restream.io
Step 1: Sign up or log in
The first step is to sign up on Restream. It will require you to choose a unique username, password and enter a valid email address.
Step 2: Choose your desired Platforms
From the list of different platforms, choose the ones you wish to stream to and add your channels by authorizing with the required credentials. Restream has an option of more than 30 platforms including YouTube, Twitch, Facebook, Twitter, and LinkedIn.

Step 3: Choose your subscription plan
Choose your desired plan that caters to your needs. Keep in mind that Restream is 100% free but free accounts do not come with recording or storage and will show a Restream watermark.

You can remove this watermark by upgrading your subscription plan to a Professional one from the dashboard.
Step 4: Choose the final streaming platforms
Connect all your channels so you can stream from a single platform. Click the platform icon and connect your preferred accounts with Restream.
Step 5: Tweak the settings according to your preference
Set up for streaming preferences and settings along with your streaming software. You can broadcast directly from your browser, multiple members from different locations, from your mobile phone, or even your GoPro. More available streaming features can be found on the Restream Help Center.

Restream also offers a wide range of services including the option to stream pre-recorded videos on Twitch at a preselected time and date. However, there is a caveat that you will not be able to multi-stream after you get an affiliate status on your Twitch channel.
Part 2: How to Multi-stream using Streamlabs Prime
Streamlabs Prime is the premium version of Streamlabs. It provides you with a range of 40+ apps that can also improve the quality of your streams and allow you to multi-stream. It is one of the best streaming software in the game currently.
Many content creators use Streamlabs to simultaneously run their streams on YouTube along with Twitch to grasp a wider range of audiences and get more views. One of the best things about Streamlabs is that you can connect to the broadcast services directly from the program without entering any stream key.
Streamlabs has included the option to Multi Stream on different platforms within its OBS client. Below are the steps required to set you up for streaming on YouTube and Twitch at the same time.
Step 1: Open the settings of your desired client
Click on the gear icon to open the settings on the bottom left of the client, click on the Stream tab where you will see the three main platforms for streaming.
Step 2: Add your preferred platforms
Add YouTube and Twitch by pressing the connect button; you can also add other services as well with the Add Destination feature.

Your stream will automatically be broadcast to all selected platforms when you go live. Although, you will be required to use the premium service of Streamlabs to ensure you can Multistream to different platforms at the same time.

Melon is a web-based service that lets you live-stream onto different platforms at the same time such as YouTube, Twitch, Facebook, and LinkedIn in just a matter of a few clicks. No downloads are required and there are umpteen options of customizations to personalize your feed according to your preference.
You can earn through donations from your live stream and are provided with the best customer support 24/7. Everything is hosted on a cloud-based setup and you can stream and record in 1080p.
Below are the steps to guide you on how to stream using the MelonApp.
Step 1: Login or Sign up
Login or Signup with your credentials into Melon and allow the required permissions i.e., microphone and camera.

Step 2: Choose your subscription plan
Choose your premium plan to avail of multi-streaming along with high-quality broadcasting, unlimited streaming, and tons of customization.

Step 3: Choose your desired platforms
Choose and connect the platforms you want to stream to from the Settings in the top right corner. If you have to reselect, simply click x, and reconnect to a different service.
Step 4: Finalize your preferences
Click on ‘Go Live’ and select the platforms for the current stream you wish to broadcast. Selected platforms will be highlighted.

Step 5: Go live
In the end, click next, put in the title of your stream and its description and you are all set to broadcast your content.
Part 3: Bonus Tips | Enlarge your Live Stream Performance
Now that you know how to stream on Twitch and YouTube, here are some tips to improve your live streams!
Tip # 1: Enhance Your Content
You can enhance your content in multiple ways to grasp a wider audience and get your message all around the globe.
Tip # 2: Introduce Graphics and Transitions
You can use interesting gifs, screens, intros, and outros for your streams. Announcing your streams beforehand can also help build up hype and make people anticipate your feed.
Tip # 3: Work More on Post Production
People stream different content on these streaming platforms including gaming, podcasts, educational and entertainment videos. Editing your content to near perfection is one of the most major aspects of a successful broadcast.
Tip # 4: Use Editing Tools to Make Your Videos Interesting
You can use different editing tools such as Wondershare Filmora which is a great video editing software that allows you to edit, trim, cut, add sounds and apply tons of effects to your content no matter what type or genre it is.
Tip # 5: Add Certain Effects to Appear Professional
You can also introduce motion tracking, keyframing, and use other powerful features, and that too for free using Wondershare Filmora. However, if you wish to go a step further you can always opt for their premium version and transcend into a world of endless options and opportunities to edit and enhance your content.
Tip # 6: Promote Your Content Using Social Media
Multi-streaming helps build up a wider community of fans as it is targeting different sets of people and you can also earn from your streams using advertisements and introducing click-on banners for brand endorsements.
Some platforms also let you promote and manage your merchandise, so it is always a good opportunity for these streaming clients and platforms.
Conclusion
Now you can also monetize your streams and broadcast on different platforms such as YouTube and Twitch at the same time. This will boost your reach and views in a very positive way. You can also tweak your content by editing it and inserting sound effects, gifs, and much more to make it more interesting and catchier.
And by multi-streaming on YouTube and Twitch, you will have a greater chance of being found by gaming sponsors and your growth will not be tied just to a single platform. You can also promote your streams on other social media platforms and your handles as well.
Pre-recorded videos are also a great way to present your content with perfection without any chances of being prone to any potential online mishaps.
As the world has progressed, a great deal has changed, and it has transformed into a digital hub. People have started to use different platforms to entertain themselves, watch their favorite content online, gaming, music, sports, or any other form of entertainment.
Cross-platform streaming is a concept people have started to follow especially when it comes to gaming. The audience has a wide variety of choices when it comes to viewing live content online.
YouTube and Twitch are two major platforms streamers use to publish their content online for their targeted audience. They need to stream their content on YouTube and Twitch simultaneously as it engages a wider range of audiences worldwide, and newer streamers can benefit from it.
In this article
Part 1: How Can You Stream on Twitch and YouTube at the Same Time?
Part 2: How to Multi-stream using Streamlabs Prime
Part 3: Bonus Tips | Enlarge your Live Stream Performance!
Part 1: How Can You Stream on Twitch and YouTube at the Same Time?
To stream simultaneously on multiple platforms, a certain program or application is required to provide you with the required tools to enable you to broadcast your content. Several programs provide the option to stream to multiple websites at the same time e.g., Restream, Streamlabs Prime, and MelonApp.
Restream
Restream.io is a service that provides you with the option to broadcast your content to more than 30 different platforms including Twitch and YouTube. When you log in, you can choose the channels you wish to broadcast on and restream will issue a unique key for you.
After you have selected your desired selection, go to your broadcasting software, and choose Restream.io as your preferred service and insert your unique key provided by Restream.
Restream will let you use their services for free provided you use it with their watermark. It is recommended for newer users but if you wish to remove the watermark and go ad-free you will have to upgrade your plan.
Below is a step-by-step guide to help you stream using Restream.io
Step 1: Sign up or log in
The first step is to sign up on Restream. It will require you to choose a unique username, password and enter a valid email address.
Step 2: Choose your desired Platforms
From the list of different platforms, choose the ones you wish to stream to and add your channels by authorizing with the required credentials. Restream has an option of more than 30 platforms including YouTube, Twitch, Facebook, Twitter, and LinkedIn.
Step 3: Choose your subscription plan
Choose your desired plan that caters to your needs. Keep in mind that Restream is 100% free but free accounts do not come with recording or storage and will show a Restream watermark.
You can remove this watermark by upgrading your subscription plan to a Professional one from the dashboard.
Step 4: Choose the final streaming platforms
Connect all your channels so you can stream from a single platform. Click the platform icon and connect your preferred accounts with Restream.
Step 5: Tweak the settings according to your preference
Set up for streaming preferences and settings along with your streaming software. You can broadcast directly from your browser, multiple members from different locations, from your mobile phone, or even your GoPro. More available streaming features can be found on the Restream Help Center.
Restream also offers a wide range of services including the option to stream pre-recorded videos on Twitch at a preselected time and date. However, there is a caveat that you will not be able to multi-stream after you get an affiliate status on your Twitch channel.
Part 2: How to Multi-stream using Streamlabs Prime
Streamlabs Prime is the premium version of Streamlabs. It provides you with a range of 40+ apps that can also improve the quality of your streams and allow you to multi-stream. It is one of the best streaming software in the game currently.
Many content creators use Streamlabs to simultaneously run their streams on YouTube along with Twitch to grasp a wider range of audiences and get more views. One of the best things about Streamlabs is that you can connect to the broadcast services directly from the program without entering any stream key.
Streamlabs has included the option to Multi Stream on different platforms within its OBS client. Below are the steps required to set you up for streaming on YouTube and Twitch at the same time.
Step 1: Open the settings of your desired client
Click on the gear icon to open the settings on the bottom left of the client, click on the Stream tab where you will see the three main platforms for streaming.
Step 2: Add your preferred platforms
Add YouTube and Twitch by pressing the connect button; you can also add other services as well with the Add Destination feature.
Your stream will automatically be broadcast to all selected platforms when you go live. Although, you will be required to use the premium service of Streamlabs to ensure you can Multistream to different platforms at the same time.
Melon is a web-based service that lets you live-stream onto different platforms at the same time such as YouTube, Twitch, Facebook, and LinkedIn in just a matter of a few clicks. No downloads are required and there are umpteen options of customizations to personalize your feed according to your preference.
You can earn through donations from your live stream and are provided with the best customer support 24/7. Everything is hosted on a cloud-based setup and you can stream and record in 1080p.
Below are the steps to guide you on how to stream using the MelonApp.
Step 1: Login or Sign up
Login or Signup with your credentials into Melon and allow the required permissions i.e., microphone and camera.
Step 2: Choose your subscription plan
Choose your premium plan to avail of multi-streaming along with high-quality broadcasting, unlimited streaming, and tons of customization.
Step 3: Choose your desired platforms
Choose and connect the platforms you want to stream to from the Settings in the top right corner. If you have to reselect, simply click x, and reconnect to a different service.
Step 4: Finalize your preferences
Click on ‘Go Live’ and select the platforms for the current stream you wish to broadcast. Selected platforms will be highlighted.
Step 5: Go live
In the end, click next, put in the title of your stream and its description and you are all set to broadcast your content.
Part 3: Bonus Tips | Enlarge your Live Stream Performance
Now that you know how to stream on Twitch and YouTube, here are some tips to improve your live streams!
Tip # 1: Enhance Your Content
You can enhance your content in multiple ways to grasp a wider audience and get your message all around the globe.
Tip # 2: Introduce Graphics and Transitions
You can use interesting gifs, screens, intros, and outros for your streams. Announcing your streams beforehand can also help build up hype and make people anticipate your feed.
Tip # 3: Work More on Post Production
People stream different content on these streaming platforms including gaming, podcasts, educational and entertainment videos. Editing your content to near perfection is one of the most major aspects of a successful broadcast.
Tip # 4: Use Editing Tools to Make Your Videos Interesting
You can use different editing tools such as Wondershare Filmora which is a great video editing software that allows you to edit, trim, cut, add sounds and apply tons of effects to your content no matter what type or genre it is.
Tip # 5: Add Certain Effects to Appear Professional
You can also introduce motion tracking, keyframing, and use other powerful features, and that too for free using Wondershare Filmora. However, if you wish to go a step further you can always opt for their premium version and transcend into a world of endless options and opportunities to edit and enhance your content.
Tip # 6: Promote Your Content Using Social Media
Multi-streaming helps build up a wider community of fans as it is targeting different sets of people and you can also earn from your streams using advertisements and introducing click-on banners for brand endorsements.
Some platforms also let you promote and manage your merchandise, so it is always a good opportunity for these streaming clients and platforms.
Conclusion
Now you can also monetize your streams and broadcast on different platforms such as YouTube and Twitch at the same time. This will boost your reach and views in a very positive way. You can also tweak your content by editing it and inserting sound effects, gifs, and much more to make it more interesting and catchier.
And by multi-streaming on YouTube and Twitch, you will have a greater chance of being found by gaming sponsors and your growth will not be tied just to a single platform. You can also promote your streams on other social media platforms and your handles as well.
Pre-recorded videos are also a great way to present your content with perfection without any chances of being prone to any potential online mishaps.
Also read:
- Tailor Your Subscribe Bar A Quick Filmora Method for YouTube Authentics
- Boost Channels and Views Through Savvy YouTube Analysis
- [Updated] Dominate Discussion How to Trend on Social Media Platforms
- In 2024, Elite 5 Earbuds YouTube's Best Companions
- Mac's Top MP4 Cutters for YouTube Success
- 2024 Approved Captivating Startups Discovering the Best 15 Video Intros
- In 2024, Comprehensively Understanding YouTube's Aspect Ratio Ecosystem
- Download YouTube Beats on Android The Ultimate 6-App Guide for 2024
- The Ultimate Checklist for Post-Editing & Uploading Your 360 Vids on YouTube
- 2024 Approved Essential Tactics for YouTube Advertising with Banners
- Pro Streaming Setup Leading Livestream Hardware and Software
- 2024 Edition The Definitive Strategy for YouTube Monetization
- Top 10 Video-Making Apps IPhone, Android Edition
- [New] Designing Distinctive Denouements
- [Updated] Eliminate Cacophony Perfecting Sound Quality for YouTube
- Anime for the Soul Selecting YouTube Channels to Brighten Today
- 2024 Approved Cutting Edge YouTube Video Editing Techniques - Premiere Pro
- Efficient Video Categorization with Tags
- Strategies for Securely Amassing One Million Video Watches
- [New] Crafting Content that Captivates YouTube Keyword Mastery
- The Ultimate Guide to Pre-Recorded Yoga on YouTube
- Enhance Video Pace - YouTube via Desktops & Phones for 2024
- In 2024, Achieving a Million on the Map A Strategic View-to-Sub Guide
- 2024 Approved Boosting Visuals Mastering YouTube's Video Enhancement Tools
- Upgrade Video Previews with Bright Neon Edging
- Bridge Gaps in Generations of Viewers 6 Interactive Tests to Find Your YouTube Match for 2024
- Boost Engagement Discover the Top 5 YouTube Promotion Tactics for 2024
- 2024 Approved A New Era of Visual Narratives Full Rotation
- Affordable Digital Screen Recorders Reviewed & Rated
- How to Change Your OnePlus Nord 3 5G Location on life360 Without Anyone Knowing? | Dr.fone
- Innovative Initiations Panzoid's Best Ten
- Updated In 2024, Streamline Your Video Collection 8 Best Mac Metadata Editors
- Full Solutions to Fix Error Code 920 In Google Play on Honor 80 Pro Straight Screen Edition | Dr.fone
- [New] Insights Into Instagram's Maxed-Out Videos
- In 2024, Two Ways to Track My Boyfriends Realme Narzo 60 5G without Him Knowing | Dr.fone
- [Updated] In 2024, From Words to Memos IPhone Sound Guide
- [Updated] In 2024, Unlock IG Success with Expert Insights on Loop Videos
- [Updated] 2024 Approved Masterclass Streamlining Your Video Uploads on TikTok (Mac/Windows)
- In 2024, Life360 Circle Everything You Need to Know On Realme C67 4G | Dr.fone
- In 2024, How to Unlock AT&T Apple iPhone 15 Pro Max with 3 Methods
- [Updated] Mastering MAC Video Capture Now for 2024
- In 2024, Complete Guide For Apple iPhone 14 Lock Screen
- Discover the Top Audio Conversion Tools for Your Needs for 2024
- [New] 2024 Approved The Ultimate Cheat Sheet to EZ Grabber Usage
- Title: "In 2024, Craft Your Vision Best Cameras for Video Creators"
- Author: Brian
- Created at : 2024-05-25 12:07:34
- Updated at : 2024-05-26 12:07:34
- Link: https://youtube-video-recordings.techidaily.com/in-2024-craft-your-vision-best-cameras-for-video-creators/
- License: This work is licensed under CC BY-NC-SA 4.0.
