
"In 2024, Conquering Low-Light Challenges in Filming"
Conquering Low-Light Challenges in Filming
Lighting Tips for Vlogging: How to Light

Richard Bennett
Mar 27, 2024• Proven solutions
One of the best things you can do for your video quality is to ensure you have great lighting. Viewers find poor lighting distracting and it’s hard for them to see how great your content is if they are busy thinking about why your video is so dark. By creating a great lighting set up you can ensure that the people watching your videos are only thinking about how much they’re enjoying them.
Going outside and using natural light is the cheapest way to get a lot of light for your videos. If your vlog is not suited to the great outdoors then you need to get more strategic. You can turn on all the lights in your living room and still end up with a dark, grainy, video.
Video Lighting Basics: Three Point Lighting

The most common technique of lighting a scene is called three-point lighting. It involves three different sources of light in the shot and is used by portrait photographers, which is also a great method for lighting your vlog.
The brightest source of light is also known as the key light which need to be high quality. A window will work, but if you do not have access to one where you are filming then consider an LED panel light or a softbox light like the ones used in portrait photography.
This first light will create a dramatic shadow across half of your face. You want to reduce this shadow, but not get rid of it completely.
Rather than setting up another light source on the opposite side of the camera, put up a reflector to bounce some light back onto your face. This reflector is called your ‘Fill Light’.
The fill light is less bright than the primary source of light and it is placed on the side opposite to the key light. Its purpose is to reduce shadows produced by the key light and the reflector will need to be mounted on a stand.
The final step to creating three point lighting is to set up another light behind you. This is your ‘Backlight’, and it will help you stand out from your background. Backlight or Hair light is always placed behind and above the subject to create separation between the subject in the shot and the background. This basic lighting technique can be applied in almost every scene you shoot, which is why it is important to keep an open mind and to continue experimenting with possible light setups.
Watch Video! Top Lighting Tips for Vlogging
Lightning Tips for Aspiring YouTube Videographers
Becoming the master of light will take some time and practice, so it is crucial to remain curious and anxious to learn new tricks throughout that process if you want to continually become better. These tips will help you make the first steps on that journey.
1. Focus Your Key Light
Try to focus your Key Light so that it lights only you and not your background. Do this by mounting anything that can cast a shadow onto your Key Light to control the area where the light hits. If you are using a window for your Key Light then you can use a curtain. If you use a softbox light then your light will already be somewhat focused.
2. Use Natural Lighting
The light provided by the Sun is still the best light source, you can have in your video. The trouble is that natural light changes quickly, which makes it highly unpredictable. The best way to deal with this challenge is to come prepared to the set and to get the shot you want as quickly as you can.
3. Try DIY Lightning
Literally, anything from candles to LED light bulbs can serve as a source of light in a shot. You just need to pay attention to the light temperature, because warmer light sources may highlight reds and yellows that can make your footage look less realistic.
4. Use Lightning Kits
This is by far the best option if you want to be in complete control of the light on your set. You can adjust the intensity of the lights, use filters, diffusers and all sorts of other accessories to create the light that flatters the subjects of your videos. The only downside is that you’ll have to spend a considerable amount of money if you want to have a professional lighting kit.
5. Set up reflectors
Sets of reflectors are often under $50, so they are fairly affordable. However, some vloggers choose to forgo purchasing reflectors and make their own out of tinfoil.

If your strong main light is too hard on your eyes then you can use a translucent ‘reflector’ to soften it. Set your translucent reflector, or other screen, up in front of your main light to diffuse it.
If you are hosting a beauty vlog then you might consider a slightly different set up. Instead of having your main light off to one side set it up directly in front of you so your entire face is lit evenly. It is still a good idea to use fill lights in this set up to give you some dimension, and a backlight is even more essential for helping you stand out from the background. The even light hitting your face will also make you look flat if you do not use a backlight.

If you are using all of the lighting options available to you and your video still looks too dark then you can try brightening it by opening up the aperture of your camera lens/setting a lower f-stop. Letting more light into your camera can help your footage look brighter, although you also run the risk of making things look overexposed/ washed out if you are not careful.
If you are stuck shooting in low light conditions it is best to use a lens with a wider aperture/lower f-stop. This will make the best of the light you do have.
Richard Bennett
Richard Bennett is a writer and a lover of all things video.
Follow @Richard Bennett
Richard Bennett
Mar 27, 2024• Proven solutions
One of the best things you can do for your video quality is to ensure you have great lighting. Viewers find poor lighting distracting and it’s hard for them to see how great your content is if they are busy thinking about why your video is so dark. By creating a great lighting set up you can ensure that the people watching your videos are only thinking about how much they’re enjoying them.
Going outside and using natural light is the cheapest way to get a lot of light for your videos. If your vlog is not suited to the great outdoors then you need to get more strategic. You can turn on all the lights in your living room and still end up with a dark, grainy, video.
Video Lighting Basics: Three Point Lighting

The most common technique of lighting a scene is called three-point lighting. It involves three different sources of light in the shot and is used by portrait photographers, which is also a great method for lighting your vlog.
The brightest source of light is also known as the key light which need to be high quality. A window will work, but if you do not have access to one where you are filming then consider an LED panel light or a softbox light like the ones used in portrait photography.
This first light will create a dramatic shadow across half of your face. You want to reduce this shadow, but not get rid of it completely.
Rather than setting up another light source on the opposite side of the camera, put up a reflector to bounce some light back onto your face. This reflector is called your ‘Fill Light’.
The fill light is less bright than the primary source of light and it is placed on the side opposite to the key light. Its purpose is to reduce shadows produced by the key light and the reflector will need to be mounted on a stand.
The final step to creating three point lighting is to set up another light behind you. This is your ‘Backlight’, and it will help you stand out from your background. Backlight or Hair light is always placed behind and above the subject to create separation between the subject in the shot and the background. This basic lighting technique can be applied in almost every scene you shoot, which is why it is important to keep an open mind and to continue experimenting with possible light setups.
Watch Video! Top Lighting Tips for Vlogging
Lightning Tips for Aspiring YouTube Videographers
Becoming the master of light will take some time and practice, so it is crucial to remain curious and anxious to learn new tricks throughout that process if you want to continually become better. These tips will help you make the first steps on that journey.
1. Focus Your Key Light
Try to focus your Key Light so that it lights only you and not your background. Do this by mounting anything that can cast a shadow onto your Key Light to control the area where the light hits. If you are using a window for your Key Light then you can use a curtain. If you use a softbox light then your light will already be somewhat focused.
2. Use Natural Lighting
The light provided by the Sun is still the best light source, you can have in your video. The trouble is that natural light changes quickly, which makes it highly unpredictable. The best way to deal with this challenge is to come prepared to the set and to get the shot you want as quickly as you can.
3. Try DIY Lightning
Literally, anything from candles to LED light bulbs can serve as a source of light in a shot. You just need to pay attention to the light temperature, because warmer light sources may highlight reds and yellows that can make your footage look less realistic.
4. Use Lightning Kits
This is by far the best option if you want to be in complete control of the light on your set. You can adjust the intensity of the lights, use filters, diffusers and all sorts of other accessories to create the light that flatters the subjects of your videos. The only downside is that you’ll have to spend a considerable amount of money if you want to have a professional lighting kit.
5. Set up reflectors
Sets of reflectors are often under $50, so they are fairly affordable. However, some vloggers choose to forgo purchasing reflectors and make their own out of tinfoil.
If your strong main light is too hard on your eyes then you can use a translucent ‘reflector’ to soften it. Set your translucent reflector, or other screen, up in front of your main light to diffuse it.
If you are hosting a beauty vlog then you might consider a slightly different set up. Instead of having your main light off to one side set it up directly in front of you so your entire face is lit evenly. It is still a good idea to use fill lights in this set up to give you some dimension, and a backlight is even more essential for helping you stand out from the background. The even light hitting your face will also make you look flat if you do not use a backlight.
If you are using all of the lighting options available to you and your video still looks too dark then you can try brightening it by opening up the aperture of your camera lens/setting a lower f-stop. Letting more light into your camera can help your footage look brighter, although you also run the risk of making things look overexposed/ washed out if you are not careful.
If you are stuck shooting in low light conditions it is best to use a lens with a wider aperture/lower f-stop. This will make the best of the light you do have.
Richard Bennett
Richard Bennett is a writer and a lover of all things video.
Follow @Richard Bennett
Richard Bennett
Mar 27, 2024• Proven solutions
One of the best things you can do for your video quality is to ensure you have great lighting. Viewers find poor lighting distracting and it’s hard for them to see how great your content is if they are busy thinking about why your video is so dark. By creating a great lighting set up you can ensure that the people watching your videos are only thinking about how much they’re enjoying them.
Going outside and using natural light is the cheapest way to get a lot of light for your videos. If your vlog is not suited to the great outdoors then you need to get more strategic. You can turn on all the lights in your living room and still end up with a dark, grainy, video.
Video Lighting Basics: Three Point Lighting
The most common technique of lighting a scene is called three-point lighting. It involves three different sources of light in the shot and is used by portrait photographers, which is also a great method for lighting your vlog.
The brightest source of light is also known as the key light which need to be high quality. A window will work, but if you do not have access to one where you are filming then consider an LED panel light or a softbox light like the ones used in portrait photography.
This first light will create a dramatic shadow across half of your face. You want to reduce this shadow, but not get rid of it completely.
Rather than setting up another light source on the opposite side of the camera, put up a reflector to bounce some light back onto your face. This reflector is called your ‘Fill Light’.
The fill light is less bright than the primary source of light and it is placed on the side opposite to the key light. Its purpose is to reduce shadows produced by the key light and the reflector will need to be mounted on a stand.
The final step to creating three point lighting is to set up another light behind you. This is your ‘Backlight’, and it will help you stand out from your background. Backlight or Hair light is always placed behind and above the subject to create separation between the subject in the shot and the background. This basic lighting technique can be applied in almost every scene you shoot, which is why it is important to keep an open mind and to continue experimenting with possible light setups.
Watch Video! Top Lighting Tips for Vlogging
Lightning Tips for Aspiring YouTube Videographers
Becoming the master of light will take some time and practice, so it is crucial to remain curious and anxious to learn new tricks throughout that process if you want to continually become better. These tips will help you make the first steps on that journey.
1. Focus Your Key Light
Try to focus your Key Light so that it lights only you and not your background. Do this by mounting anything that can cast a shadow onto your Key Light to control the area where the light hits. If you are using a window for your Key Light then you can use a curtain. If you use a softbox light then your light will already be somewhat focused.
2. Use Natural Lighting
The light provided by the Sun is still the best light source, you can have in your video. The trouble is that natural light changes quickly, which makes it highly unpredictable. The best way to deal with this challenge is to come prepared to the set and to get the shot you want as quickly as you can.
3. Try DIY Lightning
Literally, anything from candles to LED light bulbs can serve as a source of light in a shot. You just need to pay attention to the light temperature, because warmer light sources may highlight reds and yellows that can make your footage look less realistic.
4. Use Lightning Kits
This is by far the best option if you want to be in complete control of the light on your set. You can adjust the intensity of the lights, use filters, diffusers and all sorts of other accessories to create the light that flatters the subjects of your videos. The only downside is that you’ll have to spend a considerable amount of money if you want to have a professional lighting kit.
5. Set up reflectors
Sets of reflectors are often under $50, so they are fairly affordable. However, some vloggers choose to forgo purchasing reflectors and make their own out of tinfoil.
If your strong main light is too hard on your eyes then you can use a translucent ‘reflector’ to soften it. Set your translucent reflector, or other screen, up in front of your main light to diffuse it.
If you are hosting a beauty vlog then you might consider a slightly different set up. Instead of having your main light off to one side set it up directly in front of you so your entire face is lit evenly. It is still a good idea to use fill lights in this set up to give you some dimension, and a backlight is even more essential for helping you stand out from the background. The even light hitting your face will also make you look flat if you do not use a backlight.
If you are using all of the lighting options available to you and your video still looks too dark then you can try brightening it by opening up the aperture of your camera lens/setting a lower f-stop. Letting more light into your camera can help your footage look brighter, although you also run the risk of making things look overexposed/ washed out if you are not careful.
If you are stuck shooting in low light conditions it is best to use a lens with a wider aperture/lower f-stop. This will make the best of the light you do have.
Richard Bennett
Richard Bennett is a writer and a lover of all things video.
Follow @Richard Bennett
Video Platforms at a Glance: Comparing Vimeo & YouTube
Vimeo vs YouTube: Which is Better?

Ollie Mattison
Mar 27, 2024• Proven solutions
Lots of people nowadays use videos to share with people all around the world. Two of the main platforms are YouTube and Vimeo. This article tells you the difference between both so that you can decide which the best platform is for you. Whether you are a marketer, video producer or gamer you will find the information useful to find your target audience easily.
Also read:
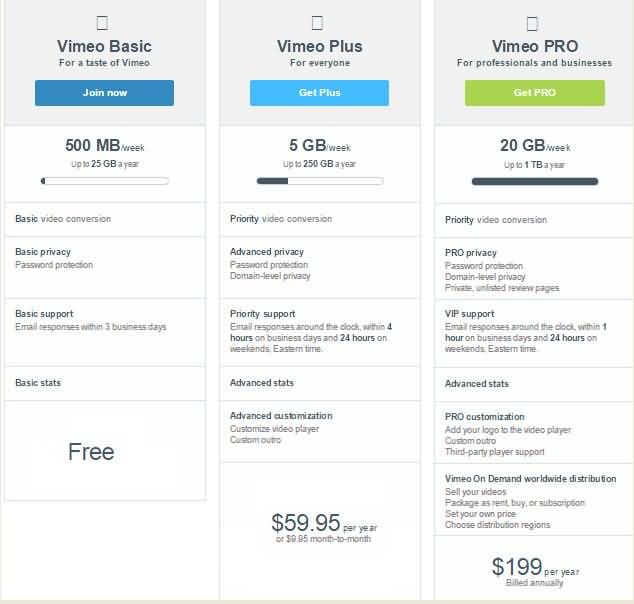
Vimeo Basic, Vimeo Plus or Vimeo Pro: Which is Right for You?
Please watch the video below for more information:
Detailed View of YouTube and Vimeo
1 Communities
YouTube: When it comes to users YouTube comes out on top with over a billion views each and every month. You are able to interact with your viewers by using the comments and people are able to follow you so that they are notified of new videos and comments. As there is already a huge following on YouTube it’s easy to get a good following if you have great content. It’s harder to control public content which is a downside to using YouTube and there is very little customer support. With the comments being moderated rarely it can cause a distraction from your video. Businesses tend to internally block YouTube video’s which means you won’t get the viewings from people on their lunch breaks.

Vimeo: With higher quality content and no advertisements video owners can quickly build a valid following and gain comments from people that are contributing high value information. You have more detailed analytics which makes it easier to see where you are going wrong should you not have the following you want and you are able to use your own domain. With Google owning YouTube you are unlikely to get the same exposure you would, however the followers tend to be valid giving you a real idea of where you are going right or wrong. Because of the higher quality followers you are less likely to get negative or abusive comments when you use Vimeo, however it is a paid subscription with each tier giving you more space to upload.
2 Membership
YouTube: YouTube on the other hand is free for all to use because the main focus is getting their equity through advertisements. There is however the option to take out a subscription which is known as YouTube Red. This lets you watch as many video’s as you want without having to view the ads and also gets you the ability to download so you don’t have to go online to view your favourite videos, a music app and original programming facilities.
Vimeo: There are 4 different membership options with Vimeo allowing you to tailor it to your needs; there is the basic, plus, pro and business. The higher the cost, the greater level of support and storage capacity you will get. There is a free membership available but you will only be able to use up to 500MB each week.
3 Advertising
YouTube: What makes YouTube free is the fact they get their money from the advertisements they put not only on their sites but before video’s that people have to watch a set amount of seconds for before they can view their video of choice. This is great news if you are a marketer as it will allow you to reach out to viewers on video’s that are relevant to your brand/product/service, however for those that are viewing the sheer amount of ads can be off-putting.
Vimeo: As a paid subscription service and even the limited free package, you won’t have to view or show viewers ads, which means that your videos are more likely to be seen in their entirety not abandoned due to advertisements.
4 Updating video
YouTube: If you upload videos to YouTube you do not have the same benefits as the only way to amend a video is to take it down, delete it and re-upload a new one. This unfortunately takes with it any statistics such as views that you have gained. If you do choose YouTube for your videos then do make sure you check everything vigorously before you upload it as there’s no way to change it.
Vimeo: Occasionally an uploaded video may need some changes made. This could be due to changes to the offer you have or you have noticed something else that needs amending. With Vimeo if you need to update a video you can do so without losing the statistics it has already gained, which is great news if you notice an error later down the line or need to add or take something away.
Conclusion
When it comes down to making the final decision between using YouTube or Vimeo you will need to look at the type of audience you want to attract. With Vimeo you are more likely to attract creators and film makers, whereas with YouTube you will have a bigger audience to target which gives you a better chance of a higher rank on search engines.
Ollie Mattison
Ollie Mattison is a writer and a lover of all things video.
Follow @Ollie Mattison
Ollie Mattison
Mar 27, 2024• Proven solutions
Lots of people nowadays use videos to share with people all around the world. Two of the main platforms are YouTube and Vimeo. This article tells you the difference between both so that you can decide which the best platform is for you. Whether you are a marketer, video producer or gamer you will find the information useful to find your target audience easily.
Also read:
Vimeo Basic, Vimeo Plus or Vimeo Pro: Which is Right for You?
Please watch the video below for more information:
Detailed View of YouTube and Vimeo
1 Communities
YouTube: When it comes to users YouTube comes out on top with over a billion views each and every month. You are able to interact with your viewers by using the comments and people are able to follow you so that they are notified of new videos and comments. As there is already a huge following on YouTube it’s easy to get a good following if you have great content. It’s harder to control public content which is a downside to using YouTube and there is very little customer support. With the comments being moderated rarely it can cause a distraction from your video. Businesses tend to internally block YouTube video’s which means you won’t get the viewings from people on their lunch breaks.
Vimeo: With higher quality content and no advertisements video owners can quickly build a valid following and gain comments from people that are contributing high value information. You have more detailed analytics which makes it easier to see where you are going wrong should you not have the following you want and you are able to use your own domain. With Google owning YouTube you are unlikely to get the same exposure you would, however the followers tend to be valid giving you a real idea of where you are going right or wrong. Because of the higher quality followers you are less likely to get negative or abusive comments when you use Vimeo, however it is a paid subscription with each tier giving you more space to upload.
2 Membership
YouTube: YouTube on the other hand is free for all to use because the main focus is getting their equity through advertisements. There is however the option to take out a subscription which is known as YouTube Red. This lets you watch as many video’s as you want without having to view the ads and also gets you the ability to download so you don’t have to go online to view your favourite videos, a music app and original programming facilities.
Vimeo: There are 4 different membership options with Vimeo allowing you to tailor it to your needs; there is the basic, plus, pro and business. The higher the cost, the greater level of support and storage capacity you will get. There is a free membership available but you will only be able to use up to 500MB each week.
3 Advertising
YouTube: What makes YouTube free is the fact they get their money from the advertisements they put not only on their sites but before video’s that people have to watch a set amount of seconds for before they can view their video of choice. This is great news if you are a marketer as it will allow you to reach out to viewers on video’s that are relevant to your brand/product/service, however for those that are viewing the sheer amount of ads can be off-putting.
Vimeo: As a paid subscription service and even the limited free package, you won’t have to view or show viewers ads, which means that your videos are more likely to be seen in their entirety not abandoned due to advertisements.
4 Updating video
YouTube: If you upload videos to YouTube you do not have the same benefits as the only way to amend a video is to take it down, delete it and re-upload a new one. This unfortunately takes with it any statistics such as views that you have gained. If you do choose YouTube for your videos then do make sure you check everything vigorously before you upload it as there’s no way to change it.
Vimeo: Occasionally an uploaded video may need some changes made. This could be due to changes to the offer you have or you have noticed something else that needs amending. With Vimeo if you need to update a video you can do so without losing the statistics it has already gained, which is great news if you notice an error later down the line or need to add or take something away.
Conclusion
When it comes down to making the final decision between using YouTube or Vimeo you will need to look at the type of audience you want to attract. With Vimeo you are more likely to attract creators and film makers, whereas with YouTube you will have a bigger audience to target which gives you a better chance of a higher rank on search engines.
Ollie Mattison
Ollie Mattison is a writer and a lover of all things video.
Follow @Ollie Mattison
Also read:
- [New] Content Hub Hierarchy Stand Out Amongst Titans – Vimeo, YouTube & Dailymotion?
- [New] Edge of Creativity Best 4K Displays for Editing Excellence for 2024
- [New] Sifting Through Mr. Beast's Bank Statements
- [Updated] Enhance Smarts with These Premier 15 Science YTs
- [Updated] The Essentials of Firefox's PIP Functionality
- [Updated] The Ultimate Rankings Top 10 Free iOS and Android Live Streamers
- [Updated] What Is the Best Video Format for YouTube?
- 2024 Approved Quick Guide to Planning Google Meet Sessions
- A Perfect Guide To Remove or Disable Google Smart Lock On Nokia C12
- How Much Money Can You Make via YouTube Ad Revenue and CPM Rates?
- How to Transfer Contacts from Vivo S17 to iPhone XS/11 | Dr.fone
- How to Upgrade Your Dell Computer's SMBus Controller for Enhanced Performance
- In 2024, Create Identity A Quick Walkthrough of Customizing Your YouTube Url
- In 2024, Creator Payment Frequency on YouTube Platform
- In 2024, How to Cast Xiaomi 14 Ultra to Computer for iPhone and Android? | Dr.fone
- Title: In 2024, Conquering Low-Light Challenges in Filming
- Author: Brian
- Created at : 2024-11-07 17:30:48
- Updated at : 2024-11-15 03:35:58
- Link: https://youtube-video-recordings.techidaily.com/in-2024-conquering-low-light-challenges-in-filming/
- License: This work is licensed under CC BY-NC-SA 4.0.