
:max_bytes(150000):strip_icc():format(webp)/are-you-really-getting-dolby-atmos-sound-135ec4330d004250883e2acab9423191.jpg)
In 2024, Chart New Horizons in Branding with These Top 10 YouTube Tools
Chart New Horizons in Branding with These Top 10 YouTube Tools
Youtube Banners Makers: 10+ Online Tools to Create Channel Art

Richard Bennett
Mar 27, 2024• Proven solutions
If you want to have more fans on your YouTube channel, it becomes really important to make your channel more attractive and fresh. YouTube banner is one of the important factors which represents the style, quality, and taste of your channel. Fortunately, there are many tools on the market that can help you make attractive banners. Therefore, we have brought you 10+ best-known YouTube banner makers that can enhance the beauty of your channel with their exceptionally amazing features. We will also let you know how to make a YouTube banner. Let’s explore.
You may also like: How to add custom thumbnails to YouTube videos >>
- Part 1: YouTube Banner Dimensions You Should Know
- Part 2: How to Make a YouTube Banner with Canva for Free
- Part 3: 10+ Best YouTube Banner Makers
Part 1: YouTube Banner Dimensions You Should Know
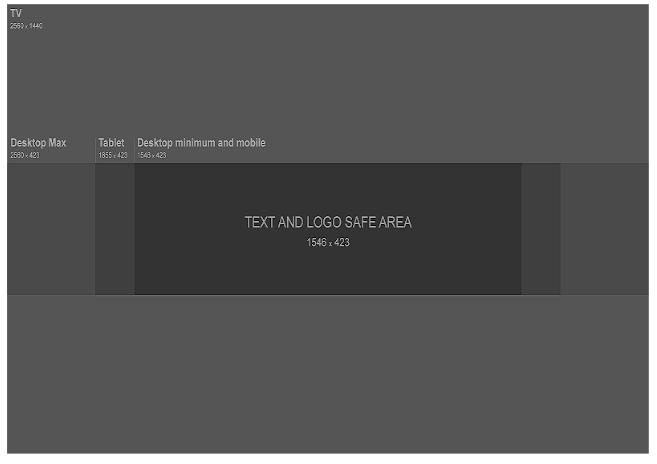
YouTube banner dimensions varied on different platforms, so you need to make the YouTube banner look great on desktop, tablet, and phone. According to Google , the recommended dimension is 2560 x 1440 px as the YouTube banner will be cropped if its size is too large. Minimum dimension is 2048 x 1152 px for uploading. The maximum width is 2560 x 423 px. The largest file size is 6MB. You can also add links to your own social media on YouTube banner, so it is a great place to recommend your other social media.
Part 2: How to Make a YouTube Banner with Canva for Free
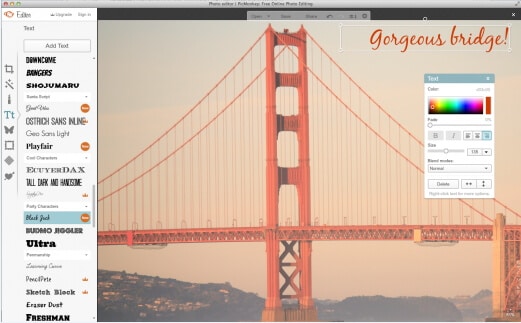
There are so many tools that you can make a YouTube banner in the market, but it is not easy to find the right tool to make a banner if you can’t find the right tools. We have listed one way to make a YouTube banner below. You can use Wondershare Filmora to edit YouTube videos as it is designed to be a YouTube editor. Besides the basic editing including cropping/trimming and adding transitions, you can use it to add various text, more than 300 effects/filters, free audio, and more. It is also easy to make a YouTube intro. Download it to have a try!
 Download Mac Version ](https://tools.techidaily.com/wondershare/filmora/download/ )
Step 1: Choose your template and layout
Canva is an online tool to make YouTube banner, so first you need to open it up . You are asked to log in.
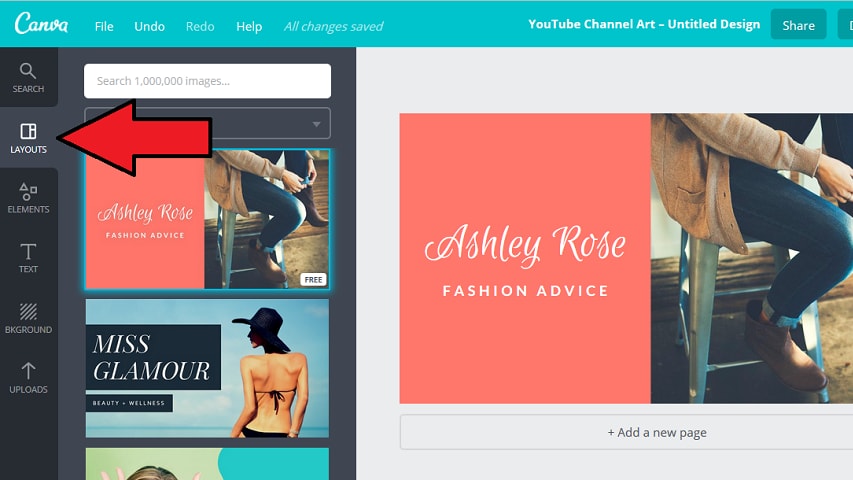
After you’ve signed up for Canva you will see a variety of different templates. Scroll through them until you find YouTube Channel Art under Social Media & Email Headers.
This template will be the right size for a YouTube banner, but it will not show you the ‘safe zones’. Your banner will show up differently depending on the screen a viewer is watching on. Click here to download YouTube’s official template, which displays safe zones. You will be able to use it as a reference.
And Canva also provides you with sample layouts that you can build off of. They will include stock photos and text. Most are free, but some might cost a dollar.
If the one you happen to like isn’t free, don’t worry. It’s actually just the specific stock images being used in the example that cost money, and you’re probably planning on replacing those anyways.
Step 2: Import your image
Canva provides a selection of stock images you can use for free. You can find them by clicking on Elements in the menu on the far left, and then clicking on Free Photos.
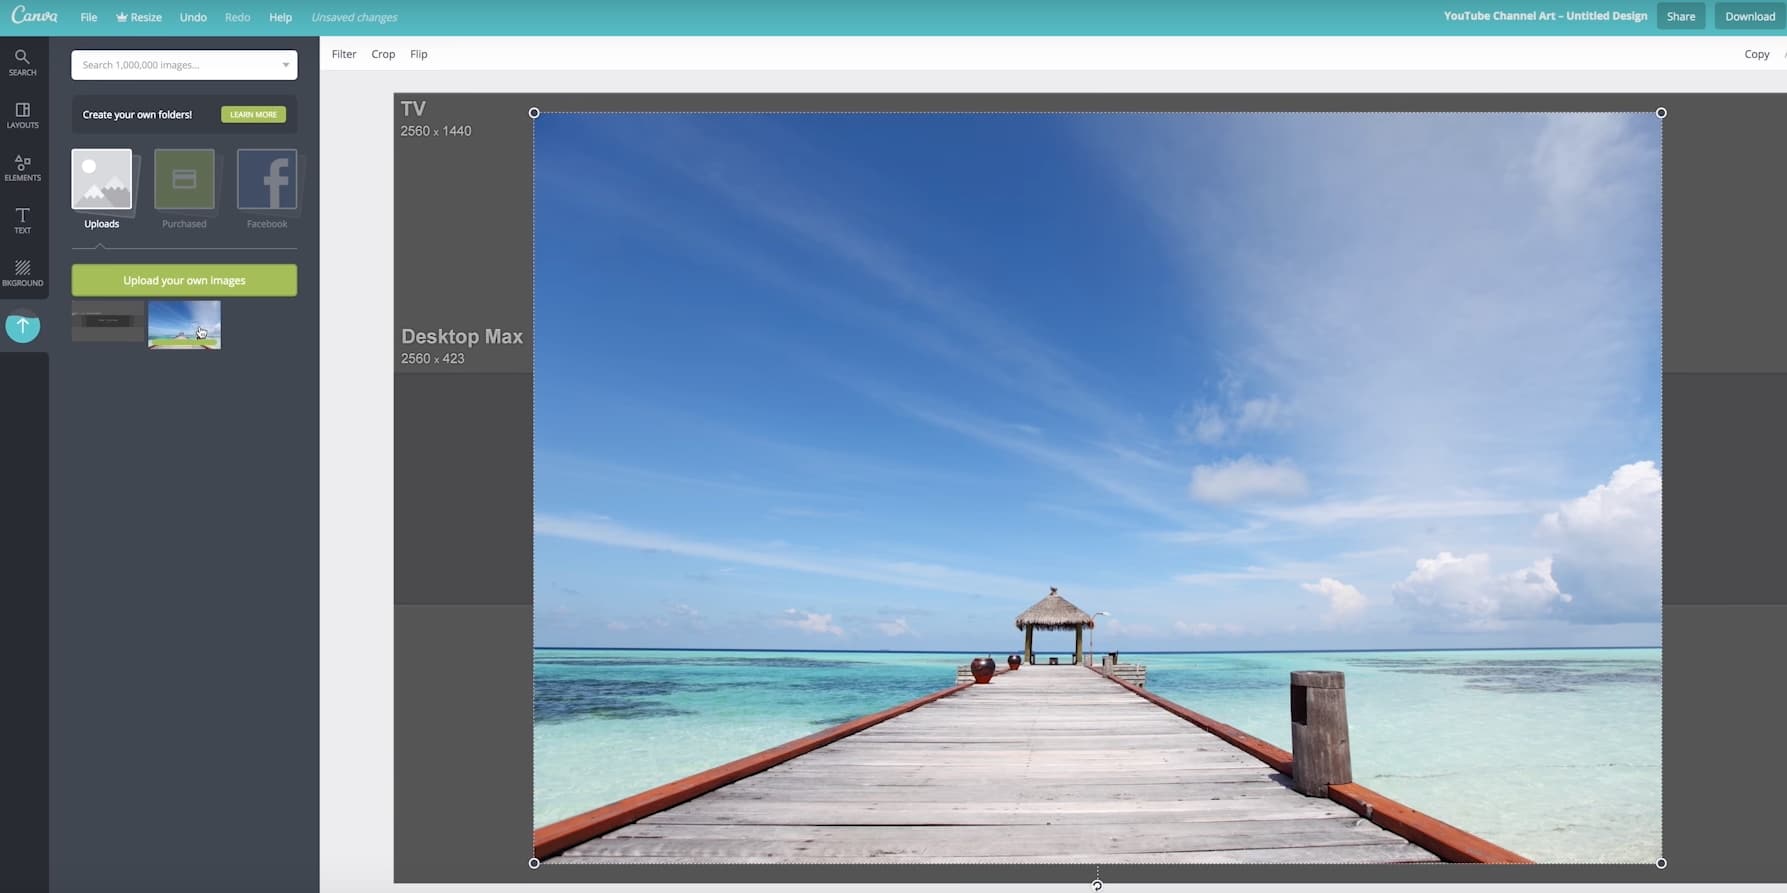
If you’d rather use your own images, click on Upload at the bottom of that same menu on the left. You’ll have the option of uploading images from your computer or importing them from Facebook.
After you have found the image you want to use or loaded it into Canva, click on it and it will appear in your layout.
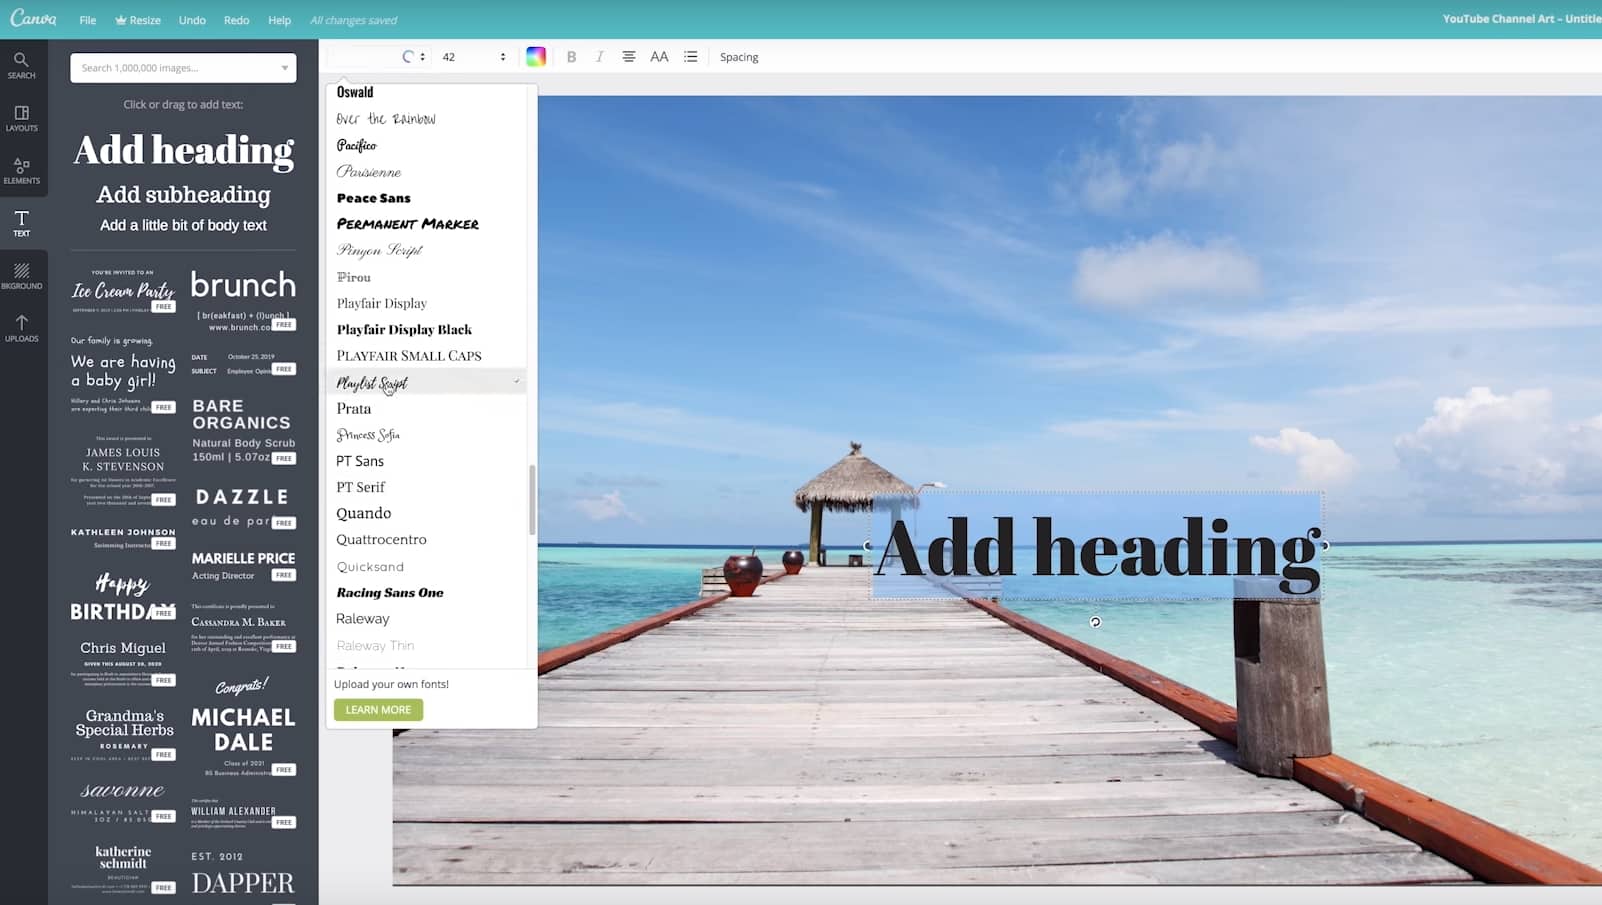
Step 3: Add text to YouTube banner
You can add various text after it is imported. There are lots of text templates in Canva, so just pick the one you like. You can also change text color and transparency to make it look great. Now to place it in the right position.
Step 4: Edit other elements
The layout you chose might include things like borders or backgrounds behind the text. You can change the colors of any of these just by clicking on them, then clicking on the color swatch in the top left corner of your design area.

Step 5: Download YouTube banner
Once you finish the editing, there is a download button in the top right corner of your screen. Click on it when you are finished to save your new channel art to your computer. It supports JPEG, PNG, and PDF. Now upload it to YouTube. So simple. Isn’t it?

Part 3: 10+ Best YouTube Banner Makers
1. Canva:
Canva is probably the most popular site for making channel art, for good reason. It has over 8000 templates for different kinds of graphics, including YouTube channel art, and there’s a huge variety of stock photos available either for free or $1. On Canva, creating your perfect banner is as easy as dragging and dropping images into a pre-built layout. Resizing is automatic, and you can flip/rotate or apply filters in just a few clicks
Pros: It contains millions of stock images, about 100 professional layouts, and lots of stunning filters.
Cons: Some high-quality images can be accessed only after payment of $1.
Price: The best thing to know is that this tool is available for free.
2. Wondershare PixStudio

Wondershare PixStudio is an all-in-one and powerful online graphic design maker for everyone. It has various types of templates for YouTube Thumbnails, Logos, Posters, etc. You can create a beautiful design by simply dragging and dropping the elements and photos. The online platform is free to use all templates, just One-Click to download your creations, and share to your Facebook, Instagram Story, and YouTube Thumbnails, etc. immediately.
Pros:
- Various types of templates
- Simple and Fast Design
- Background remover
Cons: The features of removing background be used after payment of $7.99 per month.
Price: The best thing to know is that this tool is available for free.
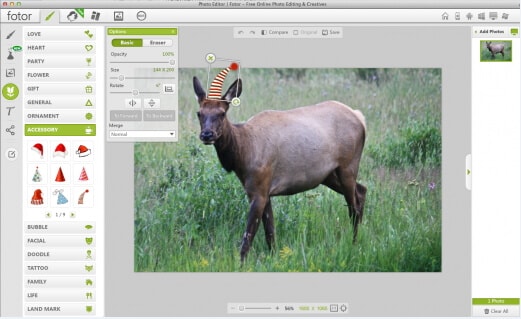
3. Fotor:
The makers of Fotor describe it as a ‘revolutionary photo editor and graphic designer’, and it is certainly a powerful tool. Fotor allows you to do a lot of fine editing on your photos – brightness, saturation, and color temperature are just a few of the things you can adjust – and its design feature is perfect for YouTube channel art.
Fotor has templates for YouTube channel art and a lot of fun sticker-like graphics. The Design interface is very similar to Canva, if slightly more complicated.
Pros: Complete art can be created within a few minutes and contains dozens of templates.
Cons: Little difficult to use for beginners.
Price: Free
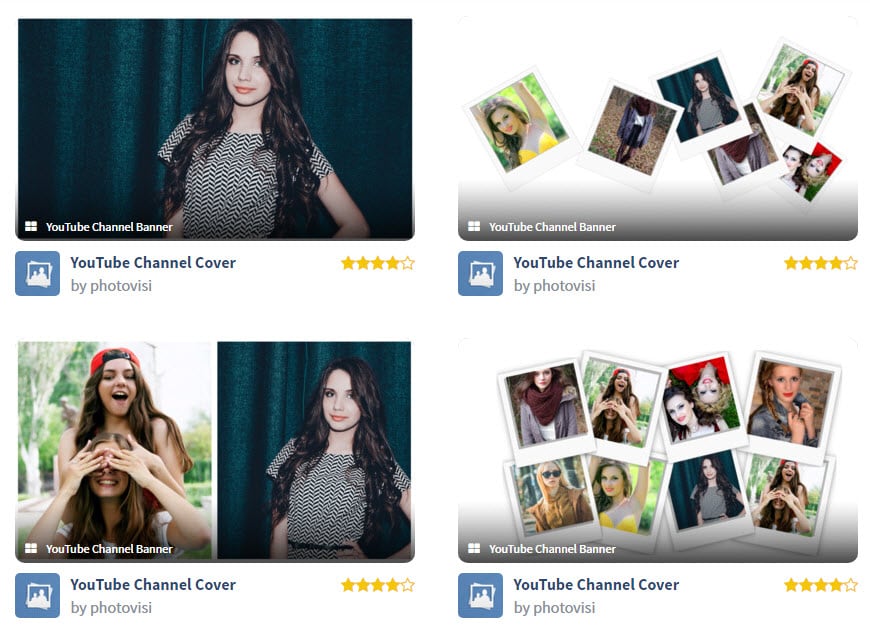
4. Photovisi:
It is a great source of inspiration for your YouTube channel where you can easily design, save and share your customized banner.
Pros: It automatically adjusts the size of the banner to the required format and is loaded with unlimited themes. Works on Android, Windows, Mac, and iOS.
Cons: Demand some special skills for usage.
Price: It is available for free at the official website
5. iKomee:
It is possible to have customized results for your YouTube banner designing using the iKomee platform where few minutes are enough to create wonders. It is one of the most loved tools of all professionals.
Pros: Contains lots of cool templates for channel art.
Cons: Limited themes and layouts.
Price: Available for free.

6. Banners Nack:
Here is one of the most wonderful YouTube banner maker for you that can be accessed online with easy to use interface where one can design animated, static HTML5 with interactive banner ads.
Pros: Professional, easy to use platform with rich quality fonts, stock images, and animated effects.
Cons: Little costly.
Price: Users can go ahead with premium plans where the basic plan is worth $12/month and a professional plan is $18/month with a business plan offer of $24 per month.
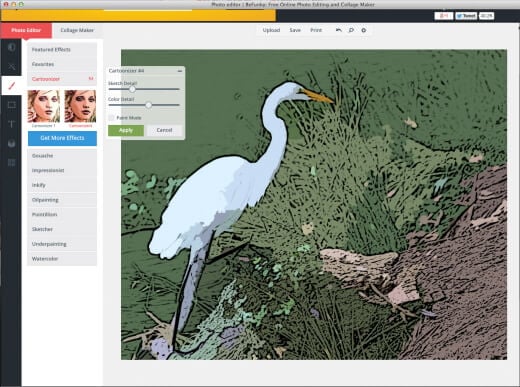
7. BeFunky:
BeFunky allows users to create meaningful banners for YouTube business building. The platform consists of numerous effortless options for banner designs and the drag and drops features make everything much easier. It is possible to boost traffic on your YouTube channel with this highly ranked banner maker.
Pros: Four-step banner-making process that can be followed by beginners too.
Cons: The uploading and downloading process takes more time due to heavy projects.
Price: Get started for free.
8. Picmonkey:
With PicMonkey.com you will be able to get customized, readymade banners with a perfect look. It is much easier to make selections for fonts, colors, and graphics with advanced templates here.
Pros: The best platform to enhance your creativity; users will be able to get perfect sharpness of quality.
Cons: File size is more for output banner and special features can be accessed only after payment.
Price: Free trial.
9. iPiccy:
The number of steps to be followed for designing a YouTube banner here completely depends upon your demand of end banner design type. Generally, four-step method is capable enough to provide you professional output with proper cropping dimensions and small file size for download
Pros: Various additional features are available like adding text etc so that highly customized designs can be created for YouTube Banners.
Cons: Demands more time of the user for making quality banner.
Price: Get started for free within a few seconds.
10. Adobe Spark:
Adobe Spark is one of the amazing online YouTube banner makers that helps you create the desired banner for your YouTube channel with ease. All that you need to do is browse to the site and pick the ‘YouTube channel art’ option to get the YouTube banner of the right size, though there are other options as well. Due to its easily customizable features, you can alter or change the background completely and try different color combinations to match your brand’s logo.
Pros:
- The drag-n-drop feature of Adobe Spark enables you to craft eye-catching and engaging banners effortlessly.
- Adobe Spark offers you the freedom to experiment with unlimited alterations in alignments, text, layouts, and themes like a trusted YouTube banner creator.
Cons: Though Adobe Spark is free, it annoys the users when it automatically adds Adobe Spark’s watermark logo to your creation. To get it removed, you must be an active subscriber of Adobe products.

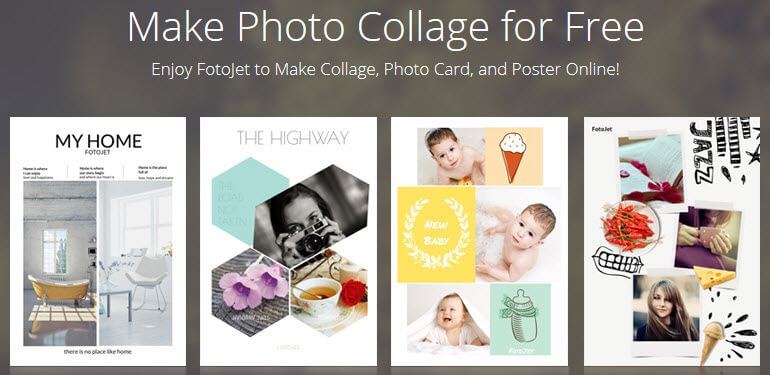
11. Fotojet:
FotoJet being a reliable YouTube banner maker assists you in creating personalized banners using numerous free templates. You get hold of interesting YouTube banner without toiling with the intricacies of graphic designing. Impressing your visitors with your unique and brand new banner from FotoJet YouTube banner creator is class apart.
Pros: It offers you the flexibility to add anything and everything on your channel art and upload it on YouTube right away.
Cons: Similar to Adobe Spark, FotoJet too adds a watermark logo of its name to your creation which is again a bit of nuisance.
Conclusion
Want to make your YouTube video more attractive and beautiful? Wondershare Filmora is such video editing software designed for YouTube creators. It not only allows you to cut, trim, crop, zoom, reverse, rotate the video clips, but also makes the advanced features like green screen, PIP, tilt-shift, and mosaic easy like a piece of cake. With Wondershare Filmora, you can ignite your YouTube videos with over 300 effects like Fashion, Beauty, BlockBuster, Travel, etc.

Richard Bennett
Richard Bennett is a writer and a lover of all things video.
Follow @Richard Bennett
Richard Bennett
Mar 27, 2024• Proven solutions
If you want to have more fans on your YouTube channel, it becomes really important to make your channel more attractive and fresh. YouTube banner is one of the important factors which represents the style, quality, and taste of your channel. Fortunately, there are many tools on the market that can help you make attractive banners. Therefore, we have brought you 10+ best-known YouTube banner makers that can enhance the beauty of your channel with their exceptionally amazing features. We will also let you know how to make a YouTube banner. Let’s explore.
You may also like: How to add custom thumbnails to YouTube videos >>
- Part 1: YouTube Banner Dimensions You Should Know
- Part 2: How to Make a YouTube Banner with Canva for Free
- Part 3: 10+ Best YouTube Banner Makers
Part 1: YouTube Banner Dimensions You Should Know
YouTube banner dimensions varied on different platforms, so you need to make the YouTube banner look great on desktop, tablet, and phone. According to Google , the recommended dimension is 2560 x 1440 px as the YouTube banner will be cropped if its size is too large. Minimum dimension is 2048 x 1152 px for uploading. The maximum width is 2560 x 423 px. The largest file size is 6MB. You can also add links to your own social media on YouTube banner, so it is a great place to recommend your other social media.
Part 2: How to Make a YouTube Banner with Canva for Free
There are so many tools that you can make a YouTube banner in the market, but it is not easy to find the right tool to make a banner if you can’t find the right tools. We have listed one way to make a YouTube banner below. You can use Wondershare Filmora to edit YouTube videos as it is designed to be a YouTube editor. Besides the basic editing including cropping/trimming and adding transitions, you can use it to add various text, more than 300 effects/filters, free audio, and more. It is also easy to make a YouTube intro. Download it to have a try!
Download Mac Version ](https://tools.techidaily.com/wondershare/filmora/download/ )
Step 1: Choose your template and layout
Canva is an online tool to make YouTube banner, so first you need to open it up . You are asked to log in.
After you’ve signed up for Canva you will see a variety of different templates. Scroll through them until you find YouTube Channel Art under Social Media & Email Headers.
This template will be the right size for a YouTube banner, but it will not show you the ‘safe zones’. Your banner will show up differently depending on the screen a viewer is watching on. Click here to download YouTube’s official template, which displays safe zones. You will be able to use it as a reference.
And Canva also provides you with sample layouts that you can build off of. They will include stock photos and text. Most are free, but some might cost a dollar.
If the one you happen to like isn’t free, don’t worry. It’s actually just the specific stock images being used in the example that cost money, and you’re probably planning on replacing those anyways.
Step 2: Import your image
Canva provides a selection of stock images you can use for free. You can find them by clicking on Elements in the menu on the far left, and then clicking on Free Photos.
If you’d rather use your own images, click on Upload at the bottom of that same menu on the left. You’ll have the option of uploading images from your computer or importing them from Facebook.
After you have found the image you want to use or loaded it into Canva, click on it and it will appear in your layout.
Step 3: Add text to YouTube banner
You can add various text after it is imported. There are lots of text templates in Canva, so just pick the one you like. You can also change text color and transparency to make it look great. Now to place it in the right position.
Step 4: Edit other elements
The layout you chose might include things like borders or backgrounds behind the text. You can change the colors of any of these just by clicking on them, then clicking on the color swatch in the top left corner of your design area.
Step 5: Download YouTube banner
Once you finish the editing, there is a download button in the top right corner of your screen. Click on it when you are finished to save your new channel art to your computer. It supports JPEG, PNG, and PDF. Now upload it to YouTube. So simple. Isn’t it?
Part 3: 10+ Best YouTube Banner Makers
1. Canva:
Canva is probably the most popular site for making channel art, for good reason. It has over 8000 templates for different kinds of graphics, including YouTube channel art, and there’s a huge variety of stock photos available either for free or $1. On Canva, creating your perfect banner is as easy as dragging and dropping images into a pre-built layout. Resizing is automatic, and you can flip/rotate or apply filters in just a few clicks
Pros: It contains millions of stock images, about 100 professional layouts, and lots of stunning filters.
Cons: Some high-quality images can be accessed only after payment of $1.
Price: The best thing to know is that this tool is available for free.
2. Wondershare PixStudio
Wondershare PixStudio is an all-in-one and powerful online graphic design maker for everyone. It has various types of templates for YouTube Thumbnails, Logos, Posters, etc. You can create a beautiful design by simply dragging and dropping the elements and photos. The online platform is free to use all templates, just One-Click to download your creations, and share to your Facebook, Instagram Story, and YouTube Thumbnails, etc. immediately.
Pros:
- Various types of templates
- Simple and Fast Design
- Background remover
Cons: The features of removing background be used after payment of $7.99 per month.
Price: The best thing to know is that this tool is available for free.
3. Fotor:
The makers of Fotor describe it as a ‘revolutionary photo editor and graphic designer’, and it is certainly a powerful tool. Fotor allows you to do a lot of fine editing on your photos – brightness, saturation, and color temperature are just a few of the things you can adjust – and its design feature is perfect for YouTube channel art.
Fotor has templates for YouTube channel art and a lot of fun sticker-like graphics. The Design interface is very similar to Canva, if slightly more complicated.
Pros: Complete art can be created within a few minutes and contains dozens of templates.
Cons: Little difficult to use for beginners.
Price: Free
4. Photovisi:
It is a great source of inspiration for your YouTube channel where you can easily design, save and share your customized banner.
Pros: It automatically adjusts the size of the banner to the required format and is loaded with unlimited themes. Works on Android, Windows, Mac, and iOS.
Cons: Demand some special skills for usage.
Price: It is available for free at the official website
5. iKomee:
It is possible to have customized results for your YouTube banner designing using the iKomee platform where few minutes are enough to create wonders. It is one of the most loved tools of all professionals.
Pros: Contains lots of cool templates for channel art.
Cons: Limited themes and layouts.
Price: Available for free.
6. Banners Nack:
Here is one of the most wonderful YouTube banner maker for you that can be accessed online with easy to use interface where one can design animated, static HTML5 with interactive banner ads.
Pros: Professional, easy to use platform with rich quality fonts, stock images, and animated effects.
Cons: Little costly.
Price: Users can go ahead with premium plans where the basic plan is worth $12/month and a professional plan is $18/month with a business plan offer of $24 per month.
7. BeFunky:
BeFunky allows users to create meaningful banners for YouTube business building. The platform consists of numerous effortless options for banner designs and the drag and drops features make everything much easier. It is possible to boost traffic on your YouTube channel with this highly ranked banner maker.
Pros: Four-step banner-making process that can be followed by beginners too.
Cons: The uploading and downloading process takes more time due to heavy projects.
Price: Get started for free.
8. Picmonkey:
With PicMonkey.com you will be able to get customized, readymade banners with a perfect look. It is much easier to make selections for fonts, colors, and graphics with advanced templates here.
Pros: The best platform to enhance your creativity; users will be able to get perfect sharpness of quality.
Cons: File size is more for output banner and special features can be accessed only after payment.
Price: Free trial.
9. iPiccy:
The number of steps to be followed for designing a YouTube banner here completely depends upon your demand of end banner design type. Generally, four-step method is capable enough to provide you professional output with proper cropping dimensions and small file size for download
Pros: Various additional features are available like adding text etc so that highly customized designs can be created for YouTube Banners.
Cons: Demands more time of the user for making quality banner.
Price: Get started for free within a few seconds.
10. Adobe Spark:
Adobe Spark is one of the amazing online YouTube banner makers that helps you create the desired banner for your YouTube channel with ease. All that you need to do is browse to the site and pick the ‘YouTube channel art’ option to get the YouTube banner of the right size, though there are other options as well. Due to its easily customizable features, you can alter or change the background completely and try different color combinations to match your brand’s logo.
Pros:
- The drag-n-drop feature of Adobe Spark enables you to craft eye-catching and engaging banners effortlessly.
- Adobe Spark offers you the freedom to experiment with unlimited alterations in alignments, text, layouts, and themes like a trusted YouTube banner creator.
Cons: Though Adobe Spark is free, it annoys the users when it automatically adds Adobe Spark’s watermark logo to your creation. To get it removed, you must be an active subscriber of Adobe products.
11. Fotojet:
FotoJet being a reliable YouTube banner maker assists you in creating personalized banners using numerous free templates. You get hold of interesting YouTube banner without toiling with the intricacies of graphic designing. Impressing your visitors with your unique and brand new banner from FotoJet YouTube banner creator is class apart.
Pros: It offers you the flexibility to add anything and everything on your channel art and upload it on YouTube right away.
Cons: Similar to Adobe Spark, FotoJet too adds a watermark logo of its name to your creation which is again a bit of nuisance.
Conclusion
Want to make your YouTube video more attractive and beautiful? Wondershare Filmora is such video editing software designed for YouTube creators. It not only allows you to cut, trim, crop, zoom, reverse, rotate the video clips, but also makes the advanced features like green screen, PIP, tilt-shift, and mosaic easy like a piece of cake. With Wondershare Filmora, you can ignite your YouTube videos with over 300 effects like Fashion, Beauty, BlockBuster, Travel, etc.
Richard Bennett
Richard Bennett is a writer and a lover of all things video.
Follow @Richard Bennett
Enhancing Narrative Flow: Integrating Chapters Into Your YouTube Content
How to Add Chapters to YouTube Videos
Richard Bennett
Mar 27, 2024• Proven solutions
If you have seen chapter markers on YouTube of our official channel, you might be wondering how someone can create chapters on YouTube? What is the way to mark different parts of the videos, and how can you add markers to all the existing videos on YouTube? Don’t worry; this article will discuss everything about YouTube chapters that you need to know. Keep reading to find all the details and learn the step-by-step instructions to add chapters to your YouTube videos for better engagement.
- Part 1: What Are YouTube Chapters?
- Part 2: How to Add Chapter to YouTube Video Progress Bar?
- Part 3: Why Add Chapters to Videos?
- Part 4: When Add Chapters on YouTube?
- Part 5: Will Chapter Decrease Watching Time?
- Part 6: Video Chapter Adding Tips
- Part 7: Why YouTube Chapter is Not Working?
Part 1: What Are YouTube Chapters?
YouTube video chapters are an excellent way to optimize your YouTube content. When you have chapters for your YouTube video, each chapter will have an individual preview. Chapters will break your YouTube video into multiple parts allowing your audience to have better context and information.
As per YouTube, chapters let the audience navigate better through videos. Chapters will let your audience watch different video parts, which will eventually lead to better engagement. If you want to organize your YouTube content, chapters are one of the best ways to go about it. By using labeled timestamps, your video will be divided into multiple sections. Your audience will be able to see the preview of the content and easily skip to the part they want to see within the video’s progress bar.
Part 2: How to Add Chapter to YouTube Video Progress Bar?
If you are a YouTube creator and want to know how you can add chapters to your YouTube content, here’s what you need to do. Follow these instructions carefully:
Step 1: First things first, please sign in to your YouTube account.
Step 2: Select the video that you want to edit and add chapters.
Step 3: Click on the edit video option. This option will be there under the video.
Step 4: On the add details page, you will see the description box. Here, you need to add the list of titles and timestamps.

Please keep in mind that you must add the first timestamp with “00:00”. You will have to add a minimum of three timestamps with a minimum of 10 seconds for each chapter. Here is how it looks like in the description after published.

Part 3: Why YouTubers Should Add Chapters to videos?
There are two primary advantages of adding chapters to your YouTube videos. Apart from making your YouTube video look organized and neat, chapters will let you provide a better user experience to everyone watching your video because they will find all the information about your video faster and easier within a video. And the second benefit is that your YouTube video will show up in search results. This is a way to optimize your content for more users to find your content.
YouTube chapters are beneficial for both creators and viewers. On the progress bar, these clickable chapters can be added. This will allow a viewer to skip and scrub through a video quickly and skip to parts they actually want to watch.
This feature is quite helpful for videos that are pretty long. Chapters will let you segment the videos into important chapters so that the viewer can rewatch already watched chapters or skip to other chapters in the video. YouTube chapters have been recently added to this platform for better navigation and engagement.
Better User Experience for Users
Just like Google wants browsers to find what they are looking for when they add a keyword, YouTube also wants to help viewers find what they are looking for. Chapters can be immensely beneficial for extended content. For example, if you are uploading a video of your convert video, let the users jump straight to their favorite songs.
Even in tutorial video content, viewers will now have a chance to get straight to the main part of the video. With chapters being added, viewers will have an opportunity to decide whether they want to watch the whole video or not. They won’t have to keep skipping one part to another blindly. Chapters will allow them to find what they are looking for in an instant.
For Creators: Increased Visibility
If you know about the Google algorithm, you must be aware that it regularly changes its algorithm to let people find the information they are looking for easily. Adding chapters to your video will encourage Google to display them more often when someone searches for them, and this will include adding your videos to its featured snippets.
While adding chapters, you need to make sure that it is labeled with correct keywords, and it is clear and descriptive. YouTube videos are often showed as Google snippet when someone tries to find something on the search engine. Adding a chapter will let Google understand the content better, thereby letting your videos gain more search traffic.
Part 4: When should I add or not chapters on YouTube?
If you are wondering whether all videos on YouTube should have chapters, the answer to this is no. A two minutes long video won’t require chapters because it won’t make sense. Think about whether you would want your audience to have reduced watch time. Another thing to pay attention to is audience retention.
We mentioned earlier that adding chapters to long videos will be a good idea, but before you jump in and start adding chapters, you need to understand whether it will help you and should be done in your particular case?
If you are uploading a video on education, science and technology, how-to, news and politics, Q and A, and other similar videos, adding chapters will definitely help. In these kinds of videos, you will let your audience rewatch a section they liked the most over and over again.
However, if you are uploading music, entertainment, comedy, and film and animation videos, we will recommend not to add chapters because this will reduce the watch time.
Part 5: Do YouTube Video Chapters Decrease Channel Watch Time?
One of the most commonly asked questions regarding adding chapters to YouTube videos is whether it will reduce the watch time of a video. Video chapters are a pretty good feature and can enable your videos to engage with the viewers.
Since chapters allow your audience to skip through video content, they are not really watching the whole video, which can’t be suitable for audience retention! Here’s what we have to say to this: don’t put your 100% focus on watch time right now. Your focus should be creating informative and engaging content, which will keep your audience hooked to their screens. Even if you add chapters, if your audience doesn’t find it engaging, they will choose not to go on with the content.
Video chapters are a tiny part of the overall content. Chapters provide value to your audience, and you should try them. If you are uploading a concise video, animation video, funny video, and more, don’t add chapters.
Even some of the most watched videos on YouTube have chapters. Learn from them. These video makers could have thought about numbers rather than giving value to their audience, but they did just the opposite, and here they are with over a million views!
Part 6: Tips for adding chapters to YouTube video
Each video on YouTube is different, and that’s why there is no one-size-fits-all answer. There are some cases where you should not think about adding chapters at all. Whereas in other cases, you will have to experiment a bit before adding chapters.
Here are some tips that will help you.
Do Some Testing
Before adding chapters to a new video that you are thinking to upload, try adding chapters to an old video. See what happens to that video. Have the views increased? How about average view duration? Track these metrics first, and then try adding chapters to your upcoming videos to benefit from videos. Along with these metrics, you will also have to evaluate if adding chapters decreases or increases the watch time and number of views.
Label Your Chapters Using Keywords
Another thing to do that will help you have better traction is using a good keyword strategy. Look at what people are using while searching for content, which is similar to yours? Using names based on keywords that have better search volume will help your videos to rank higher.
Part 7: Why Video Chapter is Not working? [Problem solved]
There are a few mandatory things that you need to do before adding chapters to your YouTube video. Here are some of the common reasons why the video chapter is not working. See if any one of them is true in your case, and rectify it right away.
- Your video doesn’t have the 00:00 timestamp.
- Your video has less than three chapters.
- You have added a chapter that is less than 10 seconds long.
- You have not added the timestamps in chronological order.
- Rather than using “:” you have entered “.” for timecodes.
- If your channel has active copyright strikes, video chapters won’t work.
- Your channel doesn’t have more than 1k subscribers.
- Your video chapters are not suitable for some viewers.
Richard Bennett
Richard Bennett is a writer and a lover of all things video.
Follow @Richard Bennett
Richard Bennett
Mar 27, 2024• Proven solutions
If you have seen chapter markers on YouTube of our official channel, you might be wondering how someone can create chapters on YouTube? What is the way to mark different parts of the videos, and how can you add markers to all the existing videos on YouTube? Don’t worry; this article will discuss everything about YouTube chapters that you need to know. Keep reading to find all the details and learn the step-by-step instructions to add chapters to your YouTube videos for better engagement.
- Part 1: What Are YouTube Chapters?
- Part 2: How to Add Chapter to YouTube Video Progress Bar?
- Part 3: Why Add Chapters to Videos?
- Part 4: When Add Chapters on YouTube?
- Part 5: Will Chapter Decrease Watching Time?
- Part 6: Video Chapter Adding Tips
- Part 7: Why YouTube Chapter is Not Working?
Part 1: What Are YouTube Chapters?
YouTube video chapters are an excellent way to optimize your YouTube content. When you have chapters for your YouTube video, each chapter will have an individual preview. Chapters will break your YouTube video into multiple parts allowing your audience to have better context and information.
As per YouTube, chapters let the audience navigate better through videos. Chapters will let your audience watch different video parts, which will eventually lead to better engagement. If you want to organize your YouTube content, chapters are one of the best ways to go about it. By using labeled timestamps, your video will be divided into multiple sections. Your audience will be able to see the preview of the content and easily skip to the part they want to see within the video’s progress bar.
Part 2: How to Add Chapter to YouTube Video Progress Bar?
If you are a YouTube creator and want to know how you can add chapters to your YouTube content, here’s what you need to do. Follow these instructions carefully:
Step 1: First things first, please sign in to your YouTube account.
Step 2: Select the video that you want to edit and add chapters.
Step 3: Click on the edit video option. This option will be there under the video.
Step 4: On the add details page, you will see the description box. Here, you need to add the list of titles and timestamps.
Please keep in mind that you must add the first timestamp with “00:00”. You will have to add a minimum of three timestamps with a minimum of 10 seconds for each chapter. Here is how it looks like in the description after published.
Part 3: Why YouTubers Should Add Chapters to videos?
There are two primary advantages of adding chapters to your YouTube videos. Apart from making your YouTube video look organized and neat, chapters will let you provide a better user experience to everyone watching your video because they will find all the information about your video faster and easier within a video. And the second benefit is that your YouTube video will show up in search results. This is a way to optimize your content for more users to find your content.
YouTube chapters are beneficial for both creators and viewers. On the progress bar, these clickable chapters can be added. This will allow a viewer to skip and scrub through a video quickly and skip to parts they actually want to watch.
This feature is quite helpful for videos that are pretty long. Chapters will let you segment the videos into important chapters so that the viewer can rewatch already watched chapters or skip to other chapters in the video. YouTube chapters have been recently added to this platform for better navigation and engagement.
Better User Experience for Users
Just like Google wants browsers to find what they are looking for when they add a keyword, YouTube also wants to help viewers find what they are looking for. Chapters can be immensely beneficial for extended content. For example, if you are uploading a video of your convert video, let the users jump straight to their favorite songs.
Even in tutorial video content, viewers will now have a chance to get straight to the main part of the video. With chapters being added, viewers will have an opportunity to decide whether they want to watch the whole video or not. They won’t have to keep skipping one part to another blindly. Chapters will allow them to find what they are looking for in an instant.
For Creators: Increased Visibility
If you know about the Google algorithm, you must be aware that it regularly changes its algorithm to let people find the information they are looking for easily. Adding chapters to your video will encourage Google to display them more often when someone searches for them, and this will include adding your videos to its featured snippets.
While adding chapters, you need to make sure that it is labeled with correct keywords, and it is clear and descriptive. YouTube videos are often showed as Google snippet when someone tries to find something on the search engine. Adding a chapter will let Google understand the content better, thereby letting your videos gain more search traffic.
Part 4: When should I add or not chapters on YouTube?
If you are wondering whether all videos on YouTube should have chapters, the answer to this is no. A two minutes long video won’t require chapters because it won’t make sense. Think about whether you would want your audience to have reduced watch time. Another thing to pay attention to is audience retention.
We mentioned earlier that adding chapters to long videos will be a good idea, but before you jump in and start adding chapters, you need to understand whether it will help you and should be done in your particular case?
If you are uploading a video on education, science and technology, how-to, news and politics, Q and A, and other similar videos, adding chapters will definitely help. In these kinds of videos, you will let your audience rewatch a section they liked the most over and over again.
However, if you are uploading music, entertainment, comedy, and film and animation videos, we will recommend not to add chapters because this will reduce the watch time.
Part 5: Do YouTube Video Chapters Decrease Channel Watch Time?
One of the most commonly asked questions regarding adding chapters to YouTube videos is whether it will reduce the watch time of a video. Video chapters are a pretty good feature and can enable your videos to engage with the viewers.
Since chapters allow your audience to skip through video content, they are not really watching the whole video, which can’t be suitable for audience retention! Here’s what we have to say to this: don’t put your 100% focus on watch time right now. Your focus should be creating informative and engaging content, which will keep your audience hooked to their screens. Even if you add chapters, if your audience doesn’t find it engaging, they will choose not to go on with the content.
Video chapters are a tiny part of the overall content. Chapters provide value to your audience, and you should try them. If you are uploading a concise video, animation video, funny video, and more, don’t add chapters.
Even some of the most watched videos on YouTube have chapters. Learn from them. These video makers could have thought about numbers rather than giving value to their audience, but they did just the opposite, and here they are with over a million views!
Part 6: Tips for adding chapters to YouTube video
Each video on YouTube is different, and that’s why there is no one-size-fits-all answer. There are some cases where you should not think about adding chapters at all. Whereas in other cases, you will have to experiment a bit before adding chapters.
Here are some tips that will help you.
Do Some Testing
Before adding chapters to a new video that you are thinking to upload, try adding chapters to an old video. See what happens to that video. Have the views increased? How about average view duration? Track these metrics first, and then try adding chapters to your upcoming videos to benefit from videos. Along with these metrics, you will also have to evaluate if adding chapters decreases or increases the watch time and number of views.
Label Your Chapters Using Keywords
Another thing to do that will help you have better traction is using a good keyword strategy. Look at what people are using while searching for content, which is similar to yours? Using names based on keywords that have better search volume will help your videos to rank higher.
Part 7: Why Video Chapter is Not working? [Problem solved]
There are a few mandatory things that you need to do before adding chapters to your YouTube video. Here are some of the common reasons why the video chapter is not working. See if any one of them is true in your case, and rectify it right away.
- Your video doesn’t have the 00:00 timestamp.
- Your video has less than three chapters.
- You have added a chapter that is less than 10 seconds long.
- You have not added the timestamps in chronological order.
- Rather than using “:” you have entered “.” for timecodes.
- If your channel has active copyright strikes, video chapters won’t work.
- Your channel doesn’t have more than 1k subscribers.
- Your video chapters are not suitable for some viewers.
Richard Bennett
Richard Bennett is a writer and a lover of all things video.
Follow @Richard Bennett
Also read:
- Achieve the Perfect Look YouTube's Guide to Video Aspect Ratios
- A Step-by-Step Guide Share YouTube Vids with FB Friends
- In 2024, Evaluating Best YouTube Extractors Available on Android
- [Updated] Android and iOS Top ASMR Audio Picks
- [New] Cut Expenses, Create Wow - Download High-Quality Templates for Videos
- [New] End-Screen Design Made Easy with Our Templates & Tutorials
- 2024 Approved Elevate Video Content with Proven Strategies for YouTube Shorts Growth
- [Updated] Becoming a Skin-Deep Sage Setting Up Your Beauty Channel
- Reliable Steps Toward Attaining Safe and Ethical One-Million Follower Status
- [New] Customize Your Video's Appeal YouTube Thumbnail Tips & Tricks
- Unlock Creative Freedom in Videos The Art of Audio Integration
- Navigating the Link Between YouTube & TikTok Platforms
- Free Uploads, More Views YouTube's Easily Overlooked Hacks
- [Updated] A Guide to Essential ASMR Video Facts
- In 2024, Beyond the Box 27 Premium Videostreaming Alternatives
- Prime Tools Turning YouTube Videos Into Text
- 2024 Approved Child Star's Staggering Fortune From YouTube Success
- [Updated] Assessing the Best Platform for Individual Use TikTok vs Shorts
- In 2024, Crafting Dynamic YouTube Content as Animated GIFs Without Downloads
- [New] Crafting a YouTube Empire 26 Successful Techniques
- Rhythmic Revelry Selecting Ultimate Event Templates
- [Updated] Breaking the Cycle of Zero Video Views on YouTube
- Enhancing Viewer Engagement with Smart End Screen Techniques for 2024
- MP3 Conversion Hack YouTube to Mac's MP3 Tutorial
- [New] Affordable Subscriber Boost Buy & Sell YouTube Views
- Start Recording YouTube Content on Your Own Terms
- Evaluating TSeries' Business Model with YouTube Viewership Metrics
- [Updated] Elevate Your Digital Footprint Crafting Compelling Shorts Thumbnails
- Ensuring Long-Term YouTube Success with Creative Commons Mainteninas
- [New] Clearer Streams YouTube Video Borderless Adjustment
- Streamline Your Content Strategy with YouTube Movie Maker
- [New] Boosting Bank Balance Crafting Commercial Video Content
- YouTube Recommended Videos - Block the Videos I Don't Like
- [Updated] Decode Your YouTube Preferences with These 6 Fan-Favorite Questionnaires
- Smooth Cinematography Premium Stabilizer Recommendations
- Streamlining Your YouTube Content with FinalCut Pro Expertise
- Breakthrough Tools An Analysis of the Top 10 Cost-Effective Video Design Schools on YouTube
- 2024 Approved Achieving a Million on the Map A Strategic View-to-Sub Guide
- 2024 Approved 10 Steps to Perfect YouTube Reactions – A Trio Guide
- Key Strategies for Adding Timestamps in YouTube Content
- Chuckle Campaign 7 Ingenious Ideas for Funny YouTube Videos
- [Updated] Efficiently Engaging with Numerous YouTube Lectures
- [Updated] Crafting an Impactful Waterway Teaser
- [Updated] Channel-Specific Choices Top Microphone Picks Adapted To Each YouTube Niche
- In 2024, Dividing Opinions Is Mirrorless Better than DSLR for Vids?
- [New] Are You Sure About Using Subforsub to Grow Your YouTube Audience?
- Solutions to restore deleted files from Motorola Edge+ (2023)
- [Updated] Inside Stardust A Comprehensive Guide to Mastery in Stardew and Its Intriguing Ginger Isle
- Dive Into Magix Video Pro X Features
- In 2024, Fake Android Location without Rooting For Your Samsung Galaxy A24 | Dr.fone
- Unveiling the Top 6 TikTok-to-MP3 Converters - FREE for 2024
- Simple ways to get lost files back from Tecno Spark 10 5G
- How to Use Vimeo Record Tool
- [New] 2024 Approved Discover Top 6 Free Web Apps for Transforming TikTok Into MP3
- In 2024, Why does the pokemon go battle league not available On Samsung Galaxy S21 FE 5G (2023) | Dr.fone
- Best 10 Mock Location Apps Worth Trying On Motorola Moto G13 | Dr.fone
- [Updated] Capture Brilliance in Canon Photos with Free and Premium LUTs
- Updated In 2024, Get Retro with FCP Easy VHS Effects for Your Videos
- New 2024 Approved Essential Guide The 6 Leading Free Internet-Based Auditory Enhancers
- [New] Best Routes to Collecting Visual Content
- Play Store Stuck on Downloading Of OnePlus Nord CE 3 5G? 7 Ways to Resolve | Dr.fone
- [New] In 2024, Streamline Your Gaming Journey Consoles & Computers Synergy
- New 2024 Approved Singing Perfection Pro The Ultimate AI-Powered Audio Alteration Suite
- [Updated] In 2024, Melodies That Matter Top 10 Perennially Played Tik Tok Beats
- Essential Steps for Adding Videos to Your Instagram Story
- [New] In 2024, Innovative Ways to Document Your Digital Collaboration Sessions
- Supercharge Your Social Media Best Apps for Post & Followers
- [New] 2024 Approved Elevate Your Vibe Most Chic TikTok Dances
- [Updated] In 2024, Complying with Aspect Ratios in Tweets
- Life360 Circle Everything You Need to Know On Samsung Galaxy A05 | Dr.fone
- Fake Android Location without Rooting For Your Poco X6 | Dr.fone
- How to Change Google Play Location On Itel A60 | Dr.fone
- Easy Guide How To Bypass Realme 12 Pro+ 5G FRP Android 10/11/12/13
- [New] 2024 Approved Choreographing the Finale for Your TikTok Story
- [Updated] Accelerate Your Social Media Journey TikTok Directly to FB for 2024
- How to Watch Hulu Outside US On Oppo A56s 5G | Dr.fone
- Tactics to Create Transparent Image in Minimal Steps
- Guide on How To Erase iPhone 12 Pro Max Devices Entirely | Dr.fone
- [Updated] Unlock Discord Networking on PC/Android & iOS
- Elevating Visuals with Hyperlapse Cinematography
- Updated In 2024, Maximizing Mobile Engagement Best Practices for Vertical Content
- Unlock Nubia Phone Password Without Factory Reset Full Guide Here
- [Updated] Insights Into Instagram Video Constraint for 2024
- In 2024, How PGSharp Save You from Ban While Spoofing Pokemon Go On Honor 90 Lite? | Dr.fone
- [Updated] How to Share Screen on Google Meet [Desktop and Mobile]
- [Updated] Melodic Matchups Finding the Right Song for Your Insta Story
- New Top Cartoon Animation Creators for Mobile Devices for 2024
- In 2024, Vimeo Chaptering Organizing Video Sections
- Title: In 2024, Chart New Horizons in Branding with These Top 10 YouTube Tools
- Author: Brian
- Created at : 2024-05-25 12:05:49
- Updated at : 2024-05-26 12:05:49
- Link: https://youtube-video-recordings.techidaily.com/in-2024-chart-new-horizons-in-branding-with-these-top-10-youtube-tools/
- License: This work is licensed under CC BY-NC-SA 4.0.
