:max_bytes(150000):strip_icc()/brave-browser-5bc4345a46e0fb0058a535fd.jpg)
In 2024, Building a Strong Visual Narrative in YouTube Videos
Building a Strong Visual Narrative in YouTube Videos
How to structure YouTube videos

Richard Bennett
Mar 27, 2024• Proven solutions
Creating a YouTube channel and uploading video content is only one part of the key to your success. With so much competition on the platform, it’s crucial that you stand out from the crowd with efficient, professional videos that are a pleasure to watch.
Without some planning and structure in mind before you begin filming, it’s all too easy to get a bit lost and start to ramble or fumble your words. Video’s filled with ‘umm’ and ‘err’ are neither pleasant to watch nor engaging.
If you’re serious about making a great YouTube channel and developing a loyal fan base, you’re going to need a workable structure for every video to help you stay on track. Here’s what you need to know:
Quick Jump Menu
- Why is structuring your video important?
- How should you structure YouTube Video Content?
- Ready to go out and make amazing videos?
Why is structuring your video important?
The structure of your video can make all the difference between a successful YouTube channel and a big waste of time. Your objective is to get people watching more and watching all the way to the end. A great structure can:
- Build interest and engagement: By keeping something in reserve and naturally building interest as you go along, people will be compelled to watch longer and interact more with your channel.
- Helps you rank higher: Longer and higher numbers of views will demonstrate your position as an authority well. The YouTube algorithm uses these metrics as part of their ranking factor, so the more and longer views you get, the higher you’ll rank in search.
- Builds consistency and familiarity: If all your videos follow a typical structure, your fans will come to be familiar with your format. They’ll know what to expect from your content and will watch more regularly as a result.
So, now you understand why structure is so important to your channel, let’s take a look at ways in which you can create an amazing structure for every video you produce.
How should you structure YouTube video content?
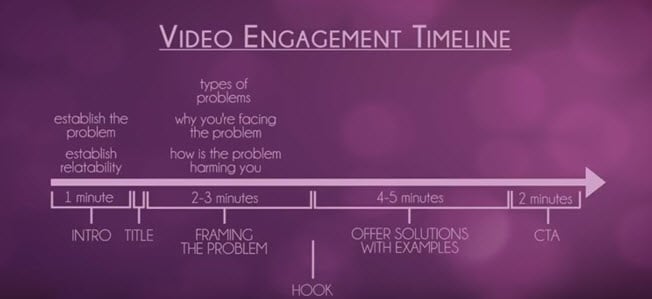
There are some key elements of a YouTube video’s structure which can make it more natural, more engaging and more fun to watch. When you’re planning your structure, you should follow a logical timeline to take the viewer from start to finish easily, and to ensure you get the actions you want at the end.
Intro
People love to be told what’s about to happen, and an intro can be a crucial step in ensuring they are going to continue watching your content. By explaining clearly what they are about to see, why it’s important to them and what problems you’re aiming to solve, you’ll keep them hooked and prevent them from browsing away to the next search result.
An introduction doesn’t need to be long or particularly involved. Remember, you don’t want to give away all your information here, as what you want is to encourage them to watch until the end. Something like “I’m going to show you … which will help you to …” is fine.
Your idea and purpose need to be conveyed fast and effectively if you’re keen to get their interest. Most viewers will decide within the first three to five seconds of a video if they want to invest their time in watching, so it’s crucial you capture their interest and engage them fast to stop them drifting away.
Main content
Once you’ve introduced your video, it’s time to start working through your content. This should be done by:
- Framing the problem
What are the types of problems that your viewers will have encountered which your video can solve? How is the problem affecting you and your viewers? Take around two to three minutes to describe the problems that you hope your video will solve, and work on being empathetic so people can relate to you and the issue you’re discussing.
- Offer solutions with examples
Move on to your solution to the problem. How did you find this solution? Is it easy to implement? Take around four to five minutes to address your solution and give examples of how it works in practice.
Now you’ve addressed the issue that your video content will solve, you’re almost ready to ask them to take the next step. Almost. There’s one more key element in your structure that you need to remember to include.
Hook
The hook can be placed anywhere in your content, although it’s most successful when placed either in the introduction or while you are framing the problem. The hook is a tidbit that aims to encourage a full viewing of your video, so don’t give away your solutions but do give them a reason to carry on watching.
If there’s a particular point where you think they might become bored or distracted, this is a great time to insert your hook. Come up with a powerful hook, for instance ‘with my solution I managed to go from ten views to two hundred in an hour’ or ‘when you hear this solution you’ll understand how I tripled my profits overnight’. Give them a reason to want to stay to the end.
Outro
Your outro shouldn’t just be about signing off in your unique way with some lovely music and visuals. This is the point at which you can ask something back from your audience, whatever that may be. We call this a ‘call to action’, and it could eb something as simple as subscribing through to something more involved like visiting your website.
Think about what you want from your audience; what should they do next? Remember to ask via a strong call to action, otherwise you’ve simply given them some free advice with very little in the way of a return for you.
Script or no script?
Many YouTubers shy away from using any sort of script, feeling that this will make them less relatable and natural. Choosing whether or not to script is entirely up to you; some people feel more comfortable with a script to hand, whereas others prefer to just wing it as they go.
If you don’t feel a script would work for you, do consider having a very rough outline of your structure and the points you want to make readily available while filming. It will help you regain control if you do happen to lose your place and will ensure you get all the information across that you’d planned to.
If you do think a full script would work better for you, make sure you are able to come across as naturally as possible while reading it. Write your script the same way you speak and run through a few times so you’re not squinting at words while you’re on camera. If you regularly wander off script, this could be a sign that a freer flowing style is more your thing.
Read More to Get : How to Loop a YouTube Video >>
Ready to go out and make amazing videos?
Having a structure to your videos might seem a little unnatural at first, but there’s plenty of evidence to show that people who take the time to plan their content get far better results than those who just improvise. If you’re unsure of the best structure for your content, watch videos made by others in your niche to see how they organize theirs.
That’s not to say you have to copy the leaders to be a success; indeed, you’ll be far more successful on YouTube if you continue to be unique. But there’s always room to learn from the best and to take inspiration from those who’ve been getting the very best results.
Richard Bennett
Richard Bennett is a writer and a lover of all things video.
Follow @Richard Bennett
Richard Bennett
Mar 27, 2024• Proven solutions
Creating a YouTube channel and uploading video content is only one part of the key to your success. With so much competition on the platform, it’s crucial that you stand out from the crowd with efficient, professional videos that are a pleasure to watch.
Without some planning and structure in mind before you begin filming, it’s all too easy to get a bit lost and start to ramble or fumble your words. Video’s filled with ‘umm’ and ‘err’ are neither pleasant to watch nor engaging.
If you’re serious about making a great YouTube channel and developing a loyal fan base, you’re going to need a workable structure for every video to help you stay on track. Here’s what you need to know:
Quick Jump Menu
- Why is structuring your video important?
- How should you structure YouTube Video Content?
- Ready to go out and make amazing videos?
Why is structuring your video important?
The structure of your video can make all the difference between a successful YouTube channel and a big waste of time. Your objective is to get people watching more and watching all the way to the end. A great structure can:
- Build interest and engagement: By keeping something in reserve and naturally building interest as you go along, people will be compelled to watch longer and interact more with your channel.
- Helps you rank higher: Longer and higher numbers of views will demonstrate your position as an authority well. The YouTube algorithm uses these metrics as part of their ranking factor, so the more and longer views you get, the higher you’ll rank in search.
- Builds consistency and familiarity: If all your videos follow a typical structure, your fans will come to be familiar with your format. They’ll know what to expect from your content and will watch more regularly as a result.
So, now you understand why structure is so important to your channel, let’s take a look at ways in which you can create an amazing structure for every video you produce.
How should you structure YouTube video content?
There are some key elements of a YouTube video’s structure which can make it more natural, more engaging and more fun to watch. When you’re planning your structure, you should follow a logical timeline to take the viewer from start to finish easily, and to ensure you get the actions you want at the end.
Intro
People love to be told what’s about to happen, and an intro can be a crucial step in ensuring they are going to continue watching your content. By explaining clearly what they are about to see, why it’s important to them and what problems you’re aiming to solve, you’ll keep them hooked and prevent them from browsing away to the next search result.
An introduction doesn’t need to be long or particularly involved. Remember, you don’t want to give away all your information here, as what you want is to encourage them to watch until the end. Something like “I’m going to show you … which will help you to …” is fine.
Your idea and purpose need to be conveyed fast and effectively if you’re keen to get their interest. Most viewers will decide within the first three to five seconds of a video if they want to invest their time in watching, so it’s crucial you capture their interest and engage them fast to stop them drifting away.
Main content
Once you’ve introduced your video, it’s time to start working through your content. This should be done by:
- Framing the problem
What are the types of problems that your viewers will have encountered which your video can solve? How is the problem affecting you and your viewers? Take around two to three minutes to describe the problems that you hope your video will solve, and work on being empathetic so people can relate to you and the issue you’re discussing.
- Offer solutions with examples
Move on to your solution to the problem. How did you find this solution? Is it easy to implement? Take around four to five minutes to address your solution and give examples of how it works in practice.
Now you’ve addressed the issue that your video content will solve, you’re almost ready to ask them to take the next step. Almost. There’s one more key element in your structure that you need to remember to include.
Hook
The hook can be placed anywhere in your content, although it’s most successful when placed either in the introduction or while you are framing the problem. The hook is a tidbit that aims to encourage a full viewing of your video, so don’t give away your solutions but do give them a reason to carry on watching.
If there’s a particular point where you think they might become bored or distracted, this is a great time to insert your hook. Come up with a powerful hook, for instance ‘with my solution I managed to go from ten views to two hundred in an hour’ or ‘when you hear this solution you’ll understand how I tripled my profits overnight’. Give them a reason to want to stay to the end.
Outro
Your outro shouldn’t just be about signing off in your unique way with some lovely music and visuals. This is the point at which you can ask something back from your audience, whatever that may be. We call this a ‘call to action’, and it could eb something as simple as subscribing through to something more involved like visiting your website.
Think about what you want from your audience; what should they do next? Remember to ask via a strong call to action, otherwise you’ve simply given them some free advice with very little in the way of a return for you.
Script or no script?
Many YouTubers shy away from using any sort of script, feeling that this will make them less relatable and natural. Choosing whether or not to script is entirely up to you; some people feel more comfortable with a script to hand, whereas others prefer to just wing it as they go.
If you don’t feel a script would work for you, do consider having a very rough outline of your structure and the points you want to make readily available while filming. It will help you regain control if you do happen to lose your place and will ensure you get all the information across that you’d planned to.
If you do think a full script would work better for you, make sure you are able to come across as naturally as possible while reading it. Write your script the same way you speak and run through a few times so you’re not squinting at words while you’re on camera. If you regularly wander off script, this could be a sign that a freer flowing style is more your thing.
Read More to Get : How to Loop a YouTube Video >>
Ready to go out and make amazing videos?
Having a structure to your videos might seem a little unnatural at first, but there’s plenty of evidence to show that people who take the time to plan their content get far better results than those who just improvise. If you’re unsure of the best structure for your content, watch videos made by others in your niche to see how they organize theirs.
That’s not to say you have to copy the leaders to be a success; indeed, you’ll be far more successful on YouTube if you continue to be unique. But there’s always room to learn from the best and to take inspiration from those who’ve been getting the very best results.
Richard Bennett
Richard Bennett is a writer and a lover of all things video.
Follow @Richard Bennett
Boost YouTube Video Performance with Rapid Rendering Methods
How to Render and Upload YouTube Videos Faster?
Richard Bennett
Oct 26, 2023• Proven solutions
You’ve shot a video you’re proud of and you can’t wait to post it! But, slow down, you have to edit all your clips together first. And then you have to export your video from the editing program, which can take a while. Then you have to wait for it to upload to YouTube, and once it’s up you have to write your description, add cards, and do a handful of other things.
The period between finishing a video and actually posting it for your subscribers to see can be long and tiresome. A lot of videos have probably died in these stages because their creators ran out of energy and patience.
Don’t let this happen to your videos! Here are 4 ways you can save time and avoid headaches during post-production:
3. Use default descriptions and tags
4. TubeBuddy’s bulk features and tagging tools
1. Create mini-projects
When you have alarge editing project with lots of different titles, animations, clip sequences, and PIP tracks it can get hard to keep track of everything. That’s especially true if you need to go back and make changes. A change to one part of your video could affect other parts of it.
Also, the more complex your video is the longer it will take to render/export.
There is a way you can keep your project more organized, save time making minor adjustments, and speed up rendering: create sub-projects of different segments of your video and import them into your main project as their own clips.
This helps you in 3 ways:
1. If there are a lot of effects it’ll be faster to render a shorter video.
2. If you import your sequence as its own clip you won’t have to worry about adjusting little parts of it whenever you change earlier sections of your video.
3. If you do want to make adjustments to your sequence you can open up your mini-project and change it without affecting anything in your main project.
2. Optimize your upload speed
At home, your videos will upload fastest if all of your internet resources are devoted to the upload. That means you should not have any other windows open on your computer while you are uploading. You should also make sure there aren’t other devices competing for wifi like smart tvs, cell phones, or really fancy coffee makers.
If you have neighbors on the same wifi signal as you and they are online at the same time, this will slow you down too.
Because there is so much that can interfere with wifi, you might want to consider a wired Ethernet cable. Ethernet connections are faster in general, and you won’t have any problems with other devices competing for resources like you get with wifi.
If you’re doing everything you can to optimize your upload speed at home and still find that it takes an unreasonable amount of time to upload videos to YouTube, go somewhere with a better connection. Save your video to a USB drive and take it to a library or college to upload. Connections in these kinds of places tend to be very strong.
3. Use default descriptions and tags
In your Creator Studio, go to Channel > Upload defaults. Here you can write in titles, descriptions, and tags which will automatically be applied to every video you upload.

Note: in the latest YouTube Studio, the upload interface is changed but the main process is similar.

You probably have tags you use for almost every video you post. For example, if your channel is about vegan cooking then every one of your videos is probably tagged ‘vegan’, ‘food’, and ‘cooking’. If you type those tags in here then you don’t have to keep adding them to every new video, and you can still add or remove tags from individual uploads so you aren’t stuck using the exact same set of tags every time.
Similarly, you probably have some default text that goes in the description of every one of your videos (i.e. a link to your personal website or a brief introduction of yourself). If you type in a default description then that text will appear automatically in every new video description and you can just add to it when you need to for individual videos.
Using defaults might only save you a couple of minutes per video, but those minutes add up.
4. TubeBuddy’s bulk features and tagging tools
TubeBuddy is a channel management tool for YouTube. Most of its features are more geared towards very large channels or companies with a YouTube presence, but there are also features that can help small or mid-sized YouTubers save time and stay organized.
Some of these tools include templates for things like cards and end screens and bulk processing tools for when you want to change a lot of things at once. For example, if you wanted to update the links in every card in every one of your videos at once then TubeBuddy could help with that.
Some of TubeBuddy’s best features for growing channels are the tagging features. TubeBuddy will help you discover tags, suggest new tags, and even copy whole lists of tags from rival videos.
There are different levels of pricing for TubeBuddy (including a free version, although it’s very limited) and you get a discount on the Pro version if you have less than 50,000 lifetime views on your channel. It ends up being $4.50USD a month (or $3.60 USD a month if you pay for a year in advance). It’s a good investment for someone who’s starting to see some growth on YouTube, but probably not if you’re still trying to reach milestones like 500 subs or 10,000 views.
You have to work hard to get anywhere on YouTube, but that doesn’t mean you should be toiling away at tedious stuff like typing in the same tags over and over. If you have any time-saving tips then make sure to share them with everyone in the comments!
Remember that your time is valuable =)

If you are using Filmora to edit YouTube videos, you can upload the video to YouTube directly from Filmora without download it again first, which can save you time. Besides, if you don’t want the video to be public, you can change Privacy to unlisted or private in Filmora.


Richard Bennett
Richard Bennett is a writer and a lover of all things video.
Follow @Richard Bennett
Richard Bennett
Oct 26, 2023• Proven solutions
You’ve shot a video you’re proud of and you can’t wait to post it! But, slow down, you have to edit all your clips together first. And then you have to export your video from the editing program, which can take a while. Then you have to wait for it to upload to YouTube, and once it’s up you have to write your description, add cards, and do a handful of other things.
The period between finishing a video and actually posting it for your subscribers to see can be long and tiresome. A lot of videos have probably died in these stages because their creators ran out of energy and patience.
Don’t let this happen to your videos! Here are 4 ways you can save time and avoid headaches during post-production:
3. Use default descriptions and tags
4. TubeBuddy’s bulk features and tagging tools
1. Create mini-projects
When you have alarge editing project with lots of different titles, animations, clip sequences, and PIP tracks it can get hard to keep track of everything. That’s especially true if you need to go back and make changes. A change to one part of your video could affect other parts of it.
Also, the more complex your video is the longer it will take to render/export.
There is a way you can keep your project more organized, save time making minor adjustments, and speed up rendering: create sub-projects of different segments of your video and import them into your main project as their own clips.
This helps you in 3 ways:
1. If there are a lot of effects it’ll be faster to render a shorter video.
2. If you import your sequence as its own clip you won’t have to worry about adjusting little parts of it whenever you change earlier sections of your video.
3. If you do want to make adjustments to your sequence you can open up your mini-project and change it without affecting anything in your main project.
2. Optimize your upload speed
At home, your videos will upload fastest if all of your internet resources are devoted to the upload. That means you should not have any other windows open on your computer while you are uploading. You should also make sure there aren’t other devices competing for wifi like smart tvs, cell phones, or really fancy coffee makers.
If you have neighbors on the same wifi signal as you and they are online at the same time, this will slow you down too.
Because there is so much that can interfere with wifi, you might want to consider a wired Ethernet cable. Ethernet connections are faster in general, and you won’t have any problems with other devices competing for resources like you get with wifi.
If you’re doing everything you can to optimize your upload speed at home and still find that it takes an unreasonable amount of time to upload videos to YouTube, go somewhere with a better connection. Save your video to a USB drive and take it to a library or college to upload. Connections in these kinds of places tend to be very strong.
3. Use default descriptions and tags
In your Creator Studio, go to Channel > Upload defaults. Here you can write in titles, descriptions, and tags which will automatically be applied to every video you upload.
Note: in the latest YouTube Studio, the upload interface is changed but the main process is similar.
You probably have tags you use for almost every video you post. For example, if your channel is about vegan cooking then every one of your videos is probably tagged ‘vegan’, ‘food’, and ‘cooking’. If you type those tags in here then you don’t have to keep adding them to every new video, and you can still add or remove tags from individual uploads so you aren’t stuck using the exact same set of tags every time.
Similarly, you probably have some default text that goes in the description of every one of your videos (i.e. a link to your personal website or a brief introduction of yourself). If you type in a default description then that text will appear automatically in every new video description and you can just add to it when you need to for individual videos.
Using defaults might only save you a couple of minutes per video, but those minutes add up.
4. TubeBuddy’s bulk features and tagging tools
TubeBuddy is a channel management tool for YouTube. Most of its features are more geared towards very large channels or companies with a YouTube presence, but there are also features that can help small or mid-sized YouTubers save time and stay organized.
Some of these tools include templates for things like cards and end screens and bulk processing tools for when you want to change a lot of things at once. For example, if you wanted to update the links in every card in every one of your videos at once then TubeBuddy could help with that.
Some of TubeBuddy’s best features for growing channels are the tagging features. TubeBuddy will help you discover tags, suggest new tags, and even copy whole lists of tags from rival videos.
There are different levels of pricing for TubeBuddy (including a free version, although it’s very limited) and you get a discount on the Pro version if you have less than 50,000 lifetime views on your channel. It ends up being $4.50USD a month (or $3.60 USD a month if you pay for a year in advance). It’s a good investment for someone who’s starting to see some growth on YouTube, but probably not if you’re still trying to reach milestones like 500 subs or 10,000 views.
You have to work hard to get anywhere on YouTube, but that doesn’t mean you should be toiling away at tedious stuff like typing in the same tags over and over. If you have any time-saving tips then make sure to share them with everyone in the comments!
Remember that your time is valuable =)
If you are using Filmora to edit YouTube videos, you can upload the video to YouTube directly from Filmora without download it again first, which can save you time. Besides, if you don’t want the video to be public, you can change Privacy to unlisted or private in Filmora.
Richard Bennett
Richard Bennett is a writer and a lover of all things video.
Follow @Richard Bennett
Also read:
- [New] Boost Popularity Quickly Top 30 Hashtags Every Gamer Needs
- [New] Boosting Engagement From the Start Premium, Paid-Free Intra Creators
- [Updated] Achieve a Millennium of Subscriber Milestones
- [Updated] Essential Knowledge for Engaging with ASMR Videos
- [Updated] Unlock the Power Scriptwriting for Popular Vlogs
- 2024 Approved Secrets to High-Resolution Pics on Deal
- 5 Quick Methods to Bypass Vivo X Flip FRP
- Choreographing Climactic Crescendos
- Echoing Ethos with Closing Credits for 2024
- Effizientes Umwandeln Von MKV Zu MP4 Ohne Bild- Und Tonqualitätseinbußen - Eine Umfassende Anleitung
- Essential Prompts Unveiling in the Crypto Sphere
- In 2024, How To Change Tecno Pova 5 Pro Lock Screen Clock in Seconds
- In 2024, The Most Useful Tips for Pokemon Go Ultra League On Samsung Galaxy M54 5G | Dr.fone
- Maximizing Auditory Experience on Windows 10
- Virtual World, Real Profit for Game Makers
- Title: In 2024, Building a Strong Visual Narrative in YouTube Videos
- Author: Brian
- Created at : 2024-11-13 06:43:17
- Updated at : 2024-11-15 01:30:14
- Link: https://youtube-video-recordings.techidaily.com/in-2024-building-a-strong-visual-narrative-in-youtube-videos/
- License: This work is licensed under CC BY-NC-SA 4.0.