
:max_bytes(150000):strip_icc()/easeus-data-recovery-wizard-free-b92bc63ec5594068a7adc5581e7b1512.png)
In 2024, Breaking Into YouTube's Top 100 With Effective SEO
Breaking Into YouTube’s Top 100 With Effective SEO
The 12-step YouTube SEO Guide for Beginners Who Want More Views

Shanoon Cox
Oct 26, 2023• Proven solutions
The joy of creating on YouTube is often dampened by the disappointment of underperforming videos. You have published your content and it’s not getting the views you had hoped.
Well, let’s change that!
In this guide, I’m going to walk you through YouTube SEO from the very start to the very end.
Nothing complicated. No paid programs or expensive apps needed. We are going back to basics and get your videos discovered.
Ready?
Let’s Go!
Part 1: Research Your Topic and Competitors
Come up with a video idea . Can’t come up with one? Let me help. I heard you can make a mean scrambled egg, why don’t you show the world how you do it?
Excellent! Let’s go with that idea.
Wait, don’t go making the video yet. First, we have to do some research. We need to know what videos already exist out there.
Step 1: Find Related Videos
Do a quick search on YouTube to see what videos already exist on your topic.

Uh oh… your video will be competing against celebrities like Gordon Ramsay and Jamie Oliver.
Okay, don’t panic! There is a fantastic quote, credited to bestselling author, Jon Acuff , that goes:

While researching your competition, you will feel overwhelmed, but remember, you are at the beginning, and Gordon Ramsay and Jamie Oliver are not even at their middle, they are way passed the finish line. You still have a long journey to go, so don’t get discouraged, get inspired!
Watch those videos and understand what they are all about.
Understand that people watch YouTube for 3 key reasons:
- To be entertained
- To learn something new
- To be inspired
A video that can hit all 3 marks is going to be positioned for success. Don’t fret too much about the competition, as long as your content is good, you will see improvement.
So if you think this scrambled egg idea can hit those 3 marks, then I encourage you to go to the next step. If you don’t, let’s regroup and brainstorm some more YouTube video ideas .
Step 2: Find Keywords
Now that we’ve decided that we are sticking with the video idea, we are ready to do some keyword research. Keywords are the words and phrases people type in the YouTube search bar to discover videos.
Come up with as many relevant keywords as you can. Start by entering a keyword into the YouTube search bar. This will tell you what are the most popular searches associated with that keyword:
Once you have an idea of what people are searching for related to your topic, you’ll want to find more relevant keywords. I like to use the free app, Ubersuggest to do that.

This app gives you a whole list of long-tail keywords, which are 3-4-word phrases which is specific to what your video is about.
Some you will use to dig deeper in and other you will deem irrelevant to your videos. A good way of determining the value of a keyword is by the stats the application shows.
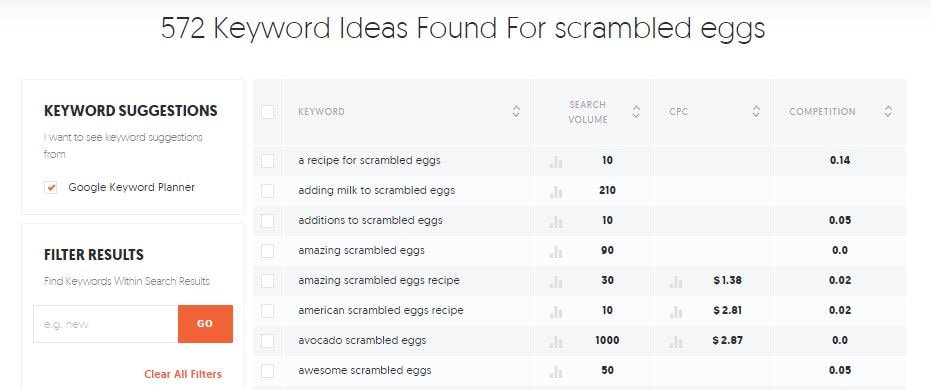
How to Read Keyword Suggestions
Once you have a list of keywords, you will see some numbers on the right-hand side. Here is what each one is about:
- Search volume is the number used to identify the popularity of the keyword. The higher the number the more people are searching for it.
- CPC is the value accredited by YouTube, determining how much advertisers are paying to target audiences who search for that keyword and click on the link.
- Competition is the number used to qualify how many other content are using that keyword.
The two categories that matter most to us right now is Search Volume and Competition. We want keywords with high search volume and low competition rate.
In the example above, you can see that the keyword “avocado scrambled eggs” has a Search Volume of 1,000 and a competition rate of 0.0. This is a good keyword to target, if you can incorporate an avocado to your dish… which of course you can!
Step 3: Write Title
I know you might want to deal with the Title, Description, and Tags after you’ve filmed and edited your video. But if you want to apply a YouTube SEO-focused strategy, then these should be addressed before you even pick up a camera as it can greatly dictate the content you end up creating.
A good YouTube title sparks curiosity, evokes emotional reaction, and promises value to your viewers.
Of course you can title your video simply: Making Scrambled Eggs
But does it spark curiosity? Not really… most people can make scrambled eggs.
Does it evoke any emotion? Maybe hunger… but even then, not really…
Finally, does it promise value? Well, assuming that most people can at least crack an egg into a pan, then hardly.
Your scrambled egg is special! Your video is special! We need to evoke that in the title — and as long as you are not writing any clickbait and deliver on what the title suggest, you can do this.
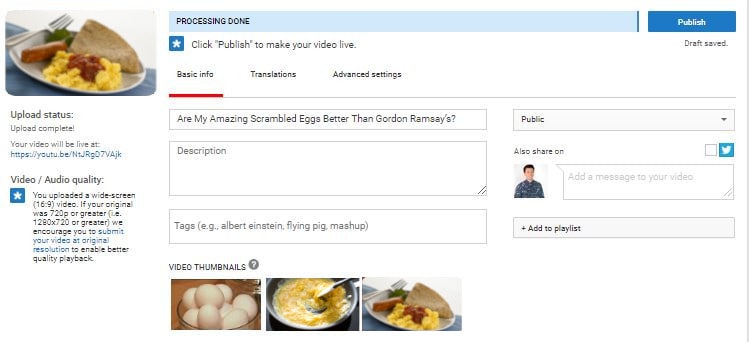
So, how about this: Are My Amazing Scrambled Eggs Better Than Gordon Ramsay’s?
Hmmm… Well, is it? We know that the Gordon Ramsay’s video has almost 30M views. Many people have already tried cooking it, I’m sure. There is only one way to find out, by encouraging others to try it over Gordon’s.
You don’t need to go for a somewhat contentious title like this, but that’s the idea, you want something that gets people curious, make them feel a certain way, and in the end, make them better for having watched your video.
See how a good title can guide the rest of your video?
Step 4: Write Description
You aren’t going to be writing the description for the viewers necessarily, you are going to be writing it for YouTube’s algorithms. The better YouTube understands what your video is about, the better they can show it to people searching for it.
This means you need to include the keywords you were researching at the beginning of your description, as YouTube will be using them to identify the content of your video. 1 or 2 keywords that best represent your video is enough. Don’t stuff the title with too many keywords or you’ll risk sounding like a robot.
But also use the description for practical uses too, if you have additional information such as supportive links, outline of the video’s content, a list of materials, step-by-step guide, or a recipe that you think your human viewers will find useful, you should input that in the description as well.
Step 5: Write Tags
Thank goodness we did the keyword research in Step 2, because coming up with tags is not as easy as it looks.
Pull 15 keywords from the list and keep it somewhere safe.
Note: The keywords you used in the title should be found in your tags, and since they are the most important ones, you should place them first.
Organize your keywords in the tag as such:
Have the specific keywords at the top, followed by more general keywords, and then branded ones:
Specific: How to make scrambled eggs
General: Scrambled eggs
Branded: Gordon Ramsay scrambled eggs
Part 2: Make The Best Darn Video Possible
It doesn’t matter how relevant your keywords are or how epic your title is, if you video sucks (i.e. your viewers click in and leave right away), YouTube will not show it in search.
Even if you haven’t created any videos yet, you can follow these next steps to ensure you are following the best practices to structure your video.
Step 6: Plan and Film the Hook
The first few seconds is where the largest percentage of your earned viewership will drop off. Odds are 20% of your viewers won’t even get past the first 10 seconds .
What you need is a hook, an intro that ensures this video is what they want to watch and let’s them know what they can expect.
Step 7: Film B-Roll
One static camera shot of you talking or cooking or giving a tutorial can cause your viewers to lose attention.
In order to keep your viewers interest, you will need b-roll, or supplemental footage you can cut to give you video more life.
While jump cuts (cuts made on a sequential clip of the same subject or in the same camera position) are fine, having additional footage to cut to will make your video feel more fluid.
So when you are filming your scrambled egg video, make sure you get some footage of you cracking the egg, scrambling it, and serving it on the plate.
Step 8: Encourage Viewers to Engage in Video
Liking, disliking, subscribing, and commenting on your video will all help your performance indirectly.
While YouTube wouldn’t rank your video higher simply because you have more likes subscribers, or comments, engagement from viewers help your video get discovered. If you get a like or comment from a YouTuber with a lot of subscribers, your video may be visible to those who are following that YouTuber for a while.
The best way to get engagement from your audience is to encourage them to like and subscribe or ask them a question or start a dialogue.
For example, in this scrambled egg video you are making, at the end you can ask, “So what do you think, is this better than Gordon Ramsay?”

Who knows, who will respond.
Step 9: Design a Thumbnail
You could have made a brilliant video, but if you have a poor quality thumbnail that is unattractive, then the overall performance of your video will suffer — and good SEO can only do so much after that.
Your viewers will absolutely judge your video by its cover so it’s important to put some thought into it and not solely rely on the three random thumbnail choices that YouTube picks for you.

Take a look at your competition. If they all look the same, do something different. Add text or a human face (preferably yours) to evoke emotion, as viewers are more likely to click into a video if they see an expressive image.
Don’t want to pay money for a photo editing software such as Photoshop?
You can use an online service called Canva or download GIMP , an open-source photo editor much like Photoshop, but far less powerful. These will help you get the job done as you are starting out.
Want to know more thumbnail maker? Check our picks of the best free YouTube thumbnail makers .
Part 3: Publishing With Attention to Optimization
Well done finishing the video! You are almost there… but not there yet.

Come on, keep going!
Step 10: Fill Out Your Videos Assets
The video is done, the thumbnail is designed, and you have all your title, description, and tags ready to go. This step is easy, upload the video, and fill out the assets, and give yourself a pat on the back.
Step 11: Add Transcripts
In addition to making your content accessible for people who don’t want to or can’t listen to the audio in your video, adding subtitles and closed captions will help YouTube understand the spoken content in your video.
While YouTube does have an automatic subtitle generator, it’s not reliable enough to be used for identifying the keywords you use in your video.
You can choose to write out the whole transcript of your video yourself, but if you are press on time, which of course you are, you can simply go and edit the automatic transcript already available in your video. By the way, you can also use some automatic transcription software.
Step 12: Add Video to Playlist
Finally the last thing you need to do for your video is to add it to a playlist. Even though it might be the first video in the playlist, it helps YouTube identify your video if you organize it in a playlist. As you accumulate more content, having videos in playlists makes content easier to find and keeps relevant videos together.
When viewers searches, having your videos in playlists increases the chance of it being discovered.
So if your first video is about scrambled eggs, maybe you next video can be about the awesome butter toasts.
I guess, you are on your way to making a pretty badass breakfast playlist. I personally can’t wait to see it!
If you treat SEO as an afterthought, only after your video is created, you are not using it to its full potential. If you follow these 12 steps during the course of your production, you will find that SEO doesn’t simply help your video perform at the end, but contributes in all the other phases of creating your video as well.
Besides considering YouTube SEO, you should make a good YouTube video as well. Filmora is a powerful video editing software that features lots of templates and effects. Get the free trial version below and have a try today.


Do you have any questions about SEO? Please leave us a comment below.
Shanoon Cox
Shanoon Cox is a writer and a lover of all things video.
Follow @Shanoon Cox
Shanoon Cox
Oct 26, 2023• Proven solutions
The joy of creating on YouTube is often dampened by the disappointment of underperforming videos. You have published your content and it’s not getting the views you had hoped.
Well, let’s change that!
In this guide, I’m going to walk you through YouTube SEO from the very start to the very end.
Nothing complicated. No paid programs or expensive apps needed. We are going back to basics and get your videos discovered.
Ready?
Let’s Go!
Part 1: Research Your Topic and Competitors
Come up with a video idea . Can’t come up with one? Let me help. I heard you can make a mean scrambled egg, why don’t you show the world how you do it?
Excellent! Let’s go with that idea.
Wait, don’t go making the video yet. First, we have to do some research. We need to know what videos already exist out there.
Step 1: Find Related Videos
Do a quick search on YouTube to see what videos already exist on your topic.
Uh oh… your video will be competing against celebrities like Gordon Ramsay and Jamie Oliver.
Okay, don’t panic! There is a fantastic quote, credited to bestselling author, Jon Acuff , that goes:
While researching your competition, you will feel overwhelmed, but remember, you are at the beginning, and Gordon Ramsay and Jamie Oliver are not even at their middle, they are way passed the finish line. You still have a long journey to go, so don’t get discouraged, get inspired!
Watch those videos and understand what they are all about.
Understand that people watch YouTube for 3 key reasons:
- To be entertained
- To learn something new
- To be inspired
A video that can hit all 3 marks is going to be positioned for success. Don’t fret too much about the competition, as long as your content is good, you will see improvement.
So if you think this scrambled egg idea can hit those 3 marks, then I encourage you to go to the next step. If you don’t, let’s regroup and brainstorm some more YouTube video ideas .
Step 2: Find Keywords
Now that we’ve decided that we are sticking with the video idea, we are ready to do some keyword research. Keywords are the words and phrases people type in the YouTube search bar to discover videos.
Come up with as many relevant keywords as you can. Start by entering a keyword into the YouTube search bar. This will tell you what are the most popular searches associated with that keyword:
Once you have an idea of what people are searching for related to your topic, you’ll want to find more relevant keywords. I like to use the free app, Ubersuggest to do that.
This app gives you a whole list of long-tail keywords, which are 3-4-word phrases which is specific to what your video is about.
Some you will use to dig deeper in and other you will deem irrelevant to your videos. A good way of determining the value of a keyword is by the stats the application shows.
How to Read Keyword Suggestions
Once you have a list of keywords, you will see some numbers on the right-hand side. Here is what each one is about:
- Search volume is the number used to identify the popularity of the keyword. The higher the number the more people are searching for it.
- CPC is the value accredited by YouTube, determining how much advertisers are paying to target audiences who search for that keyword and click on the link.
- Competition is the number used to qualify how many other content are using that keyword.
The two categories that matter most to us right now is Search Volume and Competition. We want keywords with high search volume and low competition rate.
In the example above, you can see that the keyword “avocado scrambled eggs” has a Search Volume of 1,000 and a competition rate of 0.0. This is a good keyword to target, if you can incorporate an avocado to your dish… which of course you can!
Step 3: Write Title
I know you might want to deal with the Title, Description, and Tags after you’ve filmed and edited your video. But if you want to apply a YouTube SEO-focused strategy, then these should be addressed before you even pick up a camera as it can greatly dictate the content you end up creating.
A good YouTube title sparks curiosity, evokes emotional reaction, and promises value to your viewers.
Of course you can title your video simply: Making Scrambled Eggs
But does it spark curiosity? Not really… most people can make scrambled eggs.
Does it evoke any emotion? Maybe hunger… but even then, not really…
Finally, does it promise value? Well, assuming that most people can at least crack an egg into a pan, then hardly.
Your scrambled egg is special! Your video is special! We need to evoke that in the title — and as long as you are not writing any clickbait and deliver on what the title suggest, you can do this.
So, how about this: Are My Amazing Scrambled Eggs Better Than Gordon Ramsay’s?
Hmmm… Well, is it? We know that the Gordon Ramsay’s video has almost 30M views. Many people have already tried cooking it, I’m sure. There is only one way to find out, by encouraging others to try it over Gordon’s.
You don’t need to go for a somewhat contentious title like this, but that’s the idea, you want something that gets people curious, make them feel a certain way, and in the end, make them better for having watched your video.
See how a good title can guide the rest of your video?
Step 4: Write Description
You aren’t going to be writing the description for the viewers necessarily, you are going to be writing it for YouTube’s algorithms. The better YouTube understands what your video is about, the better they can show it to people searching for it.
This means you need to include the keywords you were researching at the beginning of your description, as YouTube will be using them to identify the content of your video. 1 or 2 keywords that best represent your video is enough. Don’t stuff the title with too many keywords or you’ll risk sounding like a robot.
But also use the description for practical uses too, if you have additional information such as supportive links, outline of the video’s content, a list of materials, step-by-step guide, or a recipe that you think your human viewers will find useful, you should input that in the description as well.
Step 5: Write Tags
Thank goodness we did the keyword research in Step 2, because coming up with tags is not as easy as it looks.
Pull 15 keywords from the list and keep it somewhere safe.
Note: The keywords you used in the title should be found in your tags, and since they are the most important ones, you should place them first.
Organize your keywords in the tag as such:
Have the specific keywords at the top, followed by more general keywords, and then branded ones:
Specific: How to make scrambled eggs
General: Scrambled eggs
Branded: Gordon Ramsay scrambled eggs
Part 2: Make The Best Darn Video Possible
It doesn’t matter how relevant your keywords are or how epic your title is, if you video sucks (i.e. your viewers click in and leave right away), YouTube will not show it in search.
Even if you haven’t created any videos yet, you can follow these next steps to ensure you are following the best practices to structure your video.
Step 6: Plan and Film the Hook
The first few seconds is where the largest percentage of your earned viewership will drop off. Odds are 20% of your viewers won’t even get past the first 10 seconds .
What you need is a hook, an intro that ensures this video is what they want to watch and let’s them know what they can expect.
Step 7: Film B-Roll
One static camera shot of you talking or cooking or giving a tutorial can cause your viewers to lose attention.
In order to keep your viewers interest, you will need b-roll, or supplemental footage you can cut to give you video more life.
While jump cuts (cuts made on a sequential clip of the same subject or in the same camera position) are fine, having additional footage to cut to will make your video feel more fluid.
So when you are filming your scrambled egg video, make sure you get some footage of you cracking the egg, scrambling it, and serving it on the plate.
Step 8: Encourage Viewers to Engage in Video
Liking, disliking, subscribing, and commenting on your video will all help your performance indirectly.
While YouTube wouldn’t rank your video higher simply because you have more likes subscribers, or comments, engagement from viewers help your video get discovered. If you get a like or comment from a YouTuber with a lot of subscribers, your video may be visible to those who are following that YouTuber for a while.
The best way to get engagement from your audience is to encourage them to like and subscribe or ask them a question or start a dialogue.
For example, in this scrambled egg video you are making, at the end you can ask, “So what do you think, is this better than Gordon Ramsay?”
Who knows, who will respond.
Step 9: Design a Thumbnail
You could have made a brilliant video, but if you have a poor quality thumbnail that is unattractive, then the overall performance of your video will suffer — and good SEO can only do so much after that.
Your viewers will absolutely judge your video by its cover so it’s important to put some thought into it and not solely rely on the three random thumbnail choices that YouTube picks for you.
Take a look at your competition. If they all look the same, do something different. Add text or a human face (preferably yours) to evoke emotion, as viewers are more likely to click into a video if they see an expressive image.
Don’t want to pay money for a photo editing software such as Photoshop?
You can use an online service called Canva or download GIMP , an open-source photo editor much like Photoshop, but far less powerful. These will help you get the job done as you are starting out.
Want to know more thumbnail maker? Check our picks of the best free YouTube thumbnail makers .
Part 3: Publishing With Attention to Optimization
Well done finishing the video! You are almost there… but not there yet.
Come on, keep going!
Step 10: Fill Out Your Videos Assets
The video is done, the thumbnail is designed, and you have all your title, description, and tags ready to go. This step is easy, upload the video, and fill out the assets, and give yourself a pat on the back.
Step 11: Add Transcripts
In addition to making your content accessible for people who don’t want to or can’t listen to the audio in your video, adding subtitles and closed captions will help YouTube understand the spoken content in your video.
While YouTube does have an automatic subtitle generator, it’s not reliable enough to be used for identifying the keywords you use in your video.
You can choose to write out the whole transcript of your video yourself, but if you are press on time, which of course you are, you can simply go and edit the automatic transcript already available in your video. By the way, you can also use some automatic transcription software.
Step 12: Add Video to Playlist
Finally the last thing you need to do for your video is to add it to a playlist. Even though it might be the first video in the playlist, it helps YouTube identify your video if you organize it in a playlist. As you accumulate more content, having videos in playlists makes content easier to find and keeps relevant videos together.
When viewers searches, having your videos in playlists increases the chance of it being discovered.
So if your first video is about scrambled eggs, maybe you next video can be about the awesome butter toasts.
I guess, you are on your way to making a pretty badass breakfast playlist. I personally can’t wait to see it!
If you treat SEO as an afterthought, only after your video is created, you are not using it to its full potential. If you follow these 12 steps during the course of your production, you will find that SEO doesn’t simply help your video perform at the end, but contributes in all the other phases of creating your video as well.
Besides considering YouTube SEO, you should make a good YouTube video as well. Filmora is a powerful video editing software that features lots of templates and effects. Get the free trial version below and have a try today.
Do you have any questions about SEO? Please leave us a comment below.
Shanoon Cox
Shanoon Cox is a writer and a lover of all things video.
Follow @Shanoon Cox
Beginner’s Guide: Video Setup Must-Haves
Essential YouTube Equipment For Starting Your Channel - What Do You Really Need?

Richard Bennett
Oct 26, 2023• Proven solutions
Check out our most updated guide on this topic: YouTube Equipment Starter Guide For Beginners .
The first thing to make sure of before starting a YouTube channel is having all that you need to record and upload high-quality videos regularly. That doesn’t mean you have to take out a loan and spend thousands to purchase a brand new camera and all other gadgets that professional filmmakers use.
The smartest way to get started is to go through a list of necessary equipment for YouTube and check whether or not you already own some of it. Once your channel starts growing, you can then start thinking about whether you want to invest in upgraded equipment. Here is a quick overview of all items that you need to start entertaining your online audience and gaining subscribers to your YouTube channel:
- Your YouTube Camera
- Microphones and Audio
- Lighting Gear for YouTube
- Tripods and Camera Stands
- Smartphone Camera Gear
YouTube Cameras
The short version: Use whatever you already have, even if it’s your phone or webcam. It’s nice to have sharp, fine-tuned, 4K footage, but viewers will forgive lower visual quality if your content is good.
The long version: You will need a camera, but there are a lot of different devices you can use including DSLRs, point and shoots, webcams, and your smartphone.
Your choice of camera will have a tremendous impact on the visual quality of your content and might drive your decisions regarding other pieces of equipment. However, you shouldn’t feel obliged to work with a top-notch camera from day one, especially since cheaper options can produce great results if used the right way.
On one end of the spectrum, you have basic smartphone cameras and web cameras, which are easy to come by and simple to operate. These days, high-end phones come equipped with quite powerful cameras that are more than sufficient for the needs of the average YouTuber. Better webcams can also do the job, although high-performance webcam models can get pretty expensive too. It is probably wise to resist the urge to start broadcasting with the built-in camera in your laptop and at least get a webcam or use your phone, but your computer’s camera is still always an option. Not having a better camera should never stop you from making YouTube videos.
If you already have a DSLR camera then it’s a good idea to familiarize yourself with it. You have far more freedom to adjust the settings and achieve a professional look for your videos with a DSLR, but that does mean it’ll take some time to become an expert at using it. Ultra-high resolution is not required for YouTube, but it certainly won’t hurt to have additional sharpness and more detail in the scene. If you’re shopping for a DSLR, look for one with a flip screen that allows you to quickly check what your viewers see.
YouTube Microphone and Audio
The short version: Audio quality is extremely important. If you can buy either a new camera or an external microphone, but not both, it might be better to go for the microphone. Click here for advice on upping your audio quality without an external microphone.
The long version: Sound capturing is every bit as important for your success as your video feed. In fact, poor audio can be even more damaging to your subscriber count than grainy video, since people won’t spend their time listening to something they have to put effort into understanding.
Again, most YouTube video makers have a limited budget at their disposal, so professional microphones are mostly off the table. However, investing in a directional microphone (‘shotgun mic’) that can pick up your voice clearly and without background noise is certainly a smart move. Such microphones can be pointed towards you while you speak, and since most YouTubers sit still while doing their shows there won’t be too much need for in-session adjustments.
If you’re not ready to invest in a shotgun mic, you can also find very inexpensive (often under $20) LAV mics. These small microphones can be pinned to your shirt, which allows them to record very clear dialogue because they’re so close to your mouth.
Lights for YouTube
The short version: You need as much light as you can get. Lighting kits can be affordable on Amazon, but you can also achieve a great look using daylight/windows and ‘daylight’ lightbulbs.
The long version: If you’ve ever tried to make a video indoors, you already know that it’s necessary to have additional light. Often just filming with the normal lights in a room will cause your footage to look dark and grainy, and possibly be tinted orange. To overcome these problems you need to increase the amount of light you have available.
Sometimes, it is enough to film near windows and/or bring more household lamps into your filming area. For any household lamps or lighting fixtures you use, make sure to put in white or ‘daylight’ lightbulbs instead of using the orange/tungsten bulbs that you might have for everyday use (this is how you avoid tinting things orange).
If you have the budget available to get some lighting equipment, you can find softbox lights or LED panel lights available fairly inexpensively online. Softbox lights are great because they provide even, diffused, light.
Another useful piece of lighting equipment to have is a reflector. A reflector is usually a piece of white, silver, or gold fabric stretched over a frame. You can use it to bounce light from one light source back towards yourself (this is a great way to fill shadows cast by your main light). Reflectors tend to be inexpensive, but you can also use white cardboard or tinfoil in place of purchasing a reflector.
Tripods and Camera Stands
The short version: You need something to hold your camera. If you mostly film in your own home that can be a desk or a stack of books, but if you make a lot of videos while you’re on the go you probably need a tripod or gimbal. Heavier cameras need heavier tripods.
The long version: While handheld cameras can deliver solid results for vloggers and casual streamers, viewers do expect reasonably stable footage. For many types of videos, the camera needs to be completely still and flatly positioned on a horizontal plane. Tripods and camera stands can cost very little, so it’s a good idea to look into getting some kind of stabilizer.
When you are choosing a tripod, pay attention to how much it weighs. If the camera that needs to be mounted on it is very heavy (like some DSLR models), you want to ensure that the structure itself weighs enough not to be easily tipped over. Too thin tripods can put your camera at risk, and that’s the last thing you want. Smaller cameras such as GoPros are more flexible in this regard and can be placed on a wider range of tripods.
Even if you are using a phone or a webcam to record YouTube videos, you should consider mounting the device on a stable stand. It is possible to find mini tripods ideal for smartphones for as little as $10. These tripods are small enough to carry in your pocket, so you will be prepared to start making a video no matter where your adventures take you. If you are using a web camera, you should attach it to the stand so that it won’t move accidentally after you touch the surface it is placed on.
Smartphone Camera Gear
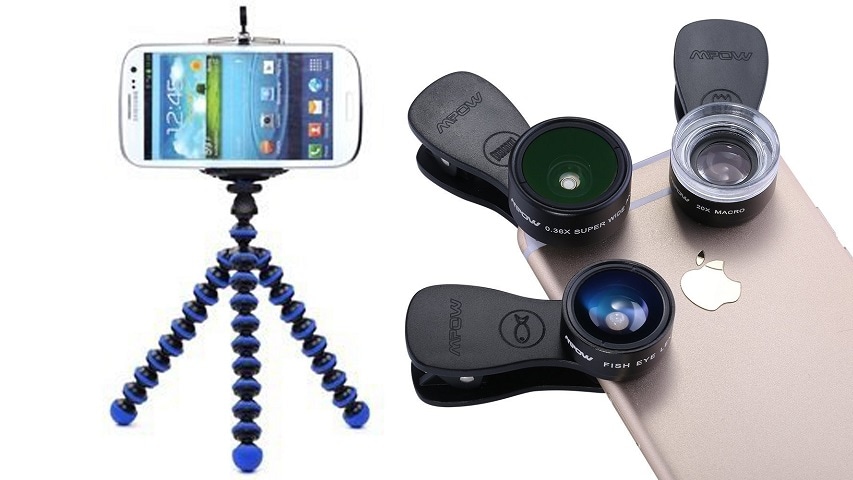
The short version: There’s a lot of gear out there designed with smartphone photos and videos in mind, including clip-on lenses, tripod mounts, phone-mounted LED lights, and inexpensive microphones that plug into the audio jack.
The long version: Recording your videos with a mobile phone can be a good decision. It all depends on the phone you have and the range of add-ons and apps that you complement it with. Almost every high-end model released in the past five years can shoot videos in 1080p or higher. Some can even produce 4K footage. If you perfect your smartphone filming technique, your YouTube videos could look as if they were made with pro equipment.
On the flip side, smartphone cameras typically perform poorly in low light. It is possible to download an app that lets you play around with settings to overcome this, but a phone-mounted LED light is probably a better solution. An external microphone might also be a necessity, but there are some good (inexpensive) options that can simply be plugged in through the headphone jack.
Another common downside of smartphone cameras is that most of them use digital zoom, which is vastly inferior to optical zoom. If you intend to shoot anything that’s further away than a few feet, you need a clip-on lens that goes on top of the built-in camera. This inexpensive device will give you a lot of freedom to work in space, and allow you to make spectacular shots even without high-end YouTube equipment.
Equipment with Easy-to-Use Video Editor
Richard Bennett
Richard Bennett is a writer and a lover of all things video.
Follow @Richard Bennett
Richard Bennett
Oct 26, 2023• Proven solutions
Check out our most updated guide on this topic: YouTube Equipment Starter Guide For Beginners .
The first thing to make sure of before starting a YouTube channel is having all that you need to record and upload high-quality videos regularly. That doesn’t mean you have to take out a loan and spend thousands to purchase a brand new camera and all other gadgets that professional filmmakers use.
The smartest way to get started is to go through a list of necessary equipment for YouTube and check whether or not you already own some of it. Once your channel starts growing, you can then start thinking about whether you want to invest in upgraded equipment. Here is a quick overview of all items that you need to start entertaining your online audience and gaining subscribers to your YouTube channel:
- Your YouTube Camera
- Microphones and Audio
- Lighting Gear for YouTube
- Tripods and Camera Stands
- Smartphone Camera Gear
YouTube Cameras
The short version: Use whatever you already have, even if it’s your phone or webcam. It’s nice to have sharp, fine-tuned, 4K footage, but viewers will forgive lower visual quality if your content is good.
The long version: You will need a camera, but there are a lot of different devices you can use including DSLRs, point and shoots, webcams, and your smartphone.
Your choice of camera will have a tremendous impact on the visual quality of your content and might drive your decisions regarding other pieces of equipment. However, you shouldn’t feel obliged to work with a top-notch camera from day one, especially since cheaper options can produce great results if used the right way.
On one end of the spectrum, you have basic smartphone cameras and web cameras, which are easy to come by and simple to operate. These days, high-end phones come equipped with quite powerful cameras that are more than sufficient for the needs of the average YouTuber. Better webcams can also do the job, although high-performance webcam models can get pretty expensive too. It is probably wise to resist the urge to start broadcasting with the built-in camera in your laptop and at least get a webcam or use your phone, but your computer’s camera is still always an option. Not having a better camera should never stop you from making YouTube videos.
If you already have a DSLR camera then it’s a good idea to familiarize yourself with it. You have far more freedom to adjust the settings and achieve a professional look for your videos with a DSLR, but that does mean it’ll take some time to become an expert at using it. Ultra-high resolution is not required for YouTube, but it certainly won’t hurt to have additional sharpness and more detail in the scene. If you’re shopping for a DSLR, look for one with a flip screen that allows you to quickly check what your viewers see.
YouTube Microphone and Audio
The short version: Audio quality is extremely important. If you can buy either a new camera or an external microphone, but not both, it might be better to go for the microphone. Click here for advice on upping your audio quality without an external microphone.
The long version: Sound capturing is every bit as important for your success as your video feed. In fact, poor audio can be even more damaging to your subscriber count than grainy video, since people won’t spend their time listening to something they have to put effort into understanding.
Again, most YouTube video makers have a limited budget at their disposal, so professional microphones are mostly off the table. However, investing in a directional microphone (‘shotgun mic’) that can pick up your voice clearly and without background noise is certainly a smart move. Such microphones can be pointed towards you while you speak, and since most YouTubers sit still while doing their shows there won’t be too much need for in-session adjustments.
If you’re not ready to invest in a shotgun mic, you can also find very inexpensive (often under $20) LAV mics. These small microphones can be pinned to your shirt, which allows them to record very clear dialogue because they’re so close to your mouth.
Lights for YouTube
The short version: You need as much light as you can get. Lighting kits can be affordable on Amazon, but you can also achieve a great look using daylight/windows and ‘daylight’ lightbulbs.
The long version: If you’ve ever tried to make a video indoors, you already know that it’s necessary to have additional light. Often just filming with the normal lights in a room will cause your footage to look dark and grainy, and possibly be tinted orange. To overcome these problems you need to increase the amount of light you have available.
Sometimes, it is enough to film near windows and/or bring more household lamps into your filming area. For any household lamps or lighting fixtures you use, make sure to put in white or ‘daylight’ lightbulbs instead of using the orange/tungsten bulbs that you might have for everyday use (this is how you avoid tinting things orange).
If you have the budget available to get some lighting equipment, you can find softbox lights or LED panel lights available fairly inexpensively online. Softbox lights are great because they provide even, diffused, light.
Another useful piece of lighting equipment to have is a reflector. A reflector is usually a piece of white, silver, or gold fabric stretched over a frame. You can use it to bounce light from one light source back towards yourself (this is a great way to fill shadows cast by your main light). Reflectors tend to be inexpensive, but you can also use white cardboard or tinfoil in place of purchasing a reflector.
Tripods and Camera Stands
The short version: You need something to hold your camera. If you mostly film in your own home that can be a desk or a stack of books, but if you make a lot of videos while you’re on the go you probably need a tripod or gimbal. Heavier cameras need heavier tripods.
The long version: While handheld cameras can deliver solid results for vloggers and casual streamers, viewers do expect reasonably stable footage. For many types of videos, the camera needs to be completely still and flatly positioned on a horizontal plane. Tripods and camera stands can cost very little, so it’s a good idea to look into getting some kind of stabilizer.
When you are choosing a tripod, pay attention to how much it weighs. If the camera that needs to be mounted on it is very heavy (like some DSLR models), you want to ensure that the structure itself weighs enough not to be easily tipped over. Too thin tripods can put your camera at risk, and that’s the last thing you want. Smaller cameras such as GoPros are more flexible in this regard and can be placed on a wider range of tripods.
Even if you are using a phone or a webcam to record YouTube videos, you should consider mounting the device on a stable stand. It is possible to find mini tripods ideal for smartphones for as little as $10. These tripods are small enough to carry in your pocket, so you will be prepared to start making a video no matter where your adventures take you. If you are using a web camera, you should attach it to the stand so that it won’t move accidentally after you touch the surface it is placed on.
Smartphone Camera Gear
The short version: There’s a lot of gear out there designed with smartphone photos and videos in mind, including clip-on lenses, tripod mounts, phone-mounted LED lights, and inexpensive microphones that plug into the audio jack.
The long version: Recording your videos with a mobile phone can be a good decision. It all depends on the phone you have and the range of add-ons and apps that you complement it with. Almost every high-end model released in the past five years can shoot videos in 1080p or higher. Some can even produce 4K footage. If you perfect your smartphone filming technique, your YouTube videos could look as if they were made with pro equipment.
On the flip side, smartphone cameras typically perform poorly in low light. It is possible to download an app that lets you play around with settings to overcome this, but a phone-mounted LED light is probably a better solution. An external microphone might also be a necessity, but there are some good (inexpensive) options that can simply be plugged in through the headphone jack.
Another common downside of smartphone cameras is that most of them use digital zoom, which is vastly inferior to optical zoom. If you intend to shoot anything that’s further away than a few feet, you need a clip-on lens that goes on top of the built-in camera. This inexpensive device will give you a lot of freedom to work in space, and allow you to make spectacular shots even without high-end YouTube equipment.
Equipment with Easy-to-Use Video Editor
Richard Bennett
Richard Bennett is a writer and a lover of all things video.
Follow @Richard Bennett
Also read:
- [Updated] Elevate Your Content Strategy with Social Blade and YouTube Stats
- [Updated] Building a Professional Online Brand as a Game Vlogger
- 2024 Approved Elevate Your Content Game on YouTube Top 11 Video SEO Insights
- In 2024, A Filmmaker's Companion The Journey From Capturing to Post-Production of 360 Videos
- Inside Tips for Maximizing Your Creator Studio Potential
- The Ultimate List of Engaging History Content on YouTube
- The Artistic Science Behind YouTube Live Imagery
- Fixed Video Short Display for You
- [Updated] Download YouTube's Best Moments Without Full Streaming
- Revitalizing Urban Areas with Environmental Vision and Purpose
- Excelling at Content Creation A Guide to Gamers' Success
- [Updated] 4 Ways To Set Up Your Talking-Head Shots For YouTube
- 2024 Approved The Best Laptops For Video Editing You Should Know
- The True Value Proposition of Subscribing to YouTube Premium
- Gaming Income Optimization Tips
- Step-by-Step to Creating an Unbeatable Biz YouTube Channel
- Steady Shots Expert Tips on Tripods in Vlog Production
- Automatic Cycling of Videos on iPhone Ease
- Vanishing Acts How to Blur Faces and Objects Online
- Youtube's Short-Form Videos - 10 Tactics for Dominance in Views
- In 2024, Beat Bazaar Curation of Superior DJ Video Samples for Download
- 11 Best Free YouTube Name Generators You Should Try
- In 2024, Chromatic Brilliance for Video Enthusiasts
- Unlocking the Secrets Elevating Your YouTube Presence in Gameplay
- From Vlogs to Virality Jake Paul, the Online Phenomenon
- The Best ASMR Microphones You Should Try for 2024
- MediaMasher Suite
- 2024 Approved A List of Ten Soaring YouTube Creations with Speed and Purpose
- Does Investing in Video Growth Pay Off on YT, In 2024
- Exclusive MCB Logo Designs and Templates
- Boosting Channel Traffic with YouTube Backlink Tactics for 2024
- YouTube's Latest Payment Regulations
- Epic Video Artistry YouTube's Magicians for 2024
- Gain YT Prompts Prowess with Environmentally Friendly Methods
- Eliminated Invisible YouTube Micro Videos for 2024
- [Updated] Aspect Ratios for Stellar Youtube Thumbnails
- The Ultimate How-To for Clearer YouTube Footage
- Proven Techniques to Enhance Subscriber Count with Effective Channel Branding
- 2024 Approved Cinematography Secrets Unveiled by YouTube Pros
- 2024 Approved Enrich YouTube Images With Radiant Neon Effects
- In 2024, 6 Ingenious Sites Brimming With Customizable YouTube Themes
- [Updated] Break Bot Patterns, Enhance Organic Video Reach
- Prime 10 YouTube Historians’ Top Picks for Learning
- Skyrocket Your View Count YouTube Success via Sony Vegas Editing
- Boosting Visuals Mastering YouTube's Video Enhancement Tools
- The Roadmap to YouTube Profits with Sourav Joshi
- In 2024, Creator Payment Frequency on YouTube Platform
- 2024 Approved Basic Tongue Articulation Adjustments A Comprehensive Guide to Utilities, Policies, and Replacements
- In 2024, Top IMEI Unlokers for Your Motorola Moto G Stylus (2023) Phone
- [Updated] In 2024, Achieve Massive Momentum Hit 1K IG Gains Monthly
- New Open-Source Video Editing on a Budget Top 10 Free Options
- In 2024, Avi Visionary Player Compatible with PC/Mobile
- [Updated] Streamlabs Versus OBS A Compreran Analysis for Broadcasters
- Updated 2024 Approved The Art of Panning and Zooming A Ken Burns Effect Tutorial
- Samsung Galaxy A05 ADB Format Tool for PC vs. Other Unlocking Tools Which One is the Best?
- In 2024, Hide location on Apple iPhone 7 and Android without others knowing | Dr.fone
- 2024 Approved Innovative Video Sharing Best Practices for Live Monitor Display
- In 2024, How to Reset a Locked Samsung Galaxy XCover 7 Phone
- New 10 Top Vocal Remover Software for Karaoke, Music Production, and More for 2024
- [New] Dive Into DiscoWorld - Our Top 10 Theme Picks for 2024
- [Updated] Compose Cringe-Inducing Gifs with Giphy
- [New] Step-by-Step to Smiles and Laughter Your Snapchat Gif Tutorial
- Prank Your Friends! Easy Ways to Fake and Share Google Maps Location On Samsung Galaxy S23 Ultra | Dr.fone
- New In 2024, Unlock 3D Magic A Beginners Guide to Video Effects on Windows 10 and 11
- [New] 2024 Approved Chromatic Charisma Mastering Colorful Filters on Snapchat
- Updated 2024 Approved Animate Like a Pro Top 10 Tools for Beginners and Experts Alike
- [New] 2024 Approved The Guide to Instagram Video Advancement A Planning Primer
- How Can Vivo Y27 4GMirror Share to PC? | Dr.fone
- Beats & Bits Video Sound Mixing on Win11
- Title: In 2024, Breaking Into YouTube's Top 100 With Effective SEO
- Author: Brian
- Created at : 2024-05-25 12:04:12
- Updated at : 2024-05-26 12:04:12
- Link: https://youtube-video-recordings.techidaily.com/in-2024-breaking-into-youtubes-top-100-with-effective-seo/
- License: This work is licensed under CC BY-NC-SA 4.0.
