
:max_bytes(150000):strip_icc()/dudeontrain_compressed-5bb126b146e0fb0026d7904e.jpg)
In 2024, Avoiding Common Pitfalls in YouTube Sponsorships, According to FameBit
Avoiding Common Pitfalls in YouTube Sponsorships, According to FameBit
How to Find YouTube Sponsorships by Using FameBit

Richard Bennett
Oct 26, 2023• Proven solutions
FameBit is one of the leading influencer marketing platforms.
Creators use FameBit to earn money by creating branded content. Businesses use FameBit to find the perfect video creators – or ‘digital influencers’ – to help with their marketing campaigns.
Until your channel is huge it is difficult to make a significant amount of money through ad revenue on YouTube. Creating branded content is one way in which YouTubers with small or mid-sized channels can generate income.
Finding sponsorships and negotiating with brands can be tricky. So can integrating products and brand messages in your videos without making your audience feel like you have ‘sold out’. This guide will help.
You must have at least 5,000 subscribers to join FameBit.

How Much Money Can You Make
How much money you can make on FameBit will depend on the deals you can negotiate with brands, and those deals will depend on how many subscribers you have and how many views you usually receive .
When calculating your fee, FameBit suggests thinking of it in terms of ‘cost per view’ (CPV). Most creators on FameBit charge between $0.05 and $0.10 per view. If you charge $0.05 per view and you get an average of 10,000 views per video then you would charge a brand $500 for your services.
How much you should charge per view depends on your genre and the nature of your audience. If you often mention products you like in videos and your subscribers have come to trust your recommendations, then it makes sense for you to charge more per view than a creator whose audience will be less receptive to product placement.
For example, if you do makeup tutorials then viewers will be used to hearing about your favorites. This makes your 10 000 views more valuable than 10 000 views on a ranting vlog channel whose subscribers are not tuning in to hear about products.
How to Make Money With FameBit
Finding Sponsorships
Brands post details about their upcoming campaigns, and the types of creators they are interested in working with, on FameBit.
While you are browsing through the available campaigns, think of the types of brands you would be excited to work with as well as which ones make sense for your channel.
If you host a lifestyle vlog about staying healthy, for example, and there is an opportunity to work with a brand that sells a type of healthy snack then it is your responsibility to look into the company and the product before you sign on to work with them. Is the snack healthy, and do you enjoy it?
Ideally, you will want to find brands that share your values and which are selling products you feel good about recommending to your subscribers.
Once you find a few campaigns you are interested in creating videos for, it’s time to write your proposals and negotiate with your potential sponsors.
Negotiating with Sponsors
When you want to be part of a campaign a brand has posted, you send them a proposal.
Be creative and detailed in the proposals you write. The best brands will value you for our ideas and creativity, and this will give you an edge over creators who put less effort into their pitches. You also want to be detailed because you do not want to risk having a disagreement with the brand based on them misunderstanding what you were going to do.
Sometimes brands will have very specific things they want you to do or say in the video you make for them. It is your job to find ways of doing and saying these things that still feel natural within the context of your videos. On YouTube, even when you are representing a brand, you need to be authentically you.
If you feel like the things a brand wants from you will make your video come across as a tacky commercial and offend your loyal subscribers, and you cannot see a creative way around this, bring it up before you agree to work with them. Explain what you think should happen instead. If they are not willing to compromise, do not agree to work with them. Find a more reasonable brand to partner with.
If you offend your subscribers and they stop watching you then your channel will become less valuable to other potential sponsors. In the long run, there is no upside to agreeing to do a video that makes no sense for your channel.
Remember that even brands that like your ideas and get excited about your proposals will not be able to work with you if you do not meet their requirements in terms of subscribers and average views. There are a lot of campaigns on FameBit which are open to small or mid-sized channels, but there will always be minimum requirements. It makes no sense for a brand to pay you to make a video nobody will see, even if it is an amazing video. Sad, but true.
How to Avoid Alienating Your Audience
Some of your subscribers will resent any branded content you create and there is no way around that. These subscribers will be in the minority – most people understand that accepting sponsorship from brands helps their favorite YouTubers continue making great videos – but it is unavoidable that there will be a few.
Most of your subscribers will not be bothered by the idea of you partnering with a brand, so long as you go about it in the right way.
Firstly; be honest about your sponsorship. Do not pretend to be giving an objective opinion on a product when the company who makes it is paying you. Your viewers will know and they will be offended.
Secondly; incorporate the brand’s message or product into your videos in ways that feel natural. Do not stray too far from your usual video style. Ultimately every video you make, even branded content, is for your viewers. Make the kind of video they expect from you and mention the product or service you have agreed to in a place where it makes sense/is on topic.
You want the branding in your videos to be subtle, but you never want to hide that it is there.
So long as you are honest and the more commercial elements of your video are not distracting, the vast majority of your subscribers – the ones you have built a real relationship with – will not mind.
Custom Videos with Awesome Video Editor


Richard Bennett
Richard Bennett is a writer and a lover of all things video.
Follow @Richard Bennett
Richard Bennett
Oct 26, 2023• Proven solutions
FameBit is one of the leading influencer marketing platforms.
Creators use FameBit to earn money by creating branded content. Businesses use FameBit to find the perfect video creators – or ‘digital influencers’ – to help with their marketing campaigns.
Until your channel is huge it is difficult to make a significant amount of money through ad revenue on YouTube. Creating branded content is one way in which YouTubers with small or mid-sized channels can generate income.
Finding sponsorships and negotiating with brands can be tricky. So can integrating products and brand messages in your videos without making your audience feel like you have ‘sold out’. This guide will help.
You must have at least 5,000 subscribers to join FameBit.
How Much Money Can You Make
How much money you can make on FameBit will depend on the deals you can negotiate with brands, and those deals will depend on how many subscribers you have and how many views you usually receive .
When calculating your fee, FameBit suggests thinking of it in terms of ‘cost per view’ (CPV). Most creators on FameBit charge between $0.05 and $0.10 per view. If you charge $0.05 per view and you get an average of 10,000 views per video then you would charge a brand $500 for your services.
How much you should charge per view depends on your genre and the nature of your audience. If you often mention products you like in videos and your subscribers have come to trust your recommendations, then it makes sense for you to charge more per view than a creator whose audience will be less receptive to product placement.
For example, if you do makeup tutorials then viewers will be used to hearing about your favorites. This makes your 10 000 views more valuable than 10 000 views on a ranting vlog channel whose subscribers are not tuning in to hear about products.
How to Make Money With FameBit
Finding Sponsorships
Brands post details about their upcoming campaigns, and the types of creators they are interested in working with, on FameBit.
While you are browsing through the available campaigns, think of the types of brands you would be excited to work with as well as which ones make sense for your channel.
If you host a lifestyle vlog about staying healthy, for example, and there is an opportunity to work with a brand that sells a type of healthy snack then it is your responsibility to look into the company and the product before you sign on to work with them. Is the snack healthy, and do you enjoy it?
Ideally, you will want to find brands that share your values and which are selling products you feel good about recommending to your subscribers.
Once you find a few campaigns you are interested in creating videos for, it’s time to write your proposals and negotiate with your potential sponsors.
Negotiating with Sponsors
When you want to be part of a campaign a brand has posted, you send them a proposal.
Be creative and detailed in the proposals you write. The best brands will value you for our ideas and creativity, and this will give you an edge over creators who put less effort into their pitches. You also want to be detailed because you do not want to risk having a disagreement with the brand based on them misunderstanding what you were going to do.
Sometimes brands will have very specific things they want you to do or say in the video you make for them. It is your job to find ways of doing and saying these things that still feel natural within the context of your videos. On YouTube, even when you are representing a brand, you need to be authentically you.
If you feel like the things a brand wants from you will make your video come across as a tacky commercial and offend your loyal subscribers, and you cannot see a creative way around this, bring it up before you agree to work with them. Explain what you think should happen instead. If they are not willing to compromise, do not agree to work with them. Find a more reasonable brand to partner with.
If you offend your subscribers and they stop watching you then your channel will become less valuable to other potential sponsors. In the long run, there is no upside to agreeing to do a video that makes no sense for your channel.
Remember that even brands that like your ideas and get excited about your proposals will not be able to work with you if you do not meet their requirements in terms of subscribers and average views. There are a lot of campaigns on FameBit which are open to small or mid-sized channels, but there will always be minimum requirements. It makes no sense for a brand to pay you to make a video nobody will see, even if it is an amazing video. Sad, but true.
How to Avoid Alienating Your Audience
Some of your subscribers will resent any branded content you create and there is no way around that. These subscribers will be in the minority – most people understand that accepting sponsorship from brands helps their favorite YouTubers continue making great videos – but it is unavoidable that there will be a few.
Most of your subscribers will not be bothered by the idea of you partnering with a brand, so long as you go about it in the right way.
Firstly; be honest about your sponsorship. Do not pretend to be giving an objective opinion on a product when the company who makes it is paying you. Your viewers will know and they will be offended.
Secondly; incorporate the brand’s message or product into your videos in ways that feel natural. Do not stray too far from your usual video style. Ultimately every video you make, even branded content, is for your viewers. Make the kind of video they expect from you and mention the product or service you have agreed to in a place where it makes sense/is on topic.
You want the branding in your videos to be subtle, but you never want to hide that it is there.
So long as you are honest and the more commercial elements of your video are not distracting, the vast majority of your subscribers – the ones you have built a real relationship with – will not mind.
Custom Videos with Awesome Video Editor
Richard Bennett
Richard Bennett is a writer and a lover of all things video.
Follow @Richard Bennett
Step-by-Step Strategies: How to Create Stellar YouTube Shorts
YouTube Shorts Ultimate Guide in 2024
Richard Bennett
Mar 27, 2024• Proven solutions
Since smartphones are cheap and easily available in the market today, and there is also a huge range of contents to view online, a majority of users prefer watching videos that are both short enough to convey the message within a few seconds, and can be seen on your phone’s screen with decent picture quality. Considering this, Google lately came up with a Tik Tok-style app calledYouTube shorts that can be accessed right from your Android or iPhone as long as you are using the YouTube app, and are signed in to your Google account.
That said, in the following sections you will learn everything about the YouTube Shorts app, and how it could help you gain more viewers for your YouTube channel.
- Part 1: What Is YouTube Shorts?
- Part 2: How to Make and Upload a YouTube Shorts Video with Shorts App?
- Part 3: Creating Vertical YouTube Shorts Video in Filmora [Step by Step Tutorial]
Part 1: What Is YouTube Shorts?
A short and quick answer to the question is, YouTube Shorts is a Tik Tok competitor developed by Google and can be accessed via the YouTube app on an Android or iOS device. In order to use the YouTube Shorts app, all you need to do is, sign in to your YouTube account on the YouTube app, and you are good to go.
1. YouTube Shorts Release History
At the time of this writing, YouTube Shorts is still in the Beta phase, and there is a lot more that the developers at Google have yet to explore and discover. However, for now, the fully functional variant of the program is available only for users in India on Android and iOS platforms.
2. YouTube Shorts Target Audience
A majority of people who can be called the target audience for YouTube Shorts are the artists and creators looking forward to getting noticed. Some of them could also be among those who wish to become an influencer, or get their YouTube channel more subscribers to be able to become eligible for YouTube Partnership Program.
And of course, the viewers and subscribers cannot be left alone when talking about the target audiences of YouTube Shorts as without them, there’s no point in creating short videos in the first place.
The type of contents that the viewers expect to see as YouTube Shorts could include:
- Entertainment – While movies are of longer duration, roasting the characters in it, or explaining some other stuff to the subscribers could be one of the things that could keep the viewers engaged
- Gaming – Some extraordinary gaming tips, tricks, and skills can be demonstrated in a short video
- How-To – A couple of brief how-to illustrations can yet be another attraction for DIY-loving viewers
- Science and Technology – A short introduction of upcoming gadgets or applications along with their usability can be explained within the timeframe of 60 seconds as well
In addition to the above, a few other categories could be People and Places, Music, Domestic and Wild Animals, Education, etc.
3. YouTube Shorts Content Requirements
While creating YouTube Shorts, there are certain guidelines that must be followed. These points include:
- YouTube Shorts videos must not be more than 60 seconds long
- The videos must be vertically shot, and must not be in the landscape orientation
- You can have multiple short videos clubbed together. However, the total length of the final video must not exceed 60 seconds in duration
- While posting YouTube Shorts videos, the title or the description must contain ‘#shorts’ in it
Certain things that you must keep in mind while creating YouTube Shorts include:
- YouTube Shorts cannot be monetized. However, they can serve as a good medium to attract and redirect the audiences to your main YouTube channel which may contain several videos that are eligible for monetization.
- The number of views and the total playtime of the YouTube Shorts videos DO affect your YouTube channel statistics
4. Where People Can Find YouTube Shorts
As mentioned earlier, YouTube Shorts can be accessed by launching the YouTube app on your Android or iOS device. You can use YouTube Shorts by clicking the + (Add) icon present at the bottom. Once the YouTube Shorts app is initialized, you can easily create and publish short videos by following the simple on-screen instructions.
Part 2: How to Make and Upload a YouTube Shorts Video with Shorts App?
You can follow the instructions given below to make and upload a YouTube Shorts video using the YouTube Shorts app:
Step 1: Record a Video with YouTube Shorts

Launch the YouTube app on your Android or iOS smart device (Samsung Galaxy Note 10+ is used here for demonstration), make sure that you are signed in to your Google account, tap the + (Add) button present at the bottom of the screen, tap Create a Short on the popup box that appears next, tap the Record button on the next window to start the recording. Once you are done, tap the Stop button to stop the recording.
Step 2: Edit the Video
Tap Music from the bottom of the screen to add background music to the video. The music that you can use in your short videos must be either created by you, or you should have permission to use them. However, the audio files that the Music library contains is made available by Google, is royalty-free, and can be used throughout the platform.

Likewise, you can tap Text to add captions as well. As for the text type, the app offers various formatting options such as alignment (left, center, and right), text highlighter, font changer, and even color selector. Further, the Speed and Timer icons at the top-right area allow you to manage the playback speed anywhere between 0.3x to 3x, and automatically stop the recording after the set time limit respectively. Once everything is set up, tap NEXT from the top-right corner to proceed to the next step.
Step 3: Pick Target Audience Type
On the Add details window, tap Select audience, and on the Select audience window, tap to select the appropriate radio button to define whether the video is suitable for kids. Tap the Back button once the target audience is selected.

Step 4: Add Details and Upload the Video
Enter a title for the video in the Title field. Make sure to include #shorts to help YouTube understand that you are preparing a YouTube Shorts video. Next, tap UPLOAD from the upper-right corner of the screen to submit the video for review. Once YouTube reviews the recording and finds it appropriate, it will be published on the portal, and will be visible throughout and even under the Shorts category of the main page.

Part 3: How to Create a Vertical YouTube Shorts Video in Filmora?
The YouTube Shorts app is pretty convenient to access and use alright. However, it doesn’t allow you to fine edit the videos. The app doesn’t even have many filtering options such as Effects, Elements, etc. to make your videos more engaging.
With that said, you can always use an efficient third-party program like Wondershare Filmora to create professionally-looking YouTube Shorts videos to attract your viewers.
When talking about Wondershare Filmora, it is a production and post-production app available for both Windows and Mac computers, and gives tough competition to some of the globally accepted similar programs like Adobe Premiere Pro, Final Cut Pro X, etc. Furthermore, Filmora has its own built-in screen, webcam, and voice recording features that can be used to prepare interactive videos, game walkthroughs, and voiceovers as needed.
For Win 7 or later (64-bit)
 Secure Download
For macOS 10.12 or later
Secure Download
The following step-by-step guide teaches you how to use Wondershare Filmora to create a vertical YouTube Shorts video:
Note: Before proceeding to the instructions, make sure that you have already recorded a vertical video using your cellphone, and that it has been transferred to your PC.
Step 1: Add the Video to Timeline
Launch Wondershare Filmora on your Windows or Mac PC (a Windows 10 computer is used here for demonstration), go to File > New Project, and click 9:16 (Portrait). Click anywhere inside the Media box, and select and import the source vertical video from your PC to Filmora.
Next, hover the mouse over the clip in the Media box, click the + button that appears at the bottom-right corner of the thumbnail, and in the resolution confirmation box that comes up next, click the button under the Match to Media section to add the video in the correct orientation to the Timeline at the bottom.
Step 2: Edit the Video
Select the clip in the Timeline, and use the Split, Crop, Speed, etc. buttons above the Timeline itself to remove the unwanted portions from the clip, manage its playback speed, and do other fine-tuning tasks.

You can even click the Edit button, and use the available editing features like Motion Tracking and Stabilization to add text or objects to a moving body in the video and stabilize the clip if the camera shook during the recording session respectively. Click OK to save the changes when done.

Note: To be able to remain compliant with the YouTube Shorts policies, make sure that the video length is no longer than 60 seconds.
Step 3: Beautify the Video

Click Titles from the standard toolbox at the top, choose your preferred text category from the list in the left, hover the mouse over a decent preset in the right window, and click the + button at the bottom-right corner of the thumbnail to add the preset on top of the media track in the Timeline. Next, you can double-click the preset track in the Timeline to modify the text and make granular modifications to it as needed. Click OK to save the changes.
Similarly, you can select the Effects and Elements tools to add effects and elements to the video as needed. To add background music, you can go to the Audio tool, and pick your preferred preset from the available options. A custom music can be added by going to the Media tool, and importing an audio file from your PC using the method explained in Step 1.

After this, optionally, you can go to Split Screen from the standard toolbar at the top, and use your preferred Split Screen preset to club multiple video clips into one screen. In Filmora, you can add as many as 6 screens in a video.
For Win 7 or later (64-bit)
Secure Download
For macOS 10.12 or later
Secure Download
Step 4: Render the Final Output
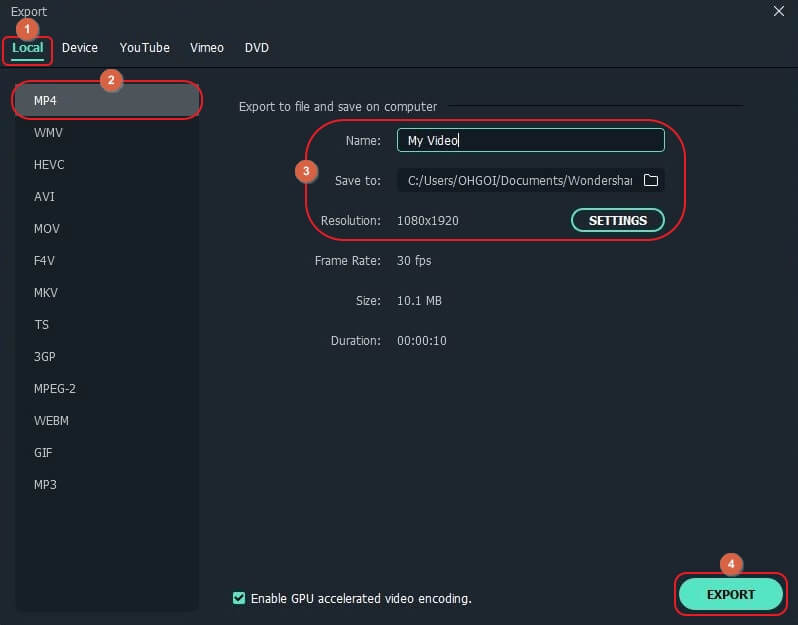
Once everything is set up, click EXPORT from the top of the window, go to the Local tab on the Export window, select MP4 from the formats list in the left, give a name and configure other settings from the available options in the right, and click EXPORT from the bottom-right corner to create a YouTube Shorts video. Once the clip is generated, you can upload the video to YouTube using #Shorts in the title or description to publish the video under the YouTube Shorts section.
FAQs About YouTube Shorts
- Where to download the YouTube Shorts app?
The YouTube Shorts app is already present in the YouTube app that your Android or iOS smartphone has. All you need to do to access it is, sign in to your Google account, tap the + button at the bottom, and tap Create a Short in the popup box that comes up.
- What if YouTube Shorts is not showing on my YouTube app?
Make sure that your YouTube app is updated to its latest version. If the app is already updated, and YouTube Shorts is still unavailable, the chances are that Google hasn’t rolled the app in your region. Since YouTube Shorts is still in its Beta phase, only the region of India can use all the functions of the app at the time of this writing. In such a case, you are suggested to wait until the YouTube Shorts app is made available for your location.
- What’s the YouTube Shorts video duration?
A YouTube Shorts video can be of only up to 60 seconds.
- What’s the YouTube Shorts size limitation?
YouTube hasn’t provided any information related to this as of now. However, you can rest assure that a 60 seconds long video file wouldn’t be too large for YouTube to handle.
- How many subs do you need to access Shorts?
YouTube Shorts is available for everyone regardless of the number of subscribers the channel has.
- Can you make money on Shorts?
Unfortunately, NO. Although you cannot monetize the recordings published as YouTube Shorts, they can be a good source to drive subscribers to your main YouTube channel that may have the videos that can be monetized.
Richard Bennett
Richard Bennett is a writer and a lover of all things video.
Follow @Richard Bennett
Richard Bennett
Mar 27, 2024• Proven solutions
Since smartphones are cheap and easily available in the market today, and there is also a huge range of contents to view online, a majority of users prefer watching videos that are both short enough to convey the message within a few seconds, and can be seen on your phone’s screen with decent picture quality. Considering this, Google lately came up with a Tik Tok-style app calledYouTube shorts that can be accessed right from your Android or iPhone as long as you are using the YouTube app, and are signed in to your Google account.
That said, in the following sections you will learn everything about the YouTube Shorts app, and how it could help you gain more viewers for your YouTube channel.
- Part 1: What Is YouTube Shorts?
- Part 2: How to Make and Upload a YouTube Shorts Video with Shorts App?
- Part 3: Creating Vertical YouTube Shorts Video in Filmora [Step by Step Tutorial]
Part 1: What Is YouTube Shorts?
A short and quick answer to the question is, YouTube Shorts is a Tik Tok competitor developed by Google and can be accessed via the YouTube app on an Android or iOS device. In order to use the YouTube Shorts app, all you need to do is, sign in to your YouTube account on the YouTube app, and you are good to go.
1. YouTube Shorts Release History
At the time of this writing, YouTube Shorts is still in the Beta phase, and there is a lot more that the developers at Google have yet to explore and discover. However, for now, the fully functional variant of the program is available only for users in India on Android and iOS platforms.
2. YouTube Shorts Target Audience
A majority of people who can be called the target audience for YouTube Shorts are the artists and creators looking forward to getting noticed. Some of them could also be among those who wish to become an influencer, or get their YouTube channel more subscribers to be able to become eligible for YouTube Partnership Program.
And of course, the viewers and subscribers cannot be left alone when talking about the target audiences of YouTube Shorts as without them, there’s no point in creating short videos in the first place.
The type of contents that the viewers expect to see as YouTube Shorts could include:
- Entertainment – While movies are of longer duration, roasting the characters in it, or explaining some other stuff to the subscribers could be one of the things that could keep the viewers engaged
- Gaming – Some extraordinary gaming tips, tricks, and skills can be demonstrated in a short video
- How-To – A couple of brief how-to illustrations can yet be another attraction for DIY-loving viewers
- Science and Technology – A short introduction of upcoming gadgets or applications along with their usability can be explained within the timeframe of 60 seconds as well
In addition to the above, a few other categories could be People and Places, Music, Domestic and Wild Animals, Education, etc.
3. YouTube Shorts Content Requirements
While creating YouTube Shorts, there are certain guidelines that must be followed. These points include:
- YouTube Shorts videos must not be more than 60 seconds long
- The videos must be vertically shot, and must not be in the landscape orientation
- You can have multiple short videos clubbed together. However, the total length of the final video must not exceed 60 seconds in duration
- While posting YouTube Shorts videos, the title or the description must contain ‘#shorts’ in it
Certain things that you must keep in mind while creating YouTube Shorts include:
- YouTube Shorts cannot be monetized. However, they can serve as a good medium to attract and redirect the audiences to your main YouTube channel which may contain several videos that are eligible for monetization.
- The number of views and the total playtime of the YouTube Shorts videos DO affect your YouTube channel statistics
4. Where People Can Find YouTube Shorts
As mentioned earlier, YouTube Shorts can be accessed by launching the YouTube app on your Android or iOS device. You can use YouTube Shorts by clicking the + (Add) icon present at the bottom. Once the YouTube Shorts app is initialized, you can easily create and publish short videos by following the simple on-screen instructions.
Part 2: How to Make and Upload a YouTube Shorts Video with Shorts App?
You can follow the instructions given below to make and upload a YouTube Shorts video using the YouTube Shorts app:
Step 1: Record a Video with YouTube Shorts
Launch the YouTube app on your Android or iOS smart device (Samsung Galaxy Note 10+ is used here for demonstration), make sure that you are signed in to your Google account, tap the + (Add) button present at the bottom of the screen, tap Create a Short on the popup box that appears next, tap the Record button on the next window to start the recording. Once you are done, tap the Stop button to stop the recording.
Step 2: Edit the Video
Tap Music from the bottom of the screen to add background music to the video. The music that you can use in your short videos must be either created by you, or you should have permission to use them. However, the audio files that the Music library contains is made available by Google, is royalty-free, and can be used throughout the platform.
Likewise, you can tap Text to add captions as well. As for the text type, the app offers various formatting options such as alignment (left, center, and right), text highlighter, font changer, and even color selector. Further, the Speed and Timer icons at the top-right area allow you to manage the playback speed anywhere between 0.3x to 3x, and automatically stop the recording after the set time limit respectively. Once everything is set up, tap NEXT from the top-right corner to proceed to the next step.
Step 3: Pick Target Audience Type
On the Add details window, tap Select audience, and on the Select audience window, tap to select the appropriate radio button to define whether the video is suitable for kids. Tap the Back button once the target audience is selected.
Step 4: Add Details and Upload the Video
Enter a title for the video in the Title field. Make sure to include #shorts to help YouTube understand that you are preparing a YouTube Shorts video. Next, tap UPLOAD from the upper-right corner of the screen to submit the video for review. Once YouTube reviews the recording and finds it appropriate, it will be published on the portal, and will be visible throughout and even under the Shorts category of the main page.
Part 3: How to Create a Vertical YouTube Shorts Video in Filmora?
The YouTube Shorts app is pretty convenient to access and use alright. However, it doesn’t allow you to fine edit the videos. The app doesn’t even have many filtering options such as Effects, Elements, etc. to make your videos more engaging.
With that said, you can always use an efficient third-party program like Wondershare Filmora to create professionally-looking YouTube Shorts videos to attract your viewers.
When talking about Wondershare Filmora, it is a production and post-production app available for both Windows and Mac computers, and gives tough competition to some of the globally accepted similar programs like Adobe Premiere Pro, Final Cut Pro X, etc. Furthermore, Filmora has its own built-in screen, webcam, and voice recording features that can be used to prepare interactive videos, game walkthroughs, and voiceovers as needed.
For Win 7 or later (64-bit)
Secure Download
For macOS 10.12 or later
Secure Download
The following step-by-step guide teaches you how to use Wondershare Filmora to create a vertical YouTube Shorts video:
Note: Before proceeding to the instructions, make sure that you have already recorded a vertical video using your cellphone, and that it has been transferred to your PC.
Step 1: Add the Video to Timeline
Launch Wondershare Filmora on your Windows or Mac PC (a Windows 10 computer is used here for demonstration), go to File > New Project, and click 9:16 (Portrait). Click anywhere inside the Media box, and select and import the source vertical video from your PC to Filmora.
Next, hover the mouse over the clip in the Media box, click the + button that appears at the bottom-right corner of the thumbnail, and in the resolution confirmation box that comes up next, click the button under the Match to Media section to add the video in the correct orientation to the Timeline at the bottom.
Step 2: Edit the Video
Select the clip in the Timeline, and use the Split, Crop, Speed, etc. buttons above the Timeline itself to remove the unwanted portions from the clip, manage its playback speed, and do other fine-tuning tasks.
You can even click the Edit button, and use the available editing features like Motion Tracking and Stabilization to add text or objects to a moving body in the video and stabilize the clip if the camera shook during the recording session respectively. Click OK to save the changes when done.
Note: To be able to remain compliant with the YouTube Shorts policies, make sure that the video length is no longer than 60 seconds.
Step 3: Beautify the Video
Click Titles from the standard toolbox at the top, choose your preferred text category from the list in the left, hover the mouse over a decent preset in the right window, and click the + button at the bottom-right corner of the thumbnail to add the preset on top of the media track in the Timeline. Next, you can double-click the preset track in the Timeline to modify the text and make granular modifications to it as needed. Click OK to save the changes.
Similarly, you can select the Effects and Elements tools to add effects and elements to the video as needed. To add background music, you can go to the Audio tool, and pick your preferred preset from the available options. A custom music can be added by going to the Media tool, and importing an audio file from your PC using the method explained in Step 1.
After this, optionally, you can go to Split Screen from the standard toolbar at the top, and use your preferred Split Screen preset to club multiple video clips into one screen. In Filmora, you can add as many as 6 screens in a video.
For Win 7 or later (64-bit)
Secure Download
For macOS 10.12 or later
Secure Download
Step 4: Render the Final Output
Once everything is set up, click EXPORT from the top of the window, go to the Local tab on the Export window, select MP4 from the formats list in the left, give a name and configure other settings from the available options in the right, and click EXPORT from the bottom-right corner to create a YouTube Shorts video. Once the clip is generated, you can upload the video to YouTube using #Shorts in the title or description to publish the video under the YouTube Shorts section.
FAQs About YouTube Shorts
- Where to download the YouTube Shorts app?
The YouTube Shorts app is already present in the YouTube app that your Android or iOS smartphone has. All you need to do to access it is, sign in to your Google account, tap the + button at the bottom, and tap Create a Short in the popup box that comes up.
- What if YouTube Shorts is not showing on my YouTube app?
Make sure that your YouTube app is updated to its latest version. If the app is already updated, and YouTube Shorts is still unavailable, the chances are that Google hasn’t rolled the app in your region. Since YouTube Shorts is still in its Beta phase, only the region of India can use all the functions of the app at the time of this writing. In such a case, you are suggested to wait until the YouTube Shorts app is made available for your location.
- What’s the YouTube Shorts video duration?
A YouTube Shorts video can be of only up to 60 seconds.
- What’s the YouTube Shorts size limitation?
YouTube hasn’t provided any information related to this as of now. However, you can rest assure that a 60 seconds long video file wouldn’t be too large for YouTube to handle.
- How many subs do you need to access Shorts?
YouTube Shorts is available for everyone regardless of the number of subscribers the channel has.
- Can you make money on Shorts?
Unfortunately, NO. Although you cannot monetize the recordings published as YouTube Shorts, they can be a good source to drive subscribers to your main YouTube channel that may have the videos that can be monetized.
Richard Bennett
Richard Bennett is a writer and a lover of all things video.
Follow @Richard Bennett
Also read:
- Launching a YouTube Channel Key Pieces of Equipment
- Final Step Guide Free Yourself From YouTube Shorts
- [Updated] Best Practices The 8 Truly Effective Promotion Techniques
- Beat the Heat Tips for Uploading Songs to YouTube
- Cooking Crusaders YouTube Stars Serving Up Deliciousness
- Perfecting Your YT Earning Monetization Verification Steps
- Boost Views with Smart YouTube Backlink Tactics for 2024
- Expertise in Editing The Leading Online Video Length Reducers
- [New] Channel Creation Made Simple YouTube's Top Business Channels Listed
- Crafting Distinctive Video Stream Names Tips for Filmora Users for 2024
- Understanding and Mastering YouTube Live Visuals for Engagement
- Your Comprehensive Pathway to Hidden YouTube Treasures
- Navigate to Top Compre Written in English, Please. Here Is a List of 30 Alternative Titles that Convey Similar Meanings to Track Your Videos With These Top 8 YouTube Rank Trackers
- In 2024, Essential Steps to Apply a Creative Commons Copyright
- 2024 Approved Advanced Presentation Techniques YouTube in Slides
- In 2024, Achieving Visual Excellence ASPECT RATIO Mastery on YOUTUBE
- [Updated] 7 Comedy YouTube Video Ideas That Funny People Can Try
- [New] Aim for Affluence Enroll Now in YouTube's Partner Programme
- Your Guide to Understanding YouTube TV's Signature Features
- Essential Free Video Editing Apps for iPhones/iPads
- [Updated] Boost Your YouTube Success with Free, High-Quality Audio
- 2024 Approved Enhancing Viewer Engagement with Smart End Screen Techniques
- Compreranly Insightful Study on VTubers and Beyond
- Can Instant Subscription Lead to Higher Watch Time?
- Guide to Avoidable Exposure Hiding Objects and Faces Online
- 2024 Approved Discover Engaging YouTube Threads
- 2024 Approved 3-Step Financial Forecasting Assessing Revenue From Google's Platform, YouTube
- In 2024, Dissecting the Best YouTube Music Troupes
- [Updated] A Step-by-Step Journey Through High-Impact YouTube Banner Designs
- The Future of YouTube Naming Trendsetting Tips for Video Blogging & Filmmaking (Max 156 Characters)
- In 2024, Channel Titles That Shine How to Innovate
- Revenue Revolution How Carminati's YouTube Income Model Works
- Boost Your Views with Premium YouTube Rank Watchers
- UnifiedEdit Suite Cutting-Edge PC Filmmaking Sound
- 2024 Approved Cutting-Edge Conjurations in Filmmaking
- In 2024, Achieve More Money From Your Short Videos on YouTube
- [New] Ensuring Correct Ad Revenue A Comprehensive Guide to YT Channel Earnings
- Bursting Laughter Crafting Engaging Reaction Videos on YouTube (3 Methods)
- In 2024, End Screen Creation Made Simple - Free Templates & Guides
- 2024 Approved Are There Legal Restrictions to Recording YouTube Videos?
- In 2024, Creating Cash Flow on YouTube An Ad-Free Blueprint for Income
- In 2024, Balancing Act Tripod Use for Stable Vlogging
- 2024 Approved Complete Unpacking The World of Virtual Idols
- 15 Steps Towards Perfecting Your Educational Video Content for YouTube
- [New] Becoming a Confident Content Creator YouTube's Top Tips
- Must-Know Basics for Mac Users on TikTok for 2024
- Step Forward Leveraging Live Talks in the Instagram World for 2024
- Updated Breakthrough Free Girl Voice Adjustment Utility Online for 2024
- [New] 2024 Approved Quick Tips for High-Quality Audio Recordings on Your iMac
- New Ways to Make Sure Your Video Editing Course Is Worthing to Watch
- [New] Free Tools Make ScreenCapture a Breeze for TV Lovers
- [Updated] Top 6 Straightforward Abodes Blueprints in MC World
- Social Media Titans Face-Off Will the Next Leader Be Likes over TikTok for 2024
- 2024 Approved Reliving Retro Fun with Top 5 Emulated Game Boy Advance Games on Desktop Systems
- [Updated] Expert's Choice The Best Windows PC Screen Recorders for 2024
- [New] In 2024, Social Media Magic Techniques to Share Your Computer Screen Online
- 4 Ways to Transfer Music from Nokia C12 Pro to iPhone | Dr.fone
- Liberating Your Media Experience Free MOV/PLAY Software
- [New] 2024 Approved Advanced Procedures for Livestreaming Sporting Spectacles
- Hard Resetting an ZTE Nubia Flip 5G Device Made Easy | Dr.fone
- New Mac Users Rejoice Free Adobe Premiere Pro CS6 Download (Updated 2023) for 2024
- [Updated] 2024 Approved Digital Artistry Top-Ranked Snapchat Creativity Enhancers
- In 2024, Why Your WhatsApp Location is Not Updating and How to Fix On Realme GT Neo 5 | Dr.fone
- [Updated] Constructing Authenticity in Documentaries
- 2024 Approved Unlocking Audio Potentials in TikTok Videos
- MKV Playback Top macOS Apps Reviewed
- Updated In 2024, The Ultimate List of 8 Chromebook-Compatible Digital Audio Workstations for Composers and Producers
- Updated 2024 Approved How to Choose Best Audio Formats
- [New] Mastering Amazing IG Video Creation for 2024
- The Complete Guide for Posting Photos Online
- In 2024, How to Fix Pokemon Go Route Not Working On Poco C65? | Dr.fone
- 2024 Approved MP4 Auditory Unlocking Nine Pathways to Seamless Sound Extraction in the Upcoming Year
- In 2024, Harmony Hunters Excellent iOS and Android Apps That Help Identify Tracks Effortlessly
- Updated Flip Your Videos with These Online Editors for 2024
- Behind the Filter Ensuring Veritable Instagram Selfies for 2024
- In 2024, A Complete Guide to the Best Brand Story Videos
- [Updated] Seamless Acquisition of Twitter's Jokes for PC
- In 2024, How to Unlock Itel Bootloader Easily
- In 2024, Discover the Best Top 10 Free and Paid Plugins for Final Cut Pro X Editors
- PassFab iPhone XS Max Backup Unlocker Top 4 Alternatives
- Choosing the Right FPS 30 or 60, Which Is Better for 2024
- [Updated] In 2024, Maintain Peaceful Posting Dismiss IG Recommendations
- In 2024, 5 Easy Ways to Transfer Contacts from Apple iPhone 6 Plus to Android | Dr.fone
- How to Reset your Vivo X100 Lock Screen Password
- Things About Transparent PNG Remove and Convert
- [Updated] Cross-Promotion Savvy Integrating YouTube with FB for 2024
- Title: In 2024, Avoiding Common Pitfalls in YouTube Sponsorships, According to FameBit
- Author: Brian
- Created at : 2024-05-25 12:02:01
- Updated at : 2024-05-26 12:02:01
- Link: https://youtube-video-recordings.techidaily.com/in-2024-avoiding-common-pitfalls-in-youtube-sponsorships-according-to-famebit/
- License: This work is licensed under CC BY-NC-SA 4.0.
