
:max_bytes(150000):strip_icc()/how-to-use-image-creator-from-microsoft-designer-7fad906276724cac96622cfcf3af3322.jpg)
"In 2024, Audiovisual Virtuoso Capturing Emotion in Harmony"
Audiovisual Virtuoso: Capturing Emotion in Harmony
People capture loads of photos of the places they visit and the events they attend for social media and future memories. If you check the online trend, users are shifting from static photos to short videos for a better visual experience. That is why you can consider creating videos out of the photos you have captured and adding suitable music in the background to make your memories visually pleasing.
All you need is a video maker with music and pictures. There is no dearth of video makers, but not all live up to the expectation. There are online video markers as well as video maker software applications available. In this article, we have picked the best video maker with photos and music and illustrated how to make a video with music and photos. We have also listed the popular video makers for your consideration.
Part 1. Best Video maker with music and pictures
We recommend Wondershare Filmora as the best video maker with photos and music. Filmora is considered one of the best video makers and editors in the world. Filmora allows you to import photos of different file formats so that you can make slideshow-like video. There are loads of transitions as well as effects available that you can place in between the photos so that the transition becomes eye-pleasing.
Similarly, you can import any audio or music file. Besides, there are stock music files available that you can apply to your slideshow video. You can even add colourful titles and graphical elements to enhance the video content. Here are the steps on how to make a video with your photos and music.
For Win 7 or later (64-bit)
For macOS 10.12 or later
Step 1: Install Filmora and Start Your Project
Download and install Wondershare Filmora as per your operating system. Filmora is available for Windows and Mac. Launch Filmora and click on New Project. Drag and drop your photos on Project Media folder.
Step 2: Import Photos and Arrange Them in Order
Drag and drop the photos on the timeline as per your sequence you want in your slideshow video. You can change the order of the photos as well as stretch durations of photos in the video from the timeline. You have to arrange the photos side by side without any gap so that there is no black screen in between the transition.

Step 3: Add Transition Effects
After arranging the photos side by side, you have to apply transition effects so that the change from one photo to another is eye-soothing. There are loads of transitions available and you can get them from Transition option located at the top bar.
Go through the different categories of transitions. Drag and drop the transition you want on to the photo after which you want the transition effect to play. Do the same for all photos except the last one. You can apply different transitions effects for different photos as per your preference.

Step 4: Add Background Music
Now it is time to add a background music to the entire video. You can drag and drop any music file from your hard drive to Filmora Project Media. Thereafter, you can drag and drop the audio file on the audio timeline below the photo timeline. You can also add audio effects from the top bar if required.

Step 5: Export Your Video
Once you are done adding photos, transitions, and music, you should play the video on Filmora and make adjustments wherever required. Thereafter, click on Export button and save the video file on your hard drive in your desired file format.

Part 2. Popular video makers with photos and music
Here is the list of the popular premium and free video maker with music and pictures that you can consider for making slideshow videos.
1. Invideo
Invideo is a popular online video maker with music and pictures along with 5000 customizable templates. These templates help users to transform photos into videos with background music in a few minutes. Besides, the platform offers a wide range of stock media files. You can create videos in more than 70 languages, and the editor is user-friendly for users of all ages.
All you need to do is select a template and customize it if required. Thereafter, you need to import the photos, add text effects, and finally add music. There are options for trimming, cropping, and adding stickers, texts and transitions. The free version lets you export 60 videos per month but with a watermark. Here are the top features of Invideo.
- 5000+ customizable templates for all video types.
- 9+ million stocks videos, photos, and audio files.
- Add transitions, stickers, animations, and texts to videos.
- Trim and crop videos and audio files.
- Add voiceover as well as fade-in and fade-out effects.
- Work in collaboration with team members.

2. Icecream slideshow maker
Icecream slideshow maker is a free video maker with music and pictures for Windows users only. The software is compatible with Windows 10, 8, 7 and XP. You can create a high-quality video from your photos with music instantly. There is no need for any prior experience to use the video maker. There are beautiful transitions available that will enhance the video quality and make your presentation stand out. The free version allows up to 10 slides per video and saving the video in Webm file format. You can upgrade to Pro version to get rid of the limitations.
You can change photo and transition duration as per requirements. The software supports various audio file formats that you can import for your video. You can also add animations to texts so that they can shine in your video. The software allows sharing the video directly to YouTube. Besides, you can save it on Google Drive and Dropbox. Here are all the features of Icecream slideshow maker that you should be aware of.
- Super intuitive user interface for all users.
- Add colourful text, transitions, and animations.
- Save and resume project work as per time availability.
- Pro version allows saving video in 4K resolution.
- Video output in MP4, AVI, MOV and WEBM formats.
- Suitable for low-end computers.

3. PhotoStage Slideshow
PhotoStage Slideshow by NCH Software is another video maker software for Windows users. The software comes with an easy and automated wizard for users to transform photos with a video instantly. There is also an image editor available to adjust different parameters of your photos before making a video out of them.
Besides, there are various transitions available to apply and you can add captions and narration as per your requirements. In fact, along with photos, you can add video clips to create the ultimate video. Moreover, there are tools available to edit your audio and music file and add different effects. Here are the top features of PhotoStage Slideshow Software.
- Supports Full HD and 4K video resolution.
- Edit and fine-tune photos and add captions.
- Wide range of eye-catching and popular transitions.
- Edit audio and music file and add different effects.
- Save video file in MOV, MP4, GIF, AVI, 3GP and more.
- Directly share on YouTube, Vimeo, Flickr, HTML5.

4. Clideo video maker
Clideo Video Maker is a free online video maker with song. All you need to do is upload photos from your hard drive and choose a preset depending on the online platform where you want to upload the video. Thereafter, add audio and trim it as per video length. Then add smooth transitions and the video will be ready to export on your hard drive or cloud storage.
The online video maker supports different video and audio file format for importing and exporting. You can use the editor on any device starting from Windows and Mac to Android and iPhone. The user interface is very simple to use and it does not store video files for more than a day. Here are all the features of Clideo video maker.
- Upload photos from hard drive, and cloud storage.
- Presets for Instagram, Stories, YouTube, and Facebook videos.
- Add different photos, audio, and video clips to make videos.
- Zoom & crop option along with image duration elongation.
- Suitable for computer and mobile phone users.

5. Movavi Slideshow Maker
Movavi Slideshow Maker is available for both Windows and Mac users. The software comes with a wizard to allow users to create video from photos. However, advanced users can create video from photos manually as well. You get to add photos, audio files and video clips of different file formats. Most importantly, there are various templates available to create professional-quality videos.
There are loads of effects, filters, titles, and stickers available to apply on your video. The free version is limited to seven days usage. The output video will have watermark on it and you can purchase the premium version to avoid all limitations. Here are the top features of Movavi Slideshow Maker.
- Slideshow wizard for fast and easy video creation.
- Manual mode for advanced users to create customized video.
- Supports different types of media file formats.
- Different types of templates for instant video making.
- Wide ranges of transitions, filters, titles, and stickers.

Conclusion
If you are making a video from your photos, you can use an online video maker with photos and music free. If you are someone who wants to make professional-quality videos from photos, a premium video maker is best for you. If you are going to upload your slideshow videos on social media and video streaming platforms, we recommend Wondershare Filmora as the best video maker with music and pictures.
For macOS 10.12 or later
Step 1: Install Filmora and Start Your Project
Download and install Wondershare Filmora as per your operating system. Filmora is available for Windows and Mac. Launch Filmora and click on New Project. Drag and drop your photos on Project Media folder.
Step 2: Import Photos and Arrange Them in Order
Drag and drop the photos on the timeline as per your sequence you want in your slideshow video. You can change the order of the photos as well as stretch durations of photos in the video from the timeline. You have to arrange the photos side by side without any gap so that there is no black screen in between the transition.
Step 3: Add Transition Effects
After arranging the photos side by side, you have to apply transition effects so that the change from one photo to another is eye-soothing. There are loads of transitions available and you can get them from Transition option located at the top bar.
Go through the different categories of transitions. Drag and drop the transition you want on to the photo after which you want the transition effect to play. Do the same for all photos except the last one. You can apply different transitions effects for different photos as per your preference.
Step 4: Add Background Music
Now it is time to add a background music to the entire video. You can drag and drop any music file from your hard drive to Filmora Project Media. Thereafter, you can drag and drop the audio file on the audio timeline below the photo timeline. You can also add audio effects from the top bar if required.
Step 5: Export Your Video
Once you are done adding photos, transitions, and music, you should play the video on Filmora and make adjustments wherever required. Thereafter, click on Export button and save the video file on your hard drive in your desired file format.
Part 2. Popular video makers with photos and music
Here is the list of the popular premium and free video maker with music and pictures that you can consider for making slideshow videos.
1. Invideo
Invideo is a popular online video maker with music and pictures along with 5000 customizable templates. These templates help users to transform photos into videos with background music in a few minutes. Besides, the platform offers a wide range of stock media files. You can create videos in more than 70 languages, and the editor is user-friendly for users of all ages.
All you need to do is select a template and customize it if required. Thereafter, you need to import the photos, add text effects, and finally add music. There are options for trimming, cropping, and adding stickers, texts and transitions. The free version lets you export 60 videos per month but with a watermark. Here are the top features of Invideo.
- 5000+ customizable templates for all video types.
- 9+ million stocks videos, photos, and audio files.
- Add transitions, stickers, animations, and texts to videos.
- Trim and crop videos and audio files.
- Add voiceover as well as fade-in and fade-out effects.
- Work in collaboration with team members.
2. Icecream slideshow maker
Icecream slideshow maker is a free video maker with music and pictures for Windows users only. The software is compatible with Windows 10, 8, 7 and XP. You can create a high-quality video from your photos with music instantly. There is no need for any prior experience to use the video maker. There are beautiful transitions available that will enhance the video quality and make your presentation stand out. The free version allows up to 10 slides per video and saving the video in Webm file format. You can upgrade to Pro version to get rid of the limitations.
You can change photo and transition duration as per requirements. The software supports various audio file formats that you can import for your video. You can also add animations to texts so that they can shine in your video. The software allows sharing the video directly to YouTube. Besides, you can save it on Google Drive and Dropbox. Here are all the features of Icecream slideshow maker that you should be aware of.
- Super intuitive user interface for all users.
- Add colourful text, transitions, and animations.
- Save and resume project work as per time availability.
- Pro version allows saving video in 4K resolution.
- Video output in MP4, AVI, MOV and WEBM formats.
- Suitable for low-end computers.
3. PhotoStage Slideshow
PhotoStage Slideshow by NCH Software is another video maker software for Windows users. The software comes with an easy and automated wizard for users to transform photos with a video instantly. There is also an image editor available to adjust different parameters of your photos before making a video out of them.
Besides, there are various transitions available to apply and you can add captions and narration as per your requirements. In fact, along with photos, you can add video clips to create the ultimate video. Moreover, there are tools available to edit your audio and music file and add different effects. Here are the top features of PhotoStage Slideshow Software.
- Supports Full HD and 4K video resolution.
- Edit and fine-tune photos and add captions.
- Wide range of eye-catching and popular transitions.
- Edit audio and music file and add different effects.
- Save video file in MOV, MP4, GIF, AVI, 3GP and more.
- Directly share on YouTube, Vimeo, Flickr, HTML5.
4. Clideo video maker
Clideo Video Maker is a free online video maker with song. All you need to do is upload photos from your hard drive and choose a preset depending on the online platform where you want to upload the video. Thereafter, add audio and trim it as per video length. Then add smooth transitions and the video will be ready to export on your hard drive or cloud storage.
The online video maker supports different video and audio file format for importing and exporting. You can use the editor on any device starting from Windows and Mac to Android and iPhone. The user interface is very simple to use and it does not store video files for more than a day. Here are all the features of Clideo video maker.
- Upload photos from hard drive, and cloud storage.
- Presets for Instagram, Stories, YouTube, and Facebook videos.
- Add different photos, audio, and video clips to make videos.
- Zoom & crop option along with image duration elongation.
- Suitable for computer and mobile phone users.
5. Movavi Slideshow Maker
Movavi Slideshow Maker is available for both Windows and Mac users. The software comes with a wizard to allow users to create video from photos. However, advanced users can create video from photos manually as well. You get to add photos, audio files and video clips of different file formats. Most importantly, there are various templates available to create professional-quality videos.
There are loads of effects, filters, titles, and stickers available to apply on your video. The free version is limited to seven days usage. The output video will have watermark on it and you can purchase the premium version to avoid all limitations. Here are the top features of Movavi Slideshow Maker.
- Slideshow wizard for fast and easy video creation.
- Manual mode for advanced users to create customized video.
- Supports different types of media file formats.
- Different types of templates for instant video making.
- Wide ranges of transitions, filters, titles, and stickers.
Conclusion
If you are making a video from your photos, you can use an online video maker with photos and music free. If you are someone who wants to make professional-quality videos from photos, a premium video maker is best for you. If you are going to upload your slideshow videos on social media and video streaming platforms, we recommend Wondershare Filmora as the best video maker with music and pictures.
Building a Strong Visual Narrative in YouTube Videos
How to structure YouTube videos

Richard Bennett
Mar 27, 2024• Proven solutions
Creating a YouTube channel and uploading video content is only one part of the key to your success. With so much competition on the platform, it’s crucial that you stand out from the crowd with efficient, professional videos that are a pleasure to watch.
Without some planning and structure in mind before you begin filming, it’s all too easy to get a bit lost and start to ramble or fumble your words. Video’s filled with ‘umm’ and ‘err’ are neither pleasant to watch nor engaging.
If you’re serious about making a great YouTube channel and developing a loyal fan base, you’re going to need a workable structure for every video to help you stay on track. Here’s what you need to know:
Quick Jump Menu
- Why is structuring your video important?
- How should you structure YouTube Video Content?
- Ready to go out and make amazing videos?
Why is structuring your video important?
The structure of your video can make all the difference between a successful YouTube channel and a big waste of time. Your objective is to get people watching more and watching all the way to the end. A great structure can:
- Build interest and engagement: By keeping something in reserve and naturally building interest as you go along, people will be compelled to watch longer and interact more with your channel.
- Helps you rank higher: Longer and higher numbers of views will demonstrate your position as an authority well. The YouTube algorithm uses these metrics as part of their ranking factor, so the more and longer views you get, the higher you’ll rank in search.
- Builds consistency and familiarity: If all your videos follow a typical structure, your fans will come to be familiar with your format. They’ll know what to expect from your content and will watch more regularly as a result.
So, now you understand why structure is so important to your channel, let’s take a look at ways in which you can create an amazing structure for every video you produce.
How should you structure YouTube video content?
There are some key elements of a YouTube video’s structure which can make it more natural, more engaging and more fun to watch. When you’re planning your structure, you should follow a logical timeline to take the viewer from start to finish easily, and to ensure you get the actions you want at the end.
Intro
People love to be told what’s about to happen, and an intro can be a crucial step in ensuring they are going to continue watching your content. By explaining clearly what they are about to see, why it’s important to them and what problems you’re aiming to solve, you’ll keep them hooked and prevent them from browsing away to the next search result.
An introduction doesn’t need to be long or particularly involved. Remember, you don’t want to give away all your information here, as what you want is to encourage them to watch until the end. Something like “I’m going to show you … which will help you to …” is fine.
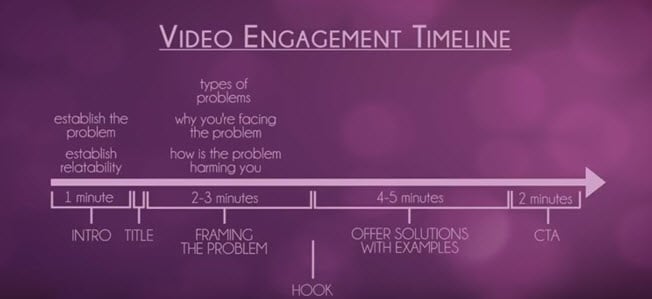
Your idea and purpose need to be conveyed fast and effectively if you’re keen to get their interest. Most viewers will decide within the first three to five seconds of a video if they want to invest their time in watching, so it’s crucial you capture their interest and engage them fast to stop them drifting away.
Main content
Once you’ve introduced your video, it’s time to start working through your content. This should be done by:
- Framing the problem
What are the types of problems that your viewers will have encountered which your video can solve? How is the problem affecting you and your viewers? Take around two to three minutes to describe the problems that you hope your video will solve, and work on being empathetic so people can relate to you and the issue you’re discussing.
- Offer solutions with examples
Move on to your solution to the problem. How did you find this solution? Is it easy to implement? Take around four to five minutes to address your solution and give examples of how it works in practice.
Now you’ve addressed the issue that your video content will solve, you’re almost ready to ask them to take the next step. Almost. There’s one more key element in your structure that you need to remember to include.
Hook
The hook can be placed anywhere in your content, although it’s most successful when placed either in the introduction or while you are framing the problem. The hook is a tidbit that aims to encourage a full viewing of your video, so don’t give away your solutions but do give them a reason to carry on watching.
If there’s a particular point where you think they might become bored or distracted, this is a great time to insert your hook. Come up with a powerful hook, for instance ‘with my solution I managed to go from ten views to two hundred in an hour’ or ‘when you hear this solution you’ll understand how I tripled my profits overnight’. Give them a reason to want to stay to the end.
Outro
Your outro shouldn’t just be about signing off in your unique way with some lovely music and visuals. This is the point at which you can ask something back from your audience, whatever that may be. We call this a ‘call to action’, and it could eb something as simple as subscribing through to something more involved like visiting your website.
Think about what you want from your audience; what should they do next? Remember to ask via a strong call to action, otherwise you’ve simply given them some free advice with very little in the way of a return for you.
Script or no script?
Many YouTubers shy away from using any sort of script, feeling that this will make them less relatable and natural. Choosing whether or not to script is entirely up to you; some people feel more comfortable with a script to hand, whereas others prefer to just wing it as they go.
If you don’t feel a script would work for you, do consider having a very rough outline of your structure and the points you want to make readily available while filming. It will help you regain control if you do happen to lose your place and will ensure you get all the information across that you’d planned to.
If you do think a full script would work better for you, make sure you are able to come across as naturally as possible while reading it. Write your script the same way you speak and run through a few times so you’re not squinting at words while you’re on camera. If you regularly wander off script, this could be a sign that a freer flowing style is more your thing.
Read More to Get : How to Loop a YouTube Video >>
Ready to go out and make amazing videos?
Having a structure to your videos might seem a little unnatural at first, but there’s plenty of evidence to show that people who take the time to plan their content get far better results than those who just improvise. If you’re unsure of the best structure for your content, watch videos made by others in your niche to see how they organize theirs.
That’s not to say you have to copy the leaders to be a success; indeed, you’ll be far more successful on YouTube if you continue to be unique. But there’s always room to learn from the best and to take inspiration from those who’ve been getting the very best results.
Richard Bennett
Richard Bennett is a writer and a lover of all things video.
Follow @Richard Bennett
Richard Bennett
Mar 27, 2024• Proven solutions
Creating a YouTube channel and uploading video content is only one part of the key to your success. With so much competition on the platform, it’s crucial that you stand out from the crowd with efficient, professional videos that are a pleasure to watch.
Without some planning and structure in mind before you begin filming, it’s all too easy to get a bit lost and start to ramble or fumble your words. Video’s filled with ‘umm’ and ‘err’ are neither pleasant to watch nor engaging.
If you’re serious about making a great YouTube channel and developing a loyal fan base, you’re going to need a workable structure for every video to help you stay on track. Here’s what you need to know:
Quick Jump Menu
- Why is structuring your video important?
- How should you structure YouTube Video Content?
- Ready to go out and make amazing videos?
Why is structuring your video important?
The structure of your video can make all the difference between a successful YouTube channel and a big waste of time. Your objective is to get people watching more and watching all the way to the end. A great structure can:
- Build interest and engagement: By keeping something in reserve and naturally building interest as you go along, people will be compelled to watch longer and interact more with your channel.
- Helps you rank higher: Longer and higher numbers of views will demonstrate your position as an authority well. The YouTube algorithm uses these metrics as part of their ranking factor, so the more and longer views you get, the higher you’ll rank in search.
- Builds consistency and familiarity: If all your videos follow a typical structure, your fans will come to be familiar with your format. They’ll know what to expect from your content and will watch more regularly as a result.
So, now you understand why structure is so important to your channel, let’s take a look at ways in which you can create an amazing structure for every video you produce.
How should you structure YouTube video content?
There are some key elements of a YouTube video’s structure which can make it more natural, more engaging and more fun to watch. When you’re planning your structure, you should follow a logical timeline to take the viewer from start to finish easily, and to ensure you get the actions you want at the end.
Intro
People love to be told what’s about to happen, and an intro can be a crucial step in ensuring they are going to continue watching your content. By explaining clearly what they are about to see, why it’s important to them and what problems you’re aiming to solve, you’ll keep them hooked and prevent them from browsing away to the next search result.
An introduction doesn’t need to be long or particularly involved. Remember, you don’t want to give away all your information here, as what you want is to encourage them to watch until the end. Something like “I’m going to show you … which will help you to …” is fine.
Your idea and purpose need to be conveyed fast and effectively if you’re keen to get their interest. Most viewers will decide within the first three to five seconds of a video if they want to invest their time in watching, so it’s crucial you capture their interest and engage them fast to stop them drifting away.
Main content
Once you’ve introduced your video, it’s time to start working through your content. This should be done by:
- Framing the problem
What are the types of problems that your viewers will have encountered which your video can solve? How is the problem affecting you and your viewers? Take around two to three minutes to describe the problems that you hope your video will solve, and work on being empathetic so people can relate to you and the issue you’re discussing.
- Offer solutions with examples
Move on to your solution to the problem. How did you find this solution? Is it easy to implement? Take around four to five minutes to address your solution and give examples of how it works in practice.
Now you’ve addressed the issue that your video content will solve, you’re almost ready to ask them to take the next step. Almost. There’s one more key element in your structure that you need to remember to include.
Hook
The hook can be placed anywhere in your content, although it’s most successful when placed either in the introduction or while you are framing the problem. The hook is a tidbit that aims to encourage a full viewing of your video, so don’t give away your solutions but do give them a reason to carry on watching.
If there’s a particular point where you think they might become bored or distracted, this is a great time to insert your hook. Come up with a powerful hook, for instance ‘with my solution I managed to go from ten views to two hundred in an hour’ or ‘when you hear this solution you’ll understand how I tripled my profits overnight’. Give them a reason to want to stay to the end.
Outro
Your outro shouldn’t just be about signing off in your unique way with some lovely music and visuals. This is the point at which you can ask something back from your audience, whatever that may be. We call this a ‘call to action’, and it could eb something as simple as subscribing through to something more involved like visiting your website.
Think about what you want from your audience; what should they do next? Remember to ask via a strong call to action, otherwise you’ve simply given them some free advice with very little in the way of a return for you.
Script or no script?
Many YouTubers shy away from using any sort of script, feeling that this will make them less relatable and natural. Choosing whether or not to script is entirely up to you; some people feel more comfortable with a script to hand, whereas others prefer to just wing it as they go.
If you don’t feel a script would work for you, do consider having a very rough outline of your structure and the points you want to make readily available while filming. It will help you regain control if you do happen to lose your place and will ensure you get all the information across that you’d planned to.
If you do think a full script would work better for you, make sure you are able to come across as naturally as possible while reading it. Write your script the same way you speak and run through a few times so you’re not squinting at words while you’re on camera. If you regularly wander off script, this could be a sign that a freer flowing style is more your thing.
Read More to Get : How to Loop a YouTube Video >>
Ready to go out and make amazing videos?
Having a structure to your videos might seem a little unnatural at first, but there’s plenty of evidence to show that people who take the time to plan their content get far better results than those who just improvise. If you’re unsure of the best structure for your content, watch videos made by others in your niche to see how they organize theirs.
That’s not to say you have to copy the leaders to be a success; indeed, you’ll be far more successful on YouTube if you continue to be unique. But there’s always room to learn from the best and to take inspiration from those who’ve been getting the very best results.
Richard Bennett
Richard Bennett is a writer and a lover of all things video.
Follow @Richard Bennett
Also read:
- From Chat Room to Screen Step-by-Step Google Meet YouTube Streams
- 2024 Approved Chorus of Creators Guidelines for Sharing Sounds Online
- Rapid Rendering of Epic Battle Royale Tiles
- In 2024, Best of Both Worlds YouTube’s VR Gems
- Brief Overview of the Quickest Chroma Key Tricks
- [Updated] Checking Credentials on YouTube
- Harness the Power of YouTube Studio for Ultimate Edits
- All About YouTube's Elite Access - A Complete Breakdown for 2024
- YouTube Studio Editor Unveiled Ultimate Editing Companion
- From Screens to Spreads The Do's and Don'ts of Live Blogging
- 2024 Approved How to Create a YouTube Channel Trailer to Increase Revenue
- Unboxing Video Success Secrets for Aspiring Creators
- In 2024, Elevating Your Content's Presence Perfecting YouTube Thumbnails Size
- Connect with Creativity Join Our List of 20 Dynamic YouTube Music Crews for 2024
- [Updated] Engage, Entertain and Captivate – Adopting Two-Point of View in Your Next YouTube Reaction Video (2 POV Method)
- In 2024, Cutting Edge Video Editing Mastering Green Screen Integration
- 2024 Approved Concise Content The Best URL Cutter Tools for Youtubers
- In 2024, Dive Deep Into Sub4sub Essential Insights to Start Right
- [New] Essential Steps to Producing a YouTube Hit Music Reaction Video Guide
- In 2024, Best Cameras for Vlogging
- YouTube Copyright Concerns for Recording Screens
- [Updated] Dissecting Mr. Beast's Fortune Portfolio
- Calculating YouTube's Income Potential with CPM Rates for 2024
- Deciphering How TSeries Benefits From YouTube for 2024
- [New] Crafting Engaging YouTube Channel Names for Vlogger Success (No More Than 156)
- In 2024, Curtail Unrequested YouTube Content Streams
- Upside Down Views The Art of Reverse Videos
- In 2024, Elevating Slideshows Incorporate YouTube Videos
- Digital Domain Decision Which Platform for Your Videos for 2024
- In 2024, Become a Youtube Gif Wizard Your Complete Online Transformation Tutorial
- Maximize Views Download YouTube Artwork for Free
- Innovating Content Approaches to Stand Out in Shorts Arenas
- [New] Decoding YouTube's Thumbnail Impact on Traffic
- In 2024, How to Mirror Xiaomi Redmi A2 to Mac? | Dr.fone
- Updated 2024 Approved Glitch Your Way to Creativity Top Free Online Tools
- How to find lost iPhone XS Backup files on Windows PC? | Stellar
- [New] Find the Perfect Video Collaboration App Our Choice of 10 Free Tools for 2024
- Xiaomi Redmi K70E Not Connecting to Wi-Fi? 12 Quick Ways to Fix | Dr.fone
- 6 Fixes to Unfortunately WhatsApp has stopped Error Popups On Honor Play 8T | Dr.fone
- [New] 2024 Approved Unlocking the Secrets of Facebook's Live Feature
- New 2024 Approved The Ultimate List of Video Editing Software for Hot Vloggers Free & Paid
- 2024 Approved Camera Mastery Expert Tips for Selecting Best iPhone Views
- The Best Methods to Unlock the iPhone Locked to Owner for Apple iPhone 15 Plus
- [Updated] In 2024, Become a TikTok Phenomenon with Self-Cloning Insights
- In 2024, The Best Android SIM Unlock Code Generators Unlock Your Motorola Moto G23 Phone Hassle-Free
- Top Best Final Cut Pro X Alternatives on Windows & Mac & Linux Free & Paid
- Updated Conquering Complex Audioscapes A No-Nonsense Guide to Effective Track Combination in Premiere Pro
- Free Game Themes & Melodies – 10 Best Websites
- Title: "In 2024, Audiovisual Virtuoso Capturing Emotion in Harmony"
- Author: Brian
- Created at : 2024-05-25 12:01:53
- Updated at : 2024-05-26 12:01:53
- Link: https://youtube-video-recordings.techidaily.com/in-2024-audiovisual-virtuoso-capturing-emotion-in-harmony/
- License: This work is licensed under CC BY-NC-SA 4.0.
