
"In 2024, Anonymous Sharing Simplified Blurring Techniques for Videos"
Anonymous Sharing Simplified: Blurring Techniques for Videos
How to Blur Faces or Objects in YouTube Videos

Richard Bennett
Mar 27, 2024• Proven solutions
Suppose you are interested in preserving the identity of people in your YouTube videos, or you are simply interested in luring out some of the faces of the objects in your YouTube videos to retain filming rights. In that case, you can do it quite easily. With the help of a proper editing application and some online tools, you can very quickly blur out faces or objects from your YouTube videos.
Blur Faces With the Best YouTube Video Editing Software
Wondershare Filmora is one of the best video editing tools for YouTube videos. Through the Filmora editing suite, you can quickly import the video and then go to the power town to blur out faces, distort objects, and more.
 Download Mac Version ](https://tools.techidaily.com/wondershare/filmora/download/ )
- You first need to download and install Wondershare Filmora
- Then it is time to load the video you wish to edit
- You can either browse the tape from your computer or drag and drop it
- Once loading is finished, you can drag and drop the video to the Video Timeline
- Afterward, you must target the exact video on the timeline
- Right-click and choose the Power Tool available
- A pop-up window will appear, where you must choose Face-Off and then Apply Face Off to the Clip
- The effect you want is the first option you get, or else the mosaic
- By clicking on the mosaic, it will be applied to your video
- Click OK
- Now you must choose Export to save the video
- Please choose the right format and the save option of your choosing (instant post on YouTube, burn the video on CD/DVD or save it on your PC)
If you are recording your tutorial for YouTube or your demonstration videos, you may need to blur or hide the private and sensitive information. Click to check how did I hide the personal info in the video .
How to Blur Faces or Objects in Videos With YouTube Video Editor
YouTube has offered the chance to blur out images, faces, and more since 2012. The face blur tool available on YouTube works quite well.
Here is what you need to do:
- First of all, open YouTube Video Manager
- Click on the Edit button
- Choose the Enhancements
- Click on the Blurring option (it is on the right of your screen)
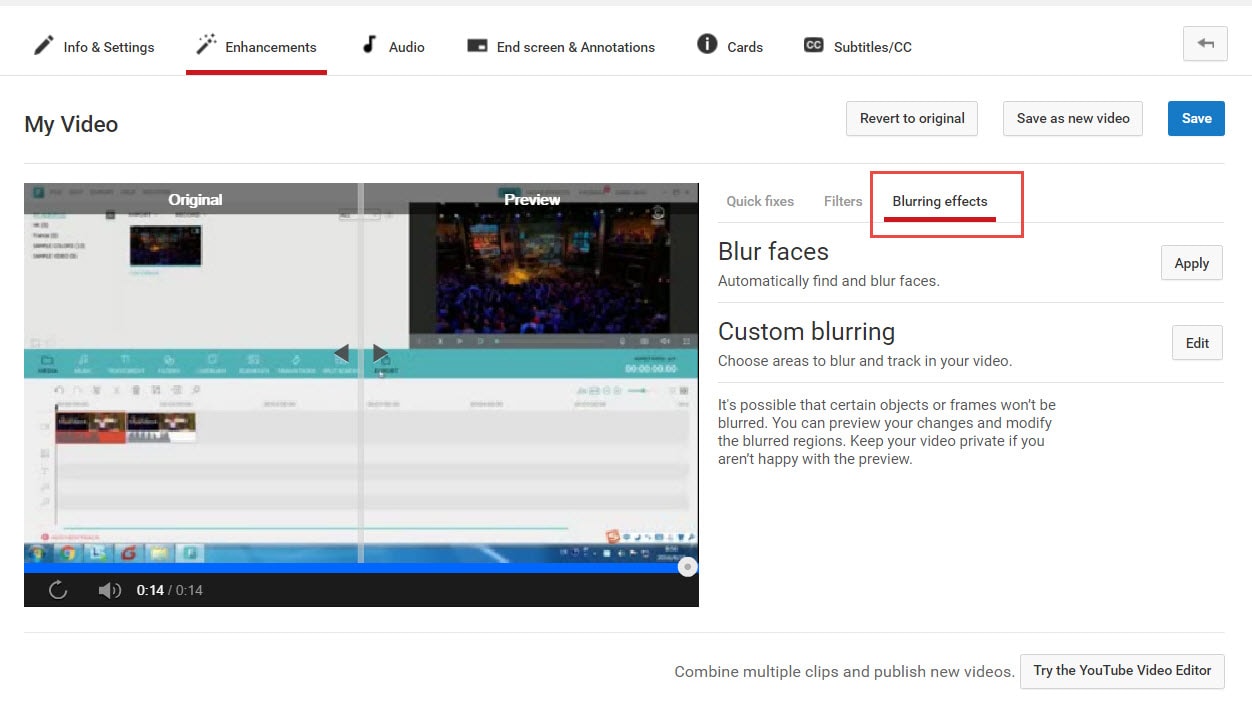
- Click on the Edit button of the Custom blurring option
- This time, a pop-up window will appear
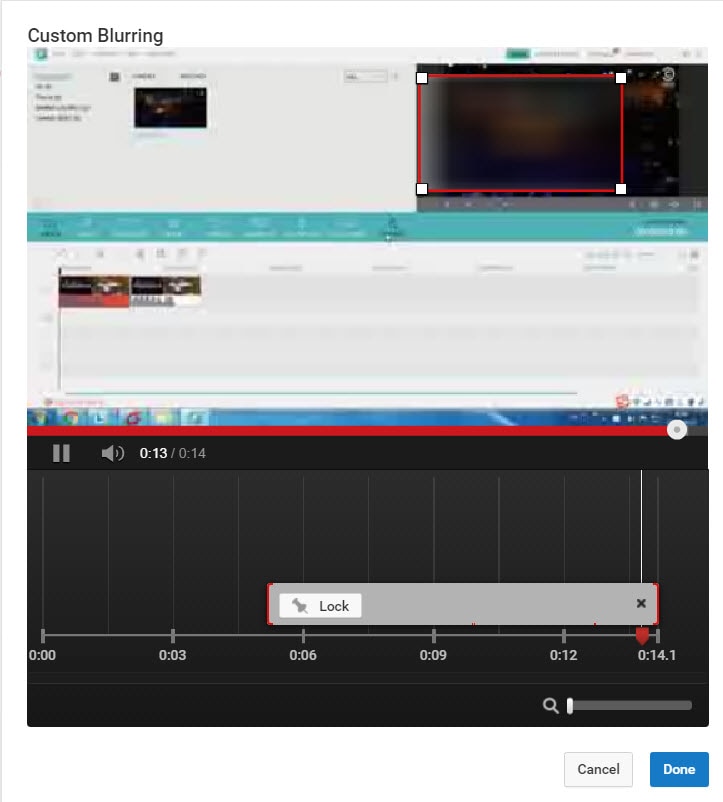
- With the use of click and drag properties, you can create the blurred content
- Click on Done
- Save the video, as per your preferences (Save as new video, revert to the original or overwrite)
Here is a tutorial video for how to blur faces or objects on YouTube:
Richard Bennett
Richard Bennett is a writer and a lover of all things video.
Follow @Richard Bennett
Richard Bennett
Mar 27, 2024• Proven solutions
Suppose you are interested in preserving the identity of people in your YouTube videos, or you are simply interested in luring out some of the faces of the objects in your YouTube videos to retain filming rights. In that case, you can do it quite easily. With the help of a proper editing application and some online tools, you can very quickly blur out faces or objects from your YouTube videos.
Blur Faces With the Best YouTube Video Editing Software
Wondershare Filmora is one of the best video editing tools for YouTube videos. Through the Filmora editing suite, you can quickly import the video and then go to the power town to blur out faces, distort objects, and more.
Download Mac Version ](https://tools.techidaily.com/wondershare/filmora/download/ )
- You first need to download and install Wondershare Filmora
- Then it is time to load the video you wish to edit
- You can either browse the tape from your computer or drag and drop it
- Once loading is finished, you can drag and drop the video to the Video Timeline
- Afterward, you must target the exact video on the timeline
- Right-click and choose the Power Tool available
- A pop-up window will appear, where you must choose Face-Off and then Apply Face Off to the Clip
- The effect you want is the first option you get, or else the mosaic
- By clicking on the mosaic, it will be applied to your video
- Click OK
- Now you must choose Export to save the video
- Please choose the right format and the save option of your choosing (instant post on YouTube, burn the video on CD/DVD or save it on your PC)
If you are recording your tutorial for YouTube or your demonstration videos, you may need to blur or hide the private and sensitive information. Click to check how did I hide the personal info in the video .

How to Blur Faces or Objects in Videos With YouTube Video Editor
YouTube has offered the chance to blur out images, faces, and more since 2012. The face blur tool available on YouTube works quite well.
Here is what you need to do:
- First of all, open YouTube Video Manager
- Click on the Edit button
- Choose the Enhancements
- Click on the Blurring option (it is on the right of your screen)
- Click on the Edit button of the Custom blurring option
- This time, a pop-up window will appear
- With the use of click and drag properties, you can create the blurred content
- Click on Done
- Save the video, as per your preferences (Save as new video, revert to the original or overwrite)
Here is a tutorial video for how to blur faces or objects on YouTube:
Richard Bennett
Richard Bennett is a writer and a lover of all things video.
Follow @Richard Bennett
Richard Bennett
Mar 27, 2024• Proven solutions
Suppose you are interested in preserving the identity of people in your YouTube videos, or you are simply interested in luring out some of the faces of the objects in your YouTube videos to retain filming rights. In that case, you can do it quite easily. With the help of a proper editing application and some online tools, you can very quickly blur out faces or objects from your YouTube videos.
Blur Faces With the Best YouTube Video Editing Software
Wondershare Filmora is one of the best video editing tools for YouTube videos. Through the Filmora editing suite, you can quickly import the video and then go to the power town to blur out faces, distort objects, and more.
Download Mac Version ](https://tools.techidaily.com/wondershare/filmora/download/ )
- You first need to download and install Wondershare Filmora
- Then it is time to load the video you wish to edit
- You can either browse the tape from your computer or drag and drop it
- Once loading is finished, you can drag and drop the video to the Video Timeline
- Afterward, you must target the exact video on the timeline
- Right-click and choose the Power Tool available
- A pop-up window will appear, where you must choose Face-Off and then Apply Face Off to the Clip
- The effect you want is the first option you get, or else the mosaic
- By clicking on the mosaic, it will be applied to your video
- Click OK
- Now you must choose Export to save the video
- Please choose the right format and the save option of your choosing (instant post on YouTube, burn the video on CD/DVD or save it on your PC)
If you are recording your tutorial for YouTube or your demonstration videos, you may need to blur or hide the private and sensitive information. Click to check how did I hide the personal info in the video .
How to Blur Faces or Objects in Videos With YouTube Video Editor
YouTube has offered the chance to blur out images, faces, and more since 2012. The face blur tool available on YouTube works quite well.
Here is what you need to do:
- First of all, open YouTube Video Manager
- Click on the Edit button
- Choose the Enhancements
- Click on the Blurring option (it is on the right of your screen)
- Click on the Edit button of the Custom blurring option
- This time, a pop-up window will appear
- With the use of click and drag properties, you can create the blurred content
- Click on Done
- Save the video, as per your preferences (Save as new video, revert to the original or overwrite)
Here is a tutorial video for how to blur faces or objects on YouTube:
Richard Bennett
Richard Bennett is a writer and a lover of all things video.
Follow @Richard Bennett
YouTube’s Secrets: Integrating Text Overlays in Your Clips
How To Add Captions to YouTube Videos
Richard Bennett
Mar 27, 2024• Proven solutions
By captioning your YouTube videos you help to make them accessible to more potential viewers. Subtitles are useful to viewers who have hearing impairments, whose first language is different from yours, or who are unable to watch your video with sound. Closed captioning can also be useful for you as a YouTuber because it helps with your SEO, or search engine optimization. Practicing better SEO can get your videos ranked higher in search results. Google and YouTube both index subtitles and transcripts much like they do your video’s description, unless you use automated captions.
This article will first explain how you can turn on subtitles for the videos you watch and then walk you through adding captions to your own videos.
How To Turn On Captions on YouTube
In order for you to be able to view subtitles for a YouTube video the uploader of the video will need to have added them, unless you change your account settings to display automatic captions.

To toggle subtitles on and off click on the Closed Captioning icon in the bottom right of your video player.
If the creator of the video has not added captions then you can enable automatic captions by going into your Account Settings and selecting Playback. Check the box next to Always Show Captions, and then check Show Automatic Captions by Speech Recognition. These captions may be flawed, but you will still be able to see the more accurate user submitted captions on videos that have them. The Always Show Captions feature may be useful not only to the hearing impaired, but to users who do not speak the same language as the video producer.
If you want to change the language of the subtitles click on the settings icon (the one that looks like a gear) next to the closed captioning icon and choose your language next to Subtitles/CC . If the language you want is not there select Auto-Translate and then pick a language. Google Translate will be used to generate subtitles in your chosen language.
Adding YouTube Captions in 4 Steps
1. Go to Video Manager in your Creator Studio and then look at your videos. Decide which one you want to add captions to.
2. Click on the drop-down menu next to the video you want to add captions to and choose Subtitles and CC.
3. Select Add New Subtitles or CC.
4. Choose whether to create your captions, upload a file that has them, transcribe your video, use automatic captioning, or use captioning software.
Create Subtitles or Closed Captions will allow you to create your subtitles on YouTube.
Upload A File allows you to upload a pre-made subtitle file from your computer. Supported file types include SubRip (.srt) and SubViewer (.sbv). You cannot use a word or PDF document for your subtitles.
Transcribe and Set Timings is where you can type a transcript of your video and set timings to sync it to your video. This differs from Create Subtitles or Closed Captions in that your transcript is all typed in to one text field.
Use Automatic Captioning will automatically use speech recognition technology to create captions. You can edit these auto-generated captions later if there are mistakes.
Use Captioning Software or Services is what you choose if you want to use a program or service to create the subtitles for your video.
The easiest way to add subtitles to your videos is to use Automatic Captioning. However, Automatic Captioning is imperfect and may result in your viewers getting a sloppy, skewed, interpretation of your video. Automatic captions are also not indexed by YouTube and Google the way subtitles you create or upload are. This means that they will not have any value to your SEO strategy. If you do not input your own captions or transcript you are missing out on an opportunity for better search engine rankings. Automatic Captions are great if you do not have time to input subtitles and need a temporary solution, though.
Richard Bennett
Richard Bennett is a writer and a lover of all things video.
Follow @Richard Bennett
Richard Bennett
Mar 27, 2024• Proven solutions
By captioning your YouTube videos you help to make them accessible to more potential viewers. Subtitles are useful to viewers who have hearing impairments, whose first language is different from yours, or who are unable to watch your video with sound. Closed captioning can also be useful for you as a YouTuber because it helps with your SEO, or search engine optimization. Practicing better SEO can get your videos ranked higher in search results. Google and YouTube both index subtitles and transcripts much like they do your video’s description, unless you use automated captions.
This article will first explain how you can turn on subtitles for the videos you watch and then walk you through adding captions to your own videos.
How To Turn On Captions on YouTube
In order for you to be able to view subtitles for a YouTube video the uploader of the video will need to have added them, unless you change your account settings to display automatic captions.
To toggle subtitles on and off click on the Closed Captioning icon in the bottom right of your video player.
If the creator of the video has not added captions then you can enable automatic captions by going into your Account Settings and selecting Playback. Check the box next to Always Show Captions, and then check Show Automatic Captions by Speech Recognition. These captions may be flawed, but you will still be able to see the more accurate user submitted captions on videos that have them. The Always Show Captions feature may be useful not only to the hearing impaired, but to users who do not speak the same language as the video producer.
If you want to change the language of the subtitles click on the settings icon (the one that looks like a gear) next to the closed captioning icon and choose your language next to Subtitles/CC . If the language you want is not there select Auto-Translate and then pick a language. Google Translate will be used to generate subtitles in your chosen language.
Adding YouTube Captions in 4 Steps
1. Go to Video Manager in your Creator Studio and then look at your videos. Decide which one you want to add captions to.
2. Click on the drop-down menu next to the video you want to add captions to and choose Subtitles and CC.
3. Select Add New Subtitles or CC.
4. Choose whether to create your captions, upload a file that has them, transcribe your video, use automatic captioning, or use captioning software.
Create Subtitles or Closed Captions will allow you to create your subtitles on YouTube.
Upload A File allows you to upload a pre-made subtitle file from your computer. Supported file types include SubRip (.srt) and SubViewer (.sbv). You cannot use a word or PDF document for your subtitles.
Transcribe and Set Timings is where you can type a transcript of your video and set timings to sync it to your video. This differs from Create Subtitles or Closed Captions in that your transcript is all typed in to one text field.
Use Automatic Captioning will automatically use speech recognition technology to create captions. You can edit these auto-generated captions later if there are mistakes.
Use Captioning Software or Services is what you choose if you want to use a program or service to create the subtitles for your video.
The easiest way to add subtitles to your videos is to use Automatic Captioning. However, Automatic Captioning is imperfect and may result in your viewers getting a sloppy, skewed, interpretation of your video. Automatic captions are also not indexed by YouTube and Google the way subtitles you create or upload are. This means that they will not have any value to your SEO strategy. If you do not input your own captions or transcript you are missing out on an opportunity for better search engine rankings. Automatic Captions are great if you do not have time to input subtitles and need a temporary solution, though.
Richard Bennett
Richard Bennett is a writer and a lover of all things video.
Follow @Richard Bennett
Also read:
- [New] Audience Choice Great Movies Not on the Main List
- [New] Best 5 YouTube Video Editor Alternatives
- [New] Captivating Customer Revelation
- [New] Hasty Heists of History Recovering Deleted Reddit Posts
- [Updated] PauseCapture Stop & Save Live Image
- 2024 Approved Control YouTube Audio Mobile/Desktop Approach
- Discover the Leading Platforms for Following Trending Hashtags on Twitter
- DSLR or Mirrorless for High-Quality Video Recording for 2024
- Elevate Video Engagement by Inserting Captions for 2024
- In 2024, Ace 10 Budget-Friendly Video Subtitle Grabs
- In 2024, ClipCraft Designer
- In 2024, The Most Useful Tips for Pokemon Go Ultra League On Motorola Moto G84 5G | Dr.fone
- Optimize Your iPhone for GIF Saving & Playing Like a Pro for 2024
- Step-by-Step Tutorial on Searching and Identifying AV Files Using Copernic Software
- The Ultimate Technique for Capturing & Broadcasting PS4 Games
- Unlock Your Best FreeFire Videos with Key Insights
- What's Captivating Twitter Users the Most for 2024
- Title: In 2024, Anonymous Sharing Simplified Blurring Techniques for Videos
- Author: Brian
- Created at : 2024-11-13 04:51:11
- Updated at : 2024-11-14 17:36:01
- Link: https://youtube-video-recordings.techidaily.com/in-2024-anonymous-sharing-simplified-blurring-techniques-for-videos/
- License: This work is licensed under CC BY-NC-SA 4.0.