
"In 2024, Animated Text That Jumps Master Class with Easy Steps"
Animated Text That Jumps: Master Class with Easy Steps
How to Create Animated Bouncing Text 
Liza Brown
Mar 27, 2024• Proven solutions
Earlier, you learned how to have a bounce text effect in Adobe After Effects . However, because AE is a complex application and has a steep learning curve, this section explains the two alternative ways to get the same effect on your existing video footage.
Method 1: How to Create Bouncing Text in Filmora Video Editor?
When talking about Wondershare Filmora , the application is populated with several presets for texts and titles, animations, effects, filters, and much more.
These pre-built templates not only make your task easier, they also save your decent amount of time that you would spend while working with After Effects or any other similar app that requires you to build things from scratch.
You can follow the instructions given below to add animated bounce text to any of your video footages with Filmora:
Step 1: Add a Footage to Timeline
Launch Wondershare Filmora on your Windows or Mac PC. By default, the aspect ratio of the project is set to 16:9. Click anywhere inside the Media window at the upper-left section, and select and import footage you want to add bounce text to.
Step 2: Insert Text and Add Bounce Effect
Click Titles from the standard toolbar at the top, and click and drag your preferred title template from the Library to the timeline. In case you don’t want any specific animation or style on the title, you can use the default title.
In the timeline, double-click the title you just added, use the upper-left section to edit the text, go to the Animation tab from the left pane, scroll down the list, and double-click the Up Down 1 or Up Down 2 preset to apply the bounce effect to the credits. Click OK to save the changes and to get back to the main window.

Step 3: Add Shake Filters
Go to Effects from the standard toolbar, expand the Filters category from the left pane, and click Shake. From the Library window, click and drag your preferred shake filter to the timeline. Here, I will choose Mild.

You can customize the default effect by double-clicking the shake filter in the timeline, using the sliders in the upper-left area of the interface to make necessary adjustments, and then clicking OK to save the changes and to get back to the previous interface.

Step 4: Export the Final Output
Click EXPORT from the top of the interface, go to the Local tab in the Export box, choose your preferred output format from the list in the left, make required customizations from the right pane, and click EXPORT from the bottom-right corner to export the video.

Now, you can add the bouncing text video and the background video to the timeline, and then place the bouncing text video above the background video track.
Double click the text track, go to the Chroma Key effect, select the Color Picker tool, and click anywhere in the Preview window to get things right. Finally, export the entire project to your preferred output format as explained in Step 4.
As explained before, Wondeshare Filmora makes the entire process of creating and adding bounce text effect pretty simple. With all the pre-build templates, and the versatility of the options that can be used to customize those presets, you can come up with the effects that are usually obtained when you start generating them from the scratch.


Method 2: Generate Animated Bouncing Texts Online
If you don’t want any heavy and resource-intensive app on your PC merely for some special text effects, you can try any of the online solutions instead. The benefit of using any such web app is that all the processing is done on site’s server, and it is only a web browser and an Internet connection that you need to have at your side.
Some most trusted websites to generate bounce text are listed below:
1. ENGFTO
Website: https://engfto.com/index/create%5Fanimated%5Fbouncing%5Ftext/0-26

You can follow the instructions given below to use Engfto to generate bouncing text for your footages:
Step 1: Get to the Animated Bouncing Text Page
Launch your favorite web browser, and go to the link given above to get to the Engfto’s animated bouncing text page.
Step 2: Customize Text and Preferences
Modify the values in the fields under the SIZE AREA and TEXT sections to customize the text area, the text itself, its size, and font. Next, adjust the values in the fields under the EFFECT PARAMETERS section to get the required bounce effect. Also, use the fields under the BACKGROUND section to either change the background color, or pick a background image from your PC.
Step 3: Obtain the Animated Text
Click the SAVE GIF ANIMATION button from the lower section of the page to download the animated text to your PC.
2. Loading.io
The instructions given below explain how to use Loading.io to get animated bounce text effect for your footages:
Step 1: Get to the Loading.io Webpage
Launch your favorite web browser and go to https://loading.io/animation/text/ .
Step 2: Customize the Text and Choose Animation Effect

Use the options available on the webpage to type your text, and change its font, color, background, transparency level etc. Select Bounce (or any of its variants) from the Animation drop-down list, and adjust the speed using the Speed slider.
Step 3: Obtain the Text
Click your preferred option from next to the Download As section to download the animated text to your PC.
Note: Regardless of the web solution you choose to generate and obtain animated bounce text, you will still need a post-production tool to add the downloaded text to your footage.
Conclusion
Generating bounce text effect is much simpler when you use Wondershare Filmora or any of the online solutions as explained in Method 2. While the former gives you more flexibility when it comes to customizations, the latter doesn’t require any app to be installed on your PC. In addition, many times the web apps offer their services for free, and therefore they are preferred by the novice users who are not much into post-production processes.

Liza Brown
Liza Brown is a writer and a lover of all things video.
Follow @Liza Brown
Liza Brown
Mar 27, 2024• Proven solutions
Earlier, you learned how to have a bounce text effect in Adobe After Effects . However, because AE is a complex application and has a steep learning curve, this section explains the two alternative ways to get the same effect on your existing video footage.
Method 1: How to Create Bouncing Text in Filmora Video Editor?
When talking about Wondershare Filmora , the application is populated with several presets for texts and titles, animations, effects, filters, and much more.
These pre-built templates not only make your task easier, they also save your decent amount of time that you would spend while working with After Effects or any other similar app that requires you to build things from scratch.
You can follow the instructions given below to add animated bounce text to any of your video footages with Filmora:
Step 1: Add a Footage to Timeline
Launch Wondershare Filmora on your Windows or Mac PC. By default, the aspect ratio of the project is set to 16:9. Click anywhere inside the Media window at the upper-left section, and select and import footage you want to add bounce text to.
Step 2: Insert Text and Add Bounce Effect
Click Titles from the standard toolbar at the top, and click and drag your preferred title template from the Library to the timeline. In case you don’t want any specific animation or style on the title, you can use the default title.
In the timeline, double-click the title you just added, use the upper-left section to edit the text, go to the Animation tab from the left pane, scroll down the list, and double-click the Up Down 1 or Up Down 2 preset to apply the bounce effect to the credits. Click OK to save the changes and to get back to the main window.
Step 3: Add Shake Filters
Go to Effects from the standard toolbar, expand the Filters category from the left pane, and click Shake. From the Library window, click and drag your preferred shake filter to the timeline. Here, I will choose Mild.
You can customize the default effect by double-clicking the shake filter in the timeline, using the sliders in the upper-left area of the interface to make necessary adjustments, and then clicking OK to save the changes and to get back to the previous interface.
Step 4: Export the Final Output
Click EXPORT from the top of the interface, go to the Local tab in the Export box, choose your preferred output format from the list in the left, make required customizations from the right pane, and click EXPORT from the bottom-right corner to export the video.
Now, you can add the bouncing text video and the background video to the timeline, and then place the bouncing text video above the background video track.
Double click the text track, go to the Chroma Key effect, select the Color Picker tool, and click anywhere in the Preview window to get things right. Finally, export the entire project to your preferred output format as explained in Step 4.
As explained before, Wondeshare Filmora makes the entire process of creating and adding bounce text effect pretty simple. With all the pre-build templates, and the versatility of the options that can be used to customize those presets, you can come up with the effects that are usually obtained when you start generating them from the scratch.
Method 2: Generate Animated Bouncing Texts Online
If you don’t want any heavy and resource-intensive app on your PC merely for some special text effects, you can try any of the online solutions instead. The benefit of using any such web app is that all the processing is done on site’s server, and it is only a web browser and an Internet connection that you need to have at your side.
Some most trusted websites to generate bounce text are listed below:
1. ENGFTO
Website: https://engfto.com/index/create%5Fanimated%5Fbouncing%5Ftext/0-26
You can follow the instructions given below to use Engfto to generate bouncing text for your footages:
Step 1: Get to the Animated Bouncing Text Page
Launch your favorite web browser, and go to the link given above to get to the Engfto’s animated bouncing text page.
Step 2: Customize Text and Preferences
Modify the values in the fields under the SIZE AREA and TEXT sections to customize the text area, the text itself, its size, and font. Next, adjust the values in the fields under the EFFECT PARAMETERS section to get the required bounce effect. Also, use the fields under the BACKGROUND section to either change the background color, or pick a background image from your PC.
Step 3: Obtain the Animated Text
Click the SAVE GIF ANIMATION button from the lower section of the page to download the animated text to your PC.
2. Loading.io
The instructions given below explain how to use Loading.io to get animated bounce text effect for your footages:
Step 1: Get to the Loading.io Webpage
Launch your favorite web browser and go to https://loading.io/animation/text/ .
Step 2: Customize the Text and Choose Animation Effect
Use the options available on the webpage to type your text, and change its font, color, background, transparency level etc. Select Bounce (or any of its variants) from the Animation drop-down list, and adjust the speed using the Speed slider.
Step 3: Obtain the Text
Click your preferred option from next to the Download As section to download the animated text to your PC.
Note: Regardless of the web solution you choose to generate and obtain animated bounce text, you will still need a post-production tool to add the downloaded text to your footage.
Conclusion
Generating bounce text effect is much simpler when you use Wondershare Filmora or any of the online solutions as explained in Method 2. While the former gives you more flexibility when it comes to customizations, the latter doesn’t require any app to be installed on your PC. In addition, many times the web apps offer their services for free, and therefore they are preferred by the novice users who are not much into post-production processes.
Liza Brown
Liza Brown is a writer and a lover of all things video.
Follow @Liza Brown
Demystifying How TSeries Capitalizes on YouTube Audience Reach
Founded by Gulshan Kumar on 11 July 1983, T-Series is an Indian Music record label with over 220 million subscribers on YouTube. Lately, there have been lots of controversies about the T-Series YouTube income, and one common question that we see is “What is T-Series income on YouTube?”
So, if you have the same question, then, you’ve come to the right page to find an answer. In this post, we’ve covered everything you need to know about the T-Series YouTube income. So, without wasting much time, let’s dive in to find out more.
Part 1: Information Box on T Series
Before we reveal all you need to know about T-Series YouTube income, here is an overview of Who T-Series is.
| Name | T-Series |
|---|---|
| Real Name | Bhushan Kumar Dua |
| Net Worth (2022) | $515.4 Million |
| Monthly Income and Salary | Approximately $8.6 Million |
| Yearly Income | Over $128 Million |
| Type | Private |
| Industry | Music & Entertainment |
| Founded | 11 July 1983; 39 years ago in Delhi, India |
| Founder | Gulshan Kumar |
| Key People | Bhushan Kumar Dua (Chairman, managing director), Krishan Kumar, Neeraj Kalyan (President) |
| Services | Music record label % Film production |
| YouTube Channel | T-Series |
| Awards and Recognition | Creator Awards |
Now you have an overview of what T-Series YouTube channel income is, read on to discover more
Part 2: T-Series YouTube Earning and Stats
T-Series main source of revenue is the views and adverts, and as of when this article was written, research shows that T-Series attracts more than 2.15 billion views per month. Since a YouTube channel could earn an average of $3 to $5 per one thousand views, it can be estimated that T-Series earn a monthly income of up to $8.6 Million per month, and could make up to over 128 Million per year. Do you still want to find out more? Check out the table on T-Series stats;
| Estimated Monthly Earning (USD/INDIAN RUPEES) | $8.6 Million / R.S699 Million |
|---|---|
| Estimated Yearly Earning (USD/INDIAN RUPEES) | Approximately $128 Million / R.S 10.4 Billion |
| Total Videos Uploads | 17, 516 |
| Total Views | 202,606,674,113 |
| Subscribers | 225 Million |
| Years Active | 16 years |
| Genre | Music |
T-Series is very popular on all social media platforms, including Facebook, Twitter, and Instagram. He has been in the game for so long that anyone believes in the content he creates. The company was discovered in the 1980s by Gulshan Kumar a cassette tape business, and it was focused on devotional music, especially Hindu hymns and Bollywood music.M 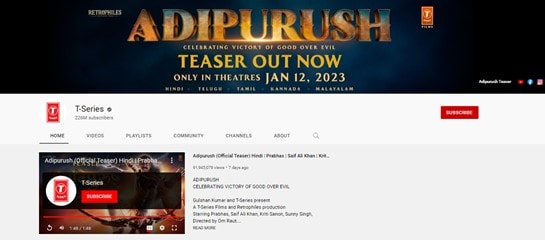
The good thing back then was that T-Series was the first of its kind, and the devotional music market was really big, especially amongst old folks. So, it was easy for T-Series music to reach the right audience within a short time, and it had its first breakthrough in the late 1980s.
Fast forward to 2004, telecommunication companies were having complaints from mobile phone users who were not satisfied with their ringtones. So, T-Series became their plug and started 30-second of their music to them. Then, in 2009, when YouTube was launched in India, T-Series discovered lots of his music where being uploaded on YouTube illegally. This led to a ruling against YouTube, and in January 2011, T-Series published its first video on YouTube.
Since 2011 till now, T-Series has experienced tremendous growth. T-Series has up to 29 different YouTube channels with total subscribers of 225million with over a billion views monthly, making them one of the top-leading YouTube channels globally. Right now,
Part 3: Why Is T-Series Trending on YouTube?
Since you already know what T-Series income on YouTube is, you might be eager to find out what he did that made him so popular and became a trend on YouTube. Well, the truth is, T-Series is not doing anything no one can do. However, he has been in the industry for so long that his YouTube channel is like a dish for many viewers, especially the ones in India.
Below are the three main things why T-Series is always trending on YouTube;
Huge YouTube Channel Monthly Visits
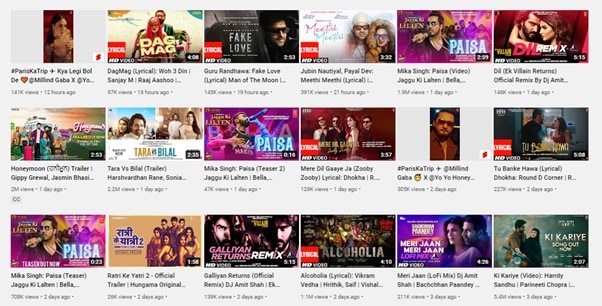
Boasting monthly views of over 100 million per month, T-Series is one of the few YouTube channels that usually have millions of visits from users globally every month. Research shows that the YouTube channel usually has approximately 7.9million visitors per month. This huge monthly visit helps them stay at the top of most YouTube searches that relates with his videos keywords, thus making them trend more when compared with his competitor’s YouTube channel.
Large Subscriber Base
With over 225 million subscribers and still counting, T-Series YouTube channel is a home for many folks to listen to music and see movie thrillers. The large subscriber base plays a huge role in his trend, and the subscriber base continues to increase, he still has the high chance of maintaining his trend within the industry for a very long time.
Regular Posting of Quality Videos
Having a huge YouTube subscriber base is one thing, but being able to deliver quality video content that anyone would love to watch is different. T-Series has been consistent in delivering quality videos, that immediately he uploads a new video on YouTube, he starts getting massive views instantly. Many folks are always eager to see his next upload on YouTube. This has been the same thing for T-Series over the past years, and it has helped him gained more and more popularity.
Bonus Tip: How to be a YouTuber and Make Videos like t series
To be a YouTube-like T-Series you don’t only need to put in the hard work in what you do, you also need to be smart and stay consistent. Plus, you must acquire advanced video editing software that will help you create videos that will make you stand out in the industry. One such video editing software is Wondershare’s Filmora video editor.
Filmora is a video editing powerhouse that boasts lots of efficient tools that one can use to edit every aspect of a video clip. From removing background noise to editing audio, adding transitions, applying effects, and lots more. The tool is one that any YouTuber must have at his/her fingertips.
Besides, Filmora offers lots of free built-in video effects from popular platforms like FilmStock, Pixel, Unsplash, and many others. The amazing thing is you don’t necessarily need video editing skills to utilize the features of the software.
Here is how to use Filmora to Create Impressive Videos for YouTube;
Free Download For Win 7 or later(64-bit)
Free Download For macOS 10.14 or later
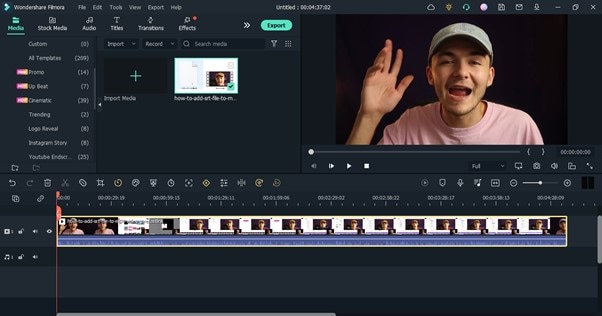
Step1 Download the latest version of Filmora from the official website and install it. Then, launch the tool and use the Import button to upload the YouTube video you wish to edit.
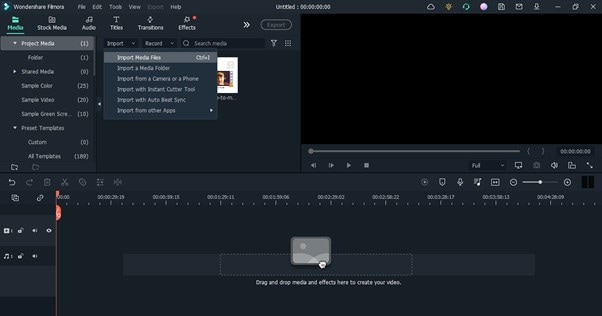
Drag-n-drop the imported video to the Timeline.
Step2 Navigate to the top of the screen and select Effects. Choose AI Portrait from the left-hand side. After that, drag-n-drop a preferred AI Portrait effect to the Timeline. Then, adjust it to the section of your video you want it to be displayed.
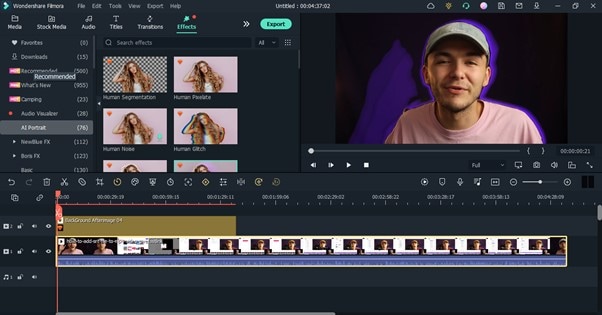
You can also change the AI Portrait effect settings. To do that, double-click on the effect from the timeline to prompt a pop-up window. Apply the AI Portrait effect from there.
Step3 You can add royalty-free music to your YouTube video by clicking Audio from the top. Then, select the preferred audio to use in the video and move it to the timeline.
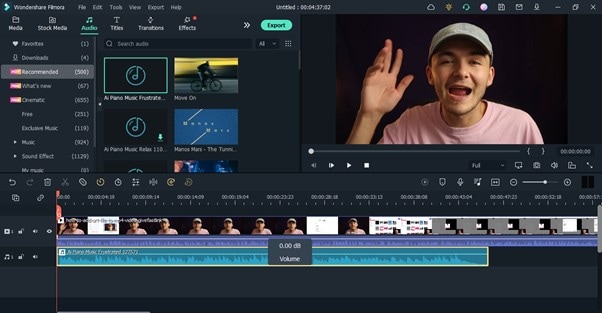
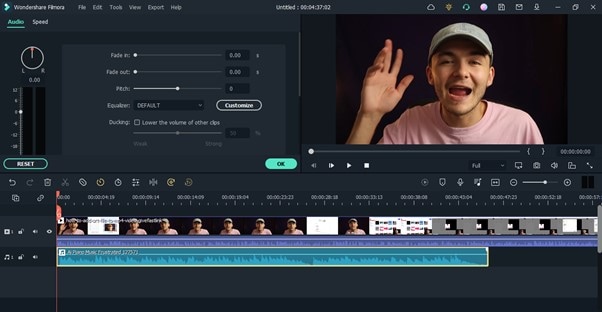
To adjust your audio settings, double-click the audio clip from the timeline and use the relevant button to balance audio fade-in and fade-out, volume, pitch, etc.
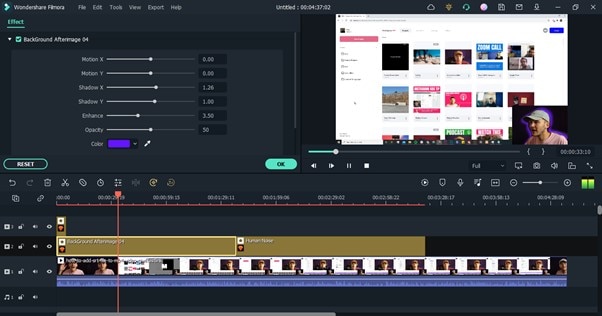
Step4 Another crucial thing you need to do is to add Subscribe watermark. To do this, click the >> icon next to Export from the top of the screen and select Element.
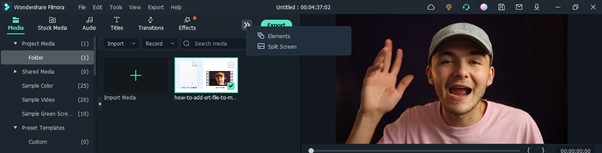
Locate and click ‘Social Media Show Element 07’ Effects. Drag-n-drop the selected effect to the Timeline.

Step5 Change the position where the Subscribe watermark should appear in your video. Then, play the video to preview it.
Step6 After you’re done with the editing, click the Export button from the top bar and choose Burn DVD from the drop-down list that shows up.
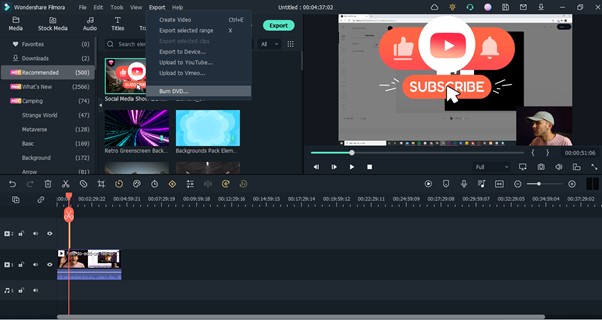
Spet 7: A pop-up window will appear on your PC screen. Select where you want to save the edited video file from the Folder Path section. Then, enter the file name in Lable. Click Export to finish.

Final Words
That’s all on T-Series income on YouTube. T-Series did not just become successful overnight. It took consistent hard work. The team put so much effort not just to come up with ideas and create videos, but also to invest in the right tools to make their videos stand out in the industry. If you’re looking to start your YouTube journey and be like T-Series some days, you should start now. The first move you should make is to invest in Wondershare Filmora software, as it has lots of tools to offer for editing videos with high quality.
Free Download For Win 7 or later(64-bit)
Free Download For macOS 10.14 or later
Part 1: Information Box on T Series
Before we reveal all you need to know about T-Series YouTube income, here is an overview of Who T-Series is.
| Name | T-Series |
|---|---|
| Real Name | Bhushan Kumar Dua |
| Net Worth (2022) | $515.4 Million |
| Monthly Income and Salary | Approximately $8.6 Million |
| Yearly Income | Over $128 Million |
| Type | Private |
| Industry | Music & Entertainment |
| Founded | 11 July 1983; 39 years ago in Delhi, India |
| Founder | Gulshan Kumar |
| Key People | Bhushan Kumar Dua (Chairman, managing director), Krishan Kumar, Neeraj Kalyan (President) |
| Services | Music record label % Film production |
| YouTube Channel | T-Series |
| Awards and Recognition | Creator Awards |
Now you have an overview of what T-Series YouTube channel income is, read on to discover more
Part 2: T-Series YouTube Earning and Stats
T-Series main source of revenue is the views and adverts, and as of when this article was written, research shows that T-Series attracts more than 2.15 billion views per month. Since a YouTube channel could earn an average of $3 to $5 per one thousand views, it can be estimated that T-Series earn a monthly income of up to $8.6 Million per month, and could make up to over 128 Million per year. Do you still want to find out more? Check out the table on T-Series stats;
| Estimated Monthly Earning (USD/INDIAN RUPEES) | $8.6 Million / R.S699 Million |
|---|---|
| Estimated Yearly Earning (USD/INDIAN RUPEES) | Approximately $128 Million / R.S 10.4 Billion |
| Total Videos Uploads | 17, 516 |
| Total Views | 202,606,674,113 |
| Subscribers | 225 Million |
| Years Active | 16 years |
| Genre | Music |
T-Series is very popular on all social media platforms, including Facebook, Twitter, and Instagram. He has been in the game for so long that anyone believes in the content he creates. The company was discovered in the 1980s by Gulshan Kumar a cassette tape business, and it was focused on devotional music, especially Hindu hymns and Bollywood music.M
The good thing back then was that T-Series was the first of its kind, and the devotional music market was really big, especially amongst old folks. So, it was easy for T-Series music to reach the right audience within a short time, and it had its first breakthrough in the late 1980s.
Fast forward to 2004, telecommunication companies were having complaints from mobile phone users who were not satisfied with their ringtones. So, T-Series became their plug and started 30-second of their music to them. Then, in 2009, when YouTube was launched in India, T-Series discovered lots of his music where being uploaded on YouTube illegally. This led to a ruling against YouTube, and in January 2011, T-Series published its first video on YouTube.
Since 2011 till now, T-Series has experienced tremendous growth. T-Series has up to 29 different YouTube channels with total subscribers of 225million with over a billion views monthly, making them one of the top-leading YouTube channels globally. Right now,
Part 3: Why Is T-Series Trending on YouTube?
Since you already know what T-Series income on YouTube is, you might be eager to find out what he did that made him so popular and became a trend on YouTube. Well, the truth is, T-Series is not doing anything no one can do. However, he has been in the industry for so long that his YouTube channel is like a dish for many viewers, especially the ones in India.
Below are the three main things why T-Series is always trending on YouTube;
Huge YouTube Channel Monthly Visits
Boasting monthly views of over 100 million per month, T-Series is one of the few YouTube channels that usually have millions of visits from users globally every month. Research shows that the YouTube channel usually has approximately 7.9million visitors per month. This huge monthly visit helps them stay at the top of most YouTube searches that relates with his videos keywords, thus making them trend more when compared with his competitor’s YouTube channel.
Large Subscriber Base
With over 225 million subscribers and still counting, T-Series YouTube channel is a home for many folks to listen to music and see movie thrillers. The large subscriber base plays a huge role in his trend, and the subscriber base continues to increase, he still has the high chance of maintaining his trend within the industry for a very long time.
Regular Posting of Quality Videos
Having a huge YouTube subscriber base is one thing, but being able to deliver quality video content that anyone would love to watch is different. T-Series has been consistent in delivering quality videos, that immediately he uploads a new video on YouTube, he starts getting massive views instantly. Many folks are always eager to see his next upload on YouTube. This has been the same thing for T-Series over the past years, and it has helped him gained more and more popularity.
Bonus Tip: How to be a YouTuber and Make Videos like t series
To be a YouTube-like T-Series you don’t only need to put in the hard work in what you do, you also need to be smart and stay consistent. Plus, you must acquire advanced video editing software that will help you create videos that will make you stand out in the industry. One such video editing software is Wondershare’s Filmora video editor.
Filmora is a video editing powerhouse that boasts lots of efficient tools that one can use to edit every aspect of a video clip. From removing background noise to editing audio, adding transitions, applying effects, and lots more. The tool is one that any YouTuber must have at his/her fingertips.
Besides, Filmora offers lots of free built-in video effects from popular platforms like FilmStock, Pixel, Unsplash, and many others. The amazing thing is you don’t necessarily need video editing skills to utilize the features of the software.
Here is how to use Filmora to Create Impressive Videos for YouTube;
Free Download For Win 7 or later(64-bit)
Free Download For macOS 10.14 or later
Step1 Download the latest version of Filmora from the official website and install it. Then, launch the tool and use the Import button to upload the YouTube video you wish to edit.
Drag-n-drop the imported video to the Timeline.
Step2 Navigate to the top of the screen and select Effects. Choose AI Portrait from the left-hand side. After that, drag-n-drop a preferred AI Portrait effect to the Timeline. Then, adjust it to the section of your video you want it to be displayed.
You can also change the AI Portrait effect settings. To do that, double-click on the effect from the timeline to prompt a pop-up window. Apply the AI Portrait effect from there.
Step3 You can add royalty-free music to your YouTube video by clicking Audio from the top. Then, select the preferred audio to use in the video and move it to the timeline.
To adjust your audio settings, double-click the audio clip from the timeline and use the relevant button to balance audio fade-in and fade-out, volume, pitch, etc.
Step4 Another crucial thing you need to do is to add Subscribe watermark. To do this, click the >> icon next to Export from the top of the screen and select Element.
Locate and click ‘Social Media Show Element 07’ Effects. Drag-n-drop the selected effect to the Timeline.
Step5 Change the position where the Subscribe watermark should appear in your video. Then, play the video to preview it.
Step6 After you’re done with the editing, click the Export button from the top bar and choose Burn DVD from the drop-down list that shows up.
Spet 7: A pop-up window will appear on your PC screen. Select where you want to save the edited video file from the Folder Path section. Then, enter the file name in Lable. Click Export to finish.
Final Words
That’s all on T-Series income on YouTube. T-Series did not just become successful overnight. It took consistent hard work. The team put so much effort not just to come up with ideas and create videos, but also to invest in the right tools to make their videos stand out in the industry. If you’re looking to start your YouTube journey and be like T-Series some days, you should start now. The first move you should make is to invest in Wondershare Filmora software, as it has lots of tools to offer for editing videos with high quality.
Free Download For Win 7 or later(64-bit)
Free Download For macOS 10.14 or later
Also read:
- [New] A Comprehensive Look at YouTube's AdSense Mechanisms
- [New] Calculating Earnings The Essence of YouTube Short Revenue Split
- [New] Crafting the Quintessential Thumbnails for Live Video Success
- [New] In 2024, Ultimate Video Streaming Channel Lists Films & Series
- [Updated] Best Practices in YT Thumbnail Sizing
- [Updated] In 2024, How to Safely Capture Your Favorite YouTube Audio for Free
- Effortless Methods to Keep Your Dell G7's GPU Drivers Current and Optimized
- How to Unlock Gionee Phone without PIN
- Navigating the World of FB Video Content Production for 2024
- The Best 8 VPN Hardware Devices Reviewed On Sony Xperia 1 V | Dr.fone
- Unlocking Success The Quintessential YouTube Video Strategies
- Title: In 2024, Animated Text That Jumps Master Class with Easy Steps
- Author: Brian
- Created at : 2024-11-12 19:57:11
- Updated at : 2024-11-15 04:56:46
- Link: https://youtube-video-recordings.techidaily.com/in-2024-animated-text-that-jumps-master-class-with-easy-steps/
- License: This work is licensed under CC BY-NC-SA 4.0.