
:max_bytes(150000):strip_icc():format(webp)/trends_MontyRakusen_Getty-5a4aa079482c5200362b0987.jpg)
"In 2024, A Step-by-Step Approach to Mastering Free YouTube Video Transcription"
A Step-by-Step Approach to Mastering Free YouTube Video Transcription
How to Transcribe a YouTube Video for FREE

Richard Bennett
Mar 27, 2024• Proven solutions
If you want to transcribe your videos to make the dialogs and speeches available in text format, you can use YouTube Transcribe feature that the streaming site offers for free. In this article, I’ll share with you a couple of methods to transcribe a YouTube video for free.
- Part 1: Transcribe YouTube Video Automatically for Free [2 Ways]
- Part 2: Transcribe YouTube Video to Text Online with Third-Party Service
- Part 3: Benefits of Transcribing YouTube Videos
- Part 4: YouTube Video Transcription FAQs
Part 1: How to Transcribe YouTube Video Automatically for Free [2 Ways]
Besides the basic video editing features on the YouTube platform, you can now quickly transcribe YouTube videos to the text as well. The good thing is, you can either use the automatic transcription feature that YouTube offers, or upload it manually while adjusting the timing as you go further.
Below are the two methods to transcribe your YouTube videos for free:
Method 1: Use the Automated Transcription Service on YouTube
As the name suggests, YouTube automatic transcription service works automatically. This means you don’t even have to click the ‘Transcribe’ button anymore to transcribe a YouTube video, and the website takes care of it on its own. All you need to do is, choose English as the language of the video when setting up subtitles. You can follow the instructions given below to do so:
Step 1 Upload a Video
Sign in to your YouTube account, click your profile picture from the top-right corner, and click YouTube Studio from the menu. Next, click CREATE from the upper-right corner, click Upload videos from the menu, and drag and drop a video from your computer to the Upload videos box that appears next.

Step 2 Select Transcription Language
On the Details page of the next box that appears, scroll down and click MORE OPTIONS, and select English in the Video language drop-down list under the Language, subtitles, and closed captions (CC) section.

Step 3 Publish the Video
Follow the on-screen instructions from this point to publish the video, and wait while YouTube automatically transcribes and adds the close captions to it.
Note: Depending on the duration of the clip, the time YouTube would take to transcribe may vary.
After YouTube has transcribed the video, you can download the transcription file in your preferred format. The instructions are given below explain how you can do so:
- Get to the Subtitles Window
While on the YouTube Studio page, click Subtitles from the left pane to go to the Channel subtitles page. And then click the video you want to modify.
- Get to Classic Studio
In the video subtitle page of the target video, hover mouse on the Published Automatic status under the Subtitles column, click the Options icon (with three vertical dots) that appears, and click Edit on Classic Studio.

- Download Transcription File
Click and open the Actions drop-down list from the top-left corner of the left pane, click your preferred transcription format including .vtt, .srt and .sbv from the list, and save the file on your local hard disk.

Method 2: Get YouTube Transcription when Watching
In addition, if you are watching any other video, you can make YouTube transcribe that for you as well. You can follow the instructions given below to get the YouTube video to text transcription:
Step 1: Play the Video
Go to the video on YouTube and start playing it. Make sure NOT to get to full-screen mode as doing so would hide the option to transcribe the clip.
Step 2: Enable Transcription
Click the More icon (with three horizontal dots) from under the bottom-right corner of the video player, and click Open transcript to see the video transcription in the Transcript pane that appears in the right.
Step 3: Manage Timestamps
Click the Options icon (with three vertical dots) from the top-right corner of the Transcript pane, and click Toggle timestamp to enable or disable the timestamps in the video transcription.
Limitations of Using YouTube Transcribe
Although YouTube’s automatic transcription is a decent feature that saves you a lot of time, since Google uses machine learning algorithms to convert the speech to text, the level of accuracy may vary depending on the accent of the speaker, and the clarity of the audio the video has. Also, even sometime you may not be satisfied with the end-results.
Alternatively, you can use Kapwing to transcribe a YouTube video and download the transcription file with the below step-by-step instructions:
Step 1: Add YouTube Video
Copy the URL of YouTube video you want to transcribe, go to https://www.kapwing.com/subtitles , paste the URL in the Paste a URL field, wait while Kapwing fetches the content of the video, and opens the Add subtitles to Video page.
Step 2: Transcribe the Video
Click Auto-generate from the right window, and follow the on-screen instructions to transcribe YouTube video to text.

Step 3: Download the Transcription File
Click Download SRT from the left pane, and follow the instructions from there to download the transcription file in *.srt format.

Pros
- Kapwing is free to use
- The auto-transcription process is quick and less tedious
- Kapwing also allows manual transcription and uploading of an existing *.srt file
Cons
- The auto-transcribed text might lack accuracy as the task is done by the speech-to-text tools that work in the background
You can follow the step-by-step instructions to transcribe a YouTube video and download the transcription file using Kapwing:
Step 1: Add YouTube Video
Copy the URL of YouTube video you want to transcribe, go to https://www.kapwing.com/subtitles , paste the URL in the Paste a URL field, wait while Kapwing fetches the content of the video, and opens the Add subtitles to Video page.
Step 2: Transcribe the Video
Click Auto-generate from the right window, and follow the on-screen instructions to transcribe YouTube video to text.
Step 3: Download the Transcription File
Click Download SRT from the left pane, and follow the instructions from there to download the transcription file in *.srt format.
Pros
- Kapwing is free to use
- The auto-transcription process is quick and less tedious
- Kapwing also allows manual transcription and uploading of an existing *.srt file
Cons
- The auto-transcribed text might lack accuracy as the task is done by the speech-to-text tools that work in the background
Part 3: Benefits of Transcribing YouTube Videos
You may need video transcriptions for several reasons, such as analyzing the summary of the entire speech in the video, extracting a single phrase or quote that was spoken in the clip, or making the video helpful even for those suffering from hearing impairment. When you transcribe a YouTube video, the transcript can be useful in many ways. Some of the most common benefits of transcribing a video include:
- Search Engine Optimization
When you add subtitles, the text can appear in Google search results when someone types a similar phrase in the search box. This helps get more views to your videos, thus giving your channel popularity, and you, monetary gains in the long run.
- Accent
If the speaker in the video is from a different region and is using an accent that you are not much comfortable with, you can turn on the subtitles and read the dialogs along with the video.
- Repurposing on Blogs
If you own a blog that you have embedded your video to, the transcription could be used to add text to it so the target audience can get a fair idea of what the video is all about. This is useful because many people prefer reading over watching.
YouTube Video Transcription FAQs
1. How to Transcribe YouTube Video to Text
Usually the transcription files have *.srt extension that are globally accepted and supported by almost all media players. However, there might be instances when you want to have the subtitles in plain text.
That said, to convert an SRT file to TXT, you can:
- Right-click the SRT file
- Go to Rename
- Replace srt with txt and press Enter
- Click OK on the confirmation box that appears next to convert SRT to TXT
After this, you can simply double-click the file, and read and modify the transcribed content as needed.
2. How to Edit and Upload Edited Transcript to YouTube
If you made any modifications to the transcript that was automatically generated by YouTube or any other third-party transcription tool, you can follow the steps given below to upload the new file to the YouTube video:
- Go to YouTube Studio and then to the Channel subtitles page as explained earlier
- Expand the Languages column of the target video
- Click the Options icon that appears under the Subtitles column when you hover mouse on to it
- Click Edit on Classic Studio
- On the next page, click Edit from the top-right corner

- Click to open the Actions drop-down list from the upper-left corner
- Click Upload a file
- Follow the on-screen instructions from there to upload the modified transcription file
- Click Save Changes from the top-right corner of the page when done
Conclusion
If you are looking for a quick and easy way of adding subtitles to your videos, letting YouTube transcribe for you could be a good approach. However, because these auto-generated transcriptions are created by machine learning algorithms, their accuracy cannot be counted on. Therefore, the best way to get the job done accurately is, let YouTube auto-transcribe your video, download the transcription file, make the necessary changes to it, and then upload the file back to the video.
Richard Bennett
Richard Bennett is a writer and a lover of all things video.
Follow @Richard Bennett
Richard Bennett
Mar 27, 2024• Proven solutions
If you want to transcribe your videos to make the dialogs and speeches available in text format, you can use YouTube Transcribe feature that the streaming site offers for free. In this article, I’ll share with you a couple of methods to transcribe a YouTube video for free.
- Part 1: Transcribe YouTube Video Automatically for Free [2 Ways]
- Part 2: Transcribe YouTube Video to Text Online with Third-Party Service
- Part 3: Benefits of Transcribing YouTube Videos
- Part 4: YouTube Video Transcription FAQs
Part 1: How to Transcribe YouTube Video Automatically for Free [2 Ways]
Besides the basic video editing features on the YouTube platform, you can now quickly transcribe YouTube videos to the text as well. The good thing is, you can either use the automatic transcription feature that YouTube offers, or upload it manually while adjusting the timing as you go further.
Below are the two methods to transcribe your YouTube videos for free:
Method 1: Use the Automated Transcription Service on YouTube
As the name suggests, YouTube automatic transcription service works automatically. This means you don’t even have to click the ‘Transcribe’ button anymore to transcribe a YouTube video, and the website takes care of it on its own. All you need to do is, choose English as the language of the video when setting up subtitles. You can follow the instructions given below to do so:
Step 1 Upload a Video
Sign in to your YouTube account, click your profile picture from the top-right corner, and click YouTube Studio from the menu. Next, click CREATE from the upper-right corner, click Upload videos from the menu, and drag and drop a video from your computer to the Upload videos box that appears next.
Step 2 Select Transcription Language
On the Details page of the next box that appears, scroll down and click MORE OPTIONS, and select English in the Video language drop-down list under the Language, subtitles, and closed captions (CC) section.
Step 3 Publish the Video
Follow the on-screen instructions from this point to publish the video, and wait while YouTube automatically transcribes and adds the close captions to it.
Note: Depending on the duration of the clip, the time YouTube would take to transcribe may vary.
After YouTube has transcribed the video, you can download the transcription file in your preferred format. The instructions are given below explain how you can do so:
- Get to the Subtitles Window
While on the YouTube Studio page, click Subtitles from the left pane to go to the Channel subtitles page. And then click the video you want to modify.
- Get to Classic Studio
In the video subtitle page of the target video, hover mouse on the Published Automatic status under the Subtitles column, click the Options icon (with three vertical dots) that appears, and click Edit on Classic Studio.
- Download Transcription File
Click and open the Actions drop-down list from the top-left corner of the left pane, click your preferred transcription format including .vtt, .srt and .sbv from the list, and save the file on your local hard disk.
Method 2: Get YouTube Transcription when Watching
In addition, if you are watching any other video, you can make YouTube transcribe that for you as well. You can follow the instructions given below to get the YouTube video to text transcription:
Step 1: Play the Video
Go to the video on YouTube and start playing it. Make sure NOT to get to full-screen mode as doing so would hide the option to transcribe the clip.
Step 2: Enable Transcription
Click the More icon (with three horizontal dots) from under the bottom-right corner of the video player, and click Open transcript to see the video transcription in the Transcript pane that appears in the right.
Step 3: Manage Timestamps
Click the Options icon (with three vertical dots) from the top-right corner of the Transcript pane, and click Toggle timestamp to enable or disable the timestamps in the video transcription.
Limitations of Using YouTube Transcribe
Although YouTube’s automatic transcription is a decent feature that saves you a lot of time, since Google uses machine learning algorithms to convert the speech to text, the level of accuracy may vary depending on the accent of the speaker, and the clarity of the audio the video has. Also, even sometime you may not be satisfied with the end-results.
Alternatively, you can use Kapwing to transcribe a YouTube video and download the transcription file with the below step-by-step instructions:
Step 1: Add YouTube Video
Copy the URL of YouTube video you want to transcribe, go to https://www.kapwing.com/subtitles , paste the URL in the Paste a URL field, wait while Kapwing fetches the content of the video, and opens the Add subtitles to Video page.
Step 2: Transcribe the Video
Click Auto-generate from the right window, and follow the on-screen instructions to transcribe YouTube video to text.
Step 3: Download the Transcription File
Click Download SRT from the left pane, and follow the instructions from there to download the transcription file in *.srt format.
Pros
- Kapwing is free to use
- The auto-transcription process is quick and less tedious
- Kapwing also allows manual transcription and uploading of an existing *.srt file
Cons
- The auto-transcribed text might lack accuracy as the task is done by the speech-to-text tools that work in the background
You can follow the step-by-step instructions to transcribe a YouTube video and download the transcription file using Kapwing:
Step 1: Add YouTube Video
Copy the URL of YouTube video you want to transcribe, go to https://www.kapwing.com/subtitles , paste the URL in the Paste a URL field, wait while Kapwing fetches the content of the video, and opens the Add subtitles to Video page.
Step 2: Transcribe the Video
Click Auto-generate from the right window, and follow the on-screen instructions to transcribe YouTube video to text.
Step 3: Download the Transcription File
Click Download SRT from the left pane, and follow the instructions from there to download the transcription file in *.srt format.
Pros
- Kapwing is free to use
- The auto-transcription process is quick and less tedious
- Kapwing also allows manual transcription and uploading of an existing *.srt file
Cons
- The auto-transcribed text might lack accuracy as the task is done by the speech-to-text tools that work in the background
Part 3: Benefits of Transcribing YouTube Videos
You may need video transcriptions for several reasons, such as analyzing the summary of the entire speech in the video, extracting a single phrase or quote that was spoken in the clip, or making the video helpful even for those suffering from hearing impairment. When you transcribe a YouTube video, the transcript can be useful in many ways. Some of the most common benefits of transcribing a video include:
- Search Engine Optimization
When you add subtitles, the text can appear in Google search results when someone types a similar phrase in the search box. This helps get more views to your videos, thus giving your channel popularity, and you, monetary gains in the long run.
- Accent
If the speaker in the video is from a different region and is using an accent that you are not much comfortable with, you can turn on the subtitles and read the dialogs along with the video.
- Repurposing on Blogs
If you own a blog that you have embedded your video to, the transcription could be used to add text to it so the target audience can get a fair idea of what the video is all about. This is useful because many people prefer reading over watching.
YouTube Video Transcription FAQs
1. How to Transcribe YouTube Video to Text
Usually the transcription files have *.srt extension that are globally accepted and supported by almost all media players. However, there might be instances when you want to have the subtitles in plain text.
That said, to convert an SRT file to TXT, you can:
- Right-click the SRT file
- Go to Rename
- Replace srt with txt and press Enter
- Click OK on the confirmation box that appears next to convert SRT to TXT
After this, you can simply double-click the file, and read and modify the transcribed content as needed.
2. How to Edit and Upload Edited Transcript to YouTube
If you made any modifications to the transcript that was automatically generated by YouTube or any other third-party transcription tool, you can follow the steps given below to upload the new file to the YouTube video:
- Go to YouTube Studio and then to the Channel subtitles page as explained earlier
- Expand the Languages column of the target video
- Click the Options icon that appears under the Subtitles column when you hover mouse on to it
- Click Edit on Classic Studio
- On the next page, click Edit from the top-right corner
- Click to open the Actions drop-down list from the upper-left corner
- Click Upload a file
- Follow the on-screen instructions from there to upload the modified transcription file
- Click Save Changes from the top-right corner of the page when done
Conclusion
If you are looking for a quick and easy way of adding subtitles to your videos, letting YouTube transcribe for you could be a good approach. However, because these auto-generated transcriptions are created by machine learning algorithms, their accuracy cannot be counted on. Therefore, the best way to get the job done accurately is, let YouTube auto-transcribe your video, download the transcription file, make the necessary changes to it, and then upload the file back to the video.
Richard Bennett
Richard Bennett is a writer and a lover of all things video.
Follow @Richard Bennett
Maximizing Impact: Strategies for Overcoming Video Short Snags
Create High Quality YouTube Video - Wondershare Filmora
An easy and powerful YouTube video editor
Numerous video and audio effects to choose from
Detailed tutorials provided by the official channel
YouTube streaming service has kept online users glued to their screens. You can access and share videos and music from any part of the world. Users resolve to YouTube for personal and business affairs. You can use it for a tutorial, promotional event, or just share the fun with other users. Several avenues are available for users to post and share their minds worldwide. So far, it has rolled out a short-form video service, Shorts, which was initially inspired by TikTok.
With Shorts, you can shoot videos, edit, and upload them for your audience. However, YouTube shorts not showing is a common issue for those wishing to share their videos in regular channel feed. You might be wondering how to solve such issues when pushed to the wall. Check out possible solutions in the next section. But first, let’s find out what really are YouTube Shorts.
In this article
02 Where can I find YouTube Shorts?
03 Here are the solutions for YouTube Common Issues
What is YouTube Shorts?
YouTube Shorts is an app that you can use to shoot and share short-form videos using your mobile phone. Furthermore, you can record and edit your videos as well as music overlays and video segmenting abilities. Viewers will access the videos for 60 seconds or less but will remain on your channel, unlike Stories that disappear after a short while. It was first released in September 2020, having started in the US and India. It has so far encroached many countries and is currently accessed by 6 billion users in over 100 countries.
Where can I find YouTube Shorts?
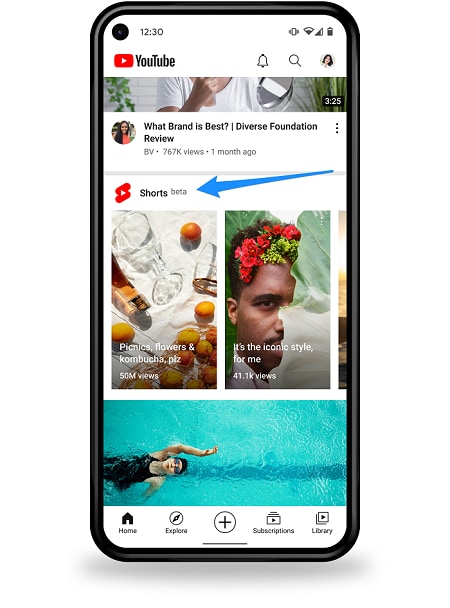
Many users are curious about how to make full use of YouTube Shorts. You can get the Short at the bottom of the YouTube app on either the homepage or on their channel page.
Is YouTube Shorts available on Google Play or App Store?
No. Unlike other streaming apps, you can’t find YouTube app on Google Play or App Store as it is not a standalone service. YouTube Shorts are found within the service’s main mobile app. It is, therefore, accessible from the YouTube app on your computer or phone at the bottom of the screen.
How to access YouTube Shorts on YouTube app
- First, go to the YouTube app at the bottom of the screen to find the “Shorts” button.
- You’ll then see a selection of thumbnails that harbors popular Shorts.
- Choose any video then click on it to bring you into the vertical video player.
- You can then watch the clip and like or dislike the video as it plays. Just use the “thumbs up” or “down” icon. Likewise, you can share and subscribe to the “Short creator’s” channel.
How to create YouTube Shorts
Do you wish to create YouTube Shorts but you don’t know how to? Here’s the kicker!
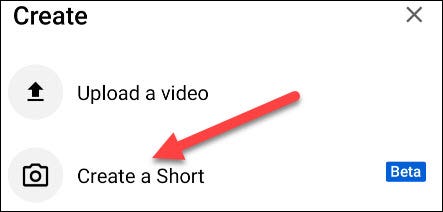
Step 1. You first need to install the YouTube app on your device then sign in to your account.
Step 2. Now, tap on the “Create” button. The icon is a “+” symbol in the bottom center of the screen.
Step 3. A pop-up window will open. Tap the “Create a Short” tab. If prompted, allow YouTube to use your phone’s camera and microphone.
Step 4. You’ll then land on the “YouTube Shorts” recording page.
Step 5. Set the length to 60 seconds and bellow. You have the option to slow down or speed up the recording by tapping the “Speed” icon on the right.
Step 6. Likewise, set a time for the camera to start recording automatically. Check below the “Speed” for the “Timer” for setting.
Step 7. Go ahead to edit your Short before posting. You can use “Filters” to apply visual effects.
Step 8. When your camera is set, hit the “Record” button. You can stop the recording by tapping on the Record button, then resume as you wish.

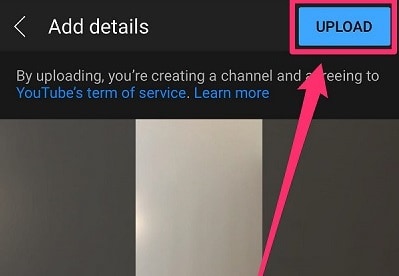
Step 9. Tap on the “Checkmark” when you are done recording. You can add some music and text as well. Then tap on the “Next” button to finish the recording.
Step 10. Then add a title and adjust “Sharing” settings. Also, add the “#shorts” to the title to make it promotional together with other Shorts videos.
Step 11. Finally, tap the “Upload” tab to add your “Shorts” to YouTube.
Here are the solutions for YouTube Common Issues
Since YouTube Shorts is still in the “Beta” mode, users are likely to experience issues while using it. Below are some fixes for YouTube shorts common issues like YouTube Shorts not showing up, unable to post video to YouTube Shorts and etc.
Solution 1. Update YouTube app
Remember apps are ever on the upgrade mode. You are likely to face some connection issues if you are operating on an older version. Here’s is how to update the YouTube app on your Android or iPhone device.
On Android device
- Launch Google Play Store.
- Next, tap on the “three diagonal lines” at the top section of your screen.
- Then select the “My Apps & Games” option.
- Search for YouTube app and tap on the “Update” button.
On iOS device
- Open the “App Store”
- Tap on your “Profile” icon.
- Then tap on the “Update” tab to fix the issue.
On your computer
- Search for YouTube streaming app from the Google Play Store.
- Here, you’ll see an update button in case your app needs an update.
- Next, click on the “Update” button and wait for the update to complete.
- Launch YouTube once more and see whether the YouTube Shorts not showing issue is resolved.
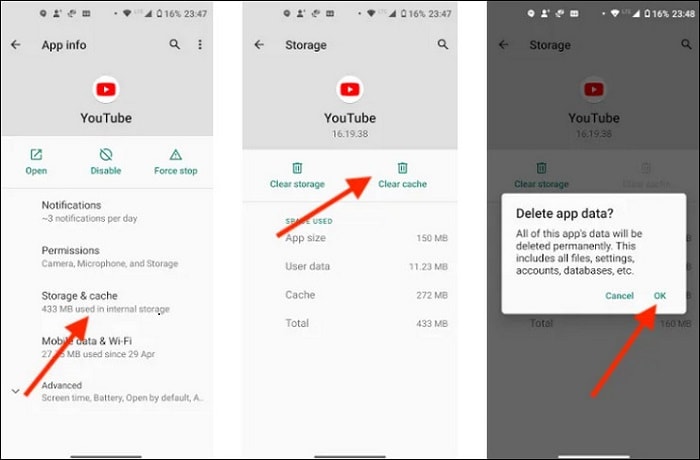
Solution 2. Clear Cache
A corrupt system may also cause issues with the normal operation of your application.
- Go to the “Settings” button on your phone.
- Then go to the “Apps” section and tap on “All Apps”
- Select the “YouTube” app from the list.
- Next, go to the “App Settings” and click on the “Storage” section.
- Tap on the “Clear cache and data” option.
- Finally, relaunch the YouTube app and check whether the issue is resolved.
Solution 3. Check if Shorts is available in your country
Remember that “Shorts” isn’t available in all the countries yet. So, you can confirm whether it is already in your country. If not, you can bypass GEO restrictions by using free VPNs.
- First, download and install a VPN app.
- Next, select the USA or India server location to fake a GPS location.
- Then clear the cache from the YouTube app and click it open.
- You should now find the option to view and even upload Shorts from your device.
Solution 4. Ensure your video is set as YouTube Shorts
Your video should be set as YouTube Shorts before posting.
- Identify the video that you wish to post.
- Add the “#shorts” in your title and description.
- See that each video is up to 60 seconds only.
- Post the video and see whether the issue isn’t reoccurring.
Conclusion
It’s a nice feeling to learn how to upload YouTube Shorts and share the fun with others worldwide. However, you may experience YouTube Shorts not showing due to restrictions in your country or other issues. We have tackled adequate solutions to solve such scenarios and make your Shorts go online. Nonetheless, check out the steps to access and create YouTube Shorts in just a few steps.
YouTube streaming service has kept online users glued to their screens. You can access and share videos and music from any part of the world. Users resolve to YouTube for personal and business affairs. You can use it for a tutorial, promotional event, or just share the fun with other users. Several avenues are available for users to post and share their minds worldwide. So far, it has rolled out a short-form video service, Shorts, which was initially inspired by TikTok.
With Shorts, you can shoot videos, edit, and upload them for your audience. However, YouTube shorts not showing is a common issue for those wishing to share their videos in regular channel feed. You might be wondering how to solve such issues when pushed to the wall. Check out possible solutions in the next section. But first, let’s find out what really are YouTube Shorts.
In this article
02 Where can I find YouTube Shorts?
03 Here are the solutions for YouTube Common Issues
What is YouTube Shorts?
YouTube Shorts is an app that you can use to shoot and share short-form videos using your mobile phone. Furthermore, you can record and edit your videos as well as music overlays and video segmenting abilities. Viewers will access the videos for 60 seconds or less but will remain on your channel, unlike Stories that disappear after a short while. It was first released in September 2020, having started in the US and India. It has so far encroached many countries and is currently accessed by 6 billion users in over 100 countries.
Where can I find YouTube Shorts?
Many users are curious about how to make full use of YouTube Shorts. You can get the Short at the bottom of the YouTube app on either the homepage or on their channel page.
Is YouTube Shorts available on Google Play or App Store?
No. Unlike other streaming apps, you can’t find YouTube app on Google Play or App Store as it is not a standalone service. YouTube Shorts are found within the service’s main mobile app. It is, therefore, accessible from the YouTube app on your computer or phone at the bottom of the screen.
How to access YouTube Shorts on YouTube app
- First, go to the YouTube app at the bottom of the screen to find the “Shorts” button.
- You’ll then see a selection of thumbnails that harbors popular Shorts.
- Choose any video then click on it to bring you into the vertical video player.
- You can then watch the clip and like or dislike the video as it plays. Just use the “thumbs up” or “down” icon. Likewise, you can share and subscribe to the “Short creator’s” channel.
How to create YouTube Shorts
Do you wish to create YouTube Shorts but you don’t know how to? Here’s the kicker!
Step 1. You first need to install the YouTube app on your device then sign in to your account.
Step 2. Now, tap on the “Create” button. The icon is a “+” symbol in the bottom center of the screen.
Step 3. A pop-up window will open. Tap the “Create a Short” tab. If prompted, allow YouTube to use your phone’s camera and microphone.
Step 4. You’ll then land on the “YouTube Shorts” recording page.
Step 5. Set the length to 60 seconds and bellow. You have the option to slow down or speed up the recording by tapping the “Speed” icon on the right.
Step 6. Likewise, set a time for the camera to start recording automatically. Check below the “Speed” for the “Timer” for setting.
Step 7. Go ahead to edit your Short before posting. You can use “Filters” to apply visual effects.
Step 8. When your camera is set, hit the “Record” button. You can stop the recording by tapping on the Record button, then resume as you wish.
Step 9. Tap on the “Checkmark” when you are done recording. You can add some music and text as well. Then tap on the “Next” button to finish the recording.
Step 10. Then add a title and adjust “Sharing” settings. Also, add the “#shorts” to the title to make it promotional together with other Shorts videos.
Step 11. Finally, tap the “Upload” tab to add your “Shorts” to YouTube.
Here are the solutions for YouTube Common Issues
Since YouTube Shorts is still in the “Beta” mode, users are likely to experience issues while using it. Below are some fixes for YouTube shorts common issues like YouTube Shorts not showing up, unable to post video to YouTube Shorts and etc.
Solution 1. Update YouTube app
Remember apps are ever on the upgrade mode. You are likely to face some connection issues if you are operating on an older version. Here’s is how to update the YouTube app on your Android or iPhone device.
On Android device
- Launch Google Play Store.
- Next, tap on the “three diagonal lines” at the top section of your screen.
- Then select the “My Apps & Games” option.
- Search for YouTube app and tap on the “Update” button.
On iOS device
- Open the “App Store”
- Tap on your “Profile” icon.
- Then tap on the “Update” tab to fix the issue.
On your computer
- Search for YouTube streaming app from the Google Play Store.
- Here, you’ll see an update button in case your app needs an update.
- Next, click on the “Update” button and wait for the update to complete.
- Launch YouTube once more and see whether the YouTube Shorts not showing issue is resolved.
Solution 2. Clear Cache
A corrupt system may also cause issues with the normal operation of your application.
- Go to the “Settings” button on your phone.
- Then go to the “Apps” section and tap on “All Apps”
- Select the “YouTube” app from the list.
- Next, go to the “App Settings” and click on the “Storage” section.
- Tap on the “Clear cache and data” option.
- Finally, relaunch the YouTube app and check whether the issue is resolved.
Solution 3. Check if Shorts is available in your country
Remember that “Shorts” isn’t available in all the countries yet. So, you can confirm whether it is already in your country. If not, you can bypass GEO restrictions by using free VPNs.
- First, download and install a VPN app.
- Next, select the USA or India server location to fake a GPS location.
- Then clear the cache from the YouTube app and click it open.
- You should now find the option to view and even upload Shorts from your device.
Solution 4. Ensure your video is set as YouTube Shorts
Your video should be set as YouTube Shorts before posting.
- Identify the video that you wish to post.
- Add the “#shorts” in your title and description.
- See that each video is up to 60 seconds only.
- Post the video and see whether the issue isn’t reoccurring.
Conclusion
It’s a nice feeling to learn how to upload YouTube Shorts and share the fun with others worldwide. However, you may experience YouTube Shorts not showing due to restrictions in your country or other issues. We have tackled adequate solutions to solve such scenarios and make your Shorts go online. Nonetheless, check out the steps to access and create YouTube Shorts in just a few steps.
Also read:
- Snappy Vids Guide Essential Info
- [Updated] Essential Tips for Producing High-Quality YouTube Videos
- [Updated] Captivating Your Audience YouTube Intro Excellence with iMovie
- 2024 Approved Audience Expansion Masterclass Skyrocketing Your Youtube Numbers
- [New] 10 Essential Vlog Editing Hacks for Novice Creators
- [New] Elevate Your Content Visibility - Discover 6 Thumbnail Designers' Best Tools
- Forging Strategic Alliances on YouTube Through FameBit Wisdom
- Elevating User Engagement with Detailed Video Chapters in YouTube
- 10+ Incredible Free YouTube Intro Makers for 2024
- In 2024, Ethical Engagement Sustainable Strategies for Content Creeps
- In 2024, Cutting-Edge PC Techniques for Stellar YouTube Video Production
- 2024 Approved Capture & Store Videos Effortlessly with Our Top List
- [Updated] Dailymotion vs YouTube Who Earns More From Video Content?
- [Updated] Avoiding YouTube Copyright Claims Understanding the Rules
- 2024 Approved Digital Deviation Expert Strategies to Rotate Videos on YouTube
- Building Your Ultimate YouTube Music List Step-by-Step Guide (Web/Mobile) for 2024
- Joyful Jests Crafting Top Humorous Content Ideas for YouTubers
- Expertise in Quick Creation Professional Valorant Thumbnail Art
- Unraveling Online Video Discussions
- 10 Mock Musicals That Bring Smiles
- [New] Capture Chuckles Quickly Efficient Methods for Exciting YouTube Reaction Videos (3 Tips)
- Unlocking Efficiency The Top 5 Video Shortener Tools
- Beauty Bliss Essential Tutorials for Ultimate Style for 2024
- Ultimate Free Flicks on YouTube - Your Next Screen Pleasure
- [New] Elevate Your Daily Blog Key Practices and Avoidance Tactics
- 2024 Approved Design Wizards Perfect Templates for Gaming Channel Logos
- Elevating Video Experience Non-Youtube Hubs Explained
- [Updated] Curated Cinematic Journeys The Best YT Film Selections
- The Best Laptops for Video Editing
- 2024 Approved Crafting Dynamic Gifs From Video An Illustrative Tutorial
- How to Manage YouTube Video Comments for Enhanced Privacy
- [New] Enlarge Your Digital Footprint Proven Methods to Multi-Stream on Youtube & Twitch
- Updated 2024 Approved Do You Want to Add an Adjustment Layer to Your Video for Easier Editing? Read This Article to Find Out How to Efficiently Add an Adjustment Layer in After Effects
- 6 Solutions to Fix Error 505 in Google Play Store on Realme 11 Pro+ | Dr.fone
- In 2024, Simple and Effective Ways to Change Your Country on YouTube App Of your Realme 11 Pro+ | Dr.fone
- How to Detect and Stop mSpy from Spying on Your Tecno Phantom V Flip | Dr.fone
- In 2024, Quietude Achieved Advanced Video Editing for Peaceful Soundscapes Using Premiere Pro
- [Updated] In 2024, 4 Techniques for Effective Android Content Capturing
- The Best iOS Resources for Playing Retro PSP Games #1-5
- How To Transfer Data From iPhone 14 To Other iPhone 11 Pro Max devices? | Dr.fone
- [New] 2024 Approved 15 Newest TikTok Trends You Need to Pay Attention To
- [New] Swift Tactics for Slideshow Storage
- [New] Dynamic IGTV Covers Design & Update Strategies
- [New] 2024 Approved From Transaction to Treasure Securing Your FB Conversations
- Factory Reset Apple iPhone 14 | Dr.fone
- Title: "In 2024, A Step-by-Step Approach to Mastering Free YouTube Video Transcription"
- Author: Brian
- Created at : 2024-05-25 12:00:01
- Updated at : 2024-05-26 12:00:01
- Link: https://youtube-video-recordings.techidaily.com/in-2024-a-step-by-step-approach-to-mastering-free-youtube-video-transcription/
- License: This work is licensed under CC BY-NC-SA 4.0.
