
:max_bytes(150000):strip_icc()/man-pc-mini-video-game-a8e6f6d1ed2445058eb8f3e8ea155693.jpg)
In 2024, 20 Essentials Every New Creator Should Own
20 Essentials Every New Creator Should Own
Essential YouTube Equipment For Starting Your Channel - What Do You Really Need?

Richard Bennett
Oct 26, 2023• Proven solutions
Check out our most updated guide on this topic: YouTube Equipment Starter Guide For Beginners .
The first thing to make sure of before starting a YouTube channel is having all that you need to record and upload high-quality videos regularly. That doesn’t mean you have to take out a loan and spend thousands to purchase a brand new camera and all other gadgets that professional filmmakers use.
The smartest way to get started is to go through a list of necessary equipment for YouTube and check whether or not you already own some of it. Once your channel starts growing, you can then start thinking about whether you want to invest in upgraded equipment. Here is a quick overview of all items that you need to start entertaining your online audience and gaining subscribers to your YouTube channel:
- Your YouTube Camera
- Microphones and Audio
- Lighting Gear for YouTube
- Tripods and Camera Stands
- Smartphone Camera Gear
YouTube Cameras
The short version: Use whatever you already have, even if it’s your phone or webcam. It’s nice to have sharp, fine-tuned, 4K footage, but viewers will forgive lower visual quality if your content is good.
The long version: You will need a camera, but there are a lot of different devices you can use including DSLRs, point and shoots, webcams, and your smartphone.
Your choice of camera will have a tremendous impact on the visual quality of your content and might drive your decisions regarding other pieces of equipment. However, you shouldn’t feel obliged to work with a top-notch camera from day one, especially since cheaper options can produce great results if used the right way.
On one end of the spectrum, you have basic smartphone cameras and web cameras, which are easy to come by and simple to operate. These days, high-end phones come equipped with quite powerful cameras that are more than sufficient for the needs of the average YouTuber. Better webcams can also do the job, although high-performance webcam models can get pretty expensive too. It is probably wise to resist the urge to start broadcasting with the built-in camera in your laptop and at least get a webcam or use your phone, but your computer’s camera is still always an option. Not having a better camera should never stop you from making YouTube videos.
If you already have a DSLR camera then it’s a good idea to familiarize yourself with it. You have far more freedom to adjust the settings and achieve a professional look for your videos with a DSLR, but that does mean it’ll take some time to become an expert at using it. Ultra-high resolution is not required for YouTube, but it certainly won’t hurt to have additional sharpness and more detail in the scene. If you’re shopping for a DSLR, look for one with a flip screen that allows you to quickly check what your viewers see.
YouTube Microphone and Audio
The short version: Audio quality is extremely important. If you can buy either a new camera or an external microphone, but not both, it might be better to go for the microphone. Click here for advice on upping your audio quality without an external microphone.
The long version: Sound capturing is every bit as important for your success as your video feed. In fact, poor audio can be even more damaging to your subscriber count than grainy video, since people won’t spend their time listening to something they have to put effort into understanding.
Again, most YouTube video makers have a limited budget at their disposal, so professional microphones are mostly off the table. However, investing in a directional microphone (‘shotgun mic’) that can pick up your voice clearly and without background noise is certainly a smart move. Such microphones can be pointed towards you while you speak, and since most YouTubers sit still while doing their shows there won’t be too much need for in-session adjustments.
If you’re not ready to invest in a shotgun mic, you can also find very inexpensive (often under $20) LAV mics. These small microphones can be pinned to your shirt, which allows them to record very clear dialogue because they’re so close to your mouth.
Lights for YouTube
The short version: You need as much light as you can get. Lighting kits can be affordable on Amazon, but you can also achieve a great look using daylight/windows and ‘daylight’ lightbulbs.
The long version: If you’ve ever tried to make a video indoors, you already know that it’s necessary to have additional light. Often just filming with the normal lights in a room will cause your footage to look dark and grainy, and possibly be tinted orange. To overcome these problems you need to increase the amount of light you have available.
Sometimes, it is enough to film near windows and/or bring more household lamps into your filming area. For any household lamps or lighting fixtures you use, make sure to put in white or ‘daylight’ lightbulbs instead of using the orange/tungsten bulbs that you might have for everyday use (this is how you avoid tinting things orange).
If you have the budget available to get some lighting equipment, you can find softbox lights or LED panel lights available fairly inexpensively online. Softbox lights are great because they provide even, diffused, light.
Another useful piece of lighting equipment to have is a reflector. A reflector is usually a piece of white, silver, or gold fabric stretched over a frame. You can use it to bounce light from one light source back towards yourself (this is a great way to fill shadows cast by your main light). Reflectors tend to be inexpensive, but you can also use white cardboard or tinfoil in place of purchasing a reflector.
Tripods and Camera Stands
The short version: You need something to hold your camera. If you mostly film in your own home that can be a desk or a stack of books, but if you make a lot of videos while you’re on the go you probably need a tripod or gimbal. Heavier cameras need heavier tripods.
The long version: While handheld cameras can deliver solid results for vloggers and casual streamers, viewers do expect reasonably stable footage. For many types of videos, the camera needs to be completely still and flatly positioned on a horizontal plane. Tripods and camera stands can cost very little, so it’s a good idea to look into getting some kind of stabilizer.
When you are choosing a tripod, pay attention to how much it weighs. If the camera that needs to be mounted on it is very heavy (like some DSLR models), you want to ensure that the structure itself weighs enough not to be easily tipped over. Too thin tripods can put your camera at risk, and that’s the last thing you want. Smaller cameras such as GoPros are more flexible in this regard and can be placed on a wider range of tripods.
Even if you are using a phone or a webcam to record YouTube videos, you should consider mounting the device on a stable stand. It is possible to find mini tripods ideal for smartphones for as little as $10. These tripods are small enough to carry in your pocket, so you will be prepared to start making a video no matter where your adventures take you. If you are using a web camera, you should attach it to the stand so that it won’t move accidentally after you touch the surface it is placed on.
Smartphone Camera Gear
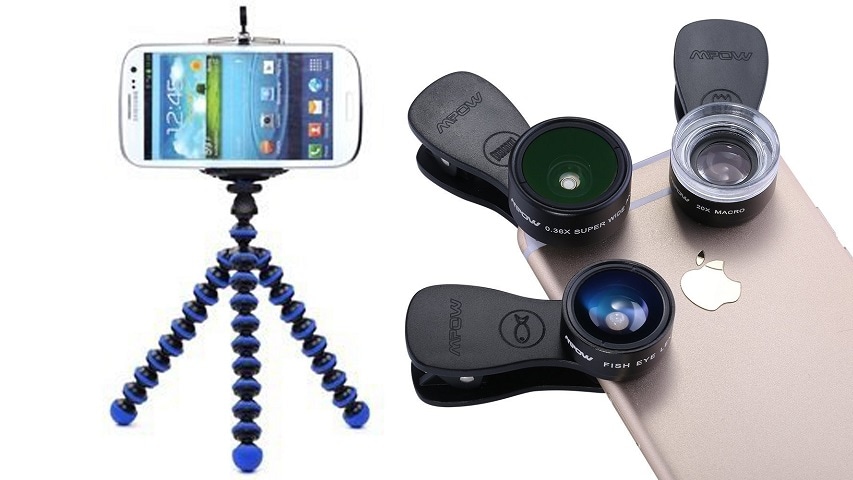
The short version: There’s a lot of gear out there designed with smartphone photos and videos in mind, including clip-on lenses, tripod mounts, phone-mounted LED lights, and inexpensive microphones that plug into the audio jack.
The long version: Recording your videos with a mobile phone can be a good decision. It all depends on the phone you have and the range of add-ons and apps that you complement it with. Almost every high-end model released in the past five years can shoot videos in 1080p or higher. Some can even produce 4K footage. If you perfect your smartphone filming technique, your YouTube videos could look as if they were made with pro equipment.
On the flip side, smartphone cameras typically perform poorly in low light. It is possible to download an app that lets you play around with settings to overcome this, but a phone-mounted LED light is probably a better solution. An external microphone might also be a necessity, but there are some good (inexpensive) options that can simply be plugged in through the headphone jack.
Another common downside of smartphone cameras is that most of them use digital zoom, which is vastly inferior to optical zoom. If you intend to shoot anything that’s further away than a few feet, you need a clip-on lens that goes on top of the built-in camera. This inexpensive device will give you a lot of freedom to work in space, and allow you to make spectacular shots even without high-end YouTube equipment.
Equipment with Easy-to-Use Video Editor


Richard Bennett
Richard Bennett is a writer and a lover of all things video.
Follow @Richard Bennett
Richard Bennett
Oct 26, 2023• Proven solutions
Check out our most updated guide on this topic: YouTube Equipment Starter Guide For Beginners .
The first thing to make sure of before starting a YouTube channel is having all that you need to record and upload high-quality videos regularly. That doesn’t mean you have to take out a loan and spend thousands to purchase a brand new camera and all other gadgets that professional filmmakers use.
The smartest way to get started is to go through a list of necessary equipment for YouTube and check whether or not you already own some of it. Once your channel starts growing, you can then start thinking about whether you want to invest in upgraded equipment. Here is a quick overview of all items that you need to start entertaining your online audience and gaining subscribers to your YouTube channel:
- Your YouTube Camera
- Microphones and Audio
- Lighting Gear for YouTube
- Tripods and Camera Stands
- Smartphone Camera Gear
YouTube Cameras
The short version: Use whatever you already have, even if it’s your phone or webcam. It’s nice to have sharp, fine-tuned, 4K footage, but viewers will forgive lower visual quality if your content is good.
The long version: You will need a camera, but there are a lot of different devices you can use including DSLRs, point and shoots, webcams, and your smartphone.
Your choice of camera will have a tremendous impact on the visual quality of your content and might drive your decisions regarding other pieces of equipment. However, you shouldn’t feel obliged to work with a top-notch camera from day one, especially since cheaper options can produce great results if used the right way.
On one end of the spectrum, you have basic smartphone cameras and web cameras, which are easy to come by and simple to operate. These days, high-end phones come equipped with quite powerful cameras that are more than sufficient for the needs of the average YouTuber. Better webcams can also do the job, although high-performance webcam models can get pretty expensive too. It is probably wise to resist the urge to start broadcasting with the built-in camera in your laptop and at least get a webcam or use your phone, but your computer’s camera is still always an option. Not having a better camera should never stop you from making YouTube videos.
If you already have a DSLR camera then it’s a good idea to familiarize yourself with it. You have far more freedom to adjust the settings and achieve a professional look for your videos with a DSLR, but that does mean it’ll take some time to become an expert at using it. Ultra-high resolution is not required for YouTube, but it certainly won’t hurt to have additional sharpness and more detail in the scene. If you’re shopping for a DSLR, look for one with a flip screen that allows you to quickly check what your viewers see.
YouTube Microphone and Audio
The short version: Audio quality is extremely important. If you can buy either a new camera or an external microphone, but not both, it might be better to go for the microphone. Click here for advice on upping your audio quality without an external microphone.
The long version: Sound capturing is every bit as important for your success as your video feed. In fact, poor audio can be even more damaging to your subscriber count than grainy video, since people won’t spend their time listening to something they have to put effort into understanding.
Again, most YouTube video makers have a limited budget at their disposal, so professional microphones are mostly off the table. However, investing in a directional microphone (‘shotgun mic’) that can pick up your voice clearly and without background noise is certainly a smart move. Such microphones can be pointed towards you while you speak, and since most YouTubers sit still while doing their shows there won’t be too much need for in-session adjustments.
If you’re not ready to invest in a shotgun mic, you can also find very inexpensive (often under $20) LAV mics. These small microphones can be pinned to your shirt, which allows them to record very clear dialogue because they’re so close to your mouth.
Lights for YouTube
The short version: You need as much light as you can get. Lighting kits can be affordable on Amazon, but you can also achieve a great look using daylight/windows and ‘daylight’ lightbulbs.
The long version: If you’ve ever tried to make a video indoors, you already know that it’s necessary to have additional light. Often just filming with the normal lights in a room will cause your footage to look dark and grainy, and possibly be tinted orange. To overcome these problems you need to increase the amount of light you have available.
Sometimes, it is enough to film near windows and/or bring more household lamps into your filming area. For any household lamps or lighting fixtures you use, make sure to put in white or ‘daylight’ lightbulbs instead of using the orange/tungsten bulbs that you might have for everyday use (this is how you avoid tinting things orange).
If you have the budget available to get some lighting equipment, you can find softbox lights or LED panel lights available fairly inexpensively online. Softbox lights are great because they provide even, diffused, light.
Another useful piece of lighting equipment to have is a reflector. A reflector is usually a piece of white, silver, or gold fabric stretched over a frame. You can use it to bounce light from one light source back towards yourself (this is a great way to fill shadows cast by your main light). Reflectors tend to be inexpensive, but you can also use white cardboard or tinfoil in place of purchasing a reflector.
Tripods and Camera Stands
The short version: You need something to hold your camera. If you mostly film in your own home that can be a desk or a stack of books, but if you make a lot of videos while you’re on the go you probably need a tripod or gimbal. Heavier cameras need heavier tripods.
The long version: While handheld cameras can deliver solid results for vloggers and casual streamers, viewers do expect reasonably stable footage. For many types of videos, the camera needs to be completely still and flatly positioned on a horizontal plane. Tripods and camera stands can cost very little, so it’s a good idea to look into getting some kind of stabilizer.
When you are choosing a tripod, pay attention to how much it weighs. If the camera that needs to be mounted on it is very heavy (like some DSLR models), you want to ensure that the structure itself weighs enough not to be easily tipped over. Too thin tripods can put your camera at risk, and that’s the last thing you want. Smaller cameras such as GoPros are more flexible in this regard and can be placed on a wider range of tripods.
Even if you are using a phone or a webcam to record YouTube videos, you should consider mounting the device on a stable stand. It is possible to find mini tripods ideal for smartphones for as little as $10. These tripods are small enough to carry in your pocket, so you will be prepared to start making a video no matter where your adventures take you. If you are using a web camera, you should attach it to the stand so that it won’t move accidentally after you touch the surface it is placed on.
Smartphone Camera Gear
The short version: There’s a lot of gear out there designed with smartphone photos and videos in mind, including clip-on lenses, tripod mounts, phone-mounted LED lights, and inexpensive microphones that plug into the audio jack.
The long version: Recording your videos with a mobile phone can be a good decision. It all depends on the phone you have and the range of add-ons and apps that you complement it with. Almost every high-end model released in the past five years can shoot videos in 1080p or higher. Some can even produce 4K footage. If you perfect your smartphone filming technique, your YouTube videos could look as if they were made with pro equipment.
On the flip side, smartphone cameras typically perform poorly in low light. It is possible to download an app that lets you play around with settings to overcome this, but a phone-mounted LED light is probably a better solution. An external microphone might also be a necessity, but there are some good (inexpensive) options that can simply be plugged in through the headphone jack.
Another common downside of smartphone cameras is that most of them use digital zoom, which is vastly inferior to optical zoom. If you intend to shoot anything that’s further away than a few feet, you need a clip-on lens that goes on top of the built-in camera. This inexpensive device will give you a lot of freedom to work in space, and allow you to make spectacular shots even without high-end YouTube equipment.
Equipment with Easy-to-Use Video Editor
Richard Bennett
Richard Bennett is a writer and a lover of all things video.
Follow @Richard Bennett
Precision and Perfection: A Guide to YouTube Studio Video Edits
Create High-Quality Video - Wondershare Filmora
An easy and powerful YouTube video editor
Numerous video and audio effects to choose from
Detailed tutorials provided by the official channel
Have you ever wished to modify a video on YouTube? If that’s the case, this guide will show you how. YouTube Studio Editor is built right into YouTube, allowing you to modify videos straight in your browser. You may add text subtitles and outline overlays to your videos to make them more accessible.
This article will lead you through the steps required to edit your YouTube videos and give them the highest quality possible on their platform.
In this article
02 How to Edit Videos With YouTube Studio?
03 Is YouTube Studio editor enough for editing videos?
What Is YouTube Studio?
YouTube Studio is a free, cloud-based video production software. It’s the ideal way to create, distribute, and measure the overall success of your films on YouTube, Google+, and the web. It provides powerful editing tools, real-time feedback on how your films are performing, and one-click posting from your PC or smartphone. YouTube Studio provides several features:
1. Manages Multiple Channels
YouTube Studio makes managing a couple of channels a lot easier. You can see all of your channels on one screen and switch from one to the other without difficulty. Simply select Manage Channels from the account icon in the top right corner. When you have a lot of money owing to you, you can modify it.
2. Get Real-Time Data On Your Channels
It’s critical to monitor where your YouTube channel is at all times as a YouTube content creator. If you want to access your YouTube channel analytics and use all of the other equipment and features in the app, go to the analytics section of the menu.
2. Get Real-Time Data On Your Channels
It’s critical to monitor where your YouTube channel is at all times as a YouTube content creator. If you want to access your YouTube channel analytics and use all of the other equipment and features in the app, go to the analytics section of the menu.
3. Make video edits
The YouTube Studio app is most useful for creating fast, vlog-style videos, but it can also handle other types of material. With titles, photographs and captions, transitions, and even music, it could create a number of videos with different purposes.
4. Scheduled Video Uploads
A few films will need to be posted later, given a content creator’s schedule or habit. When you’re in the publishing section of your project, you’ll see a visibility option that lets you schedule the release of your video.
5. Add more Users
It is possible to add partners to the studio if you are working on a project requiring teamwork. To make this option available, go to your settings and then adjust permissions. Authenticate the account you’re using and click the + symbol to add other users.
How to Edit Videos With YouTube Studio?
Get Started with YouTube Studio
Step 1: Go to YouTube Studio and sign in with your desired account. A menu will appear on the left side of the home screen.
Step 2: Select the video you want to modify by clicking its title or thumbnail.

Step 3: From the left-hand menu, choose Editor, and then click Get Started in the center of the page.
Trim your video’s beginning or ending
1. Go to the Trim button. In the Editor, a blue box will appear.

2. Click and drag the blue box’s sides. Stop when the box encloses the video segment that you want to save. You will eliminate anything from the video that is not in the box.
3. Select Preview to double-check your changes and save your file.
Remove a segment of your video
- Go to the Trim menu. In the Editor, a blue box will appear.
- Select the blue box at the start of the section you want to delete.
- Choose Split.
- Drag the blue bar to the end of the part you want to delete by clicking and dragging it.
Is YouTube Studio editor enough for editing videos?
For film editing, YouTube’s video editor is insufficient. It includes a few basic features, but if you want to do some serious altering, you’ll need a third-party program.
Modern video editing software is fairly complex, and it allows you to make professional-looking movies without a lot of training. Several video editing tools are available that take things to the next level. They can use unique effects, transitions, and even 360-degree rotation to change the scene. Here are a few video editors to choose from.
1. Adobe Premiere Pro

One of the most well-known video editing software programs is Adobe Premiere Pro. It’s been used for professional video editing, design, and rendering by editors. Adobe’s most essential seasoned academic courses will teach you how to utilize the video editing program as well as its advanced features.
Adobe Premiere Pro may be used in a variety of unique ways. It may be used as a simple video editor or a program for editing motion pictures.
2. Filmora
Filmora Video Editor is an easy-to-use video editing program for beginners. Filmora Video Editor is the best solution for you if you are seeking a simple but efficient video editor that will assist you in making your movies seem professional. With this video editor, you can easily create a professional video with no learning curve.
It allows you to make the most beautiful and delicious videos for YouTube, social media channels or posting on many websites such as Facebook, Instagram, Vimeo, and YouTube.
For Win 7 or later (64-bit)
For macOS 10.12 or later
3. Blender

Blender is a free and open-source 3D computer graphics software tool program. Modeling, rigging, animation, simulation, rendering, compositing, and movement tracking, as well as video enhancement and game development, are all aided by it. Its straightforward and easy-to-use foundation makes it simple for beginners to start improving right away.
4. Hitfilm Pro
Hitfilm is a video editor with a wide range of features and effects to help you make your videos stand out. It has a variety of video editing features, such as the ability to trim and merge clips, making it simple to build personalized motion pictures and add finishing touches. It also features excellent color-correcting, which you can use to give your videos a professional look.
5. Lightworks
Lightworks is a strong, easy-to-use enhancement tool that works with a variety of codecs. It contains equipment that keeps the user in control and is built for speed, performance, and accessibility.
Their basic software package is available for free download and includes a wide range of features. The software program can export to various formats and supports 1080p HD images.
Conclusion
● As you can see, using YouTube Studio Editor to enhance your video is simple. We hope that these suggestions will help you edit and proportion your videos more efficiently in the future. If you liked the piece, please consider sharing it on social media or by email with a friend. Are there any more tidbits or tricks you’d want to learn more about?
Have you ever wished to modify a video on YouTube? If that’s the case, this guide will show you how. YouTube Studio Editor is built right into YouTube, allowing you to modify videos straight in your browser. You may add text subtitles and outline overlays to your videos to make them more accessible.
This article will lead you through the steps required to edit your YouTube videos and give them the highest quality possible on their platform.
In this article
02 How to Edit Videos With YouTube Studio?
03 Is YouTube Studio editor enough for editing videos?
What Is YouTube Studio?
YouTube Studio is a free, cloud-based video production software. It’s the ideal way to create, distribute, and measure the overall success of your films on YouTube, Google+, and the web. It provides powerful editing tools, real-time feedback on how your films are performing, and one-click posting from your PC or smartphone. YouTube Studio provides several features:
1. Manages Multiple Channels
YouTube Studio makes managing a couple of channels a lot easier. You can see all of your channels on one screen and switch from one to the other without difficulty. Simply select Manage Channels from the account icon in the top right corner. When you have a lot of money owing to you, you can modify it.
2. Get Real-Time Data On Your Channels
It’s critical to monitor where your YouTube channel is at all times as a YouTube content creator. If you want to access your YouTube channel analytics and use all of the other equipment and features in the app, go to the analytics section of the menu.
2. Get Real-Time Data On Your Channels
It’s critical to monitor where your YouTube channel is at all times as a YouTube content creator. If you want to access your YouTube channel analytics and use all of the other equipment and features in the app, go to the analytics section of the menu.
3. Make video edits
The YouTube Studio app is most useful for creating fast, vlog-style videos, but it can also handle other types of material. With titles, photographs and captions, transitions, and even music, it could create a number of videos with different purposes.
4. Scheduled Video Uploads
A few films will need to be posted later, given a content creator’s schedule or habit. When you’re in the publishing section of your project, you’ll see a visibility option that lets you schedule the release of your video.
5. Add more Users
It is possible to add partners to the studio if you are working on a project requiring teamwork. To make this option available, go to your settings and then adjust permissions. Authenticate the account you’re using and click the + symbol to add other users.
How to Edit Videos With YouTube Studio?
Get Started with YouTube Studio
Step 1: Go to YouTube Studio and sign in with your desired account. A menu will appear on the left side of the home screen.
Step 2: Select the video you want to modify by clicking its title or thumbnail.
Step 3: From the left-hand menu, choose Editor, and then click Get Started in the center of the page.
Trim your video’s beginning or ending
1. Go to the Trim button. In the Editor, a blue box will appear.
2. Click and drag the blue box’s sides. Stop when the box encloses the video segment that you want to save. You will eliminate anything from the video that is not in the box.
3. Select Preview to double-check your changes and save your file.
Remove a segment of your video
- Go to the Trim menu. In the Editor, a blue box will appear.
- Select the blue box at the start of the section you want to delete.
- Choose Split.
- Drag the blue bar to the end of the part you want to delete by clicking and dragging it.
Is YouTube Studio editor enough for editing videos?
For film editing, YouTube’s video editor is insufficient. It includes a few basic features, but if you want to do some serious altering, you’ll need a third-party program.
Modern video editing software is fairly complex, and it allows you to make professional-looking movies without a lot of training. Several video editing tools are available that take things to the next level. They can use unique effects, transitions, and even 360-degree rotation to change the scene. Here are a few video editors to choose from.
1. Adobe Premiere Pro
One of the most well-known video editing software programs is Adobe Premiere Pro. It’s been used for professional video editing, design, and rendering by editors. Adobe’s most essential seasoned academic courses will teach you how to utilize the video editing program as well as its advanced features.
Adobe Premiere Pro may be used in a variety of unique ways. It may be used as a simple video editor or a program for editing motion pictures.
2. Filmora
Filmora Video Editor is an easy-to-use video editing program for beginners. Filmora Video Editor is the best solution for you if you are seeking a simple but efficient video editor that will assist you in making your movies seem professional. With this video editor, you can easily create a professional video with no learning curve.
It allows you to make the most beautiful and delicious videos for YouTube, social media channels or posting on many websites such as Facebook, Instagram, Vimeo, and YouTube.
For Win 7 or later (64-bit)
For macOS 10.12 or later
3. Blender
Blender is a free and open-source 3D computer graphics software tool program. Modeling, rigging, animation, simulation, rendering, compositing, and movement tracking, as well as video enhancement and game development, are all aided by it. Its straightforward and easy-to-use foundation makes it simple for beginners to start improving right away.
4. Hitfilm Pro
Hitfilm is a video editor with a wide range of features and effects to help you make your videos stand out. It has a variety of video editing features, such as the ability to trim and merge clips, making it simple to build personalized motion pictures and add finishing touches. It also features excellent color-correcting, which you can use to give your videos a professional look.
5. Lightworks
Lightworks is a strong, easy-to-use enhancement tool that works with a variety of codecs. It contains equipment that keeps the user in control and is built for speed, performance, and accessibility.
Their basic software package is available for free download and includes a wide range of features. The software program can export to various formats and supports 1080p HD images.
Conclusion
● As you can see, using YouTube Studio Editor to enhance your video is simple. We hope that these suggestions will help you edit and proportion your videos more efficiently in the future. If you liked the piece, please consider sharing it on social media or by email with a friend. Are there any more tidbits or tricks you’d want to learn more about?
Also read:
- Transform Your View Exclusive Alternative Video Websites
- Unveiling the Swift-Growing YouTube Sources for Inspiration
- Foundations First What To Invest In for YouTubing
- In 2024, Elite Recording Tools for Gamers
- Subscribe Smart - Hundreds for Under $5
- 2024 Approved DJ Delight Choosing Ultimate Event Videos
- [New] Cut to Perfection 10 Premier Online Video Editors Ranked
- [New] Cut Buffering Time – Turn On AV1 in YouTube Settings
- Alternative Classics New Filmmaking Titles to Love for 2024
- [Updated] Aspect Ratios Unveiled A Complete YOUTUBE Manual
- 2024 Approved Design Guide YouTube Banners & Thumbnail Creation
- [Updated] Downloading Videos Directly to iPhone/iPad - YouTube's Quick Guide
- Craft Your Story with Immersive YouTube Video Editing Tips
- [New] Elevate Your Channel Ranking with These 11 SEO Secrets
- [Updated] Discover 5 Exceptional Non-YouTube Video Platforms Today
- 11 FREE YouTube Playlist Downloaders [Online/PC/Android/iOS]
- Productivity in Duality Employment & Video Creation
- Perfect Timekeeping A Guide to Adding Timestamps in YouTube Links
- 8 Mistakes People Should Avoid as a New YouTuber
- The Content Creator’s Dilemma Vimeo or YouTube?
- [Updated] 11-Year-Old's Financial Rise via YouTube Stardom
- In 2024, Essential Insights for ASMR Aficionados
- [Updated] Capture King Review The Screen Recorder Showdown
- In 2024, Tickle-Me Trendsetters Top 20 Hilarious TikTok Jokes & Riddles
- 3 Ways for Android Pokemon Go Spoofing On Xiaomi Civi 3 | Dr.fone
- How Do I Stop Someone From Tracking My Motorola G54 5G? | Dr.fone
- 6 Best Audio Mixers For Enhancing Your Streaming
- Breaking Down the New Normal Facebook Short Videos for 2024
- [Updated] Explore the Best Webcams on Your Windows 10 PC
- Updated Best Online MP3 Cutter And Joiner
- 2024 Approved 10 Leading Intro Creator Platforms Free and Paid Options
- 10 Easy-to-Use FRP Bypass Tools for Unlocking Google Accounts On ZTE
- Title: In 2024, 20 Essentials Every New Creator Should Own
- Author: Brian
- Created at : 2024-05-25 11:58:59
- Updated at : 2024-05-26 11:58:59
- Link: https://youtube-video-recordings.techidaily.com/in-2024-20-essentials-every-new-creator-should-own/
- License: This work is licensed under CC BY-NC-SA 4.0.
